Manage Staff Roster
Important
Information and features vary according to the roles to which you belong and the permissions associated with those roles. For more information, contact your module manager or your campus support team.
The Manage Staff Roster page allows you to view, assign, remove, and contact staff who are assigned to the session. Details including the role, hiring status, and assigned location for the staff are displayed in the roster.
To access the Staff Roster, go to the Session Summary page and click the Manage Staff Roster link on the Staff Assignment block, or select Staff assignment options > Manage staff roster from the Session options drop-down.

The staff roster displays the following information for each staff member listed. Click the plus icon to expand the row and view all columns.
Column | Description |
|---|---|
Staff Name | The name of the staff member. Click the name to open the staff member's profile page. |
Position | The staff member's position (e.g., RA or RD). |
Permission | The roles the staff member has been assigned. Click the role name to view the permissions enabled for that role. |
Action | From the Actions drop-down, select one of the available options: Replace staff, Update staff position, and Update staff assignment. The Replace staff and Update staff assignment options are not available if the staff member's position is Not Hired. |
Remove | Click the Remove icon to remove the staff member from the session. A pop-up asks you to confirm the removal. |
Contact | To send a communication to the staff member, select the email address or phone number from the Contact drop-down. |
On-Call Zone | The on-call zone the staff member is assigned to. |
Assignment Zone | The assignment zone the staff member is assigned to. |
Staff Room | The room the staff member has been assigned to. Click the room name to open the Manage Residence Spaces page for that room. |
There are multiple ways to view, filter, and sort the staff roster.
The list displays 15 names at a time by default, but you can use the Show all button to view the entire list on one screen. Otherwise, use the number links or arrow buttons at the top and bottom of the list to navigate among the pages.
Filter the roster with the Staff Filter block.
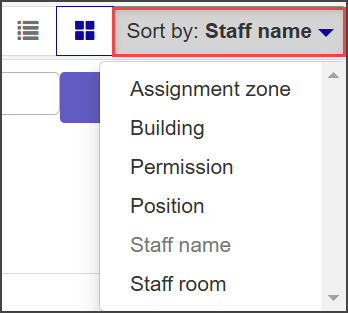
Names on the roster can be sorted using the Sort by drop-down at the top right or by clicking on the header of the column you would like to sort by.
Toggle between card view and table view.

To add staff to the staff roster for a session, open the session summary page.
In the Staff Assignment block, click Manage Staff Roster. The Manage Staff Roster page opens.
You can also access the Manage Staff Roster page by selecting Staff assignment options > Manage staff roster from the Session options drop-down.
Begin typing the name of the staff member in the search field next to the Add to roster button and select the name of the person you want to add when it appears in the list.
Click Add to roster. The staff person is added to the roster.
Note
Employees must be active in the system to appear in search results. Students must be active and in a current degree program.
To email someone on the Staff Roster, click the plus sign next to their name to expand the row and see more details.
Click the Contact drop-down menu and select the staff member's email address.
Note
This is not a "group" email, but will send a separate, identical email to each recipient.
Select the checkboxes next to the names of the staff members you want to email. The Options menu becomes available.
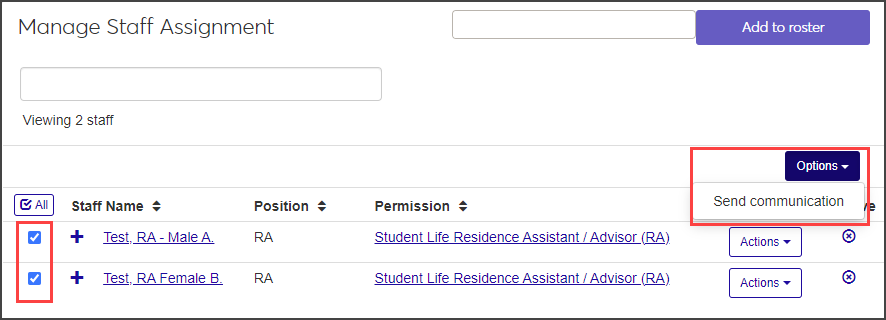
Click the Options drop-down menu and choose Send communication. The Create New Communication window opens. The Interaction Code, Name/Description and To fields auto-populate.
Enter a Subject and type your message in the Body text field. Use the formatting and data tools as necessary.
To include any needed attachments, click the Attach file button and upload the files you want to include.
Click Send. If you are sending the email to more than one staff member on the roster, each will receive an individual copy of the email.
On the Manage Staff Roster page, click Actions for the person whose role you would like to change and select Update Staff position. The Update Staff Position pop-up opens.
Select the new role from the Position drop-down menu.
Click Update.
When you select Update staff assignment from the Actions drop-down, you can assign a staff member to an on-call zone or assignment zone or move the staff member to a new on-call or assignment zone.
Note
Resident Directors are assigned to on-call zones; Resident Assistants are assigned to assignment zones. When you assign an RA to an assignment zone, the on-call zone and staff room are assigned automatically.
Select Update staff assignment from the Actions drop-down for the person whose assignment you want to change. The Update Staff Assignment pop-up opens.
Select a new assignment zone or on-call zone from the drop-down menu.
Click Update to save the change.