AP Register Report
Important
Information and features vary according to the roles to which you belong and the permissions associated with those roles. For more information, contact your module manager or your campus support team.
Use the AP Register Report page to generate a report of vendor invoice activity.
Permissions Required
To access the AP Register Report page, you must be in a Procurement - Accounts Payable role with "Can create AP Register reports" permission.
Desktop Location
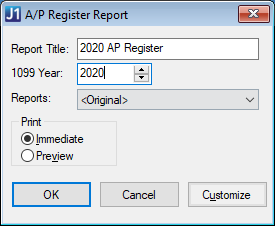
The AP Register report can also be generated in the Desktop from the A/P Register Report window.
Note
The Reports field in the Desktop is equivalent to the Report Layout field in J1 Web.
The J1 Web report page does not include "Immediate" and "Preview" options because the report opens in a new browser tab and can be downloaded to print later.
At this time, J1 Web does not allow report customization directly from the report page. For instructions to create customized report layouts for J1 Web, see How To Create Customized Reports for J1 Web.
From the Finance Procurement Hub options, go to Reports and select AP Register.
On the AP Register Report page, enter an optional Report Title (up to 60 characters).
Enter a Start and End Date. Required. The dates for the current month are entered by default, and you can update the dates if needed.
Enter a 4-digit 1099 Year. Required.
Select a Report Layout. The <Original> is the default, and any layouts that were customized for J1 Web are available for selection.
Note
Reports that were customized in Desktop are not available for selection. To create customized reports for J1 Web, see How To Create Customized Reports for J1 Web.
Select a File Format. The default selection is PDF, and you can select multiple formats.
Click Generate. If only the PDF file format is selected, the report opens in a new browser tab. If another file format is selected, the report downloads as a zip file.
Important
Access to the folders where Jenzabar-provided original reports are stored is controlled by your institution. For more information, contact your campus support team or see Working with Reports in J1 Web.
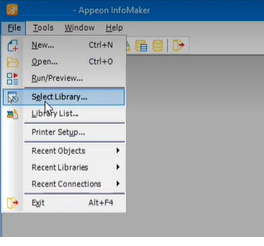
Open InfoMaker.
Click File > Select Library.
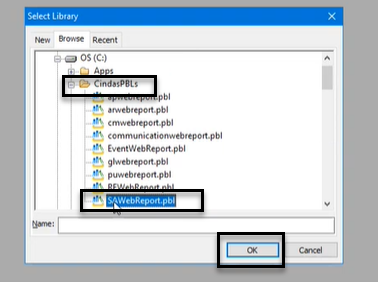
On the Select Library pop-up, navigate to the shared folder where Jenzabar-provided original reports and queries are stored.
Select the PBL (PowerBuilder Library) file that contains the report or query you want to customize.
Click OK.
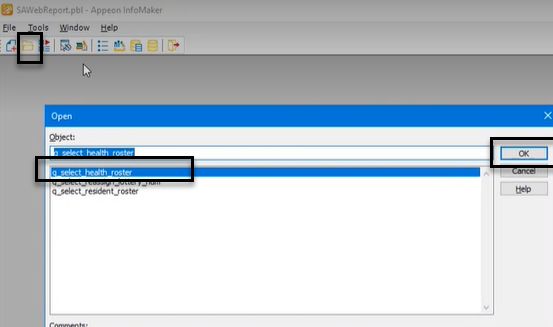
Click the Open icon.
On the Open pop-up, in the Object section, select the report or query you want to customize.
Click OK.
Customize the report or query as needed.
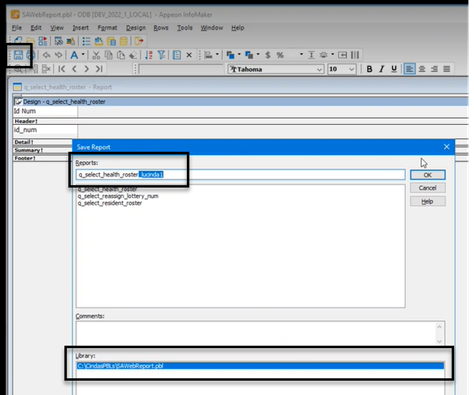
Save the customized version in the shared folder by adding a unique, easily identifiable extension to the file name.
Tip
By default, InfoMaker saves the customized version in the same folder that you opened the original version from. Confirm the file path is correct in the Library section.
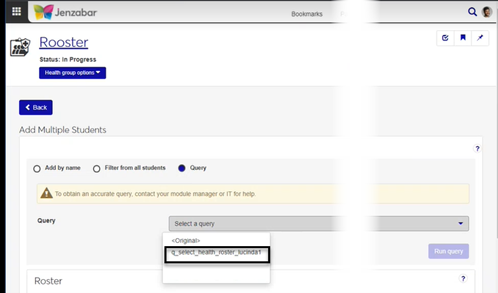
On the corresponding report page in J1 Web:
Customized versions of queries will display in the Query or Data Set drop-down.
Customized versions of reports will display in the Report Layout drop-down.
The report results are filtered by the Start and End Dates. The 1099 Year is used to determine the 1099 Amount in the report is generated.
Follow the steps to Create Customized Reports for J1 Web. The original report is r_ap_register and it is located in the APWebReport.pbl. If you need additional assistance, contact your campus support team.
Note
Any versions of this report that were customized in Desktop cannot be brought over to J1 Web. You'll need to re-customize the reports from the original J1 Web report.
Infomaker must be installed on your machine to work with and customize reports. Contact your campus support team for additional information.
No. Custom versions of the report created in J1 Web won't be available in Desktop.
The <Original> report layout includes the following information for each vendor.
ID Number and Name
Subsidiary Code
Date of last Invoice
Transaction Description
Invoice #
Pay/Check Date
Check #
Void flag
Transaction Amount
Transaction Discount
Net Amount
Total 1099 Amount
Total Amount Invoiced YTD
Total Amount Paid YTD
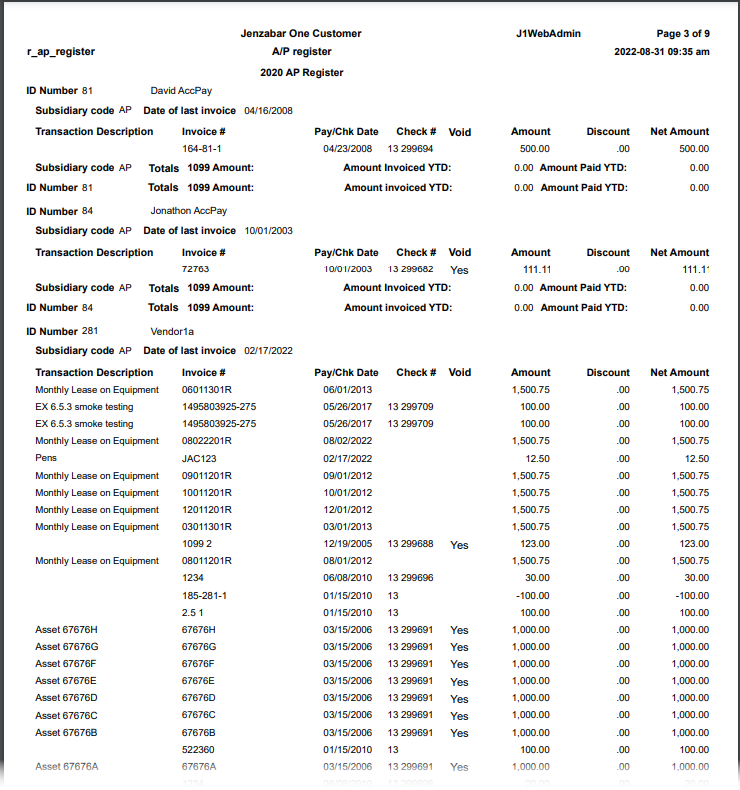
The AP Register report shows information from the TRANS_HIST table.
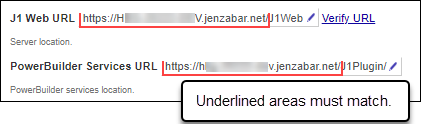
Verify the PowerBuilder Services URL is entered correctly in System Administration, System Settings, Product Installs and Sign page.
The URL must use HTTPS and not HTTP
The URL subdomain and domain must match the J1 Web URL
If the location where you store J1 Web reports is not the default installation location (C: > Jenzabar > Reports), verify the J1 Web server has permission to access the location. Detailed steps are available in the help topic Working with Reports in J1 Web.