Approve Timecards
Important
Information and features vary according to the roles to which you belong and the permissions associated with those roles. For more information, contact your module manager or your campus support team.
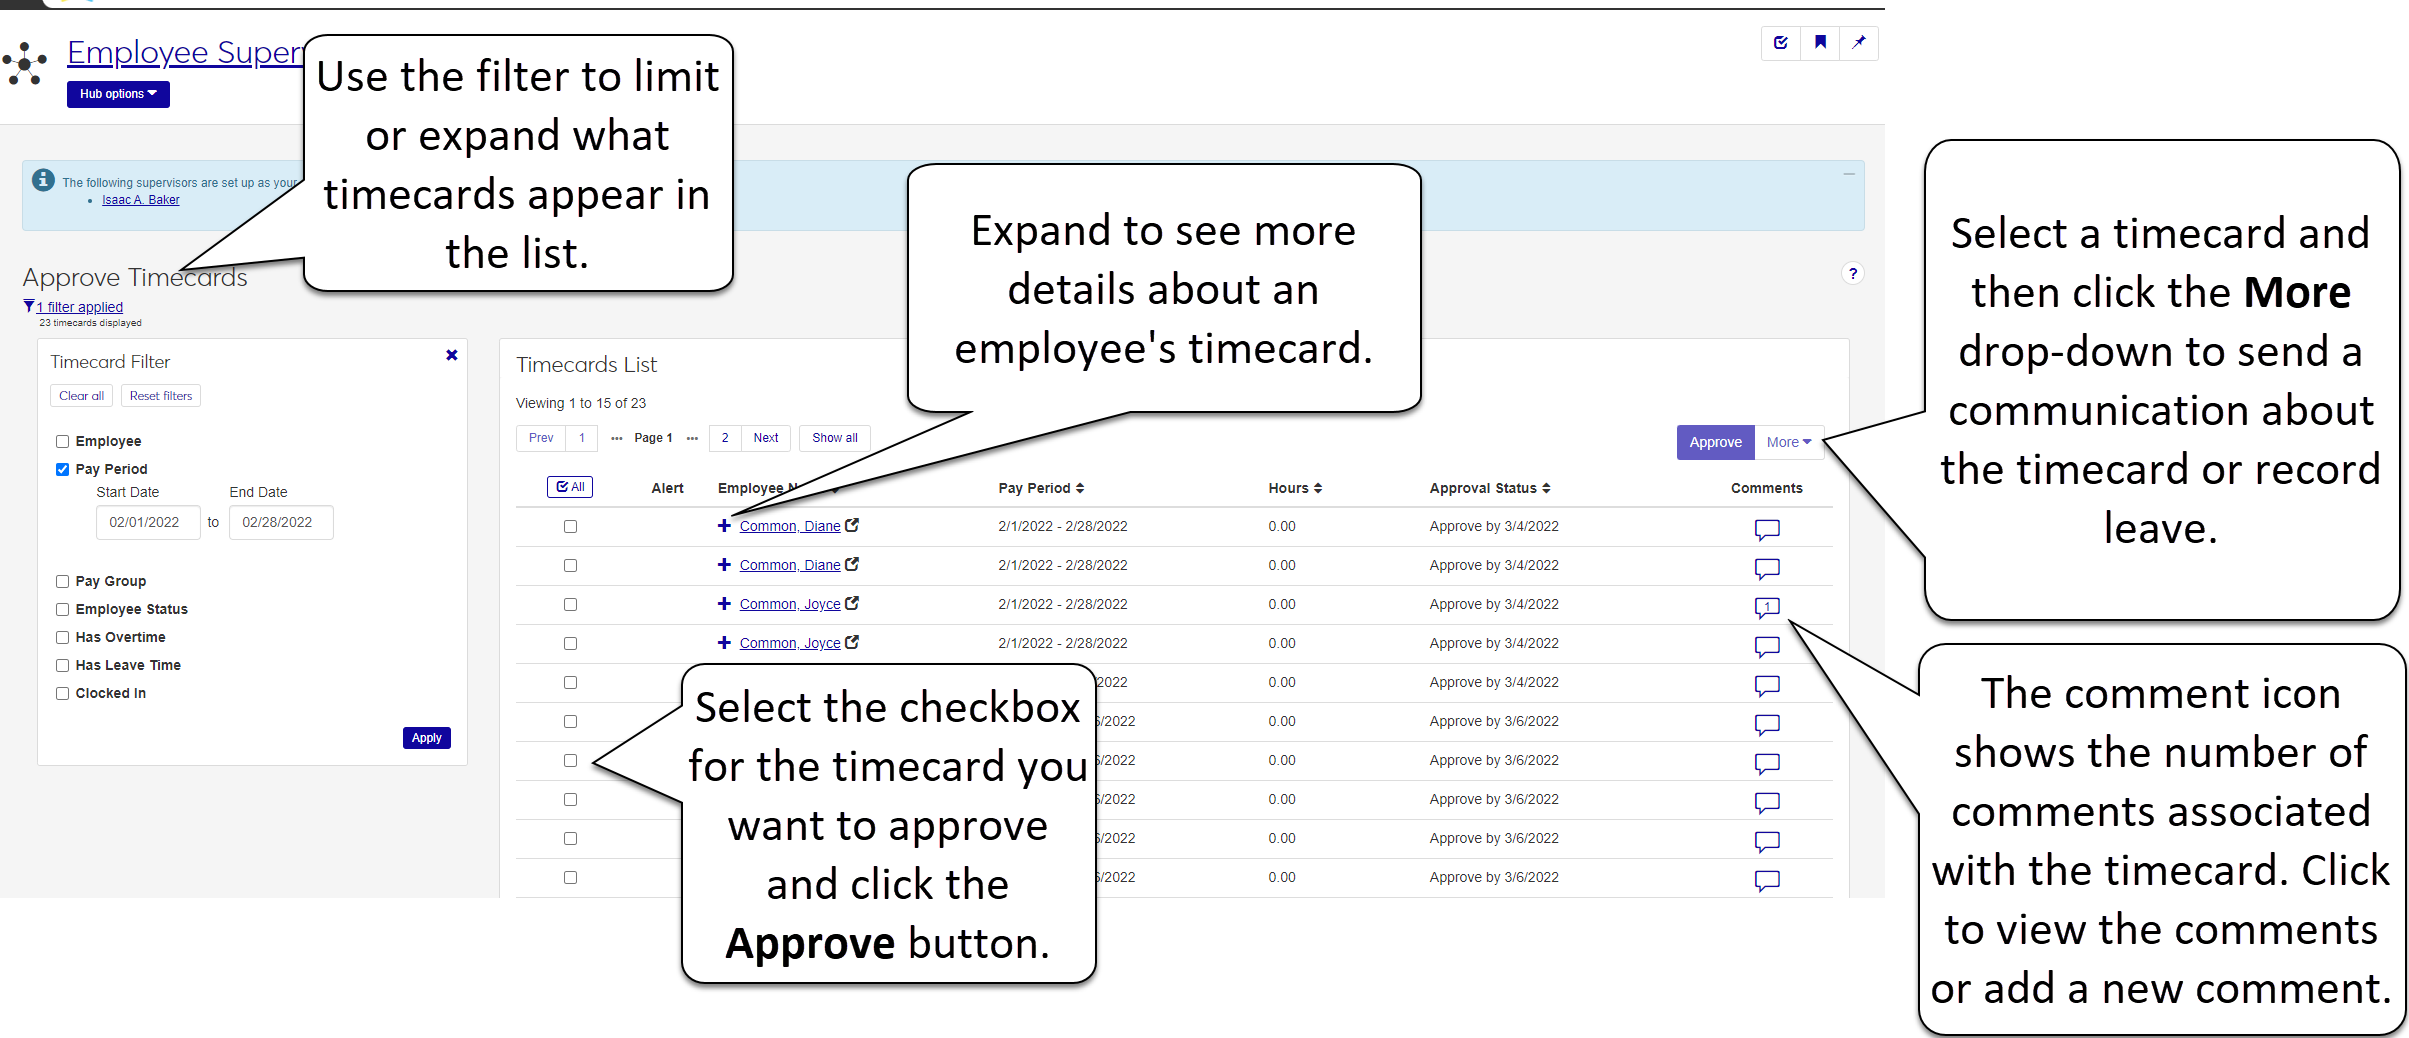
As an employee supervisor, use this page to approve employee timecards. You can filter the timecards by the employee's name, the pay period, the pay group, employee status (if the timecard is finalized or not), and if the employee has overtime or leave time. If any of the employees use the clock in/out format to record time, you can filter to those employees that are currently clocked in. If necessary, you can edit an employee's timecard and record leave.
Note
If employees or your administrator make any changes to the timecards displayed on this page, the timecards are updated here in real time. For this reason, you might see changes to the timecards while you are working with them.
Select Approve Timecards from the Hub options. The Approve Timecards page appears.
Locate the employee whose timecard you want to approve.
Note
Employees who have more than one active position are listed multiple times. Make sure you choose the correct position.
To view more information about the employee and the timecard details, click the expand button
 next to their name.
Note
Click the collapse button
 when finished.
To approve the employee's timecard, select the checkbox for the employee you want to approve and click the Approve button. A message appears providing details about the timecard.
Choose whether to continue or cancel. Click the Yes, approve button to submit or the X to cancel. Once submitted, the status updates (with a check mark next to the word Approved), the timecard goes to Payroll for processing, and the employee receives a system message that the timecard is approved.
Choose Approve Timecards from the hub options drop-down menu.
The Approve Timecards page appears with the Approve Timecards filter displayed.
Tip
The default filter is set to show timecards that are finalized.
Use the checkboxes to select the filters you want and click Apply.
Note
If you have employees that use the clock in/out method to record time, an additional option allows you to filter based on if the employee is clocked in or not.
Note
If you need to make changes to an employee's timecard, you need to enter/edit time on the Approve Timecards page in the same timecard format (e.g., hourly, monthly) that the employee uses.
Select Approve Timecards from the Hub options. The Approve Timecards page appears displaying the current pay period.
Use the filters to find the appropriate employee.
Access the employee's hours worked and non-working hours by clicking the expand button
next to their name. Click View entries. Note
Employees who have more than one active position are listed multiple times. Make sure you expand the correct position.
To add or update the number of hours the employee worked on a certain day:
Click the number of Daily Total Hours for the day you want to enter hours. The Enter Time pop-up appears.
Note
If no hours have been entered for that day yet, Daily Total Hours will show 0.
Enter or update the number of hours in Start Time and End Time. Click Save.
Repeat this step to edit the employee's work hours on additional days in this pay period.
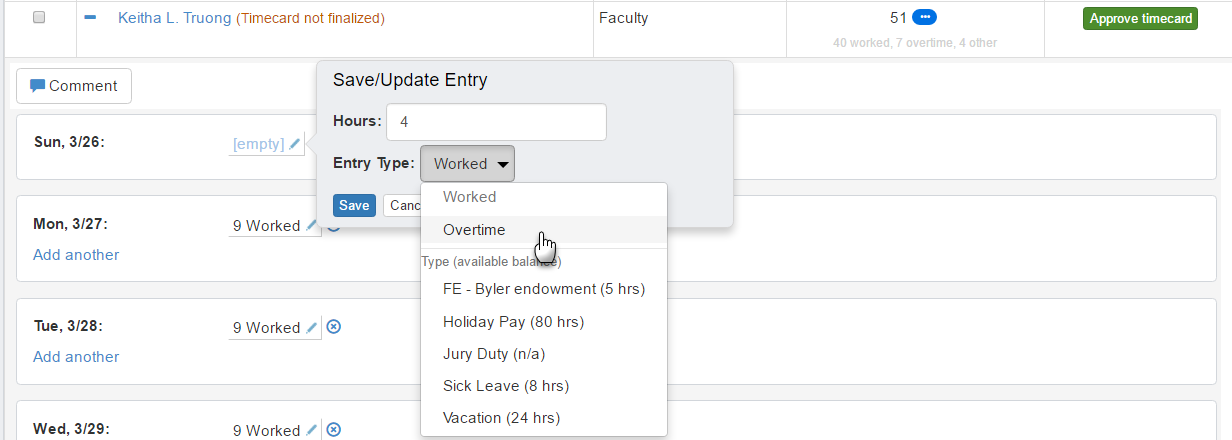
To add leave (other) hours for an employee:
Click the More drop-down and select Record leave. If hours already exist, use the Add another link to add more time. The Other Hours pop-up appears.
Enter the number of hours and select the leave type from the drop-down list.
Note
The employee's available leave balances appear next to each leave type in the drop-down list.
Click Save.
Repeat this step to add the employee's leave hours on additional days in this pay period or to add another type of leave to this date.
To update an employee's leave hours that have already been entered:
Click the number of Daily Total Hours for the day you want to update hours. The Enter Time pop-up appears.
Update the number of hours or the type of leave.
Note
The employee's available leave balances appear next to each leave type in the drop-down list.
Click Save.
Repeat this step to edit the employee's leave hours on additional days in this pay period.
To delete an employee's working or leave hours, find the date you want to edit and click the delete icon next to the hours you need to remove.
Click the collapse button
when finished.
If the current pay period includes a holiday, the holiday indicator appears on the employee's timecard.
Note
If the employee took the time off, enter the number of hours they are normally eligible for. If they worked all or part of the day, enter the number of hours they actually Worked.
Select Approve Timecards from the Hub options. The Approve Timecards page appears.
Navigate to the row containing the timecard you want to comment on and click the Comment icon in the Comments column.
Tip
If there are already comments on a timecard, the number of comments appear in the icon. Click it to view or add to the comments.
Click New comment.
Enter your comment in the pop-up window, and click the Add button.
The comment is visible to you and your employee.
Tip
When employees have multiple positions and you enter a comment on one of their timecards, the employee must go to that specific timecard from their Timecard Entry page to view your comment.
Select Approve Timecards from the Hub options The Approve Timecards page appears.
If you need to view any employee's daily hours worked and non-working hours for the pay period before approving timecards, click the expand button
next to the employee's name. Click View entries.Note
Click the collapse button
when finished.Locate the employees whose timecards you want to approve and select the checkbox next to their names.
Note
Employees who have more than one active position are listed multiple times. Make sure you choose the intended position.
Tip
To approve all employee timecards with time entered for the pay period, click the Select All button
 . All employees with any amount of time entered for the pay period will be selected.
Click the Approve button.
A confirmation window appears. If any of the selected timecards have issues, outstanding leave requests or missing hours for example, the confirmation window provides those details.
Click Yes, approve to submit or the X to cancel. Once submitted, the Approve timecard buttons next to the employees' names are replaced with a check mark next to the word Approved and the timecards are sent to Payroll for processing.
Tip
If you approve a timecard with outstanding leave requests, those leave requests are also approved.
Note
You can only record leave for one employee at a time.
Choose Approve Timecards from the hub options drop-down menu.
Check the box beside the timecard for the employee for whom you want to record leave.
Click the More drop-down and select Record leave.
Note
You can't record leave if the timecard approval cutoff date is in the past or if you have already approved the timecard.
The Record Leave window opens. Enter a Description, Date, Type, Start Time, and Hours.
In the Comments section, add any optional comments about the leave.
Use the Add another to enter additional time if necessary.
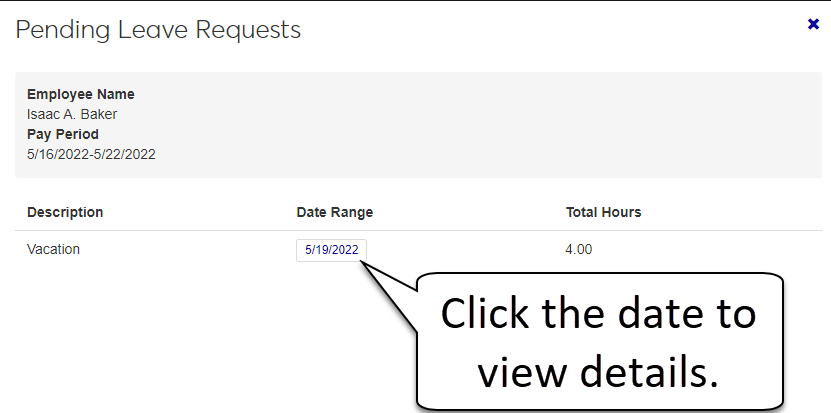
Click the Pending Leave Request notification in the Alert column.
The Pending Leave Requests window with a list of the employee's pending leave requests appears. Click on the date link to view the request details.
A pop-up window appears showing the details of the employee's request. You can approve or deny the request from this window.
Click the expand button next to the timecard you want to view the status history for. Click View status history. You will see any existing status history for the timecard, as well as details such as the employee name, position title, and current pay period.
Note
Recipients must have a verified email address in the Desktop, Name Entity window, Addresses tab.
From the Approve Timecards page, click the More drop-down and select Create communication. The Create New Communication window opens.
From the Communication Type drop-down, select Email.
Select an Interaction code, Name/Description from the drop-down.
Note
You'll only see active codes you have access to.
Enter the email address you want to send the email from.
Enter a descriptive Subject.
Add your message to the Body field.
To add an attachment, click Attach file, navigate to and select the file you want to send.
Click Send.
Tip
Before you can approve another supervisor's employee timecards, they must identify you as their alternate approver for timecards.
Choose Approve timecards from the Hub options menu.
The other supervisors you are an alternate approver for display at the top of the page.
An additional filter, Supervisor, appears in your Approve Timecards Filter.
Click in the filter and choose the other supervisor's name from the drop-down menu.
Click Apply to display the timecards in your Approve Timecards list.
Locate the employee whose timecard you want to approve.
To view more information about the employee and the timecard details, click the expand button
next to their name.To approve the employee's timecard, check the box beside the employee name and click the Approve button. A message appears providing details about the timecard.
Choose whether to continue or cancel. Click the Yes, approve button to submit or the X to cancel.Once submitted, the status updates (with a check mark next to the word Approved), the timecard goes to Payroll for processing, and the employee receives a message that the timecard is approved.
Choose Manage supervisor settings from the Hub options drop-down menu.
In the Choose Alternate Approvers section, select Timecards from the drop-down menu.
In the add approver field, type the person's name that you want to add as your alternate approver and select their name.
Tip
The alternate approver must be an active user and have supervisor permissions.
Click Save.
Tip
When you click Save, the alternate approver receives a confirmation message.
Yes. A notification displays next to the employee's name (Timecard not finalized) but you can still approve it; however, you may want to make sure the correct time is entered before approving the timecard.
When you click Approve, a pop-up displays another warning that the timecard is not finalized. Click Yes, Approve if you want to proceed, or click X to close the pop-up.
Yes. When you approve a timecard with outstanding leave requests, the requests are also automatically approved. A warning message displays; however, you can continue and approve the timecard and the requests for payroll processing.
No. If an employee is currently clocked in, you won't be able to approve the timecard that includes today. A message in the Employee Status column alerts you that the employee is currently clocked in.
When your employee finalizes a timecard:
You receive a task to approve the timecard.
The timecard is locked from employee edits.
The Employee Status changes to Finalized.
The Employee Finalized date is updated.
When you approve a timecard, the system does the following:
Approves any pending leave requests.
Sends a message to the employee.
Updates the Timecard Block and Timecard page.
Sends the information to Payroll for processing.
If the employee doesn't have hours available for a certain type, you won't be able to select that type. The number of hours available appears next to the type in the drop-down list. This number can be edited in J1 Desktop on the Timecard Entry window.
If your school allows online overtime, you can enter any overtime hours for an employee by selecting Overtime from the available time type drop-down menu.
If your school does automatic overtime, you will not have an option to enter your overtime manually on your timecard, but instead, you will see any overtime listed on the breakdown of your hours.
If your school does not allow online overtime, speak with your HR administrator to see how they prefer you to log any overtime.
Note
Overtime hours cannot be entered until you reach a minimum of 40 hours of regular work. Leave time (such as sick, personal, vacation, etc.) do not count toward the 40 hours.
If you see the orange LV icon  this means that the employee has gone over their available leave balance. Seeing this icon means your school allows employees to go into negative leave hours, but wants you to be aware of how they entered their time before you approve the timecard.
Your HR Administrator sets up an allowed number of hours for each pay period. If an employee goes over the normally allowed number of hours you will get a warning when you try to approve their timecard. You can still submit the timecard, but make sure you understand any rules or regulations about overtime at your school. If the additional number of hours was a mistake, or not allowed, you can edit the employee's timecard before approving.
While you are on the Approve Timecards page, you will see your approval cutoff date, and right below your approval cutoff, you will see the employee time entry cutoff date.
The blue ellipsis icon  appears next to an employee's hours if that employee has multiple positions. When you click the icon, it lists a breakdown of the employee's entered time for all of their positions in the pop-up window.
Pay periods and employees' personal, benefit, and salary or earnings information must all be set up in J1 Desktop. For employees who have multiple positions, applicable information must be set up for each position.
To see their employee hub and access information, each employee must be entered into J1 Web with an Employee role. Once added to the Employee role, they can access their Employee Hub.
The Record Leave option is not available if the employee's position is not eligible for leave.
When an employee cancels a leave request, the system does the following:
Removes the leave request from your calendar.
Removes the leave request from your employee's calendar.
Removes any associated timecard entry, if applicable. If there was an associated timecard entry, the Approve Timecards page refreshes and no longer shows the leave request.
The email feature is disabled if either you or your employee do not have a valid email address entered into the system.
If the Approve by date has passed, you no longer have the option of approving the timecard. In addition, if the timecard has zero hours it cannot be approved.
If you are already on the Approve Timecards page and an employee submits a new leave request, your screen automatically refreshes and displays the new leave request.
Your employee's position must be eligible for holiday leave for Holiday to be available as a leave type. If you think your employee should be eligible for leave, please see your HR administrator.
Note
If your employee has more than one position with different benefits, make sure you are viewing the position that is eligible for holiday leave.