Procurement for Campus Users
The requisitions functionality in the Campus Portal Requisitions and Orders and Requisition Approval features is now available in J1 Web Finance. Because the Campus Portal does not honor J1 Web Finance permissions, Jenzabar encourages schools to migrate Campus Portal features to the J1 Web Finance product and transition campus users to work in J1 Web.
The J1 Web Orders and Requests page replaces the Campus Portal Requisitions and Orders feature, and the J1 Web Review Requisitions page replaces the Campus Portal Requisition Approval feature. Click the links below for more information about each page.
In this document, a campus user represents someone who:
is an employee, for example, a supervisor, someone leading an initiative or program, or an administrative assistant.
does not work in the business office.
interacts with funds, but has limited access to them.
purchases items to support their work.
should be able to monitor their spending activity for a particular department, program, grant, etc.
may need to determine the current budget for a particular department, program, grant, etc.
Note
This list is not comprehensive and may exclude certain scenarios your users experience.
Danger
Enabling J1 Web Finance features for your campus users cannot be undone; once the features are active, users can no longer perform those tasks in the Campus Portal. Be sure that you've set up your system properly and adequately prepared your users before completing the migration.
Migrating users and features from the Campus Portal to J1 Web involves adding multiple users to roles with different permissions and access. Jenzabar strongly recommends completing the steps outlined in the topics below to implement the migration.
Enabling the Campus Portal functionality in J1 Web requires a large number of users to be added to roles and granted permissions. Jenzabar advises clients to follow the steps below to prepare for implementing J1 Web Finance and migrating users from the Campus Portal to J1 Web.
Danger
Enabling J1 Web Finance features for your campus users cannot be undone; once the features are active, users can no longer perform those tasks in the Campus Portal. Be sure that you've set up your system properly and adequately prepared your users before completing the migration.
Verify license information. You must have the J1 Web Financials license to migrate J1 Web features from the Campus Portal. Work with Jenzabar Support to ensure you have the appropriate license.
Plan your migration. Identify the J1 Web product areas you want to prioritize as you transition users from the Campus Portal to J1 Web. This will position you to seamlessly adopt additional functionality when it is ready.
Note
Open items, state reporting, and foreign currency features are not yet available with J1 Web and cannot be run in parallel with the Desktop application due to data issues. Clients using those features should not upgrade to J1 Web Finance until the features are available. Open Items, State Reporting, and Foreign Currency features are scheduled for a future release.
Familiarize users with J1 Web standard features and navigation. If your school isn't already using J1 Web, gain familiarity with the system's standard features including navigation, search, blocks, bookmarks and pins, and user preferences. The MyJenzabar Common Module Resource Center provides access to guides, YouTube videos, and eLearning courses about these features.
Familiarize users with Jenzabar Communications. J1 Web uses the Communication Management hub to send and view emails, comments, and notifications (collectively called "interactions"). The MyJenzabar Communications Module Resource Center provides access to guides, YouTube videos, and eLearning courses about these features.
Learn about permissions in J1 Web.
Review Common J1 Web roles that impact users' ability to use standard features, especially if you are just starting with J1 Web. See the User Management online help for information.
Review Finance permissions available in J1 Web and consider how your Finance department wants to set up a new permission structure. Desktop and Campus Portal Finance permissions are not migrated into J1 Web. J1 Web uses unique roles and permissions, and this new model provides additional flexibility as well as an opportunity to re-imagine and improve existing permission structures. See the J1 Web Finance Permissions and Setup Admin Guide on MyJenzabar for more information.
Note
Remember that working in J1 Web and Desktop at the same time will require managing dual permissions. The Desktop groups and permissions for campus users are not honored in J1 Web.
Jenzabar provides default roles for each Finance hub. Because permissions work differently between Desktop and J1 Web, your campus users will need to be added to J1 Web roles and granted permission to work with the J1 Web features that replace the Campus Portal features.
Review the Desktop and Campus Portal groups, permissions, and access for your campus users. It's helpful to make a list of what each campus user has access to and which tasks they'll need to accomplish.
Notice
Brad is an assistant football coach who makes purchases and monitors spending for the football team.
Tip
You can use the J1 Web Core, Campus Portal Security: Users page to filter campus users based on their portal role.
Review the default roles and permissions for the finance modules you are licensed to use. Each module in the J1 Web Finance product has its own hub, roles, and permissions. Use the sections in this guide to learn about each role and which tasks users can accomplish with the appropriate permissions.
Note
In addition to the finance roles, users will also need to be in Common roles to access certain features in J1 Web. For more details on these roles, see Common Roles and Permissions for Campus Users.
Create new roles based on the default roles that align with the tasks your users accomplish. Jenzabar recommends creating new roles based on the default finance roles to tailor roles and permissions for your campus users. This practice preserves the default role and gives you the flexibility to customize roles to fit your needs.
Review GL account security for all your finance users. Verify that the new J1 Web roles for campus users are associated with the correct GL accounts and that users have access only to accounts they work with.
Associate positions with your custom roles. Jenzabar provides an onboarding tool that lets you use positions (e.g., assistant coach) to streamline the process of adding users to roles in J1 Web. After a position is created, you can associate it with one or more roles. Users added to that position are automatically added to the associated roles.
Enable campus user features in J1 Web. After you've added your campus users to the appropriate roles, use the J1 Web Finance Settings in each hub to enable the J1 Web features and permanently disable the Campus Portal features.
Access to the Orders and Requests and Review Requisitions pages is managed by roles and permissions. Campus users that transition from the Campus Portal to J1 Web need to be in the following roles with the noted permissions to view pages and work with requisitions and purchase orders (POs).
The roles and permissions listed below are the recommended roles for your campus users. Your school may have additional (or fewer) roles and permissions assigned to people who work with requisitions.
Note
Jenzabar recommends creating copies of the default role to manage user permissions at your school. Depending on your school's processes, you may have various copies of a role that grant different sets of users certain permissions to work with requisitions and POs.
For more details about setting up users to work with orders and requests, see J1 Web Finance Roles and Permissions for Campus Portal Migration.
In this document, a campus user represents someone who:
is an employee, for example, a supervisor, someone leading an initiative or program, or an administrative assistant.
does not work in the business office.
interacts with funds, but has limited access to them.
purchases items to support their work.
should be able to monitor their spending activity for a particular department, program, grant, etc.
may need to determine the current budget for a particular department, program, grant, etc.
Note
This list is not comprehensive and may exclude certain scenarios your users experience.
The default Procurement - Purchasing role provides the following permissions to work with requisitions and POs. Administrators and module managers can grant users some or all of these permissions based on their daily responsibilities.
Users in these roles can only access requisitions and POs where they are the requestor or approver. To approve, deny, or return requisitions, users must be listed as an approver in the approval track associated with the requisition. Approval tracks are set up and managed in Desktop from the Purchasing Module Setup window > Approvals tab.
Permissions are grouped in the Requisitions, Purchase Orders, and Orders and Requests sections.
Can approve, deny, return requisitions
Can view purchase orders and generate reports
Can create and submit basic requisitions
Can update purchase order line item receiving status
To view GL account information and access project codes on requisition pages, users must be in one or more of the following General Ledger Accounting Hub roles (or roles copied from these roles) with the noted permissions.
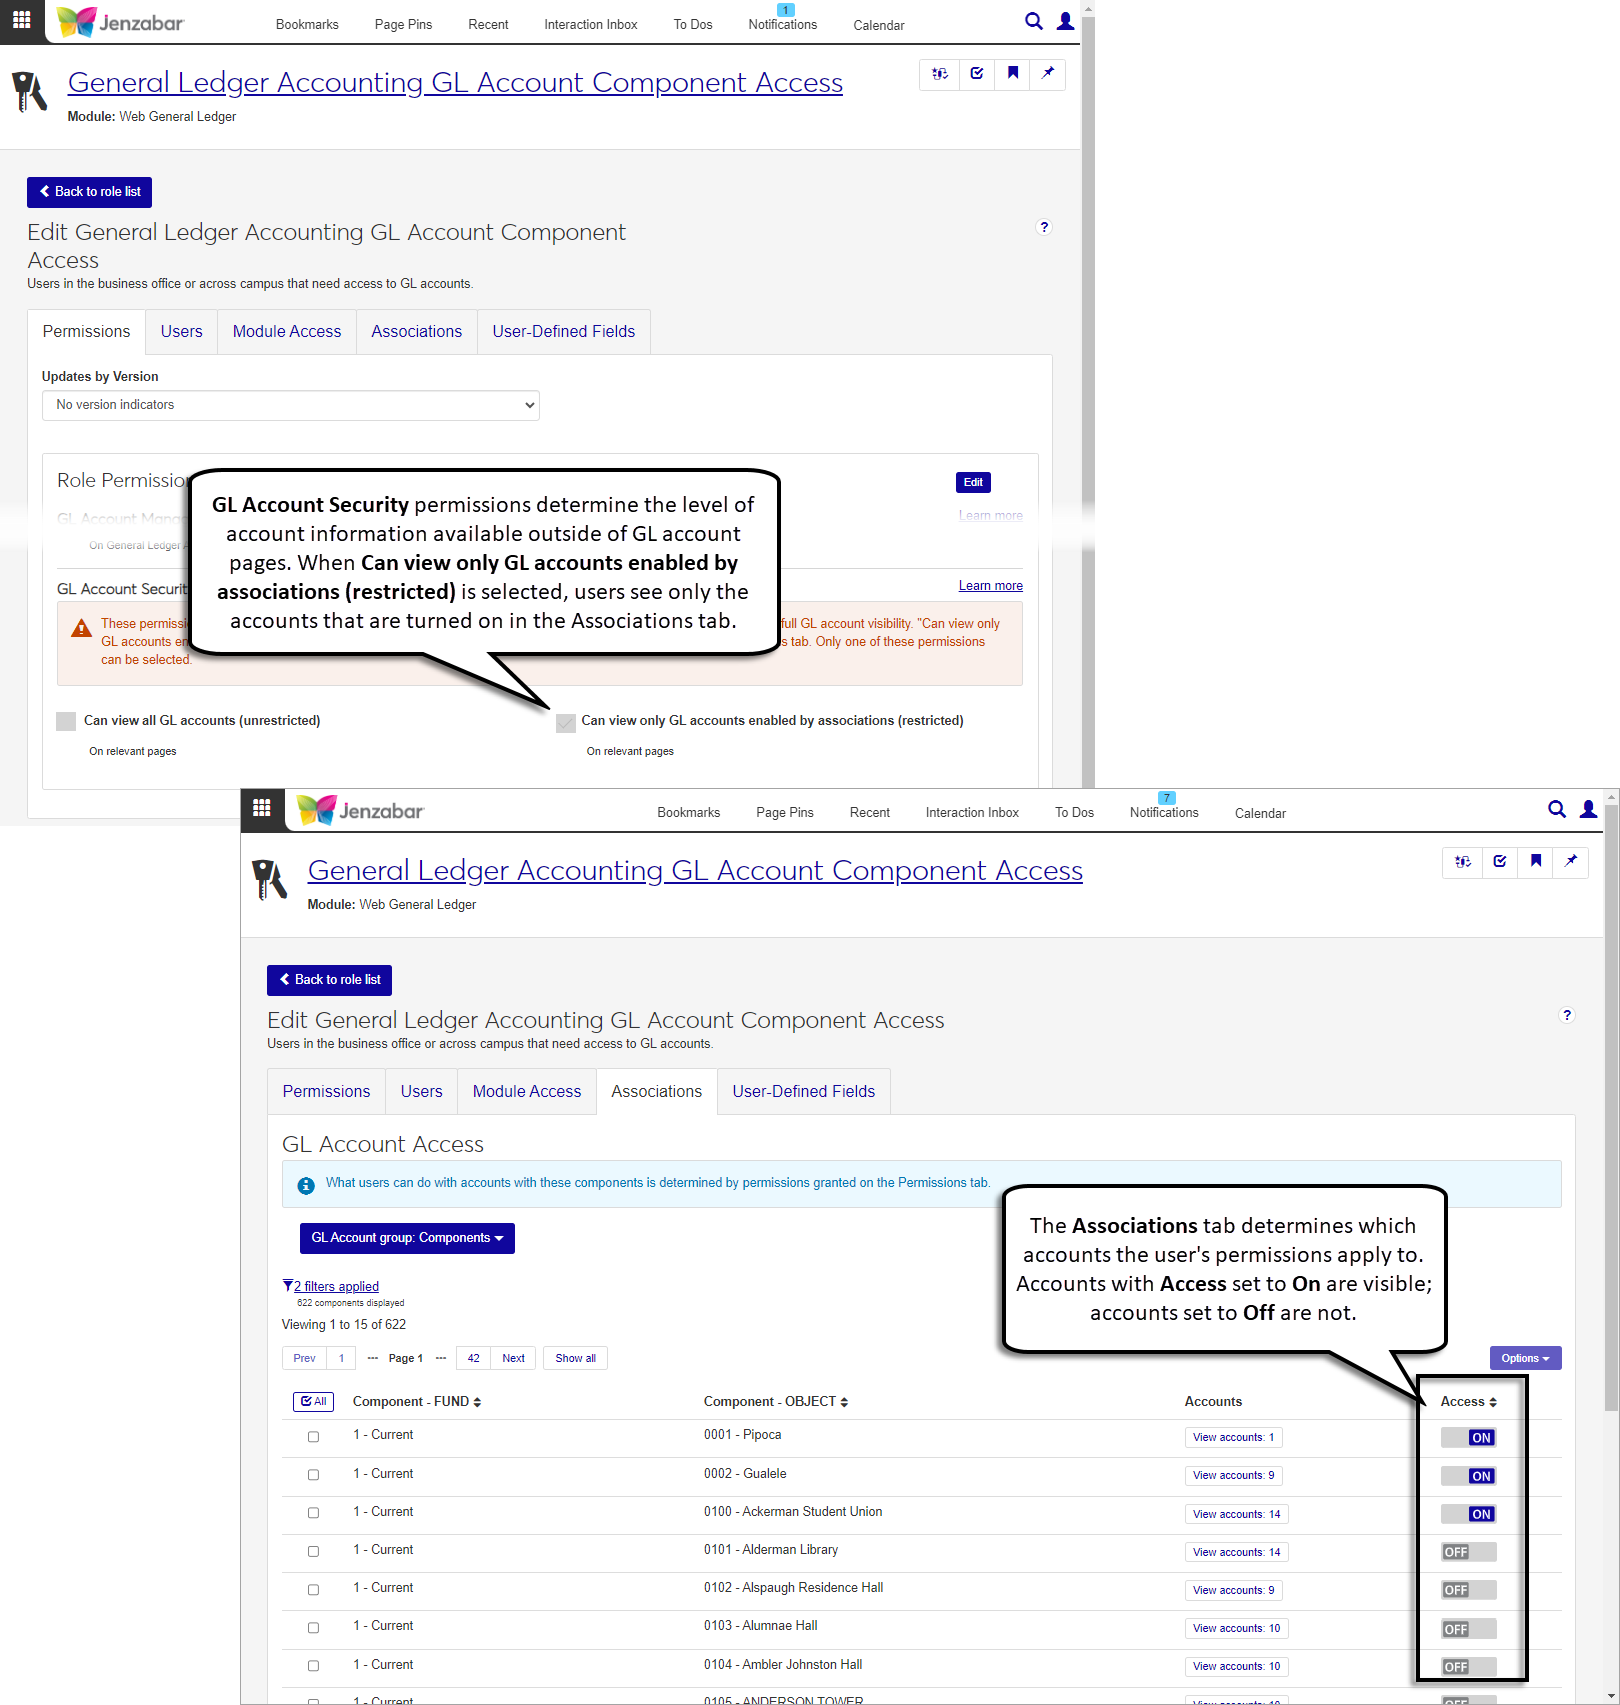
General Ledger Accounting GL Account Component Access role, with "Can view only GL accounts enabled by associations (restricted)" permission
General Ledger Accounting GL Account Alternate Code Access role, with "Can view only GL accounts enabled by associations (restricted)" permission
General Ledger Accounting Project Access role, with "Can view only projects enabled by associations (restricted)" permission
To restrict user access to one or a few accounts or project codes, enable those specific codes on the Associations tab and select "Can view only GL accounts/projects enabled by associations (restricted)" on the Permissions tab.
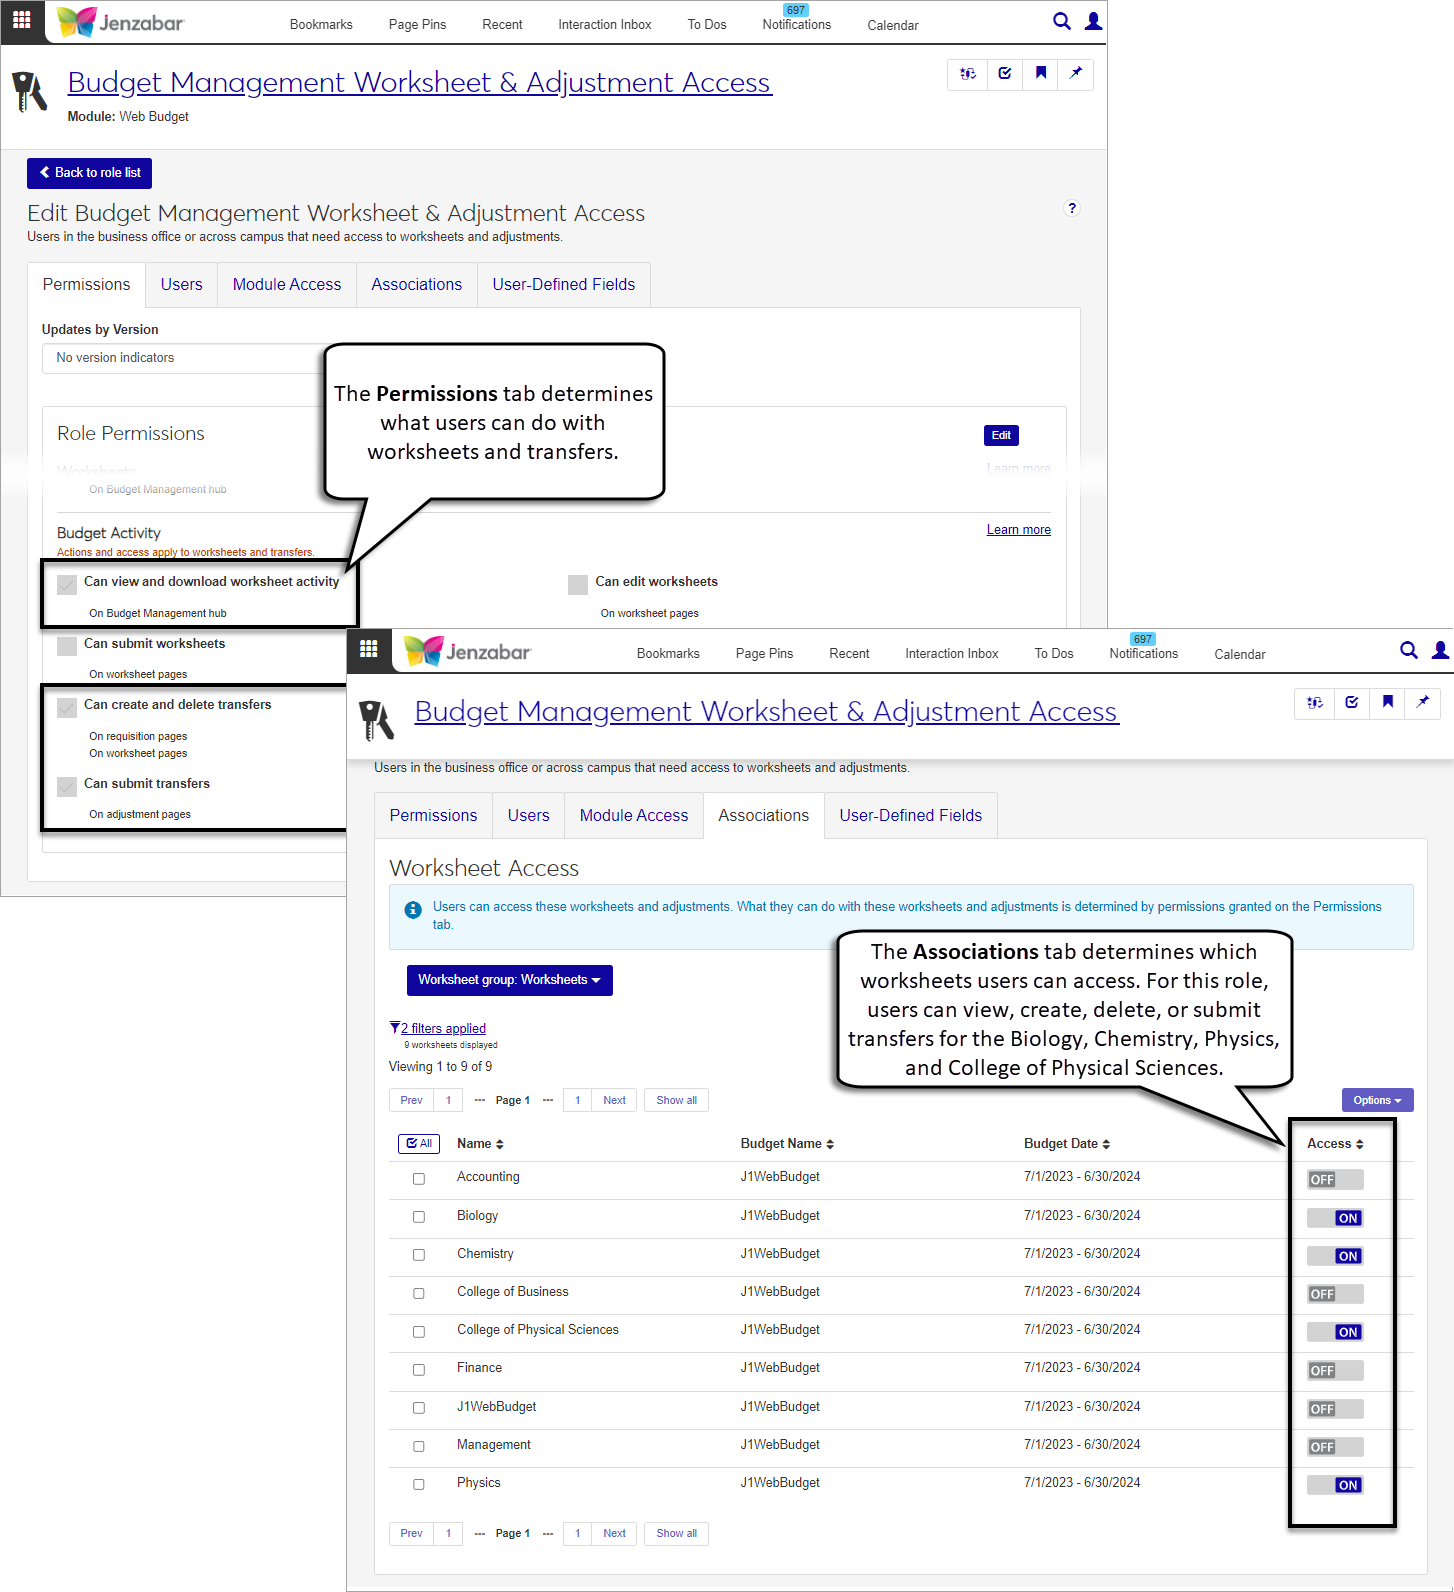
If your school is licensed for the Budget product, users need to be in a Budget Management Worksheet & Adjustment Access role with the following permissions granted in the Budget Activity section:
Can create and delete transfers
Can submit transfers
Warning
Campus users should only be granted permissions from the Budget Activity section of the page as the other permission sections are for administrative users.
Additionally, users must be granted access to the worksheets associated with the accounts where transfers are being made. Use the Associations tab to enable the worksheets users can access. User permissions are applicable only to the worksheets that have been enabled for the role.
In addition to the functionality in the Procurement hub, users who work with requisitions and POs may also need access to view, update, or add person and organization information. To perform these actions, they'll need to be in one or more of the roles outlined below.
Role | Permissions |
|---|---|
Person Management |
|
Organization Management |
|
Communication Management Base |
|
Facilities User |
TipIn J1 Web, "places" are usually buildings and "spaces" are usually rooms in the building. |
Additional Resources
Tip
These resources and more are available on the MyJenzabar Procurement Resource Center.
