Receivables Management Roles & Permissions Setup
Caution
As you prepare for the transition from Desktop to J1 Web Finance, we recommend reviewing these guidelines: Before You Get Started with Jenzabar One (J1) Web Finance.
The Receivables Management Hub lets users work with and manage student accounts, charges, and receipts. The sections below provide details about roles and permissions to work with accounts receivable (AR) functionality and information about the Desktop windows that have been brought into J1 Web.
Note
At this time, the configuration and settings for student accounts, charges, and receipts are still managed in the Desktop application. This functionality is scheduled for future J1 Web releases.
Student Accounts
Danger
J1 Web does not currently support the Open Items configuration. If your school is configured for open items in the Desktop A/R Configuration window, do not set up users to work in the Receivables Management hub for student accounts.
Access to work with student account information in J1 Web is managed by roles and permissions. To view pages and make updates to information in the system, users must be in the appropriate roles (similar to a Group ID in Desktop) with permissions enabled. The following roles and permissions are needed for users who work with student accounts.
Note
The roles and permissions listed below are the recommended roles for users working with student accounts. Your school may have additional (or fewer) roles and permissions assigned to people who access student account information.
Tip
Jenzabar recommends creating copies of the default role to manage user permissions at your school. Depending on your school's processes, you may have various copies of a role that grants different sets of users certain permissions to work with student accounts.
Receivables Management Role
The default Receivables Management role provides the following permissions to work with student accounts. Administrators and module managers can grant users some or all of these permissions based on their daily responsibilities.
Permission | Users in this role can. . . |
|---|---|
Can view student accounts and generate reports | Access the Student Accounts page, calculate balances, and view subsidiary information associated with students. |
Can view student account details and generate reports | Access the student account details page and see account activity for the selected subsidiary codes. ImportantSome aspects of this permission are restricted by GL account access. For more information, see Roles and Permissions to Work with Student Accounts. |
Can edit student account transactions | Update transaction details on the student account details page. ImportantSome aspects of this permission are restricted by GL account access. For more information, see Roles and Permissions to Work with Student Accounts. |
Can download to Excel | Download student account information from the Student Accounts list and Student Account Details pages. |
Can view student payment plan | See payment plan information in the Student Accounts list and access the Payment Plan tab on the Student Account Details page. |
Can add payment plan to student | Select payment plans and add students to them on the Student Account Details page. |
Can delete payment plan from student | Select payment plans and remove students from them on the Student Account Details page. |
Can adjust student payment plan payments | Update the due date, amount, and number of payments in a payment plan. |
Can cancel automatic payment | Stop automatic payments for a selected payment plan. |
Can reverse payment | Reverse payments made towards a payment plan. |
Can view student electronic payment | Access the Electronic Payment tab on the Student Account Details page. |
Can edit student electronic payment | Add bank information for students that want to receive funds via direct deposit. |
Can manage student subsidiaries | Add subsidiary codes to students. |
Can view FERPA block | See the FERPA contacts on the Student Summary page. |
Can generate charges | Access the Generate Charges page and run the billing process for students. |
Can view hours | Select criteria to view student billing hours on the Student Billing Hours page. |
Can view fees | Select criteria to view fees associated with students on the Fees page. |
Can view student billing data | Select criteria to view tables and columns associated with charges or refunds on the Student Billing Data page. |
Can transfer student deposit | Transfer funds from student deposits into the designated GL accounts on the Student Deposits page. |
Can generate account statements | Access the Account Statements page and generate student account statements. |
Can update account balances | Choose to update statement balances when student account statements are generated. |
Can publish statements to students | Choose to make updated account statements available to students in their Campus Portal Financial Document Center. |
Can create student refund invoices | Access the Create Student Refund Invoices page to create invoices to process student refunds. |
Can transfer subsidiary balances | Access the Transfer Subsidiary Balances page and move balances from an AR subsidiary to an offset account. |
Can manage payment plan availability and assignment | Select payment plans to make available on the Campus Portal or assign payment plans to students. |
Can manage finance charges | Access the Finance Charges page, generate, and clear finance charges. |
Permissions for AR Reports
You can also grant permission to generate reports for AR processes.
Permission | Users in this role can. . . |
|---|---|
Can create AR Exceptions report | Access the Reports hub and generate the AR exceptions report. |
Can generate History Register report | Access the Reports hub and generate the AR History Register report. |
Permissions to Work with User-Defined Fields
If you use user-defined fields (UDEFs) for student account information, users will also need permission to view and edit those fields. On the User-Defined Fields tab, grant the appropriate permissions for the following UDEF options:
Student Account Details User-defined fields
Student Account Transaction User-defined fields
General Ledger Accounting Roles
The subsidiary codes used to manage student accounts are associated with GL accounts, and users who work with student accounts need to be in one or more of the following General Ledger Accounting hub roles to view GL accounts.
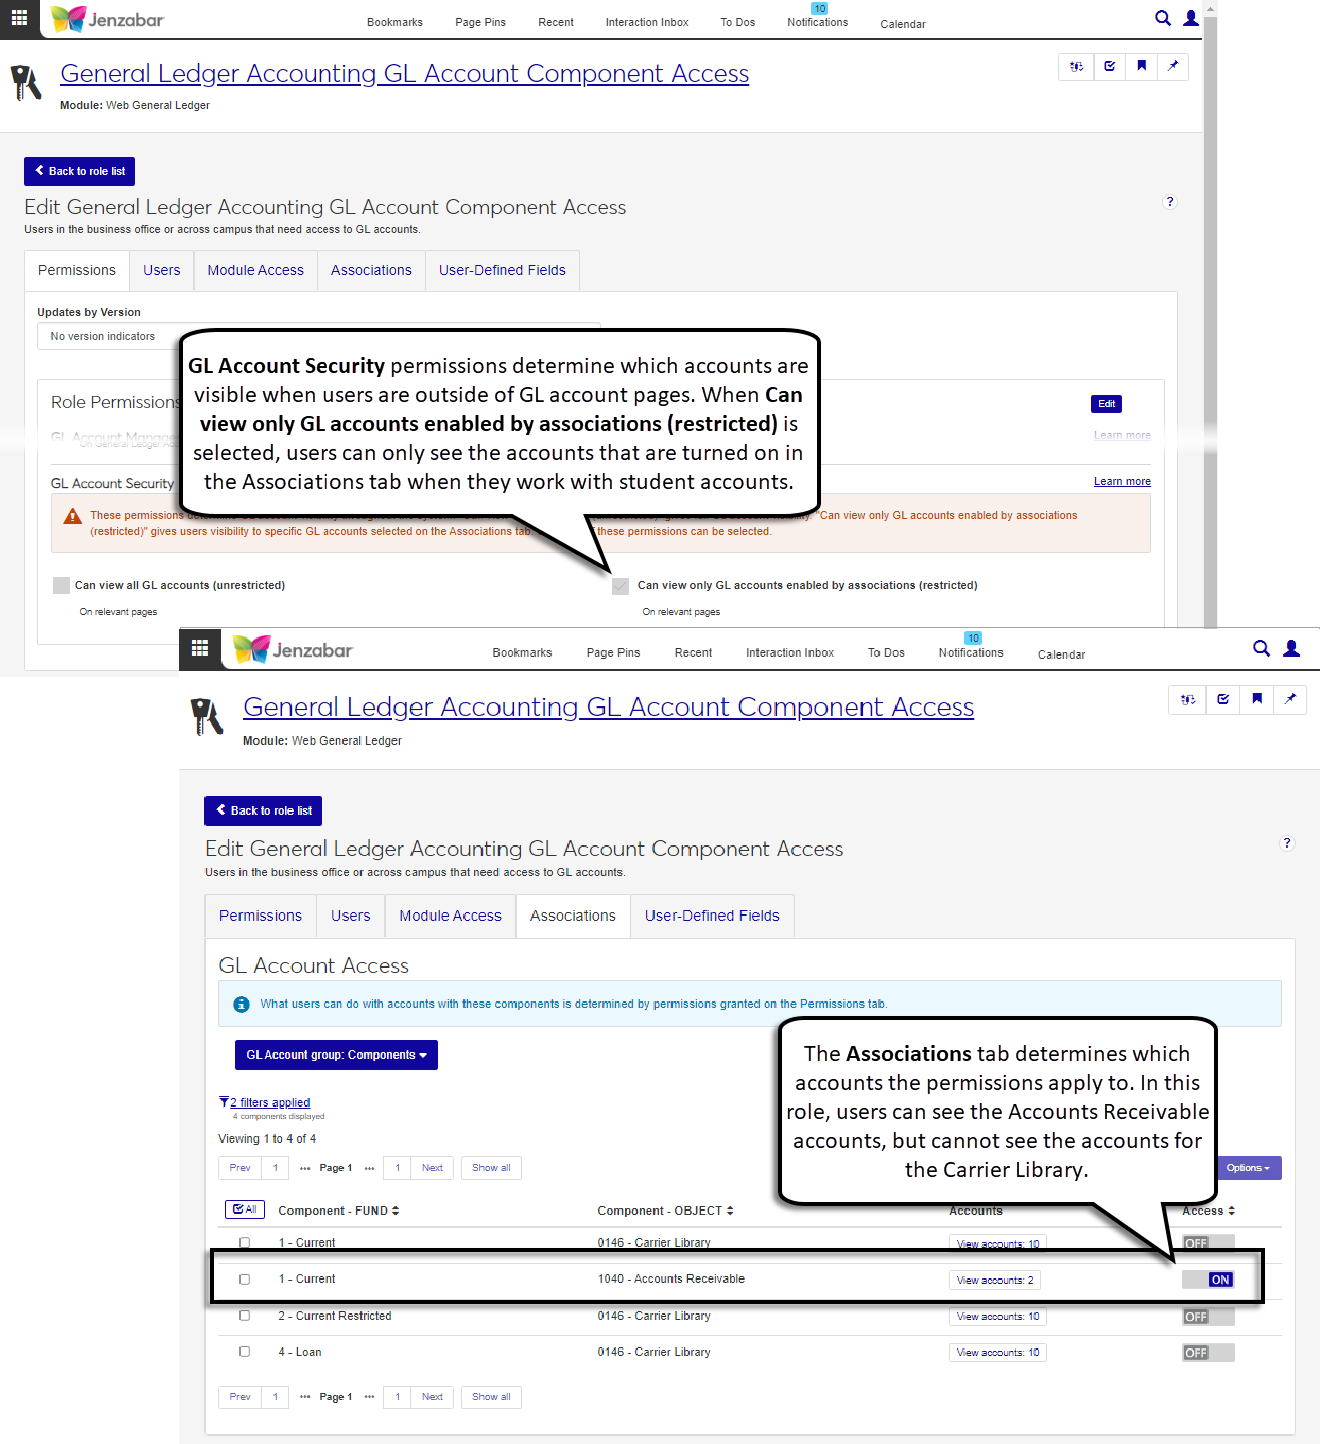
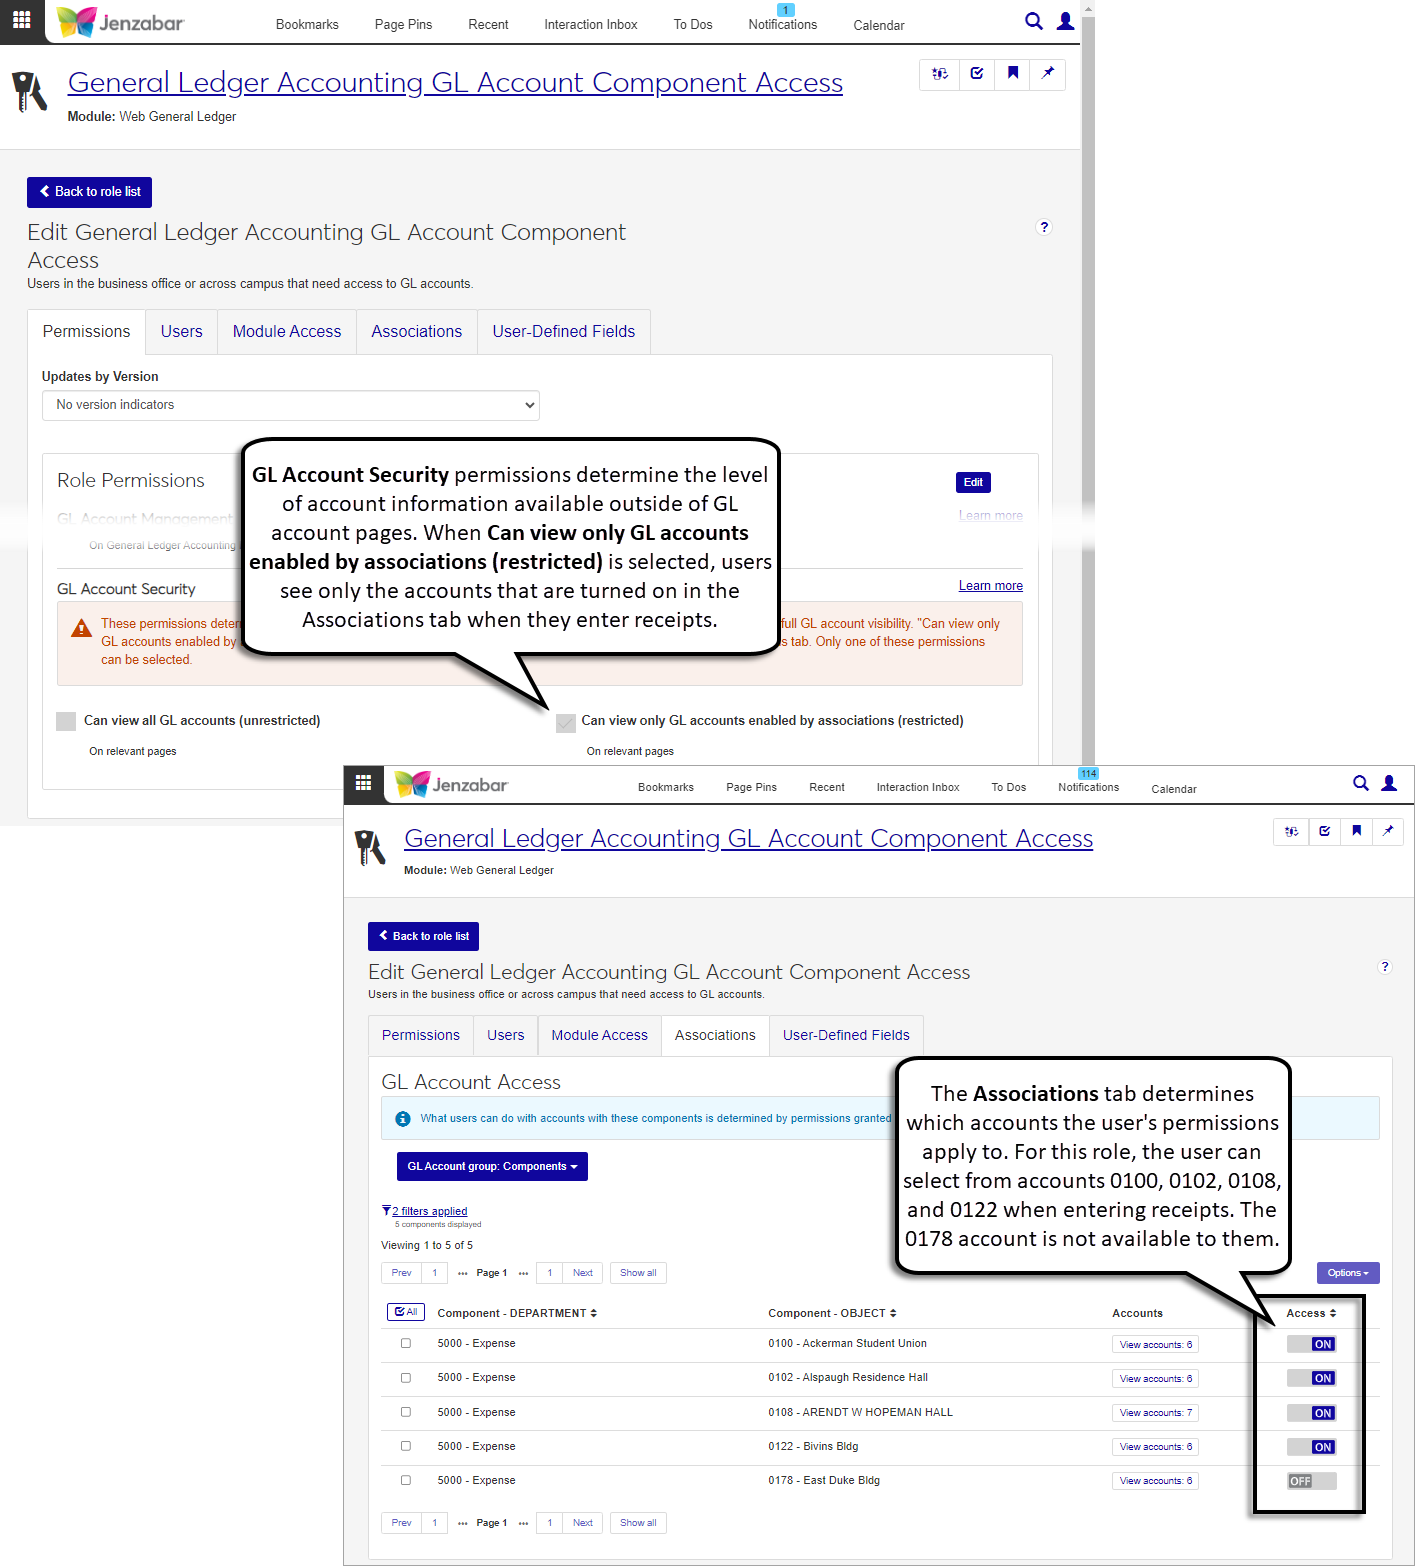
General Ledger Accounting GL Account Component Access role, with "Can view only GL accounts enabled by associations (restricted)" permission
General Ledger Accounting GL Account Alternate Code Access role, with "Can view only GL accounts enabled by associations (restricted)" permission
Because student account subsidiaries are associated with certain GL accounts, most people who work with student accounts only need access to view the GL accounts associated with student subsidiaries.
Common Roles
Many users who work with student accounts need access to view student information such as name and contact information. Additionally, there are often comments, notes, and messages related to student accounts. Module Access determines which communications users can view based on the module codes that are turned on for the role. If at least one of the user's roles has access turned on for the appropriate module, they can view and work with communications and interactions.

Tip
Jenzabar recommends turning on Module Access in the Receivables Management role, not the Communication Management role. This lets you maintain one or two Communication Management roles that grant access to communications features for all finance users. The module specific role determines which communications are visible to users based on the enabled Module Access code.
The following roles and permissions provide access to general information and messages associated with students.
Role | Permissions |
|---|---|
Person Management |
|
Organization Management NoteThis role is typically for users who work with Third Party payments. |
|
External Person Management |
|
External Organization Management NoteThis role is typically for users who work with Third Party payments. |
|
Communication Management Base |
NoteThe role Module Access tab determines which communications are accessible. |
Registration Roles
Access to student information and financial aid status is granted via the Registration hub. The following roles and permissions let users who work with student accounts view student information outside of the Receivables Management hub.
Role | Permissions |
|---|---|
Registration - Access to All Students |
|
Registrars |
|
The table below lists the Desktop window and the corresponding J1 Web page where that functionality is available. The Student Accounts page is accessed from the Finance, Receivables Management Hub options.
Warning
J1 Web does not currently support the Open Items configuration. If your school is configured for open items in the Desktop A/R Configuration window, do not set up users to work in the Receivables Management hub for student accounts or to create student refund invoices.
Desktop Window | J1 Web Page |
|---|---|
Subsidiaries | Student Accounts > Select students > Student Account Details, top section of the page 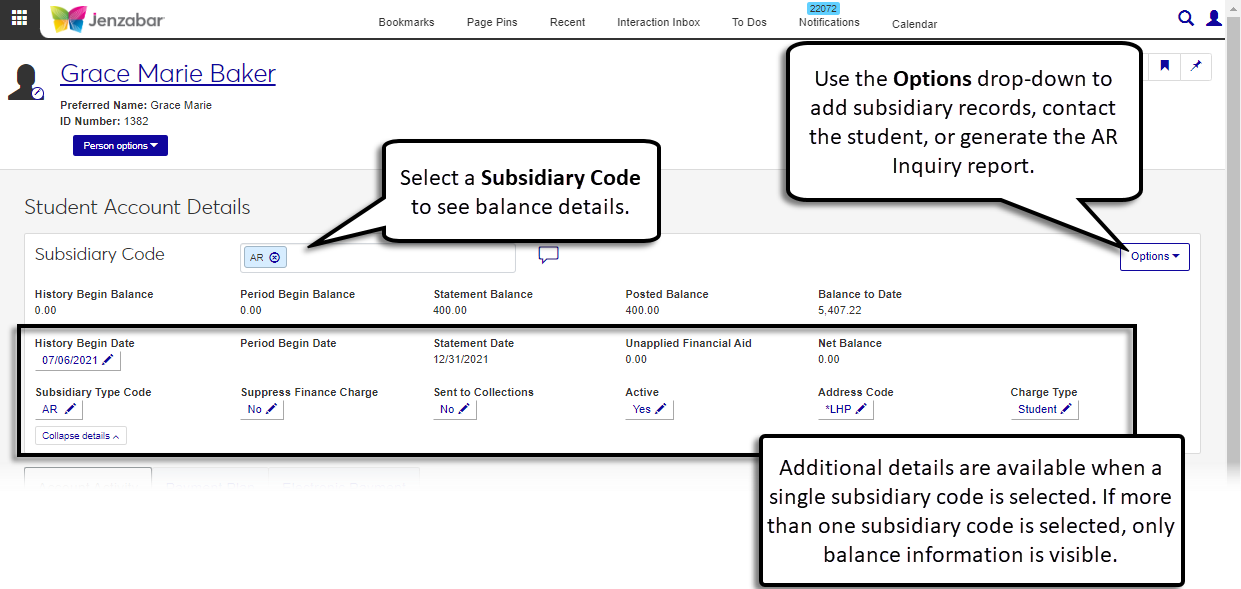 |
A/R Inquiry | Student Accounts > Select students > Student Account Details page, select Generate AR inquiry report from the Options drop-down 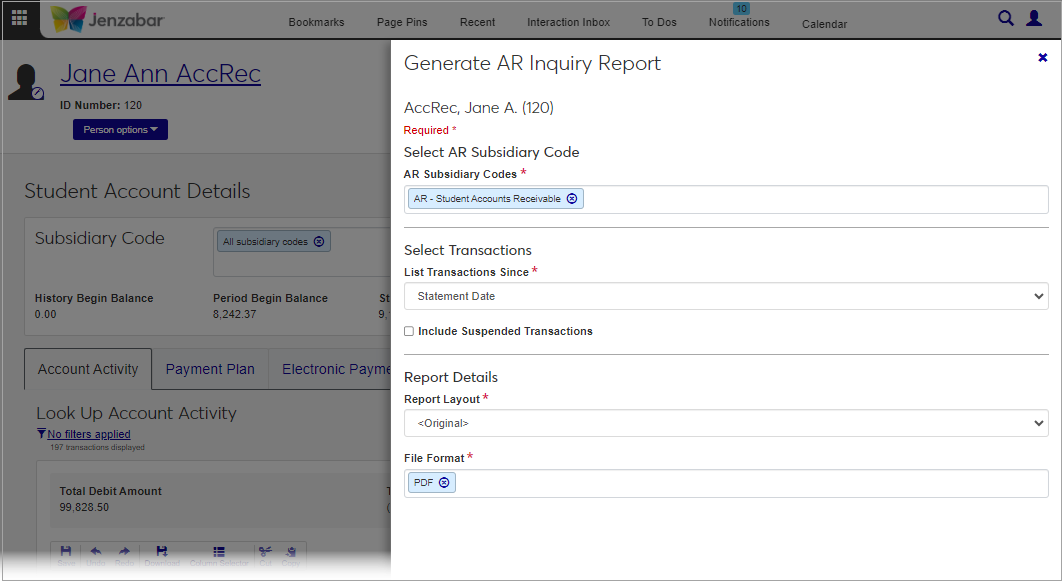 |
A/R Inquiry Details | Student Accounts > Select students > Student Account Details page, Account Activity tab  |
Self-Service Payment Plans | Student Accounts > Select students > Student Account Details page, Payment Plan tab 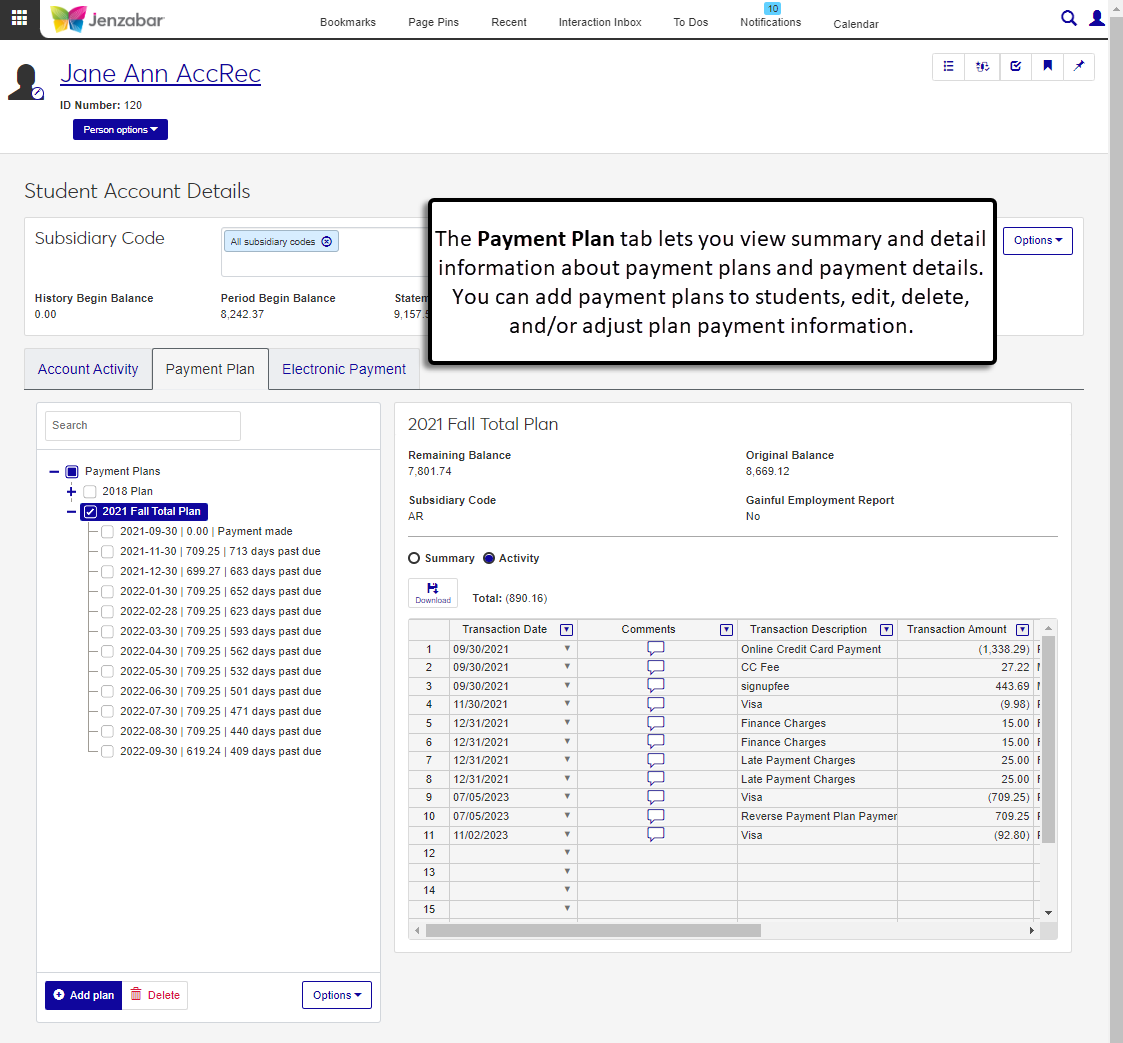 |
Student Information Impacting Charges | Student Accounts List page > Links to Student Information Details and Person Information Details pages 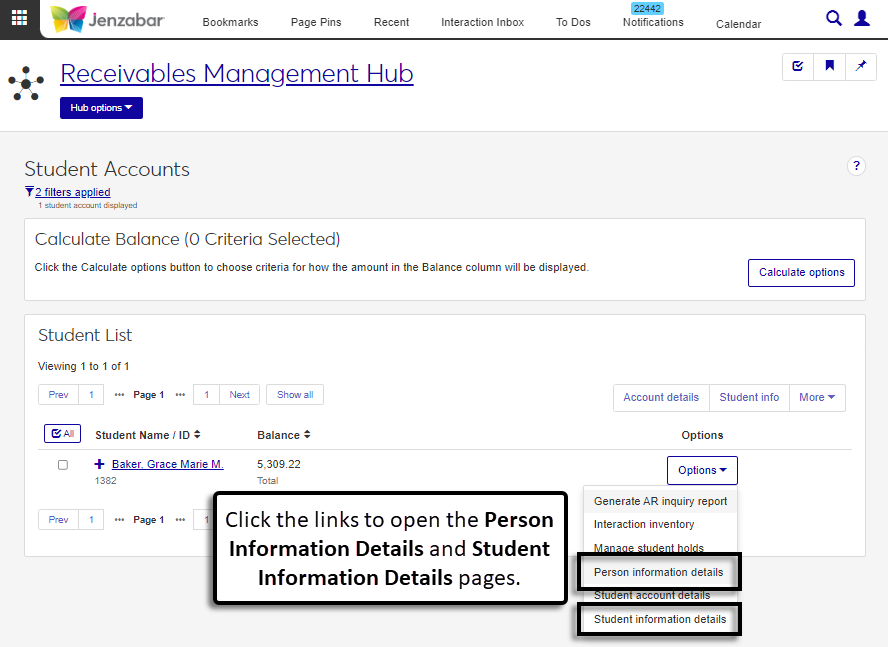 |
Communications are delivered by email via the Communication Management feature when account statements are published to students, when payment plans are added to a student, and when payment plan payments are made. The messages are defined in interactions, which are managed on the Interactions page.
Automation plans send the interactions when an event happens in J1. There is an equivalent automation plan for each of the interactions provided by default. These plans are managed on the Automation Plans page.
If you want to make changes to the default templates, Jenzabar recommends creating a copy of the default interactions and automation plans and then making the default interactions/automation plans inactive.
Permissions Required
To manage the interaction templates and automation plans, you must be in a Communication Management Base role with the following permissions:
Can add or edit interactions
Can add or edit automation plans
Additionally, you must have Module Access enabled for Accounts Receivable. This is typically enabled in a Receivables Management role.
Note
For more detailed information about working with interactions and automation plans, see Interactions and ???.
On the Communication Management hub, click Hub options, and select Interactions. The Interactions page opens.
Copy the default interaction and make the default inactive.
In the Interaction Filter, select the Keyword checkbox and type one of the following for the interaction you want to customize.
Enter "statement" for Statement Delivered.
Enter "consent" for Consent to Payment Plan.
Enter "payment made" for Payment Plan Payment.
Select the Default Interaction checkbox and select Yes from the drop-down.
Click Apply. The Interactions list displays the interaction associated with the keyword.
In the Status column, click the Active button to change it to Inactive.
In the Actions drop-down, select Copy. The Copy Interaction wizard page opens to the Basics step.
On the Basics step, most of the information is prepopulated from the original interaction and certain fields can be updated.
The Type is set to "Email" by default and cannot be changed.
Enter the Name / Description from the default interaction (see default values below) or modify it to your liking.
Statement Delivered Email
Consent to Payment Plan Email
Payment Plan Payment Made Email
Enter the same Code as the default it's copied from.
Statement Delivered Code: STMTDEL
Consent to Plan Code: CPPEML
Payment Made Code: PPPMEML
From the Select an Interaction Owner drop-down, select Accounts Receivable.
Review the remaining prepopulated values and click Save and continue.
Warning
Don't select Do not allow duplicate interactions for a record. Leave it unselected.
Tip
The Show in Communication Feed checkbox is available for schools that have the Communication Management Plus license.
On the Data Merge Options step, review the preselected values and click Save and continue.
On the Email Basics step, review the preselected values and click Save and continue.
On the Template Content step, click the Status button to change it to Active.
Review the Content and edit as necessary.
Click Save and finish. The copied interaction appears in the Interactions list.
On the Communication Management hub, click Hub options and select Automation Plans. The Automation Plans page opens.
Make a copy of the default automation plan. Default plans are noted with an asterisk (*) next to the Code.
In the filter's System Event field, start typing the event name and select the option from the drop-down. Use the options below for student account system events.
Statement Delivered
Consent to Payment Plan
Payment Plan Payment Made
Click Apply. The automation plan appears.
In the Status column, click the Active button to change it to Inactive.
In the Actions drop-down, select Copy. The Copy pop-up opens to the Basics step.
On the Basics step, most of the information is prepopulated from the default automation plan.
Enter the Name / Description from the default plan (see options below for reference) or modify it to your liking.
Statement Delivered
Consent to Payment Plan
Payment Plan Payment Made
Enter the same Code as the default it's copied from.
Statement Delivered Code: STMTDEL
Consent to Payment Plan Code: CONSENTPP
Payment Plan Payment Made Code: PPPMADE
In the Initiated By field, keep the default selection of System Event.
Module, Process, and Event are prepopulated from the default automation plan.
Click Save and continue. The Automation Tasks page opens.
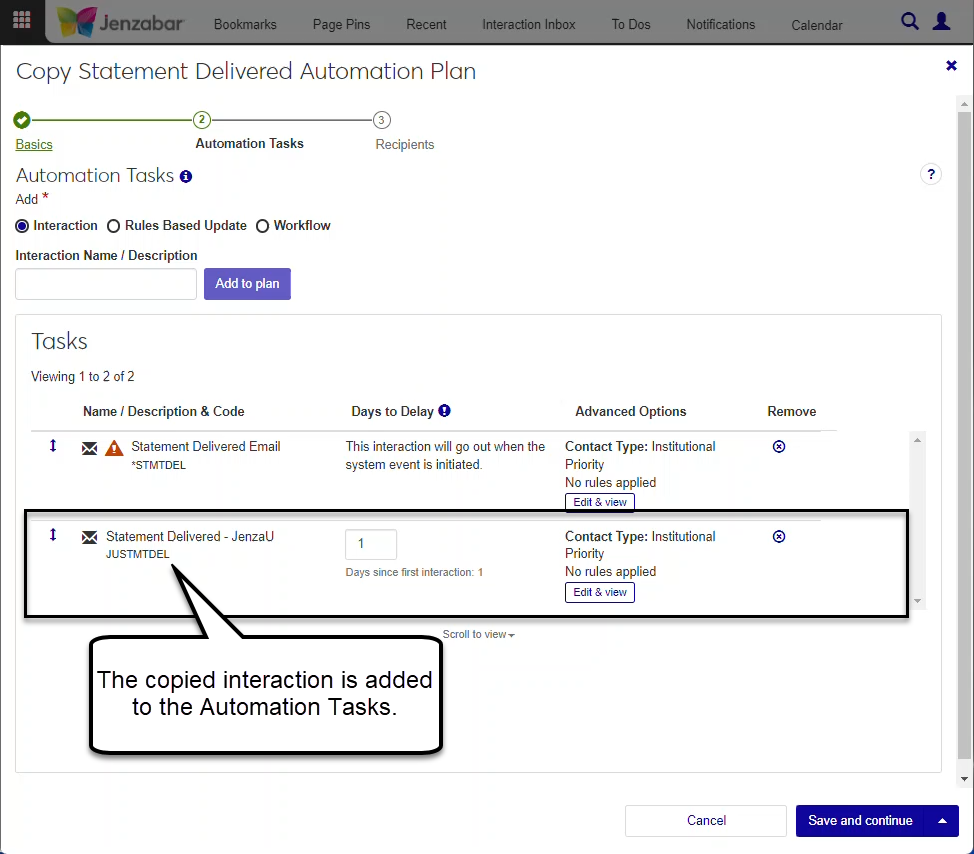
On the Automation Tasks step, the Interactions radio button is selected. Change the associated interaction from the default to the corresponding copy:
In Interaction Name / Description, enter the name of the copied interaction that corresponds with this automation plan and select the interaction from the list.
Click Add to plan. The interaction appears in the Tasks list below.
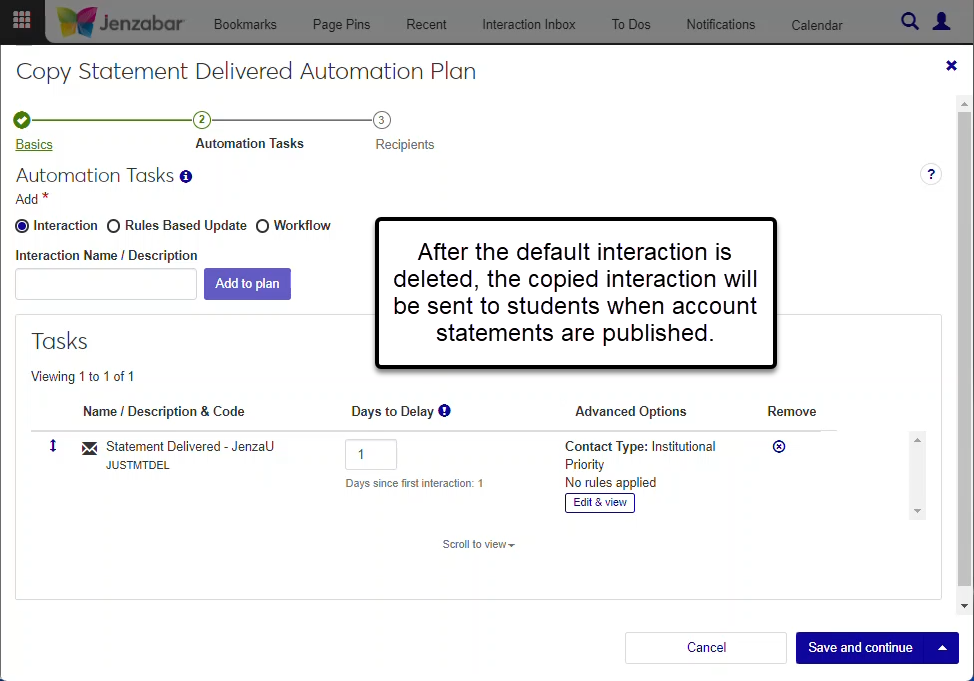
On the row for the default interaction, click the Remove icon
 . The default interaction is removed from the list.
Click Save and continue. The Recipients page opens.
On the Recipients step, click the Inactive button to make it Active.
The Recipients options are preselected. Make sure the radio button for Anyone associated with system event is selected.
Click Save and finish. The copied automation plan appears in the Automation Plans list.
If you aren't making any changes to the default emails, you do not need to create copies. You can continue using the Jenzabar-provided interactions and automation plans.
To receive emails from J1 Web, users need to have a valid email address associated with their profile. They do not need to be in a Communication Base role.
Charges
Danger
J1 Web does not currently support the Open Items configuration. If your school is configured for open items in the Desktop A/R Configuration window, do not set up users to work in the Receivables Management hub for student accounts.
Access to work with student charges in J1 Web is managed by roles and permissions. To view pages and make updates to information in the system, users must be in the appropriate roles (similar to a Group ID in Desktop) with permissions enabled. The following roles and permissions are needed for users who manage student charges.
The roles and permissions listed below are the recommended roles for users working with student charges. Your school may have additional (or fewer) roles and permissions assigned to people who access student account information.
Jenzabar recommends creating copies of the default role to manage user permissions at your school. Depending on your school's processes, you may have various copies of a role that grants different sets of users certain permissions to work with charges.
Receivables Management Role
The default Receivables Management role provides the following permissions to work with charges. Administrators and module managers can grant users some or all of these permissions based on their daily responsibilities.
Student Accounts Section
Permission | Users in this role can. . . |
|---|---|
Can view student accounts and generate reports | Access the Student Accounts page, calculate balances, and view subsidiary information associated with students. |
Can view student account details and generate reports | Access the student account details page and see account activity for the selected subsidiary codes. ImportantSome aspects of this permission are restricted by GL account access. |
Can edit student account transactions | Update transaction details on the student account details page. ImportantSome aspects of this permission are restricted by GL account access. |
Can download to Excel | Download student account information from the Student Accounts list and Student Account Details pages. |
Can generate charges | Access the Generate Charges page and run the billing process for students. |
Can view hours | Select criteria to view student billing hours on the Student Billing Hours page. |
Can view fees | Select criteria to view fees associated with students on the Fees page. |
Can view student billing data | Select criteria to view tables and columns associated with charges or refunds on the Student Billing Data page. |
Can manage finance charges | Access the Finance Charges page, generate, and clear finance charges. |
Miscellaneous Charges Section
Permission | Users in this role can. . . |
|---|---|
Can view miscellaneous charges | Access the list of miscellaneous charges and see transactions associated with them. |
Can create miscellaneous charges | Create batches of miscellaneous charge transactions. |
Can edit miscellaneous charges | Update transaction details for miscellaneous charge batches. |
Can download to Excel | Download information about miscellaneous charges to Excel. |
General Ledger Accounting Roles
The subsidiary codes used to manage student accounts are associated with GL accounts, and users who work with student charges need to be in one or more of the following General Ledger Accounting hub roles to view GL accounts.
General Ledger Accounting GL Account Component Access role, with "Can view only GL accounts enabled by associations (restricted)" permission
General Ledger Accounting GL Account Alternate Code Access role, with "Can view only GL accounts enabled by associations (restricted)" permission
Because student account subsidiaries are associated with certain GL accounts, most people who work with student accounts and charges only need access to view the GL accounts associated with student subsidiaries.
To view MS charge batches, users must also be in a General Ledger Accounting Miscellaneous Batches role (or copy of it) with the "Can view batches" permission.
Common Roles
Many users who work with student accounts need access to view student information such as name and contact information. Additionally, there are often comments, notes, and messages related to student accounts. Module Access determines which communications users can view based on the module codes that are turned on for the role. If at least one of the user's roles has access turned on for the appropriate module, they can view and work with communications and interactions.
Tip
Jenzabar recommends turning on Module Access in the Receivables Management role, not the Communication Management role. This lets you maintain one or two Communication Management roles that grant access to communications features for all finance users. The module specific role determines which communications are visible to users based on the enabled Module Access code.
The following roles and permissions provide access to general information and messages associated with students.
Role | Permissions |
|---|---|
Person Management |
|
Organization Management NoteThis role is typically for users who work with Third Party payments. |
|
External Person Management NoteThis role is typically for users who work with Third Party payments. |
|
External Organization Management |
|
Communication Management Base |
NoteThe role Module Access tab determines which communications are accessible. |
Registration Roles
Access to student information and financial aid status is granted via the Registration hub. The following roles and permissions let users who work with student charges view student information outside of the Receivables Management hub.
Role | Permissions |
|---|---|
Registration - Access to All Students |
|
Registrars |
|
The table below lists the Desktop window and the corresponding J1 Web page where that functionality is available. Charges information can be accessed in the Finance, Receivables Management hub.
Desktop Window | J1 Web Page |
|---|---|
Student Billing | Generate Charges 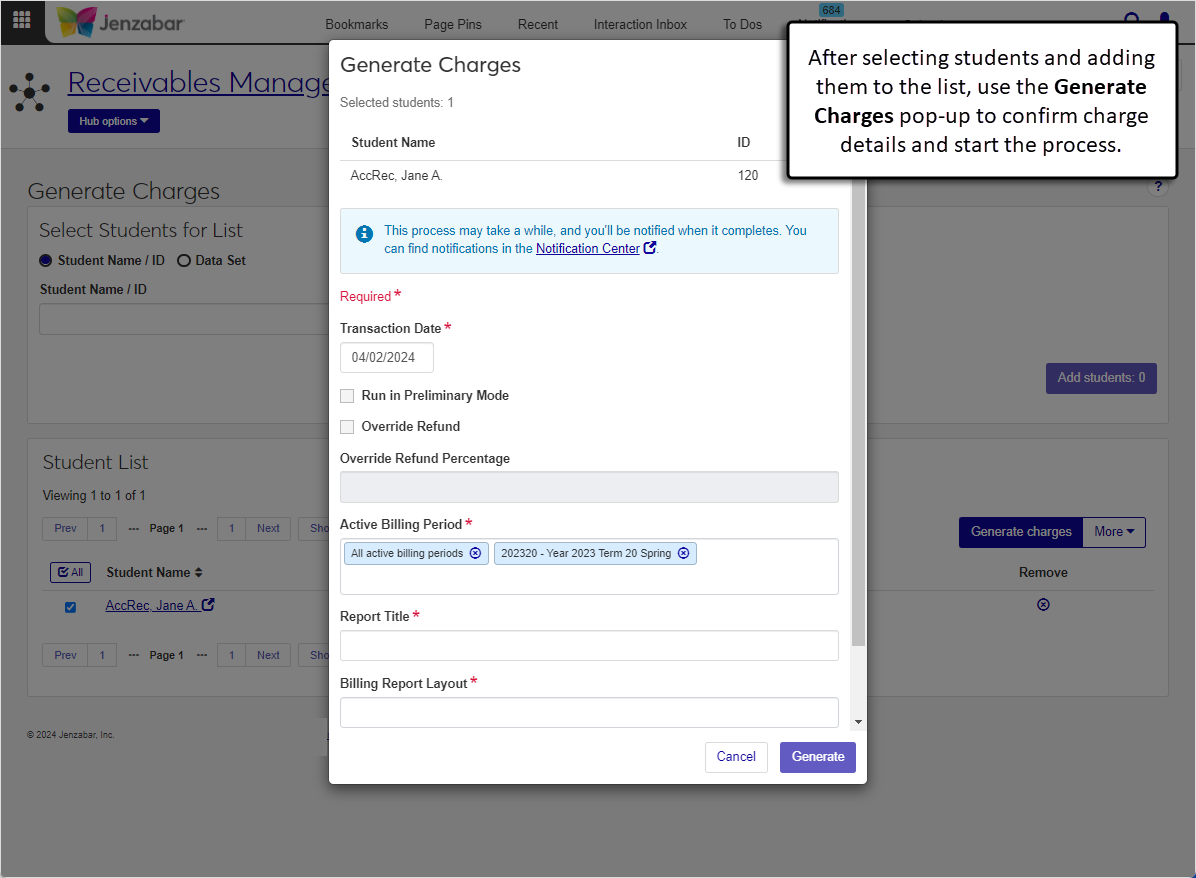 |
Miscellaneous Charges | Miscellaneous Charges 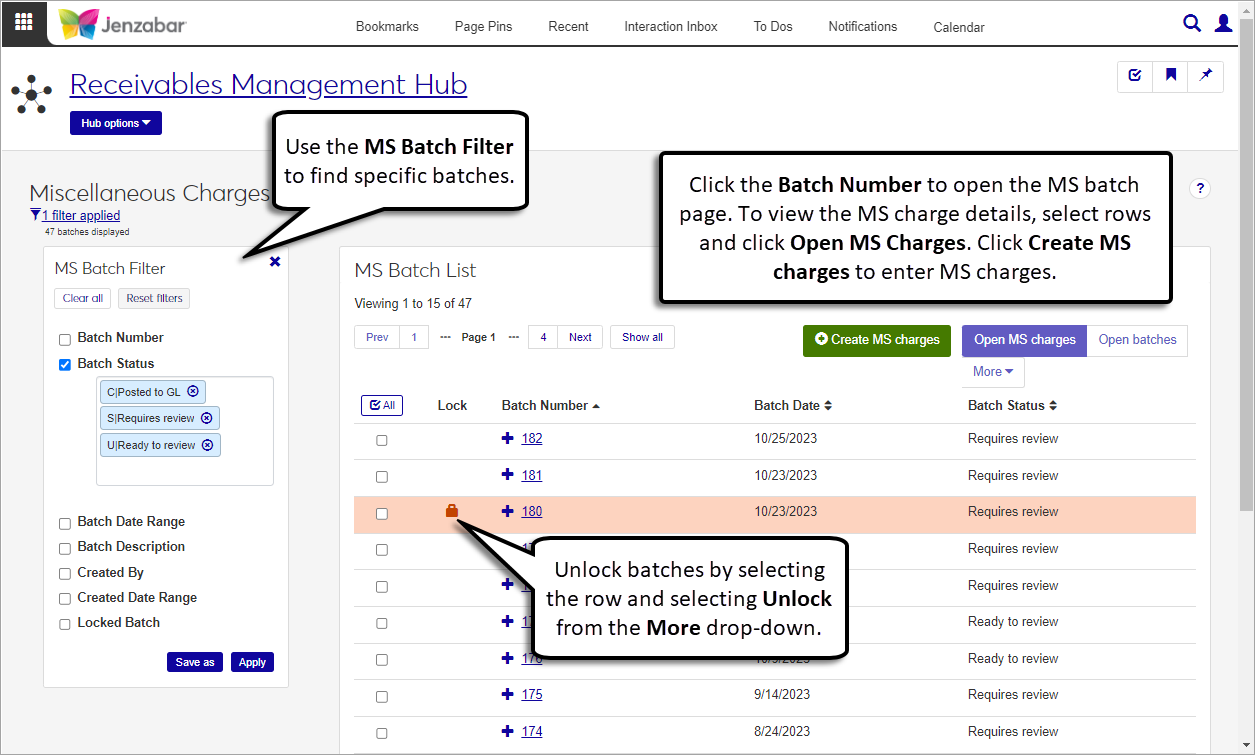 |
Miscellaneous Charges (New button > A/R Charge Entry) | Receivables Management Hub options > Create miscellaneous charges 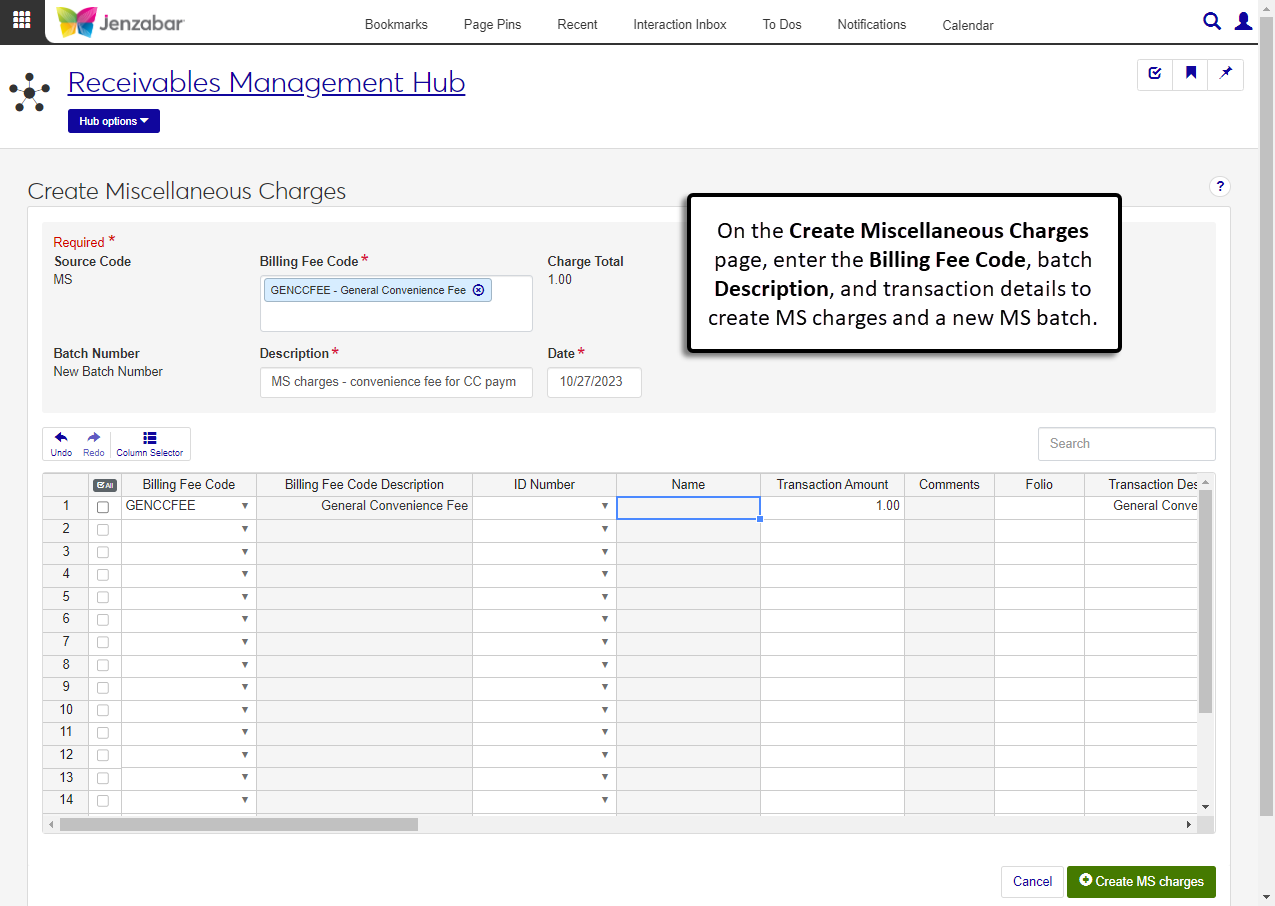 |
Miscellaneous Charges (Edit details button > A/R Charge Entry) | Miscellaneous Charges page > Select one or more rows and click Open MS charges 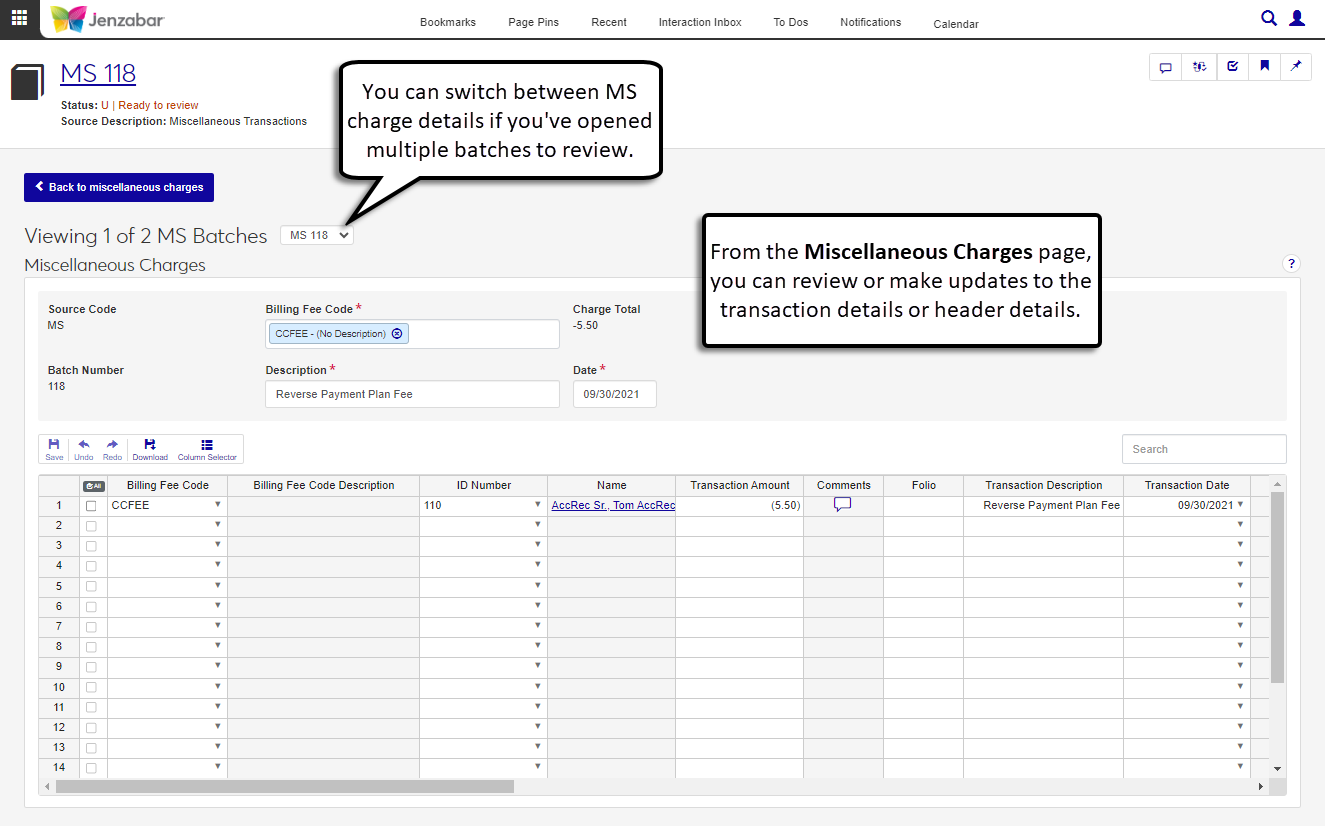 |
Student Information Impacting Charges | Student Accounts List page > Select one or more students and open the Student Information Details or Person Information Details page 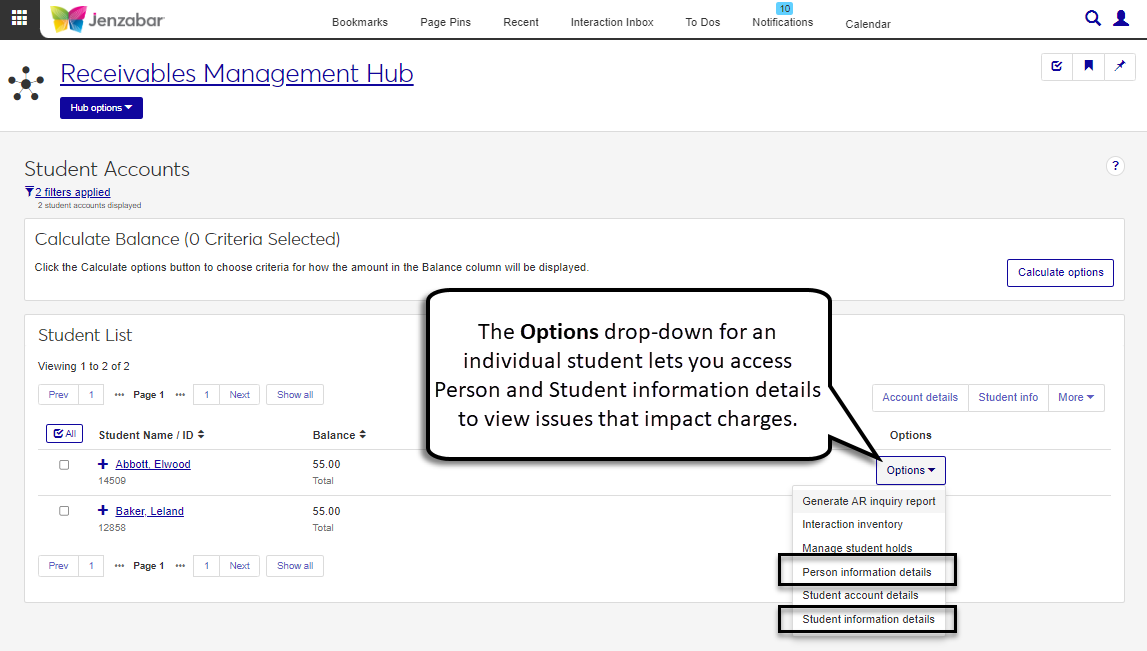 |
View Student Hours | Student Billing Hours 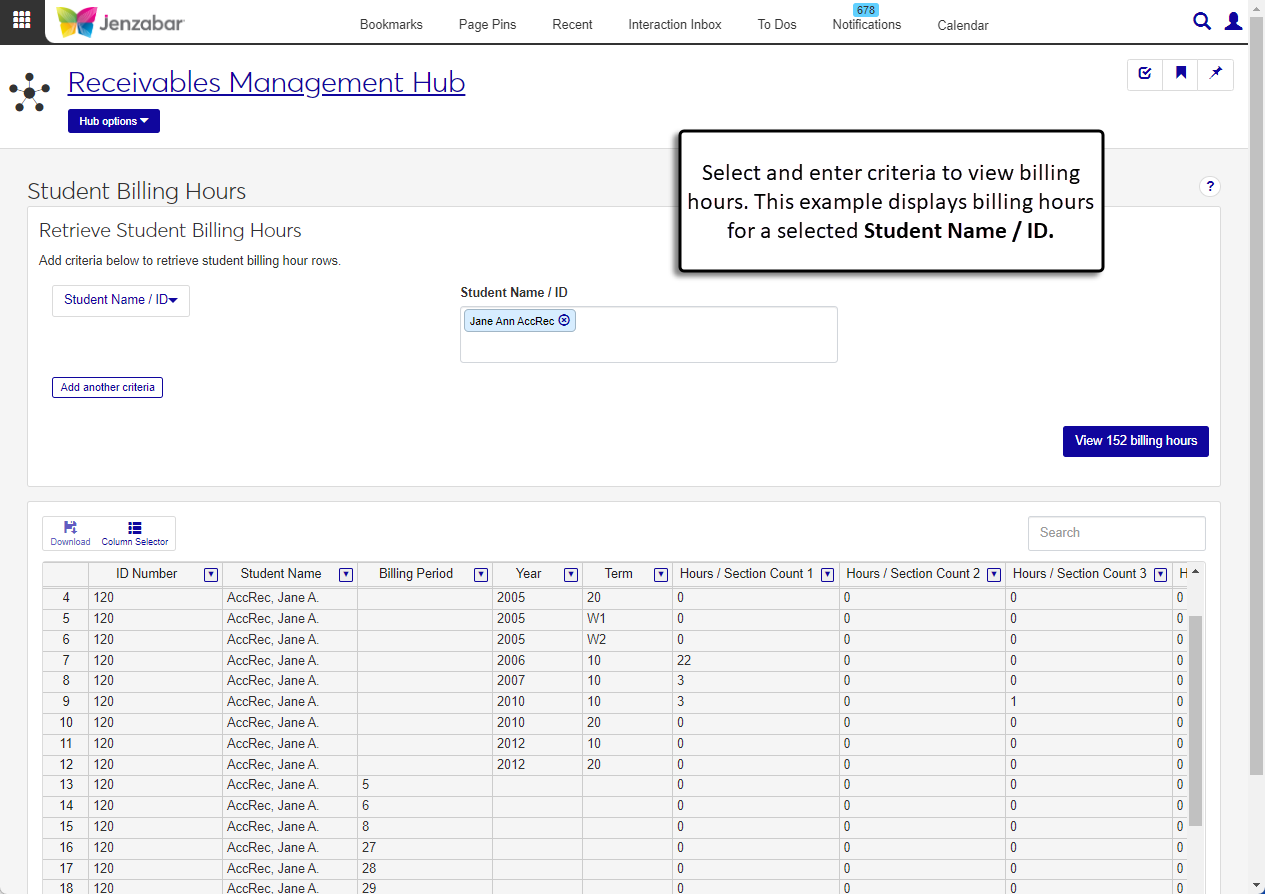 |
View Fees | Fees 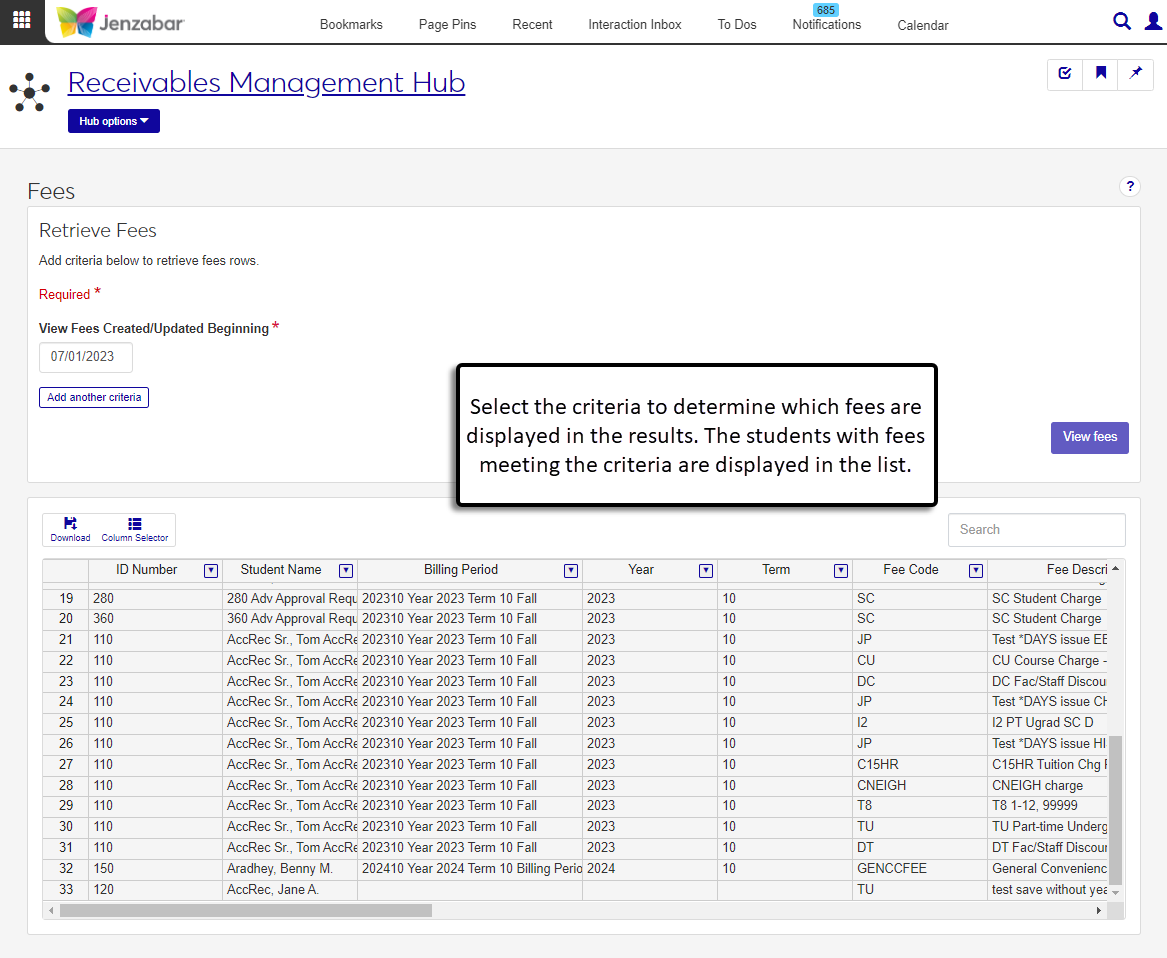 |
View Student Data | Student Billing Data 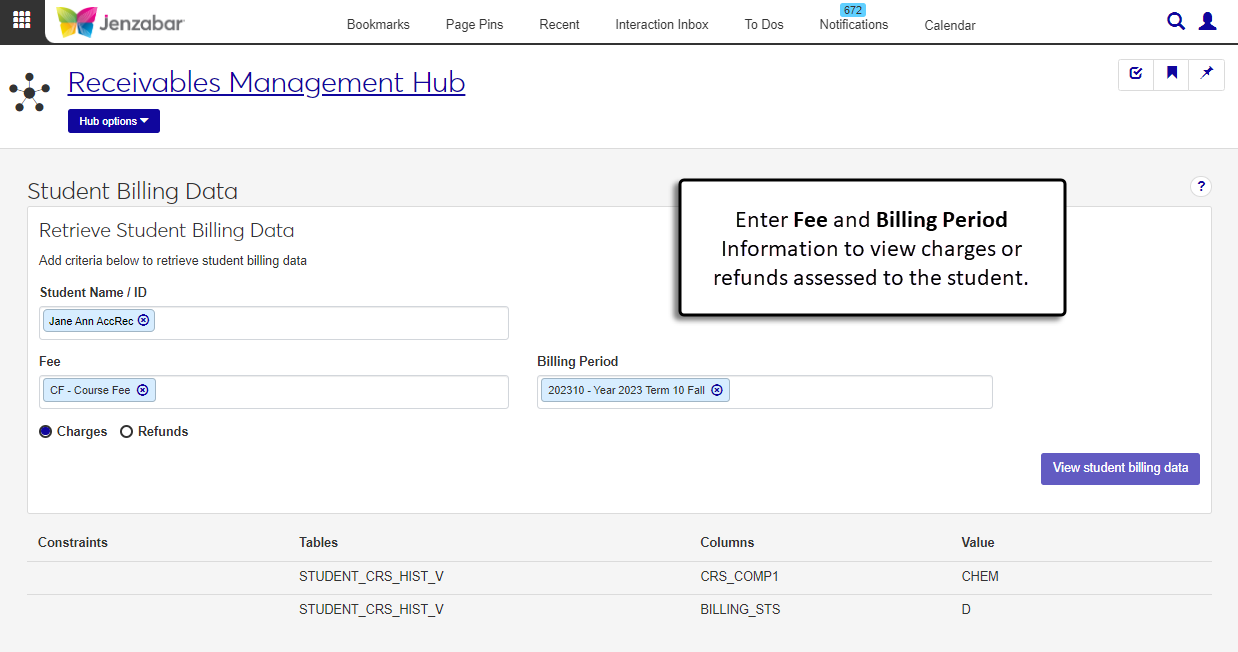 |
Receipts
Access to work with receipts in J1 Web is managed by roles and permissions. To view pages and make updates to information in the system, users must be in the appropriate roles (similar to a Group ID in Desktop) with permissions enabled. The following roles and permissions are needed for users who process payments and enter receipts.
Note
The roles and permissions listed below are the recommended roles for users who enter receipts. Your school may have additional (or fewer) roles and permissions assigned to people who work with receipts.
Receivables Management Role
The default Receivables Management role provides the following permissions to work with receipts. Administrators and module managers can grant users some or all of these permissions based on their daily responsibilities.
Tip
Jenzabar recommends creating copies of the default role to manage user permissions at your school. Depending on your school's processes, you may have various copies of a role that grants different sets of users certain permissions to work with receipts.
Permission | Users in this role can. . . |
|---|---|
Can view receipts | Access the Receipts list page and generate receipt files. |
Can create and import receipts | Create receipts for payments and import receipt information from external files. |
Can edit receipts | Update receipt header and transaction details. |
Can delete receipts | Remove receipts from the system. |
Can generate reconciliation report | Review the payments received for specified receipt batches. |
Can manage receipts numbers | Determine how receipt numbers are assigned in your system. |
Can download to Excel | Download receipt information to Excel. |
General Ledger Accounting Roles
Receipts are associated with GL accounts and can also be associated with project codes. To view GL account information and access project codes on receipt pages, users must be in one or more of the following General Ledger Accounting Hub roles (or roles copied from these roles) with the noted permissions.
General Ledger Accounting GL Account Component Access role, with "Can view all GL accounts (unrestricted)" permission
General Ledger Accounting GL Account Alternate Code Access role, with "Can view all GL accounts (unrestricted)" permission
General Ledger Accounting Project Access role, with "Can view all projects (unrestricted)" permission
Note
The permissions outlined here assume that users entering receipts should be able to select from all GL accounts and project codes in your system. If you need to restrict user access to one or a few accounts or project codes, you'll need to enable those specific codes on the Associations tab and select "Can view only GL accounts/projects enabled by associations (restricted)" on the Permissions tab.
Viewing Receipt Batches
Receipt (RC) batches are automatically created when a new receipt is entered. Batch details are maintained in the General Ledger Accounting hub. To access RC batch information, users must be in the following role (or a copy of it) with the noted permission.
General Ledger Accounting Receipt Batches role, with the "Can view batches" and "Can download to Excel" permissions
Common Roles
In addition to the functionality in the Receivables Management hub, users who work with receipts may also need access to view, update, or add person and organization information. To perform these actions, they'll need to be in one or more of the roles outlined below.
Role | Permissions |
|---|---|
Person Management |
|
Organization Management |
|
External Person Management |
|
External Organization Management |
|
Communication Management Base |
|
The table below lists the Desktop window and the corresponding J1 Web page where that functionality is available. Receipt information can be accessed in the Finance, Receivables Management hub.
Desktop Window | J1 Web Page |
|---|---|
Receipt Entry | Receipts  |
Receipt Entry Detail (from Receipt Entry > New Detail) | Create Receipt (accessed from Finance > Receivables Management Hub options > Create receipt or from the Receipt List page by clicking the Create receipt button) 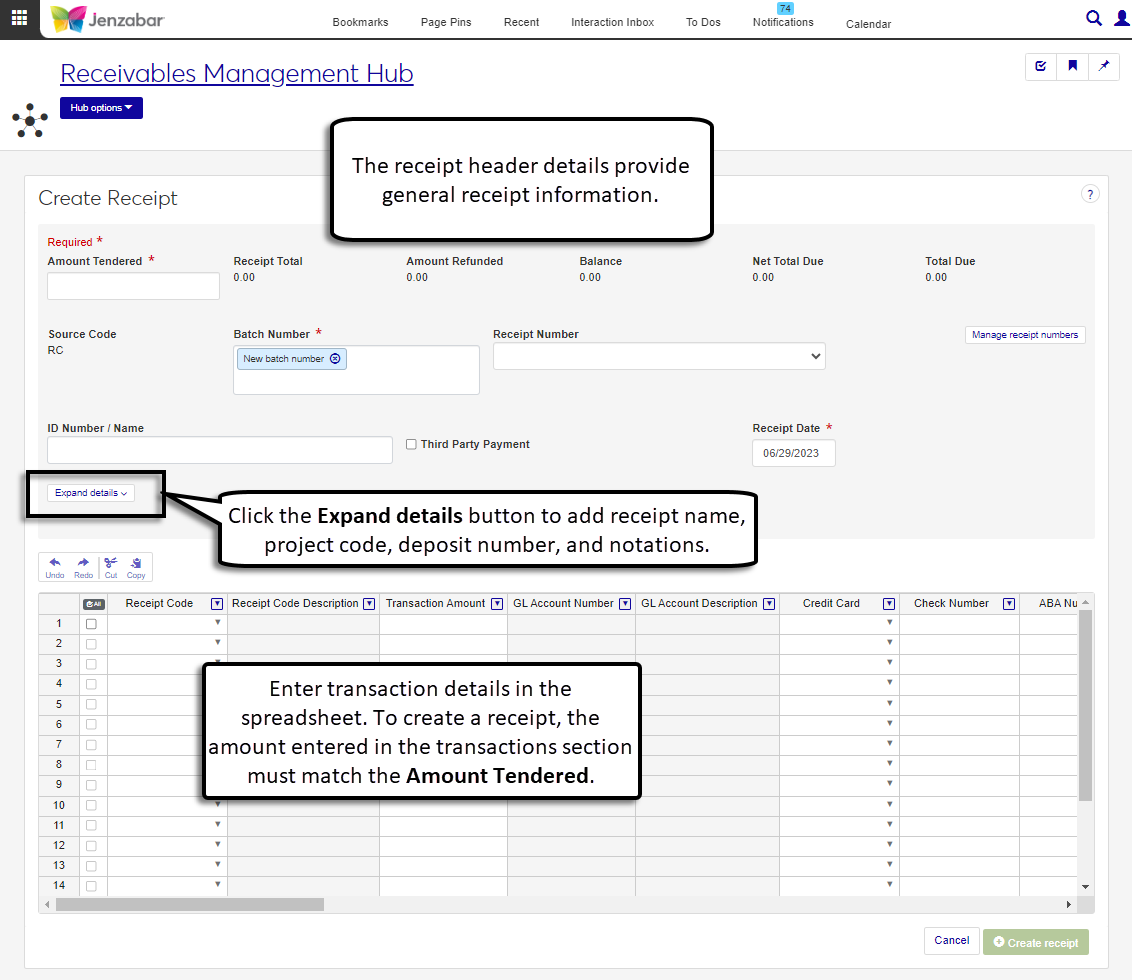 |
Receipt Entry Detail (from Receipt Entry > Edit Detail) | Receipt Header & Details (accessed from Finance > Receivables Management Hub options > Receipts page and clicking the Receipt Number link) 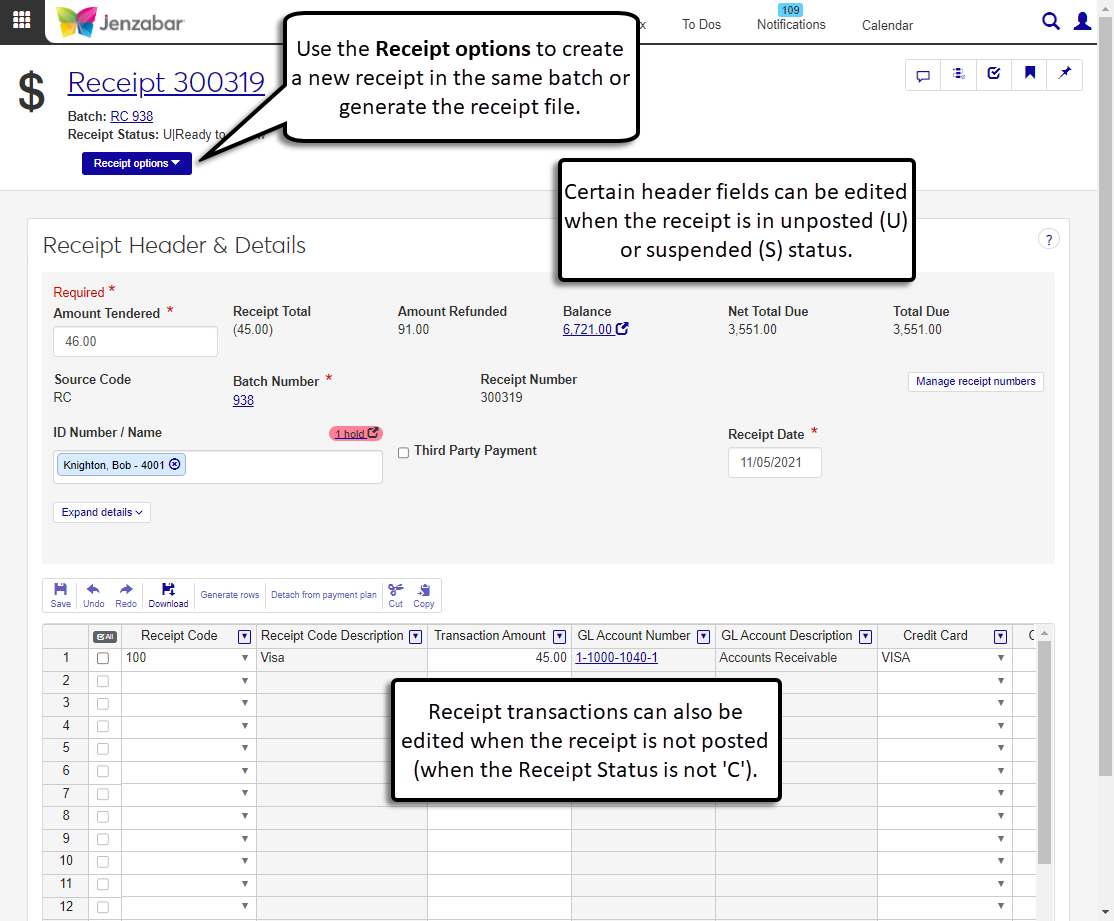 |
Checks Received Groups | Receipts NoteTo generate the Checks Received (also called the Payments Received report), click the Reconcile button on the Receipts page. The Checks Received Groups window lists receipt (RC) batches. In J1 Web, receipt batch details are maintained in the General Ledger Accounting hub. You can access batch details for a specific receipt from the Receipt List page by clicking the Batch Number link. |
Example Role Setup for Receivables Management Users
Below are some example roles and permissions for users in typical finance positions. Jenzabar recommends copying the default roles and assigning users to the copied roles. In the examples below, the role naming convention for copied roles is "[Position Code] - [Default role name]". It's recommended that you develop a naming convention for copied roles, as there will likely be several copies of each role in your system.
 | Amanda is the AR Manager for the Student Accounts office. She's in an AR Manager position with the following roles and permissions. |
The following roles and permissions let Amanda view and manage general information about students as she works with student account information. Some student accounts are paid via third-party organizations, so she also needs access to view organizations.
Note
Module Access doesn't need to be turned on for any of the Common roles.
Role | Permissions |
|---|---|
ARMGR - Person Management |
|
ARMGR - Organization Management |
|
ARMGR - External Person Management |
|
ARMGR - External Organization Management |
|
FINANCE - Communication Management Base |
|
The following roles and permissions let Amanda access GL account details and batch information for student account transactions.
Note
Module Access should be turned on for the GENERALLEDGER code for at least one of the roles below.
Role | Permissions | Associations |
|---|---|---|
ARMGR - General Ledger Accounting GL Account Component Access |
| Access turned on for component combinations associated with student-related accounts |
ARMGR - General Ledger Accounting GL Account Alternate Code Access |
| Access turned on for security codes associated with student-related accounts |
ARMGR - General Ledger Accounting Charge Batches |
| Access turned on for CG, FC, IT, and TP source codes |
ARMGR - General Ledger Accounting Financial Aid Batches |
| Access turned on for FA, LD, and LO source codes |
ARMGR - General Ledger Accounting Miscellaneous Batches |
| n/a |
ARMGR - General Ledger Accounting Preliminary Batches |
| Access turned on for @C and @F source codes |
ARMGR - General Ledger Accounting Receipt Batches |
| n/a |
The following roles and permissions let Amanda manage student accounts, receipts, miscellaneous charges, and users that work in the Receivables Management hub.
Role | Permissions | Module Access |
|---|---|---|
ARMGR - Receivables Management |
| Access turned on for the ACCOUNTSRECEIVABLE code |
ARMGR - Accounts Receivable User and Role Management |
| n/a |
ARMGR - Receivables Administration | All permissions | n/a |
To access the Student Information Details page, Amanda is in the following Registration module roles.
Role | Permissions |
|---|---|
ARMGR - Registration - Access to All Students |
|
ARMGR - Registrars |
|
 | Steve is a cashier in the Student Accounts office. He's in a Cashier position with the following roles and permissions. |
The following roles and permissions let Steve view general information about students as he works with student account information. Some student accounts are paid via third-party organizations, so he also needs access to view organizations and external organizations.
Note
Module Access doesn't need to be turned on for any of the Common roles.
Role | Permissions |
|---|---|
CASHIER - Person Management |
|
CASHIER - Organization Management |
|
CASHIER - External Person Management |
|
CASHIER - External Organization Management |
|
CASHIER - Communication Management Base |
|
The following roles and permissions let Steve access GL account details for student account transactions and to record receipts. He may also record receipts associated with a project code, so he also needs access to view project codes.
Note
Module Access should be turned on for the GENERALLEDGER code for at least one of the roles below.
Role | Permissions | Associations |
|---|---|---|
CASHIER - General Ledger Accounting GL Account Component Access |
| Access turned on for component combinations associated with student-related accounts |
CASHIER - General Ledger Accounting GL Account Alternate Code Access |
| Access turned on for security codes associated with student-related accounts |
CASHIER - General Ledger Accounting Project Access | Can view all projects (unrestricted) | Access turned on for all project codes |
CASHIER - General Ledger Accounting Receipt Batches | Can view and download batches | n/a |
The following roles and permissions let Steve manage student accounts, receipts, miscellaneous charges, and users that work in the Receivables Management hub.
Role | Permissions | Module Access |
|---|---|---|
CASHIER - Receivables Management |
| Access turned on for the ACCOUNTSRECEIVABLE code |
To access the Student Information Details page, Steve is in the following Registration module roles.
Role | Permissions |
|---|---|
CASHIER - Registration - Access to All Students |
|
CASHIER - Registrars |
|
Additional Resources
Tip
These resources and more are available on the MyJenzabar Accounts Receivables Resource Center.
Working with Student Accounts in J1 Web Transition Guide
Processing Payments and Entering Receipts in J1 Web
J1 Web Finance Permissions Overview and Setup Guide
