Alternative GPA Setup
Most of the setup for Alternative GPA is on the Repeat, Transcript, and GPA Settings page. There are also some definitions to maintain and some work to do with catalog courses.
Brief instructions are given here up front to get you on your way quickly. If you need more comprehensive information, the reference topics are linked.
The Repeat, Transcript, and GPA Settings page lets you create the two alternative GPAs and set parameters for GPAs, transcripts, and repeat courses.
From the Registration Administration hub options, select Settings.
Click Repeat, transcript, and GPA settings. The Repeat, Transcript, and GPA Settings page opens.
Scroll down, or click the anchor link to the GPA Configuration section.
Click the Edit this section button.
Select the checkbox for Use Alt 1 GPA. This turns on the first alternative GPA field.
Edit the Short Display Label as desired. Example: alt1
Edit the Long Display Label as desired. Example: Alternative 1
Truncate Alt 1 GPA instead of rounding it: Select the checkbox if your school truncates rather than rounds GPA decimals.
Decimal Places in Alt 1 GPA: Enter a number 1–4.
Select checkboxes for the Transcript Options you want for Alt 1 GPA.
Make selections and edits for Alt 2 GPA as desired.
Click the Save this section button.
Make sure the other settings on this page are set.
Tip
For full instructions on these settings, see the Repeat, Transcript, and GPA Settings topic.
The hours for Forgiven and Not Forgiven repeat courses can be ignored or tracked in various combinations for both of the alternate GPAs.
From the Registration Administration hub, click Hub options.
Click Manage definitions, and select Forgiven course recalc definitions. The Forgiven Course Recalc Definitions page opens.
On the row for FL ("Forgiven Logic" if your school hasn't edited the Description), click the Edit icon
 . The Edit pop-up opens.
In the Add to Alt 1 Hours section (label may vary because of your school's edits), select Yes or No in each drop-down to track them in the Alt 1 GPA records for Attempted hours, Earned hours, and GPA hours.
Do the same in the Add to Alt 2 Hours drop-downs.
Click Update.
On the row for NFL ("Not Forgiven Logic" if your school hasn't edited the Description), click the Edit icon
. The Edit pop-up opens. Make selections for Add to Alt 1 and Add to Alt 2. Click Update.Tip
For full instructions, see the Forgiven Course Recalc Definitions topic.
How to Select Forgiven and Not Forgiven Logic for Each Credit Type
Double-check each credit type's forgiven and not forgiven logic so that repeated and forgiven courses work correctly in both alternative GPAs.
From the Registration Administration hub, click Hub options.
Click Manage definitions, and select Credit type definitions. The Credit Type Definitions page opens.
Check each credit type. Each should have Not Forgiven Course Logic* in the Not Forgiven Logic column, and Forgiven Course Logic* in the Forgiven Logic column unless you have a custom logic scheme set up. (*Your school may have edited the description of Not Forgiven Course Logic and Forgiven Course Logic.)
If you need to make corrections, click the Edit icon
on a row. Make the edits, and click Update. Tip
For complete instructions, see the Credit Type Definitions topic.
Each course in your catalog needs a repeat limit so that the repeat and forgiven logic works correctly.
Tip
Individual course limits are called Times May Be Taken. These work in conjunction with the general Forgiven Course Limits and other repeat logic that's set on the Repeat, Transcript, and GPA Settings page.
To set the same limit multiple courses at once:
Access the Manage Catalog Courses page, Hours view.
Use the filter to find the courses you want to edit.
Select the checkboxes for the courses.
Click Options, and then click Edit selected. The edit pop-up opens with the selected courses showing.
Under Select a Detail to Update, select Times May Be Taken or Lab Times May Be Taken.
In the next field, enter the number of times the course can be taken (the original plus the repeat attempts).
Click Update.
Tip
For complete instructions, see the Manage Catalog Courses topic.
To set the limit for one course at a time:
Access the Manage Catalog Courses page.
Use the filter to find the course you want to edit.
On the course's row, click the Actions button, and select Manage course details. The course's Manage Course Details page opens.
Select the Hours tab.
Click the Edit details button.
In the Times May Be Taken and/or Lab Times May Be Taken field, enter a number. (The number should be the original plus the repeats allowed to equal the total number of times a student can attempt the course.)
Click the Done editing button. Your changes are saved.
Tip
For complete instructions, see the Manage Catalog Course Details topic.
Select which repeat flags (such as *, #, and R) trigger using the Repeat Grade to Print.
A typical setup:
* (Forgiven): On. Forgiven instances use Repeat Grade to Print.
# (Not Forgiven): Off. Not forgiven instances use the regular grade.
R (Repeat): Off. Repeat instances use the regular grade.
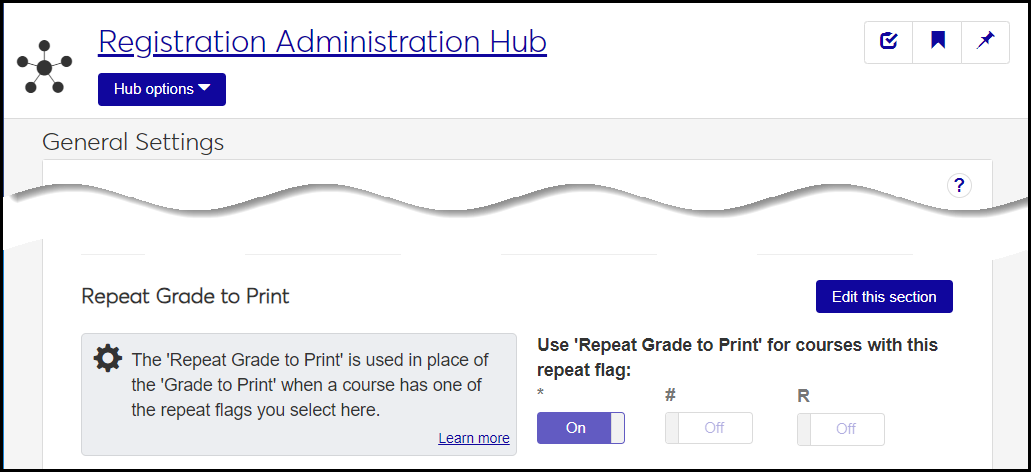
On the Registration Administration hub, click Hub options. Select Settings and then General settings. The General Settings page opens.
In the Repeat Grade to Print section, if any buttons are off that you want on
Click the Edit this section button.
Click the buttons to switch them to On or Off.
Click the Save this section button.
Tip
For complete instructions, see the Repeat Grade to Print Settings topic.
For each grade that might be a repeat grade, enter a Repeat Grade to Print. (Most grades could be a repeat grade, but perhaps Audit wouldn't be, for example.)
From the Registration Administration hub, click Hub options.
Click Manage definitions, and select Grade table definitions. The Grade Table Definitions page opens.
For each grade that you need to edit, click the Edit icon
.In the Repeat Grade to Print drop-down, select a grade.
Scroll down or click the anchor link to Repeat Grade to Print.
Click the Update button.
Tip
The Repeat Grade to Print you select here is used for the instances (such as *Forgiven) that you selected above in the instructions for "How to Set the Repeat Grade to Print Feature for the Repeat Flags".
For complete instructions, see the Grade Table Definitions topic.