Communication Management Settings
Important
Information and features vary according to the roles to which you belong and the permissions associated with those roles. For more information, contact your module manager or your campus support team.
Use the Communication Management Settings page to determine who is assigned to phone numbers and email addresses and grant designated users temporary access. You can also manage call forwarding, the texting grace period, initial text message wording, and document mail merge settings for all of J1 Web Communications.
*Available with Communications Plus.
To access the Communication Management Settings page, users must belong to a Communication Management Base role with the Can manage settings permission enabled.
*Available with Communications Plus.
Numbers purchased from Twilio are displayed on the Communication Management, Settings page, Phone Numbers tab. They can be used to receive and send text interactions as well as make and receive calls from within the system. Options let you manage who is assigned to the phone numbers your school is using and manage forwarding options.
One or more users can be assigned to a number as well as be granted temporary access to a number. Temporary access can be useful for seasonal or student staff, adjuncts, proxies for faculty on sabbatical, etc.
When one or more users are assigned to a number, they can see all the texts and calls to and from that number in the shared interaction inbox. To ensure recipients don’t receive multiple or overlapping messages or multiple users answer the same incoming call, shared numbers are locked when one of the individuals assigned to it is using it.
Tip
To assign an individual to a phone number, they must be in the system and an active J1 Web user.
Schools using Twilio can make and receive phone calls from J1 Web. Calls can also be forwarded to a recorded message.
To make and receive calls users must:
Be assigned to a voice-enabled Twilio number with call forwarding configured
Belong to a role with access to phone call/To Do phone call interactions
When a call comes into a Twilio number that is forwarded to another number such as a cell phone or desk phone, an incoming call notification appears on your screen with options to view known information about the caller and answer the call.
Once answered, the call can be answered and assigned an interaction code to save the conversation in the system for reference.
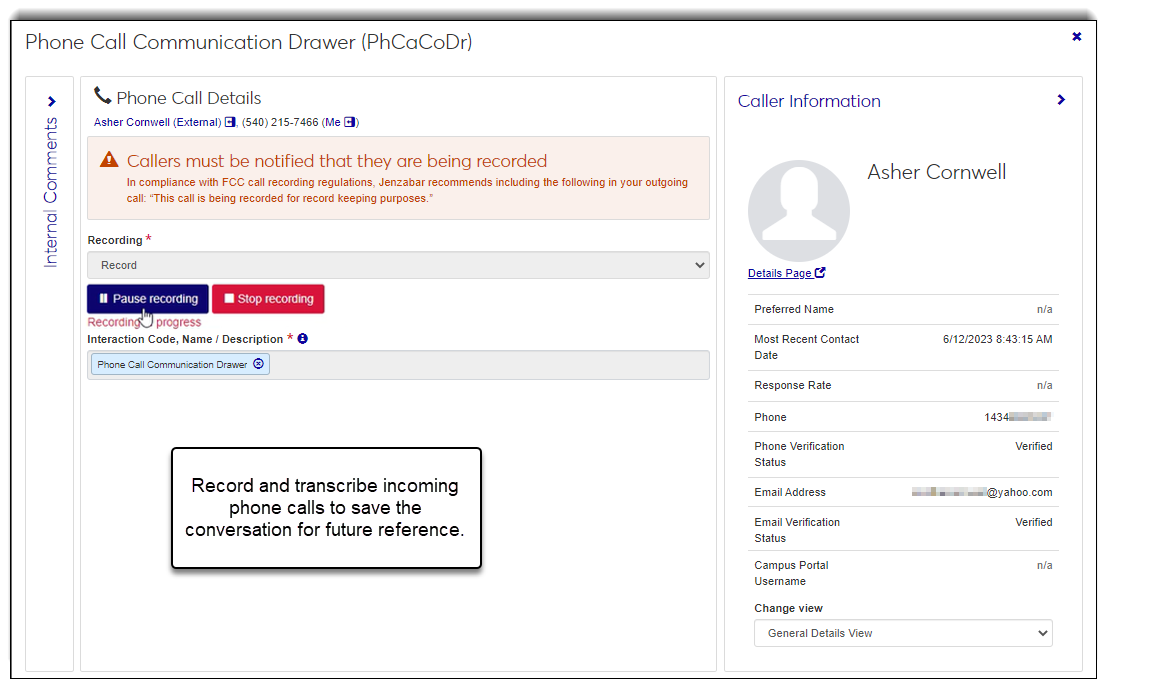

When a call comes into a Twilio number, you can redirect it to a pre-recorded message.
Note
Chatbot options are available when J1 Web has set up the integration using the System Administration, Communications, Chatbot Integration setting.
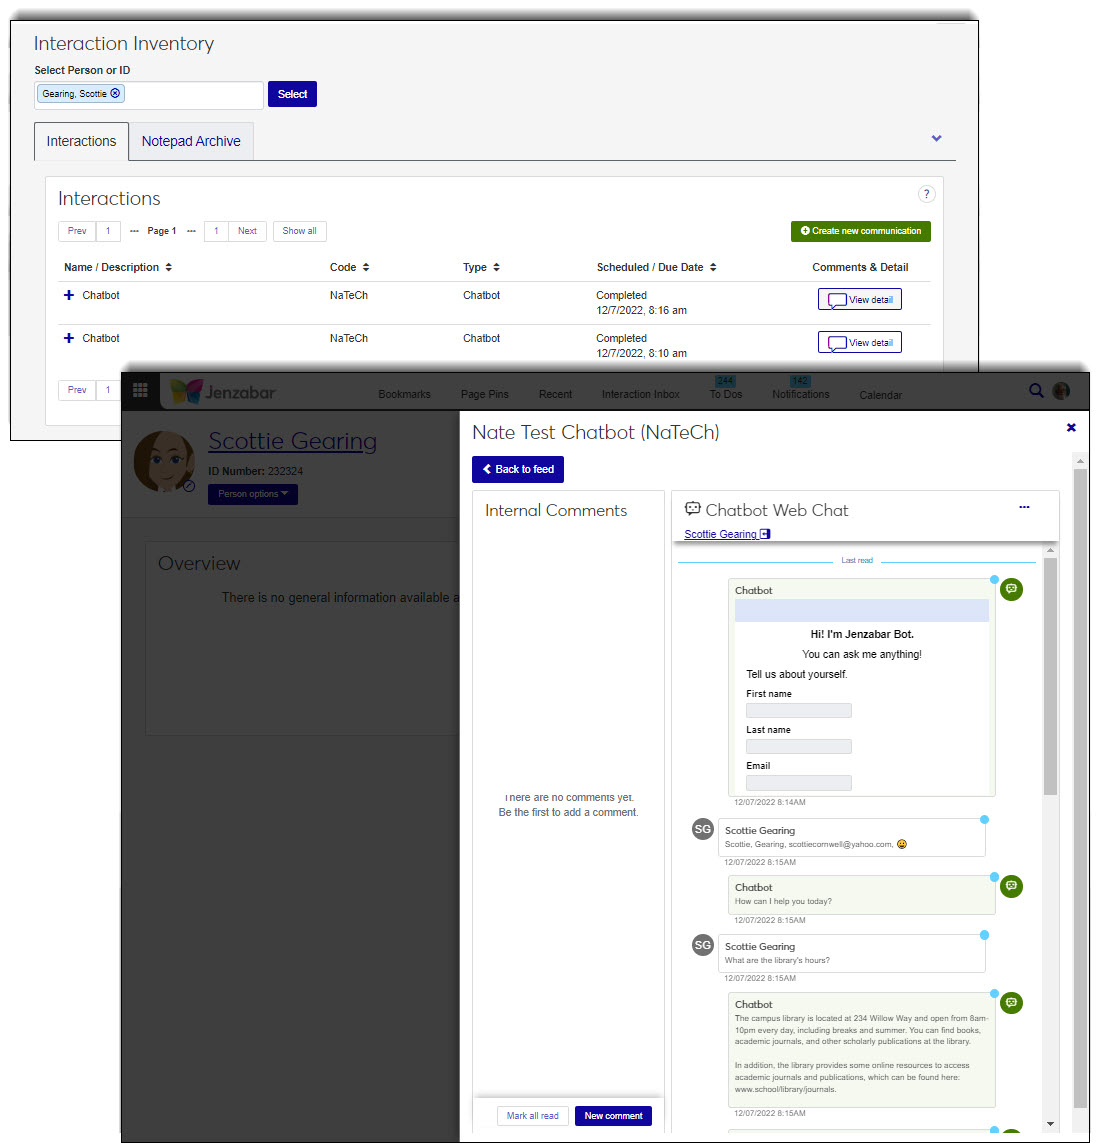
You can leverage Chatbot's knowledge base to reply to incoming text messages. This can be helpful if you have a common number that receives a high volume of general questions. For example, a number shared by your registration department that receives a high number of questions about registration time frames.
his will send the individuals assigned to the number a message alerting them when the Chatbot is unable to answer a question and human intervention is needed.
A Confidence setting lets you determine the probability Chatbot will provide the correct answer. The higher the confidence level, the less human intervention is needed.
The Response Attempts lets you determine how many times you want the Chatbot to try and reply before notifying individuals human intervention is needed. When Chatbot cannot answer the incoming question, individuals assigned to the number receive a 'Chatbot Assistance Required' notification and see warning icons in the Interaction Inbox. Anyone assigned to the number can reply and because these are text threads, when more than one user is assigned to the number, the conversation is locked to the person responding to prevent overlap.
Note
To determine the best confidence and response attempt configurations for your system, Jenzabar recommends working with your Chatbot administrator to understand how complex and robust the question and answer database is for your school's Chatbot.
Available to schools using Jenzabar Chatbot and with the integration configured in System Administration, System Settings, Communications.
When Chatbot is enabled, its knowledge base can be leveraged to answer frequently asked questions. Individuals assigned to the number and interaction can view the exchange and will be notified when the Chatbot cannot provide the best response and human intervention is needed.
Note
To determine the best configurations for your system, Jenzabar recommends working with your Chatbot administrator to understand how complex and robust the question and answer database is for your school's Chatbot.
From J1 Web, access the Communication Management hub, Settings page.
Select the Phone Numbers tab.
Using filter and sort options, find the number you want to manage the Chatbot settings for.
From the Actions drop-down, select Manage Chatbot. The Manage Chatbot window appears.
To enable Chatbot, click the Disabled option.
Click the Disabledoption.
From the Confidence drop-down, select Very high, High or Medium.
This determines the probability Chatbot can provide the correct answer. A higher score means the Chatbot can provide more accurate answers with less human intervention.
From the Response Attempts drop-down, select the number of response attempts you want the Chatbot to take to answer a question before alerting the individuals assigned to the number that human intervention is needed.
To disable Chatbot, click the Enabled option. Chatbot is disabled.
Click the Save changes button.
From the left-hand navigation panel, select Core, Communication Management hub, Settings.
From the global search, select System page and enter Settings.
If you don't see the Communication Management Settings page listed immediately, click More results. The Search Results page appears where you can find the page and link to it.
There are several ways to find a number or user associated with a phone number:
Use the filter options.
Select as many filter options as you want to narrow down your search results and click Apply.
To remove the filters and view the full list of codes, click Clear all and then click Apply.
Use the column heading buttons to sort.
*Available with Communications Plus.
When users are assigned to a phone number, they can:
Send and receive text messages within the system
View and respond to text messages in the Interaction Inbox
If more than one user is assigned to the number, they can see all the text interactions associated with it in the shared Interaction Inbox.
When users are assigned to a forwarded phone number, they can:
Answer and make phone calls from within the system
View phone calls in the Interaction Inbox
If more than one user is assigned to the number, they can see all the phone calls associated with it in the shared Interaction Inbox.
From J1 Web, access the Communication Management hub, Settings page.
Select the Phone Numbers tab.
Using filter and sort options, find the number you want to add or remove users to.
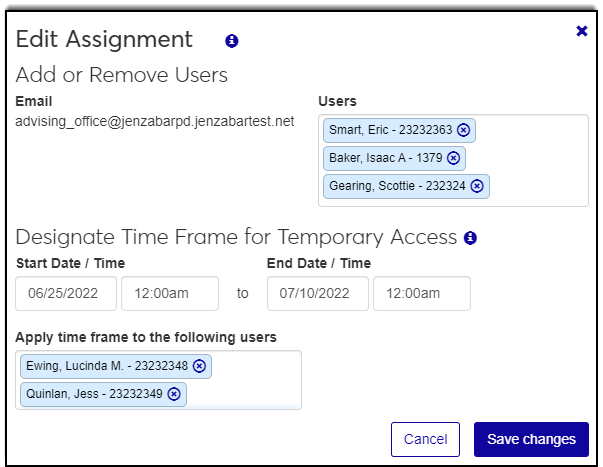
From the Actions drop-down, select Edit assignment. The Edit Assignment window appears.
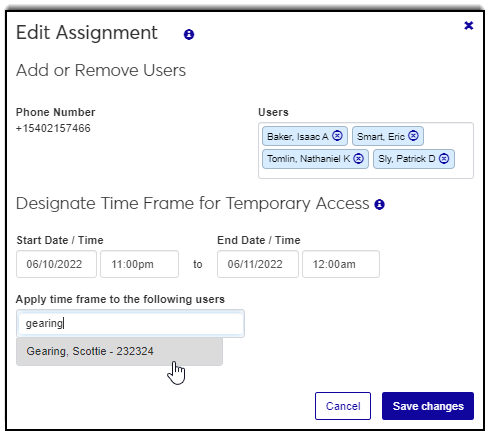
To add a user, start typing their name in the User field and select from the options that appear.
Note
To assign a user to a phone number, they must be in the system and an active J1 Web user.
To remove a user, click the x icon next to their name in the Users field.
Texts they sent and phone calls they made or answered can still be seen seen on recipients' records from the Interaction Inventory and feed. If the user shared the number with other users, they can still see the texts and phone calls in the shared Interaction Inbox.
Warning
When a user is removed from a number, any texts they have scheduled to go out will not be delivered.
To grant a user temporary access to the number:
Use the start and end date and time options to determine when the user can use the number for working with text and phone call interactions.
To add a user, start typing their name in the Apply time frame to the following users field and select from the options that appear.
To remove a user's temporary access to the number, click the x icon next to their name in he Apply time frame to the following users field. Texts they sent and phone calls they made can still be seen seen on recipients' records from the Interaction Inventory and feed. If the user shared the number with other users, they can still see the texts in the shared Interaction Inbox.
Warning
When a user is removed from a number, any texts they have scheduled to go out will not be delivered.
Click the Save changes button. Your updates are saved and the Edit Assignment window closes.
Note
To assign a user to a phone number, they must be in the system and an active J1 Web user.
Temporary access can be useful for seasonal or student staff, adjuncts, proxies for faculty on sabbatical, etc.
From J1 Web, access the Communication Management hub, Settings page.
Select the Phone Numbers tab.
Using filter and sort options, find the number you want to grant or remove a user access to.
From the Actions drop-down, select Edit assignment. The Edit Assignment window appears.
To grant a user temporary access to the number:
Use the start and end date and time options to determine when the user can use the number for working with text interactions.
To add a user, start typing their name in the Apply time frame to the following users field and select from the options that appear.
To remove a user's temporary access to the number, click the x icon next to their name in he Apply time frame to the following users field. Texts they sent and phone calls they made can still be seen seen on recipients' records from the Interaction Inventory and feed. If the user shared the number with other users, they can still see the texts and calls in the shared Interaction Inbox.
Warning
When a user is removed from a number, any texts they have scheduled to go out will not be delivered.
Click the Save changes button. Your updates are saved and the Edit Assignment window closes.
From J1 Web, access the Communication Management hub, Settings page.
Select the Phone Numbers tab.
Using filter and sort options, find the number you want to forward.
From the Actions drop-down, select Edit forwards. The Edit Forwards window appears.
To forward incoming calls to a voice-capable phone:
Note
Twilio charges for forwarding calls to a voice-capable phone. For more information, see Twilio's "How Much am I Charged for Call Forwarding with Twilio" help topic.
Select Forward calls.
In the Forward calls to field, start typing and select the number you want to forward calls to. Only valid numbers in the PhoneMaster table can be selected.
Note
PhoneMaster numbers are managed on the Person Information Details page, Contact Info tab, Phone Number section.
Click Save changes. Your changes are saved and the Edit Forwards window closes.
To play a recorded message to incoming calls:
Note
Recorded messages are uploaded as .MP3 files. To upload an .MP3, the .MP3 file extension must be enabled on the Desktop Make File Extensions Available window.
Select Upload a recording. The upload option appears.
Click Choose file. Windows explorer opens.
Browse to and select the recorded message .MP3 file you want to play to incoming calls.
Note
The maximum allowed file size is determined on the Desktop Make File Extensions Available window.
Click Open or Select. Windows explorer closes and the name of selected .MP3 file is shown.
Click Save changes. Your changes are saved and the Edit Forwards window closes.
To disable call forwarding:
Click the x icon next to the number you are forwarding to in the Forward calls to field or the .MP3 file name in the Recording to upload field.
Click the Save changes button. Your updates are saved and the Edit Forwards window closes.
When you remove all users assigned to a number, the number remains active, but the number can no longer be used to send/receive texts or make/receive phone calls. This includes scheduled texts that are scheduled but haven’t been sent yet.
Users previously associated with the number can still see the text exchanges and phone calls from the Interaction Inventory, Interaction Inbox, and feed.*
*Available with Communications Plus.
From J1 Web, access the Communication Management hub, Settings page.
Select the Phone Numbers tab.
Using the available filter options, find the number you want to remove all users from.
From the Actions drop-down, select Remove all users. The Remove all users window appears.
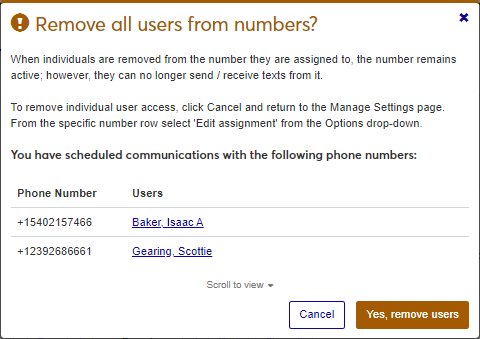
Click the Yes, remove users button. Your updates are saved and the Remove all users window closes.
There is no limit. You can add as many users to a number as you want.
Ensure the .MP3 file extension is enabled and that your file doesn't exceed the maximum allowed file size on the Desktop Make File Extensions Available window.
*Available with Communications Plus.
Texting settings control the texting grace period and content sent in the first message a text recipient receives.
When multiple users are assigned to a phone number, the texting grace period determines how long a shared number will be locked when one of the individuals assigned to it is using it. This ensures recipients don’t receive multiple or overlapping messages. Messages scheduled for sending to a different thread will not be delivered until the active thread is closed.
From J1 Web, access the Communication Management hub, Settings page.
Select the Texting tab.
In the Grace Period section, Minutes for text number to remain locked field, enter the number of minutes you want a shared number to be locked when one of the users is responding. This ensures only one user responds at a time.
Click Save .
Texting Template
Before a recipient receives their first text interaction, a welcome text is sent that includes an opt out option. The Texting Template options let you customize the welcome message. Jenzabar recommends messages be under 160 characters and per federal government guidelines, include information about opting out.
Tip
Up to 1600 characters can be entered, but only 160 characters can be sent in a text at a time. If a message exceeds 160 characters, it is broken up into multiple texts.
From J1 Web, access the Communication Management hub, Settings page.
Select the Texting tab.
In the Texting Template section, Welcome Message with Opt Out field, enter a welcome message and information about opting out from receiving future text messages. Example: You will begin receiving texts from Jenzabar University, if you would prefer to not receive texts, please reply with STOP/UNSUBSCRIBE.
Note
Texts are limited to 160 characters. You can enter up 1,600 characters of content, but multiple messages will be sent in 160-character chunks.
Click Save.
*Available with Communications Plus.
Email addresses J1 Web users use for sending and responding to emails appear on the Email Assignments tab. The Email Assignment settings determine who is assigned to the email addresses your school uses for sending and responding to email interactions. You can create and assign multiple users to a shared email address, which can be used to handle departmental emails.
For example, you can create a shared admissions email address and assign multiple admissions officers to it. They can access a shared inbox where everyone assigned to the email address can see any communications associated May have general admission and general inbox multiple users can
be able to and temporary access settings let you grant temporary access to designated users. This can be useful for seasonal or student staff, adjuncts, proxies for faculty on sabbatical.
Tip
To assign an individual to an email address, they must be in the system and an active J1 Web user.
There are several ways to find an email assignment:
Use filter options.
Select as many filter options as you want to narrow down your search results and click Apply.
To remove the filters and view the full list of the email assignments, click Clear all and then click Apply.
Use the column heading buttons to sort.
When you create a new email assignment, you are creating a new subdomain in J1 Web. If your school already has shared inboxes or distribution lists in Outlook, Jenzabar recommends creating new ones in J1 Web to associate exchanges and information with records in the system and utilize analytic information about message success rates and issues.
From J1 Web, access the Communication Management hub, Settings page.
Select the Email Assignments tab.
Click the Create new assignment button. The Create New Assignment window appears.
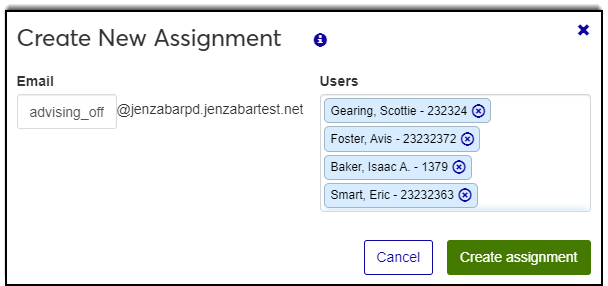
In the Email field, enter a recognizable name for your email address. This identifies who the email is from. For example, if you are creating a shared email address for your admissions office, you could enter jenzabar_admissions.
In the Users field, start typing the name of the users you want to assign to the email address and select from the options that appear.
Click the Create assignment button. Your changes are saved and the Create New Assignment pop-up window closes.
Warning
When a user is removed from an email address, any email messages they have scheduled to go out will not be delivered.
To assign a user to an email address, they must be in the system and an active J1 Web user.
If you are removing a user, emails they sent can still be seen in the system. For example, if Caroline retires, texts they sent to a student can still be seen on the student’s record from the Interaction Inventory, Interaction Inbox, and feed.*
*Available with Communications Plus.
From J1 Web, access the Communication Management hub, Settings page.
Select the Email Assignments tab.
Using filter and sort options, find the email address you want to add or remove users to.
From the Actions drop-down, select Edit assignment. The Edit Assignment window appears.
To remove a user, click the x icon next to their name in the Users field.
Warning
When a user is removed from an email, any messages they have scheduled to go out will not be delivered.
To add a user, start typing their name in the Users field and select from the options that appear.
Click the Save changes button. Your updates are saved and the Edit Assignment window closes.
When you remove all users assigned to an email address, the email address remains active, but it can no longer be used to send/receive email messages. This includes emails that are scheduled but haven’t been sent yet.
Users previously associated with the email address can still see the messages from the recipient's Interaction Inventory and feed.*
*Available with Communications Plus.
From J1 Web, access the Communication Management hub, Settings page.
Select the Email Assignments tab.
Using filter and sort options, find the email address you want to remove all users from.
From the Actions drop-down, select Remove all users. The Remove all users window appears.
Click the Yes, remove users button. Your updates are saved and the Remove all users window closes.
Yes. Emails will go out from school.edu and replies don't come back into J1 Web. They only go into the users Outlook inbox. When you use Client Application Services to relay emails, you lose the ability to associate interactions with records in the system and access to analytic information.
There is no limit. You can add as many users to a number as you want.
No, those messages are still available to other users assigned to the phone number or email address.
Document Settings determine the maximum number of pages that can be downloaded from a document interaction's output and saved in your document storage system or system file . If a document exceeds the maximum number of allowed pages established here, it is broken up into more than one document.
Notice
If 50 is the default maximum number of allowed pages and a document interaction ends up being 150 pages, it will be broken up and stored in three different 50-page files.
From J1 Web, access the Communication Management hub, Settings page.
Select the Documents tab.
Click the Edit button. The default options become available.
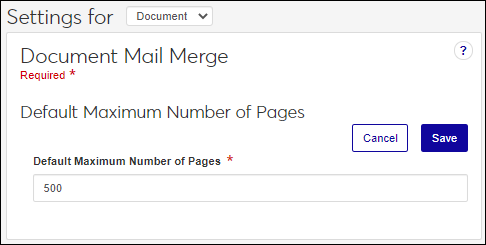
In the Default Maximum Number of Pages field, enter the maximum number of pages that can be downloaded from an interaction's output.
Click Save. Your updates are saved.
*Available to schools using Communications Plus and Jenzabar Chatbot with the integration configured in System Administration, System Settings, Communications.
Chatbot settings let you determine which Chatbot categories are imported, associate an interaction with a Chatbot category to control who can see the imported Chatbot conversations, and select individuals to manage some of those conversations.
Before You Get Started
Before you associate interactions with Chatbot categories, you must define the Chatbot interactions that will be used. Just like other interactions, access codes associated with the Chatbot interactions determine who can view the conversation. Define an interaction for each Chatbot category you want to import.
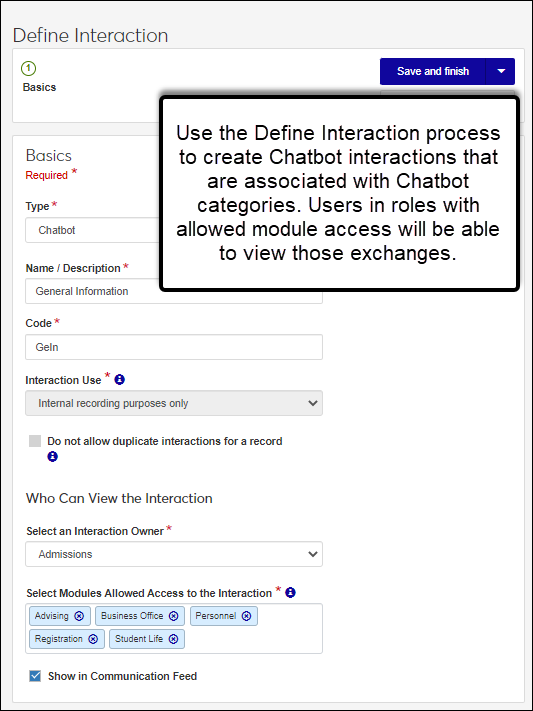
Chatbot categories are imported into J1 Web from Jenzabar Chatbot. When new categories are added to Chatbot, they automatically appear in J1 Web.
From J1 Web, access the Communication Management hub, Settings page.
Select the Chatbot tab.
Using filter and sort options, find the Chatbot category you want to work with.
From the Actions menu, select Edit. The Category pop-up window appears.
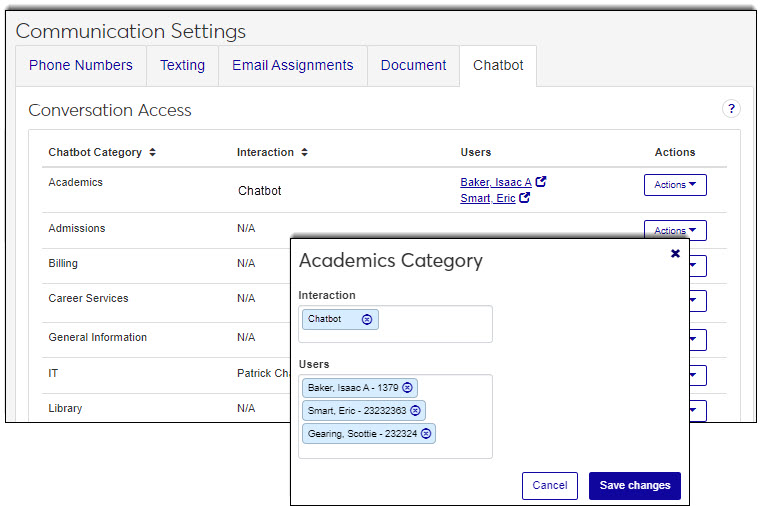
From the Interaction drop-down, select the interaction you want to associate with the Chatbot category.
Users in roles with access to that interaction will be able to view the Chatbot exchange in the interaction inventory and feed for the individual associated with it.
Note
Chatbot interactions must be defined before they can be associated with the categories.
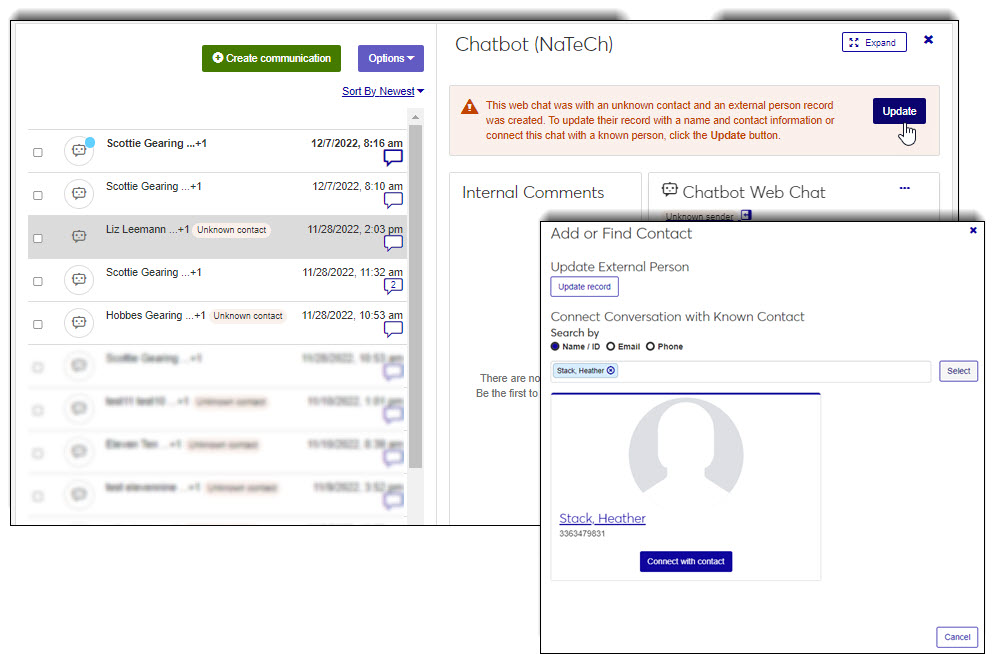
In the Users field, start typing and select the name of the individual you want assigned to the Chatbot category. These users will be able to see the conversations in their Interaction Inbox where they can evaluate contacts the system wasn't able to identify.
Note
Because Chatbot conversations are imported into the Interaction Inbox for review, users assigned to a Chatbot category must be in a Communication Management role with the Can access interaction inbox permission enabled.
Click Save changes.
FAQ
No, Chatbot categories are imported into J1 Web from Jenzabar Chatbot. When new categories are added to Chatbot, they automatically appear on the Chatbot tab.
Chatbot conversations will not be imported into J1 Web unless they are assigned to an interaction. Verify the category you want to import has been associated with the appropriate Chatbot interaction.
It won't be imported into J1 Web. You likely don't want to import all Chatbot categories into J1 Web especially ones like "chitchat" that don't have meaningful information. You'll see all the categories listed, but it doesn't mean you have to assign them all to an interaction code.