Aim Label Definitions
Important
Information and features vary according to the roles to which you belong and the permissions associated with those roles. For more information, contact your module manager or your campus support team.
Aim labels are used to identify the goals (aims) your institution has set for students (e.g., Major, Minor, Core). They correlate to a group of requirements that track student progress for a particular aim. The group of requirements for a particular aim is called a requirement tree. Aim labels can be associated with multiple requirement trees, and the requirements for each tree may vary based on the associated degree program and advising requirement codes (e.g., the aim label 'MAJOR' is applied to both biology and art students, but the requirements to complete those programs are different).
The number of aim labels is based on how your programs are designed. For example, a four-year undergraduate degree program at a liberal arts college or university typically consists of three requirement components — general education requirements, major requirements, and general elective requirements.
Each component is assigned an aim label because each component is built as a stand-alone tree. At a community college, however, a two-year undergraduate degree or a one- or two-year certificate program generally consists of course requirements constructed as a single tree, and only needs one aim label.

Aim label Codes and Descriptions appear on the default Jenzabar Graduation report (one of the degree audit reports), as well as in the Course Needs and Degree Progress feature in the Campus Portal.
The permissions to manage Aim Labels are in the Academic Advising Module Manager role.
You can also manage these definitions in J1 Desktop on the Maintain Aim Labels window. Definitions edited in J1 Web are changed in Desktop and vice versa.
Aim labels are stored in the STUD_AIMS_LABELS table.
From the Advising Administration hub, click the Hub options drop-down, and select Definitions > Aim Labels.
Enter characters, words, or phrases in the Quick Filters to limit the list of definitions.
Click the plus sign beside any definition to expand the row and see more information.
Click a heading to sort the list by that column.
Tip
You can also use the page search in the upper right corner of J1 Web. Just start typing the name of the definition page you want, and select it in the results.
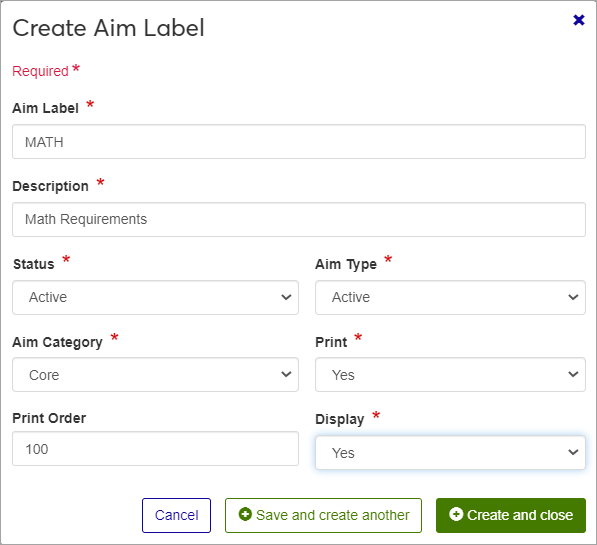
Click the Create definitions button.
Enter an Aim Label, up to 5 letters or numbers. Once saved, you won't be able to edit this label. Required.
Enter a Description. This required 30-character maximum field provides a brief description of this aim. This will help other users understand how this aim is used. This description will show up in most places where the Aim Label is used.
Choose a Status option. This is used to indicate if the aim is active within the student's degree program. Aim labels set as inactive will not be shown as an option in drop-down menus. Required.
Aim Type is used to categorize an aim label in order to classify its function and define its relationship with the student. This field is required. There are currently four aim types that are predefined in the Advising module:
A: Active
I: Inactive
P: Prospective (can be applied to prospective students)
O: Other (a miscellaneous label for Aim Labels that don't fit one of the other Aim Types)
Select an Aim Category to classify the label. This can be used for reporting requirements. Required.
Category
Description
Comment
Program
Specifically for the degree or major
Core
Typically general education requirements for a student's program
Used by the Texas transcript and documents associated with the Texas Core Requirements
Developmental
For Education Success tracking
In order for Education Success tracking to control registration, you must classify the appropriate aim labels as Developmental.
Other
For any other requirement category
Print indicates whether you want this information printed on reports. Required.
Print Order specifies the order in which a requirement is displayed and printed. A lower print order number indicates a higher priority. The default value of 100 appears for new records. Optional.
Display indicates if you would like the information displayed interactively on the window. Required.
Click either Save and create another or Create and close.
On the row you want to edit, click the Edit icon
 . The Edit Aim Label Definition pop-up opens.
Make your changes. You can't edit the Aim Label field, but you can edit the others.
Click the Update button.
On the Aim Label Definitions page, select the checkbox on the rows you want to edit.
In the Options drop-down, click Edit selected. The Edit Aim Label Definitions pop-up opens.
The top section of the pop-up displays information about the selected definitions. In the Select a Detail to Update drop-down, select a detail to edit. In the next field, enter or select a new value. You can edit every field except the Aim Label.
Click Add another detail to update additional details for the selected aim labels.
Click the Update button.
Select the checkboxes next to the rows you want to export.
From the Options drop-down, select Download to Excel. The Download to Excel pop-up opens.
Select options for the Excel format and data columns.
Click Download. Your .xlsx or .zip file is saved in the file location that you have set in your browser settings.