Edit Role
Important
Information and features vary according to the roles to which you belong and the permissions associated with those roles. For more information, contact your module manager or your campus support team.
The Edit Role page lets you view the users associated with a role, manage the permissions associated with a role, and add and remove users to and from roles. You can choose to view version indicators to see what roles have been added or changed in a specific release or for all releases. This helps identify new permissions and ensure they are enabled for the appropriate roles.
Note
Users assigned to a role are notified when permissions are removed from the role or if the role is deleted.

Use this tab to enable and disable the different permissions available with the role.
Use this tab to see a list of the users assigned to this role.
Name
Click a user's name to access their page
Click the + icon to view other roles the user is associated with
Position Title shows any titles a user is assigned to on the Desktop HR Employee Master via Personnel window, Positions tab. If the user is not assigned to a position title, nothing appears in this column.
ID Number
J1 Sign In shows the user's J1 ID managed in the Desktop (Users window)
Remove Access provides a remove button you can use to remove the user from the role
Use this tab to enable/disable access to different interactions and workflows. Codes are associated with interactions and workflows when they are defined and created.
Jenzabar provides access codes based on Jenzabar modules and you can create custom ones on the Access Codes page. If a user belongs to multiple roles, they’ll have access to the interactions and workflows available with each.
Description identifies the access code. Jenzabar provides interaction codes based on modules.
Code system generated access code identifiers.
Access enables/disables users access to interactions and workflows associated with the module code. If the Registration access is enabled and then selected when creating interactions, users in a role with Registration access enabled will be able to view/work with the interaction. Consider what departments would benefit from seeing different interactions and workflows with students or staff. For example, registration users might benefit from being able to view/comment on advising interactions.
The Associations tab is only available for select roles and options vary by role. It lets you control access to constituents and information in the system based on the user's relationship to them.
Example: You can create a Department Head role and enable access to select majors. They'll be able to see students assigned to those enabled majors. When a student changes to a major that role doesn't have enabled, the department head will lose access to their information.
Example: You can create an advising role for your coaches and enable access to select athletic rosters. Coaches will gain and lose access to students as the students are added and removed from the rosters.
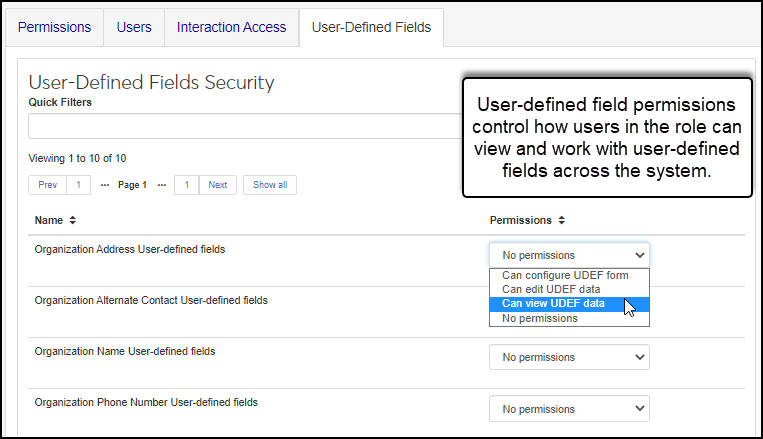
User-Defined Fields tab controls permissions for viewing, editing, and configuring user-defined fields (UDEF) across the system. Users that belong to multiple roles will have access to the user-defined features enabled with each.
Permission levels determine what users can do with user-defined fields:
No permissions means users in this role will not see user-defined fields in the system
Can configure UDEF form means users in this role can see user-defined fields in the system as well as manage the fields from the Manage User-Defined Fields page
Can view UDEF data means users in this role can see the user-defined fields in the system
Can edit UDEF data means users in this role can add, update, or delete data in the user-defined fields in the system
Access the Edit Role page, Permissions tab.
From the Permissions tab, click Edit. The permissions checkboxes become available.
Click Edit. Permission options are enabled.
Select the checkboxes of the permissions you want to grant the role or deselect the permissions you want to remove from the role.
Note
When assigning permissions to the role, it is important to consider the different levels of capability you want users to be granted. You may want to create several roles with varying permissions to accommodate different types of users.
Tip
To review detailed information about the role permissions, refer to Jenzabar-Provided Roles topic.
Click Save. Several things happen:
Permissions are associated with the role and the checkboxes are no longer enabled.
Role permissions are immediately applied. A user will immediately have permission granted or revoked according to the updated features of the role.
Impacted users are notified about any permissions that may have been removed in a J1 message and a notification banner on their Home page. These link to detailed information about the changes.
Access the Edit Role page, Users tab.
From the Users tab, click Add to role. The Add to role window appears.
To add individual users:
In the Search Users by Name field, start typing the name of the user to be added to the role.
From the user names that appear, select the user to be added to the role.
Note
If your school is licensed for HR and the user is associated with a position, it appears in the user list.
Note
Only active J1 Web users can be added to the role. Users are activated using the Desktop Users window. For more information, see Managing User Access to J1 Web.
Click the Add to role button. The user is added to the role and immediately has access to information and features associated with the role. Desktop and additional role information is available by clicking the Expand icon.
To grant access to multiple users in a group with secondary access:
Select the Associations tab.
From the Group drop-down options, select the appropriate group you want to grant access to. Available grouping appear. This may be departments or campus locations.
Turn the appropriate Access switches to ON or OFF.
Tip
To enable or disable multiple access options at the same time, select the appropriate checkboxes or the All checkbox. Then from the Options drop-down and select Turn access off or Turn access on.
Click Collapse details and repeat Step C to set up additional permissions as needed.
Access the Edit Role page, Users tab.
Locate the user to be removed from the role.
Note
To quickly find a user, type their name in the Filter these users field or sort the users by clicking on any of the column headings.
From the Remove Access column, click the Remove icon . The confirm remove pop-up window appears
Click Yes, remove. Several things happen:
The confirm remove pop-up window closes and the role permissions are immediately applied. The user will immediately no longer have permission to the features associated with the role.
The user no longer appears in the list of users in the role.
Impacted users receive a message to notify them they have been removed from the role and a notification banner on their Home page. These link to detailed information about the change.
Note
Users removed from a role still appear on any system messages and tasks they were a included with before being removed.
To view a user's Desktop ID Number and Sign In, and a list of any other roles the user is assigned to, click the Expand icon.
Note
Use the column headings to quickly sort the listings.
Module Access codes are loosely based on Desktop's Module Code Stamp. They control who can work with different interactions and workflows. Codes are associated with interactions and workflows when they're defined and created. J1 Web roles can have multiple access codes enabled and users that belong to multiple roles will have access to the interaction codes available with each.
Access the Edit Role page, Module Access tab.
From the Access column, click the No and Yes option to grant and prohibit access to the interaction and workflow codes. Consider which departments would benefit from seeing different interactions with students or staff. For example, registration users might benefit from being able to view/comment on advising interactions and workflows.
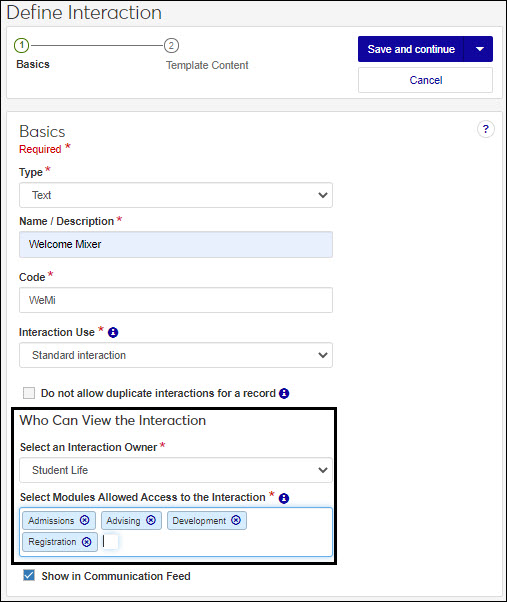
This example shows interaction access codes being associated with a text interaction. Users in roles with access to the enabled codes will be able to view/work with the text message.
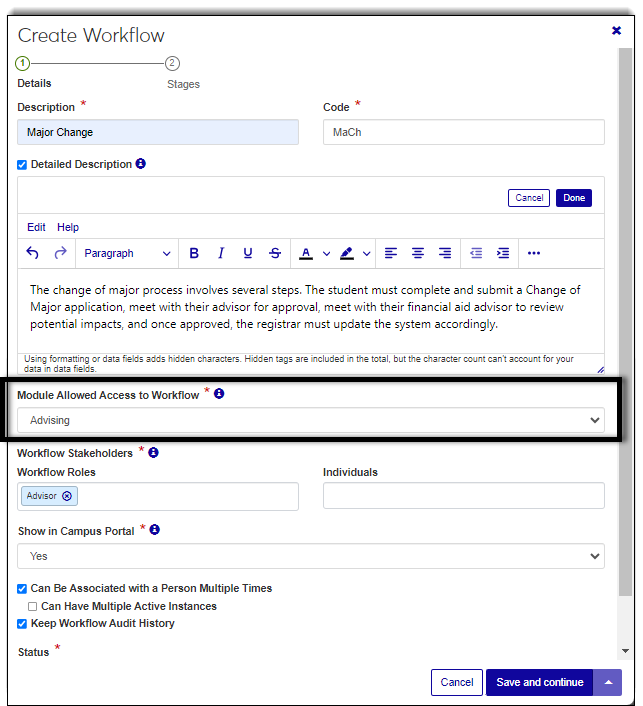
This example shows the access code being associated with a new workflow. Users in roles with access to the enabled codes can view the workflow.
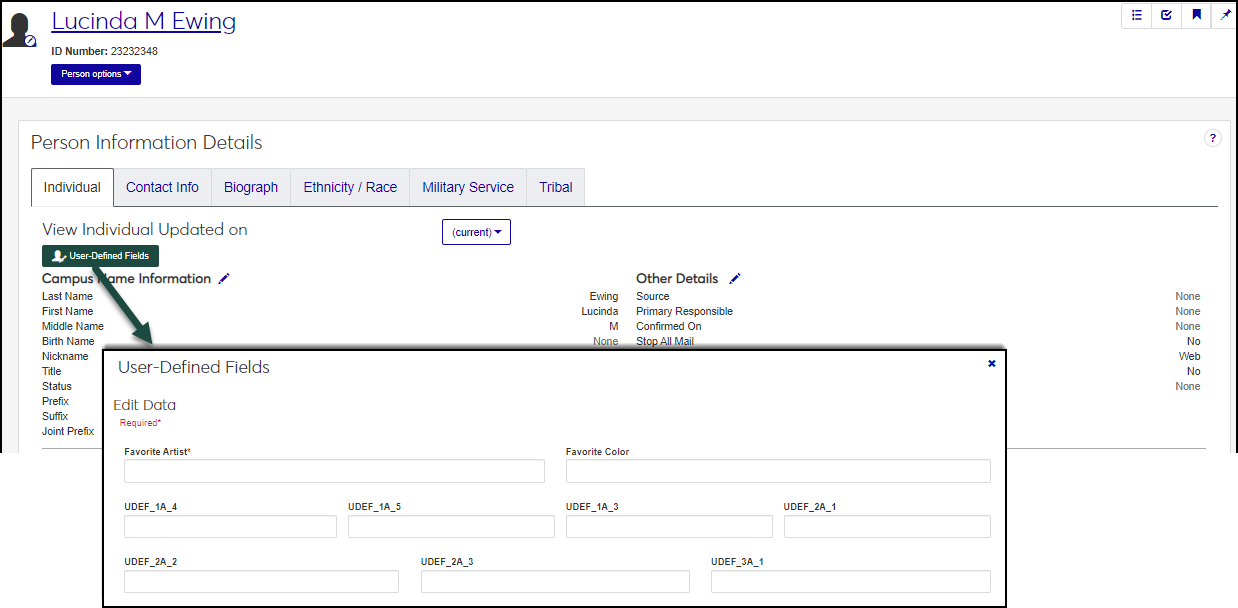
Access the Edit Role page, User-Defined Fields tab.
Find the user-defined fields you want to control access to using the search.
From the Permissions drop-down select from the following:
No permissions means users in this role will not see user-defined fields in the system
Can configure UDEF form means users in this role can see user-defined fields in the system as well as manage the fields from the Manage User-Defined Fields page
Can view UDEF data means users in this role can see the user-defined fields in the system
Can edit UDEF data means users in this role can add, update, or delete data in the user-defined fields in the system
The Associations tab is only available for select roles and options vary by role. Associations let you control access to constituents and information in the system based on the user's relationship to them.
Access the Edit Role page, Associations tab.
From the group drop-down, select the student or course group you want to enable access to. The groups appear.
Notice
For example, the Secondary Advisor - Access to Students by Academic Program role has student grouped by certifications, concentrations, minors, and programs. Once you select the certifications group, you'll see a list of the available certifications and can enable access to the appropriate ones.
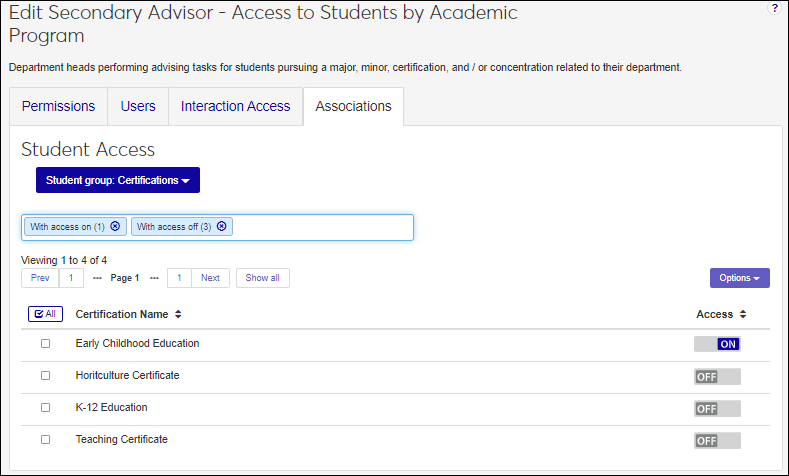
From the Access column, click the OFF and ON option to enable and disable access to the appropriate groups. Users assigned to the role will have access to constituents or information based on their association to them.
From the Updates by Version drop-down, select the version you want to see information about new and updated roles for.
New and Updated indicators appear next to roles that were added or changed for the selected release version.
New means the role was added to J1 Web in the release shown.
Updated means the role was changed in the release shown. This could mean permissions were added or modified.
Note
Removed roles and permissions are not shown at this time.
Yes, click the Expand icon. The user's Desktop login, ID, and other J1 Web roles appear.
Yes, you can remove and grant access to the same user as many times as needed. Follow the How Tos listed above for step-by-step instructions on adding a user to a role and removing a user from a role.
Yes, any users assigned to a role can immediately access all the information and features associated with the role. You can create several similar roles with varying levels of access to control access for different users.
Ensure you clicked the Edit button before updating the role permissions. If you still cannot update the role permissions, you may not have access to the edit feature.
They may not have been added to the Desktop application. This can be verified using the Desktop Users window.
Users can be added in J1 Web if they are informally associated with a process, but they cannot log in to J1 Web and are not considered active J1 Web users. In order to be assigned to a role in J1 Web, they must be in the Desktop application and have an active J1 Web login (designated on the Desktop Users window).
Several things could cause this happen:
The user may be in the Desktop application, but doesn't have an active J1 Web login.
The user may have been added to J1 Web and not the Desktop application.
The user may be in the Desktop application, but doesn't have an active J1 Web login.
The user may already be assigned to this role.
To resolve this issue:
Verify the user exists on the Desktop Users window.
Verify the user has an active J1 Web login on the Desktop Users window.
Verify the user isn't already assigned to the role by searching for them in the Filter these users search option.
Position titles are assigned to users on the Desktop HR Employee Master via Personnel window, Positions tab. If the user is not assigned to a position title, nothing appears in this column.
Your school may not be licensed to use the Human Resources module.
The user may not be assigned to a position on the Desktop HR Employee Master via Personnel window, Positions tab.
When a permission is highlighted in yellow, it means it's not in its default state.
 |
Some permissions are selected and can't be deselected because another permission depends on them. For example, granting course overrides depends on being able to view them. Therefore, you can't deselect the "Can view course overrides" permission if "Can grant course-full overrides" is selected.
Version indicators show you what roles have been added or changed and in what release. This can help you identify new permissions and ensure they are enabled for the appropriate roles.
Use the Updates by Version drop-down to select a specific version, all versions, or no versions.
New means the role was added to J1 Web in the release shown
Updated means the role was changed in the release shown. This could mean permissions were added or modified
Note
Removed roles and permissions are not shown at this time.
Jenzabar provides access codes based on Jenzabar modules; however, you can create custom ones using the Access Codes page (Core, Campus-wide Definitions, Access Codes).