Manage Leave Requests
Important
Information and features vary according to the roles to which you belong and the permissions associated with those roles. For more information, contact your module manager or your campus support team.
The Manage Leave Requests page allows you to work with all the leave requests associated with your employees.
Note
You can work with any employee you have access to in Desktop HR Group Security via Payroll.
Use the Leave Request Filter to narrow down what leave requests you want to work with. In the Leave Request List, you can approve or deny employee leave requests, add leave, and communicate with your employees using email. You can also record leave for an employee.
Leave Request Filter
Use the Leave Request Filter to find the leave requests you want to work with. Check the boxes beside the filter options and add additional details to further narrow down the search. Click Apply to see the results.
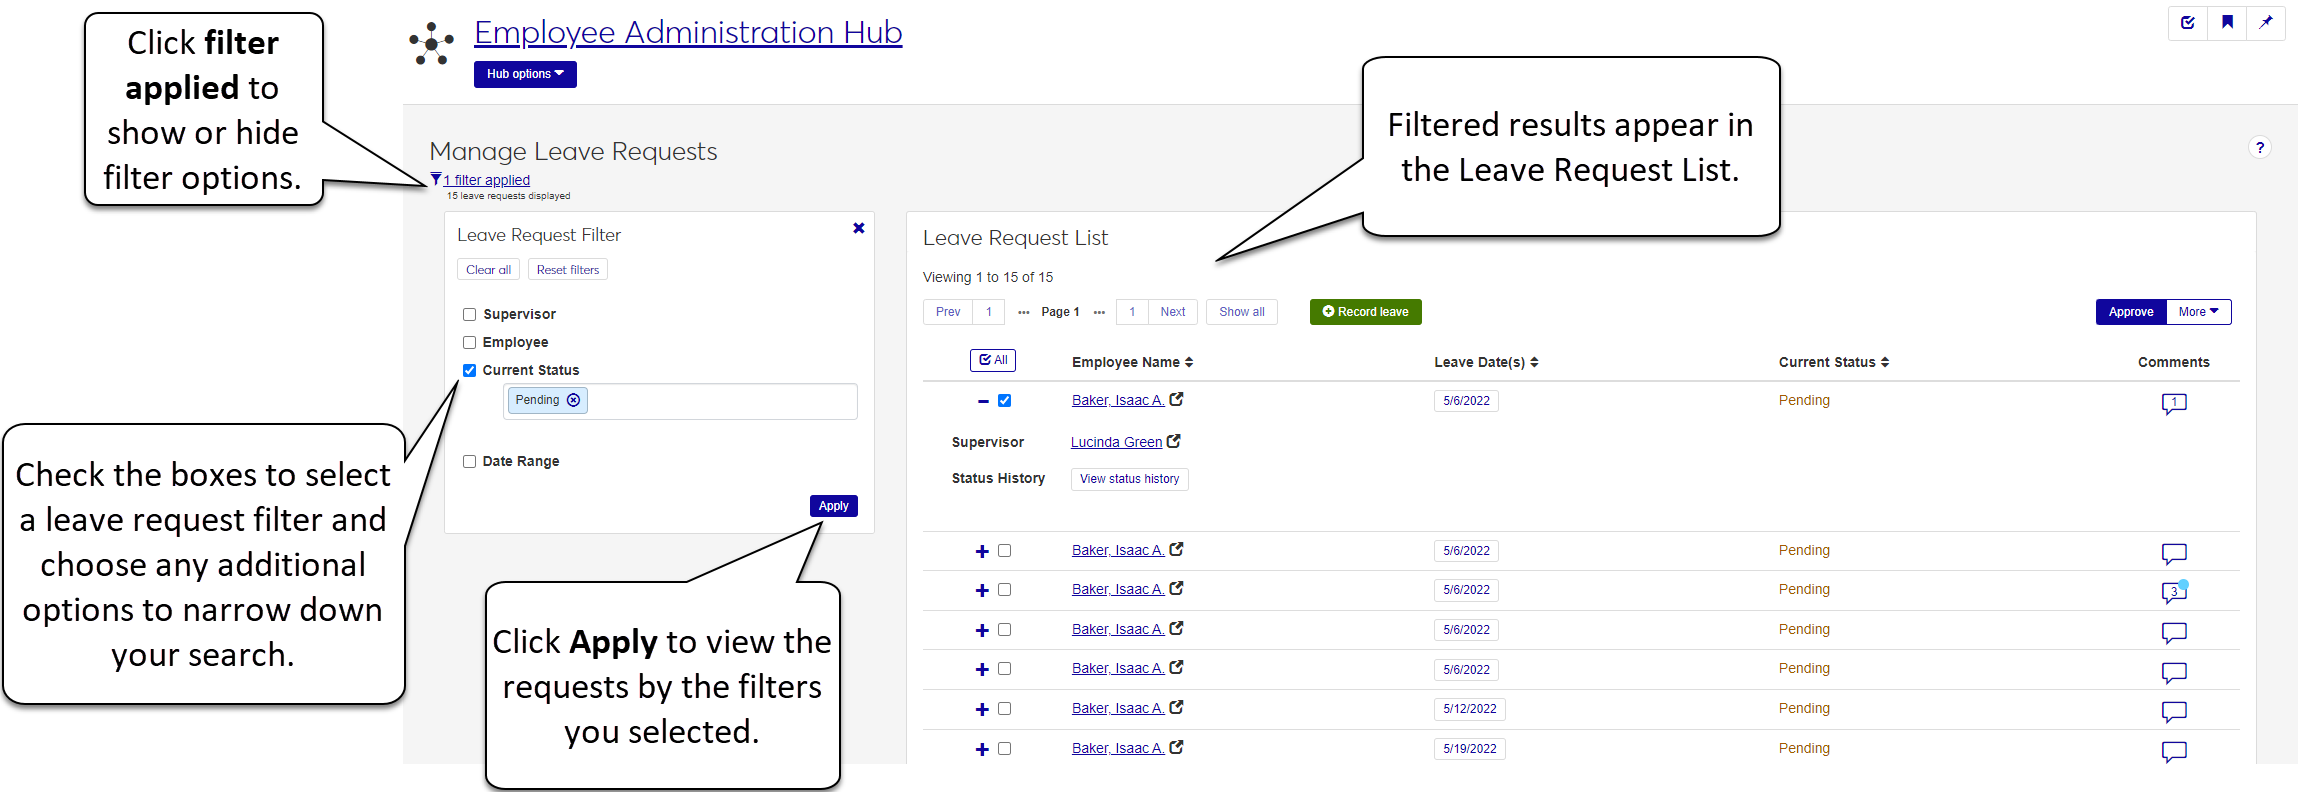
Leave Request List
Use the Leave Request list to work with existing leave requests for your employees or record leave. Check the box to select individual requests to work with or click All to select them all.
Employee Name: Click this link to access the employee's page. Click the plus sign beside the employee's name to display more information, including the employee's supervisor and the status history of the leave request.
Leave Dates: View the calendar dates of the requested leave. Click the dates to view details about the leave request, including any comments, and quickly deny or approve the request.
Current Status: View the status of the leave request, such as Pending, Approved, or Denied.
Comments: If the leave request includes comments, you'll see the number of comments in the icon. You can add, edit, delete, or attach a file to comments.
Note
You can also quickly approve or deny a request by clicking the Leave Dates link to open the Leave Request Entries pop-up. Click Approve.
Note
Once approved, the Manage Leave Request page refreshes and updates the request's status to Approved. Once Approved, you cannot edit the request.
From the Hub options, select Manage leave requests. The Manage Leave Requests page appears. Pending requests are listed by default. Use the filter options to see other requests.
Review the Leave Request List and select the checkbox next to the requests you want to approve. Click the Approve button.
In the Approve Requests pop-up, review the request and click Yes, approve to finalize the approval.
Note
After you deny a request, the Manage Leave Request page updates the request's status to Denied. Once you deny a request, you can't edit it.
From the Hub options, select Manage leave requests. The Manage Leave Requests page appears. Pending requests are listed by default. Use the filter options to see other requests.
Review the Leave Request List and select the checkbox next to the requests you want to deny.
Click the More drop-down and select Deny.
On the Deny Leave Request pop-up window, click Yes, deny for leave requests appearing in the Ready to Deny section. Click Cancel to go back to the Manage Leave Requests page without denying the leave.
From the Hub options, select Manage leave requests. The Manage Leave Requests page appears listing any pending leave requests.
Select the checkboxes next to the employee names of the requests you want to approve, or select the entries for requests you want to deny.
Click the Approve button to approve the selected leave requests, or from the More drop-down, select Deny to deny them.
From the Hub options, select Manage leave requests. The Manage Leave Requests page appears listing any pending leave requests.
Click the Record leave button.
On the Record Leave pop-up window, type the name of the employee you want to enter leave for.
Enter the following details:
Description: Enter a short title or date range for the leave to help remind you what the request is for. (60-character limit.)
Date: Enter a day for the request. You can only enter one day in a row. If the leave spans multiple days, you can enter additional days by using the Add another link.
Type: Select the type of leave from the drop-down.
Start Time: Enter the start time of the leave.
Hours: Select the number of hours.
Important
If you are taking the whole day, select 8 hours.
Comments: if applicable, enter comments to help your employee or their approver better understand the context of the request.
If the leave spans more than one day, use the Add another link and repeat step 4 for each additional day.
When you are finished, click Record leave. Once recorded, the employee's timecard, calendar, and leave request page are updated. The leave is added to the Leave Request List.
You can't approve leave requests you already denied, or any leave request associated with a timecard that has already been approved.
If a leave request is denied, the calendar entry made when an employee first requested the leave is removed from your calendar. However, you can still view the leave request on the Manage Leave Request page. Use the Current Status filter on the Manage Leave Request page to show denied requests.
If your employee cancels a leave request, the system does the following:
Removes the leave request from your calendar.
Removes the leave request form your employee's calendar.
Removes any associated timecard entry, if applicable.
With leave requests turned on, you and your employees will see any pending or approved leave as a bulleted list above any additional timecard entries.
Once you deny a request, you cannot edit it or change the status. If you deny a request you wanted to approve, your employee can re-submit the request or you can record leave for the employee using the Record leave button.
Employee leave eligibility is attached to their active position. To view or change leave eligibility in Desktop, use the HR Employee Master via Personnel or Payroll window to search the employee's ID number. When you've retrieved the employee you want to work with, click the Positions tab. The Leave/Holiday Eligible Position checkbox controls whether or not an employee can request leave.