Account Activity Tab
Important
Information and features vary according to the roles to which you belong and the permissions associated with those roles. For more information, contact your module manager or your campus support team.
The Account Activity tab on the Student Account Details page lets you review balance information and transaction details for the selected subsidiary codes.
View balance information for the selected subsidiary codes in the top section of the page. The Subsidiary Code drop-down includes both AR subsidiaries and AR subsidiary groups. Use the Options button to add or delete subsidiary codes and generate the AR inquiry report. When an individual subsidiary code is selected, you can add comments for others who work with student balance information.
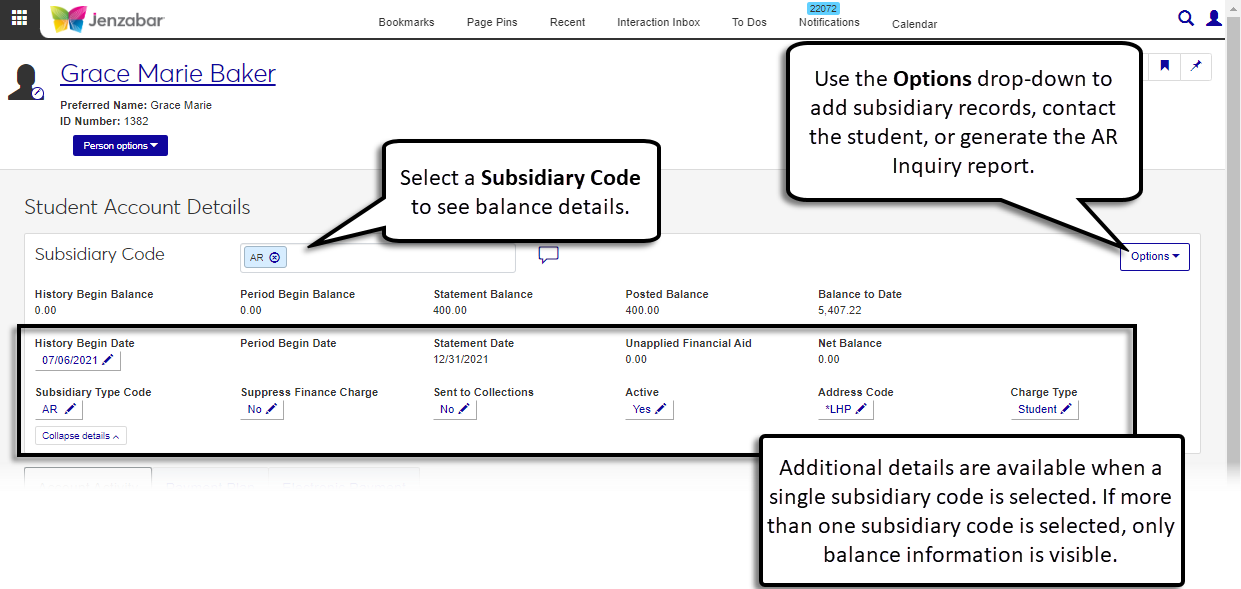
The page defaults to show balances for all subsidiary codes associated with the student. You can also view balance information for an individual or specific combination of subsidiary codes.
Note
Balance information in the subsidiary section does not include suspended (S) transactions.
The following balance information is always visible.
History Begin Balance - the net balance of all transactions that are no longer in the system. This is typically $0 for new students.
Note
This is the Desktop AR History Begin Balance.
Period Begin Balance - the beginning balance for the next statement run, which is the sum of the history begin balance and transactions with a status of H (history).
Statement Balance - the ending balance from the last statement run. This balance is the sum of the history begin balance and transactions with a status of Y (year) and H (history).
Posted Balance - the amount posted to the General Ledger. This balance is the sum of the history begin balance and transactions with a status of C (current), Y (year), and H (history).
Note
This is the Desktop AR Posted Balance.
Balance to Date - the total amount the student is responsible for. This balance is the sum of the history begin balance and transactions with a status of U (unposted), C (current), Y (year), and H (history).
Note
This is the Desktop AR Balance to Date.
Additional subsidiary information can also be viewed when the Expand details button is clicked.
You can add comments to a subsidiary by clicking the Comment icon  next to the Subsidiary Code. Comments are visible on the Student Account Details page and from the Student Accounts list when the Subsidiaries button is clicked for a student row.
Note
This functionality mirrors the Add Feedback option on the Desktop Subsidiaries window. Comments created in Desktop are visible in J1 Web, and vice versa.
You can use the filter options and the column selector to view various details about a student's transactions. The top of the spreadsheet displays the total debit and credit amounts, as well as the total balance including suspended transactions.
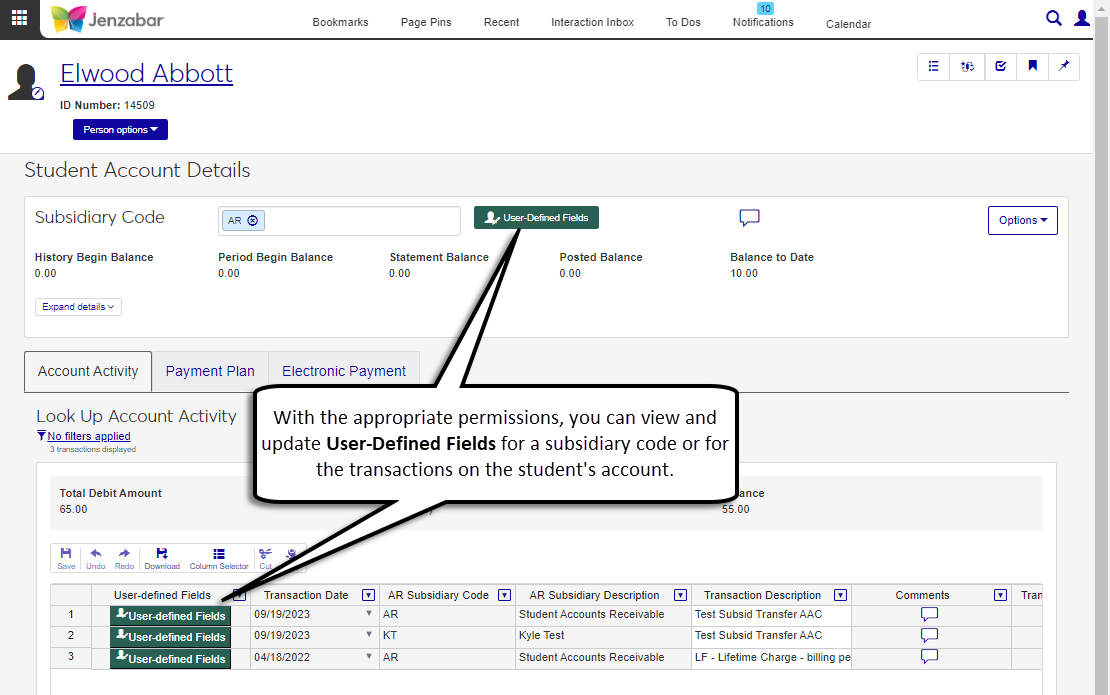
You can also view and add comments to specific transactions. Use the spreadsheet toolbar to save, download, and update changes. The Column Selector lets you determine which transaction columns are displayed.

To access the Student Account Details page and work with subsidiaries and account transactions, you need to be in a Receivables Management role with the following permissions:
Can view student account details
Can edit student account transactions
Can manage student subsidiaries
Additionally, to access user-defined fields (UDEFs) for account activity, you must have "Can view UDEF data" or "Can edit UDEF data" permission for the following fields:
Student Account Details User-defined fields
Student Account Transaction User-defined fields
Note
You may also need to be in additional roles to view transaction information. For more information, see Roles and Permissions to Work with Student Accounts.
Subsidiary details can also be managed from the Desktop Subsidiaries window, Master tab. Student balance information can be managed from the Desktop A/R Inquiry window, and the A/R Inquiry Details window displays the student's transactions for the selected subsidiary code.
On the Student Account Details page in the Subsidiary Code field, click the Remove icon on the default All subsidiary codes option.
Select one or more subsidiary codes or groups from the drop-down. The page refreshes to show balance information for the selected subsidiary information.
If a single subsidiary code is selected, click the Expand details button to view and edit additional information.
From the Student Account Details page, select a Subsidiary Code.
Click the Expand details button.
Click the Edit icon
 for any of the following fields and select from the available options.
 History Begin Date. This date is used in the AR Aging Report to calculate the outstanding balance.
Subsidiary Type Code. This code determines how the subsidiary code will be grouped on printed statements and reports. It also defines which messages and addresses print on statements.
Suppress Finance Charge. When set to No, finance charges for the selected subsidiary are applied to the student. When set to Yes, finance charges for the selected subsidiary are not applied to the student.
Sent to Collections. Select Yes if the student account has gone to collections.
Active. Set to Yes when a new subsidiary code is added to a student. If the student doesn't have an active account with your school, select No.
Warning
If this option is set to No, the account won't be included in the recalculate financial balances process for AR accounts.
Address Code. Select the address code associated with this subsidiary code.
Charge Type. Options are Student and Third Party.
Note
When your system is configured to use the enhanced third party billing method, this field determines which third-party name is printed on the statement.
Click Save after updating each field.
Note
Comments can only be added when a single subsidiary code is selected.
From the Student Account Details page, select a Subsidiary Code. The Comment icon
appears next to the Subsidiary Code.Click the Comment icon to open the Comments pop-up and review existing comments.
To add a comment, click New comment.
Enter comment text.
Click Attach to include attachments with the comment.
Click Add.
On the Student Account Details page, click the Options button and select Add subsidiary record. The Add Subsidiary Record pop-up opens.
Click in the Subsidiary Code field and select from the options that appear. Required.
Enter a History Begin Date. Required.
Click in the Subsidiary Type Code field and select from the options that appear. Required.
Select the Address Code that will be associated with the student for the selected subsidiary.
Select a Charge Type to determine the name that is printed on the statement. Required. Options are "Student" or "Third party".
Select the Suppress Finance Charge checkbox if overdue balance charges shouldn't be applied for the student on this subsidiary.
Select the Sent to Collections checkbox if the account has gone to collections.
The Active checkbox is selected be default. Deselect if necessary.
Warning
Recalculations for AR accounts are only performed for active subsidiary accounts. If Active is set to No, the subsidiary record won't be included in the recalculation process.
Click Add record.
On the Student Account Details page, select one or more options in the Subsidiary Code field.
Click the Options button and select Delete selected subsidiary codes. The Delete Selected Subsidiary Codes pop-up opens.
Review the subsidiary codes in the "Ready to Delete and "Unable to Delete" sections.
Click Yes, delete.
On the Student Account Details page, click the Options button and select Generate AR inquiry report. The Generate AR Inquiry Report pop-up opens.
From the AR Subsidiary Codes drop-down, select the applicable code. Required.
From the List Transaction Since drop-down, select an option. Required.
None
Period Begin Date
Statement Date (default)
Specific Date Range. Enter the Start Date; the End Date defaults to today's date.
Select the Include Suspended Transactions checkbox if desired.
Select a Report Layout. <Original> is the default, and any customized versions of the report are available from the drop-down.
Note
Reports that were customized in the Desktop are available in this drop-down if they have been copied to the J1 Web server, and you can create customized versions for J1 Web by following the steps to Create Customized Reports for J1 Web.
Select one or more options in the File Format. The default is PDF.
Click Generate. If PDF is the only file format selected, the report opens in a new browser tab. If any other file formats are selected, the files are downloaded as a zip file.
On the Student Account Details page, select one or more options in the Subsidiary Code field. The Account Activity tab updates to display transactions.
In the Account Activity spreadsheet, use the Activity Filter and the Column Selector to review transaction details.
Make updates to editable columns as needed.
Tip
Use the spreadsheet toolbar to easily cut, copy, undo, or redo changes in the spreadsheet.
Click the Save button in the toolbar after changes are made.
To view and update subsidiary code UDEFs:
On the Student Account Details page, Account Activity tab, select a Subsidiary Code from the drop-down.
Click the User-Defined Fields button to open the User-Defined Fields pop-up.
Review and make edits to the available fields.
Click Save.
To review and update UDEFs for account activity:
On the Student Account Details page, Account Activity tab, click the User-Defined Fields button for a detail row.
In the User-Defined Fields pop-up, review and make edits to the available fields.
Click Save.
On the Student Account Details page, click the Options button and select Create communication. The Create New Communication pop-up opens.
The Communication Type is set to Email and cannot be updated.
The Interaction code, Name / Description defaults to Student Account Communication.
The From field is autofilled with the signed in user's email address.
The To field is autofilled with student's name.
The default Contact Type is Institutional Priority, which is the contact type your school has designated as the primary method of contact for all users in the system.
The Subject defaults to the student's name with "Student Account" (e.g., Grace Baker Student Account).
Add your message to the Body field. Apply formatting and add hyperlinks using the options available.
To add a hyperlink:
Click the link icon
 .
.Enter the URL.
Add an optional Text to display and Title.
From the Open link in... drop-down, select Current window or New window.
Click Save.
To add an attachment, click Attach file, navigate to and select a file.
Click Send.
Important
Access to the folders where Jenzabar-provided original reports are stored is controlled by your institution. For more information, contact your campus support team or see Working with Reports in J1 Web.
Open InfoMaker.
Click File > Select Library.
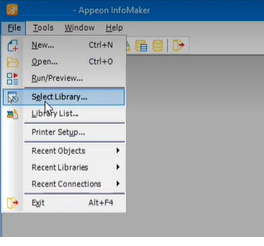
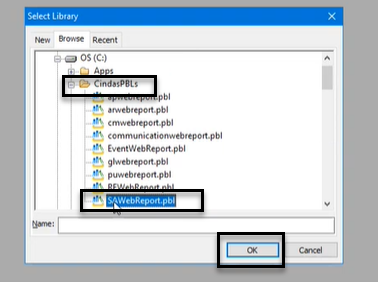
On the Select Library pop-up, navigate to the shared folder where Jenzabar-provided original reports and queries are stored.
Select the PBL (PowerBuilder Library) file that contains the report or query you want to customize.
Click OK.
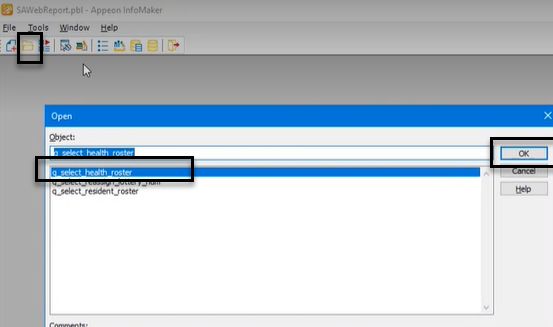
Click the Open icon.
On the Open pop-up, in the Object section, select the report or query you want to customize.
Click OK.
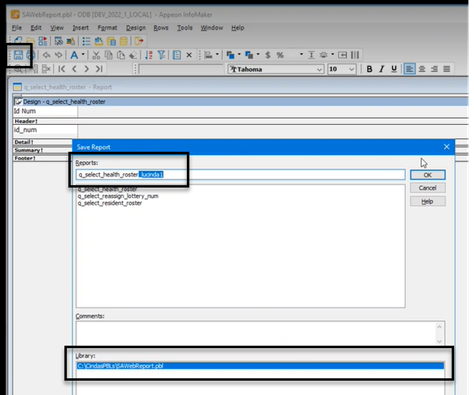
Customize the report or query as needed.
Save the customized version in the shared folder by adding a unique, easily identifiable extension to the file name.
Tip
By default, InfoMaker saves the customized version in the same folder that you opened the original version from. Confirm the file path is correct in the Library section.
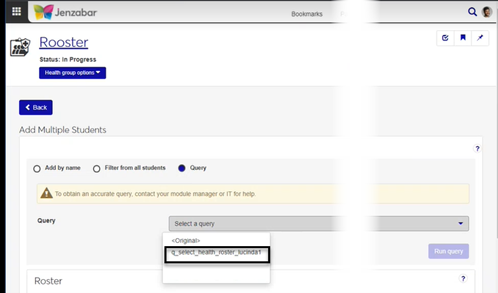
On the corresponding report page in J1 Web:
Customized versions of queries will display in the Query or Data Set drop-down.
Customized versions of reports will display in the Report Layout drop-down.
You may not be in a role with the correct permissions. For additional information about which permissions let you work with specific tabs, see Roles and Permissions to Work with Student Accounts.
If you need additional assistance, contact your campus support team.
In most cases, yes. Customized versions of the report created in Desktop before your school started using J1 Web should be available as options in the Report Layout drop-down. If your school created new customized layouts in Desktop and copied them to the appropriate location on the J1 Web server, those reports are also available in the drop-down.
However, certain reports were modified to be used in J1 Web (i.e., the base report for J1 Web is different from the base report in Desktop). In those cases, the customized versions from Desktop will not work even when they are moved to the correct location on the J1 Web server. You'll need to re-customize those reports from the original version of the J1 Web report by following the instructions to Customize Reports for J1 Web.
See the help for each report page for guidance about customizing a specific report.
For the customized versions of the report created in Desktop to appear as choices in the Report Layout field drop-down, your campus support team needed to complete certain steps as part of the installation process. For more information, contact your campus support team or see Working with Reports in J1 Web.
Tip
Only custom versions of the report created in Desktop before J1 Web installation will appear as choices in the Report Layout field drop-down. Reports customized in Desktop after you've installed J1 Web are not available in the drop-down unless they have been copied over to the appropriate location on the J1 Web server.
Infomaker must be installed on your machine to work with and customize reports. Contact your campus support team for additional information.
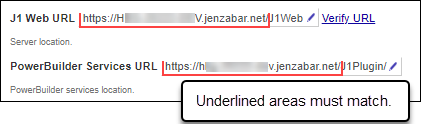
Verify the PowerBuilder Services URL is entered correctly in System Administration, System Settings, Product Installs and Sign page.
The URL must use HTTPS and not HTTP
The URL subdomain and domain must match the J1 Web URL
If the location where you store J1 Web reports is not the default installation location (C: > Jenzabar > Reports), verify the J1 Web server has permission to access the location. Detailed steps are available in the help topic Working with Reports in J1 Web.
You may not have the appropriate permissions. To view and/or update UDEFs for student accounts, you must be in a role with one of the following permissions granted for Student Account Details or Student Account Transactions on the User-Defined Fields tab.
Can view UDEF data
Can edit UDEF data