Setting Up Open Enrollment
Important
Information and features vary according to the roles to which you belong and the permissions associated with those roles. For more information, contact your module manager or your campus support team.
This topic walks you through turning the feature on, setting time controls for registration control groups, setting up academic periods, and designating courses as open enrollment.
Turn It On and Set Defaults
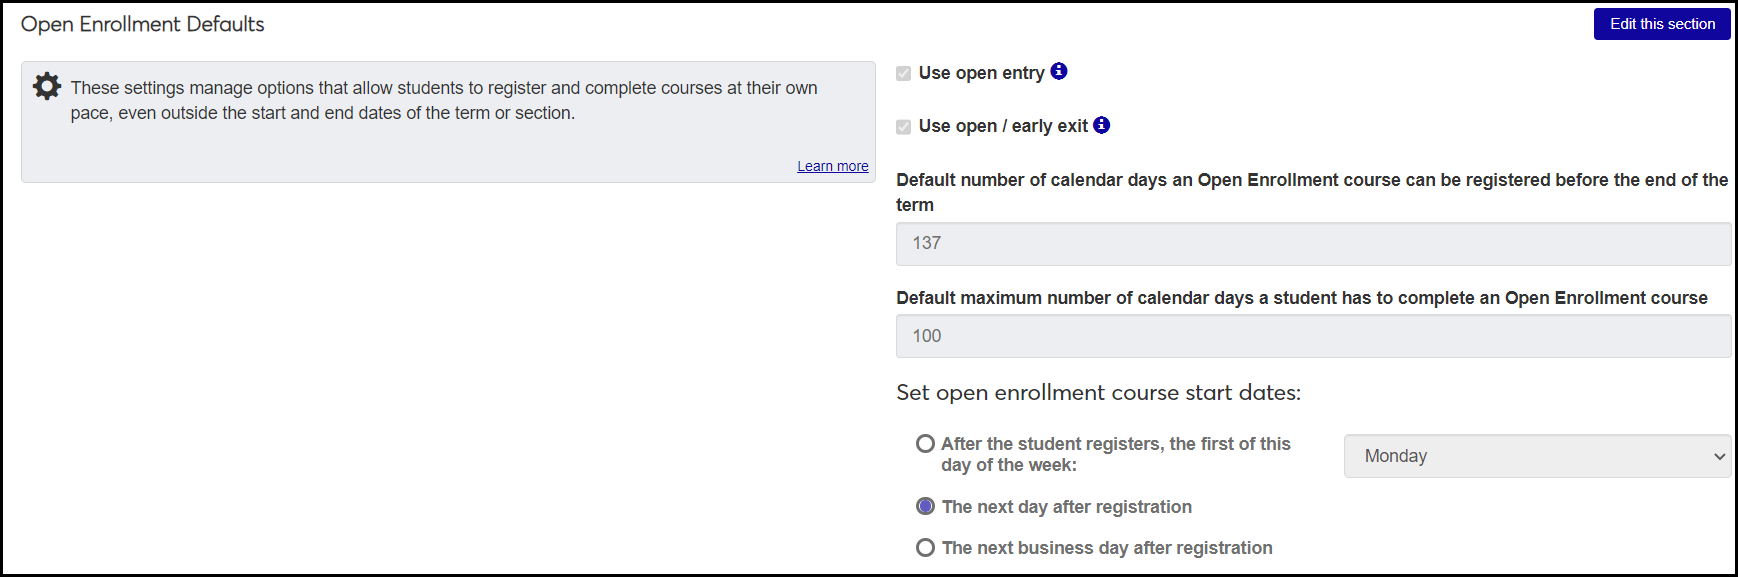
Turn on Open Entry and Open/Early Exit on the Enrollment Settings page, Open Enrollment Defaults section. The other settings are enabled when you select the Use open entry checkbox. Turning on Open Entry and Open/Early Exit makes them available for catalog courses.
Set the defaults for catalog courses that you later designate as Open Entry:
Default number of calendar days an Open Enrollment course can be registered before the end of the term: This is a cutoff date for registering. For example, if the term ends December 10 and this field is set to 4, then the last day a student can register is December 6. (See the "Academic Days-Off Items" topic for information on other factors in that calculation.)
Default maximum number of calendar days a student has to complete an Open Enrollment course: A student must finish the course by this number of days after they began the course. That start date is calculated from the next parameters.
Set open enrollment course start dates:
After the student registers, the first of this day of the week: If you select Monday, the course will start the next Monday after the student registers.
The next day after registration: the next day after the student registers, even if it's a weekend or holiday
The next business day after registration: the next business day (not a weekend or holiday)
Set Time Controls for Web Registration Groups
Typically, for most courses at most schools, students register before a term begins. But with Open Enrollment, students might register anytime, so they need to be in web registration groups that can register throughout the term.
Caution
Open Enrollment depends on students being in web registration groups that can register any time during the term.
Assign Open Enrollment Students to the web registration groups you want. Use the Student Information Details page, Enrollment tab or the Desktop Maintain Web Reg Group Code window.
If necessary, create a new web registration group on the Web Registration Group Definitions page.
Note
Registration control groups are also called web registration groups and tel / web groups. They terminololgy has changed over the years with the technology, but we're aiming to become consistent with "registration control groups."
On the Year / Term / Subterm page, use the Year / Term Control for Registration Control Groups option (or Subterm Control for Registration Control Groups option) to set the Last Campus Portal Add date for the appropriate web registration groups in the selected years and terms.
Set Up Academic Days Off and Academic Periods
Calendars can be important to open enrollment. You can set up academic periods and academic days off so that calendar calculations consider school holidays (and even weather closings). See the topics for "Academic Days-Off Items" and "Academic Periods" for information on setting these up.
Designate a Catalog Course as Open Enrollment
When you designate a catalog course as open enrollment, the sections you create from it are open enrollment by default. However, you can turn open enrollment on or off for each section individually.
To designate a catalog course as open enrollment, use the Manage Course Details page in the editing mode.
Note
Once a catalog course or section has been designated Open Enrollment, it can be edited only in J1 Web.
When a course section is created, it inherits by default the open enrollment settings of the catalog course or section it was created from. You can then edit the section to adjust the open enrollment settings. See the "Managing Open Enrollment Sections" topic.
You can set up open enrollment either in Desktop or J1 Web, but the features are in J1 Web.
To do the setup in Desktop:
In J1 Desktop, go to the Registration Configuration window, Registration Configuration tab.
In the Open Enrollment group, select Use Open Entry.
If you wish, select Use Open/Early Exit, too.
Set the defaults for catalog courses that allow Open Entry and Open/Early Exit in their sections.
Default number of calendar days an Open Enrollment course can be registered before the end of the term: Enter a number 0 - 366.
Default maximum number of calendar days a student has to complete and Open Enrollment course: Enter a number 1 - 366.
All Open Enrollment courses will start: Select a radio button. If you select Day of the Week, select a day.
Click the Save icon on the main toolbar.
See below to designate catalog courses as open enrollment. For information on turning open enrollment on or off for existing sections, see the "Managing Open Enrollment Sections" topic.
To do the setup in J1 Web:
From the Registration Administration hub, click the Hub options.
Select Settings, and then Enrollment settings.
Click Open Enrollment Defaults.
Click the Edit this section button.
Select the Use open entry checkbox.
Make your other selections, and click the Save this section button.
For full instructions, see the "Open Enrollment Default Settings" topic linked below.
Make sure that students who will use open enrollment belong to registration control groups (also called web registration groups or tel/web groups) that can register throughout the term.
You can define the groups on the Web Registration Group Definitions page.
You can view and edit a student's registration control groups on the Student Information Details page, Enrollment tab.
Tip
If you're editing multiple students, it's still quicker (for now) in Desktop on the Maintain Web Reg Group Code window.
On the Year / Term / Subterm Definitions page, select the year terms you want to edit.
Click the Options button, and select Year / Term Control for Registration Control Groups (or Subterm Control for Registration Control Groups).
In the First Campus Portal Add and Last Campus Portal Add columns for each year/term, enter dates that allow students to enter courses throughout the term, and even before the term begins if you wish.
Click the Save icon in the toolbar.
Click the Create academic days-off item button. The Create Academic Days-Off Item pop-up opens.
Enter an Item Name.
If necessary, select the checkbox for Allow this item to be added to published academic periods. Select this only for unplannable events such as weather-related closings. It usually isn't advisable for predictable days off such as holidays.
Click the Create item button.
In the Registration Administration hub, click the Hub options button. The Academic Period page opens.
Click the Create academic period button. The Manage Academic Period page opens.
Enter a Start Date and End Date.
Click the Continue button.
Select an option in the Academic Days-Off Items field.
To add another academic days-off item, click the Add another link.
Click the Save button.
You can use either J1 Desktop or J1 Web to designate catalog courses as Open Enrollment. However, once a course or section is designated as Open Enrollment, you can make edits only in J1 Web.
To do it in J1 Desktop:
Open the Catalog window to the Course Attributes tab.
In the Open Enrollment group, select Default Allow Open Entry.
If you wish, select Default Allow Open/Early Exit, too.
Select a number 0 - 366 for each of these fields:
Default Registration Cutoff (Days Before End of Term) This is the equivalent of the 'Default number of calendar days and Open Enrollment course can be registered before the end of the term' field on the Registration Configuration window, but this one applies only to sections created from this catalog course.
Default Max Days Duration This is the equivalent of the 'Default maximum number of calendar days a student has to complete an Open Enrollment course' field on the Registration Configuration window, but this one applies only to sections created from this catalog course.
Click the Save icon on the main toolbar.
To do it in J1 Web:
Go to the Registration Administration hub, Manage Catalog Courses page.
In the title drop-down, select the Hours view.
Use the filters to find the course you want.
On the course's row, click the Select action button, and select View course details. The Manage Course Details page opens.
Click the Edit details button.
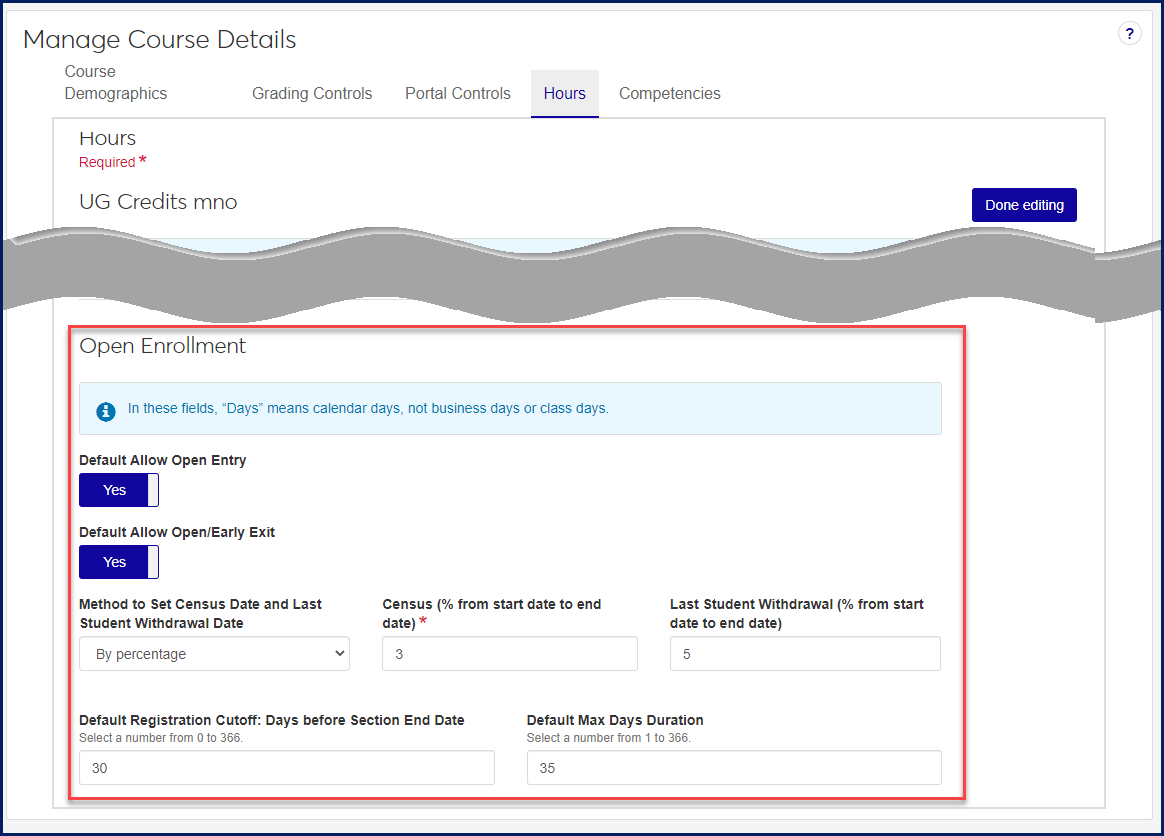
In the Open Enrollment section, click the Yes/No toggles to turn Default Allow Open Entry and Default Allow Open/Early Exit on.
Select a Method to Set Census Date and Last Student Withdrawal Date. ("Student withdrawal" means students using the Campus Portal to withdraw themselves from courses."
If you select 'By date', then enter dates and times for the census date and the last student withdrawal date.
If you select 'By number of days' or 'By percentage', then enter how long after the start date you want the census and the last student withdrawal.
Select a number for each of these:
Default Registration Cutoff: Days before End of Term: (Select a number 0 - 366)
Default Max Days Duration: (Select a number 1 - 366)
Click the Done editing button.
Academic Periods
You can set up academic periods that are distinct from terms so you can use them for purposes (such as open enrollment) that aren't constrained by year/terms. A school year or calendar year might be a useful academic period.
Academic periods consist of a date range and some days-off items. Days-off items are days that you don't want counted within the period. They might be planned holidays or unplanned days off such as for weather emergencies.
Notice
You want to create an academic period that spans January through June. There are 4 holidays plus 5 days of spring break during that time, so first you create 9 days-off items. Then you create an academic period, and you add those 9 days-off items to it.
During that period, the school has to close unexpectedly for 2 days because of flooding. So you create 2 new days-off items, and you add them to the period.
A student has an open-enrollment course with 180 days to complete. Because the 4 holidays, 5 days of spring break, and 2 days of flooding, the student now has 11 extra days to complete the course.
Use this page to view, publish, edit, or delete academic periods. From here, you can also click the Create academic period button to open the Manage Academic Period window and create a new period there.
Publishing makes an academic period available for calendars.
You can edit the start and end dates of a period, and you can edit the Days-Off Items or add new ones. If the period is published, you can't change the existing dates or Days-Off Items, but you can add new Days-Off Items.
Tip
In most cases, it's best not to add to published academic periods, but it may be necessary for unplanned events such as weather-related closings.
You can delete an unpublished period.
On the Registration Administration hub, click the Hub options button.
Select Admin options and Manage academic periods from the drop-down. The Academic Periods page opens.
In the row for an academic period, click the Actions button.
Select Publish.
A pop-up reminds you that publishing makes this academic period available for calendars.
Click the Yes, publish button.
In the row for an academic period, click the Actions button.
Select Edit. The Manage Academic Period page opens.
Edit the Start Date and End Date as needed.
Tip
If the period is published, you can't edit the dates.
Click the Continue button.
Edit the existing Academic Days-Off Items fields as needed.
To add another academic days-off item, click the Add another link.
Click the Save button.
In the row for an academic period, click the Actions button.
Select Delete.
A pop-up asks whether you're sure. Click Yes, delete.
Academic Days-Off Items
Use this page to view, edit, delete, and create academic days-off items. You can add these items to academic periods on the Manage Academic Period page.
The Academic Period checkbox makes an item available to add to an academic period. If you have an item that you don't want to make available, deselect the checkbox.
The Actions button has the Edit and Delete options.
Note
You can edit only the name of the item.
When you create a new item, you can allow it to be added to published periods. (Do that only for unplannable events such as weather-related closings.) An item that can be added to unpublished periods always has the Academic Period checkbox selected on the Academic Days-Off Item page, and it's always available to add to a published period.
On the Registration Administration hub, click the Hub options button.
Select Admin options and Manage academic days-off items. The Academic Days-Off Items opens.
Click the Create academic days-off item button. The Create Academic Days-Off Item pop-up opens.
Enter an Item Name.
If necessary, select the checkbox for Allow this item to be added to published academic periods. Select this only for unplannable events such as weather-related closings. It usually isn't advisable for predictable days off such as holidays.
Click the Create item button.
Click the Actions button for an Academic Day Off.
Select Edit. The Edit Academic Days-Off Item pop-up opens.
Note
Items that can't be edited are highlighted in orange and display a lock icon.
Edit the Item Name as needed.
Click the Save button.
Click the Actions button for an Academic Day Off.
Select Delete. A pop-up tells you whether the item has been assigned to a calendar, and it warns you that the item will no longer be available.
If you're sure you still want to delete it, click Yes, delete.
Manage Academic Period
This page opens from the Academic Period page when you click the Edit option for an academic period or when you click the Create academic period button.
Use the Manage Academic Period page to create or edit an academic period. You can add or edit the start and end dates. You can also add or edit Days-Off Items. If the period is published, you can't change the existing dates or Days-Off Items, but you can add new ones.
Tip
You can create days-off items on the Academic Days-Off Items page.
In the Registration Administration hub, click the Hub options button. The Academic Period page opens.
Click the Create academic period button. The Manage Academic Period page opens.
Enter a Start Date and End Date.
Click the Continue button.
Select an option in the Academic Days-Off Items field.
To add another academic days-off item, click the Add another link.
Click the Save button.
In the Registration Administration hub, click the Hub options button. The Academic Period page opens.
In the row for an academic period, click the Actions button.
Select Edit. The Manage Academic Period page opens.
Edit the Start Date and End Date as needed.
Tip
If the period is published, you can't edit the dates.
Click the Continue button.
Edit the existing Academic Days-Off Items fields as needed.
To add another academic days-off item, click the Add another link.
Click the Save button.