Student Planning Calendar in J1 Web
When faculty or staff register students for courses (or drop courses for advisees), they use the Student Planning Calendar. It mirrors the schedule planning calendar that students see on the Student Registration feature in the Campus Portal.
Pages that use the planning calendar include My Advisee Roster (on the Academic Advising hub), the Student Registration page (in the Registration Operations hub), and the Register option on a student's Summary page.
Note
Students' planning calendars are available only if the Campus Portal feature your school uses for students registering themselves is the newer Student Registration feature rather than the older Add/Drop feature. The setting to turn on the Student Registration feature is in J1 Web on the Campus Portal (JICS) Settings page.
The calendar is for trying out potential schedules. Placing a course section on the calendar doesn't register the course. Instead, it helps you visualize the student's schedule.
Then when you're ready to register one or more of the course sections, go to the Registration Checkout pop-up.
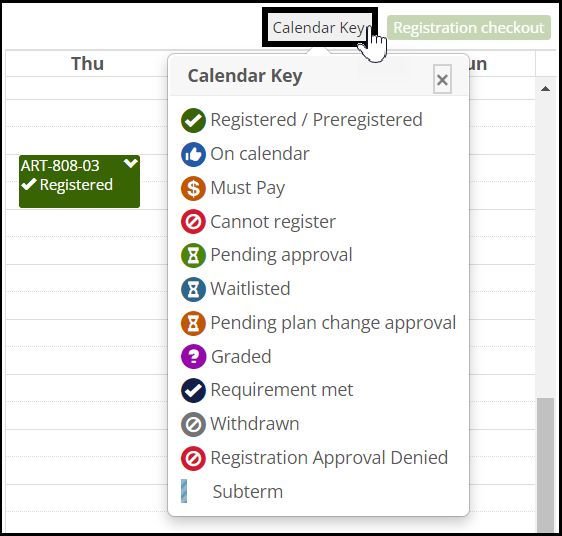
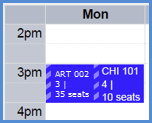
Tiles on the calendar represent course sections. Colors and symbols indicate the status of the section. Click the Calendar Key link to view the key of symbols and colors.
Green tile with check mark: Registered (or preregistered).
Blue tile with thumb up: On the calendar but not registered. (You could say it's in the cart and ready for checkout.)
Amber tile with dollar sign: Requires payment before it can be registered.
Red tile with a circle struck through: The student cannot register for this course.
Green tile with hourglass: Registered pending approval.
Blue tile with hourglass: Waitlisted.
Amber tile with hourglass: Pending approval of change to academic plan.
Purple tile with question mark: Course completed and graded.
Dark blue with check mark: Requirement met.
Gray with circle struck through: Withdrawn.
Red tile with a circle struck through: Registration Approval Denied.
Edge Stripes and Colors
Edge striping indicates a special condition concerning a course. Colors and stripes are used together to help you quickly identify what you need to do for a course. Click the course and select View details.
Striping | Meaning | Example | |||
|---|---|---|---|---|---|
Same Color as the Course | a course in a subterm |
| |||
Amber and White | a course with a warning TipTo see the begin and end dates of a course in a subterm, click the course on your calendar and select View details. |
| |||
Solid Red | a course with an error such as:
|
|


Hours and Full-Time Status
The student's credit hours and full-time status appear at the top of the calendar:
Total Registered Hours: Sum of the credit hours for the courses on the calendar that are registered (with a status of C - Current, P - Preregistered, or R - Reserved). Database: student_crs_hist.credit_hrs
Total Planned Hours: Sum of the credit hours for the unregistered courses on the calendar
Status: The student's part-time or full-time status based on the Total Registered Hours. Database: student_term_sum.pt_ft_sts
From a student's Summary page:
Click the Person options drop-down.
Select Student > Register > Register [year/term]. The student's planning calendar opens with the title Register Selected Students for [the year/term you selected].
From the My Advisee Roster page in the Academic Advising hub:
On an advisee's row, click the Actions drop-down.
Select a Register option (example: Register: 2025-2026 - Fall). The student's planning calendar opens with the title Register Selected Students for [the year/term you selected].
From the Student Registration page in the Registration Operations hub:
Select students by name or ID or by using filters.
Click the Add to the registration list button.
Select a Year / Term to Register.
Select the checkboxes for one or more students.
Click the Options drop-down, and select Register selected students. The Register Selected Students pop-up opens.
If you selected only one student:
The planning calendar opens.
You can work with the course sections already on the calendar, or you can scroll down to the Course Search. There you can find sections and register them or place them on the planning calendar.
If you selected more than one student:
The Register Selected Students pop-up opens.
On a student's row, in the Planning Calendar column, click the Open icon
 . The student's planning calendar opens.
 If there are course sections already on the calendar, you can work with them from the calendar.
If not, close the calendar, and use the Register Selected Students pop-up to register sections or to place sections on the calendar.
Click a course section's tile. A menu pops up.
Select View details. The Details pop-up opens with information including the following:
Course Section Code and Title
Credit Hours
Student Status: Registration status such as Registered, Not on my schedule, Graded
Course Status: Enrollment status such as Full, Open, Waitlisted
Year/Term
Meeting Type: Such as In-Person or Online
Schedule: Meeting days, times, and locations
Instructors
Description
Textbooks
To close the pop-up, click Close.
Scroll down past the calendar.
If you know the course code:
In the Section field, begin typing a section code. The list of course sections that match appears.
Select the section from the list.
If you don't know the course code:
Click the Show course search button. The course search appears.
Browse the list or use filters to find a course.
Click Select next to a course section. The course code appears in the Section field above.
Optional: Repeat steps to find more course sections.
Click the Register drop-down, and select Add to planning calendar. The courses are placed on the calendar but are not registered.
If a course section has issues such as schedule conflict, payment required, corequisite needed, or out of the student's division, you can view details of the issue.
Click the course section's tile on the calendar. A menu pops up.
On the pop-up menu, click View possible issues. The Possible Issues pop-up lists the issues.
To close the Possible Issues pop-up, click OK.
On the planning calendar, click an unregistered course section.
On the pop-up menu, click Remove from calendar. The course is removed.
Note
If a course is already registered, you can't simply remove it from the calendar. See instructions below to drop a course (before the add/drop deadline) or withdraw a student (after the deadline).
To register all the unregistered sections on the calendar:
Scroll down below the calendar. Click the Populate unregistered courses button. All the unregistered sections from the calendar appear as chips in the Section field.
In the Register drop-down, click either Register and continue or Register and close. The section is registered (or else an alert tells you if the registration failed).
To register an individual section from the calendar:
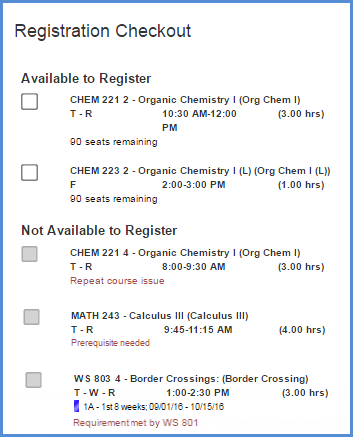
On the planning calendar, click an unregistered course section. On the pop-up menu, click Register. The Registration Checkout pop-up opens.
If there are no issues, the section is registered, and an alert tells you so.
If there are issues, the Registration Checkout pop-up opens and explains the issues.
On the planning calendar, click the registered course.
On the pop-up menu, select Drop course. An alert tells you whether the drop was successful.
Students can withdraw themselves from courses on the Campus Portal (if your school allows it), and registrars can withdraw students on the Student Registration page. Advisors can't withdraw students.
For details, see the Withdrawal Overview, Student Registration in J1 Web, and My Advisee Roster topics.
It could be for any of several reasons:
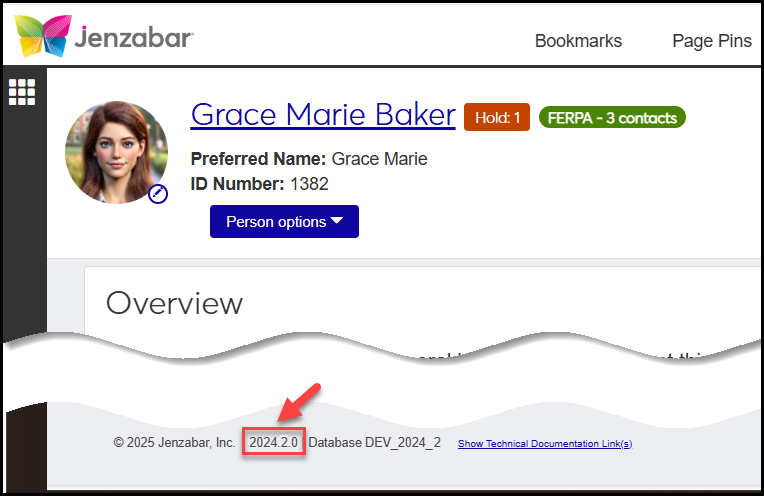
Software version:
Your school must be using J1 Web version 2024.2 or later.
Look on the bottom of any page for your version number.
Campus Portal Student Registration feature turned on:
Your school must be using the Student Registration feature rather than the old Add/Drop Courses (Course Schedules) feature.
Your school turns on the Student Registration feature on the Campus Portal (JICS) Settings page in J1 Web.
Permissions:
You must be in a role that has permission to register students.
The registrar’s office or IT can tell you whether you’re in such a role and whether permission to register is turned on.
These roles (and roles made from them) have the permission:
Registrars
Registration Module Manager
Primary Advisor - Access to Assigned Students
Secondary Advisor - Access to Students by Academic Program
Secondary Advisor - Access to Students by Athletic Roster
Secondary Advisor - Access to Students by Campus Location
Registration Period:
A registration period must be open for the student.
Registration dates are set on the Year / Term Subterm Definitions page, including dates for the student’s registration control group (aka tel/web group or registration group). If you don’t have access to that page, the registrar’s office can help.
The Registrar's office determines the registration dates on the Year / Term / Subterm Definitions page.
A registration administrator on the Campus Portal (JICS) Settings page selects the fields available for course searches.
The student might be restricted to registering only for courses on their academic plan for this term. The level of restriction is called "plan sensitivity." You can see their level just under the My Academic Plan heading.
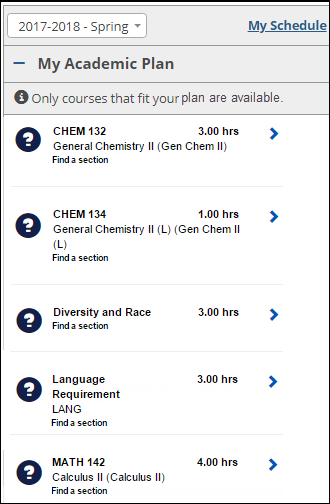
Click the Info  icon for a description of the student's plan sensitivity.
Level | Description | Info Pop-Up | Courses you can see |
|---|---|---|---|
Most restrictive | Only courses on this term's plan are available. | Select courses on the student's academic plan for this term. This will help them successfully complete your degree program. | Courses on their plan for the selected term. |
Moderately restrictive | Only courses on their plan are available. | Select courses on the student's academic plan. If you register them for courses planned for a future term, be sure to update their academic plan. |
|
Least restrictive | Courses on and off the student's plan are available. | You can select any courses, but be aware of the requirements for the student's academic plan. |
|
If the subterm dates don't overlap, you can put courses from different subterms in the same time slot. On the calendar, they'll appear with blue edge striping to remind you that they're subterm courses and not necessarily in conflict.
 |
It may be disabled for a number of reasons including these:
The registration period is not open yet. (The button label is "Registration closed".)
There are no unregistered courses on the calendar.
The student needs registration clearance.
On the registration checkout screen, some courses may be listed under the heading Not Available to Register. The checkboxes for those courses are disabled. The reasons are listed. Examples include schedule conflicts, required prerequisites or corequisites, and repeated courses or courses that fulfill the same requirement as another course on your calendar.
 |
There are several possibilities.
The course search may be view only. You can't add courses to to schedule from it.
The course may not be on the student's academic plan or doesn't meet their degree requirements.
The course might not be allowed in the student's division.
No. Advisors can add and drop students subject to the settings and dates set on the Year / Term / Subterm Definitions page and on the Manage Section Details page. However, advisors can't withdraw students. Only the Registrars and Registration Module Manager roles (and copies of them) include permissions to withdraw students.
Current: The student is fully enrolled in the course. (This is sometimes called "Registered".)
History: The student completed the course.
Preregistered: The student is enrolled in the course, but the registrar's office hasn't made registration final yet. (Some schools mark students as preregistered while they run preliminary charges. The registrar's office will change your status to Registered by the time the course begins.)
Reserved: A seat is being held for for the student pending approvals or payments. If the deadline passes before they get approvals or make payments, they'll be dropped from the course.
Waitlisted: The course is full, but the student is in line. They'll be notified if a seat opens.
Withdrawn: The student left the course after the drop deadline.
When the student's advisor registers a course requiring advisor approval, the approval is granted automatically and marked with that day's date.
When someone other than the advisor registers a course requiring advisor approval, the course is set to Reserved status. The course will move to Current status when either the advisor approves or a registrar overrides the advisor approval requirement. (The "Can override advisor approval required" permission is in the Registration Override and Access Control role and roles made from it.)
The system looks for available drop dates in the following sequence:
Advisor Add / Drop Date Override dates: If there's a drop-date for the advisor in the term, that takes precedence—only for the selected advisor dropping courses for their advisees.
Course section add / drop dates: If there's no drop date for Advisor Add / Drop Date Overrides (or if the person person doing the dropping isn't an advisor with add/drop override dates for the term), then the course section drop date takes precedence.
Registration Control Group dates: If none of the above apply, then the Registration Control Group drop date takes precedence.
Term (or Subterm) dates: If none of the above apply, then the drop date for the term or subterm is used.