Course Roster in J1 Web
Important
Information and features vary according to the roles to which you belong and the permissions associated with those roles. For more information, contact your module manager or your campus support team.
The course roster is displays information for each student including majors, programs, advisors, divisions, and classifications. You can check each student's registration status and contact them directly.
Column | Description |
|---|---|
Student (Name) | |
ID | |
Enrollment Status | From Student Course History as of the year/term of the section |
Classification | Such as Freshman, Sophomore. From the Student Master table as of the year/term of the section. |
Major | From the Student Master table |
Actions | Contact the student via message, email, or phone |
Credits | From Student Course History. Label may vary. Examples: UG Hours, Credit Hours. |
Cross-Listed* | Shows the parent-child relationships for cross-listed courses |
Advisors | Shows up to 2 primary advisors. Includes a Success Team link to the student's Advisee Spotlight page. |
Current Division | Student's current division on the Student Master table |
Transcript Division | The division in which the course will count toward the student's GPA |
Current Program* | Student Program - Current on the Degree History Table |
Program 2* | The earliest available additional degree |
Activities | The student's sports or other activities |
Graduation Stage | Example: Graduation Application Filed |
Degree Period | The student's projected degree period such as 2019 Degree |
* Label isn't shown if no data is available.
Note
If the student's information is FERPA restricted, a badge labeled "FERPA Restricted" appears next to the student's name.
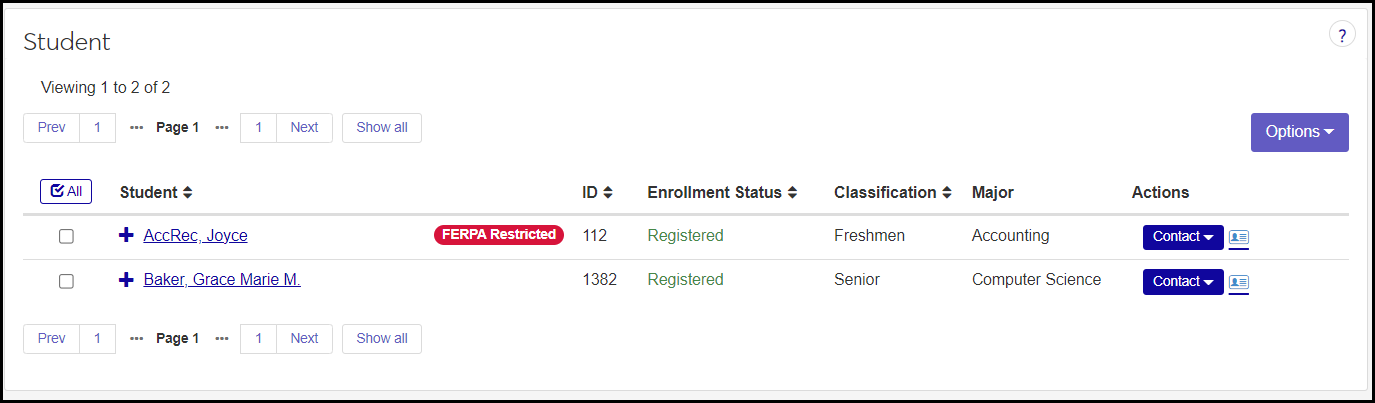
The List View icon and the Card View icon toggle between list view and card view. The Students view of the Course Roster opens in list view by default.


List view and card view icons
In the list view, students appear 15 to a page. Above and below the list, you can navigate the pages or show all students at once. You can use the sort arrows  to arrange the list by one of the columns, or you can use the Sort by drop-down list.
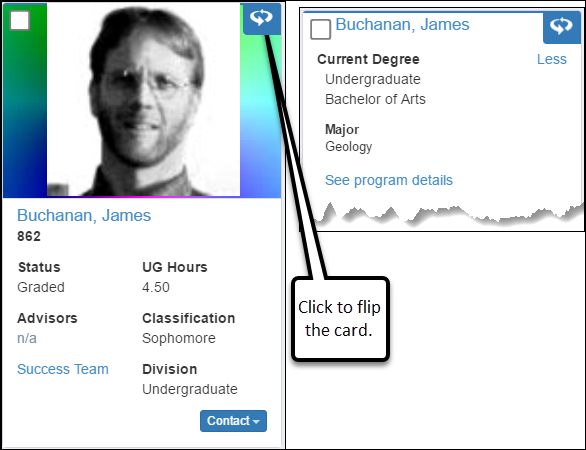
The card view provides a handy glance at the same information but in a card form, including profile pictures if you wish.
The Generate roster PDF button opens the class list in a new tab in your browser. From there, you can use your browser's features to print or download the file.
Select one or more students and select an action in the Options drop-down list. The Options drop-down applies to all the students you select.
Note
Most options are available only in the List View.
Send Communication
You can send a a communication to each of the selected students. (Each student receives an individual communication.) If your school has the Communications Plus license, the communication can be a phone text.
Note
This option is available in the Card View as well as the List View.
Register in Another Section
On a section's Roster page, there's a convenient way to move students to a different section. This helps you balance enrollment in various sections or better fit the constraints of your facilities and schedules.
When you move students to a new section, you can select an option for what to do with the old section.
Delete it (so it doesn't show in the student's course history)
Drop it (so it appears as a dropped course)
Keep it (so the student is enrolled in both)
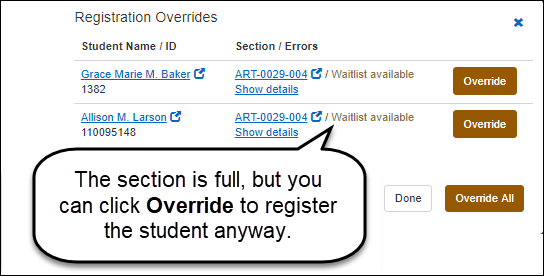
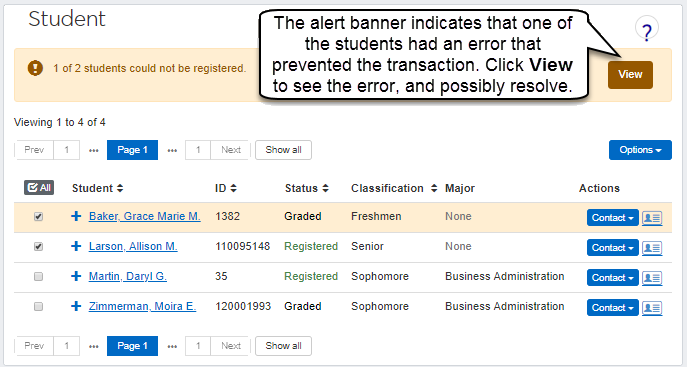
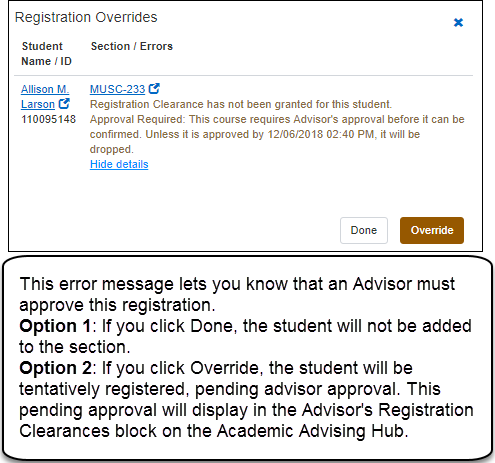
After you click Done, a confirmation message appears. If there were registration errors that require an override, the Registration Overrides pop-up opens. If you have permission, you can override the error and complete the action.
Examples of error messages and override options:
Override a Section Full Error
Some Students Couldn't Be Registered
An Advisor Must Approve
Download to Excel
Use this option to download selected students to a spreadsheet. The pop-up lets you select the fields to include and the way the spreadsheet is formatted.
Withdraw a Student
Select a single student, and click this option to withdraw them from the course. The Withdrawal Details pop-up guides you to enter the necessary information.
The filter card helps you find students that meet your search criteria. Click the filter icon  to open it.
By default, Registration Status is selected, and it's populated with these search phrases:
Preregistered
Awaiting Approval
Awaiting Payment
Registered
Graded
Thus, waitlisted and dropped students are filtered out by default. Deselect the Registration Status checkbox to see all students.
From the Course Center block, the My Course Center block, the Course List page, and the My Course List page:
Click Select Action for any course section.
Select View roster from the drop-down list. The roster opens to the Students view.
Click the Filter icon
to show the filter options.Make filter selections, and click Apply to narrow the list of students.
Click Reset filters to revert the filters to the default selections. Then click Apply.
Click Clear all to remove all filter selections. Then click Apply.
Click the Expand icon
 to view all the information for a student.
From any section's summary page:
Click Course options.
Select View roster from the drop-down list.
Make view and filter selections as above.
On the Course Roster page, click the Card View icon
.Find the student's card.
Click the Flip icon
 to flip the card over.
From the list view, click the Generate roster PDF button. The roster opens in a new browser tab.
Use your browser's controls to view, print, or download the PDF.
Click the Filter icon
to show the filter options.Select any checkboxes.
Enter search phrases. Some are drop-down lists; others are free-text fields. All allow multiple entries.
Click Apply.
To change your filter combinations, make other selections, and click Apply again.
To save your filter combination, clickSave as.
Enter a name.
If you wish, select Set as default so the filter is applied by default when you open the page.
Click Save.
On either the list view or card view, select one or more students.
Click the Options drop-down, and select Send communication. The Create New Communication pop-up opens.
Select a Communication Type from the drop-down.
Enter your message information, include any needed attachments, and click Send. If you are sending to more than one student on the roster, each will receive an individual copy.
On a section's Roster, use the list view.
Select one or more students.
In the Options drop-down, select Register in another section. The Register Students in Another Section window pops up.
Select the Term, Section Code, and Enrollment Status for the new section.
In the Action drop-down, select what happens to the old section: drop, delete, or keep.
Click the Register button.
On a section's Roster, use the list view.
Select the checkbox for a single student.
Click the Options drop-down, and select Withdraw student. The Withdrawal Details pop-up opens. An alert tells you how many withdrawals the student already has, and how many your school allows. If the student has reached the limit, a warning tells you.
Note
The withdrawal limit is set on the Registration Limits page in Registration Administration. Also set there is how the limit is enforced. If it's enforced with a stop, you can't withdraw students who've reached the limit. If it's enforced with a warning, you'll see the warning, but the system allows you to withdraw the student.
Note
The Census Date and the Last Withdraw Passing Date are visible for reference.
Fill in the information. All fields are required except the checkboxes.
Add to withdrawal counts (checkbox): Select the checkbox if you want this withdrawal to add to the student's count of withdrawals. This is the usual practice. If you're changing an existing grade, selecting or deselecting this checkbox overrides the previous setting.
Withdrawal Date: Select from the drop-down:
First day of class
Day before first day of class
Friday before first day of class
Date dropped
Last date of attendance
Manual date entry
Withdrawal Reason: Select from the drop-down. Options are defined on the Withdrawal Reason Definitions page.
Tip
If you're withdrawing the student from all courses, select the Total withdrawal from term option. This doesn't automatically withdraw them from all courses; you'll still need to withdraw them from each course.
Drop Date: Select from the drop-down:
First day of class
Day before first day of class
Friday before first day of class
Last date of attendance
Manual date entry
Drop Flag: Select Drop or None from the drop-down.
Last Date of Attendance: Enter a date.
Final Grade: Select from the drop-down. The options are defined on the Grade Table Definitions page. Only grades designated as withdrawal grades are listed.
Update Midterm Grade Columns: If you select this checkbox, select a Midterm Grade from the drop-down. The options are defined on the Grade Table Definitions page. Only grades designated as withdrawal grades are listed.
Click OK. The student is withdrawn.
Select the checkboxes next to the rows you want to export.
From the Options drop-down, select Download to Excel. The Download to Excel pop-up opens.
Select options for the Excel format and data columns.
Click Download. Your .xlsx or .zip file is saved in the file location that you have set in your browser settings.
By default, waitlisted and dropped students are filtered out of the course roster. To see them, deselect the Registration Status checkbox in the filter. Or, to change the combination of registration statuses you see, keep the checkbox selected, and add or remove search phrases from it.