System Roles
Important
Information and features vary according to the roles to which you belong and the permissions associated with those roles. For more information, contact your module manager or your campus support team.
Use this page to review roles available at your school, create, copy, and delete roles, and update general role information.

The Default icon distinguishes Jenzabar-provided roles from roles your school has created. The lock indicates these roles can be updated and used to manage users, but they cannot be deleted.
Notice
Jane Smith is your school's primary event approver; however, you want to create a role for a secondary event approver in case Jane is unavailable to approve events. You can update the name to reflect this is a secondary role.
Each role has several kinds of information:
Permissions
Users
Module Access
Associations
Note
Some roles don't have an Associations tab.
User-Defined Forms
The tabs appear on the Edit Role page. For more information, see the Edit Role topic.
Click the Create role button. The Create Role page appears.
From the Role Template drop-down, select the role template you want the new role to be based upon. The New Role Name and New Role Description fields automatically show the name and description of the original role template.
In the New Role Name field, update the role name to an easily recognizable name. The name can be based on how roles/positions are set up at your school as well as distinguish how this role differs from the role template.

In the New Role Description field, update the description to highlight permissions or features available to users assigned to the role. The description can help distinguish how the new role differs from the role template.
Click Continue. The Define Access options appear.
Select the checkboxes of the permissions you want to enable for this role.
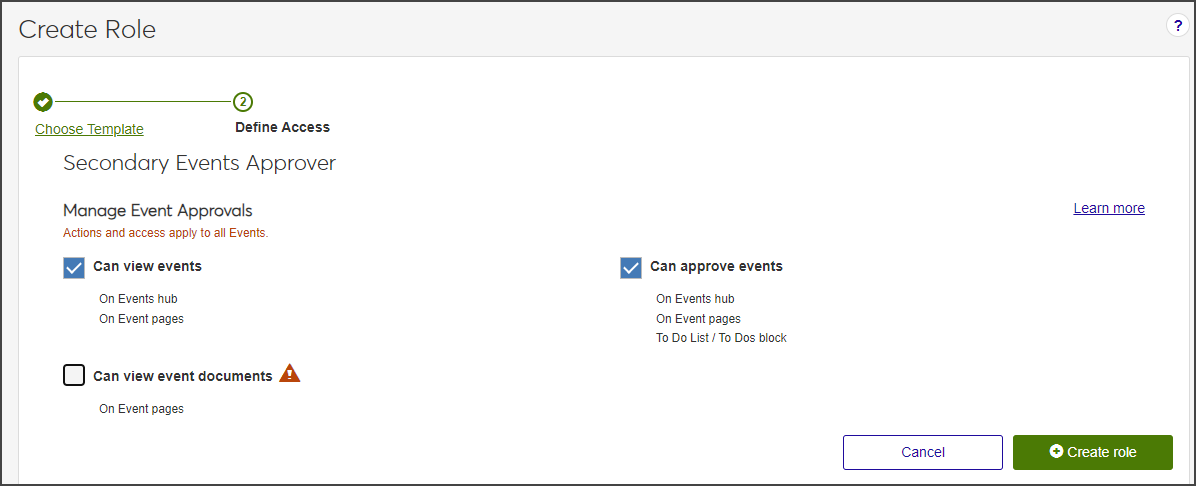
Click Save. The Create Role page closes and the System Roles page reappears.
To assign users to the new role:
Select Edit role from the Options button. The Edit Role page appears.
From the Users in Role section, start typing the name of the user to be added to the role in the field next to the Add to role button.
From the user names that appear, select the user to be added to the role.
Note
Only active J1 Web users can be added to the role. Users are activated using the Desktop application Users window. For more information, see Managing User Access to J1 Web.
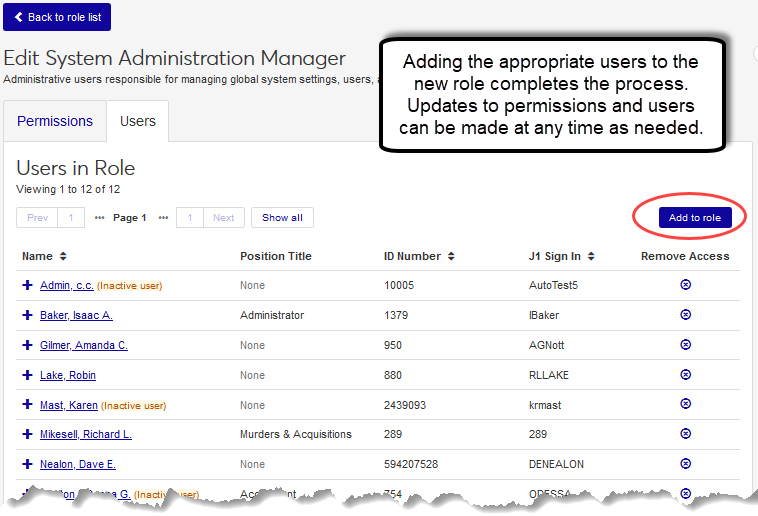
Click the Add to role button. The user is added to the role and immediately has access to information and features associated with the role. Additional user information is available by clicking the Expand icon.
Updates are automatically saved.
From the System Roles page, find the role you want to copy.
From the Options drop-down list, select Copy role. The Copy Role page appears.
The Role Template field automatically shows the name of the template the role being copied is based upon. This field cannot be updated.
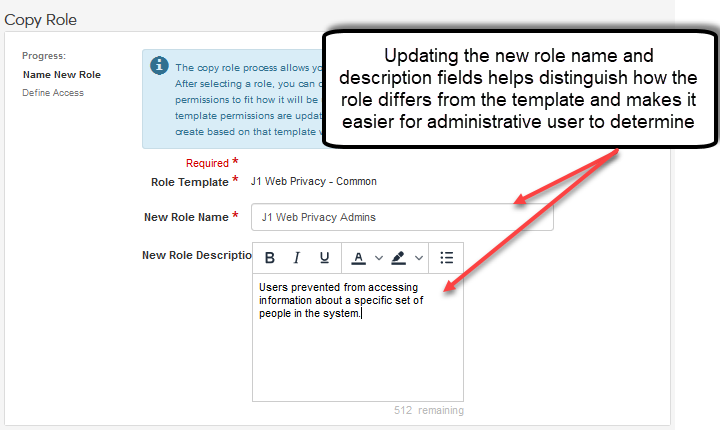
In the New Role Name field, update the role name to an easily recognizable name. The name can be based on how roles/positions are set up at your school as well as distinguish how this role differs from the role being copied.
In the New Role Description field, update the description to highlight permissions or features available to users assigned to the role. The description can help distinguish how the new role differs from the role being copied.
Click Continue. The Define Access options appear.
Select the checkboxes of the permissions you want to enable for this role.
Tip
The permissions enabled for the original role are already selected. They can be disabled and others enabled as needed.
Click Save. The Create Role page closes and the System Roles page reappears.
To assign users to the new role:
Select Edit role from the Options button. The Edit Role page appears.
From the Users in Role section, start typing the name of the user to be added to the role in the field next to the Add to role button.
From the user names that appear, select the user to be added to the role.
Note
Only active J1 Web users can be added to the role. Users are activated using the Desktop Users window. For more information, see Managing User Access to J1 Web.
Click the Add to role button. The user is added to the role and immediately has access to information and features associated with the role. Additional user information is available by clicking the Expand icon.
Updates are automatically saved.
Note
Customizations to standard roles will be lost when a product update is installed. To maintain your customizations, create a new role based on the standard role and give it a unique name.
Locate the role to be updated.
Tip
Use the column headings to quickly sort the listings.
Click the Edit icon next to the role name or description to be updated.
Make the appropriate updates.
Click Save. The updates are applied.
Note
If the role has any users that are not associated with any other roles, the role cannot be deleted. To delete a role with users assigned to it, assign the users to other roles first. For example, Hermione Granger is only assigned to the Academic Advising Module Manager role. Before you can delete the Academic Advising Module Manager role, Hermoine must be assigned to the Advisors role or another role within J1 Web.
Locate the role to be deleted.
Tip
Use the column headings to quickly sort the listings.
From the Manage Role Options drop-down, select Delete role. The delete confirmation pop-up window appears.
Click Yes, delete. Several things happen:
The delete confirmation pop-up window closes and the role is immediately removed from the role listing.
Impacted users are notified the role has been removed in a J1 Web message and a notification banner on their Home page. These link to detailed information about the change.
Note
Users removed from a role still appear on any J1 Web messages and tasks they were a included with before being removed.
To view the J1 Web modules associated with the role, click the Expand icon.
Click the Filter icon. The filter options appear.
Select the checkboxes for the filters you want to use. The filter options appear.
Select and enter the filter options you want to apply to the roles list.
Click Apply. The roles are filtered.
Creating a Role
When you create a new role, you build it from one of the default templates provided by Jenzabar.
When the new role is created, none of the options are selected yet (permissions, users, module access, associations, and user-defined forms). You make the selections on each tab. But when you copy a role, the copied role keeps the original's selections in the following tabs:
Copying a Role
You can copy any existing role—a default template provided by Jenzabar or a copy. the copied role keeps the original's selections in the following tabs:
The copied role keeps the selections of its source role in the following tabs:
Permissions
Module Access
User-Defined Forms
Note
Some roles don't have an Associations tab.
You can make changes to those selections, but you're not starting from scratch.
Note
Selections from the Users and Associations tabs are not copied. (You'll usually want those tabs to be unique in each role, so they start as blank in the copy. You'll add the users and associations.
Yes, as long as:
it isn't a standard Jenzabar-provided role.
all the users assigned to the role belong to at least one other role. For example, if Jane Smith belongs only to the Advisor role being deleted, you must reassign Jane to another role before you can delete the role.
No, customizations are not lost with subsequent software updates.
Active users:
Have their J1 Web login activated in the Desktop application (Users window)
Can be added to a J1 Web role