Define a Text Interaction

Important
Texting is a licensed version only feature for users with a Twilio account. For more information, contact your Customer Success Representative.
Communications lets you send real-time, bi-directional text messages to any constituent in the system with a valid, verified, SMS-capable phone number.
Note
Recipient phone numbers are managed on the Desktop, Name Entity window.
Users assigned to a phone number in J1 Web can use the new Text Communication Type option to send text messages from the Create New Communication window. Text messages are sent in plain text, but you can insert emojis and type out web addresses.
The define interaction process lets you create text messages that can be sent immediately, scheduled, or saved and combined with automation plans that are sent according to a schedule you create.
Note
J1 Web accepts inbound text attachments, but Twilio does not support sending attachments over text yet. This might be available in a future release.
Text messages are charged in 160-character segments, so consider the length of your message as you prepare it.
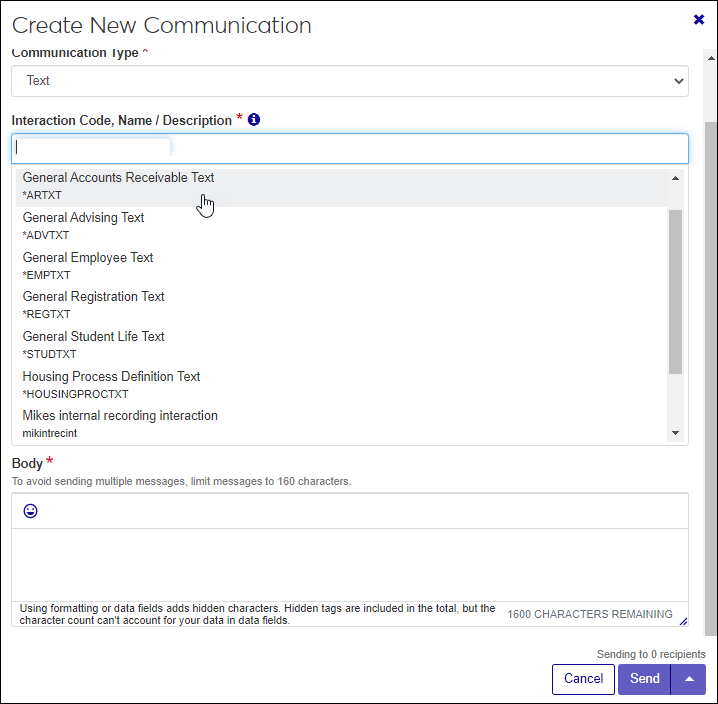
When users send a text somewhere in the system and are asked to select an Interaction Code, the non-templated interactions they have access to are the options that appear.
Access the Communication Management, Define Interaction page.
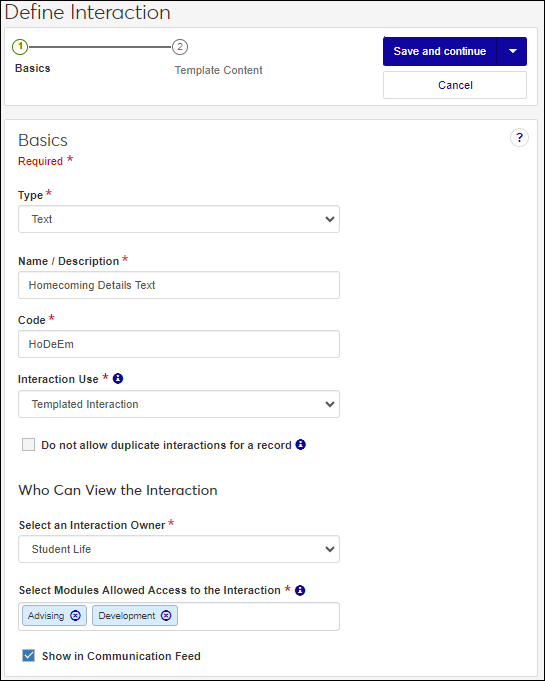
From the Type drop-down, select Text.
In the Name/Description field, enter a recognizable name or description for the interaction.
In the Code field, a unique code is generated for you or you can choose to enter your own unique identifier. Codes cannot be more than 15 characters.
From the Interaction Use drop-down, select Non-Templated Interaction.
If you want to keep the same interaction from being sent to an individual or organization more than once, select the Do not allow duplicate interactions for a record checkbox.
From the Select an Interaction Owner drop-down, select the module/department that is primarily responsible for this interaction type.
Note
If you select a default interaction access code from Communication Preferences (My General Settings), it will be shown here; however, you can change it as needed.
In the Select Modules Allowed Access to the Interaction, start typing and select the modules you want to be able to access the interaction.
Tip
Users in roles with permission to this module code will be able to view and depending on their permissions, work with this interaction. Consider who on campus would benefit from being able to view and potentially comment on this interaction. For example, registrars and advisors may benefit from similar information about a student.
If you want the interaction to be available in an individual’s or organization’s feed, select the Show in Communication Feed checkbox.*
* Available with Communications Plus.
Tip
If sensitive FERPA or HIPPA information might be included in the interaction, it might be better to not include it in the communication feed.
Click Save and finish. The interaction will be available from the Interactions page.
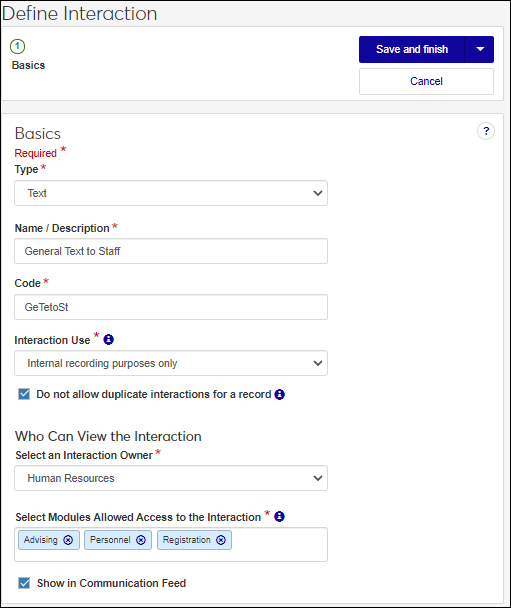
Internal recording purposes only interactions can be used to capture a communication that occurred outside the system that you want recorded and associated with an individual / organization's record.
Internal recording purposes only interactions cannot be used in automation plans.
Access the Communication Management, Define Interaction page.
From the Type drop-down, select Text.
In the Name/Description field, enter a recognizable name or description for the interaction.
In the Code field, a unique code is generated for you or you can choose to enter your own unique identifier. Codes cannot be more than 15 characters.
From the Interaction Use drop-down, select Internal recording purposes only.
If you want to keep the same interaction from being sent to an individual or organization more than once, select the Do not allow duplicate interactions for a record checkbox.
From the Select an Interaction Owner drop-down, select the module/department that is primarily responsible for this interaction type.
Note
If you select a default interaction access code from Communication Preferences (My General Settings), it will be shown here; however, you can change it as needed.
In the Select Modules Allowed Access to the Interaction, start typing and select the modules you want to be able to access the interaction.
Tip
Users in roles with permission to this module code will be able to view and depending on their permissions, work with this interaction. Consider who on campus would benefit from being able to view and potentially comment on this interaction. For example, registrars and advisors may benefit from similar information about a student.
If you want the interaction to be available in an individual’s or organization’s feed, select the Show in Communication Feed checkbox.*
* Available with Communications Plus.
Tip
If sensitive FERPA or HIPPA information might be included in the interaction, it might be better to not include it in the communication feed.
Select a save option.
To save and send the interaction at another time or as part of a set, click Save and finish. The interaction will be available from the Interactions page.
To save and apply the interaction immediately, click Save and apply now.
From the Recipients drop-down, select Data Sets to use a query to determine who will have the document applied to their record based on data conditions or select People / Organizations to select recipients individually.
Click Save and continue. The Text Content step appears.
In the Content field, enter your text message. Formatting options include bold, italics, underline, strikethrough, bulleted and numbered list, and hyperlink.
Click Save and finish. The message is sent and the interaction available from the Interactions page.
Templated interactions are reusable communications your school sends out repeatedly. They can be sent individually or grouped in an automation plan and sent according to a schedule. For example, your school might send texts about upcoming registration dates, library or student center hours, and homecoming every fall. You can use these interactions as templates and reuse them every year.
Access the Communication Management, Define Interaction page.
From the Type drop-down, select Text.
In the Name/Description field, enter a recognizable name or description for the interaction.
In the Code field, a unique code is generated for you or you can choose to enter your own unique identifier. Codes cannot be more than 15 characters.
From the Interaction Use drop-down, select Templated Interaction.
If you want to keep the same interaction from being sent to an individual or organization more than once, select the Do not allow duplicate interactions for a record checkbox.
From the Select an Interaction Owner drop-down, select the module/department that is primarily responsible for this interaction type.
Note
If you select a default interaction access code from Communication Preferences (My General Settings), it will be shown here; however, you can change it as needed.
In the Select Modules Allowed Access to the Interaction, start typing and select the modules you want to be able to access the interaction.
Tip
Users in roles with permission to this module code will be able to view and depending on their permissions, work with this interaction. Consider who on campus would benefit from being able to view and potentially comment on this interaction. For example, registrars and advisors may benefit from similar information about a student.
If you want the interaction to be available in an individual’s or organization’s feed, select the Show in Communication Feed checkbox.*
* Available with Communications Plus.
Tip
If sensitive FERPA or HIPPA information might be included in the interaction, it might be better to not include it in the communication feed.
Click Save and continue. The Template Content step appears.
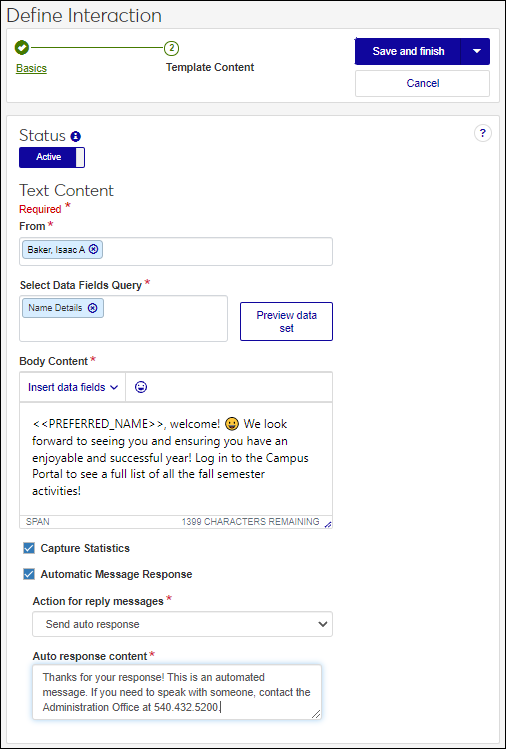
To make the email available for use, click the Status option to make it active.
In the From field, start typing and select the individual sending the text. This could be you or another user in the system. The recipient will only see the phone number the interaction is being sent from unless they add it as a contact.
Note
Selected individual must be associated with a Twilio phone number in J1 Web (Settings page, Texting option). If you have multiple users you want to see and respond to the text, add them to the number.
In the Body Content field, enter your text content.
To use data fields in the text, select a Data Fields Query. Data fields can be added using the Insert data fields option where you enter text content. Fields are shown as placeholders that are replaced with content when the text is sent. For example, PREFERRED_NAME is replaced with the recipient’s preferred name.
To add emojis, click the emoji icon and select the one you want to insert into the message.
To include a link in a text interaction, type in the URL. Recipients with a smart phone will be able to see and use an active hyperlink. Recipients with a phone that only accepts plain text will see the text you entered.
Tip
Texts are limited to 160 characters. You can enter up 1,600 characters, but multiple messages will be sent in 160-character chunks.
If your school is using Twilio and wants to collect analytical information, select the Capture Statistics checkbox.
Note
This lets Twilio collect information about the text such as delivery success and read rates. This analytic information can be helpful for evaluating text effectiveness and concentrating efforts.
If you want to send recipients an automated response when they reply:
Select the Automatic Message Response checkbox.
From the Action for reply messages drop-down, select:
Send auto response to send an automated text response to an incoming text response. Enter the body of the text response you want to send in the Auto response content field.
Discard responses so senders won’t receive a reply and their responses are discarded.
Select a save option.
To save and send the interaction at another time or as part of a set, click Save and finish. The interaction will be available from the Interactions page.
To save and apply the interaction immediately, click Save and apply now. For more details, see Save and Apply Interaction Immediately.
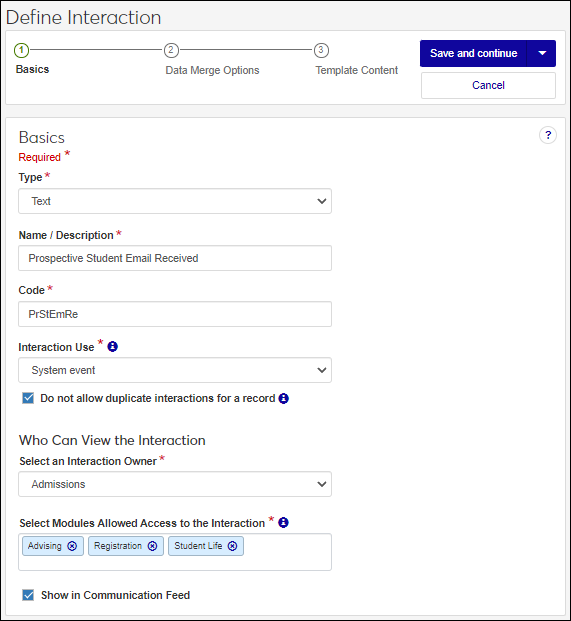
System event interactions get sent/applied when a selected event occurs in J1 Web as opposed to being sent on a schedule. For example, you can send a text to an admissions counselor when a prospective student emails a general admissions inbox.
Access the Communication Management, Define Interaction page.
From the Type drop-down, select Text.
In the Name/Description field, enter a recognizable name or description for the interaction.
In the Code field, a unique code is generated for you or you can choose to enter your own unique identifier. Codes cannot be more than 15 characters.
From the Interaction Use drop-down, select System Event.
If you want to keep the same interaction from being sent to an individual or organization more than once, select the Do not allow duplicate interactions for a record checkbox.
From the Select an Interaction Owner drop-down, select the module/department that is primarily responsible for this interaction type.
Note
If you select a default interaction access code from Communication Preferences (My General Settings), it will be shown here; however, you can change it as needed.
In the Select Modules Allowed Access to the Interaction, start typing and select the modules you want to be able to access the interaction.
Tip
Users in roles with permission to this module code will be able to view and depending on their permissions, work with this interaction. Consider who on campus would benefit from being able to view and potentially comment on this interaction. For example, registrars and advisors may benefit from similar information about a student.
If you want the interaction to be available in an individual’s or organization’s feed, select the Show in Communication Feed checkbox.*
* Available with Communications Plus.
Tip
If sensitive FERPA or HIPPA information might be included in the interaction, it might be better to not include it in the communication feed.
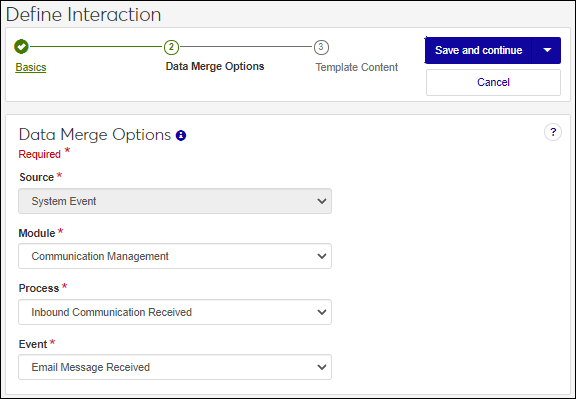
Click Save and Continue. The Data Merge Options step appears.
From the Module, Process, and Event drop-downs, select the module/ department, process, and event you want to trigger sending the email.
Note
Additional module, process, and event options will be available in future releases.
Click Save and continue. The Template Content step appears.
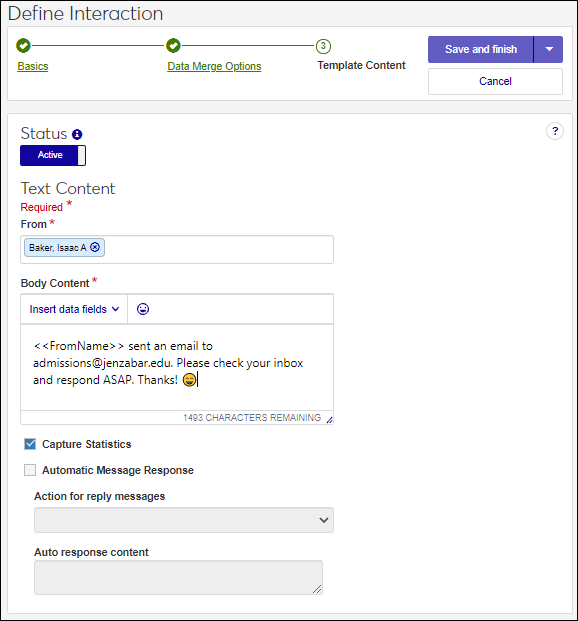
To make the email available for use, click the Status option to make it active.
In the From field, start typing and select the individual sending the text. This could be you or another user in the system. The recipient will only see the phone number the interaction is being sent from unless they add it as a contact.
Note
Selected individual must be associated with a Twilio phone number in J1 Web (Settings page, Texting option). If you have multiple users you want to see and respond to the text, add them to the number.
In the Body Content field, enter your text content.
To use data fields in the email, select them from the Insert data fields options where you enter your text content. Available fields vary by the system event selected. For example, if you are sending a text after receiving an email, then you can only insert data fields related to emails. Fields are shown as placeholders that are replaced with content when the text is sent.
To add emojis, click the emoji icon and select the one you want to insert into the message.
To include a link in a text interaction, type in the URL. Recipients with a smart phone will be able to see and use an active hyperlink. Recipients with a phone that only accepts plain text will see the text you entered.
Tip
Texts are limited to 160 characters. You can enter up 1,600 characters, but multiple messages will be sent in 160-character chunks.
If your school is using Twilio and wants to collect analytical information, select the Capture Statistics checkbox.
Note
This lets Twilio collect information about the text such as delivery success and read rates. This analytic information can be helpful for evaluating text effectiveness and concentrating efforts.
If you want to send recipients an automated response when they reply:
Select the Automatic Message Response checkbox.
From the Action for reply messages drop-down, select:
Send auto response to send an automated text response to an incoming text response. Enter the body of the text response you want to send in the Auto response content field.
Discard responses so senders won’t receive a reply and their responses are discarded.
Click Save and finish. The interaction is created and available on the Interactions page.