Using Roles to Control User Access in Registration
Important
Information and features vary according to the roles to which you belong and the permissions associated with those roles. For more information, contact your module manager or your campus support team.
Warning
Make sure you have set users up in J1 Desktop before assigning roles and permissions in J1 Web.
Roles determine what users can and cannot do in J1 Web. Each role has specific privileges to different features and information available to those users assigned to it. Jenzabar provides standardized 'role templates' for each module. These templates can be copied and tailored to create new roles with varying permissions to control different levels of access. For example, you can set roles up according to your school's organizational or departmental hierarchy. Roles can have multiple users assigned to them and a user can belong to multiple roles.
Tip
You can add users to a role by using the Manage Registration Roles page, or you can add roles to a user’s permissions by using the Manage System Users page in the System Administration hub.
Before a user can manage J1 Web Registration roles, a System Administrator must give them permission. The easiest way to do this is to add them to the role of Registration Module Manager.
Tip
When planning your user roles, think about what information each user will need access to. A registrar will likely need the ability to create and grant overrides, whereas other faculty may not need to be able to do that. Who will need to be able to create and edit courses and sections?
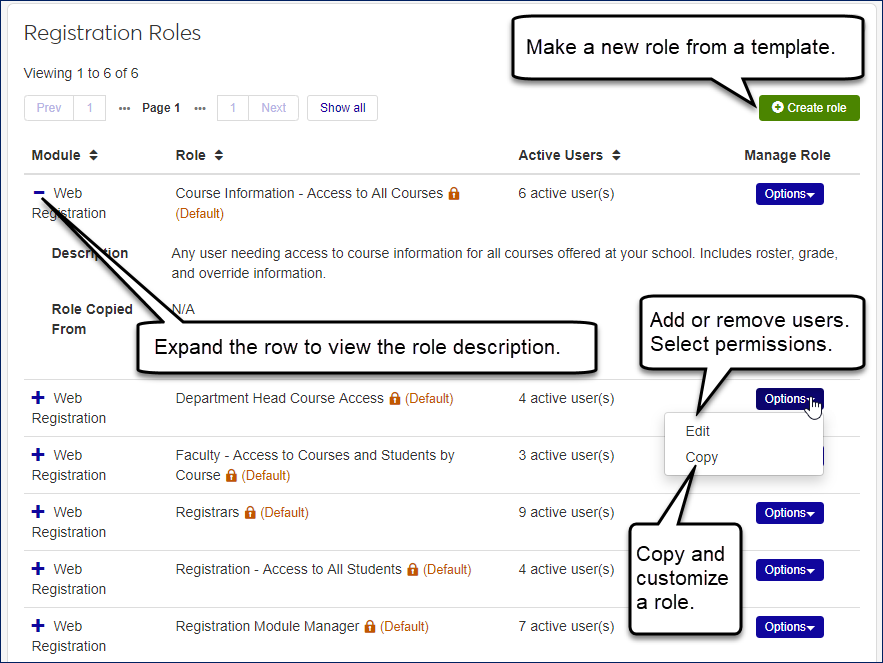
Registration Roles
Use this page to view roles for the registration module. With proper permissions, you can jump to pages where you can edit, copy, or create registration roles. Editing allows you to add or remove users to the role and to change the role's permissions. Creating and Copying are ways of creating a new role based on a selected template. You can change the name and description, and you can change the role's permissions.
Note
If the original role's permissions are changed in a future release, then any roles created or copied from that template will automatically inherit the new changes.
Create
When you create a new role, you choose a default role for a template. All the permissions are deselected to begin with, and you select the permissions you want assigned to the role.
Copy
Copying could save you time over creating because when you copy an existing role, the permissions are selected in the new role just as they were in the one you copied from. You can then edit the selections as you wish.
Filtering the Roles
You can filter the list of registration roles as you can many lists. Two of the criteria are especially interesting. With Default vs. Copied Roles, you can limit the list to only original roles or to ones your school has created. With Versions, you can see when roles were created or last updated.
Default Roles
These roles are available by default. With proper permissions, you can use the default roles to copy and create new roles, customize the permissions in those roles, and assign users.
Tip
We recommend using the default roles only as templates for creating and copying the roles you'll actually use. Leave the default roles with no users assigned. Assign users and permissions in roles you copy and create. That way you can customize permissions for your various users, and you always have the default roles as uncustomized templates.
Course Information – Access to All Courses
Any user needing access to course information for all courses offered at your school. Includes roster, grade, and override information.
Department Head Course Access
Department heads accessing courses and the related faculty and students. Access granted according to the course code’s department.
Faculty – Access to Courses and Students by Course
Faculty managing their course loads and rosters. Features for supporting and advising students enrolled in their courses are also available.
Registrars
Registrars and individuals working in the registrar’s office who need to access student and course information, and perform registration tasks.
Registration – Access to All Students
Registrars and high-level administrators such as presidents and deans of students who need to view information on individual students such as holds, financial aid status, test scores, programs, graduation status, course list, and retention score.
Registration Module Manager
Administrative users managing Registration roles and settings.
Registration Override and Access Control
Registrars and other who need the ability to override various registration errors.
Registration Process Manager
Administrative users who run processes such as recalculating academic records, updating class rank, and academic standing, and more.
Registration Reporting Manager
Administrative users who run registration reports.
The information on each role's Edit page is divided into tabs.
Permissions Tab
This tab appears in every role. It contains all the role's permissions, which you can select and deselect. When a permission is unselected, users assigned to that role don't have that permission.
Users Tab
The Users tab in every role lets you view, add, and remove users from the role. Users assigned to the role have all the selected permissions in the role.
Module Access Tab
The Module Access tab in every role allows you to turn on or off access to the various modules for communications interactions. For example, if the Registration and Advising modules are selected, the users with that role will be able to use communications (such as notifications, email, and texts) in those modules.
User-Defined Forms Tab
The User-Defined Forms tab in every role allows you to select one of the following permissions for the user-defined fields in use:
Can configure UDEF form
Can edit UDEF data
Can view UDEF data
No permissions (default)
Associations Tab
This tab appears in some roles. It lets you fine-tune the instances in which the users have the selected permissions. In Registration, only the Department Head role (and roles made from it) have the Associations tab. So you make copy of the role for each different academic department, and associate it with the specific department. You'll have one role for the Biology Department, another for the Math Department, and so on.
Use the System Roles Filter to narrow the list of roles that appear. You can filter by keywords, default or copied roles, or by the version that the role was last updated.
Create or Copy a New Registration Role
You can make a new role using the Create Role Wizard, or by copying an existing role. In both cases you can use the Edit option to:
Customize the permissions available to each role
Assign users to the appropriate roles
Control access to different interactions
Create a New Role Based on a Default Role Template
Tip
Use the create role feature to create a new registration role based on the Jenzabar-provided default role templates. The wizard steps you through selecting the template and determining what permissions will be available with the role.
Click the Create Role button.
Choose the default template you want to use for the new role. Give it a unique name, and modify the description.
Customize the permissions for this role and save. Registration Roles page reappears.
Locate the newly created role and from the Options drop-down, select Edit.
To add users to the role, use the Users tab.
To grant access to different interactions, use the Interaction Access tab.
To grant access to associated groups for Department Head-based roles, use the Associations tab.
Copy and Modify a Role
Tip
Use the copy role feature to create a new registration role based on any existing role. The wizard steps you through selecting the template and determining what permissions will be available with the role.
On the row for the role you want to copy, click Options and select Copy.
Give the role a unique name, and modify the description.
Customize the permissions for this role and save. Registration Roles page reappears.
Locate the newly created role and from the Options drop-down, select Edit.
To add users to the role, use the Users tab.
To grant access to different interactions, use the Interaction Access tab.
To grant access to associated groups for Department Head-based roles, use the Associations tab.
Note
For more information about managing roles, see the System Administration Online Help.
Whether you create a new role or copy an existing one, you select an existing role to use as a template. However, there are key differences between creating and copying.
Availability: You can copy any role, but only default roles can be used as templates for creating new roles.
Permissions: When you copy, all permissions are copied in their current state, but when you create, no permissions are selected. In each case, you can select and deselect permissions in the new role.