Tribal Tab
Important
Information and features vary according to the roles to which you belong and the permissions associated with those roles. For more information, contact your module manager or your campus support team.
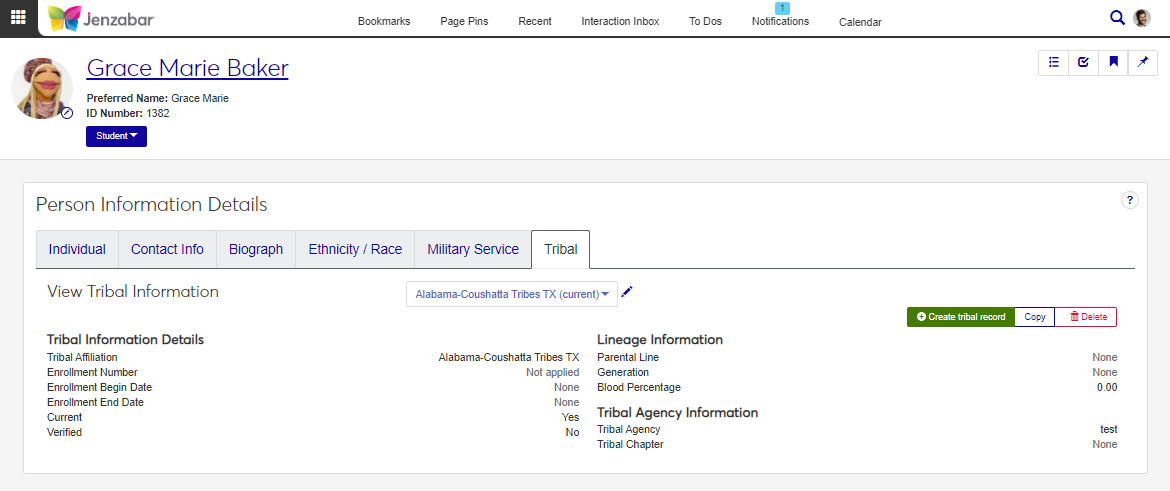
The Tribal tab lets you track an individual's tribal membership. Tribal information is typically used for state and other reporting. From this page, you can view, create, copy, edit, and delete tribal records.
Desktop Location
Tribal information can also be managed in Desktop on the Biograph tab, Tribal subtab of several windows, including:
Name Entity
Maintain Biographical Details
Review Internet Submissions
Biographical Data
Student Information
Maintain Candidacy
HR Employee Master via Payroll
HR Employee Master via Personnel
Database Location
Tribal records are saved to the TRIBAL_INFORMATION table.
Permissions Needed
To view and manage tribal information, you must be in a Person Management role (or copy of it) with the appropriate permissions. For additional information, see Person Management Permissions.
Fields
The options available in the following fields are maintained on the Tribal page in the Campus-wide Definitions hub.
Field | Description |
|---|---|
Tribal Affiliation | Required. Indicates the name of the tribe the individual is associated with. |
Enrollment Number | Up to 25 characters. The enrollment number associated with the person's tribal affiliation. |
Current Flag | Indicates that the selected record is the current record. Selected by default. Only one tribal record can be marked as "Current". When the checkbox is selected, the checkbox for the existing record is deselected when the new record is saved. |
Verified | Indicates the tribal record has been verified. Verification methods vary by school. |
Enrollment Begin Date | Indicates the person's tribal affiliation start date. |
Enrollment End Date | Indicates the person's tribal affiliation end date. |
Parental Line | Indicates the parental line associated with the person's tribal lineage (e.g., father is Cherokee). |
Generation | Indicates the generational lineage associated with the individual (e.g., second generation Cherokee). |
Blood Percentage | Indicates the person's blood percentage for the selected tribal lineage (e.g., 50% Cherokee). Up to 3 digits before and 2 after the decimal. |
Tribal Agency | Indicates the tribal agency the person is associated with. |
Tribal Chapter | Indicates a chapter within a specified tribal agency. |
Use the global search to access the person's summary page.
From the Person options drop-down, select Person information details. The Person Information Details page opens.
Click the Tribal tab.
To view other tribal records, click the View Tribal Information drop-down and select an option.
On the Person Information Details page, Tribal tab, click Create tribal record. The Create Tribal Record pop-up opens.
Select a Tribal Affiliation from the drop-down. Required.
Enter an Enrollment Number (up to 25 characters).
The Current Flag is selected by default. Deselect it if this is not the current record.
Note
Only one tribal record can be marked as "Current". When the checkbox is selected, the checkbox for the existing record is deselected when the new record is saved.
Select the Verified checkbox if the tribal record has been verified by your school.
Enter the Enrollment Begin Date.
Enter the Enrollment End Date, if applicable.
Select the Parental Line from the drop-down.
Select the Generation from the drop-down.
Enter the person's Blood Percentage (up to 3 digits before and 2 digits after the decimal).
Select the Tribal Agency from the drop-down.
Select the Tribal Chapter from the drop-down.
Click Create.
On the Person Information Details page, Tribal tab, select the record you want to copy from the View Tribal Information drop-down.
Click Copy. The Copy Tribal pop-up opens.
Update the fields as needed. For more information about the editable fields, see Fields.
Click Create.
On the Person Information Details page, Tribal tab, select the record you want to update from the View Tribal Information drop-down.
Click the Edit icon next to the record name. The Edit Tribal Information pop-up opens.
Update the fields as needed. For more information about the editable fields, see Fields.
Click Update.
Caution
Deleting a tribal record permanently removes it from the system.
On the Person Information Details page, Tribal tab, select the record you want to delete from the View Tribal Information drop-down.
Click Delete. The Delete Tribal Record pop-up opens.
Click Yes, delete.
You may not have the right permissions. Contact your campus support team for additional assistance.