An Student Finances license is required to work with this window.
|
An Student Finances license is required to work with this window. |
This window can be used to look up students with payment plans and review plan information. From this window, you can also:
View all plans the student has consented to
See the status of the payments on the plan
Review a summary and details of the plan
Make a payment
Adjust plan payment amounts
Lock plan balances
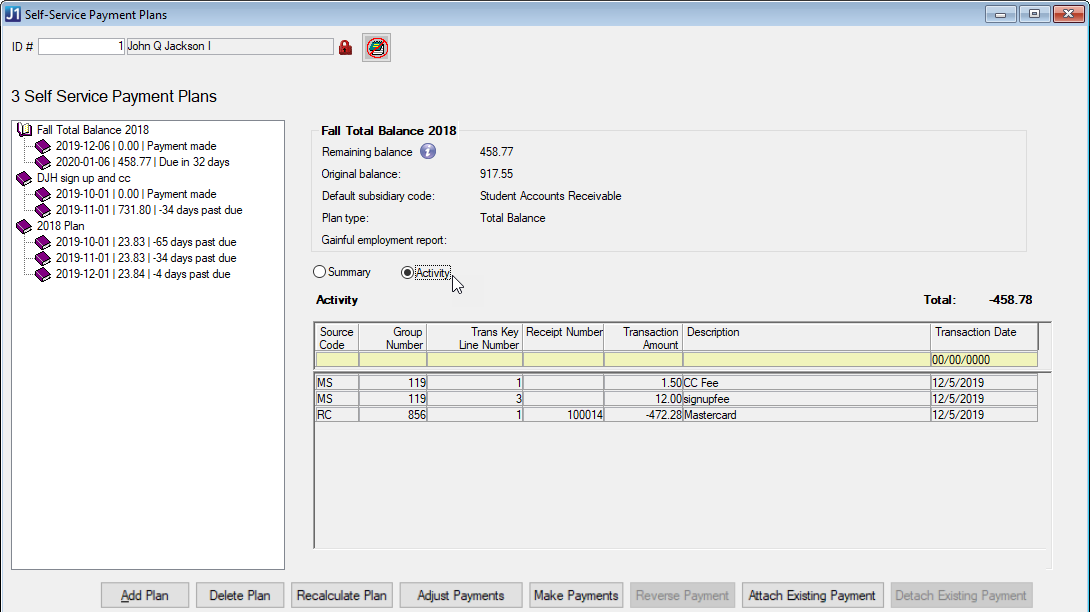
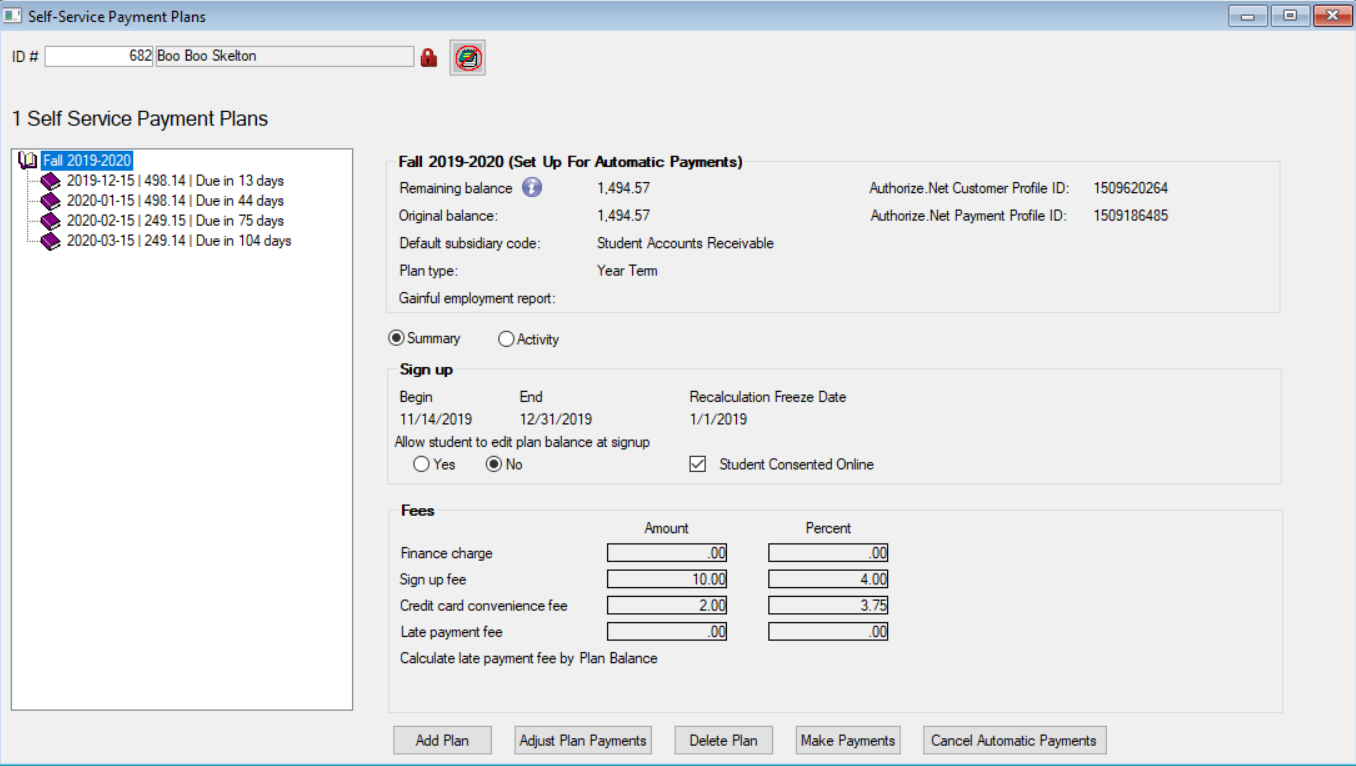
Review Plan Summary, Payments, and Adjustments
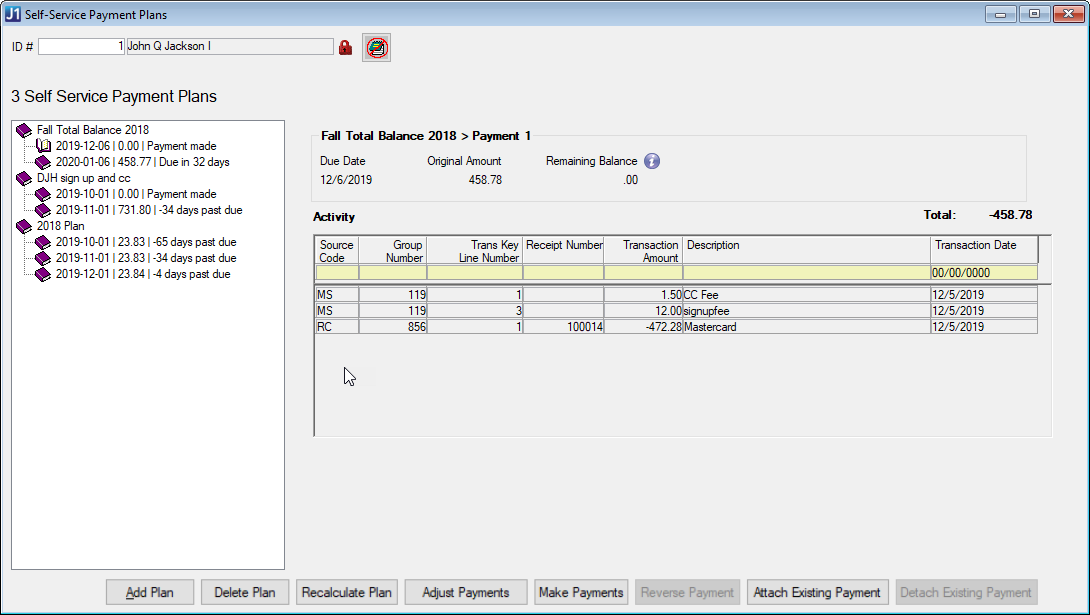
From the Self-Service Payment Plans window, enter the ID number of the student you want to view.
Choose a payment plan from the list of plans the student has consented to.
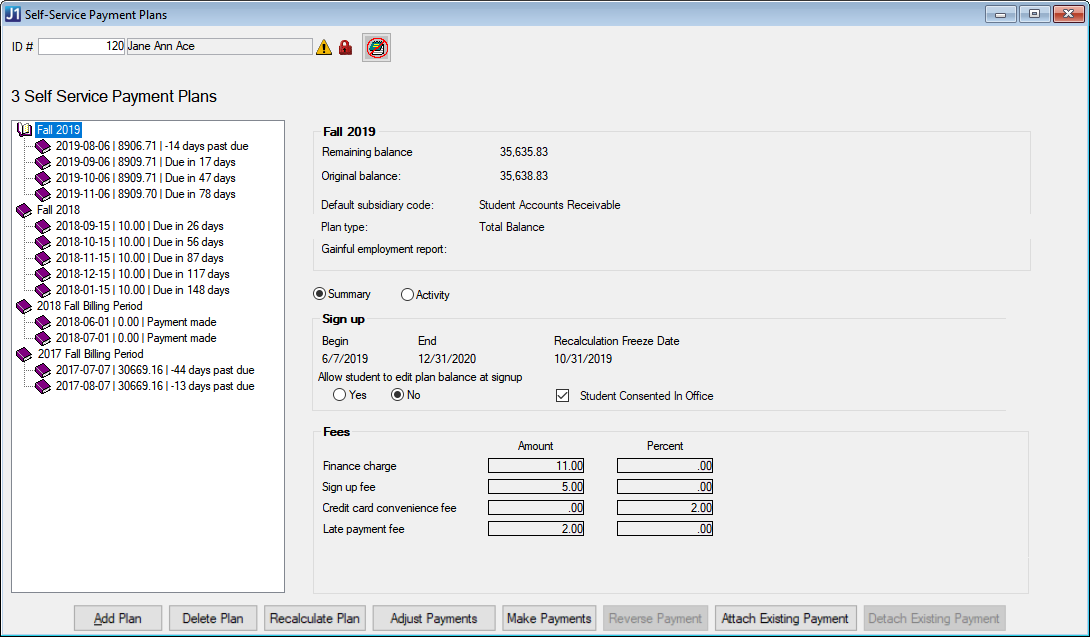
When the right-side of the window populates with the plan information, you will see an option for Summary or Activity.
If you choose Summary, you can view plan information such as the sign up dates and any fees associated with the payments.
Add a Payment Plan to a Student
If you want to manually add an eligible payment plan to the student, open the Self-Service Payment Plans window, enter the ID number of the student you want to view.
Click Add Plan.
Choose a payment plan from the drop-down. Example

If you want to associate a subsidiary code to the plan, choose one from the drop-down options.
 |
You can only tie Receivable type subsidiaries to a payment plan, so the drop-down will show the available subsidiaries. |
The balance will automatically populate, but you can edit the plan's starting balance if needed.
If there are any fees associated with the payment plan, you will see a message listing any dollar amounts and/or percentages after the number of monthly payments.
Choose month and day when the payment is due from the drop-down.
Review plan payments and due dates.
If you are working with the student, and the student has already consented to the plan, select the Student consented to plan checkbox. If the student has not consented to the plan yet, you can check this box later by selecting the payment plan on the Self-Service Payment Plans window and going to the Summary section.
 |
Students must consent to all payment plans either in office or on the JICS Campus Portal. |
Click Save.
|
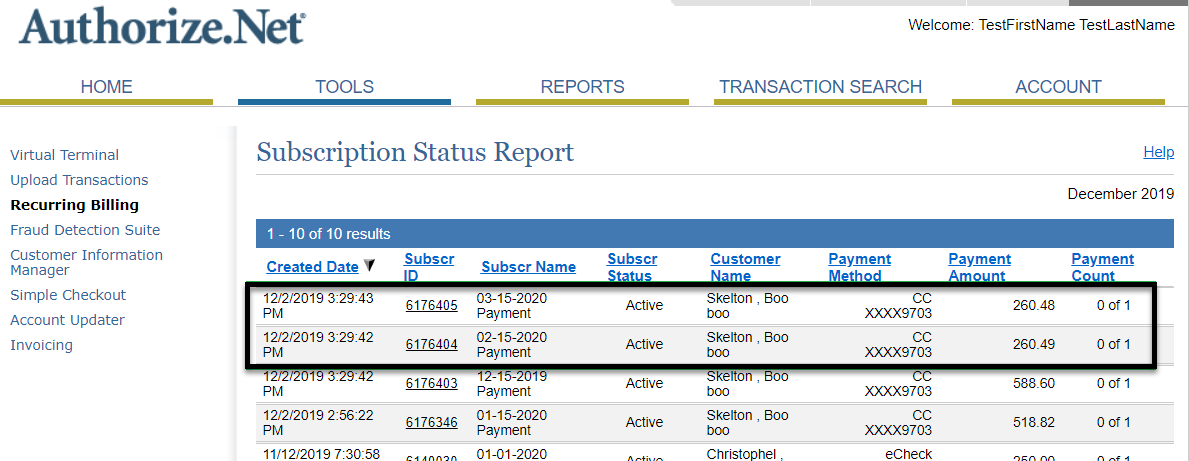
Student's
can also make payments online from the Payment Plan or My
Financial Account features. All payments will appear on the
Self-Service Payment Plans window when you select a monthly
payment. Example
|
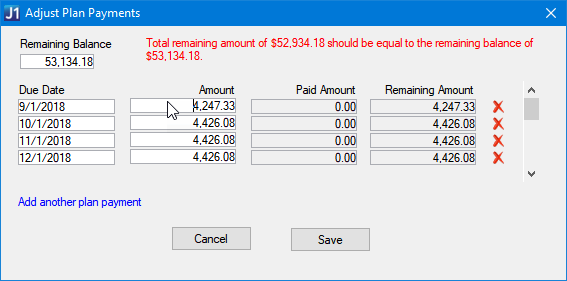
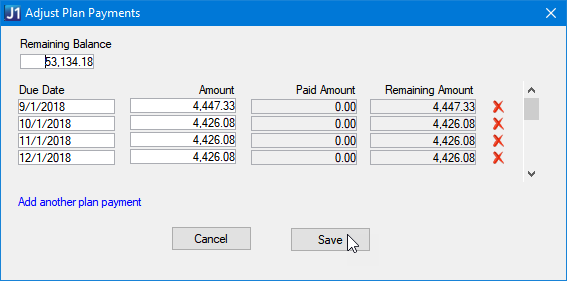
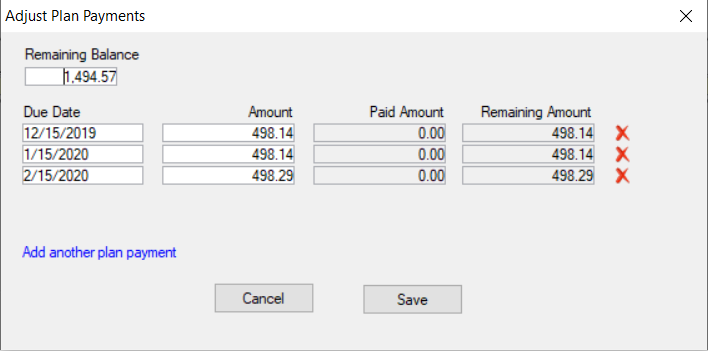
From the Adjust Plan Payments window, you can change the balance, payments, and due dates for a student's payment plan.
From the Self-Service Payment Plans window, enter the ID number of the student you want to view.
Select a payment plan from the list of plans the student has consented to.
Click the Adjust Plan Payments button. Example
You can change the Remaining Balance total by clicking the field and editing the amount. Example
|
When you change the Remaining Balance, you will need to make sure the individual payment rows add up to the remaining balance before you can click Save. |
|
Changing the Remaining Balance does not change the student's overall account balance, only the balance for this payment plan. |
You can click in the Due Date fields to change the date a payment is due.
Edit the Amount field to change the amount due for the payment.
|
You can change the Amounts for each individual payment row, however, the individual payment amounts must add up to the Remaining Balance amount. If the individual amounts do not equal the Remaining Balance, you will see a red note at the top of the Adjust Plan Payments window. Example
|
Click the Add another plan payment link to add a row to the payment plan. You can then add a new due date and amount.
When you are finished adjusting the payment plan, click Save.
Recalculate a Student's Payment Plans Balances
If you want to recalculate payment plan balances for a student, open the Self-Service Payment Plans window, enter the ID number of the student you want to view.
Click on the top level of the Payment Plan to select the Plan you want to recalculate.
Click Recalculate Plan.
The recalc process for that student/plan combination will recalculate the remaining plan payments and the Self-Service Payment Plans window will refresh to show the changes.
|
Plans with the Balance Locked checkbox selected will not be recalculated. |
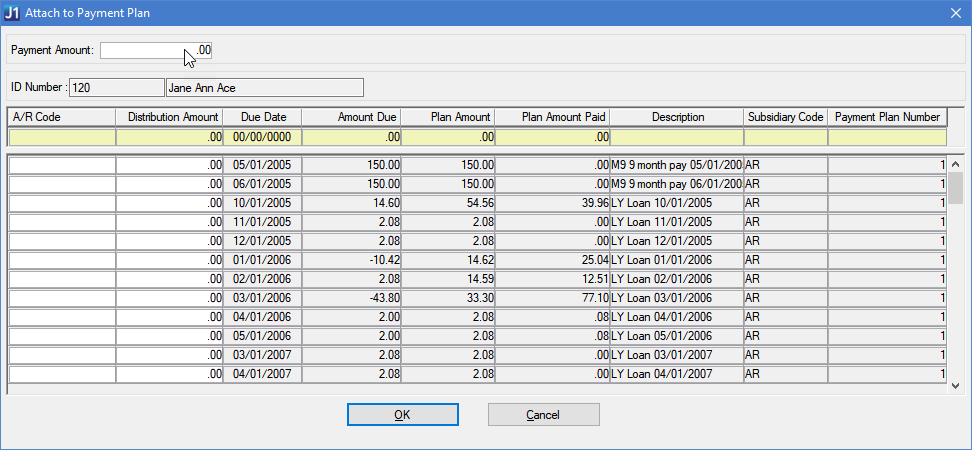
Attach an Existing Payment to a Payment Plan Payment
|
Only receipts with the same year/term or billing period as the selected payment plan will appear in the window. If the payment plan is based on the total amount any receipts not attached to a payment plan will appear. |
|
The total amount of the receipt(s) cannot be greater than the remaining payment amount. |
Detach an Existing Payment from a Payment Plan Payment
If a payment was incorrectly associated to a payment plan payment and a receipt needs to be removed from the plan payment, you can do so with the Detach Existing Payment button.
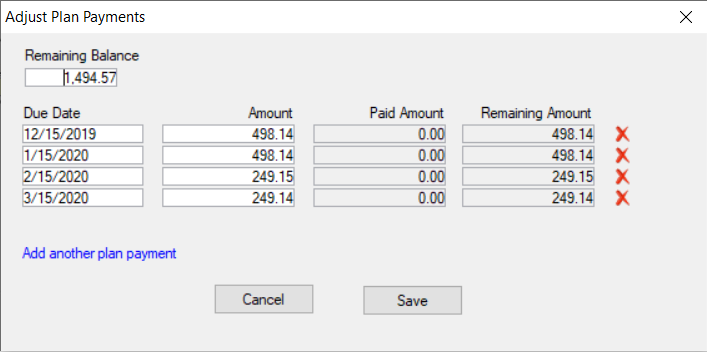
Adjust Payment Plans with Automatic Payments
The process for adjusting payment plan payments for automatic payments is the same as adjusting payments for manual payments. The biggest difference is that when the payment in adjusted from the Self-Service Payment Plans window, the amounts are also updated on Authorize.Net.
From the Self-Service Payment Plans window, enter the ID number of the student you want to view.
Select a payment plan with automatic payments set up from the list of plans the student has consented to.
Click the Adjust Plan Payments button. Example
You can change the Remaining Balance total by clicking the field and editing the amount. Example
Before:
After:
|
When you change an individual payment or the Remaining Balance, you will need to make sure the individual payment rows add up to the remaining balance before you can click Save. |
|
Changing the Remaining Balance does not change the student's overall account balance, only the balance for this payment plan. |
You can click in the Due Date fields to change the date a payment is due.
Edit the Amount field to change the amount due for the payment.
|
You can change the Amounts for each individual payment row, however, the individual payment amounts must add up to the Remaining Balance amount. If the individual amounts do not equal the Remaining Balance, you will see a red note at the top of the Adjust Plan Payments window. |
Click the Add another plan payment link to add a row to the payment plan. You can then add a new due date and amount.
When you are finished adjusting the payment plan, click Save. The new payment information is updated in J1 and on Authorize.Net. Example
If you need to delete a plan that is already associated with a student, make sure you notify the student and work out any financial obligations before removing the plan.
From the Self-Service Payment Plans window, enter the ID number of the student you want to view.
Select a payment plan from the list of plans the student has consented to.
Click the Delete Plan button.
|
By default, the Reverse Payment button is hidden and disabled. Only when you select a payment plan payment associated with one or more RC transactions will the button be visible but still disabled. The button will only be visible and available when a single receipt transaction is selected in the Activity grid for a posted receipt that is not already a reversed or a reversal receipt. |
From the Self-Service Payment Plans window, enter the ID number of the student you want to view.
Choose a payment plan from the list of plans the student has consented to.
When the right-side of the window populates with the plan information, you will see an option for Summary or Activity.
Choose Activity, to see details for any payment, fee, or charge that has been applied to the payment plan balance.
Select the Payment Plan and Payment Plan Payment you want to reverse, then click the Reverse Payment button. Example
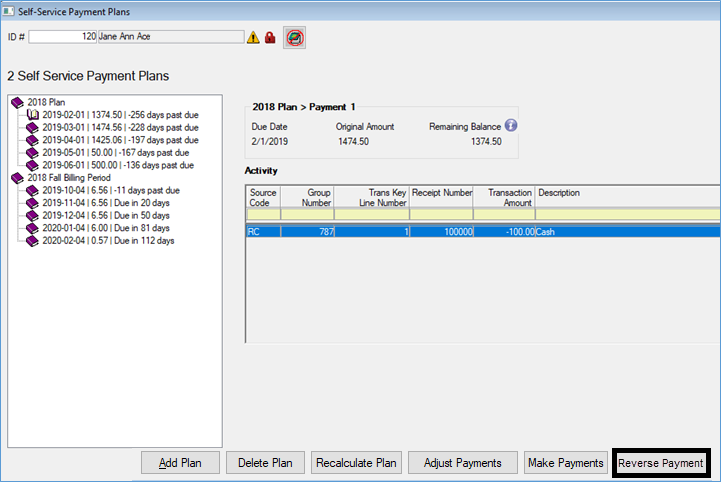
Once you have clicked the Reverse Payment button, a receipt batch will be created to offset the receivable subsidiary and offset account balances associated with the original receipt transaction. If the reversed payment included any miscellaneous charges (such as sign up and/or convenience fees) the system will also create a reversing miscellaneous charge batch to reverse the original amounts.
The Self-Service Payment Plans window will refresh and the reversed payment will be displayed along with the new plan balance.
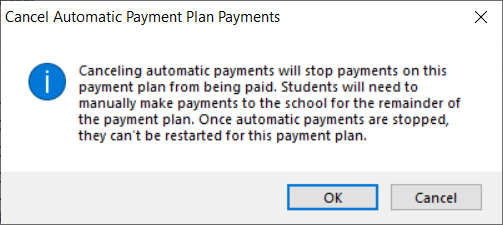
If a student needs to stop their automatic payments on a payment plan, and cannot access the Campus Portal to do so, you can stop the payments from the Self-Service Payment Plans window.
From the Self-Service Payment Plans window, enter the ID number of the student you want to view.
Select a payment plan from the list of plans the student has consented to.
If the student has set up automatic payments, you will see a Cancel Automatic Payments option at the bottom of the window. Example
Click the Cancel Automatic Payments button to stop the automatic payments for the student.
 |
Clicking this button will only stop automatic payments for this payment plan. If a student has multiple payment plans set up with automatic payments, you will need to cancel automatic payments on each payment plan. |
A warning will appear, click OK to finish. Example
 |
Once automatic payments are canceled for a payment plan, they cannot be restarted on the same payment plan. Manual payments will be the only option for this payment plan. |
|
Canceling automatic payments does not clear the balance due on the payment plan. |
The student will now be responsible for making manual payments on this payment plan.
|
The Balance Locked checkbox is only visible when the Recalculation Freeze Date is in the future. This checkbox lets the payment plan administrator "lock" or freeze an individual payment plan balance to keep it from being impacted by changes to the student's account balance. This is helpful when balances need to be locked for manual changes to payment plans. |
From the Self-Service Payment Plans window, make a manual update to the payment plan balance or monthly payment amounts.
Select the Balance Locked checkbox.
Click OK in the confirmation pop-up. The database is updated so the balance will not be updated when the automatic recalculation process runs.
How are these self-service payment plans different from the legacy payment plans?
The new Self-Service Payment Plans give student's the ability to view, select, consent, and pay on payment plans in the Campus Portal through the Payment Plan and My Financial Account features.
What if students are currently on a legacy payment plan?
They will need to complete the payment plan they are currently on.
Can I change the balance on a student's payment plan?
Yes, as long as you have the appropriate permissions, you can make changes to a payment plan balance using the Adjust Plan Payments.
|
You can change the Amounts for each individual payment row, however, the individual payment amounts must add up to the Remaining Balance amount. If the individual amounts do not equal the Remaining Balance, you will see a red note at the top of the Adjust Plan Payments window. Example
|
Payment plans set up for automatic payments will not be auto-recalculated. Any changes causing the plan balance to be changed will need to be updated through the Adjust Plan Payments option on the Self-Service Payment Plans window.
Can a plan that has had payments be deleted?
No, once a plan has payment activity, it cannot be deleted.
Sometimes, due to financial hardships or the need to change plans, you may need to close one payment plan that already has payments. To do that, you can click the Adjust Payment Plans button and zero out the plan balance. The plan's remaining amount is still part of the student's overall balance, and if necessary, you can setup a new payment plan for the student.
|
Changing the Remaining Balance does not change the student's overall account balance, only the balance for this payment plan. |
What are the Attach/Detach Existing Payment Buttons for?
For when a payment is made that should/shouldn't be attached to a payment plan payment. These buttons are enabled when an individual payment row is selected. The Detach Existing Payment button allows users to detach the selected payment from the plan it's currently attached to. The Attach Existing Payment allows users to select an existing receipt that was not originally attached to the payment plan when the payment was made.
The checkbox on the Self-Service Payment Plan window will change depending on where the student consented to the payment plan.
When a student signs up for a payment plan, they can do so in-person or online from the JICS Campus Portal. If they sign up online, they will consent to the plan by reading the agreement and clicking the consent checkbox. If they sign up in person, they will be able to verbally consent to the plan and you can click the consent checkbox from the Add a Payment Plan window or the Self-Service Payment Plan window.
What amounts are calculated to determine a student's account balance?
A student's account balance is calculated using flags from General Ledger. Three flags are checked to verify student account balances:
Include in Account Balance checkbox on the A/P & A/R Subsidiary Definitions window
Payment Source Code? checkbox on the Define Journal Source Codes window
Include in Payment Plan Balance checkbox on the Define Journal Source Codes window.
What does the Recalculate Plan button do?
This button will run the recalc process for that student/plan combination to recalculate the remaining plan payments.
|
This is the same recalc that automatically occurs when there is any event that occurs that affects the plan balance (ie. New charges/adjustments/refunds, etc). |
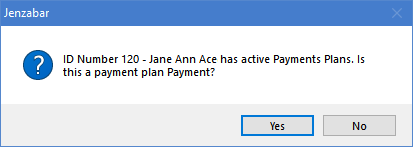
Why would I need to reverse a payment?
When an online payment is made, it is immediately considered a received payment and the payment plan payment is marked as paid. Some payment types can take a few days to clear, and if for some reason it doesn't, the payment will need to be reversed so the plan reflects that amount is still due.
Can I set up automatic payments for a student in Desktop?
No, automatic payments must be set up by the student in the Campus Portal.
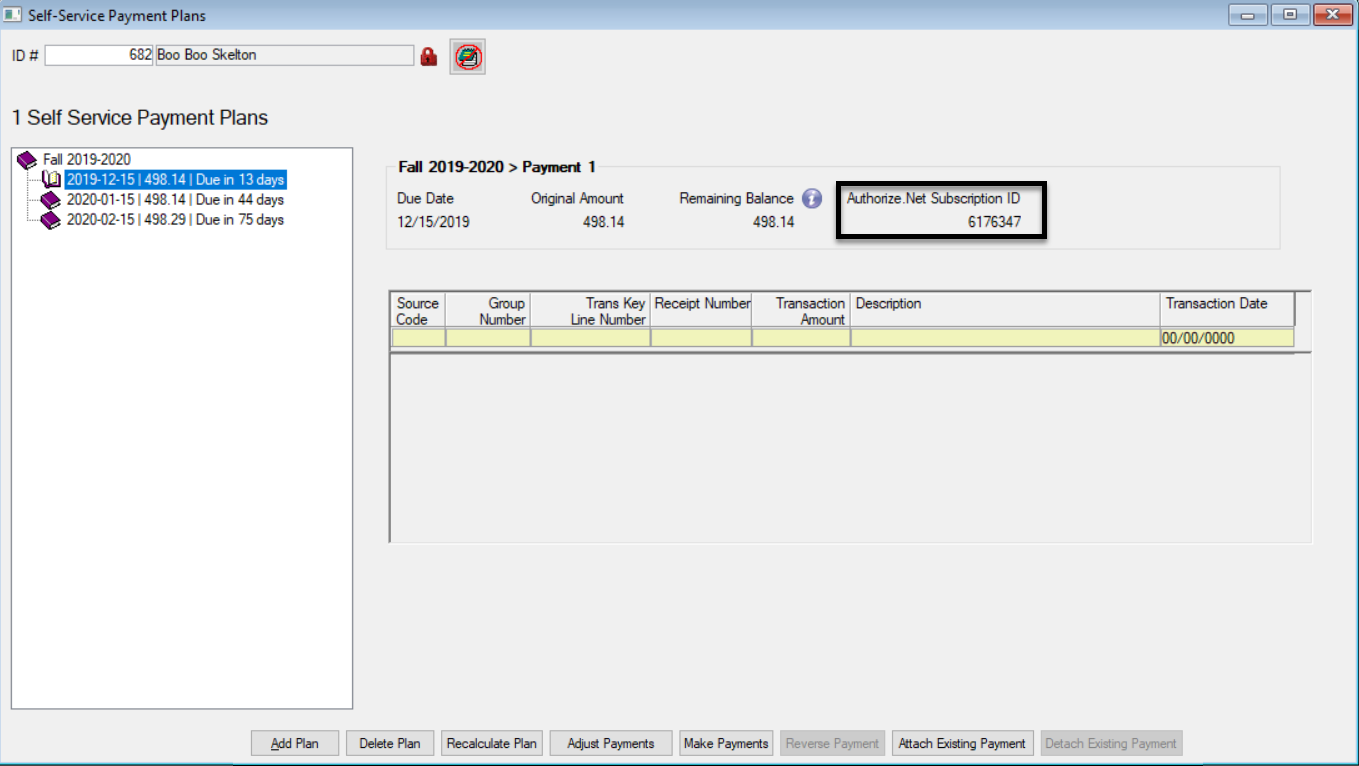
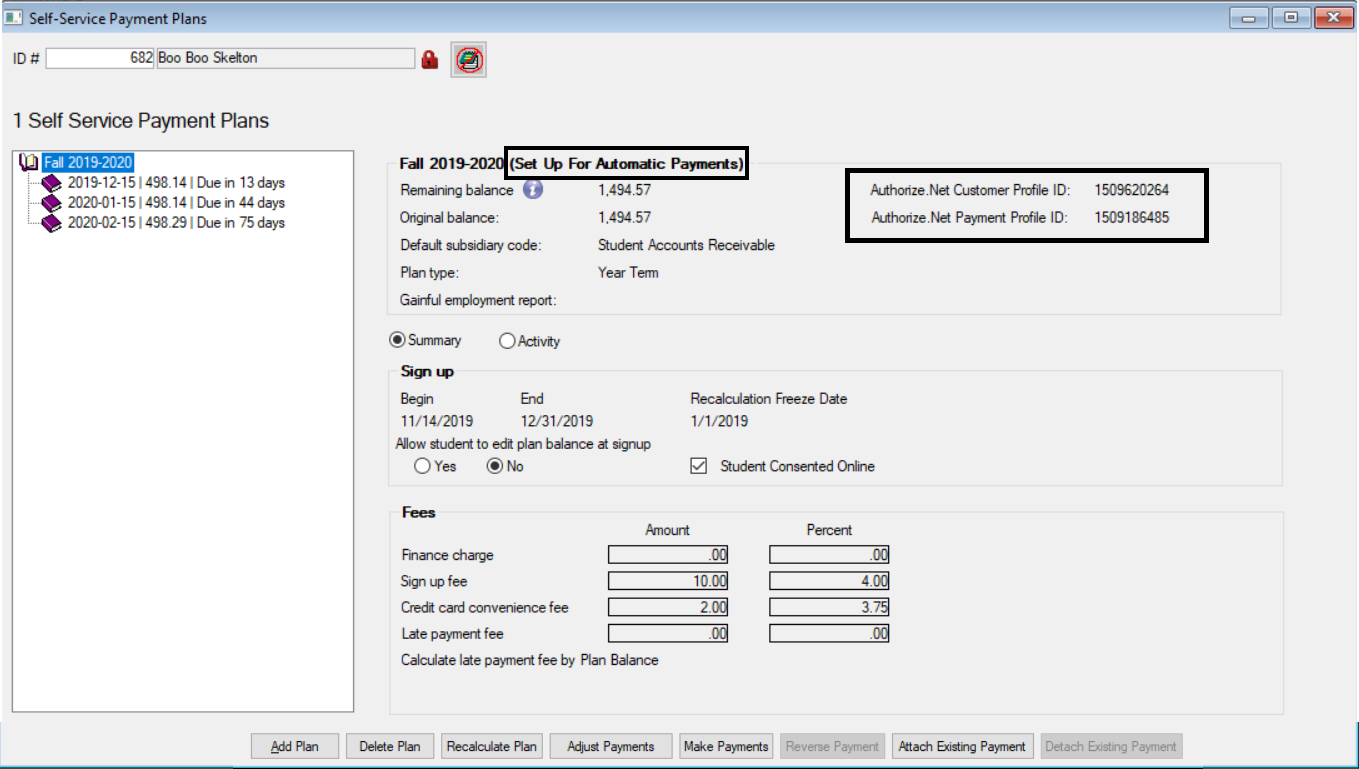
How will I know if a student is using automatic payments?
If a student has set up automatic payments, when you open the payment plan in the Self-Service Payment Plans window, you will see (Set Up For Automatic Payments) next to the plan name, Authorize.Net customer and payment ID numbers, and the Cancel Automatic Payment button will be available at the bottom of the window. Example