Online Application Setup
Overview
The Online Application Setup utility allows administrators to setup and modify the Jenzabar SONIS Online Application. It can be used to add or remove fields, send automated emails to applicants, and control how the applicant is entered into the Jenzabar SONIS system. Institutions can have more than one active online application. Applications are differentiated by the program(s) assigned to them.
For more training on this process, click here to access a Jenzabar Learning & Development course on the SONIS Online Application.
Applicant Portal Button
Once a user has submitted their Online Application and the application has been imported to SONIS, the applicant gains access to the Jenzabar SONIS Applicant Portal. You can add a link to the Applicant Portal on the Apply Online page to ensure that new applicants know how to find the Applicant Portal. Check the Enable Applicant Portal Button box on the Apply Online Login Setup page to add the button.

Note
The page instructions that appear above the button can be edited from the Page Instructions/Buttons utility under the Systems hub.
Attachments Directory
Before creating an application, institutions that want to allow applicants or references to attach files to the application must first ensure that there is a folder for these files to be stored in. For hosted customers, Hosted Services will handle this process. For self-hosted customers, navigate to the Web Options page in the Systems hub and scroll down to the Online Attachments Directory field. Enter the name of the folder on the system where online application attachments will be stored and click Submit to save the entry.

Creating Applications
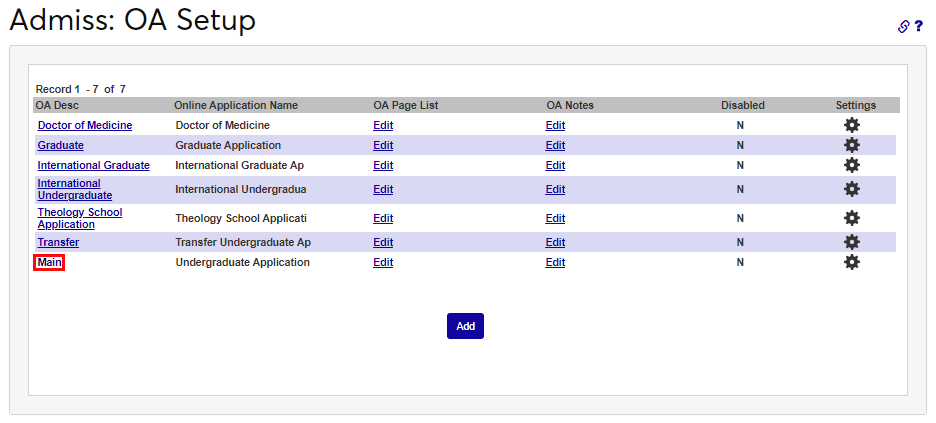
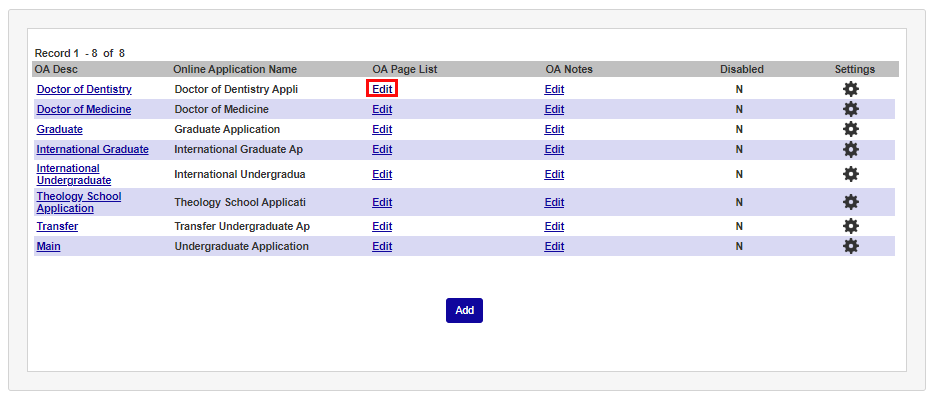
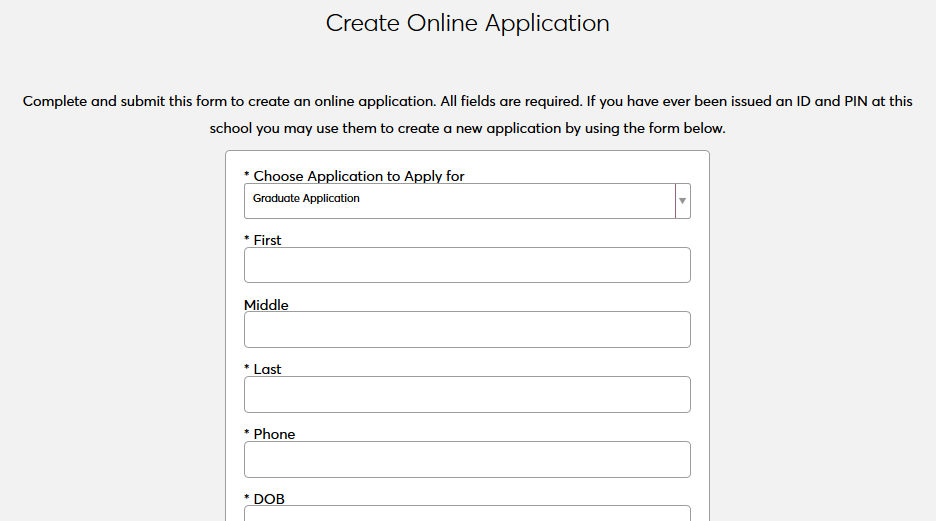
To begin creating an application, navigate to Online Application Setup in the Systems hub. If a school created an online application before the multiple online applications update, the application will be listed as Main. Click the OA Description to edit the basic details of an existing application or click Add to create a new application.
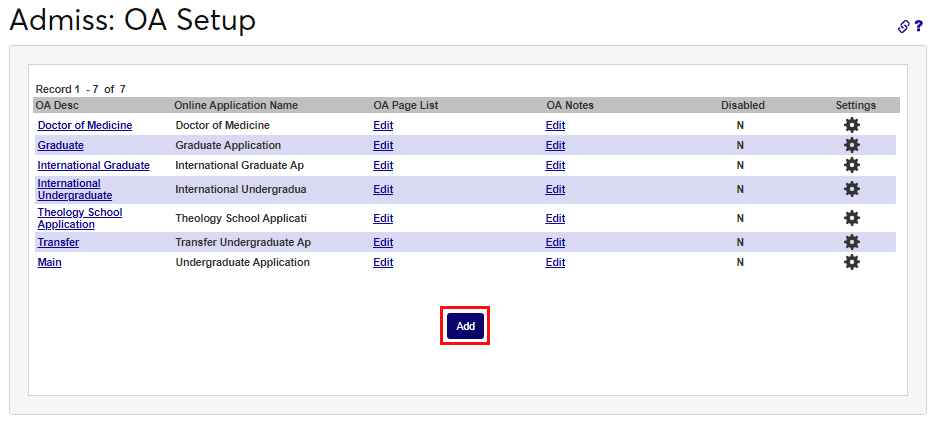
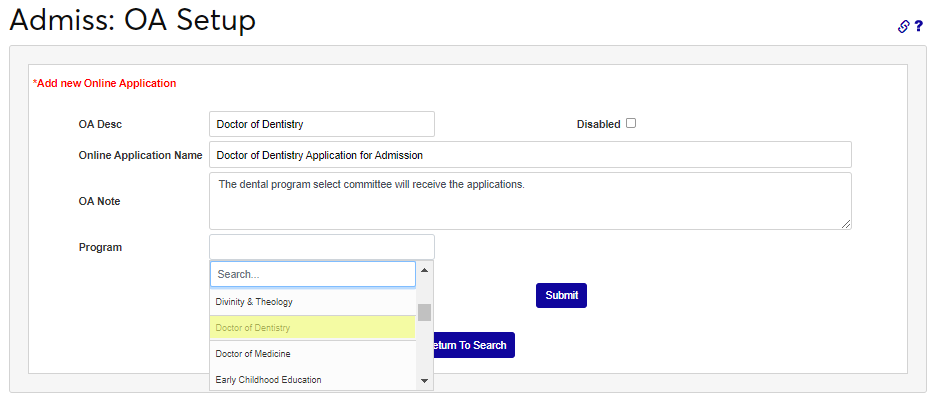
On the following page, create an OA Description that will be used as the label for the application inside Jenzabar SONIS, including tables. This field has a 50-character limit.
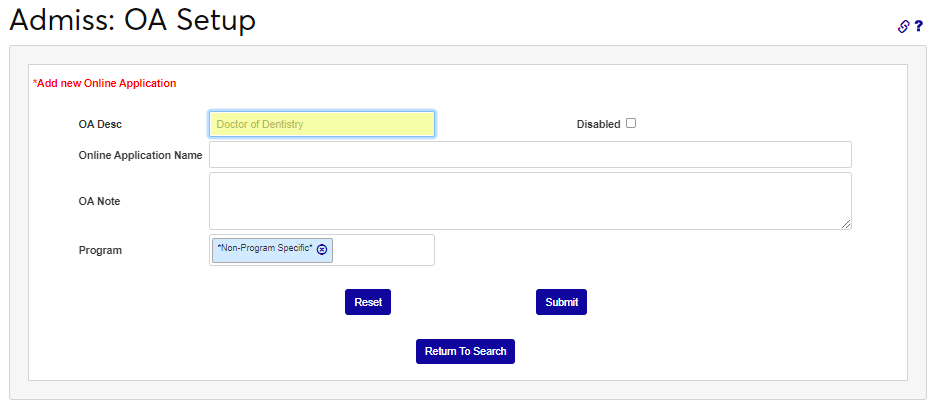
Next, provide an OA Name for the application. This is the name that applicants will see and be able to select. The field has a 100-character limit.
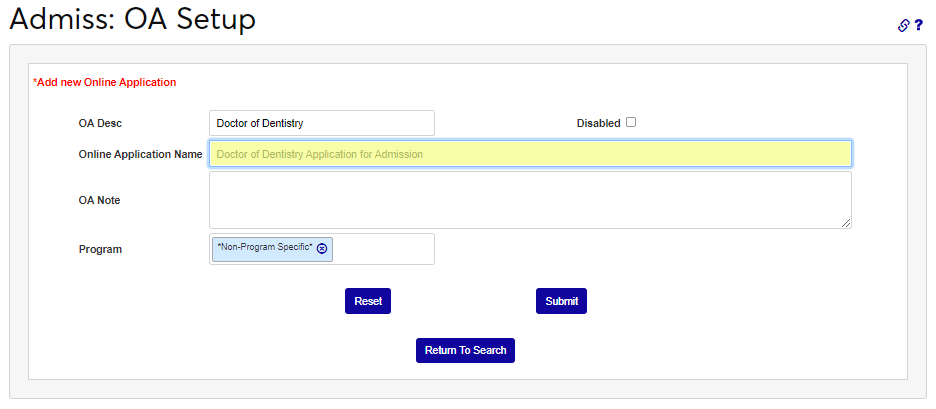
The OA Note field is used to add clarification about the purpose of the application and will display on this page only. There is no character limit for this field.
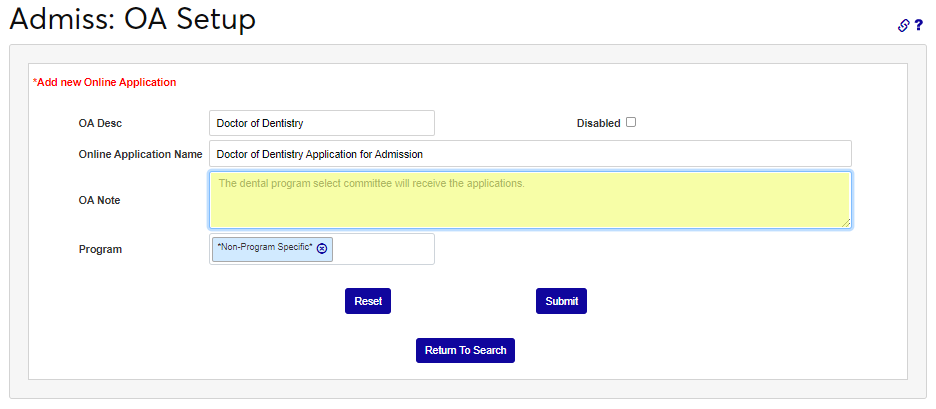
Select a program or programs to be associated with the application. Applicants will only be able to see and select programs selected in this list when completing this application.
When editing an existing application, the Disabled box can be used to prevent an application from being used. If the Disabled box is checked, the application will not be viewable or selectable by applicants.
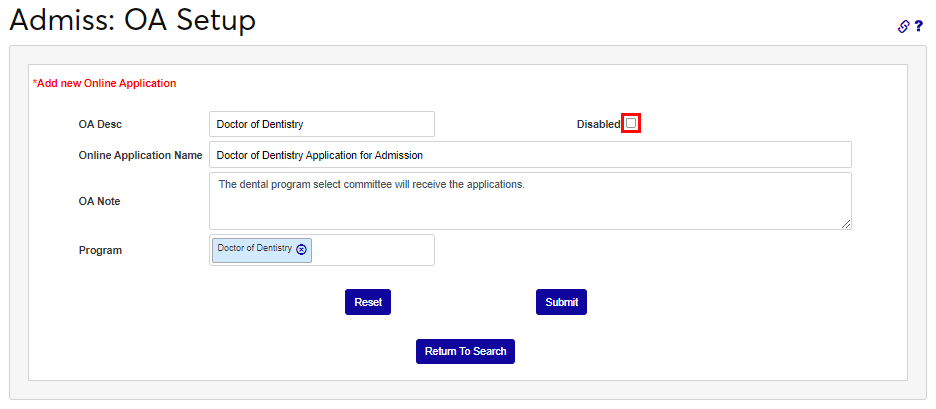
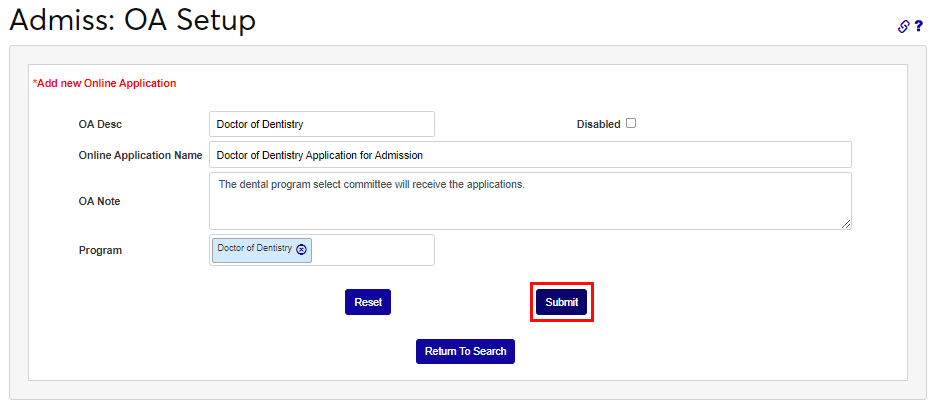
Click the Submit button to create the application or save edits.
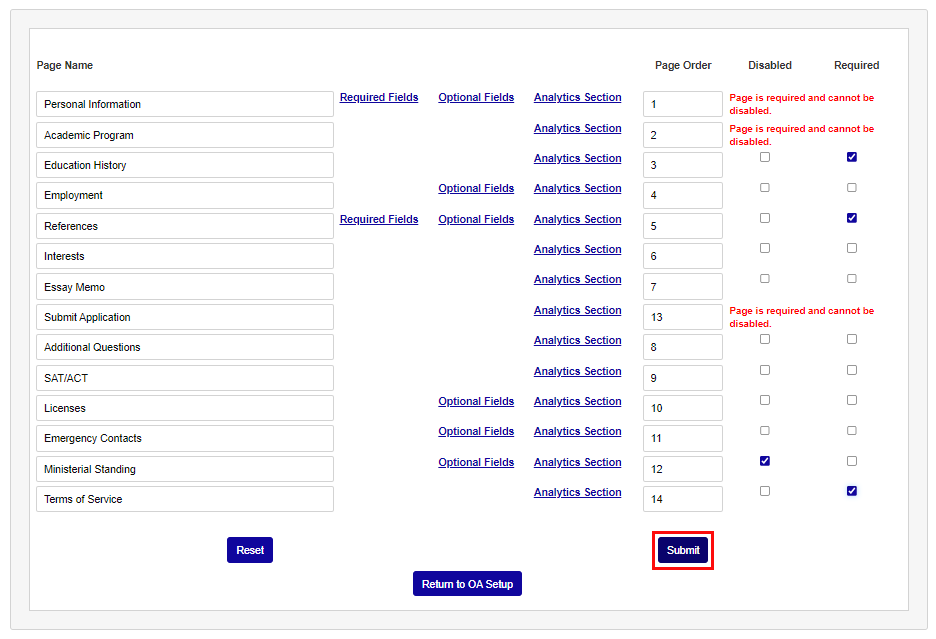
Page List
Once an application has been created, administrators can choose which pages should be included. By default, all pages are included. To change this, click Edit under the OA Page List column.
The Page List, as the name suggests, lists all the pages that appear in a SONIS online application. In the left-hand column, each Page Name can be changed, as appropriate to the application type. Each field has a 50-character limit.
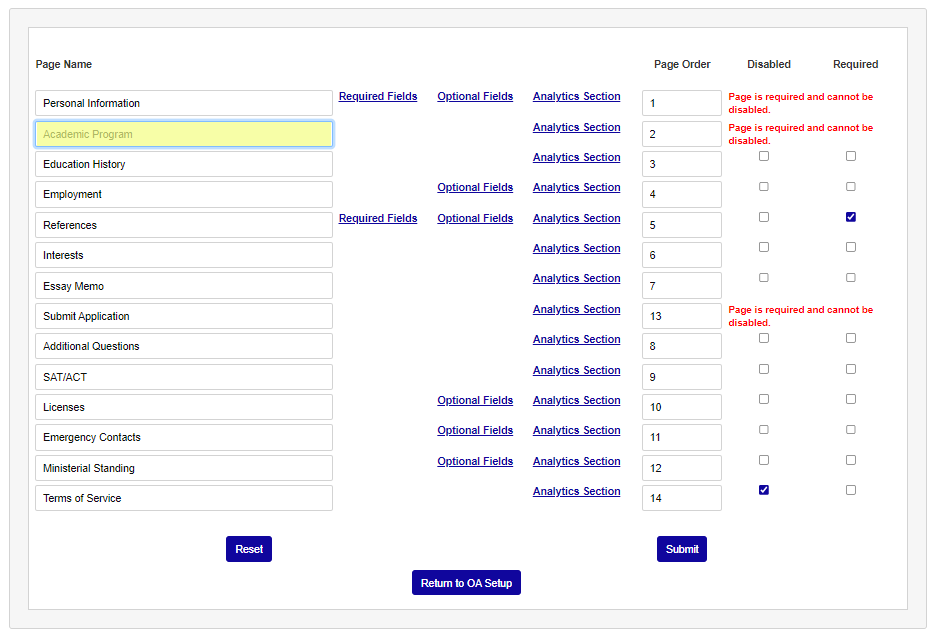
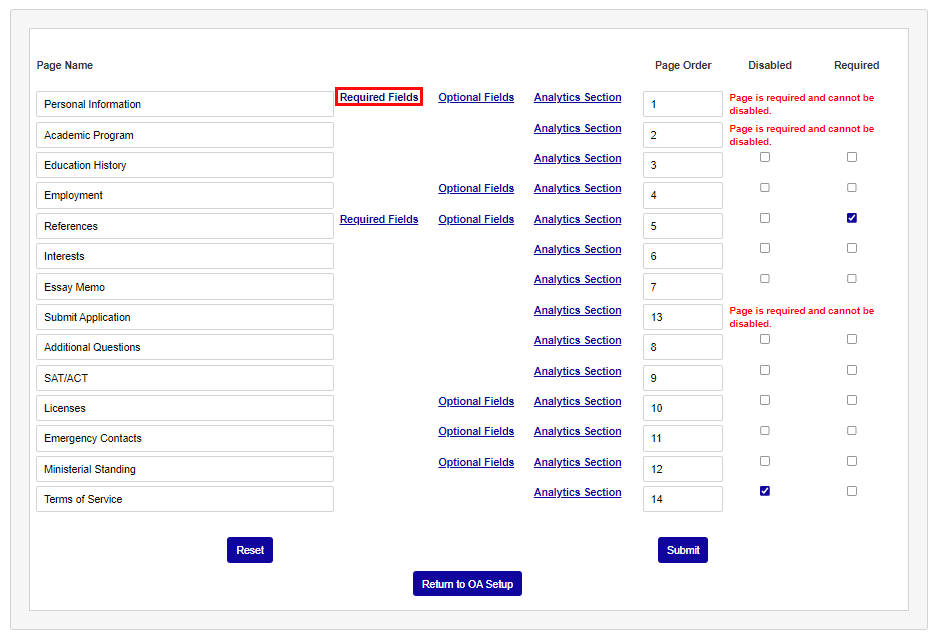
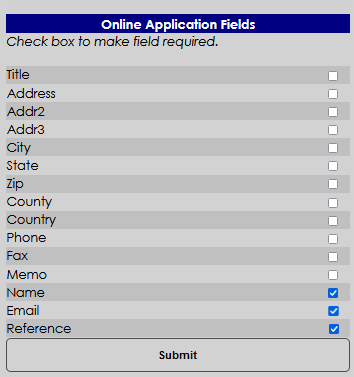
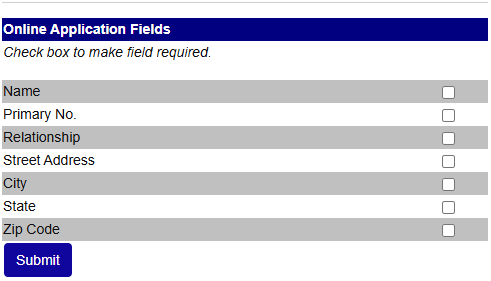
For any page with the Required Fields link, clicking the link opens a new window with the option to choose which fields should be required in the specific application page. Applicants cannot proceed without responding to each required field. Every field listed will be displayed on the application page, but only fields with their box checked will be required. Click Submit to save any changes made to this page.
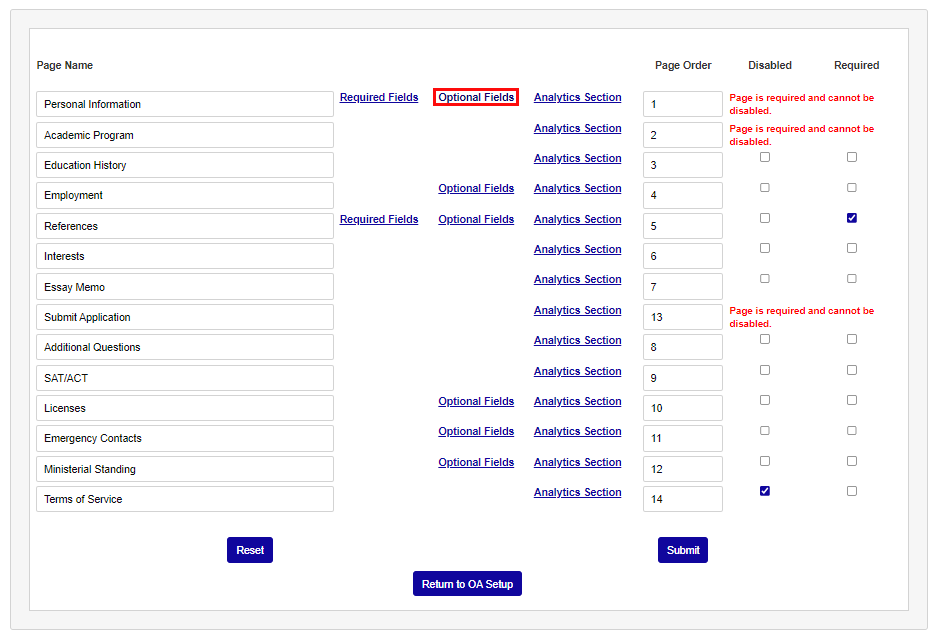
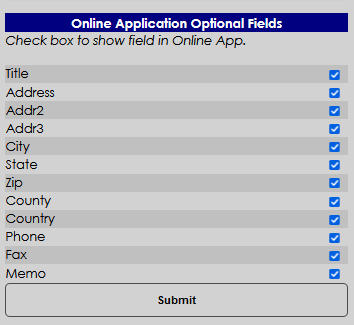
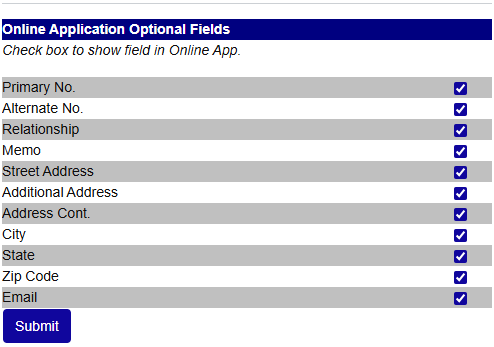
The Optional Fields link works in the same manner. Click Optional Fields to open a new window and select which fields will appear on this page. Only fields that are checked will appear. None of these fields are required and applicants can proceed without filling them out.
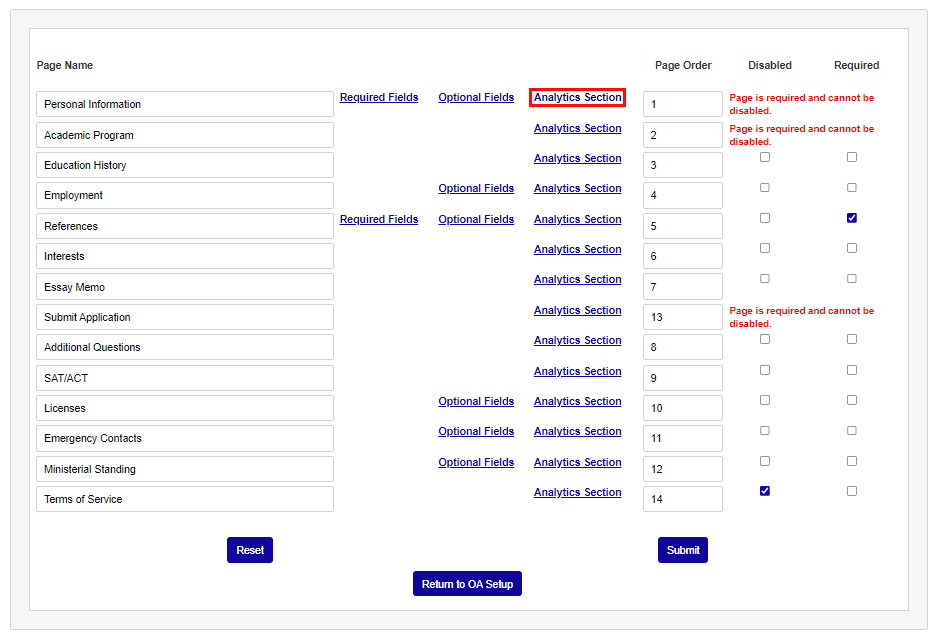
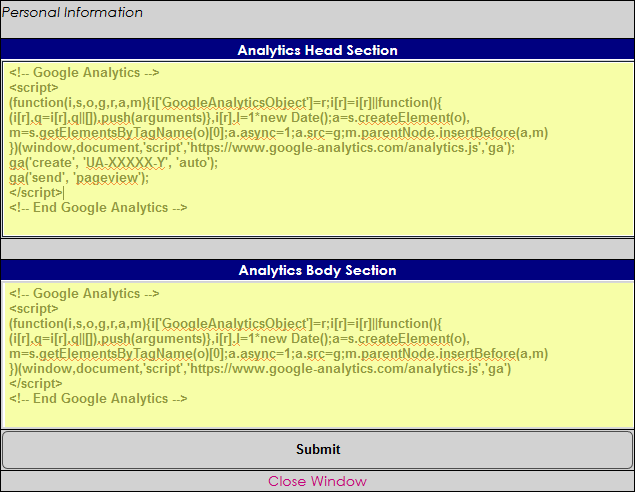
Some institutions may wish to track who visits a particular page or pages of the application. Once analytics code has been obtained from Google, Facebook, or another third-party provider, click the Analytics Section link in each row to add the code to that specific page. Code can be added to the head, the body, or both depending on the tracking requirements. Enter this code for all pages that should be individually tracked.
In the Page Order column, the order the pages display to the applicant can be changed by editing the numbers in each field. Ensure that all pages to be included are numbered with no repeats. The page names will not display differently on this page, only within the application as it's being completed.
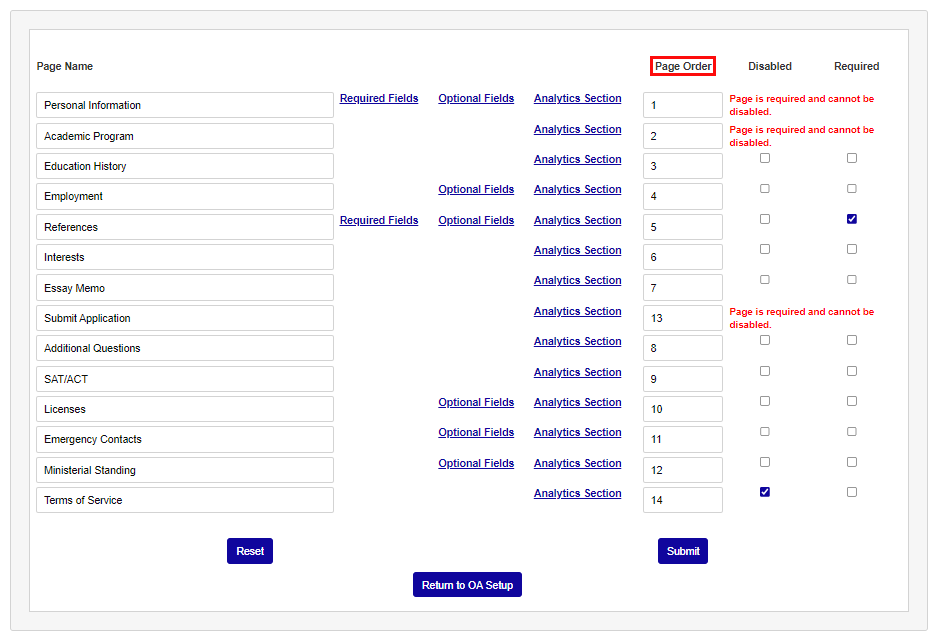
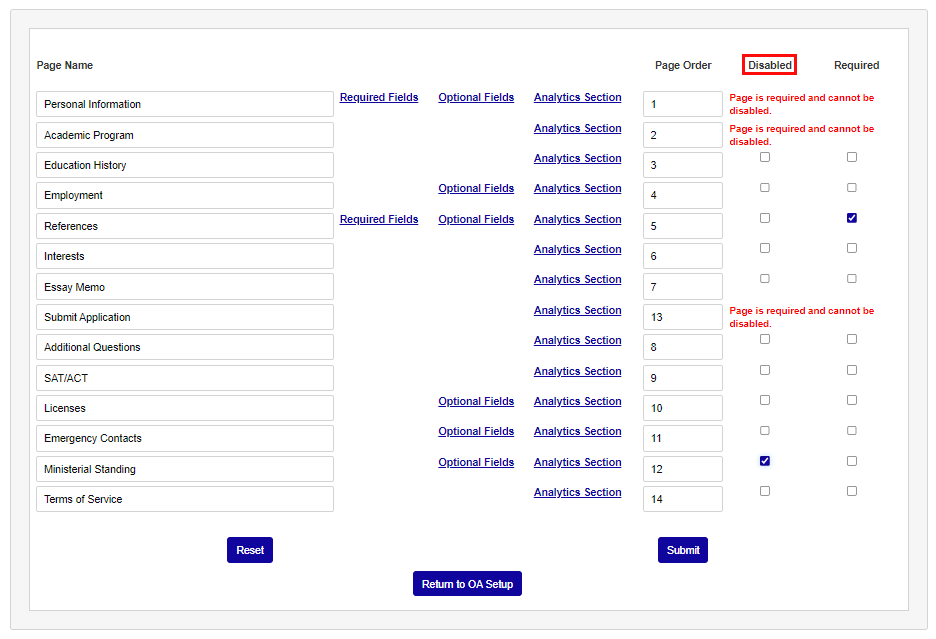
While the Personal Information, Academic Program, and Submit Application pages must be included for the application to function, the rest of the pages are optional and can be disabled. Click the Disabled box next to any page to remove it from the application.
Pages can also be marked as Required. Applicants cannot submit their applications without completing each required page.
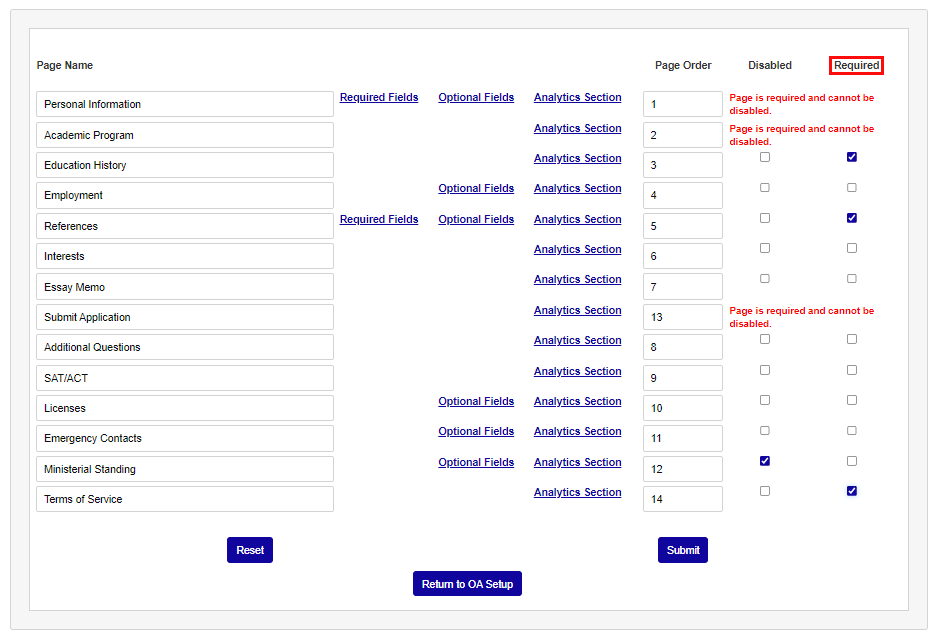
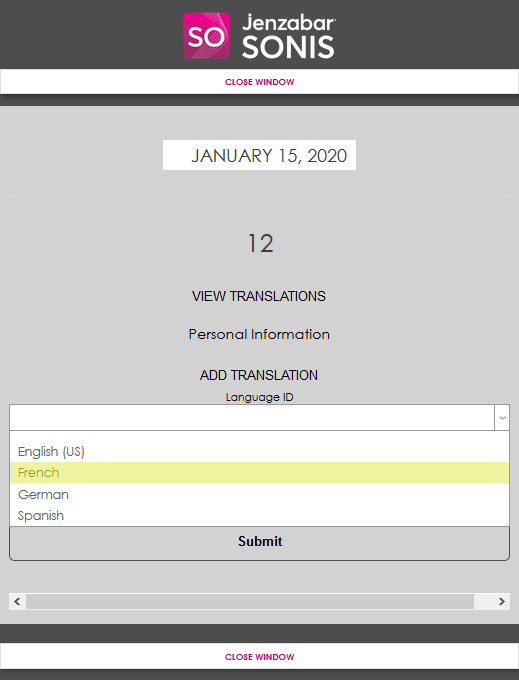
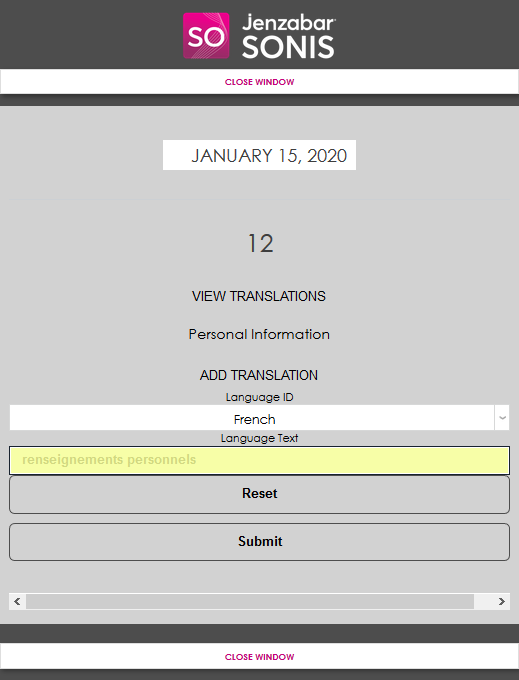
Schools that use the Jenzabar SONIS multi-language function will see a View Translations link to control how the page titles are translated. When the pop-up window opens, select a language, and enter a translation for that language. Only languages set as active in the SONIS system will appear in this list.
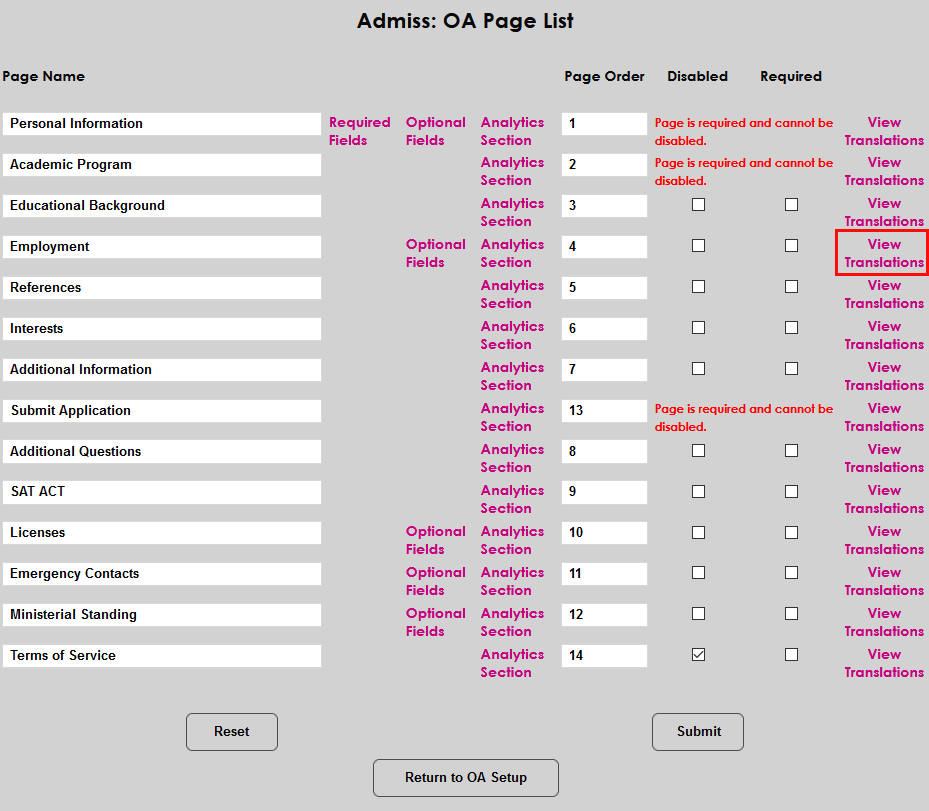
Click Submit to save the setup entries.
Page Types
Schools often have unique needs for their Online Application and the various page types can be used to customize the application to fit the institution's needs. The Page Types reviewed here are the default pages. It is possible for the names and displayed fields to be different if they were previously modified by the institution.
The Personal Information page is required and includes both required and optional fields. Applicants will be asked to submit personal and demographic details.
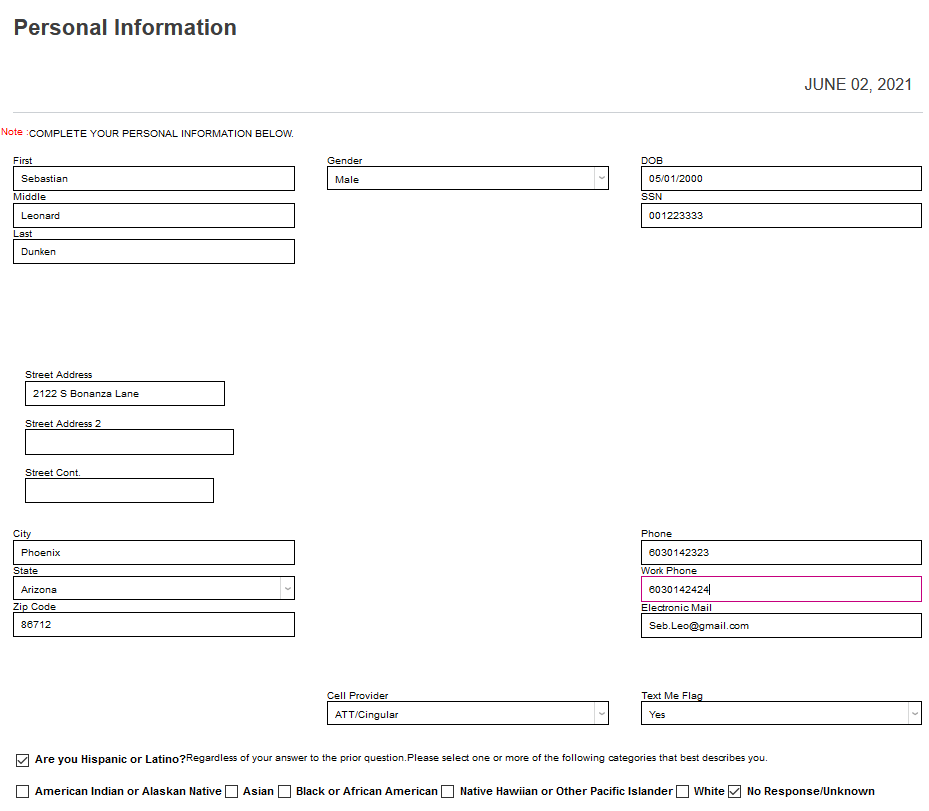
Personal information includes the following fields that are always included on the page. Check or uncheck the boxes to control whether answering them should be required or not.

Note
If the Citizen field is set to be required, the field will default to blank. If it's set as not required, it will default to Yes and any applicant who doesn't change the selection will be marked as a citizen when imported to the system.
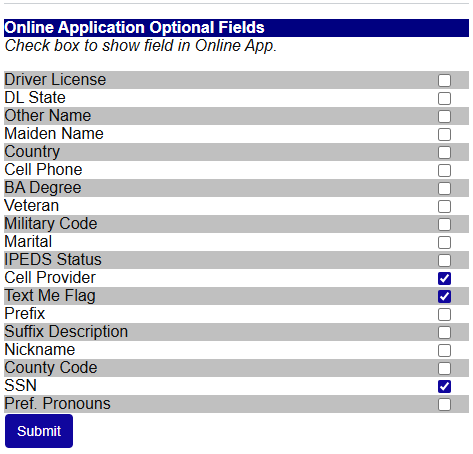
Personal Information includes the following optional fields. Check or uncheck the boxes to control whether they appear on the page or not.
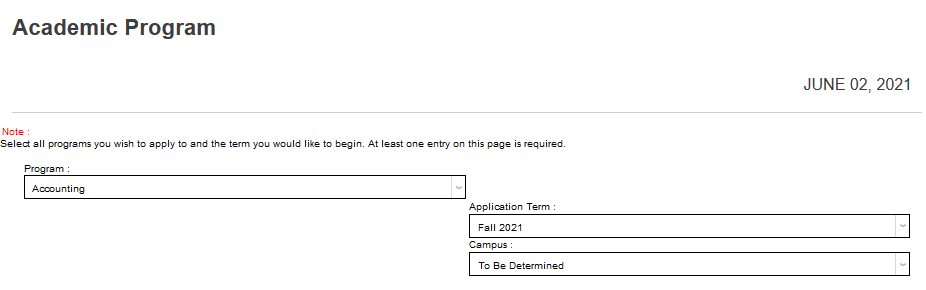
The Academic Program page is required. This page allows applicants to select the program they are applying for.
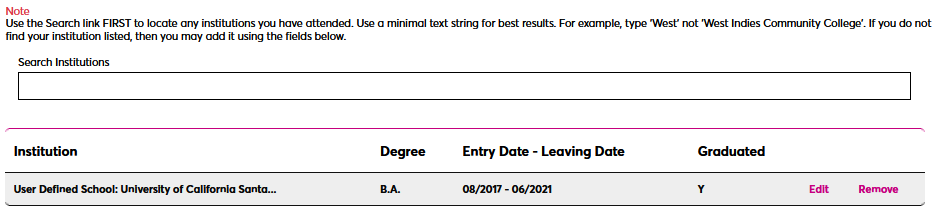
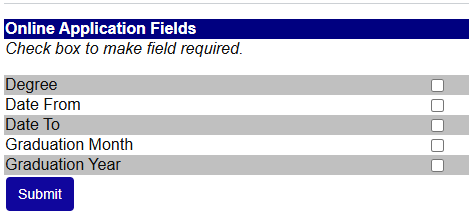
The Educational Background page is not required and may be used to gather an applicant's previous educational history. The applicant should use the Search by Institution field to search for an existing school in the Institution table. The search updates automatically as the applicant types.
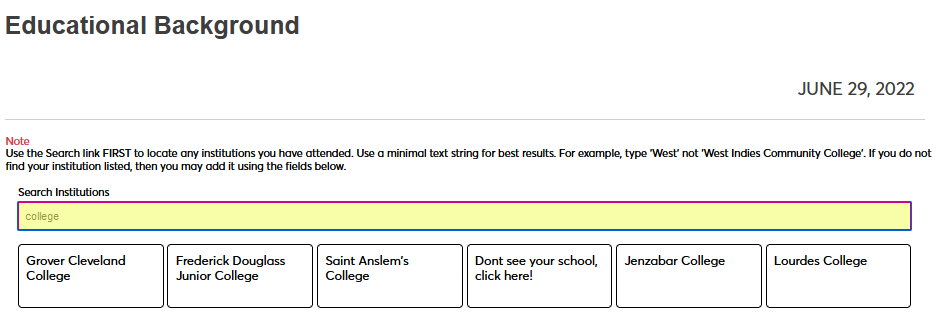
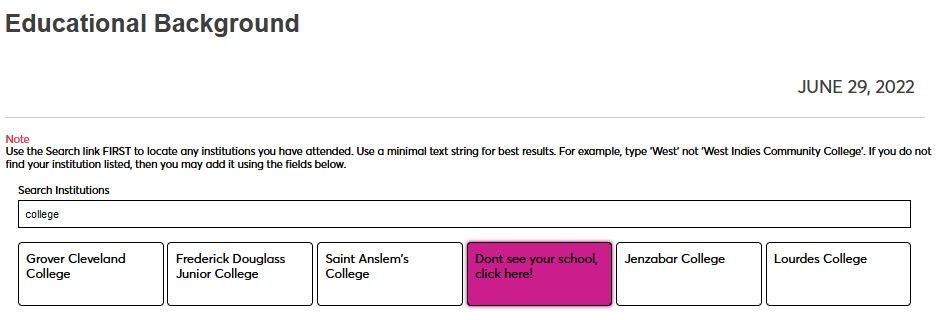
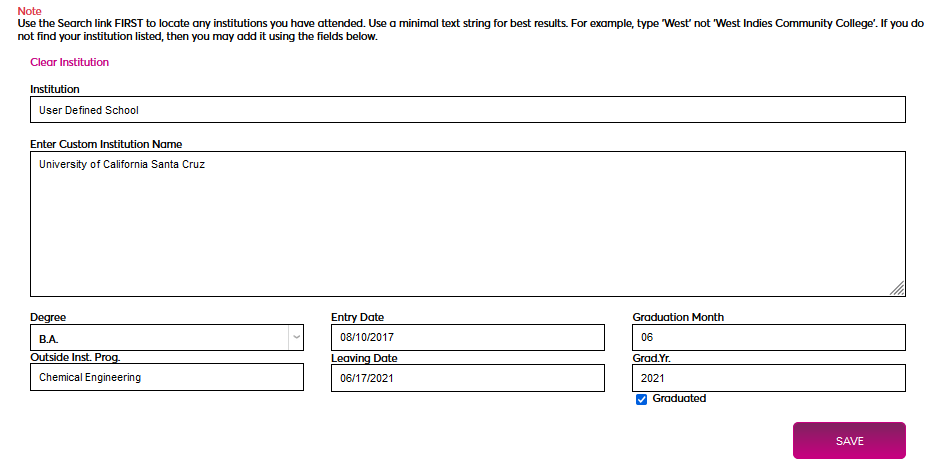
If the applicant does not find the school they attended, they should click the Don't see your school, click here! button. This text can be edited using the Captions utility. The applicant will then enter the name of their school in the Enter Custom Institution Name field.
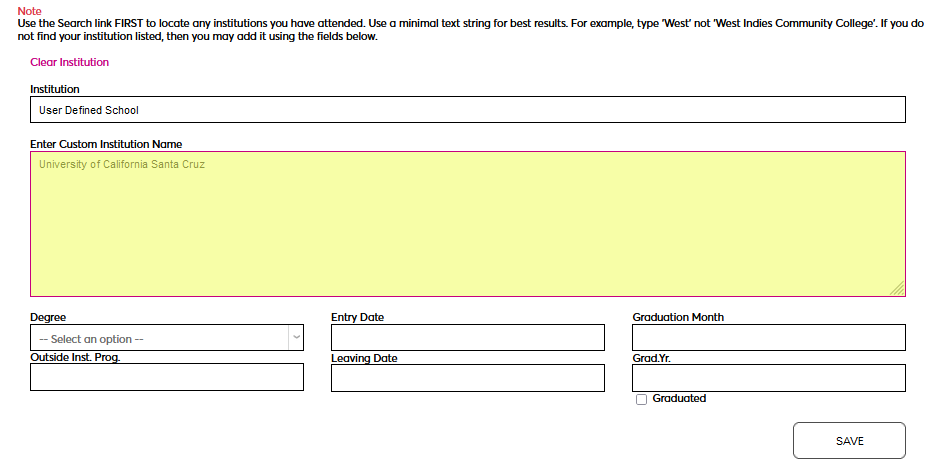
Once the user has entered the additional info regarding their education in this school, they can click Save to add the record. Note that the Entry Date and Leaving Date fields are checked for chronological consistency, meaning that the entry date must come before the leaving date.
The custom institution will appear in a table where the student can edit or delete the record. Additional institutions can be added through the same method.
Personal information includes the following fields that are always included on the page. Check or uncheck the boxes to control whether answering them should be required or not.
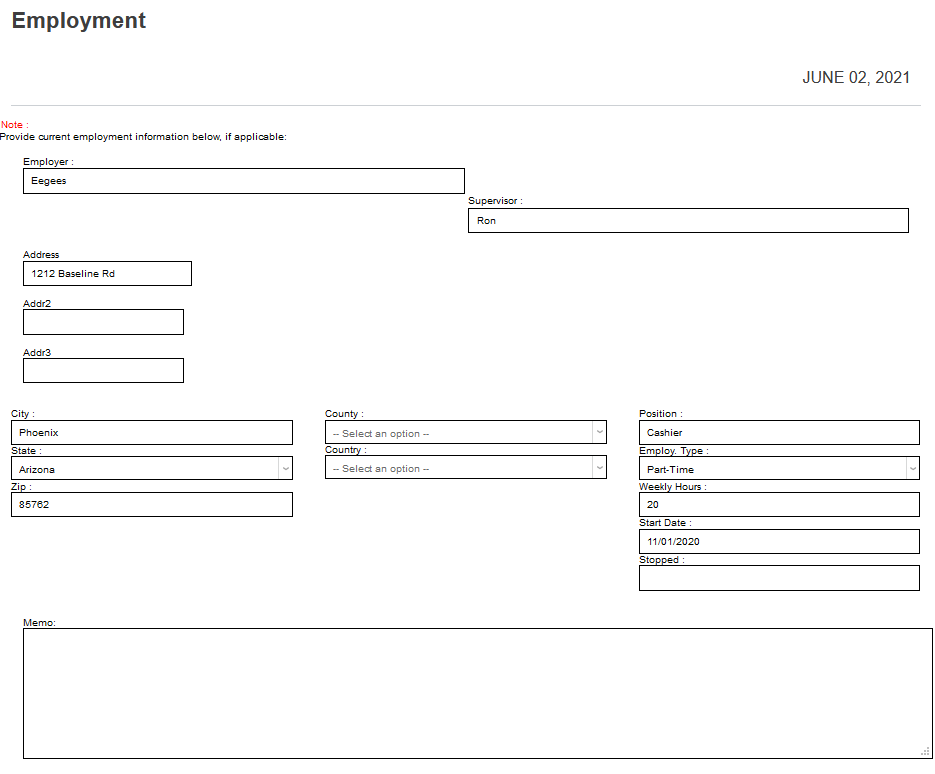
The Employment page is not required and includes optional fields. Applicants may submit their past and current employment information.
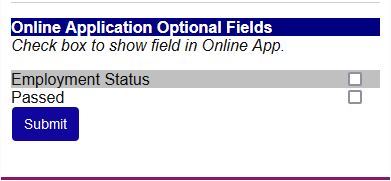
The Employment page includes two optional fields, Employment Status and Passed.
The References page is not required and allows schools to request that an applicant provide references. Should an institution require references, there are both required and optional fields that can be configured for display on the page, including whether to require the attaching of documentation. An option for the applicant to waive their right to view the response of a reference is included on the page by default.
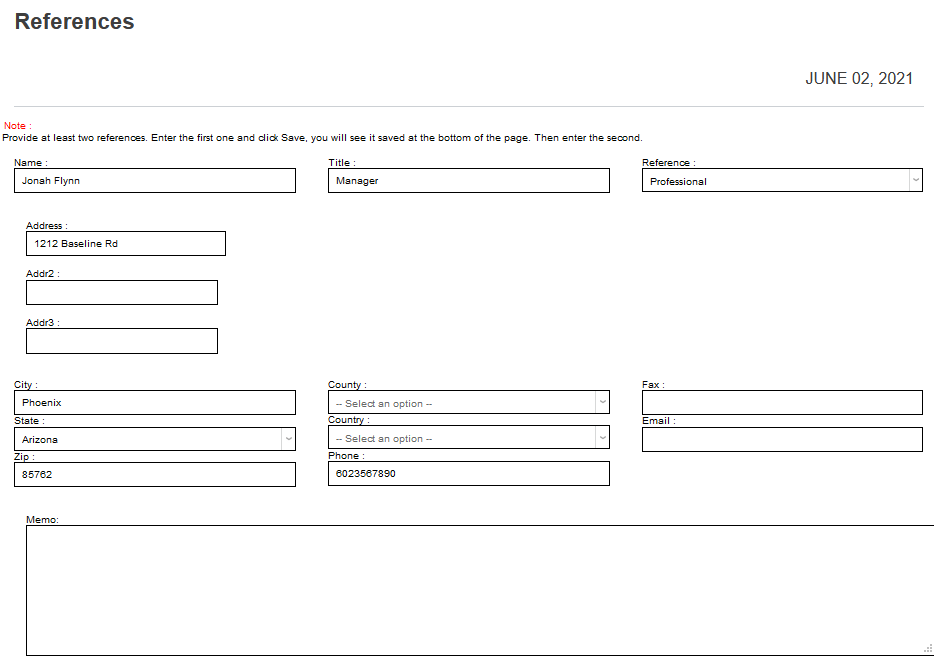
The possible required fields are shown below. Checking a box makes the item display on the online application as required.
The possible optional fields are shown below. Checking a box makes the item display on the online application but does not require a response from the applicant.
The questions for references are defined on the Systems hub Evaluations page.
If a reference name has been submitted by an applicant and is deleted by the applicant before an application is submitted, any questionnaire responses for that reference will also be deleted. References can be emailed a link to a page with a questionnaire allowing the reference to complete defined questions and upload a letter of reference. The page displayed for the reference indicates whether the applicant waived the right to review the response or not.
The applicant portal will display whether references have responded to the reference request, and if not, allows the applicant to send the reference a reminder email with the questionnaire link.
Reference questionnaire responses and any accompanying uploads are viewable in the applicant's Users hub References page.
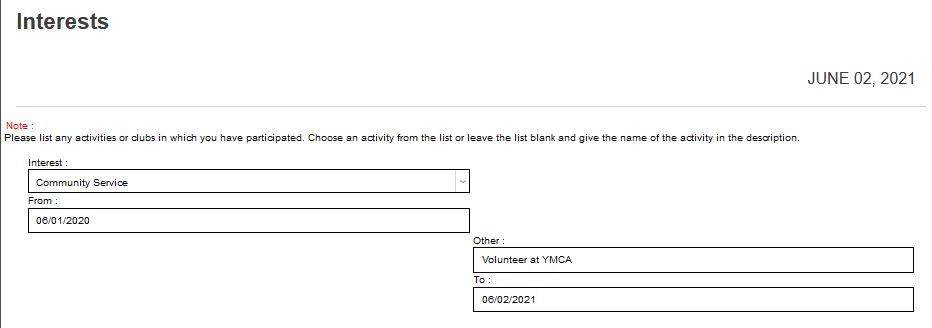
The Interests page is not required. It can be used to gather information about an applicant's extracurricular and social activities.
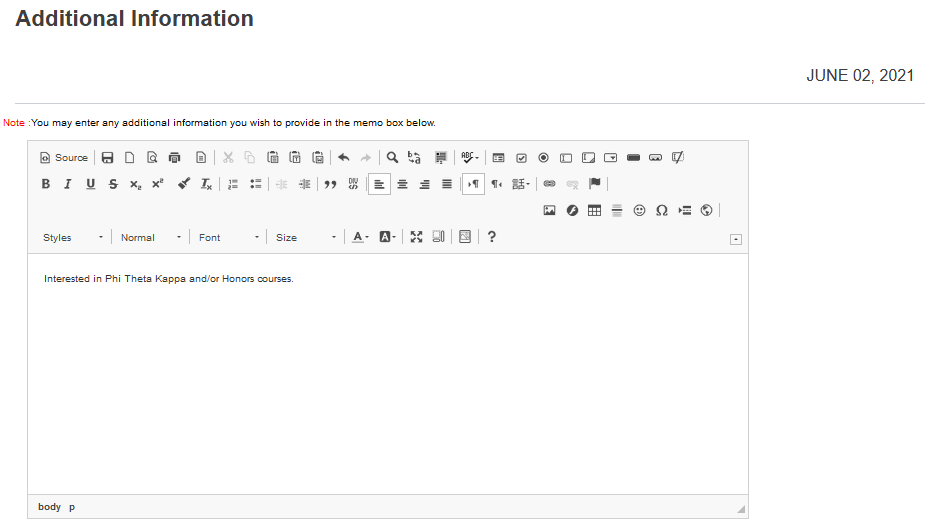
The Additional Information page is not required. It's used to collect an applicant's Essay.
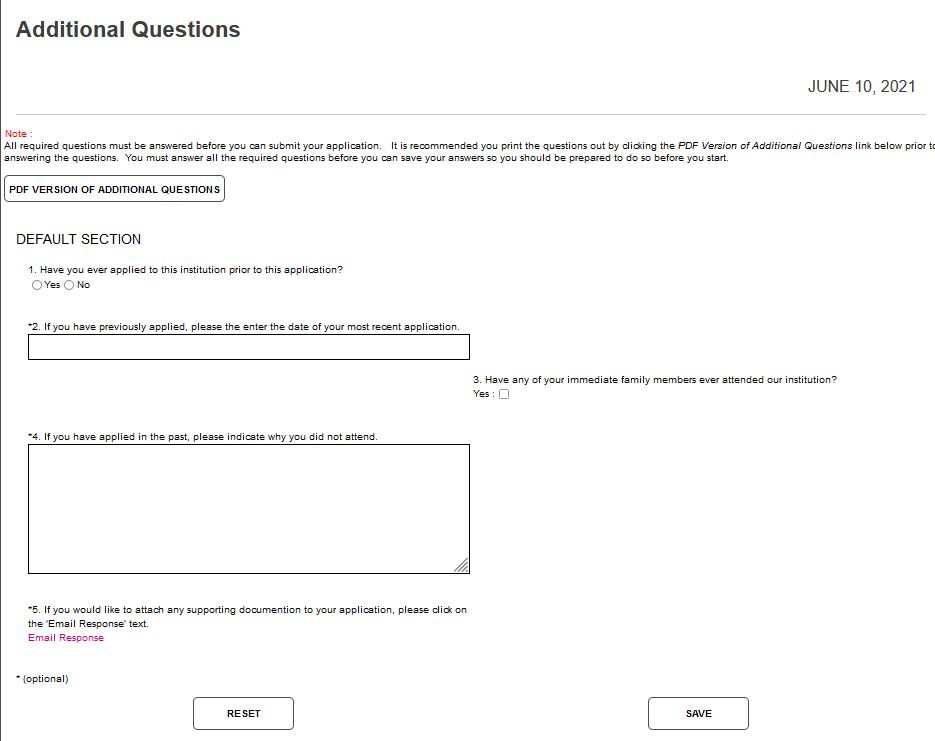
The Additional Questions page is not required and can be used to gather further information from the applicant, as desired. In the example, questions are asked about previous attendance by the applicant and their family members. Free form, yes/no, true/false, multiple-choice, and check box entries are available. The applicant may download a PDF version of the questions and may submit supporting documentation using the Email Response link. Fields with an asterisk are required.
The OA Questions Setup page is used to set up Additional Questions. Select Add to create a new question or click on an existing question to edit it.
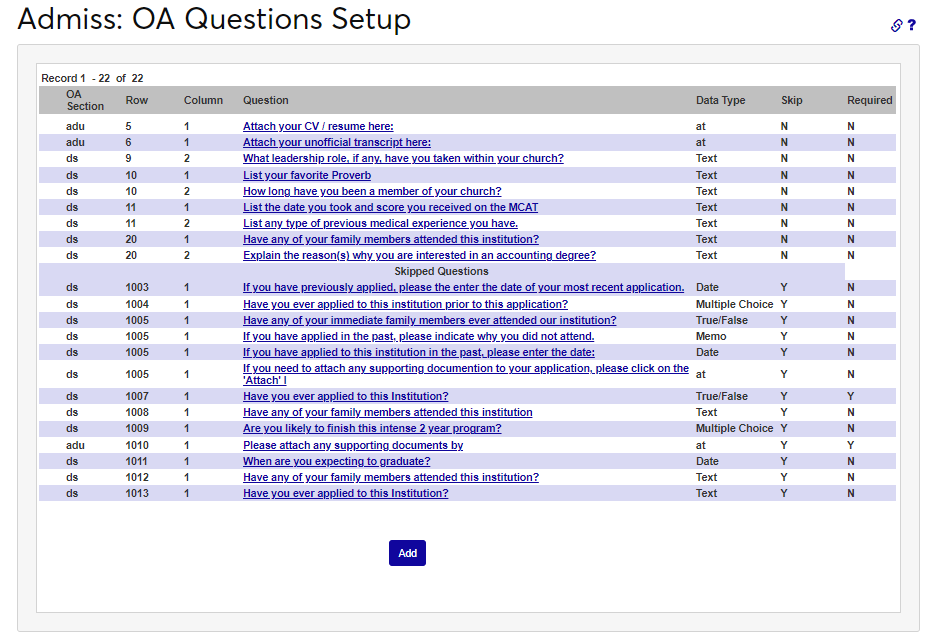
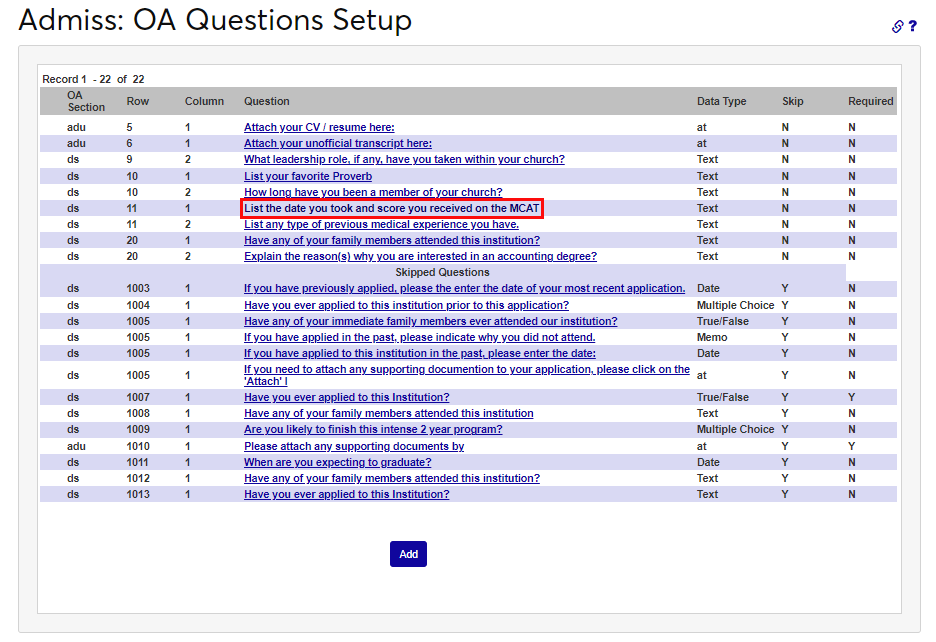
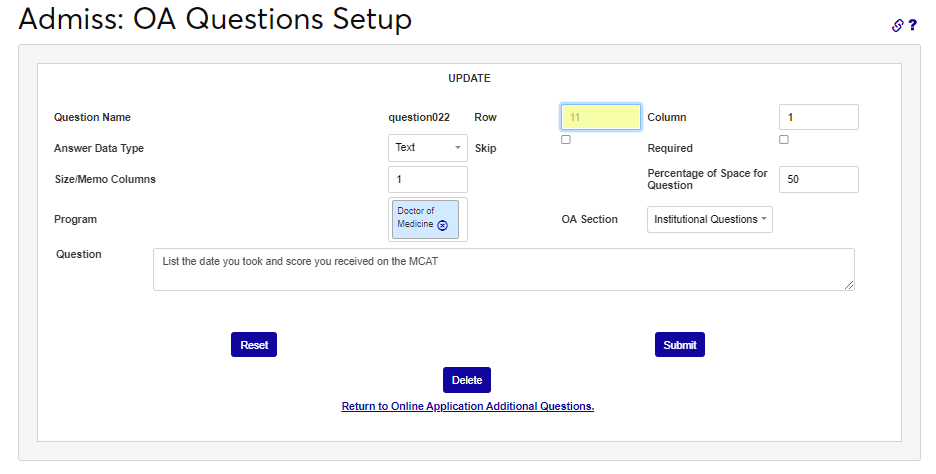
Question Name will fill automatically with questionxx, indicating the number of the question. The Row number indicates the display order and can be reordered, as desired.
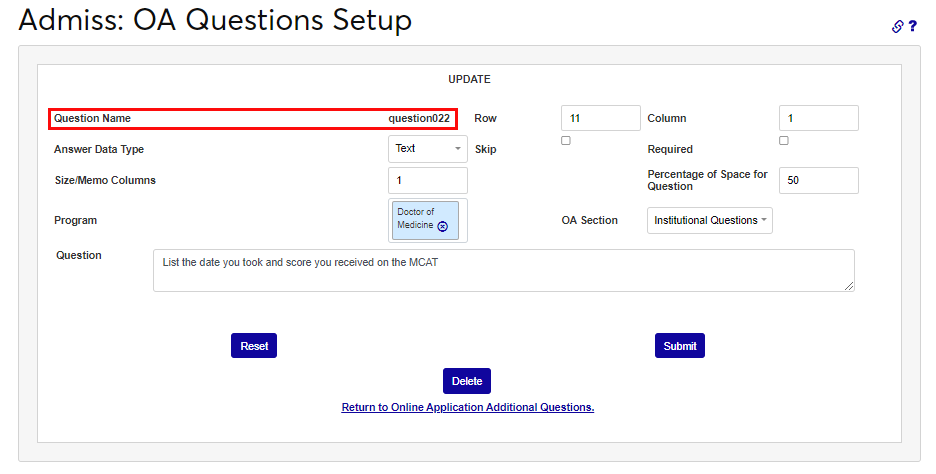
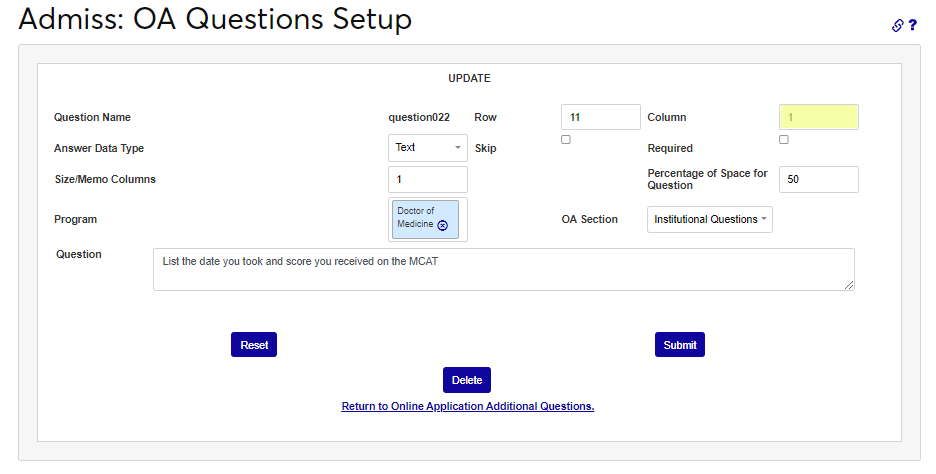
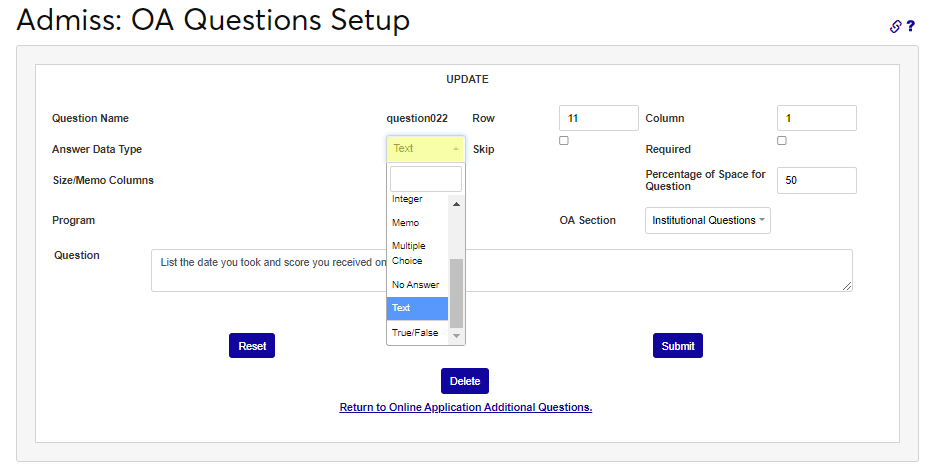
The Column number indicates which column the question will appear in. By default, the row and column are selected based on the questions already created. The type of answer allowed is selected in the Answer Data Type dropdown.
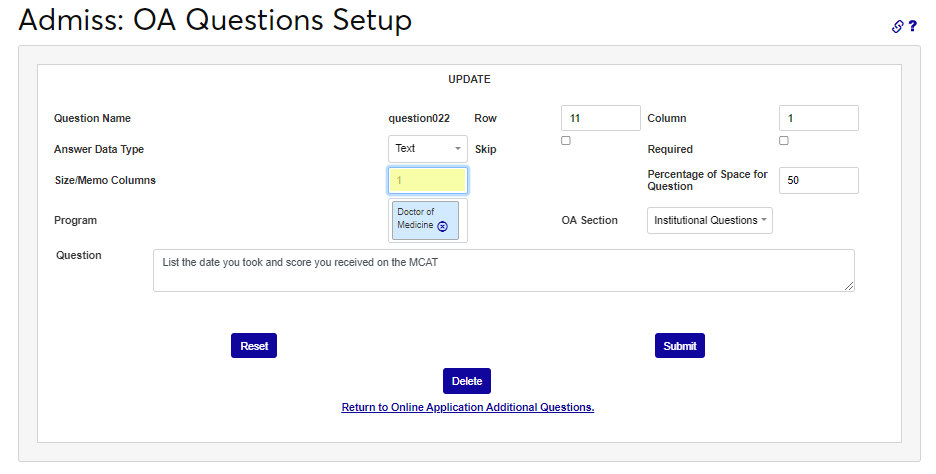
Indicate if the question may be skipped or not by selecting either Skip or Required. The Size/Memo Columns is set to 1 by default and should not be changed without carefully reviewing how the online application questions display after the change is applied.
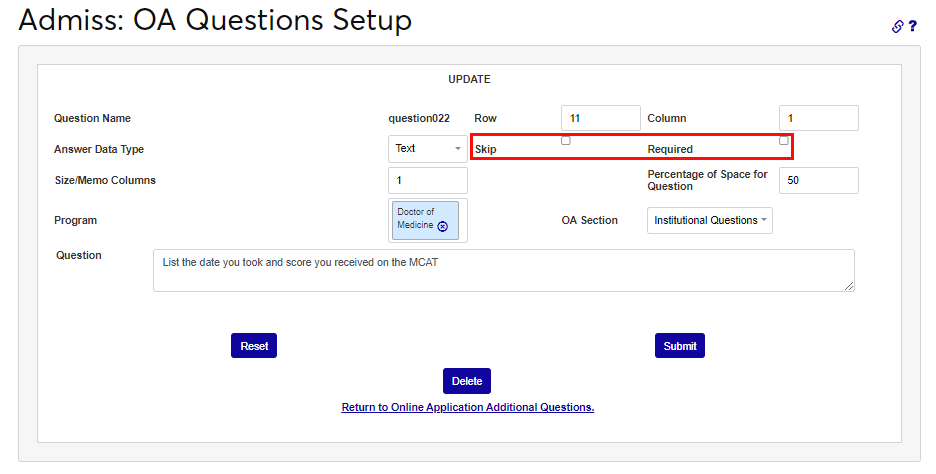
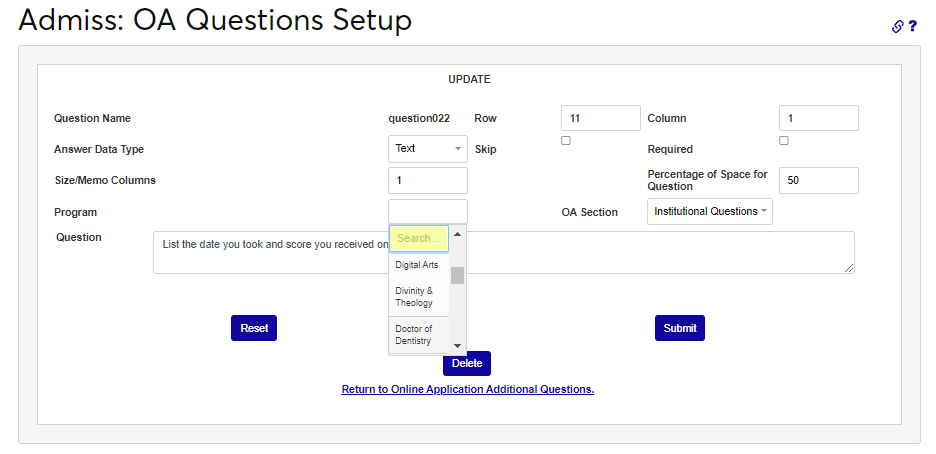
The Percentage of Space for Question is set to 50 by default and should not be changed without carefully reviewing how the online application questions display after the change is applied. If this question applies to specific programs or is more generic but an optional question that relates to specific programs is desired, select the Program(s) from the dropdown.

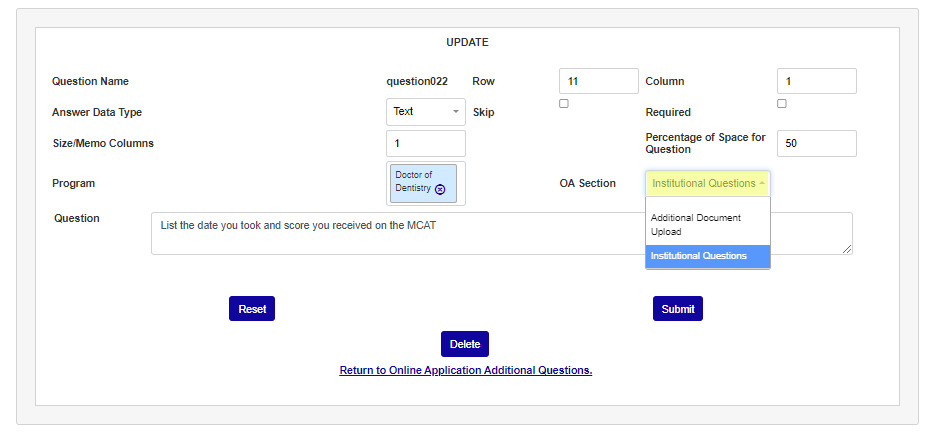
Select the area of the application the question should display from the OA Section dropdown. Enter the question text in the Question box. There is no character limit for the question.
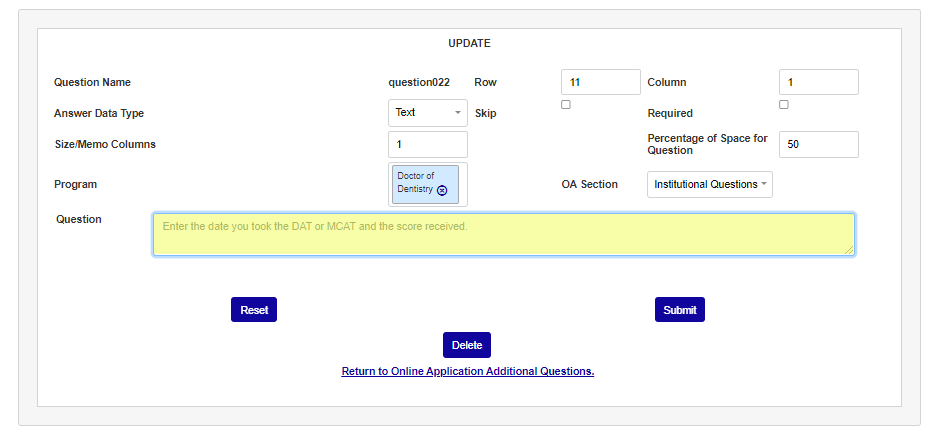
Select Submit to complete the setup of the question.
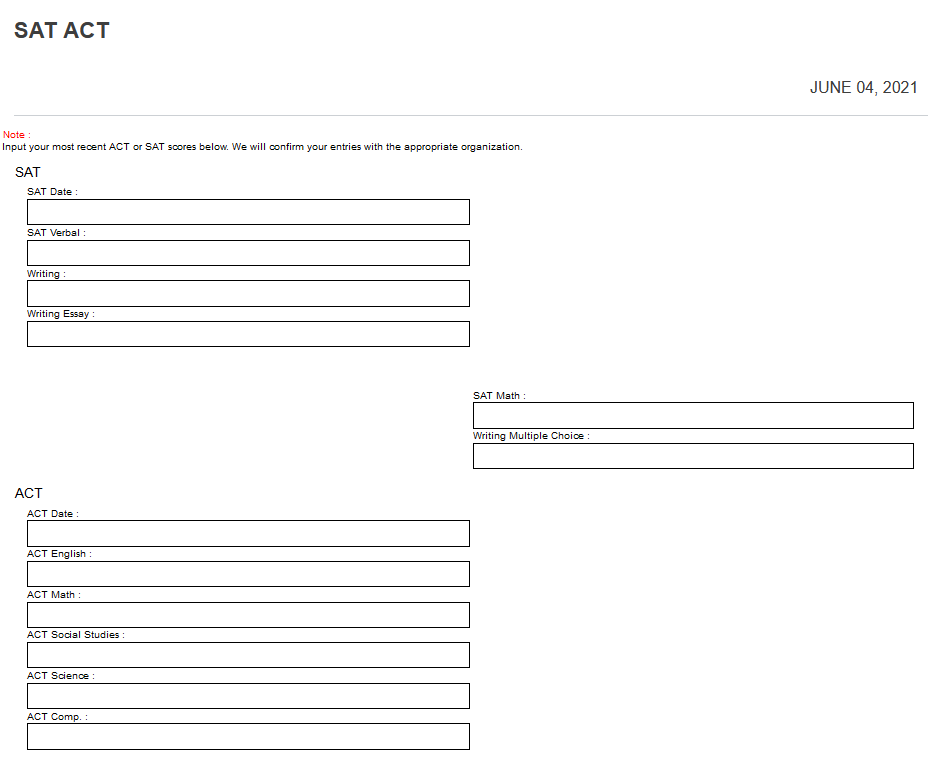
The SAT/ACT page is not required. It may be used to gather the applicant's standardized test history and scores.
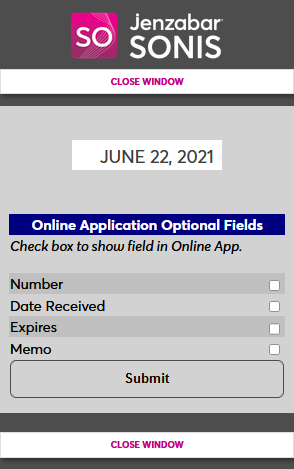
The Licenses page is not required and allows applicants to submit applicable licenses.
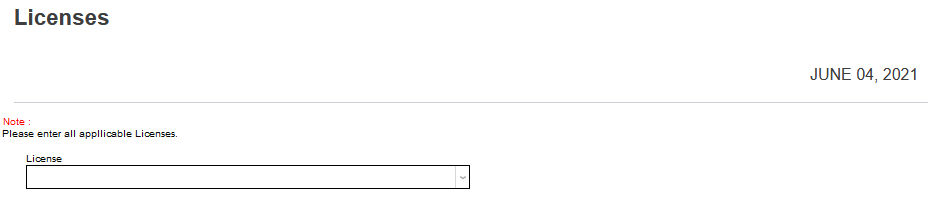
Optional fields include, Number, Date Received, Expires, and Memo.
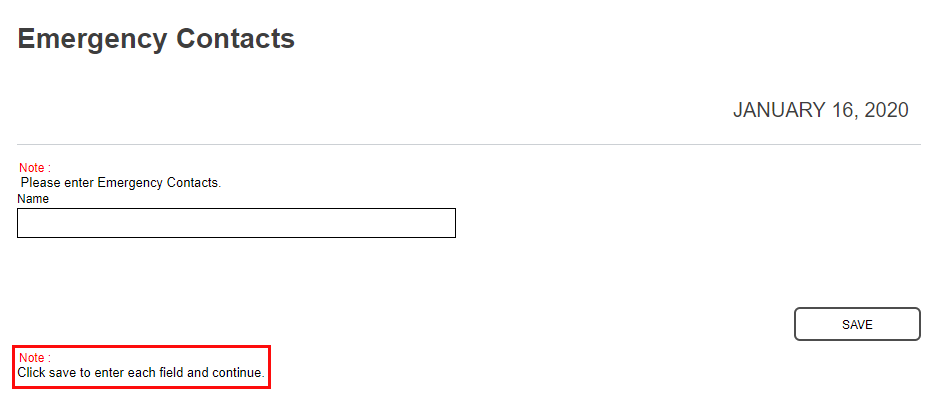
The Emergency Contacts page is not required, includes optional fields, and may be used to gather an applicant's emergency contact information.

The Emergency Contacts page can have the following required fields. Check or uncheck the boxes to control whether answering them should be required or not.
The Emergency Contacts page can have the following fields displayed. Check or uncheck the boxes to control whether they appear or not.
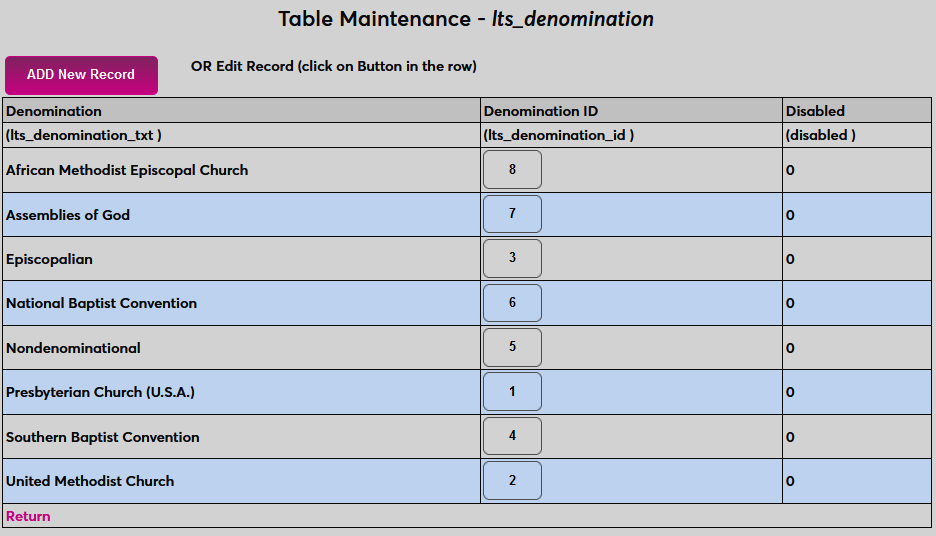
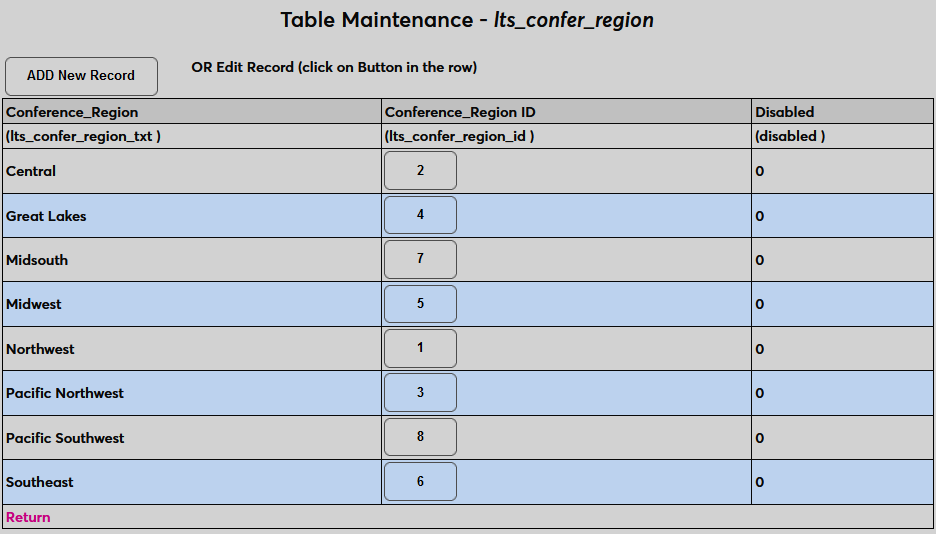
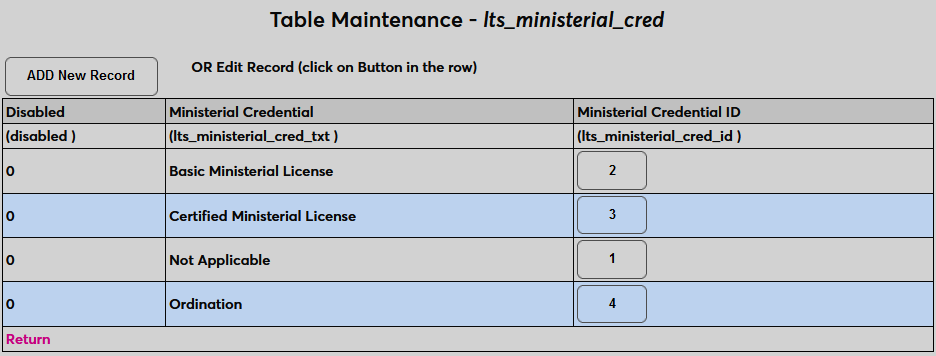
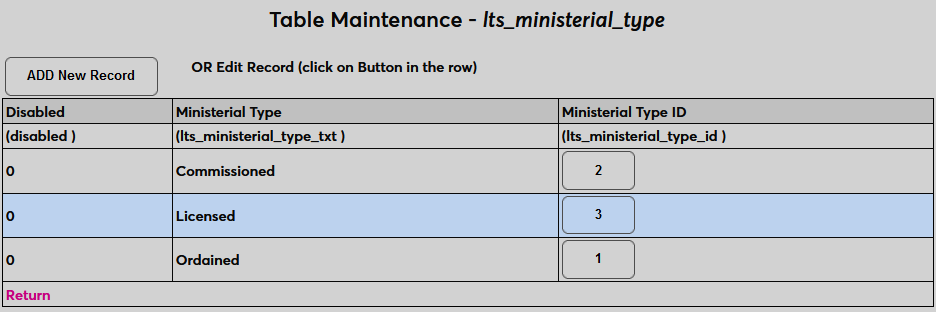
The Ministerial Standing page is not required. It can be used by seminaries and other religious schools to collect information about the applicant's standing as a religious minister.
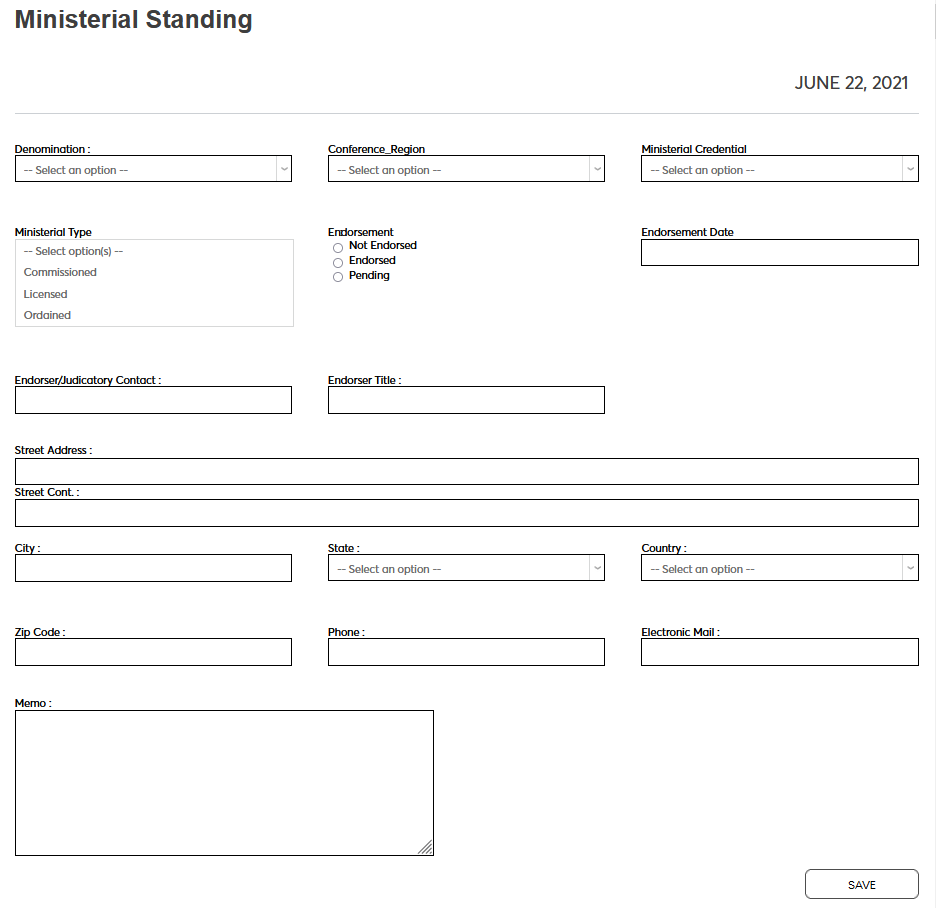
The Denomination, Conference Region, Ministerial Credential, and Ministerial Type menus are all tied to tables in Table Maintenance. These tables must be populated in order for the page to function properly.
The following fields are optional:

The Terms of Service page is used to allow applicants to access terms of service agreements that the institution has required them to fill out before proceeding to the application. Completed terms of service agreements can be rescinded from this page. Though rescinding an agreement will immediately kick the applicant out of the application and they will be unable to reenter until they accept the agreement.
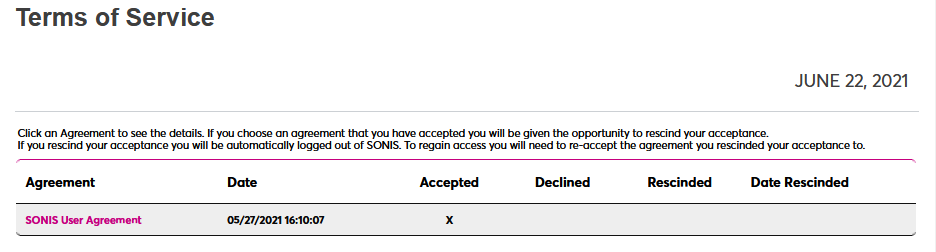
For more information on terms of service agreements, visit the Terms of Service Agreements page.
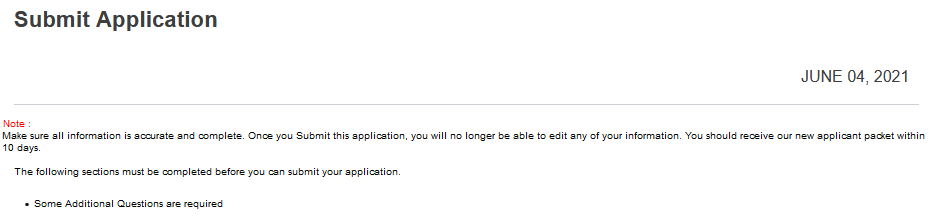
The Submit Application page is required and the institution may add any desired information and instructions for applicants. If an application fee is required, students can pay from this page using the school's Payment Gateway.
OA Notes
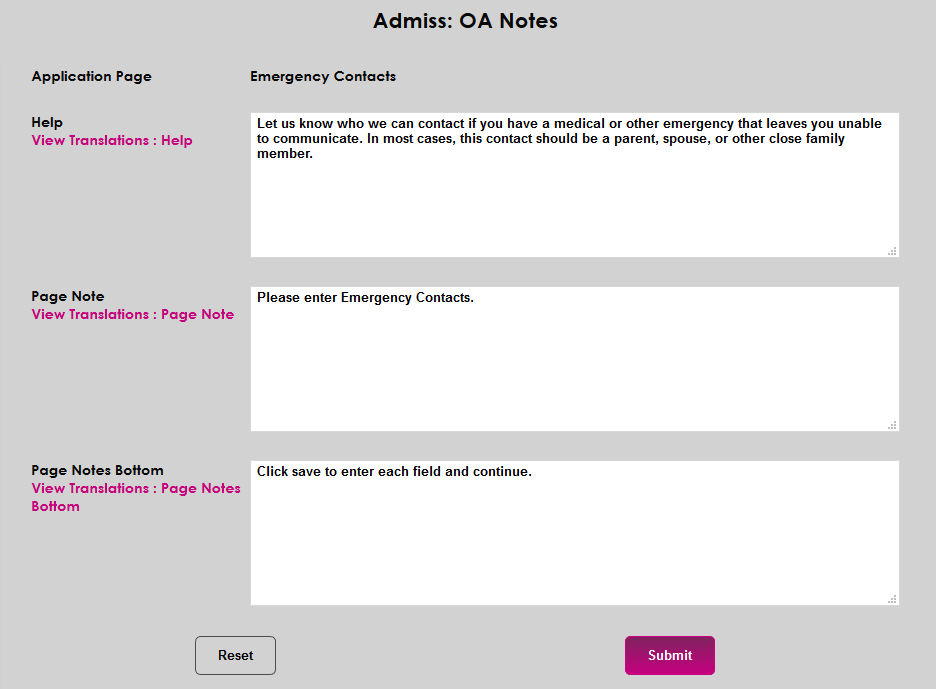
The OA Notes page allows administrators to change the instructions and other notes that appear on individual pages in the application. To edit the notes on an application, click Edit under the OA Notes column
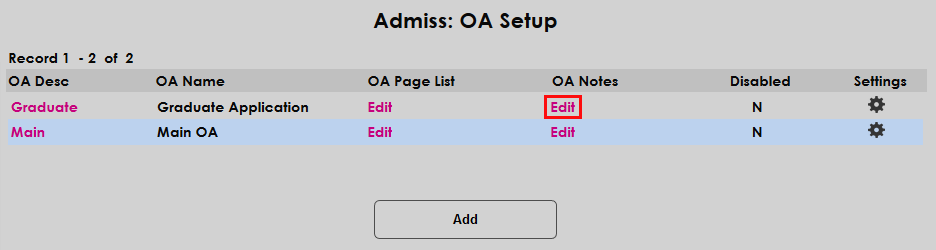
Next, choose a page to edit by selecting it in the Application Page column on the far left.
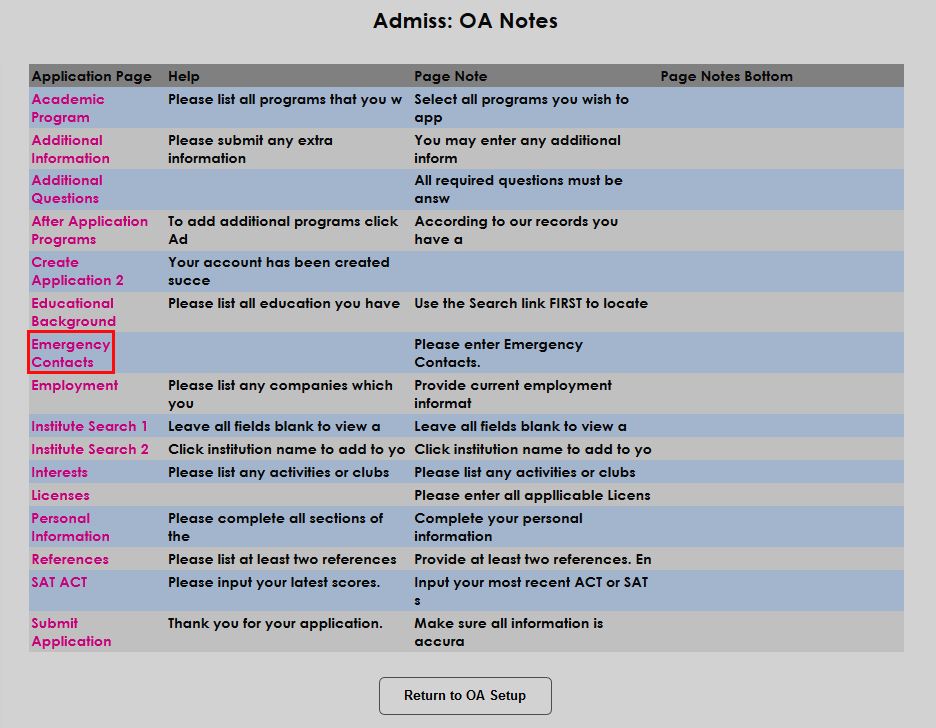
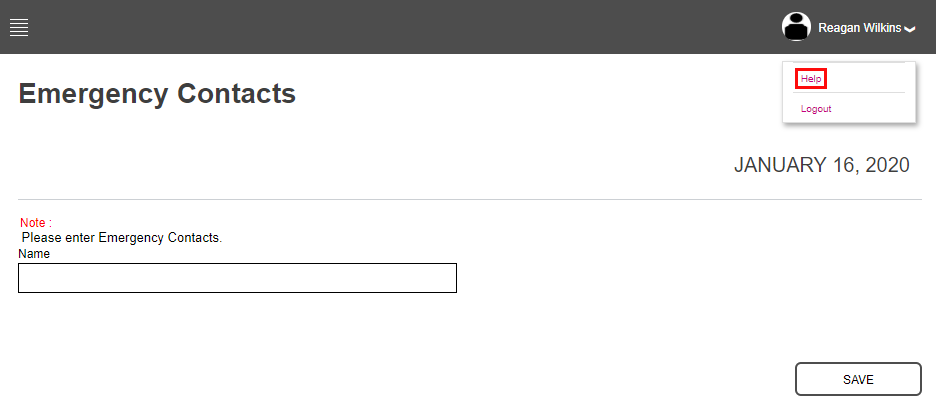
Provide help text in the Help field. This text appears when the applicant selects Help from the menu in the top-left corner.
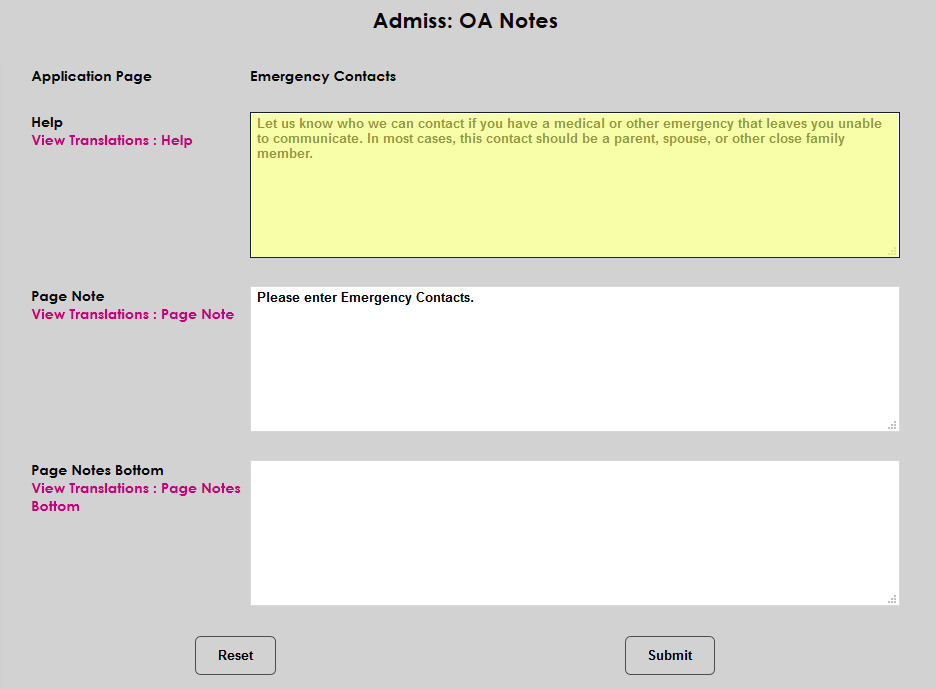
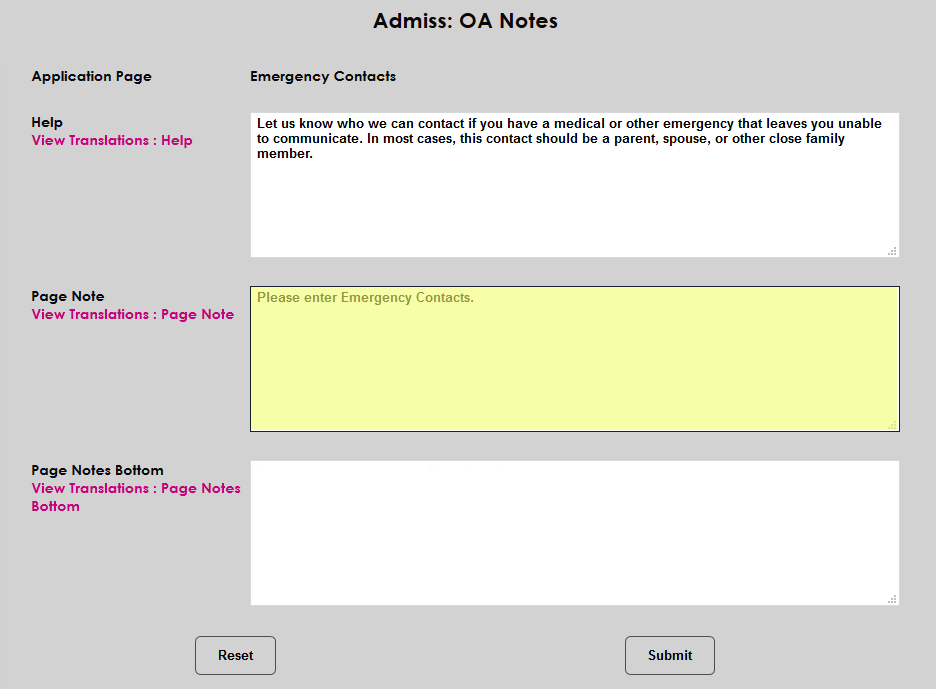
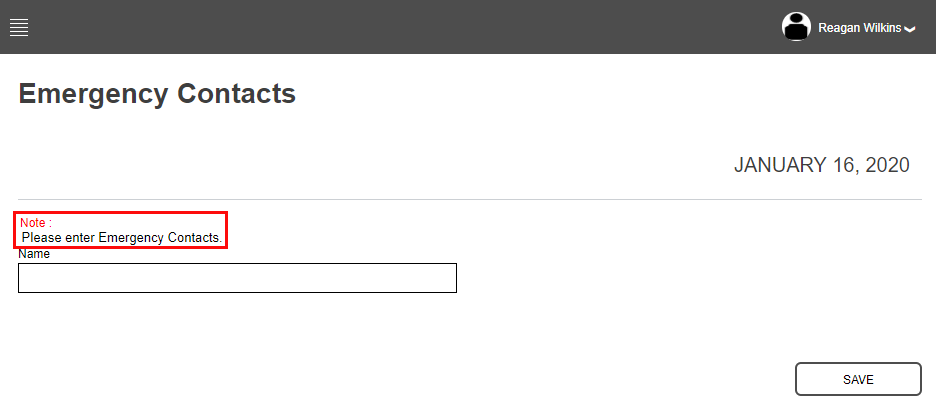
The Page Note appears near the top of the page above the field or fields. It's generally used to provide instructions for how to complete the page.

The Bottom page notes appear below the submit button at the bottom of the page. These can be used for further instructions or other information that applicants may need to know.
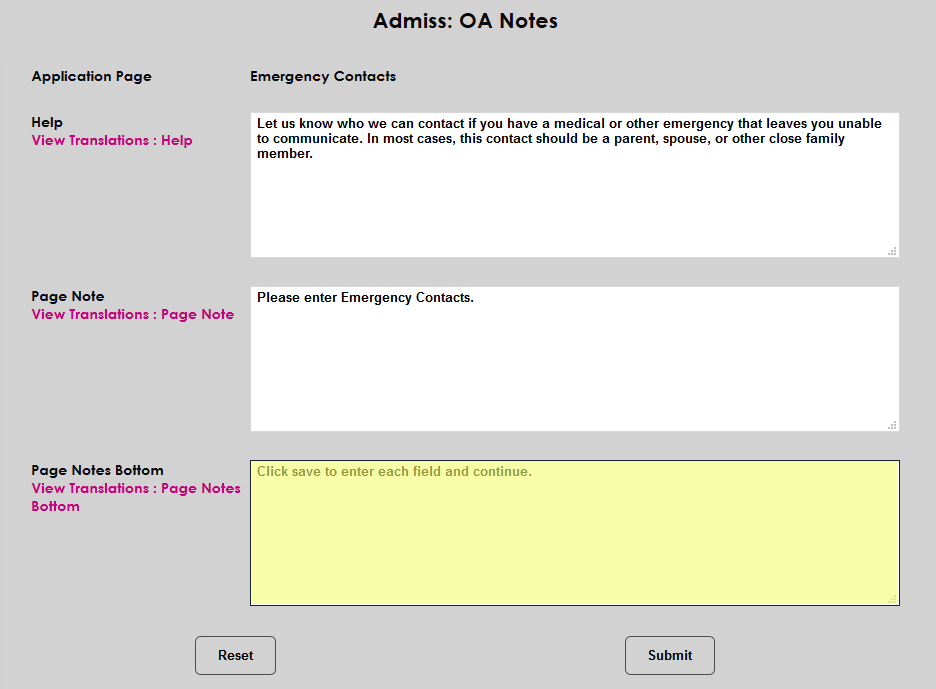
Click Submit to save the changes and add or edit the notes.
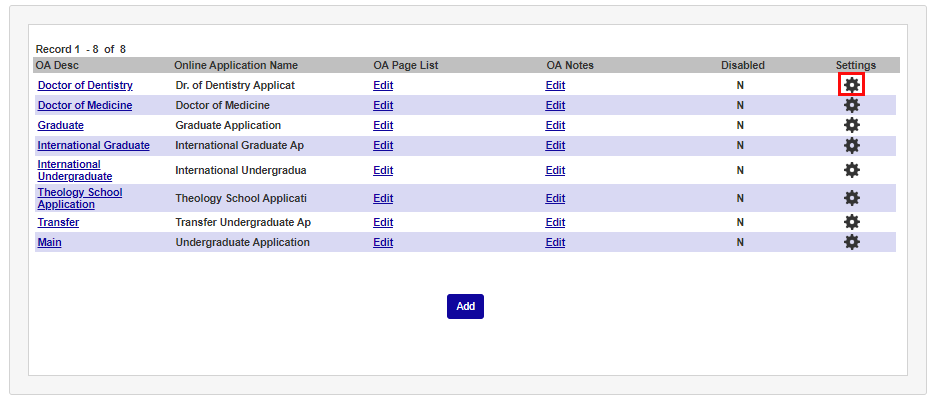
Additional Application Settings
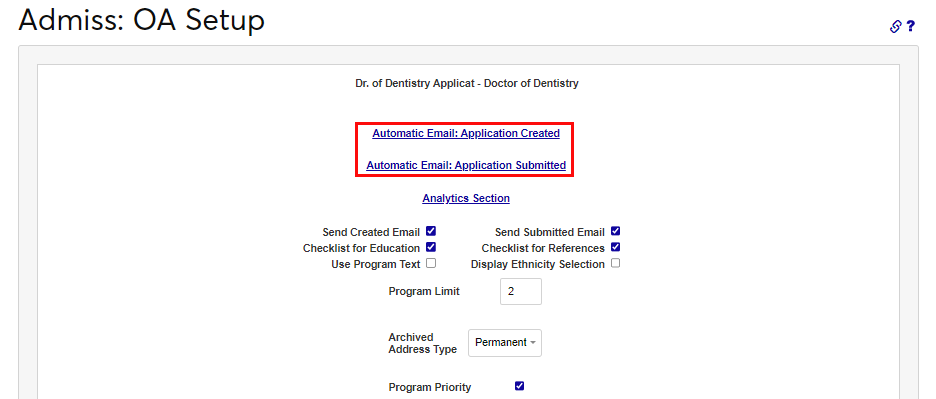
In addition to the basic application settings, there are a variety of other settings available for online applications. These are also specific to each application. Click the settings wheel in the far-right column to edit these settings.
Automatic Email
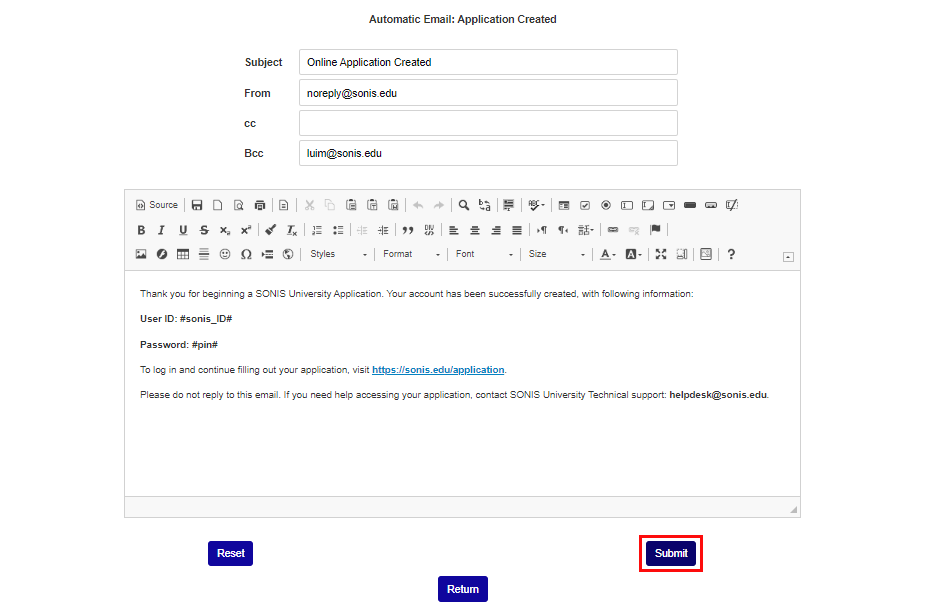
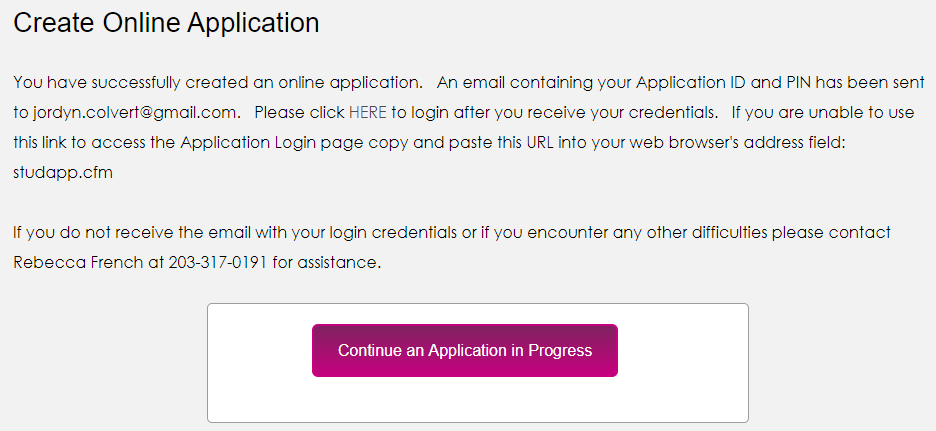
At the top of the page, Jenzabar SONIS offers the option of setting up automatic emails that will be sent to applicants upon an application's creation and/or completion. To create or edit either email, click the link.
On the next page, compose the email, making the wording as universal as possible. The tags #sonis_ID# and #pin# can be used to insert the individual student's SONIS ID and pin number into the email. Click Submit to save the entries when the email is composed as desired.
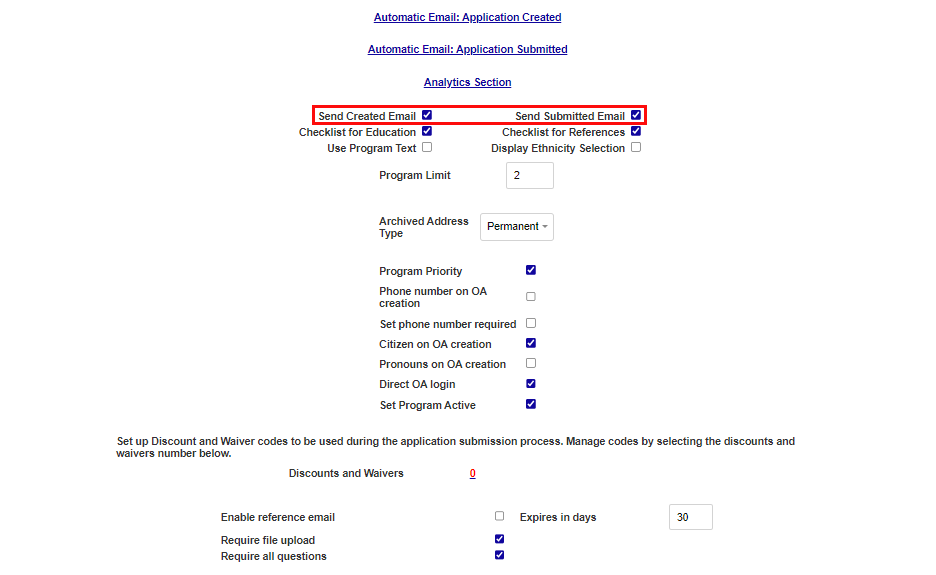
To ensure that one or both emails are sent automatically, check the Send Created Email and Send Submitted Email boxes just below the email setup links, as appropriate to the configured emails.
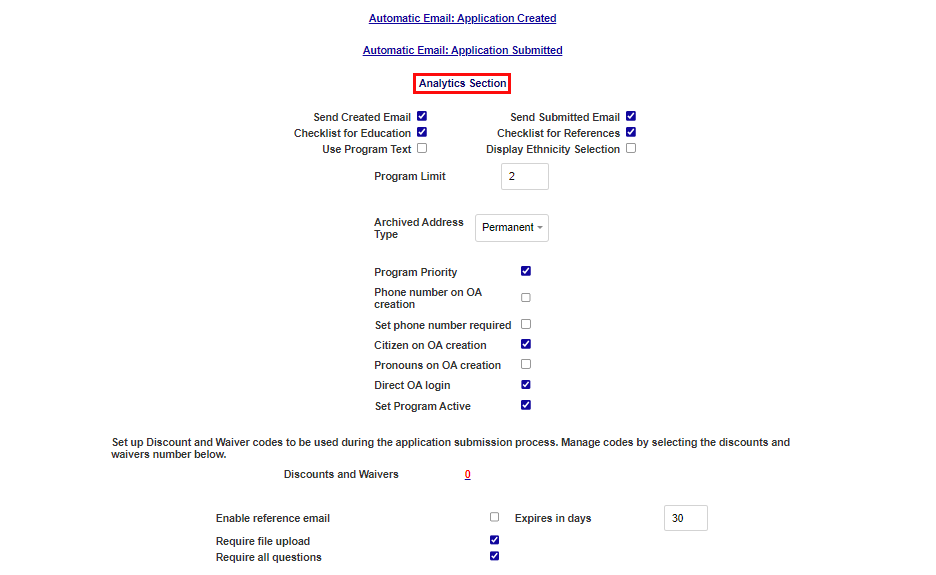
Analytics Section
Schools who use analytics programs from Google and other services can employ them to gather data from the Online Application. The analytics code is inserted into the header and/or body of the application submit page, createapp2.cfm. To set this up, click on the Analytics Section link and, after a new window opens, enter the script provided by the analytics program in either the Head Section, the Body Section, or both. Click Submit to save the entries.
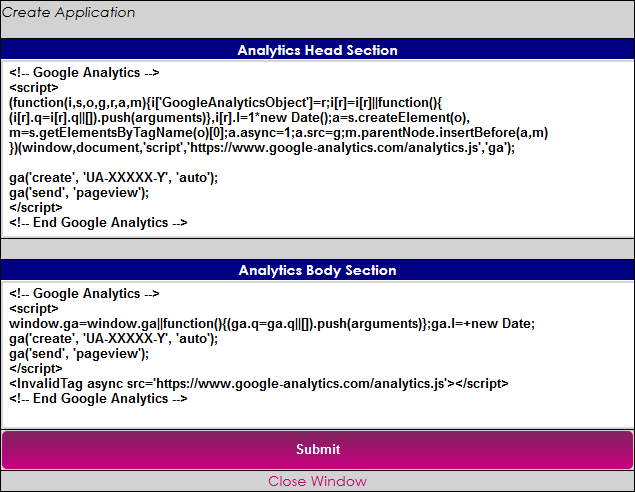
Note: If two single quotes (apostrophes for non-programmers) appear side-by-side in the analytics code, the code must be edited to function properly. For example, if the following exists: ’’ (two single quotes), then only one single quote will appear: ’.
In order for two single quotes to appear side-by-side, the number of single quotes must be doubled. For example, in order for ’’ to appear in the code, the administrator must enter ’’’’.
The same does not hold true for words surrounded by single quotes. For example, if the code says: ‘datalayer’, the text ‘datalayer’ will appear without changes.
Checklists & Ethnicity
Each applicant in the SONIS system has a checklist of items that need to be completed by school officials before they can become a student. These include things like acquiring a transcript and acquiring SAT/ACT scores. The two checklist boxes, Checklist for Education and Checklist for References, are used to create separate entries in the applicant's checklist that are specific to the information they entered. For example, if the Checklist for Education box is checked and the student enters SAT scores, the student's checklist will include acquiring those scores from the school that they attended.
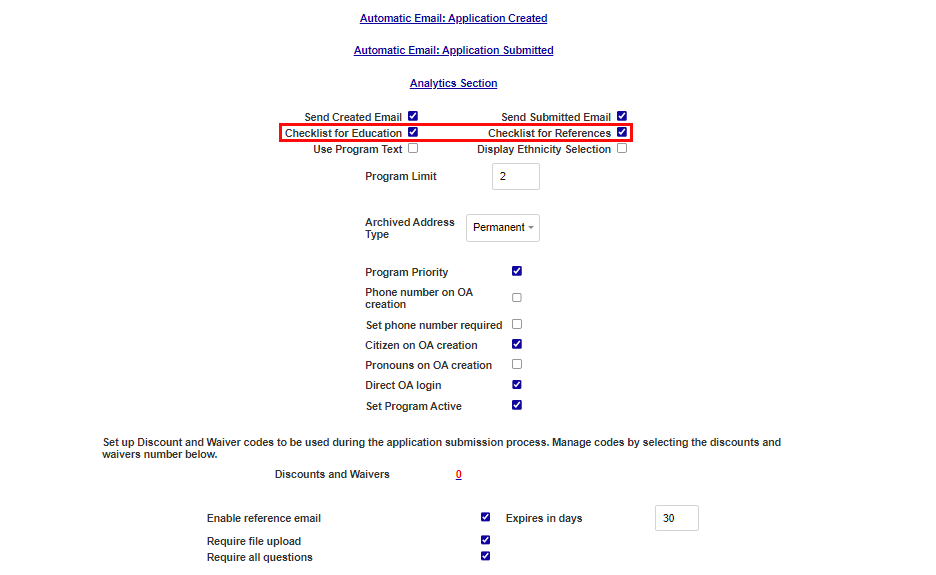
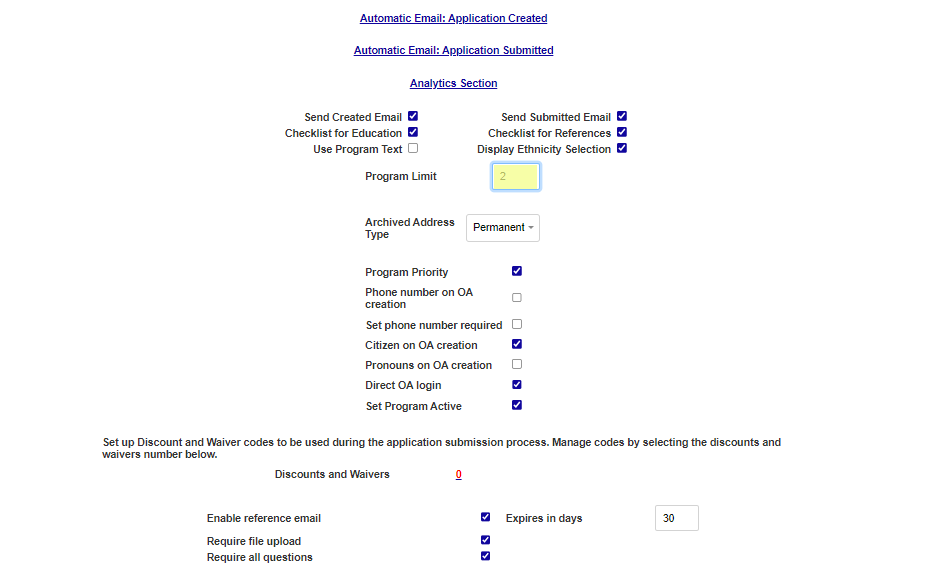
By default, the Personal Information page of the application includes questions about the applicant's ethnicity for demographics tracking and reporting purposes. To remove this section, uncheck the Display Ethnicity Selection box.

The Program Limits field controls the number of programs that a student can apply for at one time. If the application being created is for a single program, this number should be 1.
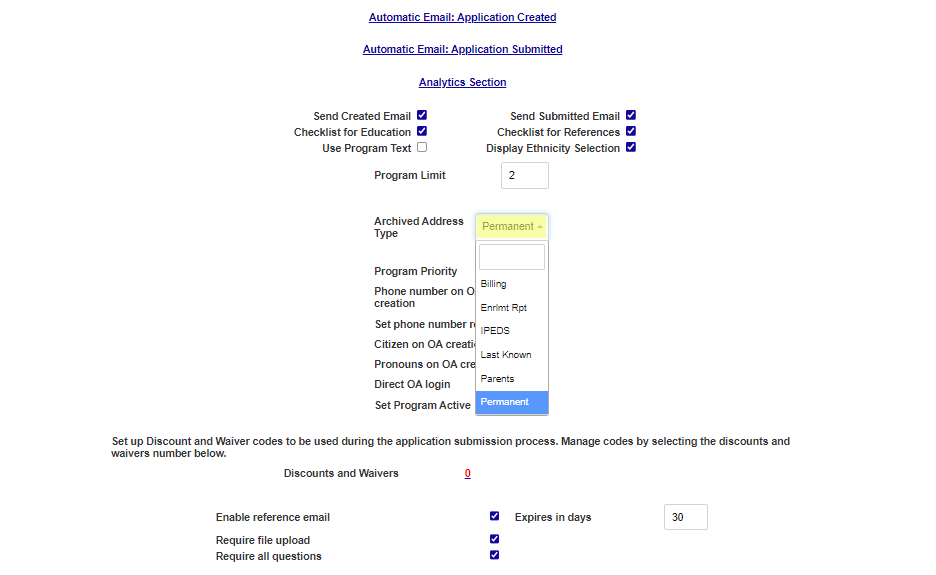
The Archived Address Type menu controls where an applicant's entered address is stored. Address Types are created in Table Maintenance.
Record Options
In the center of the page are a set of checkboxes that control how the application displays fields and how the applicant's records are created because of their entries.
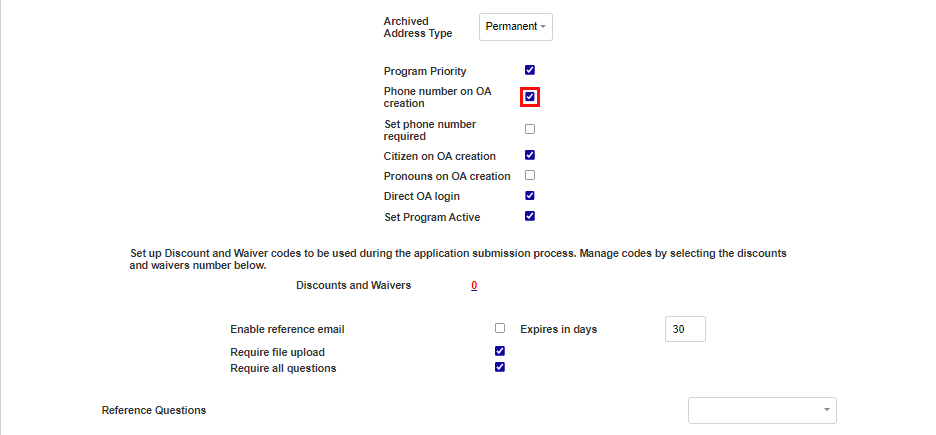
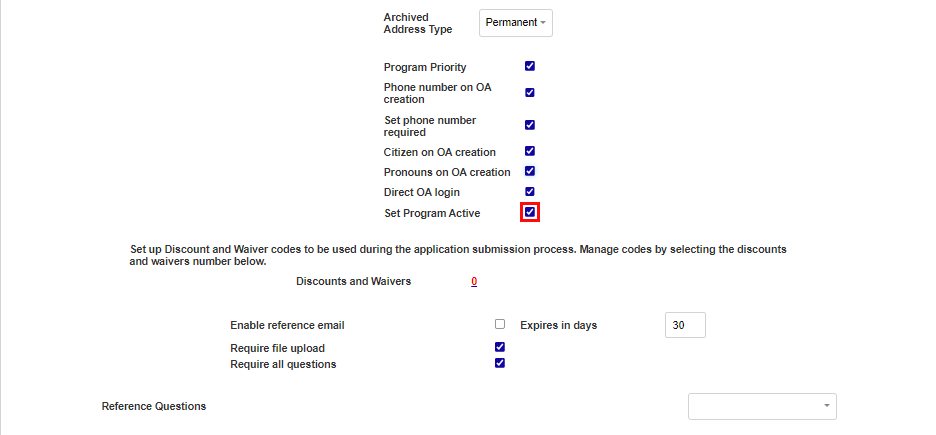
If Program Priority is checked, applicants can only select one program at a time rather than using multi-select. The idea is that by forcing students to select each program to apply for individually, they're more likely to choose the program they're most interested in first rather than choosing programs at random or applying for every program. The first program selected is listed in the student's Application record as their Preferred program. Check the Phone number on OA creation box to ask the applicant for a phone number as part of the application creation process.
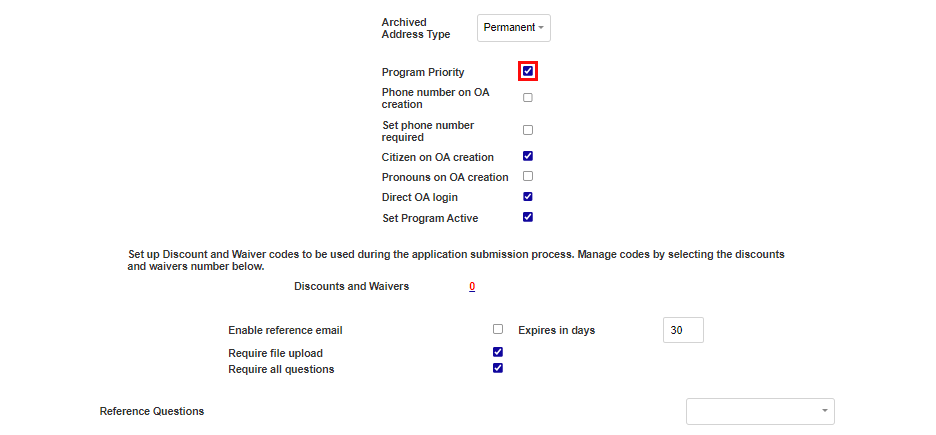
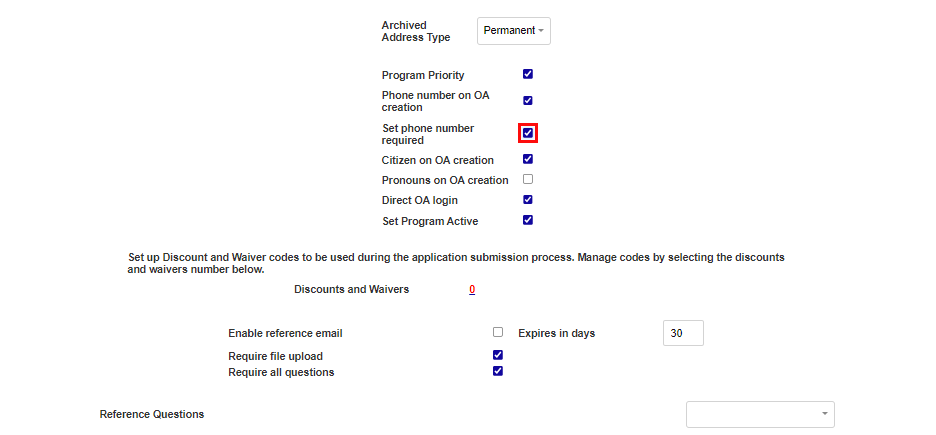
If the Set phone number required box is also checked, applicants cannot proceed without providing a phone number. This setting cannot be changed based on the application since the field appears on the same page where the application is selected. The application will default to the setting chosen in the Main application.

If the Pronouns on OA Creation box is checked, applicants will be prompted to select their preferred pronouns when filling out an application. This information is then stored on the applicant's Biographic record.

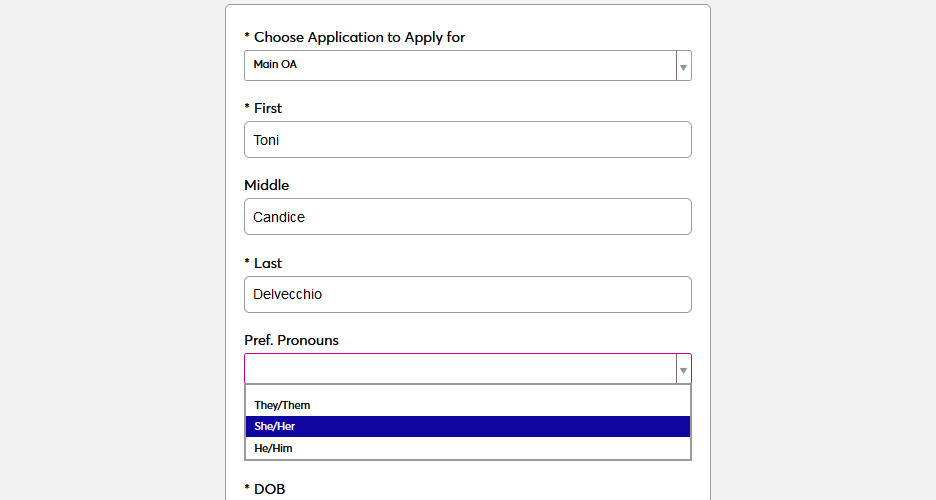
Note that the Preferred Pronouns option must also be activated globally using the checkbox in Web Options. If the option is turned off in Web Options, it will override the OA Setup checkbox.

Without the Direct OA login box checked, each applicant must log in with their username and password before they can continue creating their application. If the box is checked, the applicant is given the option to continue without a login.
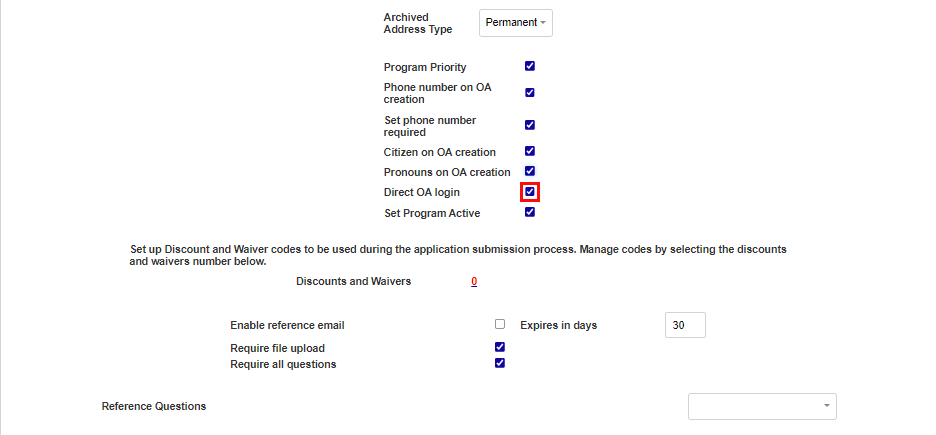
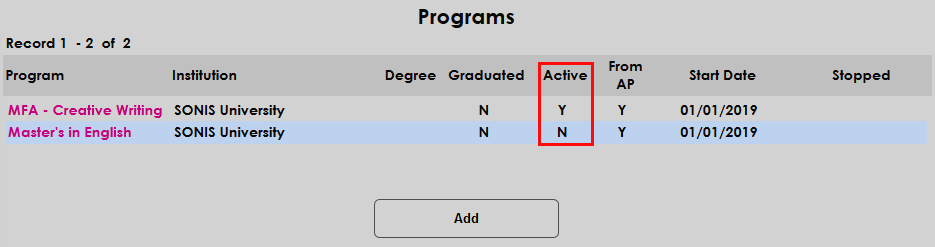
If the Set Program Active box is checked, the primary program included in the application will be marked as active when the applicant is imported.
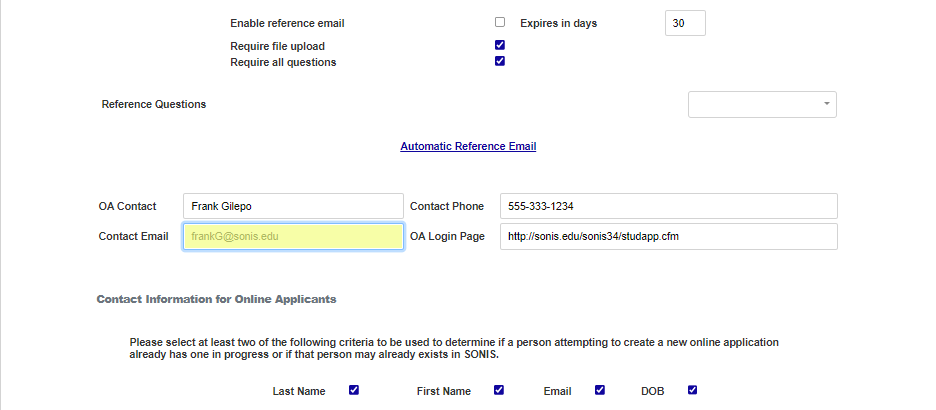
Contact Information
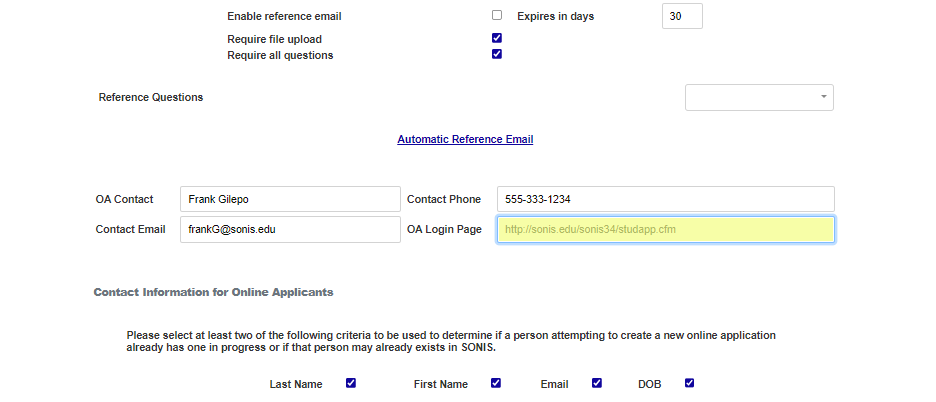
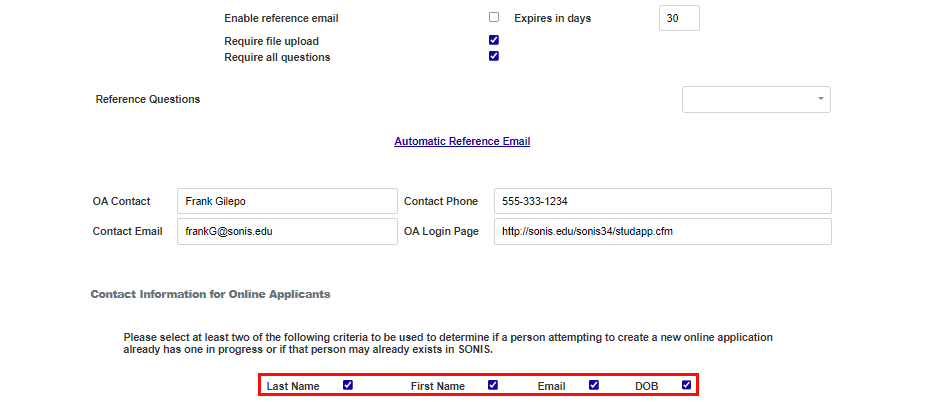
The OA Setup page is also used to set the contact information that users will see when applying. Fill in an OA Contact person along with their Contact Phone number.
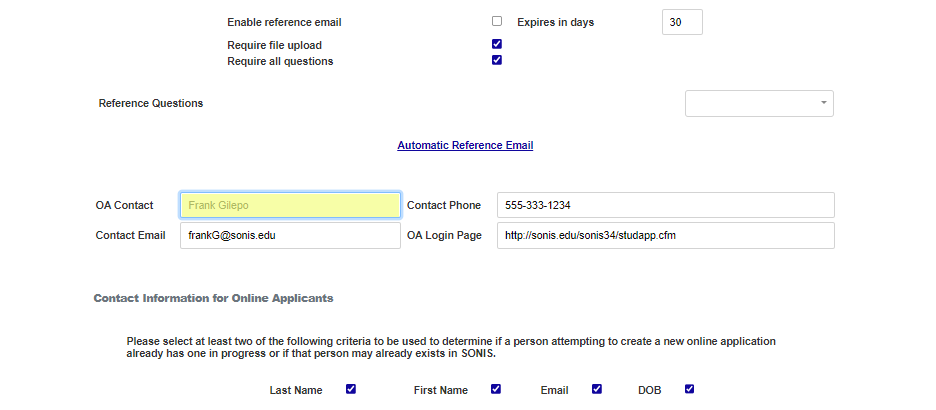
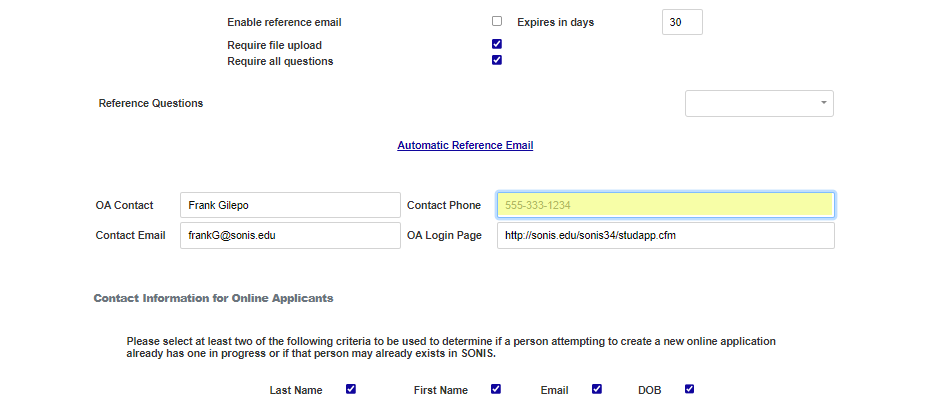
Enter the Contact Email address. Contact name, phone number, and email are provided to applicants so they know who to reach out to if they have questions or encounter an error. The OA Login Page field is used to direct applicants back to the start page once they've created their application.
Repeat-Checking
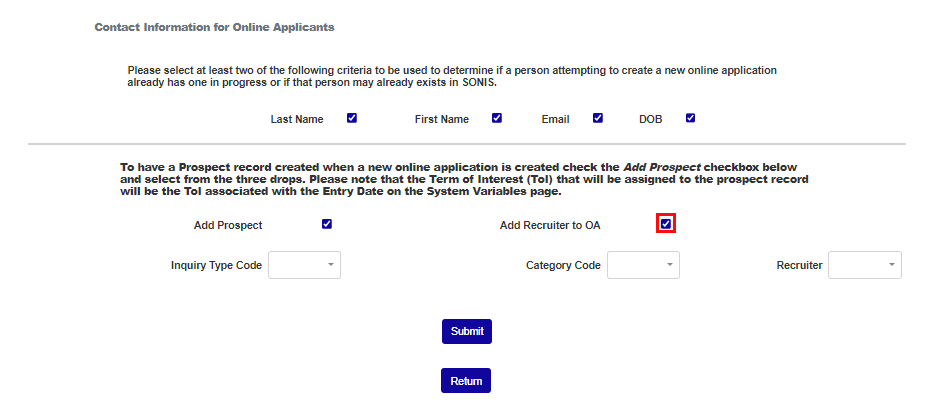
The Jenzabar SONIS system can be set to automatically recognize when an applicant has filled out an application in the past to prevent spam and accidental repeats. The system can use the applicant's Last Name, First Name, Email, and or Date of Birth to compare against previous applicants and prevent repeats. Checking all options creates more strict repeat prevention while checking fewer options allows more potential repeats to get through but can potentially lead to less applicants who are not actually repeats being flagged.

Creating Prospect Record & Assigning Recruiters
The last section of the OA Setup page allows schools to create a Prospect record for each applicant when their application is imported. To add a prospect record, check the Add Prospect box.
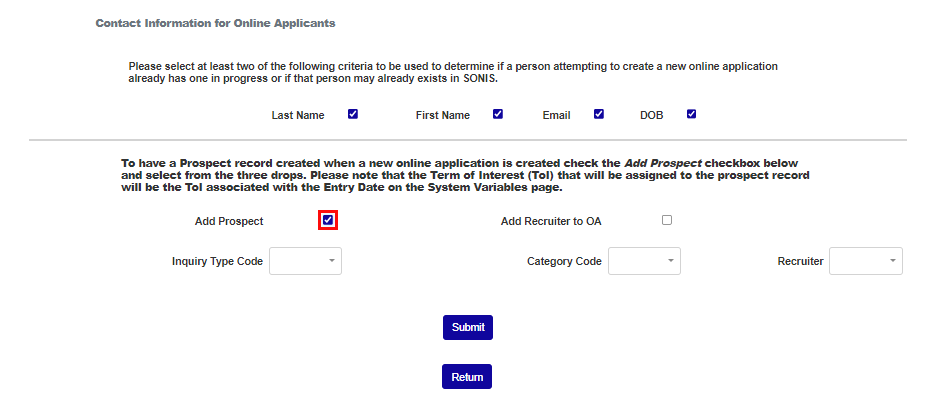
Select a default Inquiry Type Code to assign to each Prospect Inquiry record. This list is created and edited in Table Maintenance.
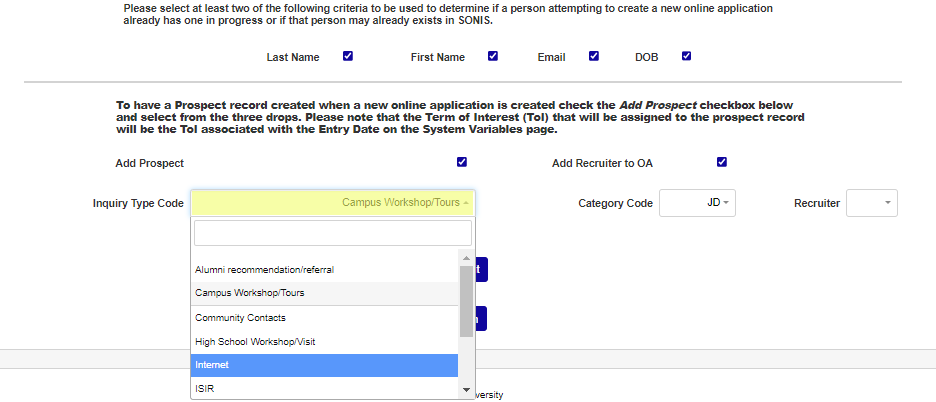
Select a default Category code to assign to the prospect record. Category codes are created and edited via the Categories utility in the Systems hub.
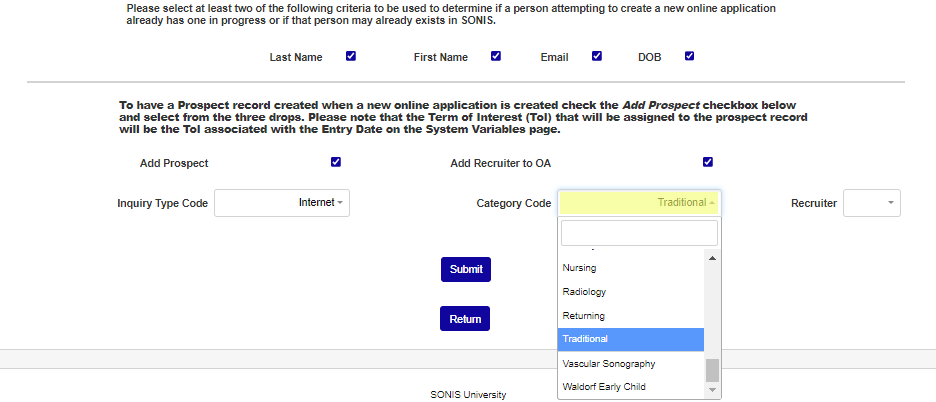
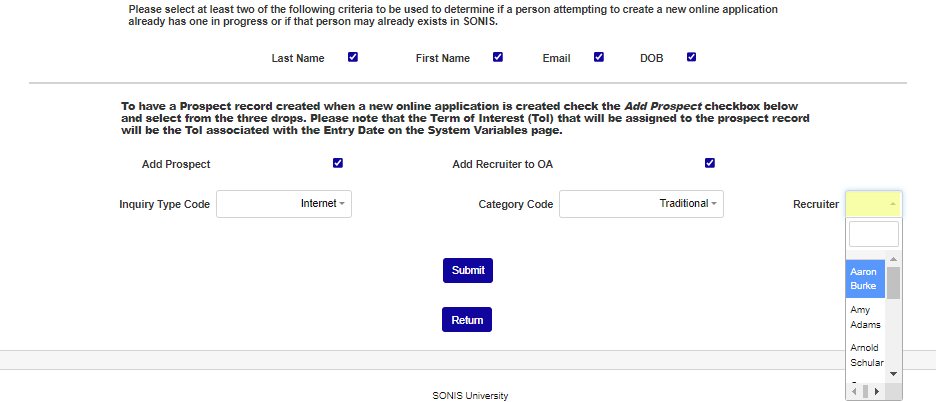
To assign a recruiter to each applicant when the application is imported, check the Add Recruiter to OA box. When this option is active, a Recruiter drop-down menu will appear when the applicant creates their application, allowing them to select the recruiter or agency they've worked with.
If the Add Recruiter to OA box is checked, select a default recruiter to assign to each prospect record. If the applicant leaves the Recruiter drop-down menu blank, this recruiter/agency will be assigned to them. Recruiters are created and edited in the Agency table.
References and Reference Emails
The References options allow institutions to request references and/or a reference questionnaire from the applicant. Reference questions are defined on the Systems hub Evaluations page. References can also be requested by utilizing the Application Checklist feature.
The Enable reference email option allows institutions to automatically send custom emails to any individual that an applicant lists as a reference. Each email includes a secure link to provide a reference for the applicant within the SONIS system. With this option enabled, institutions can receive personal and professional references from their applicants without the applicants having to submit that data themselves. To activate the reference emails feature, check the Enable reference email box.
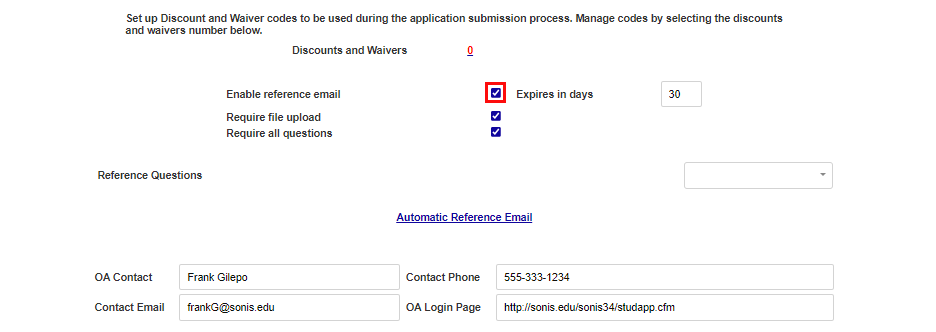
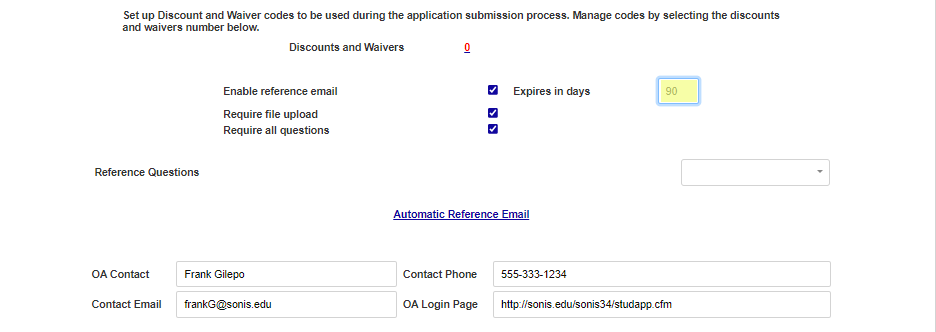
By default, all links expire within 30 days for security purposes, but this number can be edited by clicking in the Expires in days field and entering the desired number of days.
The ability to upload and attach a reference document is included by default and is optional. To make uploading a document required, click the Require file upload button. To require answers to all questions in a reference questionnaire, click the Require all questions box.

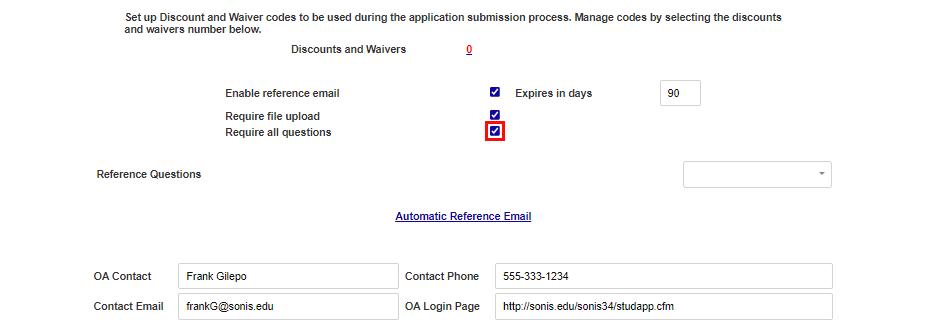
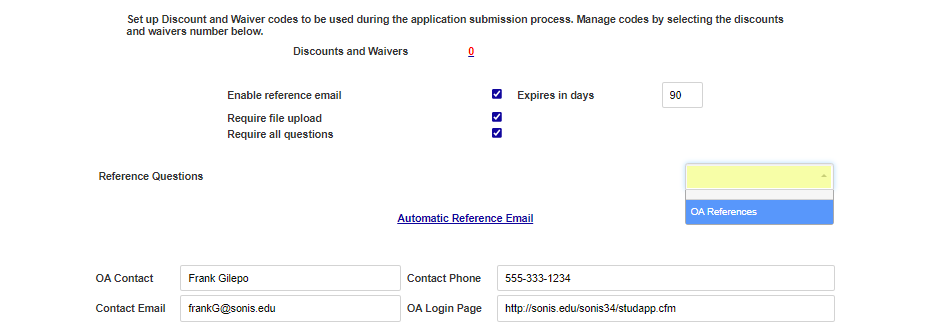
Defined, active, reference questionnaires will display in the Reference Questions dropdown. If a questionnaire should be displayed for references to complete, select one from the dropdown.
To edit the email that's sent to references, click the Automatic Reference Email link.
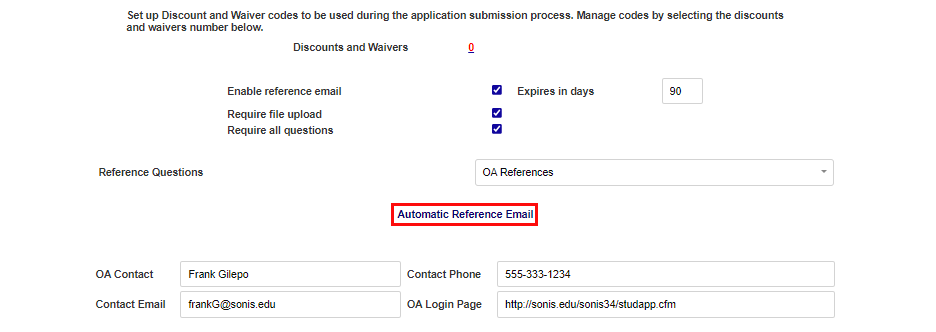
The following variables can be used to customize the email to each recipient:
#full_name# - Optional. Inserts the full name of the person receiving the email based on the data entered by the applicant.
#last_name# - Optional. Inserts the applicant's last name.
#first_name# - Optional. Inserts the applicant's first name.
#schlink# - Required. This tag is used to insert the link to the school's SONIS environment and should never be removed from the body of the email. Doing so would remove the necessary link for the reference to be redirected to the school's Applicant dropbox.
The Subject, From, CC, and BCC fields, as well as the body of the email can all be edited to match institutional preferences. Once these fields have been set, click Submit to save the email.

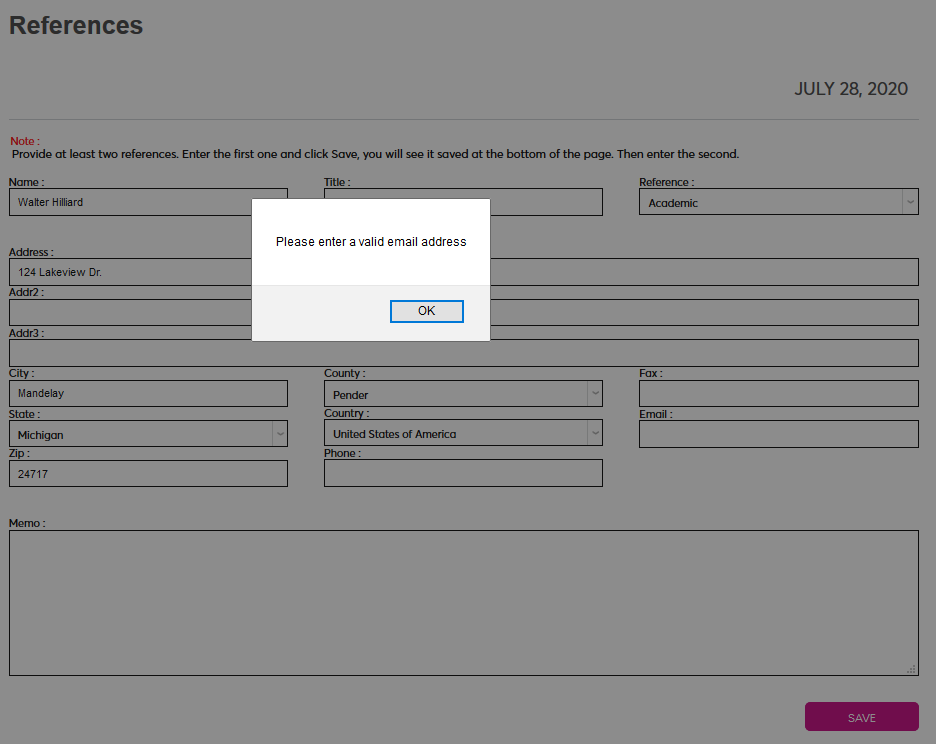
When the reference emails option is active, a valid email address is required when submitting the OA References page.
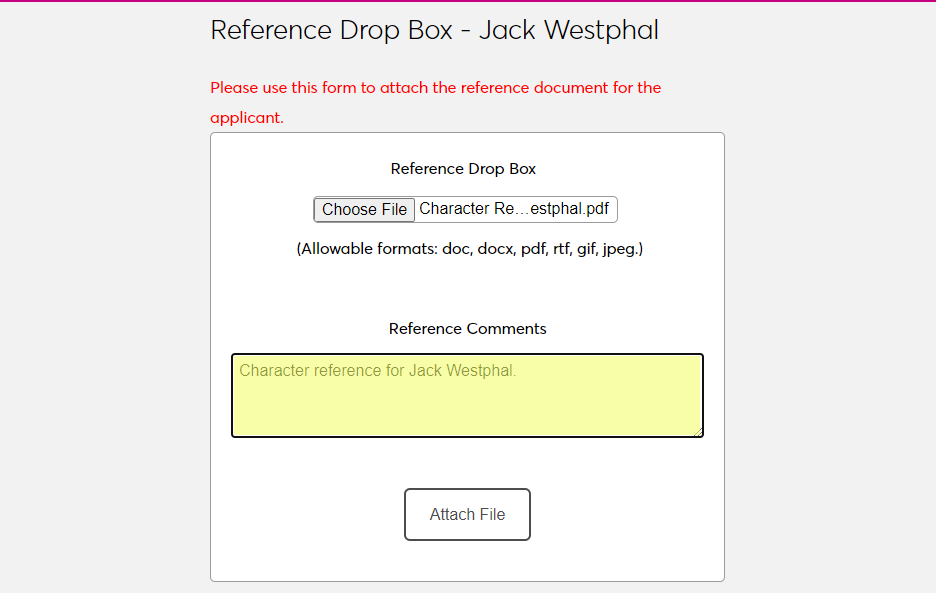
Once a reference has been submitted, an email will be sent automatically. It will include a link to add reference documents. When the recipient clicks on the link in the email, they'll be taken to a secure page where they can upload the requested documentation. Click the Browse button to locate and select the appropriate file.
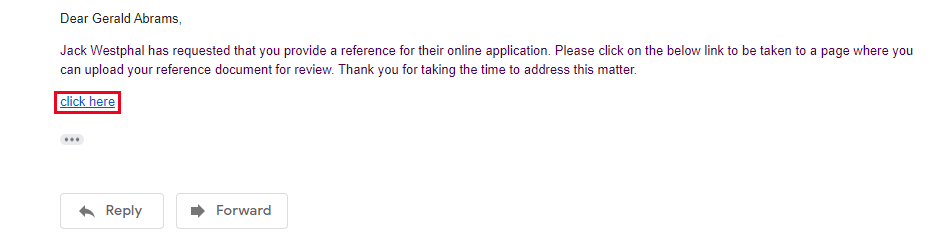
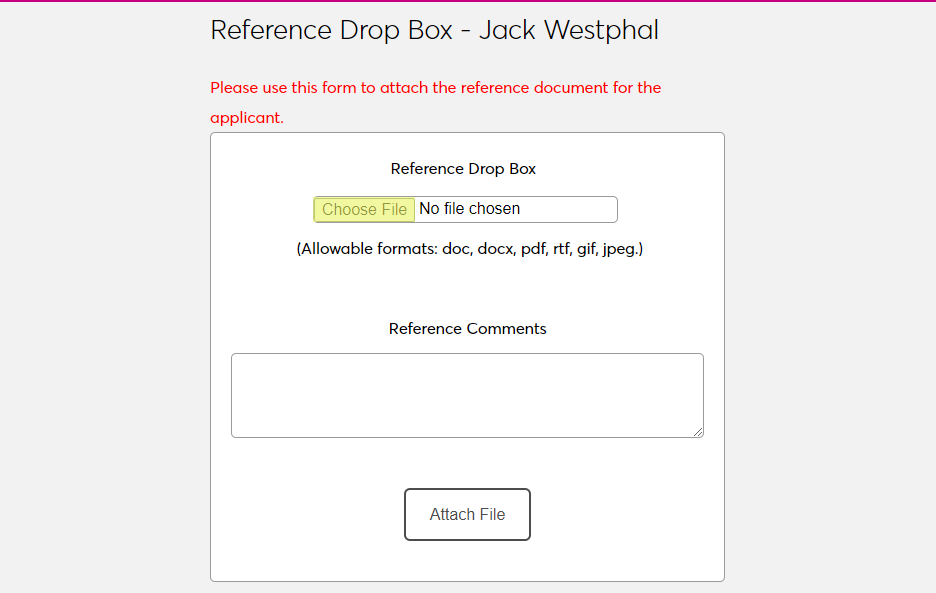
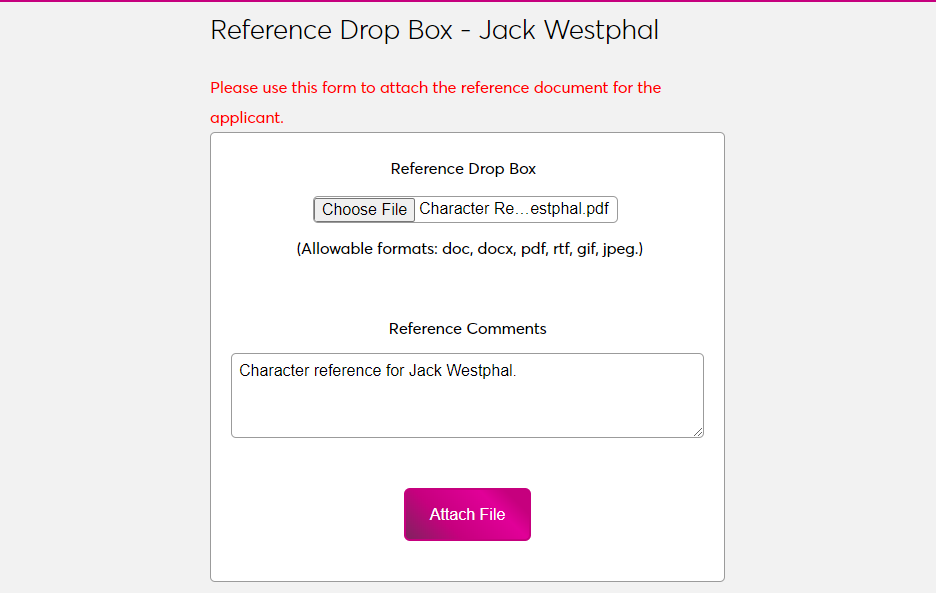
A Reference Comments field is included for any notes that the individual may want to add. Click Submit to upload the file.
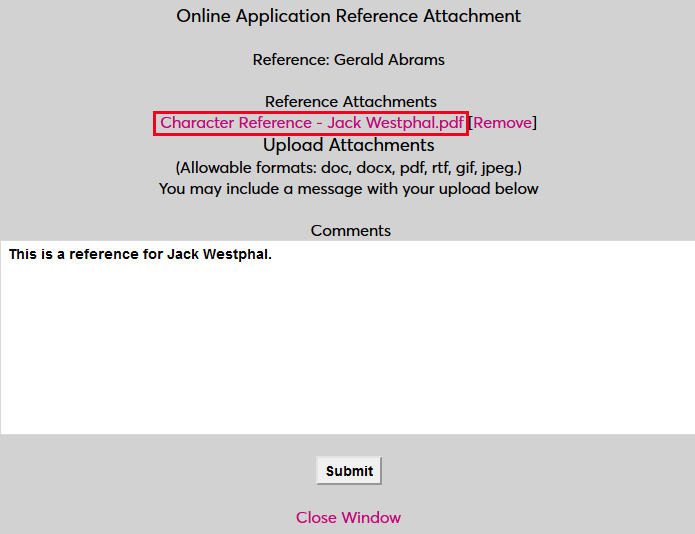
Once a document has been attached, it can be viewed through the Import Functions utility. Click on the name of the file to view the file information in a pop-up window.

From the pop-up window, administrators can view and edit the file Comments and view the file itself by clicking on the name of the file. They can also unattach the file by clicking Remove.

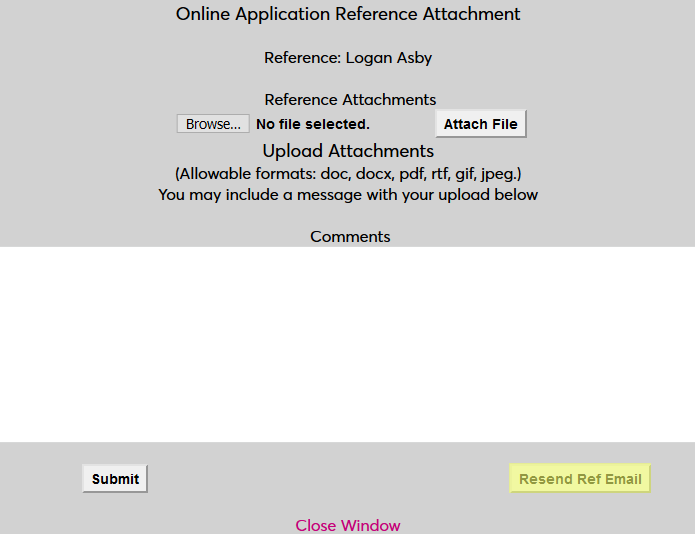
If a reference has not yet attached a file, click Attach to open a pop-up window with more options for this reference.

In the pop-up window, administrators have the option to attach a reference file from this person. Click Browse to locate and select the file and Attach to attach it.

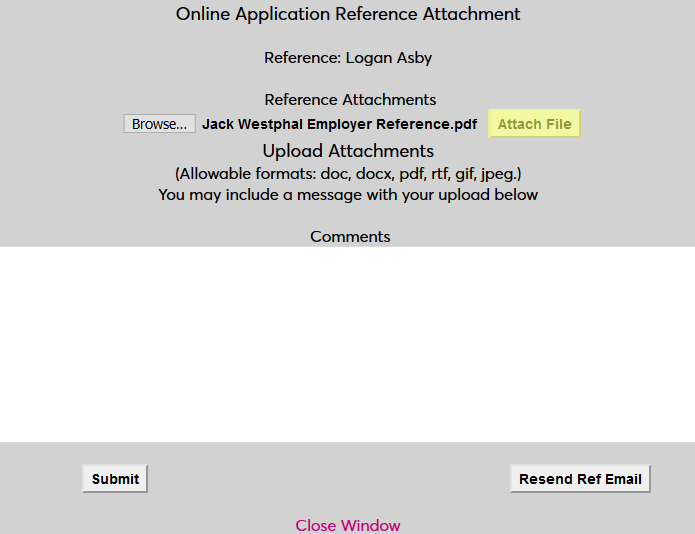
The page also offers the option to Resend Ref Email to the reference. This can be useful if the person's email address has been changed, the email was lost somehow, or the link has expired.
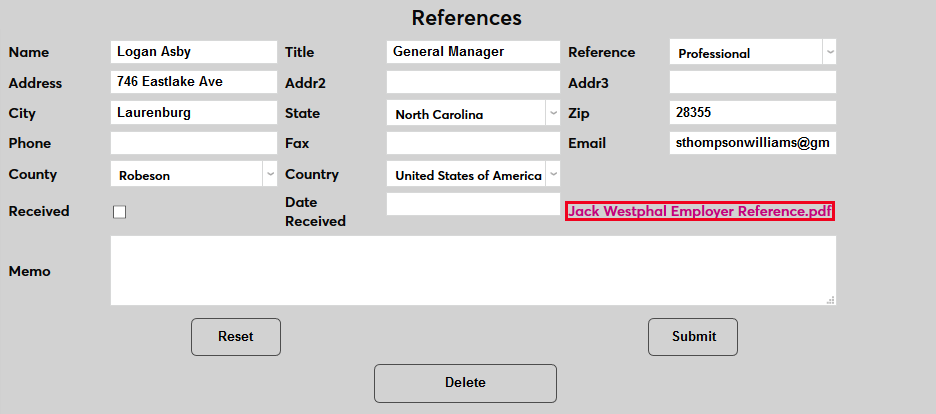
Once the application has been imported, any attached files can be accessed through the applicant's References page under their Records menu. Click on the Name of the reference. On the following page, click on the name of the file to open the file information page from this location, where it can be removed or altered.

Login, Create New, & Completion Page Analytics
As previously covered, analytics can be inserted into internal pages of each Jenzabar SONIS Online Application. They can also be used globally in the head, body, and/or footer of the login page, create new application page, and submission page. This allows for institutions to more accurately measure how many applicants are both beginning and completing their applications.
To add analytics to one of the listed pages, click Edit on one of the links at the top of the OA Setup page. A new window will open.
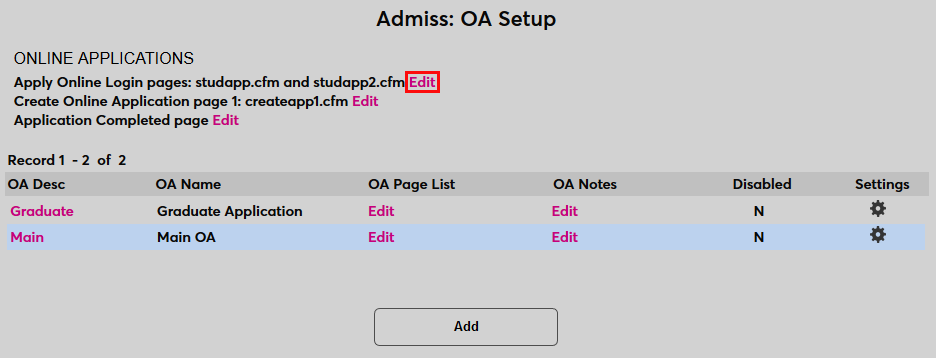
Enter analytics code into the Head Section, Body Section, and/or Footer Section. Some analytics code my need to be inserted into all three sections while other code may only need to appear in one or two.
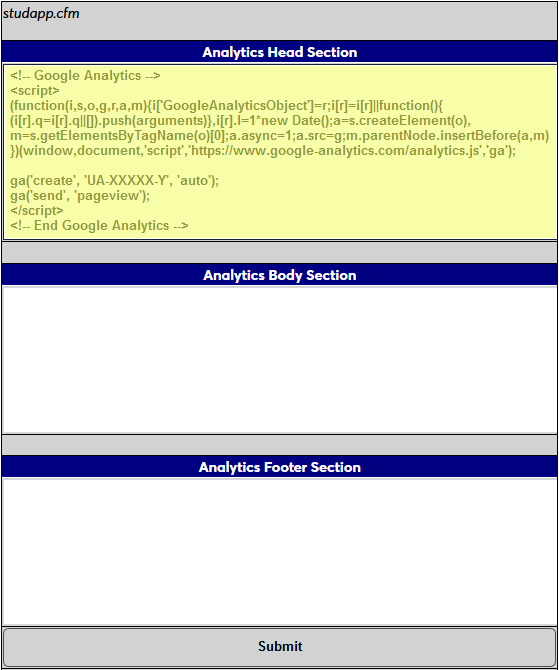
Click Submit to save the analytics code. Repeat the process to append analytics code to the other pages as well.
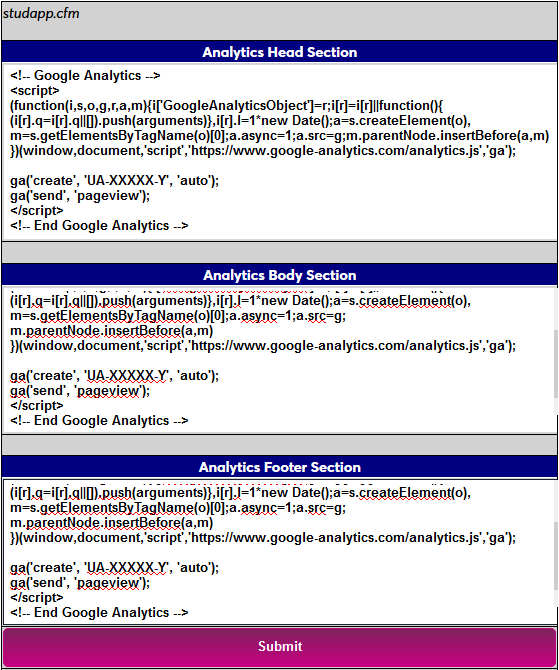
The page referred to as the "login page" is the page where users can create a new application or continue an existing application, studapp.cfm.
The page referred to as the "create application" page is the page where the student begins their application by entering their basic information, createapp1.cfm.
The page referred to as the submission page is the page that an applicant is taken to after they submit their application, studapp.cfm?m=app_comp.
Application Fee
Setup
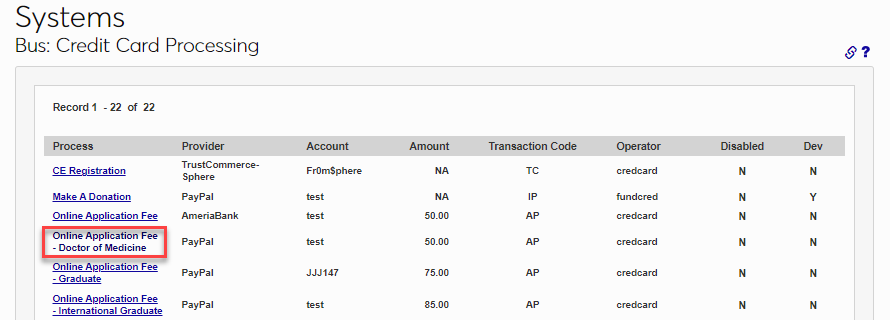
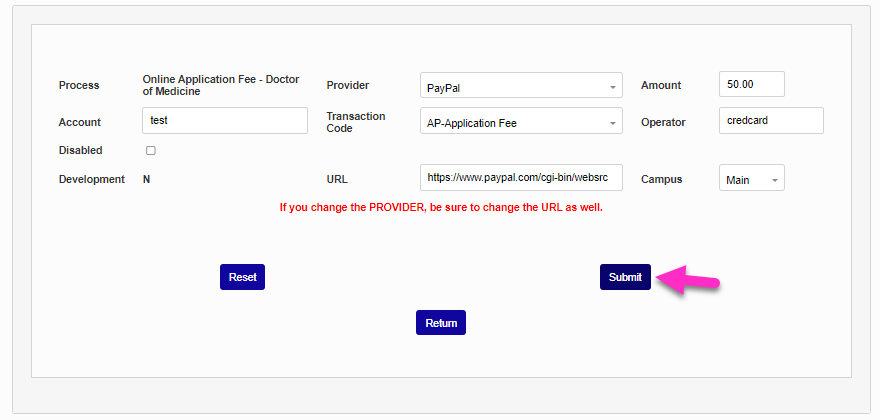
Many institutions charge their prospects a fee for application processing. This fee can help assuage some of the cost associated with reviewing applications and weed out spam or joke applications. To set up an application fee, navigate to the Credit Card Processing page in the Systems hub and click on Online Application Fee to be set up in the Process column.
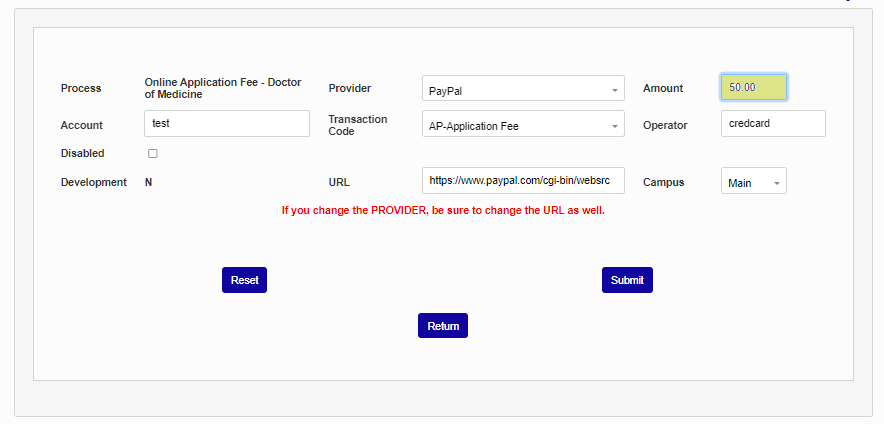
On the following page, setup the Provider information, set the Amount , select a Campus that will be associated with the payment, if desired, and click Submit. Visit the Credit Card Processing documentation for more detailed information on the payment setup process.
Fee Waivers & Discounts
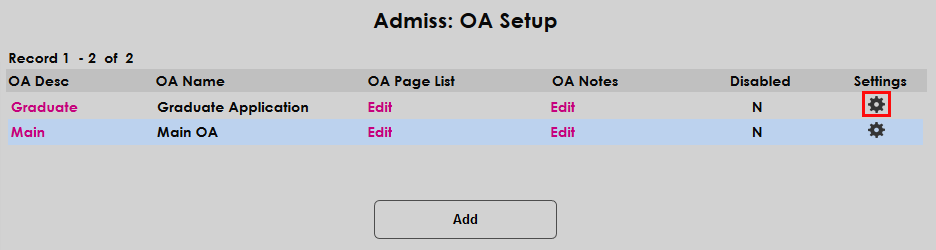
Once the fee is in place, there may be occasions when a school wishes to waive the fee or give out discounts to certain applicants. This can be accomplished through the OA Setup utility. Click on the Settings icon of an application to create waiver and/or discount codes for that application.
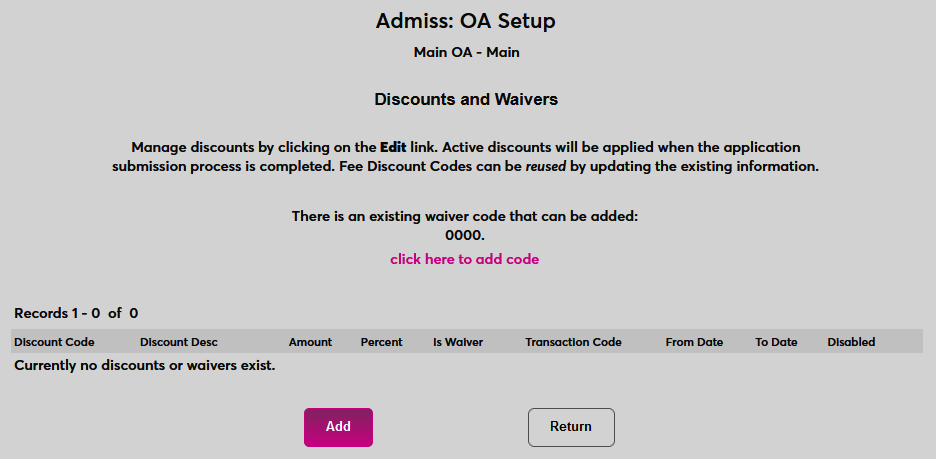
Scroll down to the text that says, "Set up Discount and Waiver codes to be used during the application submission process. Manage codes by selecting the discounts and waivers number below." The number of discounts and waivers that have been created is displayed below. Click the link to be taken to the Discounts and Waivers page.

If a waiver code exists in the system already that was created with the old waiver functionality that this new system is replacing, SONIS will offer the chance to import that waiver code. To continue using that code, click the link to add it. This is a one-time opportunity and the link will not appear when returning to this page with new waiver and discount codes created.
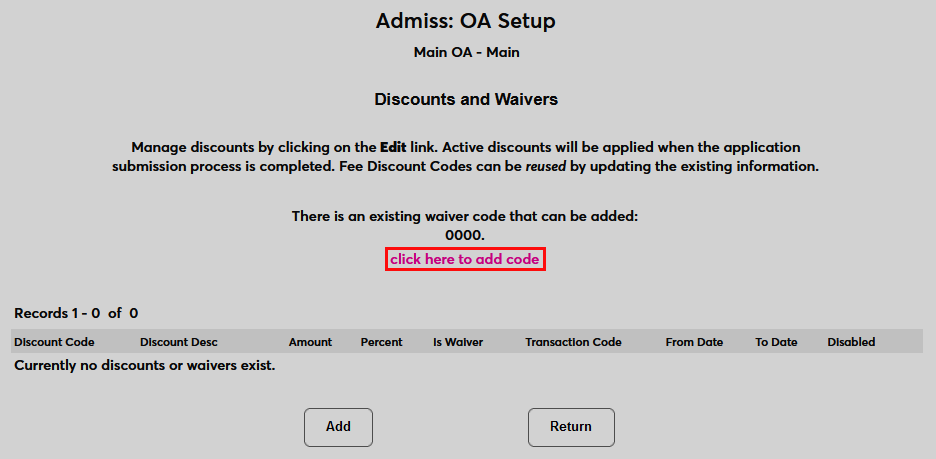
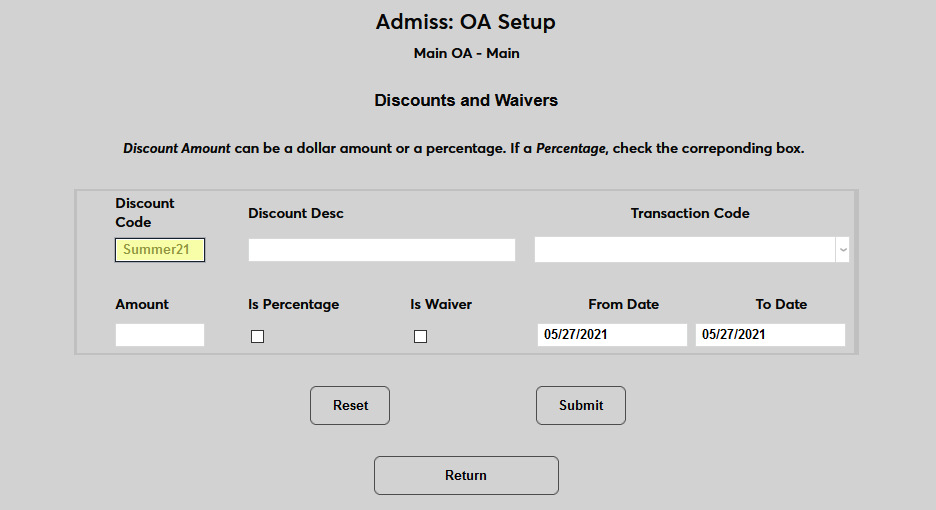
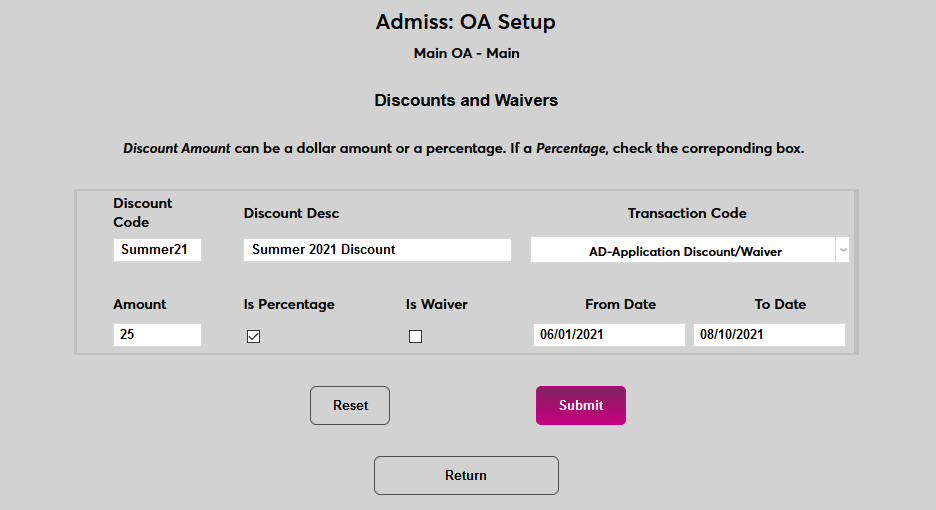
Alternately, click Add to create a new code from scratch. Both actions will take the administrator to the Discounts and Waivers add page.
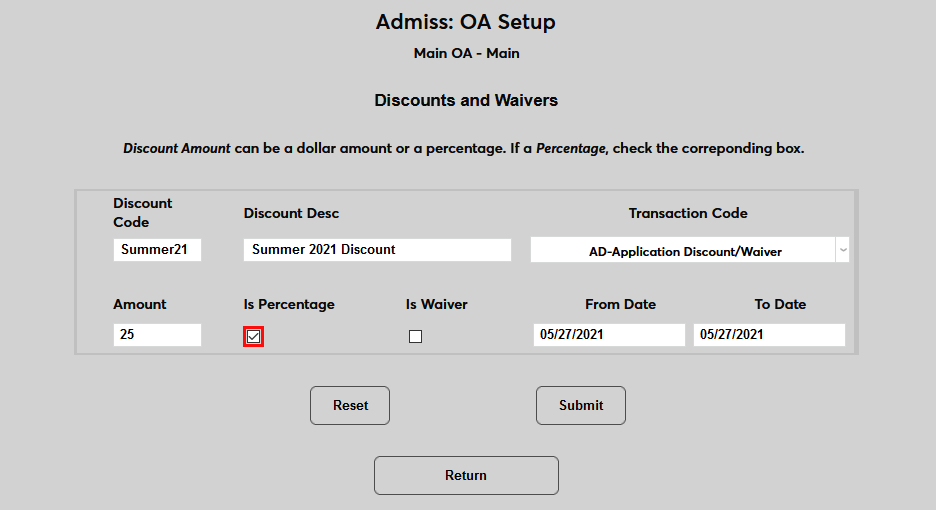
First, create the Discount Code that applicants will use. This field has a 10-character limit and is not case-sensitive.
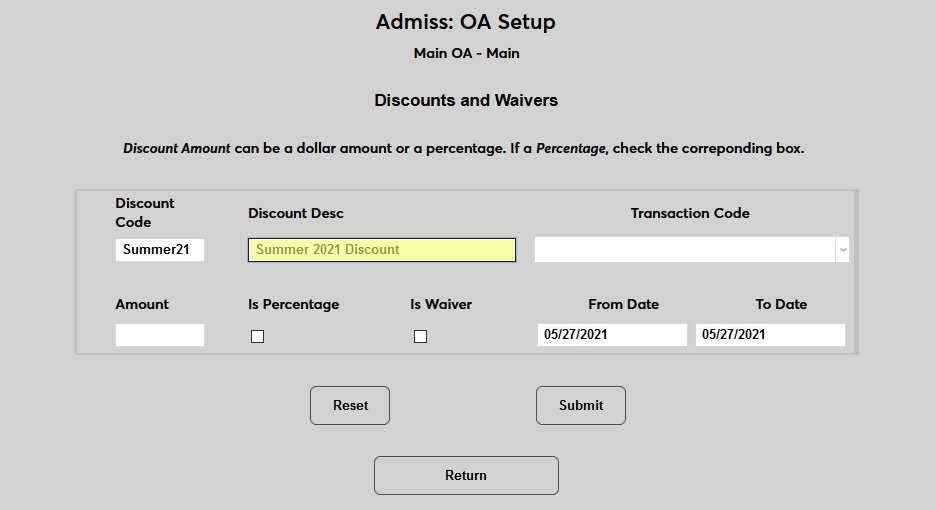
Next, briefly describe the discount in the Discount Description field. This description can include who the code is designed for, when it's going to be given out, and other key information. The field has a 50-character limit.
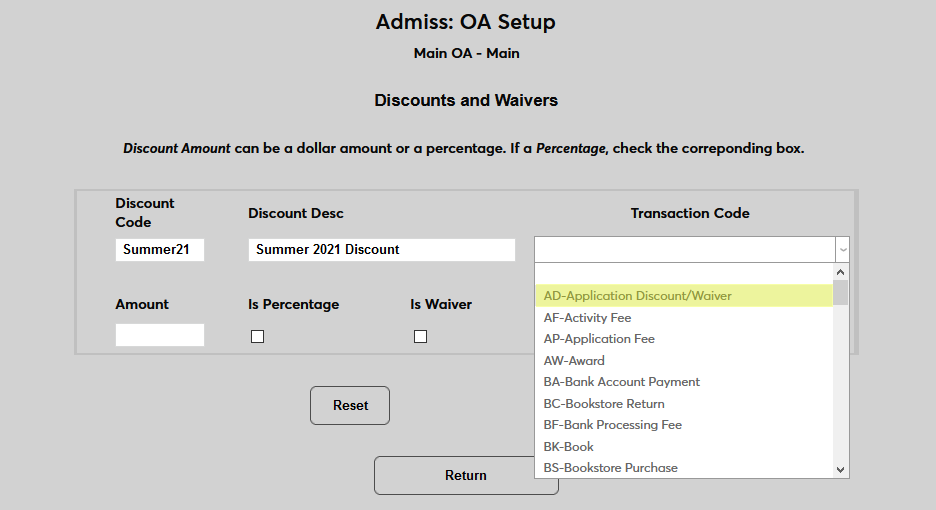
Select a Transaction Code for the waiver/discount. It's recommended that institutions create a new transaction code for these circumstances. Some institutions may choose to create separate codes for waivers and discounts for more precise record keeping.
Select an Amount for the discount. By default, this is assumed to be a monetary sum.
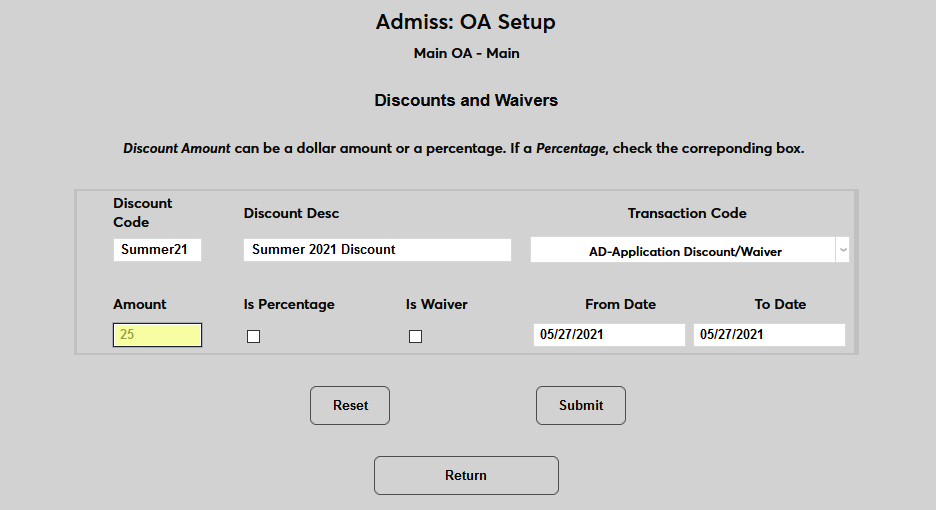
Check the Is Percentage box if the discount should be a percentage of the total charge rather than a fixed monetary discount. In this example, the applicant would receive a $25 discount without the Is Percentage box checked or a 25% discount if the box is checked.
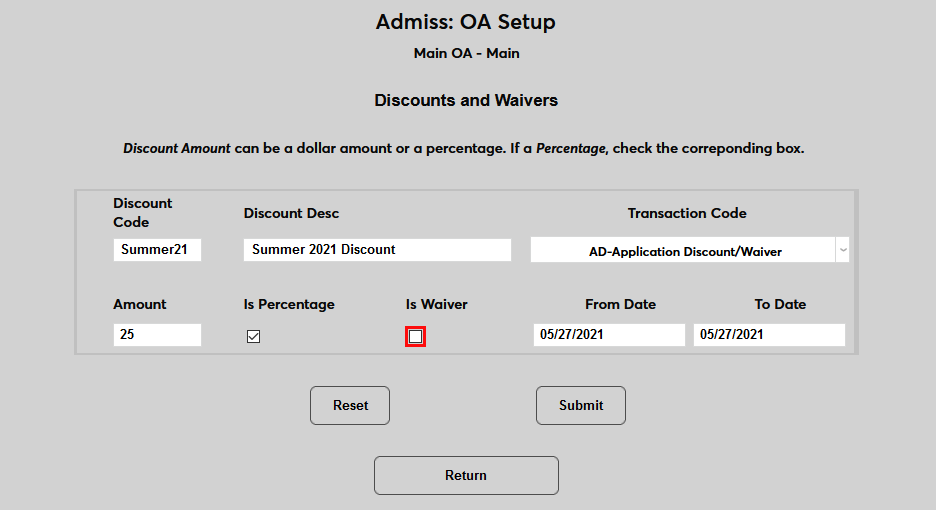
Check the Is Waiver box if the code should be a waiver rather than a discount. If the waiver box is checked, the Amount field will be ignored and the applicant will receive a 100% discount when they use the code.
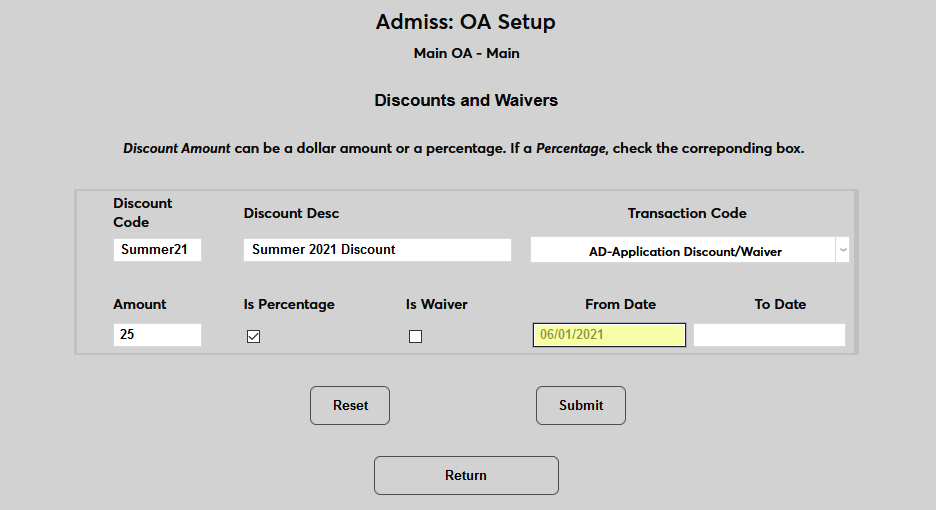
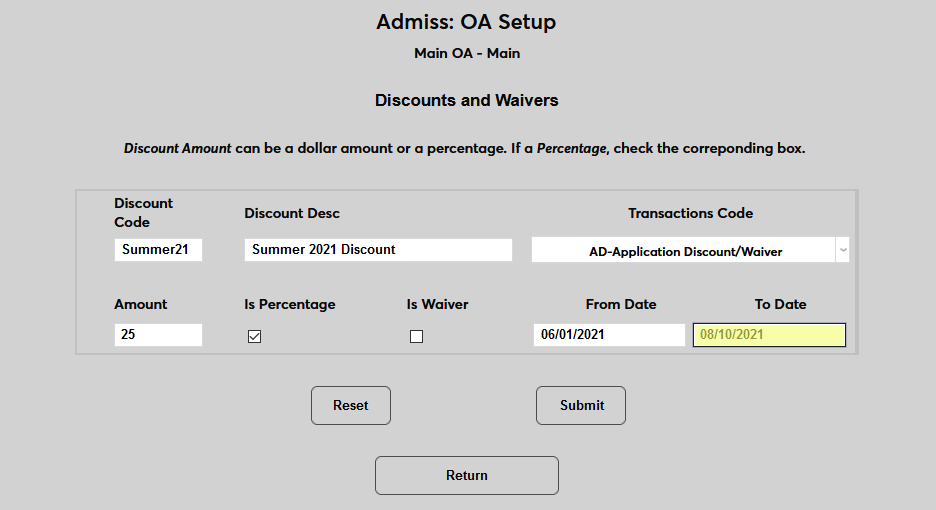
Set a From Date when the discount/waiver will become active. The To Date is optional. If there is no To Date, the code will remain active indefinitely. When both dates are present, codes can only be used on and between the specified dates. Any attempted usage outside of these dates will not result in a discount or waiver.
Click Submit to save the changes and create the discount/waiver.
Once discounts and waivers have been created, they can be edited by clicking the edit button on the landing page.
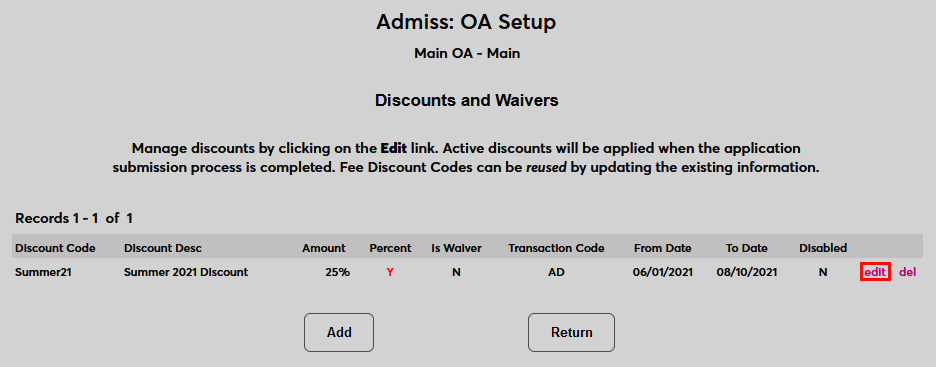
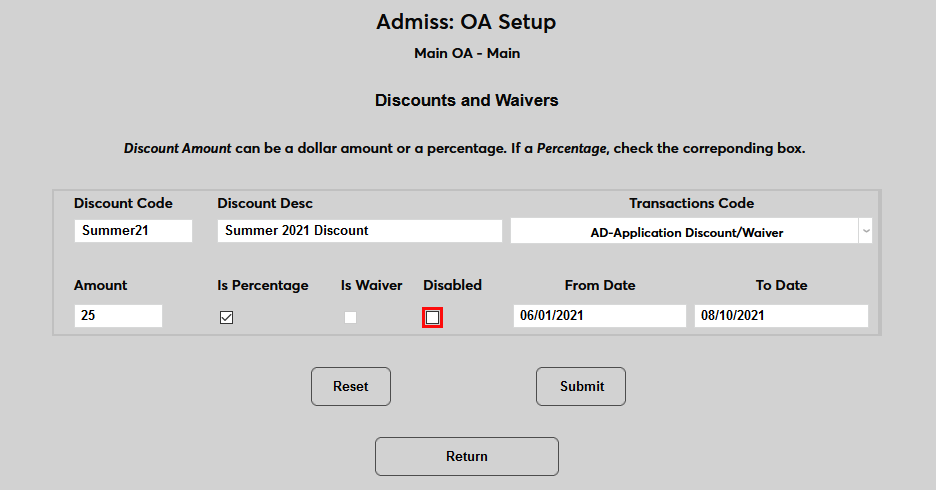
From the edit page, the code, description, T-code, dates, and amount can be changed or the code can be disabled, which prevents it from being used. Note that a discount cannot be edited to become a waiver.
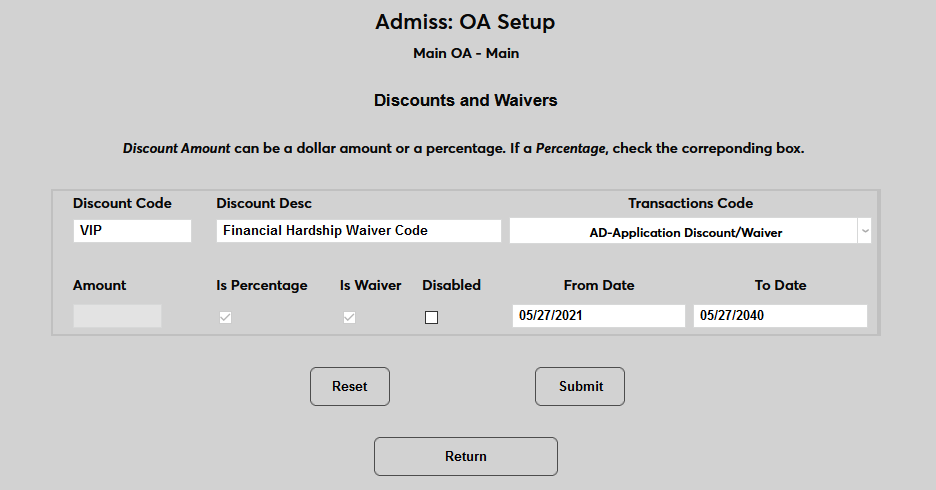
The same applies to waivers. Once a waiver has been created, it cannot be altered to be a discount and an Amount cannot be entered.
Click Disable All to disable every discount code and/or waiver.
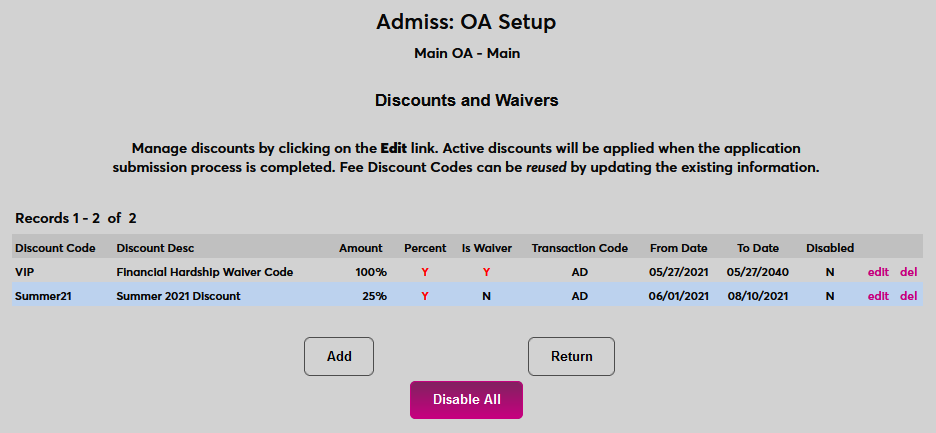
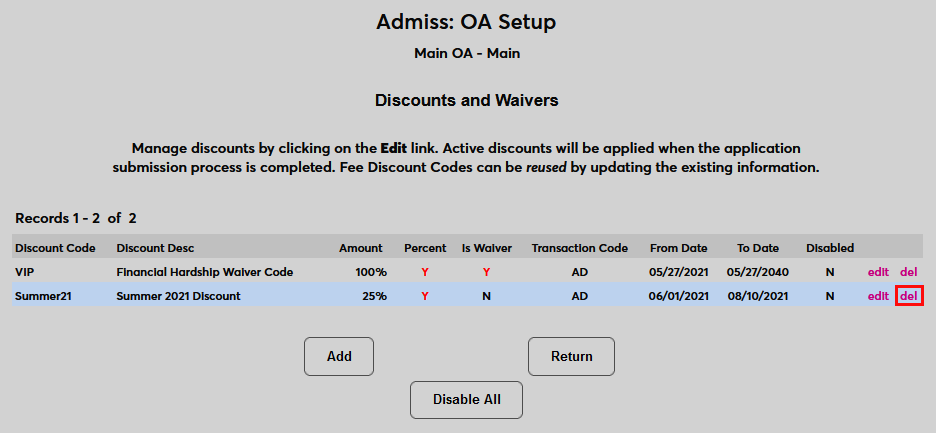
Codes can also be removed altogether by clicking the delete button.
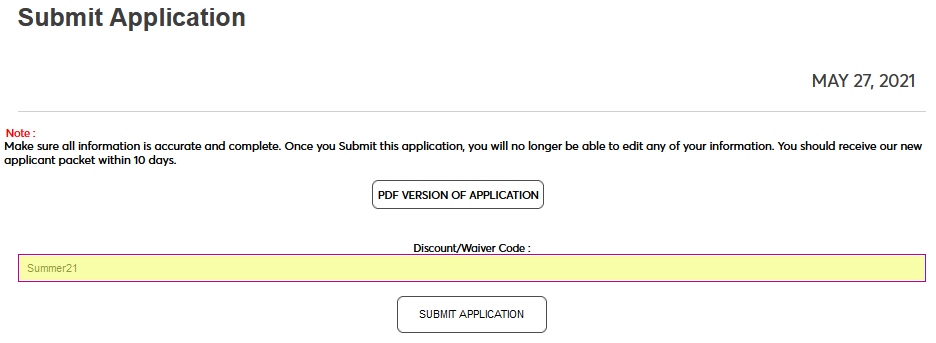
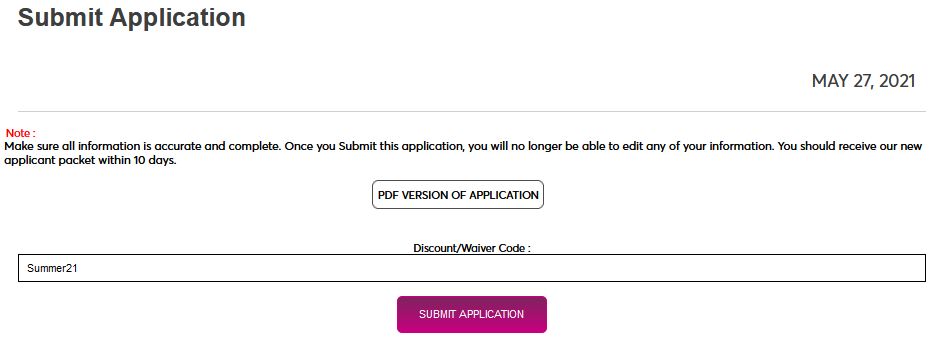
When the discount/waiver option is active, applicants who have the code can enter it on the final page of their application before submitting. Applicants who do not have the waiver code can simply ignore the field. If the correct code is entered, the student have their application fee discounted or waived.
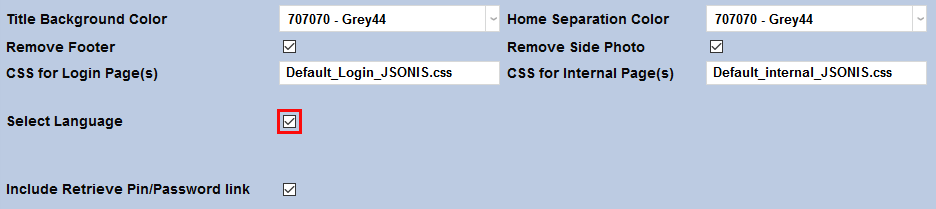
Language Select
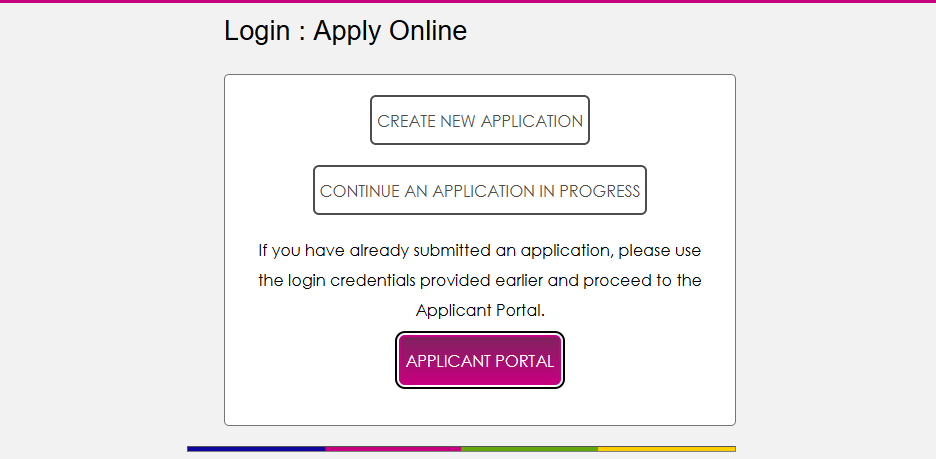
Schools that have language translation activated can turn on translation for their Online Application. Select Apply Online from the Login Page Setup dropdown menu and click Select.


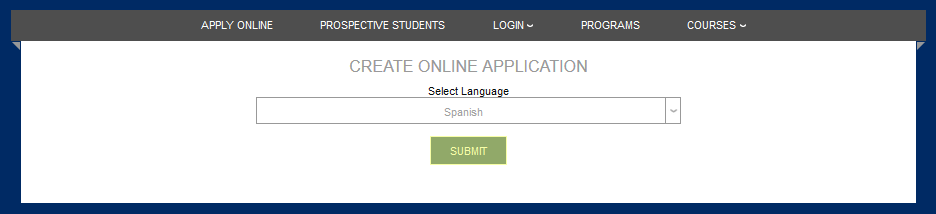
Check the Select Language box and click Submit. Applicants will be required to select a language before beginning the application.

On the following page, the applicant will be asked to fill out an additional form before moving on to the application.
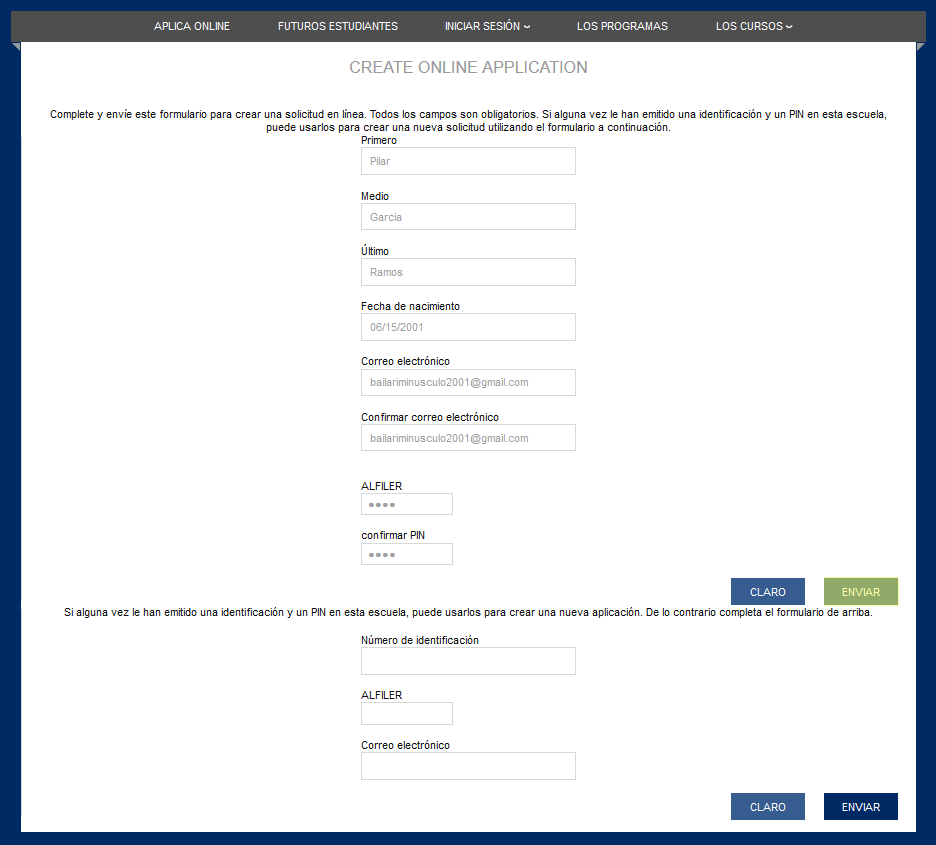
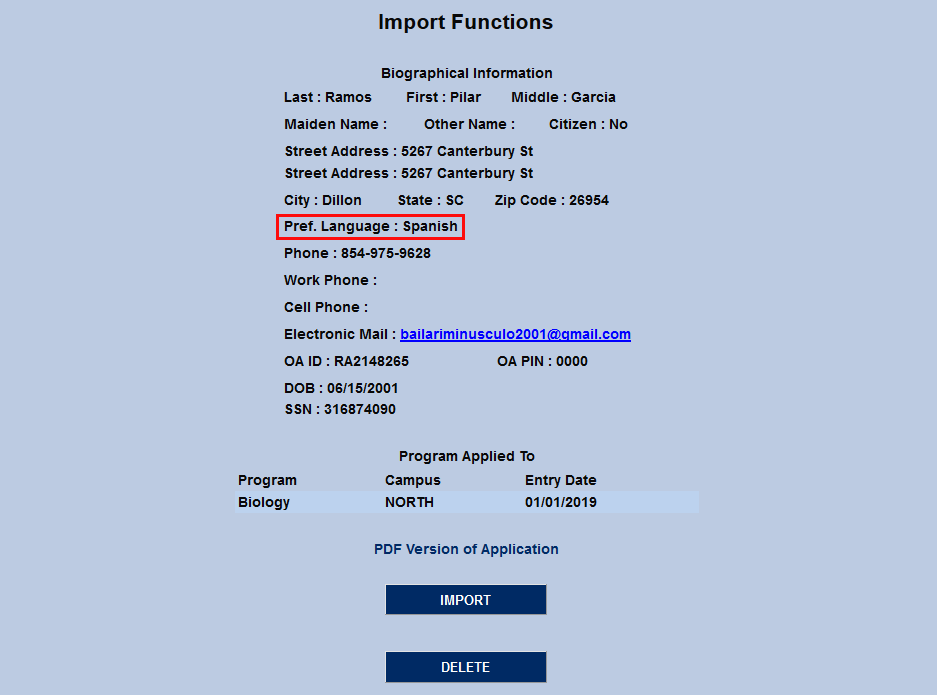
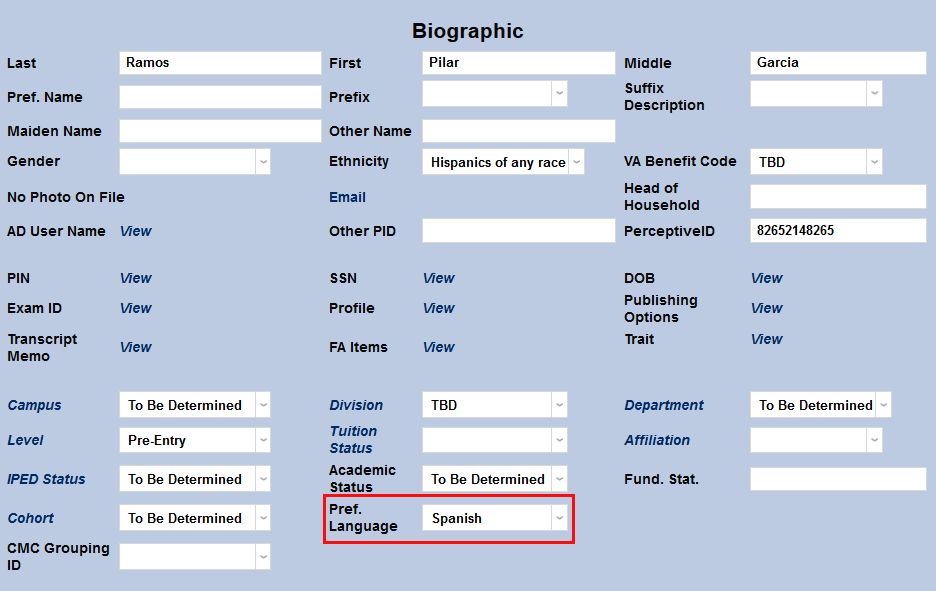
Once the student has submitted their application, the language they chose will be listed as their Preferred Language in Import Functions and will automatically populate to the student's Biographic page once they've been imported.