Course Search
Overview
The Jenzabar SONIS Course Search page and the Course Creation Wizard are used to add new courses. The Course Search page is used to access and edit previously created courses and course sections. Before course information can be viewed or altered, the course must be selected through the course search page. Attempting to access a course through another part of the system, for example an active Workflow, will reroute the user to the Course Search page. Attachments can be added, viewed, and edited after the course is selected.
To view and alter a specific student's course data, select the student using the Name Search function and click on Courses in the left-nav menu.
For an overview of how courses work in Jenzabar SONIS, click here to access the on-demand Course Management in SONIS course from Jenzabar Learning & Development which includes an eBook on Course Management.
Users can view the course catalog without logging into a user portal if the Courses by Semester functions are enabled.
Searching
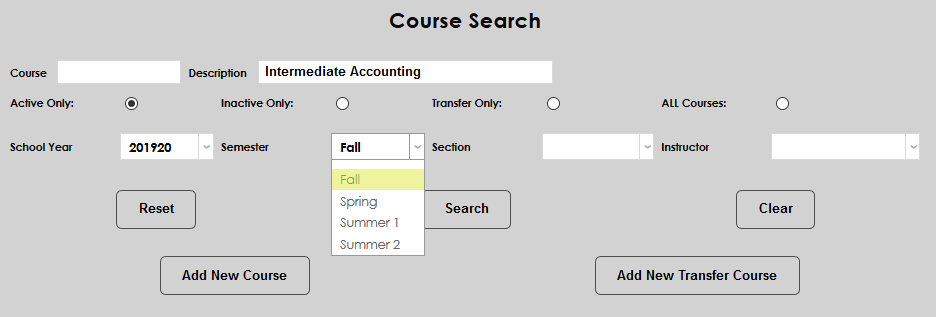
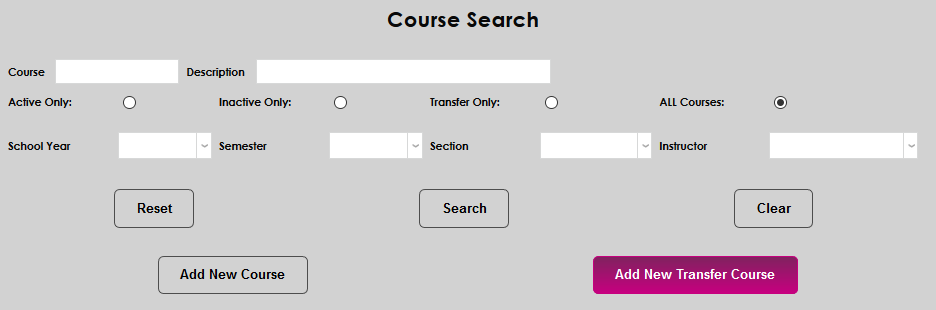
Course
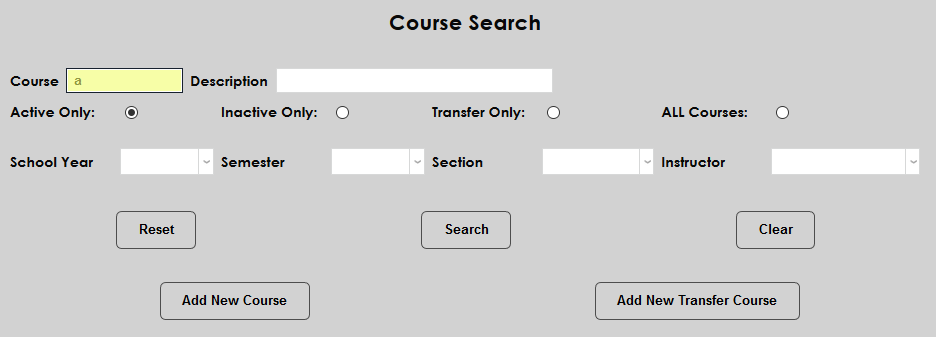
The Course field is used to search for a course by the course number. Administrators can enter the full course number to go directly to the course or part of the number to perform a more wide search. For example, when searching for ACC220, a user could enter ACC220 or ACC or even just A to bring up a list of every course number that begins with an A.
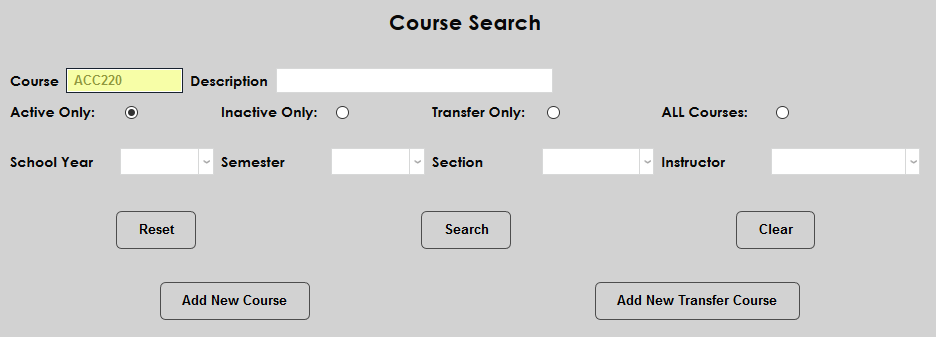
Note that, because of the way the search is designed, searching text from the middle or end of the number will not work. In the previous example, entering CC220 or 220 would yield zero results.
The Description field is used to search by the longform description of the course. This field allows substring searches, meaning that any text contained in the course description can be used. A user could search for Intermediate Accounting, Accounting, Intermediate, ACC or even ounting. Each of these search terms would yield results lists of varying sizes.
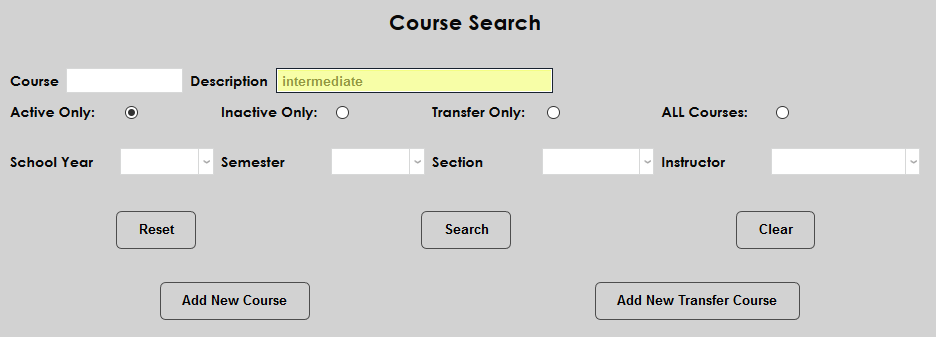

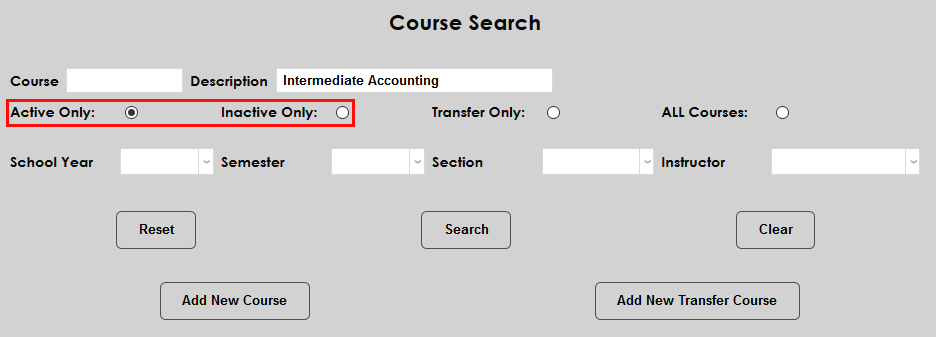
Active Only and Inactive Only are filters on the school's courses/course sections.
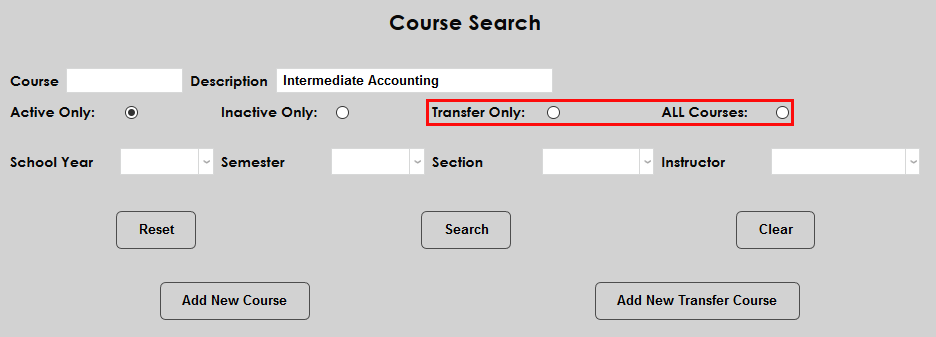
Transfer Only limits the search to transfer courses only. All Courses searches for both home and transfer courses.
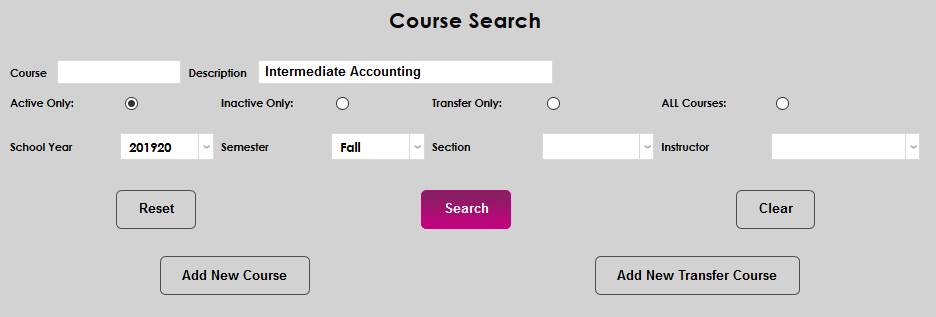
Click the Search button to initiate the search.
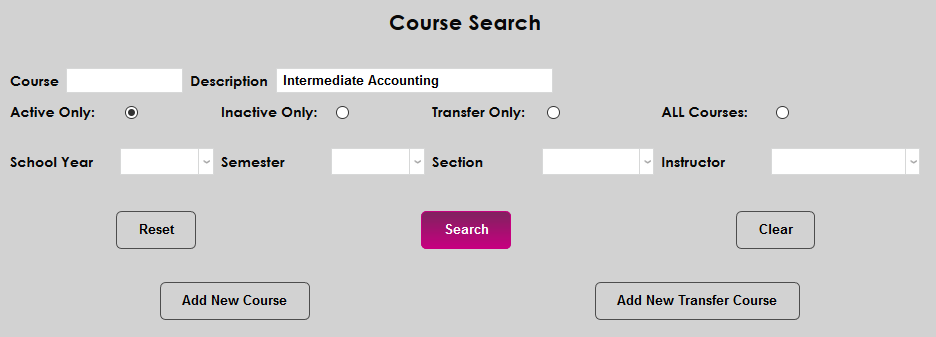
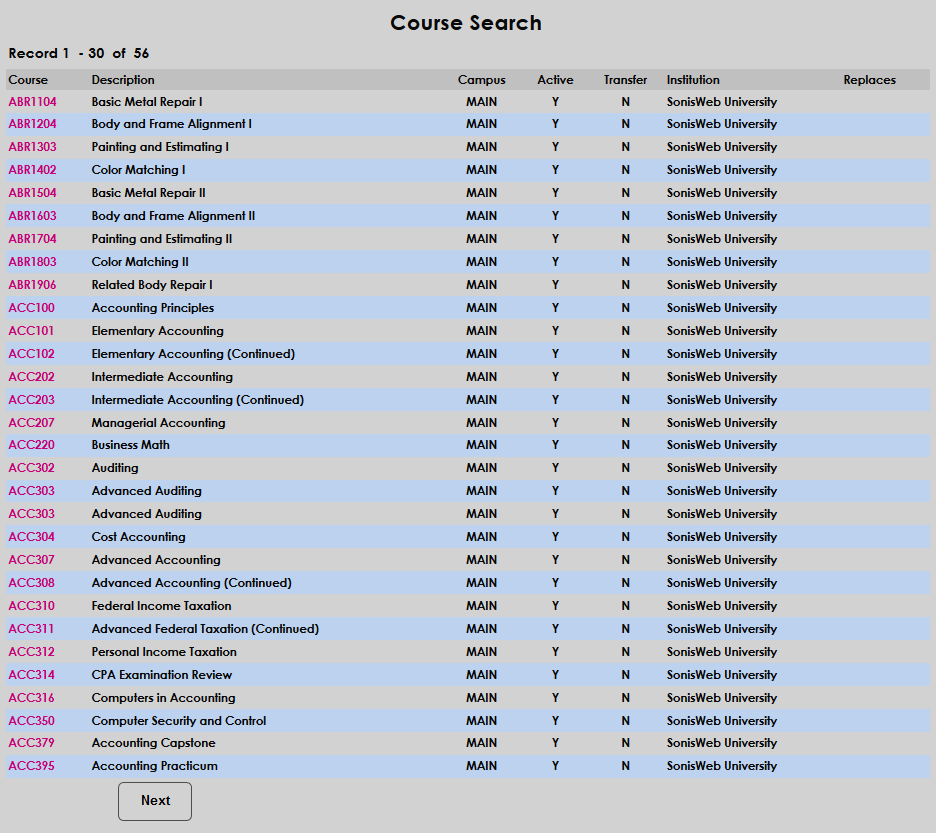
If the search returns multiple results, click on the Course number to proceed to that course's Add/Edit page and open up the full list of course edit options.

Course Section
When School Year, Semester, Section, and/or Instructor are added to the search, the search becomes a course section search. Course sections are an individual instance of a course with a specific semester, meeting times, instructor, and class roster.
As with the previous search, click on the Course number to continue to the Course Section List page.

Quick-Access Menu
The SONIS system saves previous courses that have been selected for quick access. To see the list of the most recently selected courses, mouse over the Courses+ menu item in the top-nav. The list appears in order with the most recently selected course on top. However, selecting a course from this menu will not change its position on the list.

To change the number of courses that appear in this dropdown menu, navigate to the Web Options page under the Systems hub. Scroll down to the CourseSearch Save Limit option and edit the number in the field to the right.

Adding Courses
New School Course
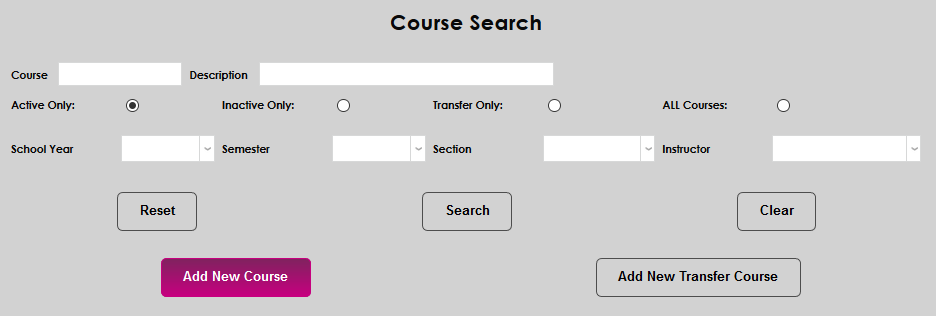
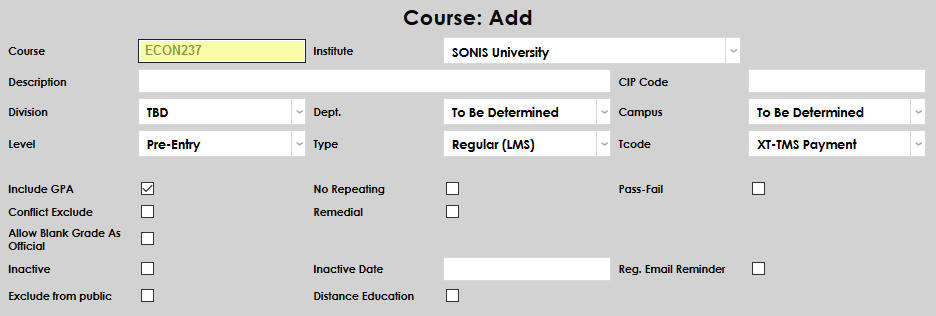
To add a new course that will be native to the Jenzabar SONIS member school or an affiliated institution, click Add New Course.
On the next page, begin by selecting the Institute where the course will take place. Only the home institution and any affiliates are listed. Navigate to the Institution Add/Edit page under the Systems hub to create and make changes to system institutions.
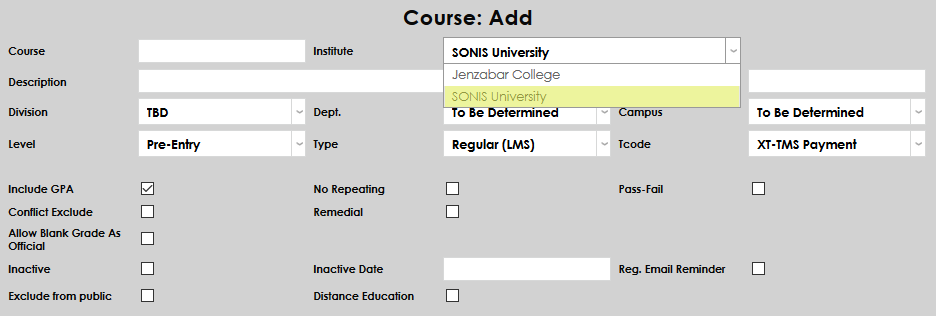
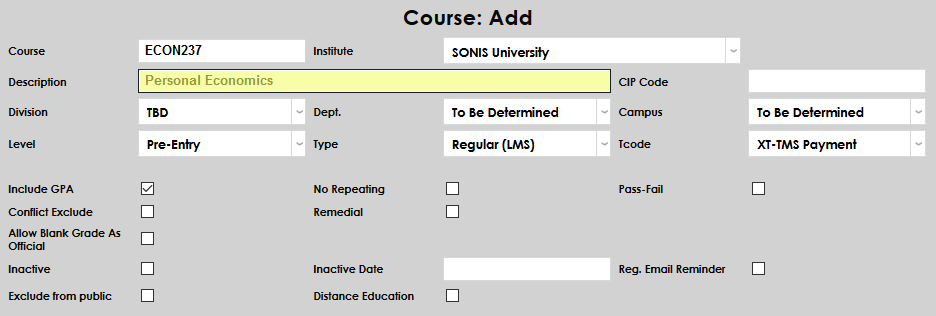
Create a Course number for the course following the school's numbering principles and a longform Description for the course. The Course field has a 10-character limit and the Description field has a 100-character limit.
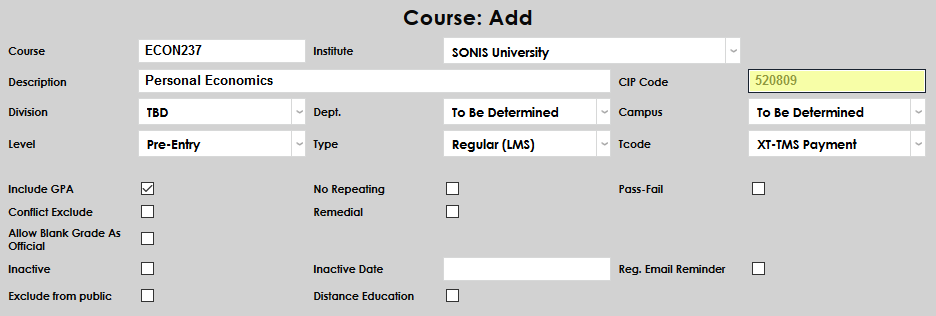
To ensure that course data is transferred to the National Student Clearinghouse, enter the CIP Code for the course. CIP codes, where needed, can be obtained through the National Center for Education Statistics website.
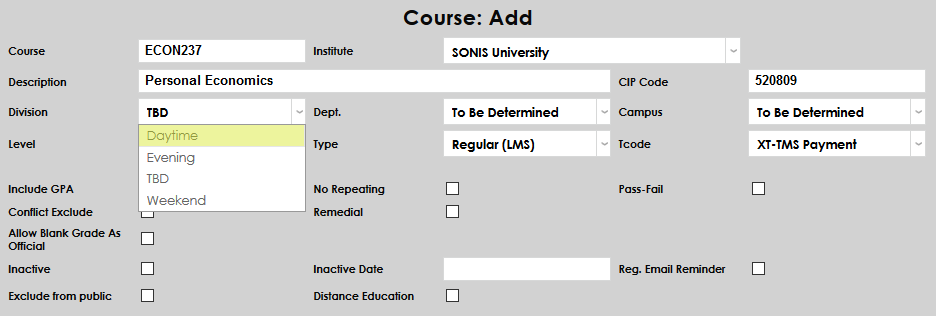
Select a Division for the course. The Division module status is applied to students and was originally designed to separate students who take classes at different times such as daytime, evening, and weekend. However, SONIS member schools can customize this status to separate students into whatever categories suit their needs. For example, a school could have separate divisions for in-person students and distance learners. If the course can be taken by students in multiple divisions, or divisions are not being used, stick with the default TBD. Students are not prohibited from taking courses associated with other divisions.
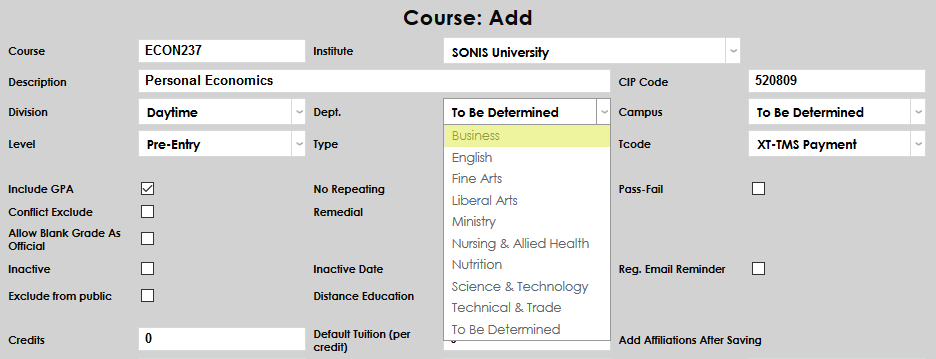
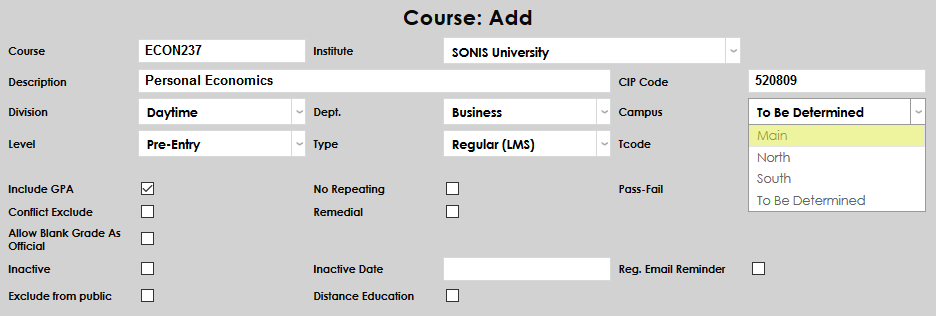
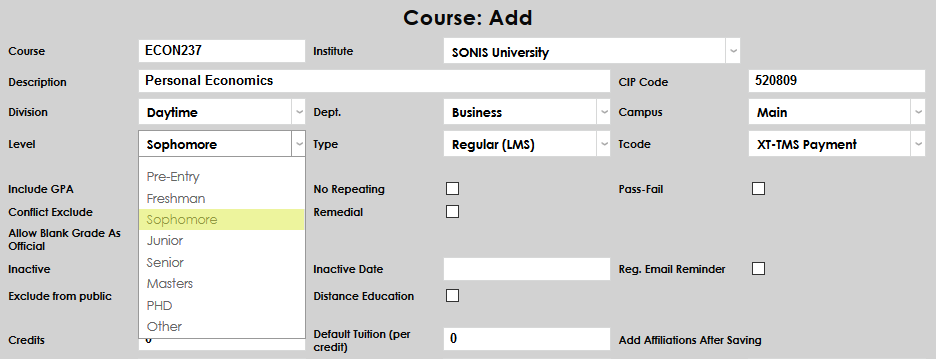
Next, select a Department, Campus, and Level for the course. The department refers to the academic department of the course. The campus is the location where the course will take place. The level is the level of student (freshman, sophomore, junior, senior, etc.) who the course is intended for. Schools that do not have academic departments and/or who only have one campus can leave these selections blank or as TBD. These settings do not restrict students associated with other departments, campuses, or levels from taking the course.
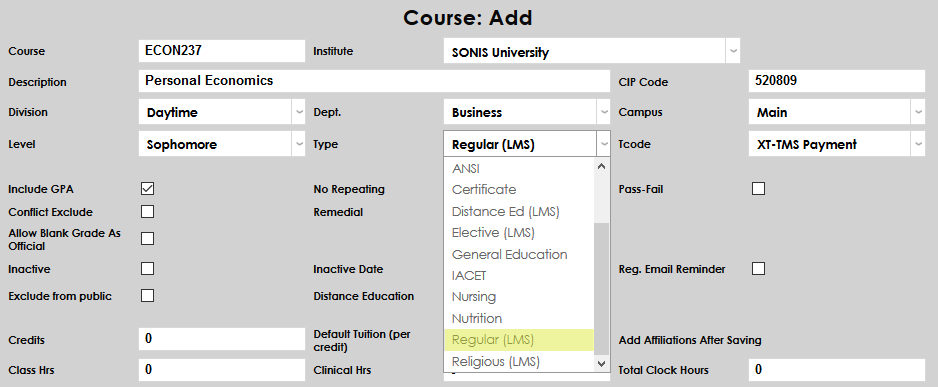
Select a Type for the course. Course types can be used in various ways by schools to label and separate courses. Some schools may wish to tie a course type or types to a different Grading Index, altering the way final grades and GPAs are calculated.
Select a T-Code for the course charges.

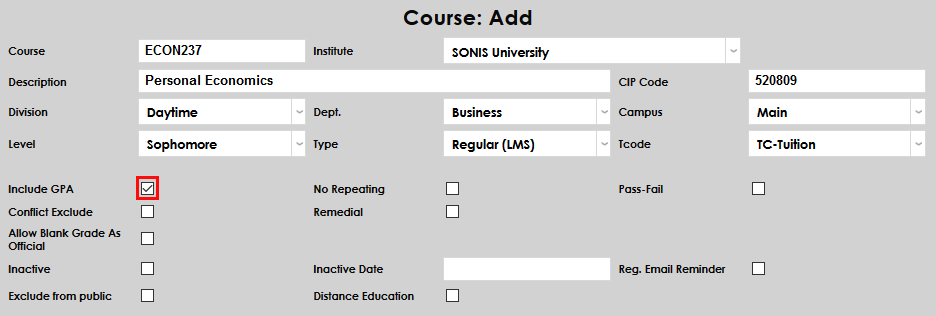
Leave the Include GPA box checked if grades for the course should be included in each student's GPA calculation. Uncheck the box if the course should be excluded from GPAs.
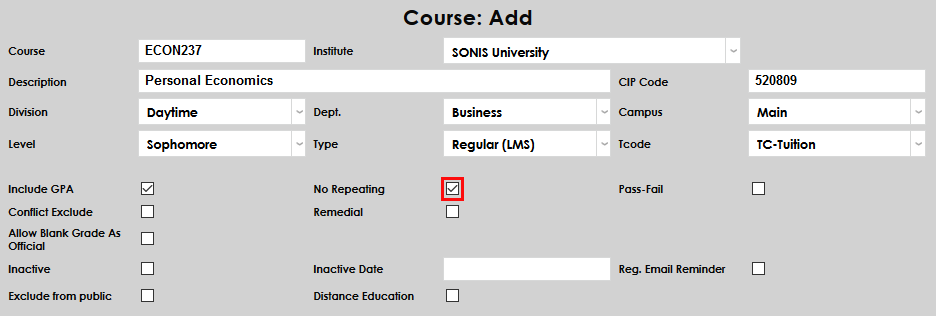
The No Repeating box is used to determine if a course may be repeated for credit. Contrary to the way the box is labeled, checking the No Repeating box allows students to the take course for credit additional times. If the box is left unchecked, students may still be able to repeat the course based on the school's other settings, but a new grade will replace their previous grade.
Some schools may wish to allow repeats but limit the number of times a course can be taken for credit. To set this limit, navigate to the Web Options page under the Systems hub and edit the field labeled Number of Times A Course Can be Enrolled in and Passed. If the value is set to zero (0), students can complete courses an unlimited number of times.

SONIS offers a User Security option, which allows administrators to override the repeat limit when registering students for courses.


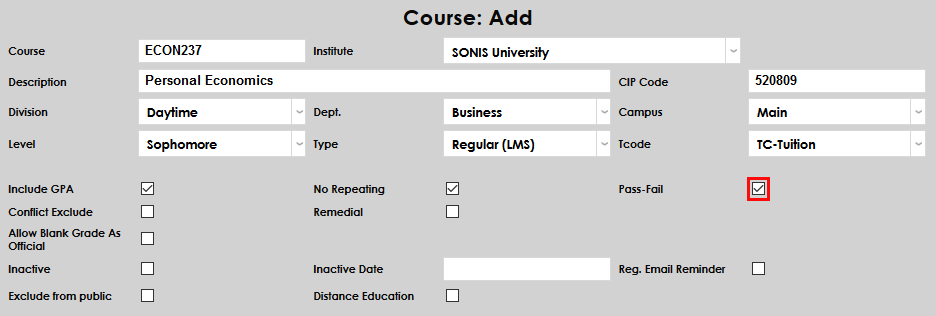
Check the Pass-Fail box if the course can only be passed or failed and does not offer a letter grade. Schools can provide the option to register for courses as Pass/Fail to students and/or advisors even if the Pass-Fail box for the individual courses is unchecked. Click here to learn more about this option.
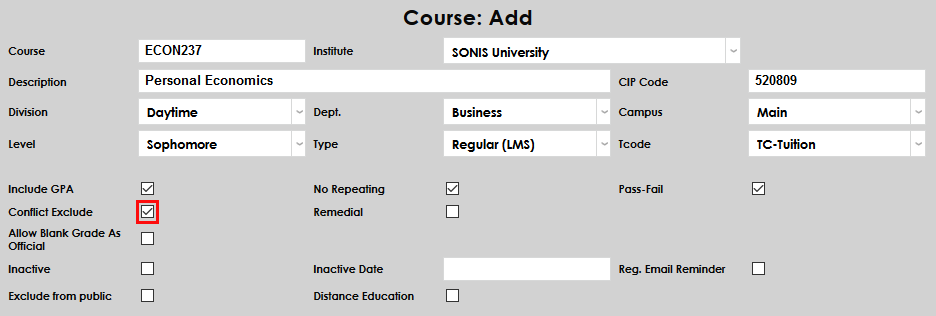
If the Conflict Exclude box is checked, all conflicts — including program and level conflicts, date, and time conflicts, etc. — will be ignored when registering a student for the course.
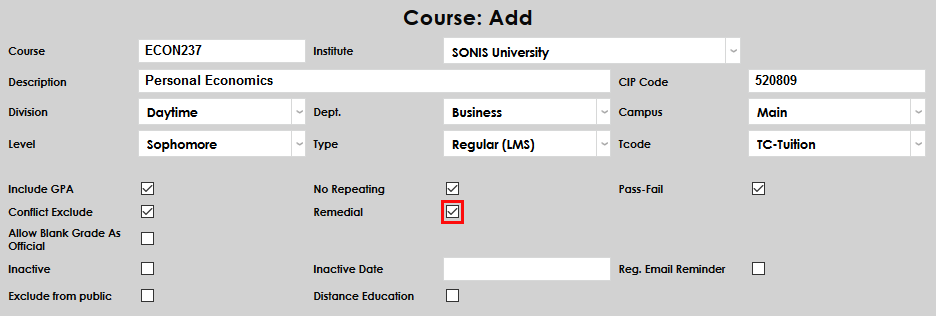
Check the Remedial box if the course should be labeled as a remedial course. Additionally, checking the Remedial option excludes the course from the student's GPA calculation, regardless of whether the Include GPA box is checked or not.
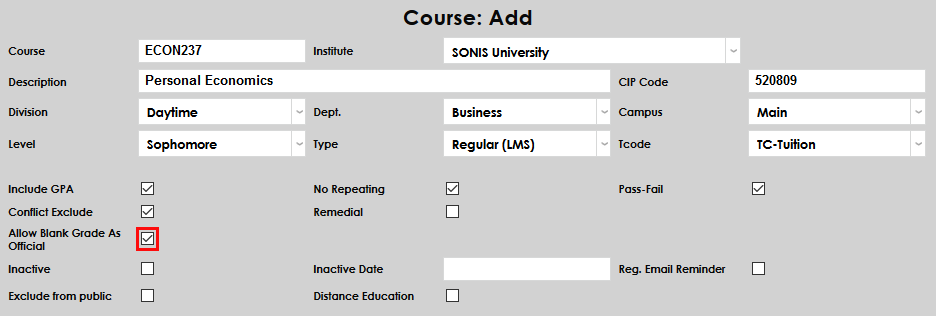
If the Allow Blank Grade As Official box is checked, a student can be given a blank grade and that blank grade can be marked as Official. Generally, this is not allowed. A school may want to check this option if the course is a lab with the grade tied to the primary course or another course type that doesn't give out a grade. Marking the blank grade as official prevents a completed course from being confused with an active course.
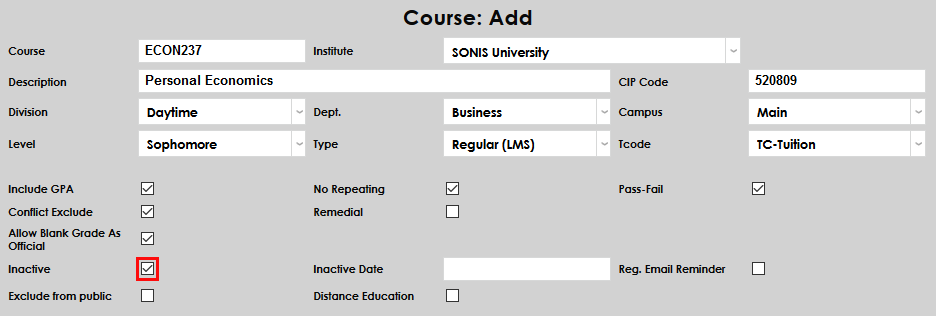
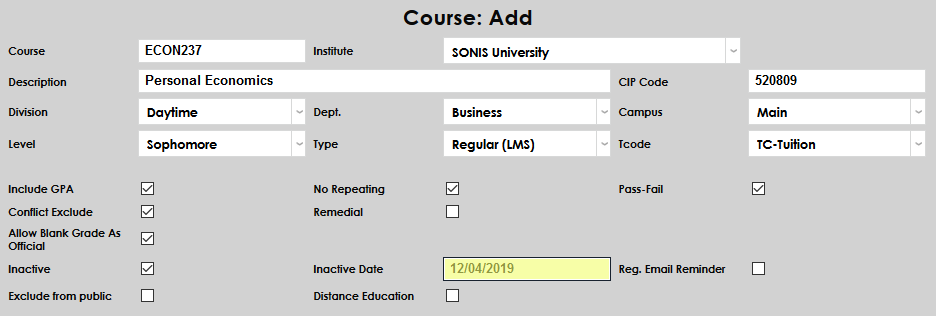
The Inactive box is a way to disable the course and prevent new sections from being created. When the course is marked as inactive, enter an Inactive Date for record-keeping purposes.
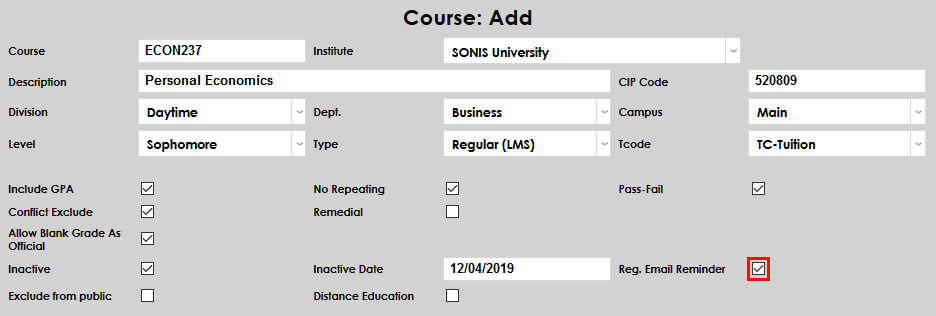
If the Registration Email Reminder box is checked, students who register for the course will receive a reminder. These reminders can be set to occur a given number of days before the course begins, depending on school preferences. The number of days before a course begins that the reminder will be sent is created using the Registration Email Reminders utility under the Systems hub.
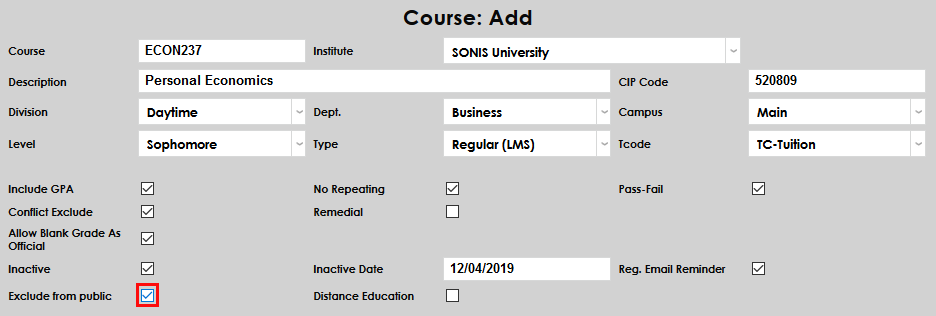
If the Exclude from Public box is checked, the course will not appear on external Jenzabar SONIS pages such as the Courses by Semester page.
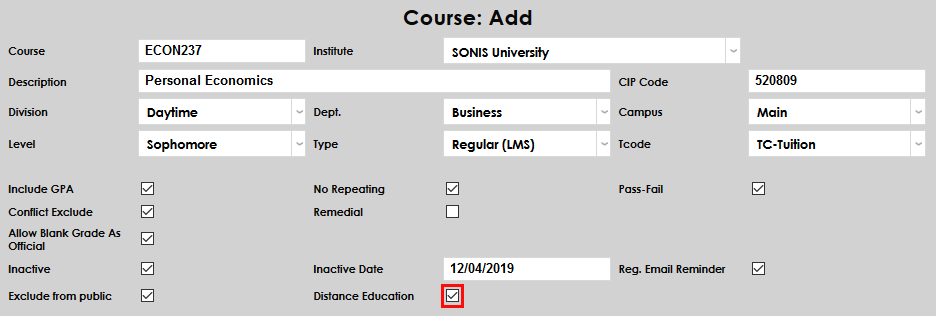
Check the Distance Education box to label the course as a distance education course for reporting purposes.
Enter the number of Credits that will be earned for the course. While most courses have a designated number of credits, some may use Total Clock Hours instead. This field has a seven-character limit and can hold decimals.

The Default Tuition Per Credit is the amount that the student will be charged for taking the course. The amount entered in this field is multiplied by the number of credits in the Credits field to determine the tuition. For example, if 100 is entered in this field, a 3-credit course would charge the student $300.00. Schools that use a flat tuition amount per course, instead of per-credit charges, can leave this field blank. This field has a seven-character limit and allows decimals.

Class Hours is an informational field designed to store the total number of hours a student will spend in the class per semester. The field holds seven characters. This field can be used for an alternate purpose if needed, as it doesn't display on the student's transcript.

If the course has clinical hours required, enter the number of hours into the Clinical Hours field. This field has a seven-character limit and allows decimals.

Clock hours can be used with, or instead of, Credits. Total Clock Hours is the total amount of time that the student will spend in the course. This field has a seven-character limit and allows decimals.

The CE Credits field is used to designate the number of credits that a student will receive for taking the course as a continuing education course. Some courses may be available as a standard course and a CE course while others may be only available as one or the other. This field has a five-character limit and allows decimals.

CE Per Credit is the amount that the student will be charged for taking the course. The amount entered in this field is multiplied by the number of credits in the CE Credits field to determine the tuition. Schools that charge a flat tuition amount instead of per-credit charges can leave this field blank. This field has a seven-character limit and allows decimals.

Audit Cost is the amount charged to a student who chooses to audit the course. This is the total amount charged and not a per-credit fee.

Check the Show in CE Registration box to allow continuing education students to view the course in the CE course schedule and register for the course.

If the Attendance Record Checking box is checked, the lead faculty and other group members will be alerted when daily attendance is not submitted. This notifier is set up using the Jenzabar SONIS Timed Task Scheduler. The box is also used by the Bulk Attendance process.

Check the Advisor Specified Credits box and/or the Student Specified Credits box to allow Variable Credit Registration.


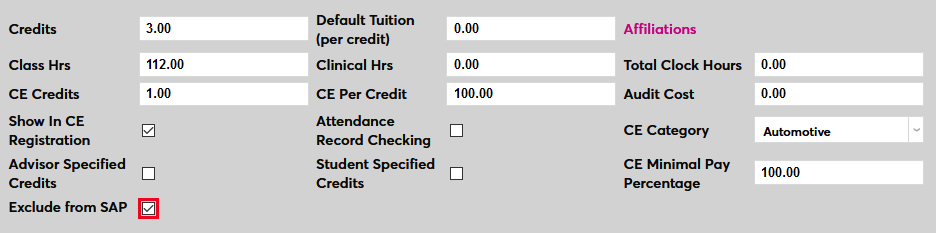
Check the Exclude from SAP box to exclude the course from Satisfactory Academic Progress calculation. Courses marked exclude from SAP will be excluded when calculating both attempted credits and completion percentage. This option does not affect GPA calculation or transcripts.
Administrators can designate a Prerequisite or a Corequisite for the course. Prerequisites are courses that must be completed before a student can register for the course. Corequisites are courses that must be taken during the same semester or time period, for example, a lab or an internship.
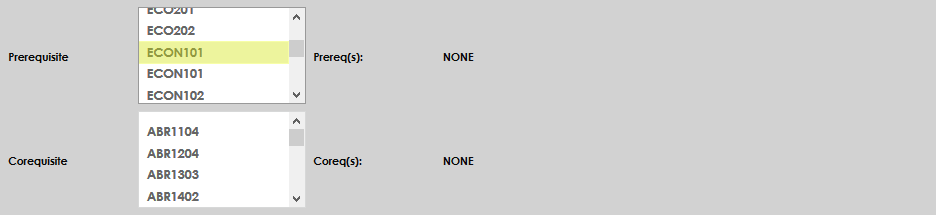
When there are multiple prerequisites for a course that must be taken in sequence (for example, ENG400 requires the successful completion of ENG300, ENG200, and ENG100), it is recommended that users set up the SONIS prerequisites for each separately. Using the same example, the user would make ENG100 the prerequisite for ENG200, make ENG200 the prerequisite for ENG300, and make ENG300 the prerequisite for ENG400. This will ensure all that prerequisites are met without adding unnecessary processing overhead to the system, which would be the case if ENG100, ENG200, and ENG300 were all made prerequisites for ENG400.
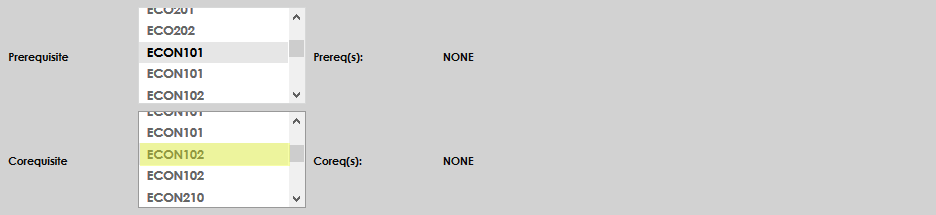
The following system logic applies to all prerequisites and corequisites:
• If a student is currently enrolled in the prerequisite and no failing official grade exists, SONIS will allow registration in the next course in sequence in both student and admin registration.
• If a student has failed or not taken the prerequisite, SONIS will not allow registration in the student portal and will alert the student that the course has a prerequisite.
• If a student has failed or not taken the prerequisite, SONIS will prompt an admin user with appropriate override permissions to allow the registration anyway or to cancel the attempt. Note that a failing grade is identified on the grade Records, where Passing Grade is unchecked.
• If a student has registered for the next course in sequence while currently enrolled in the prerequisite and subsequently fails the prerequisite, it is the responsibility of administrative staff to use the Registration Prerequisite Verification utility under the Systems menu to identify those students, notify them, and unenroll them.
As mentioned above, administrators can bypass prerequisite and corequisite requirements with the correct User Security additional privileges.


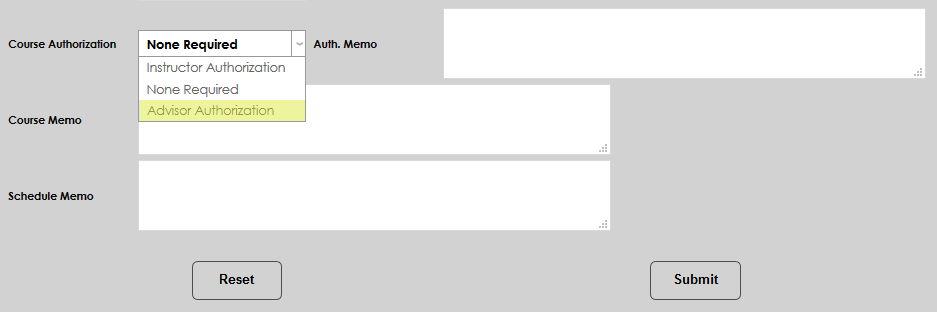
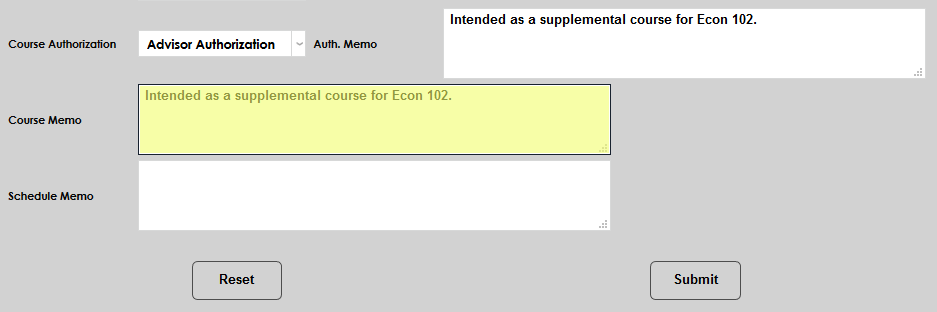
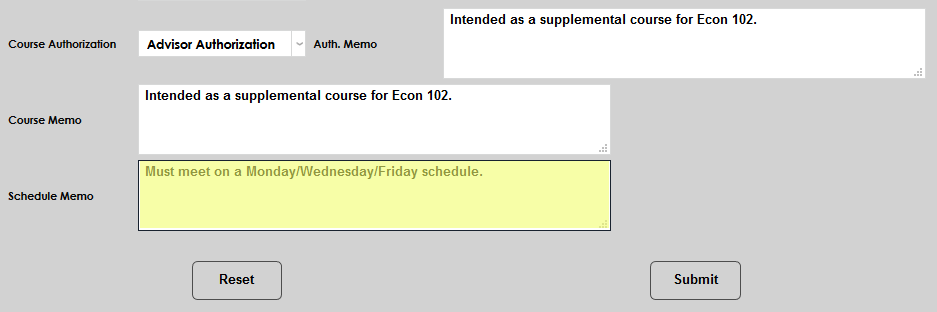
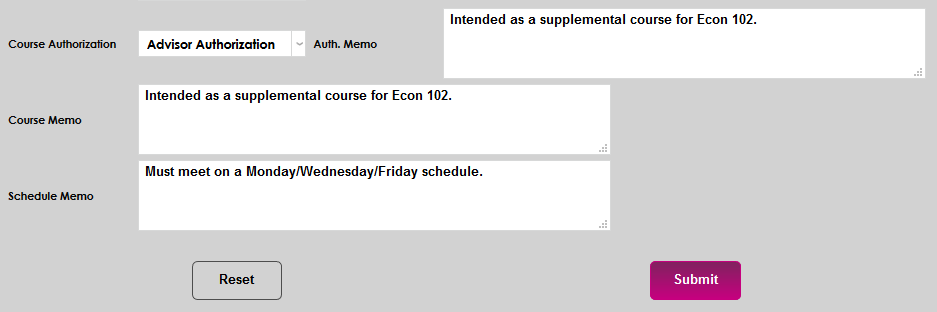
Courses can be set to require authorization before registering. Select Advisor Authorization to require the student's advisor to provide approval. Select Instructor Authorization to require that the instructor of the course approve each registration.
To approve a course marked for advisor authorization from the Faculty portal, select an advisee using the Select Advisee or Advisee Listing pages and navigate to that student's Advisee Schedule page. Once the correct school year and semester has been loaded, check the Advisor Authorization box and click Submit.
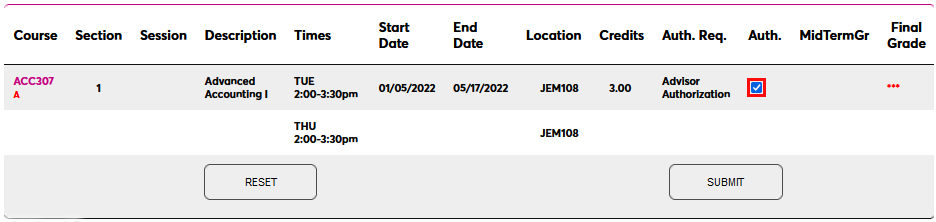
To approve a course marked for instructor authorization from the Faculty portal, select the appropriate course from the Courses page under the Course Management section. The complete list of students who've registered for this course so far will be listed. Check the Instructor Authorization box for each student who should be approved and click Submit.

Administrators can include an Authorization Memo that describes who the course is intended for to assist an advisor or instructor in deciding when to provide authorization. This memo will appear when registering a student for the course.
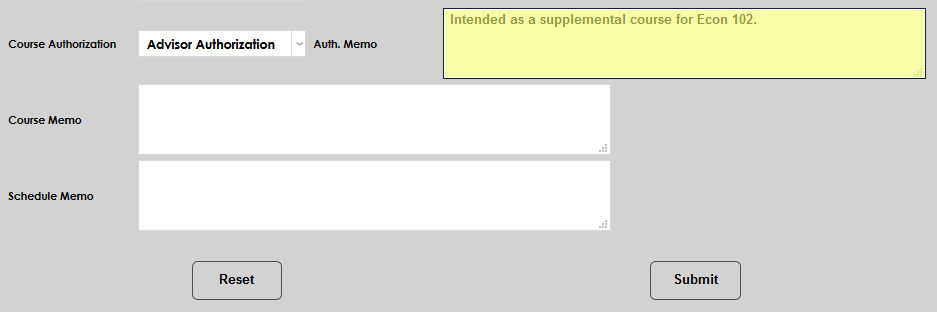
Course Memo and Schedule Memo fields are included to provide additional information.
Once all necessary fields have been completed, click Submit to save the page and create the course.
New Transfer Course
To add a transfer course, begin by clicking the Add New Transfer Course button.
Every transfer course must be tied to the institution where it was taken.
Add
Institutions that are not currently in the SONIS system can be added by clicking the Add New Institution button. They can also be added, as well as edited, through the Institution Add/Edit utility under the Systems menu.
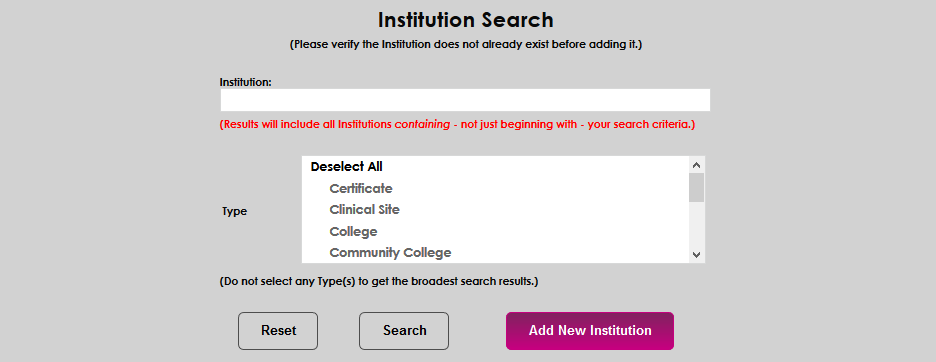
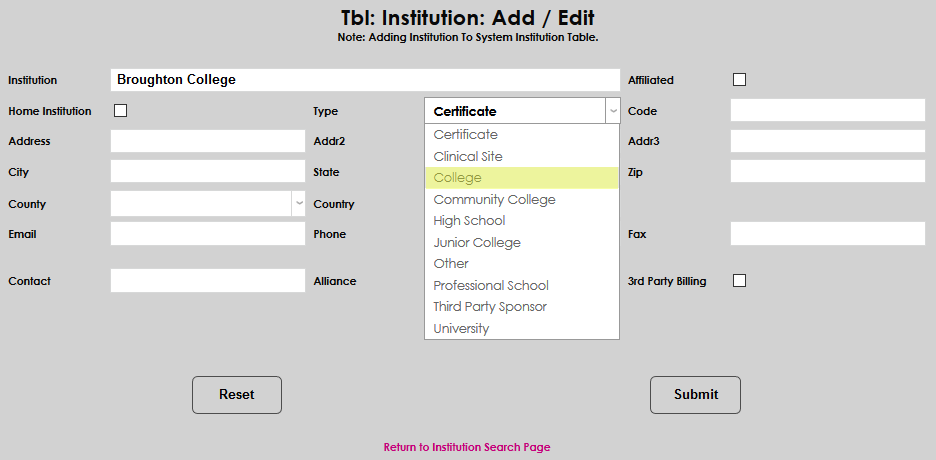
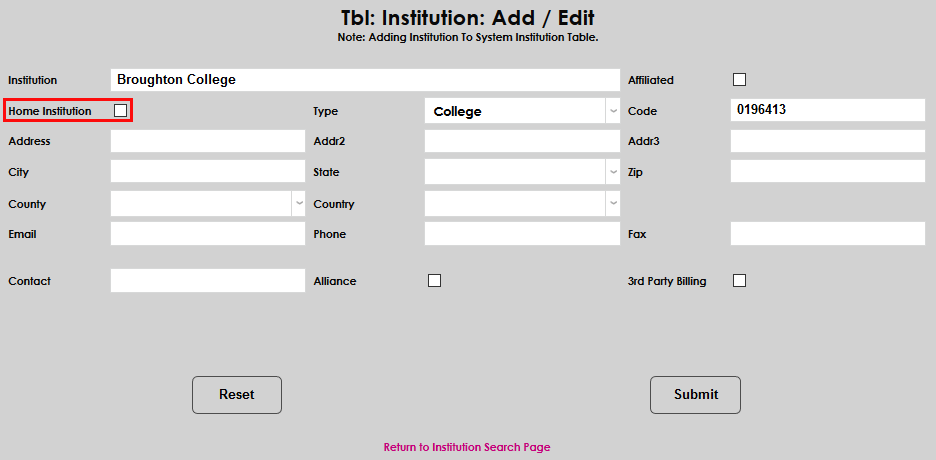
On the next page, enter the name of the Institution and select the Type of institution. If the desired type isn't available, the Institution Type table must be updated. It can be found in Table Maintenance under the Systems menu.
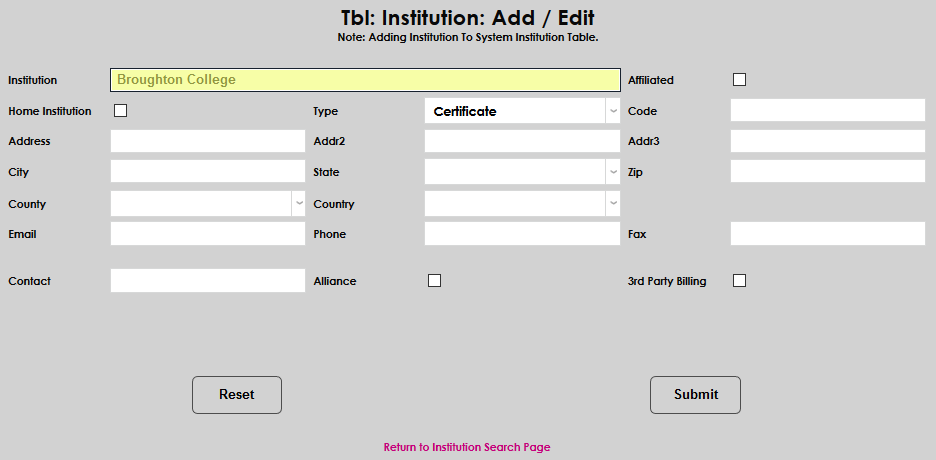
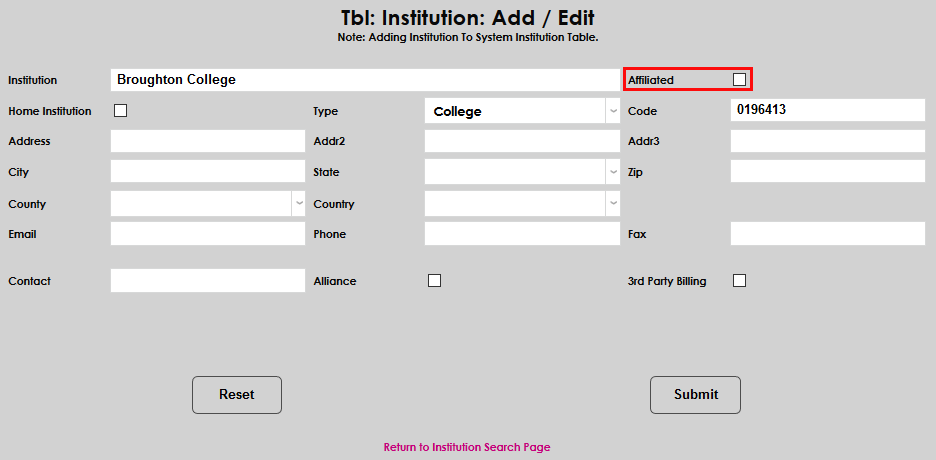
The Home Institution checkbox is only for the school itself. Only one school can be designated as the home institution. The Affiliated box is used to designate schools that are closely tied together and often share certain resources.
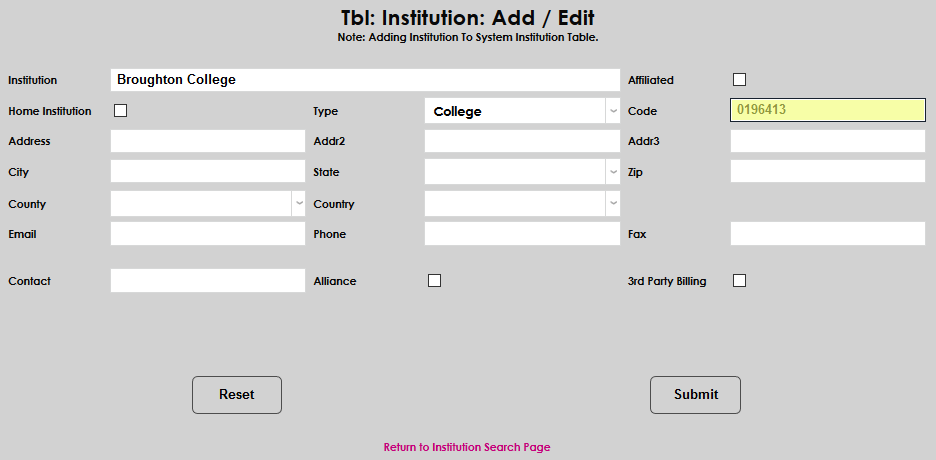
Enter the National Student Clearinghouse code for the institution. Codes can be found on the NSC website.
Next, enter the contact information for the institution.
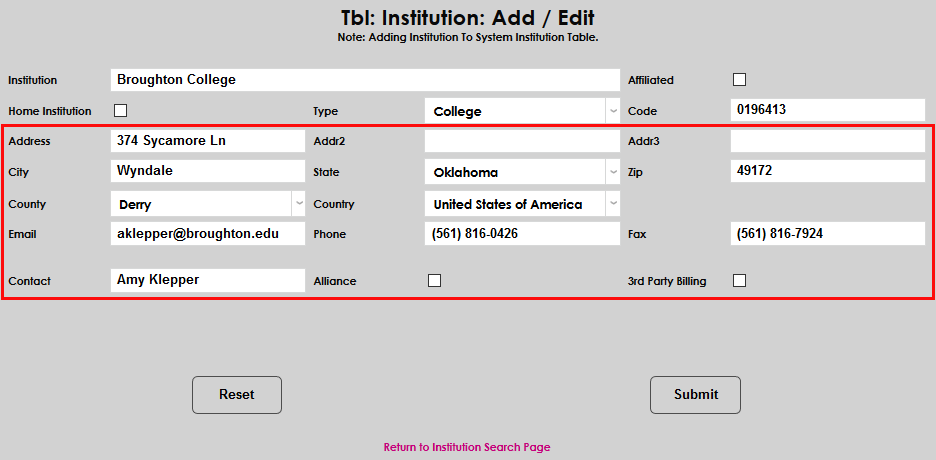
Alliance schools are more closely associated than affiliate schools, generally sharing courses, staff, student data, etc. If the 3rd Party Billing box is checked, the institution can pay for student tuition costs. This option is generally not applicable to schools.

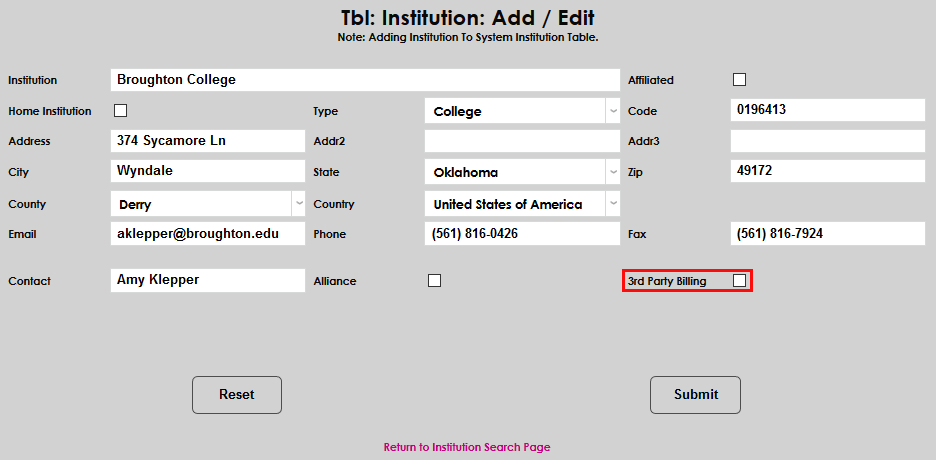
Click the Submit button to create the institution and continue.
Search
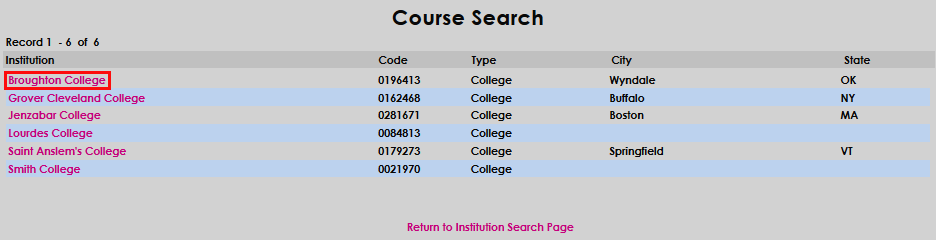
If the course was completed at an institution that already exists in the local Jenzabar SONIS system, the institution can be located through a simple search. To search, type the name of the institution, a portion of the name, or choose Type to narrow the search down.

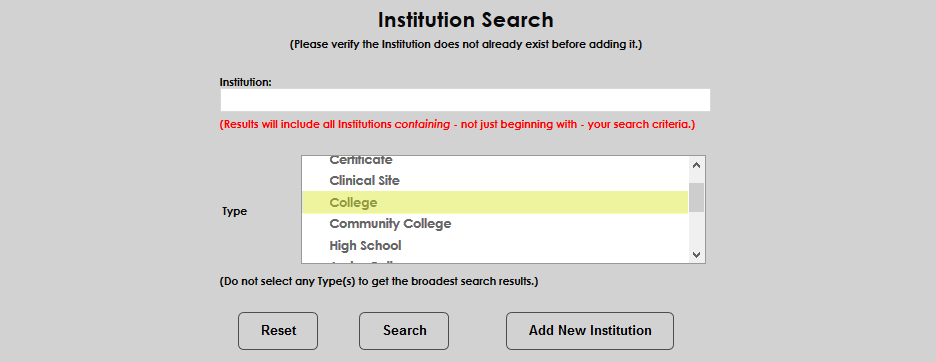
Click the Search button to continue.
On the next page, select the correct institution by clicking on the name.
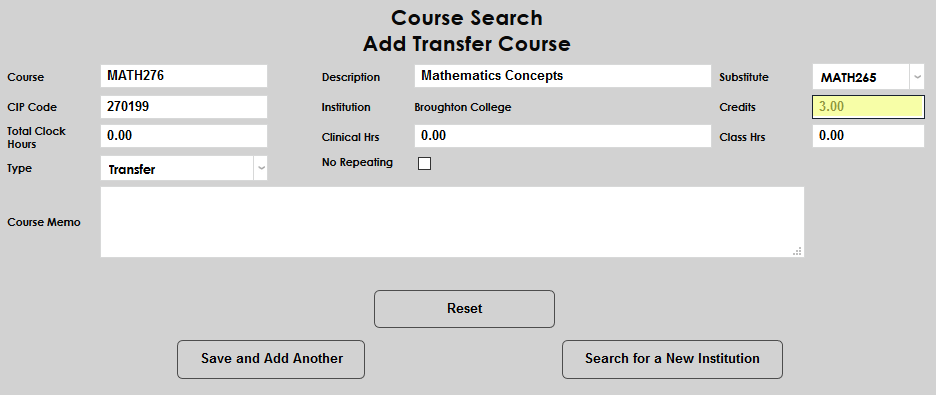
Creating Course
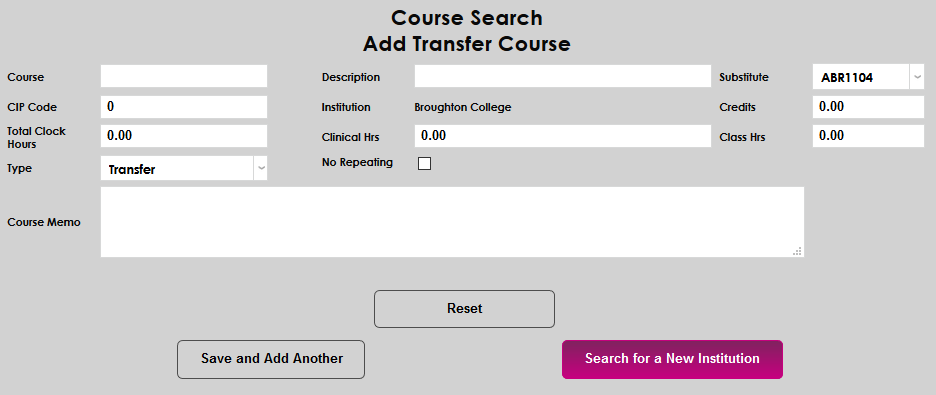
Once an institution has been selected, continue setting up the course details. Create a course ID in the Course field and a Description. These can be duplicates of previously existing courses. The Course field has a 10-character limit and the Description field has a 100-character limit.
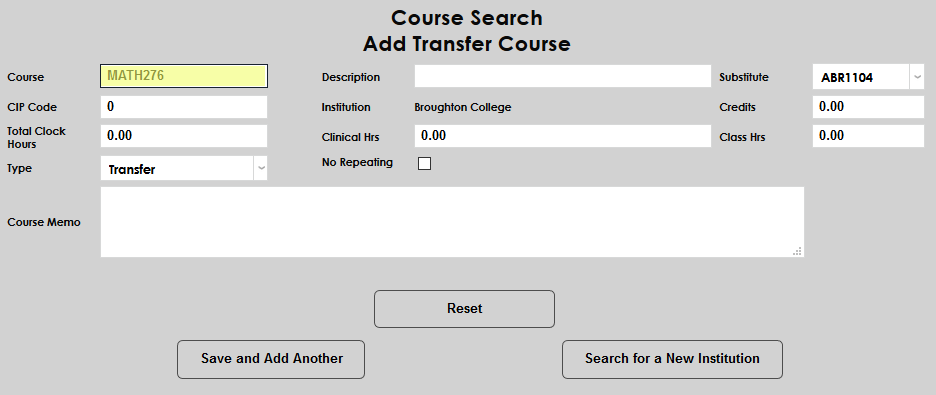
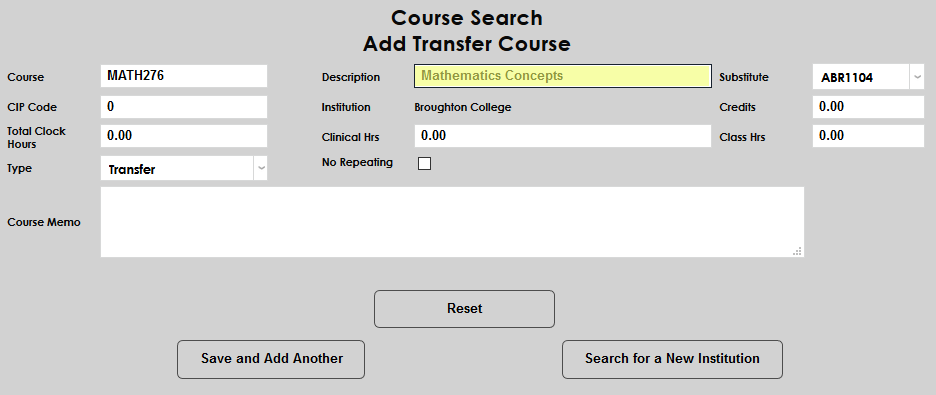
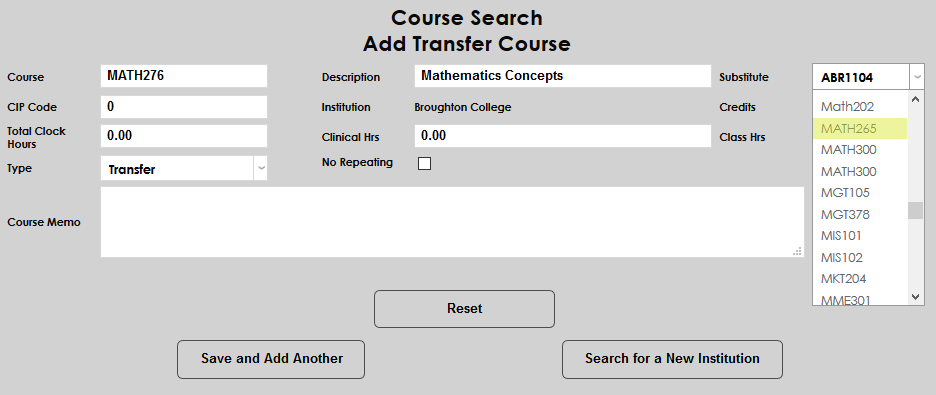
Select a Substitute which is a matching local course that the student will get credit for having taken, also known as a transfer course equivalency.
To ensure that course data is transferred to the National Student Clearinghouse, enter the CIP Code for the course. CIP codes, where needed, can be obtained through the National Center for Education Statistics website.

Fill in the number of Credits for the course. While most courses have a designated number of credits, some may use Total Clock Hours instead. This field has a seven-character limit and can hold decimals.
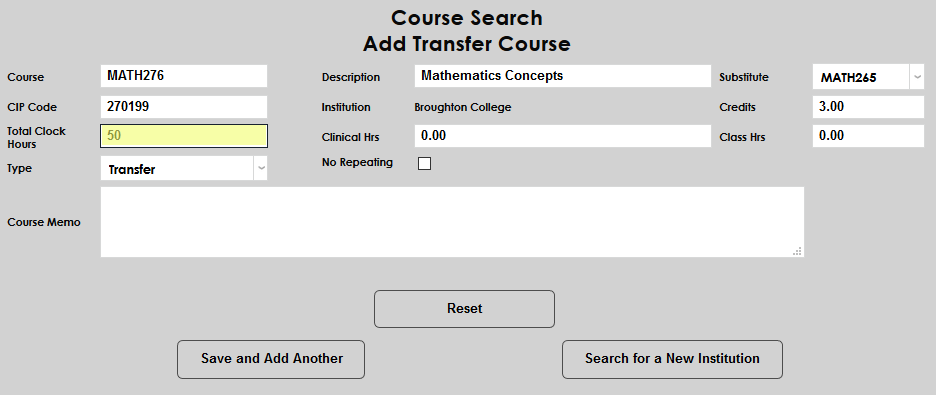
Clock hours are generally used by trade schools and can be used with or instead of Credits. The Total Clock Hours is the total amount of time that the student will spend in the course. This field has a seven-character limit and can hold decimals.
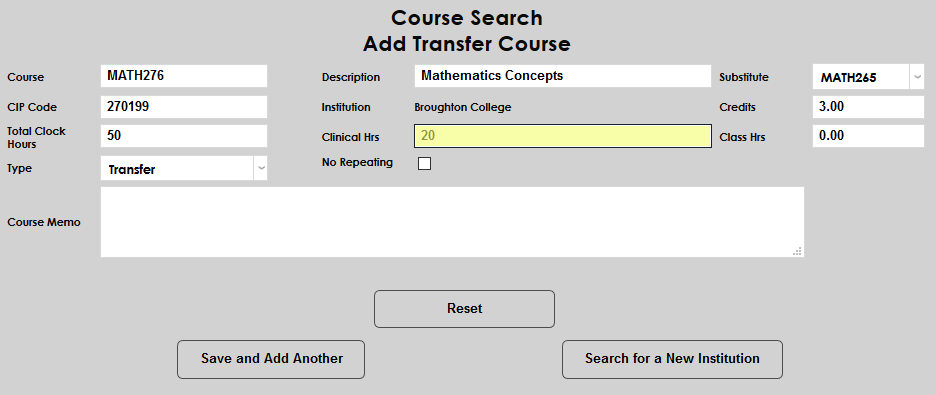
If the course has clinical hours required, enter the number of hours into the Clinical Hours field. This field has a seven-character limit and can hold decimals.
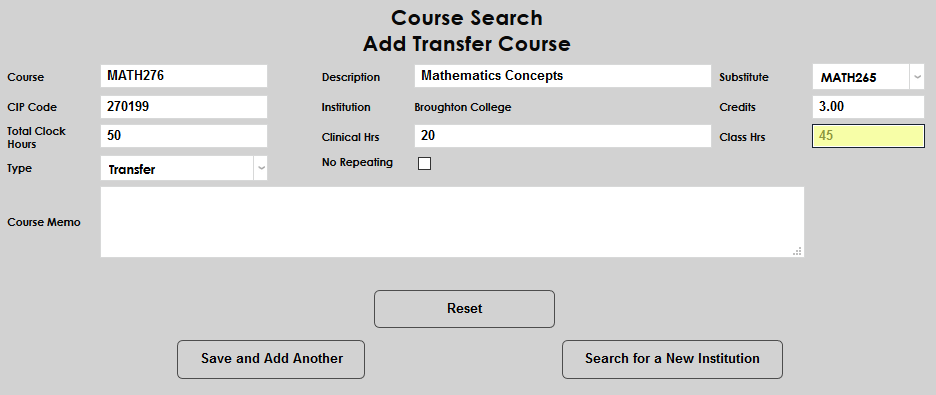
Class Hours is an informational field designed to store the total number of hours a student will spend in the class per semester. The field holds seven characters and can be used for an alternate purpose if needed since it doesn't output to the student's transcript.
The Type should remain as Transfer.
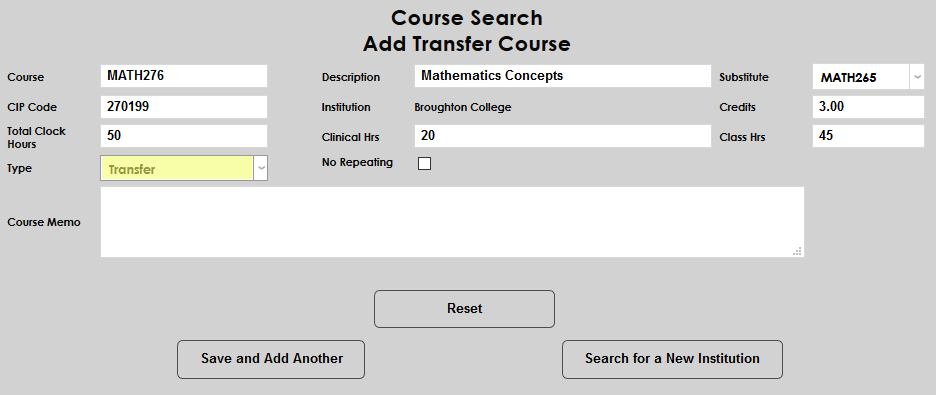
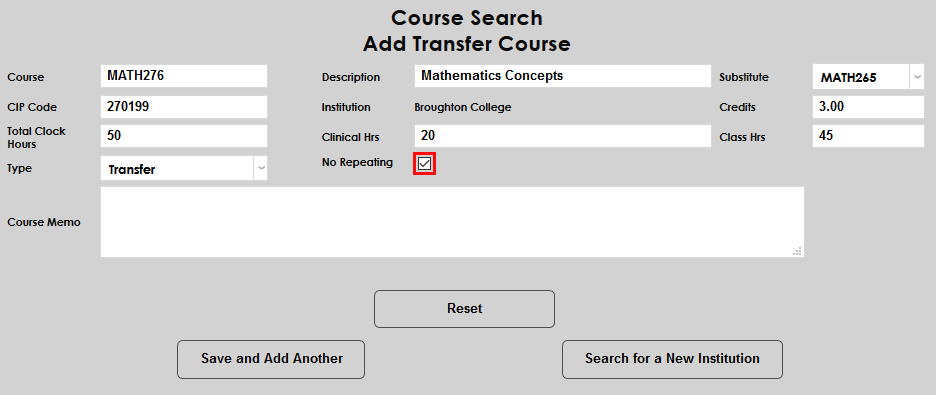
The No Repeating box is used to prevent or allow students to repeat the course for credit. Contrary to the way the box is labeled, check the No Repeating box to allow students to the take course for credit additional times. If the box is left unchecked, students may still be able to repeat the course based on the school's other settings, but the new grade will replace their previous grade.
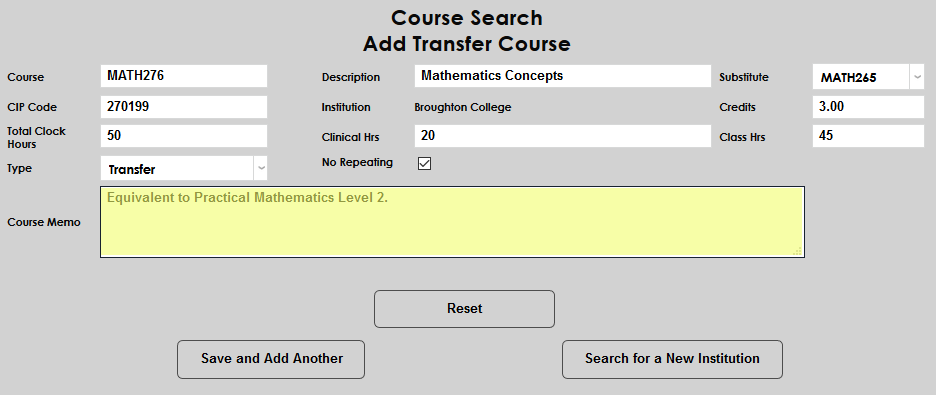
The Course Memo field can be used to make additional notes about the course.
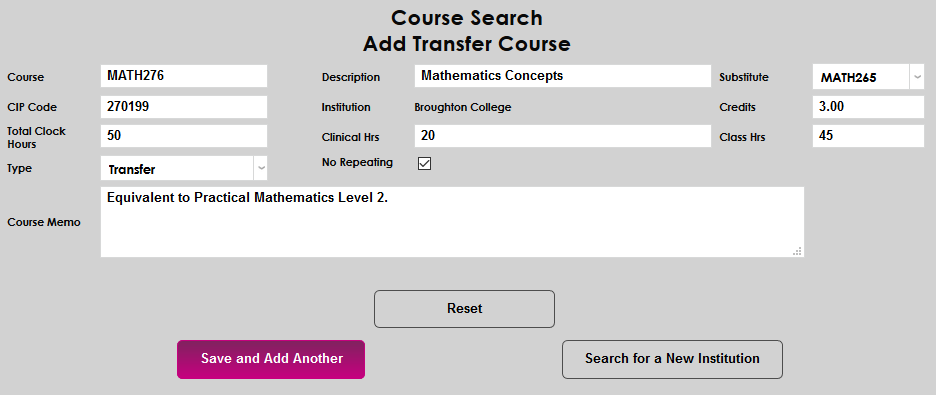
Click Save and Add Another to create the course.
When finished adding courses for the selected institution, click Search for a New Institution to return and select or add another institution.