Financial Aid
Overview
The Financial Aid page, in the Users hub, allows Jenzabar SONIS users to manage an applicant or student's basic FAFSA data, budget, awards, and Satisfactory Academic Progress. The ability to view a student's summary of credits is also included.
Financial Aid
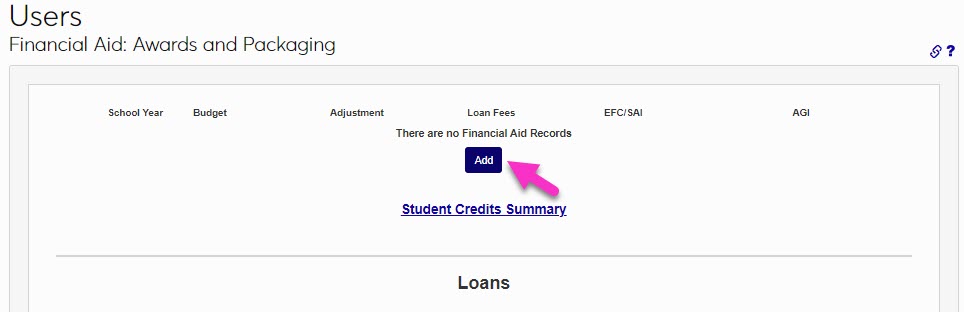
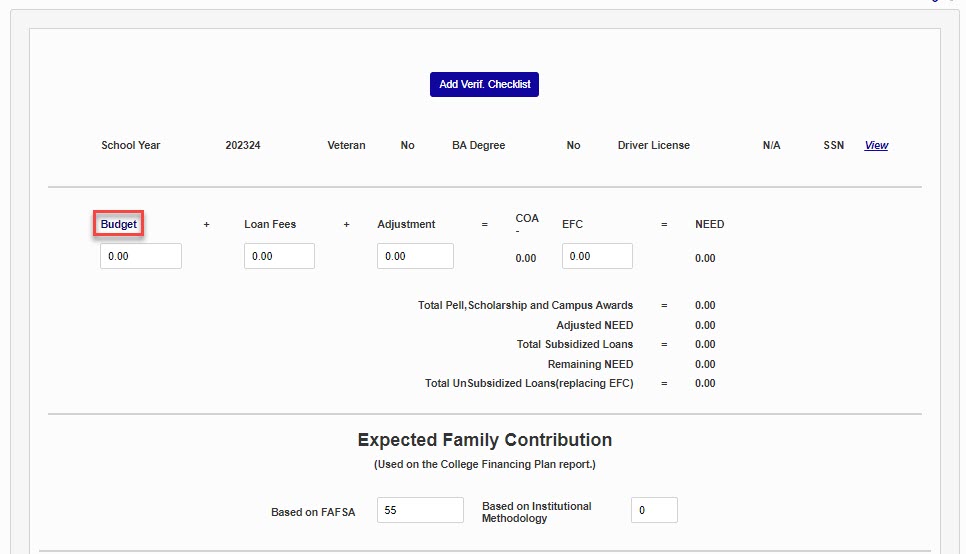
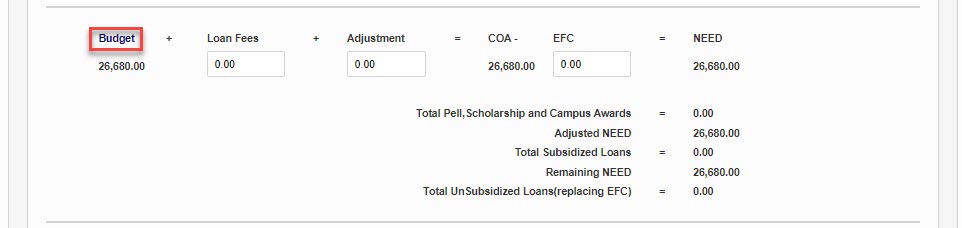
The top section of the Financial Aid page provides access to viewing a student or applicant's budget, any adjustment amounts, loan fees, EFC/SAI, and AGI by school year.
Adding a Financial Aid Year Record
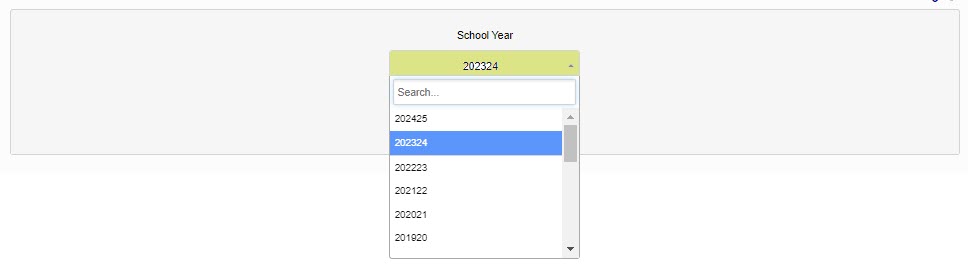
To add an aid year record, select Add. On the next page, the School Year dropdown menu will display all years that are active in Jenzabar SONIS for which the student or applicant does not currently have a financial aid record.
Select the desired School Year and click Add to create the selected year's financial aid record.

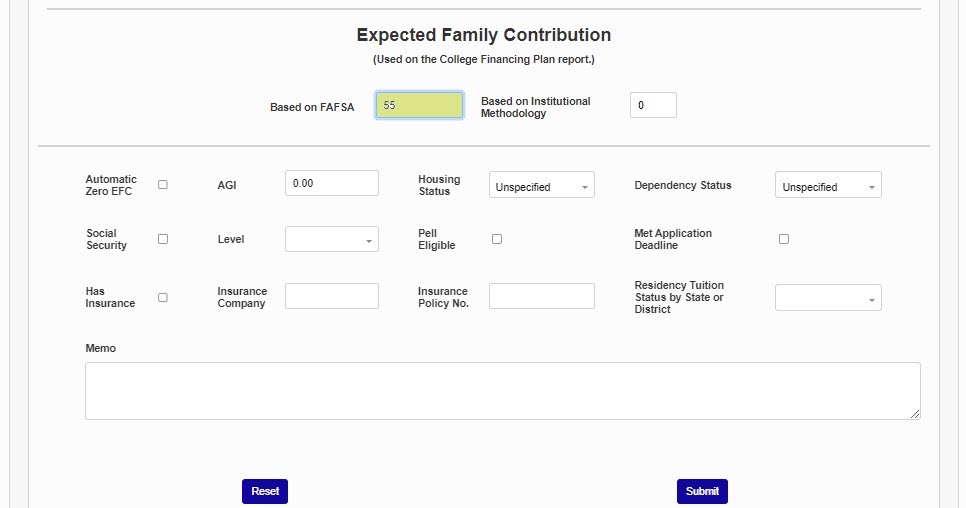
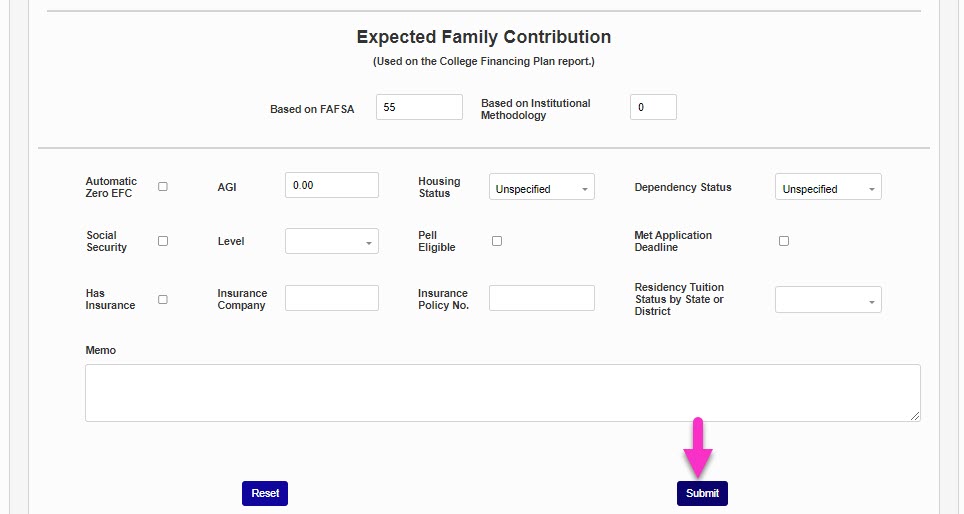
To complete the addition of the school year to the record, a piece of financial information must be entered. A quick way to do this is to add the EFC/SAI, Housing Status, or Residency Status. In this example, the EFC has been added. Each of these fields will be covered in more detail later in this article. After adding a piece of information, scroll to the bottom of the page and click Submit. This will complete the addition of the year record to the user's account.
Budgets
To add a budget to an existing School Year, click the desired School Year.

The next page is populated with the values and data points that were displayed in summary on the previous page. To add or edit the budget, click on Budget.
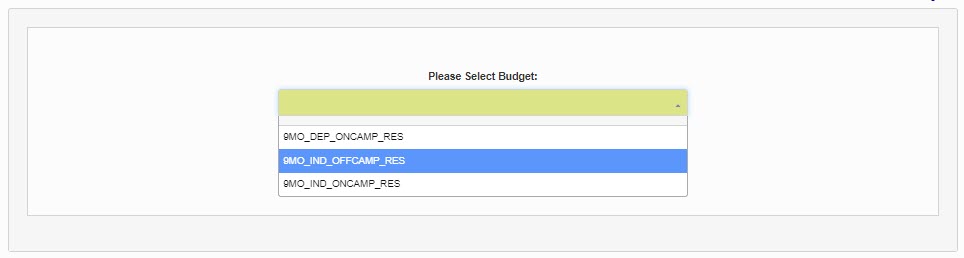
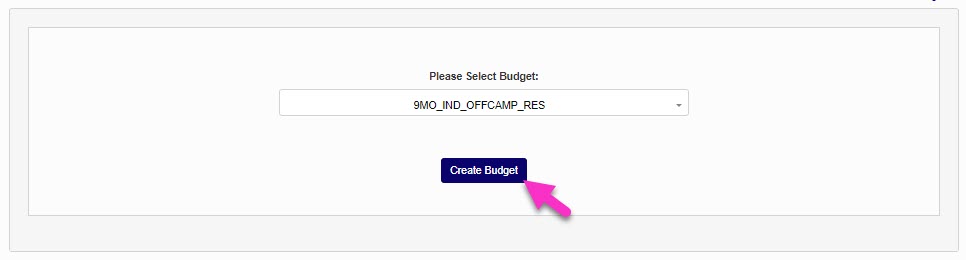
To add a new budget, select it from the Please Select Budget dropdown and click Create Budget. If the needed budget doesn't display, it must be created in Fin Aid: Budgets.
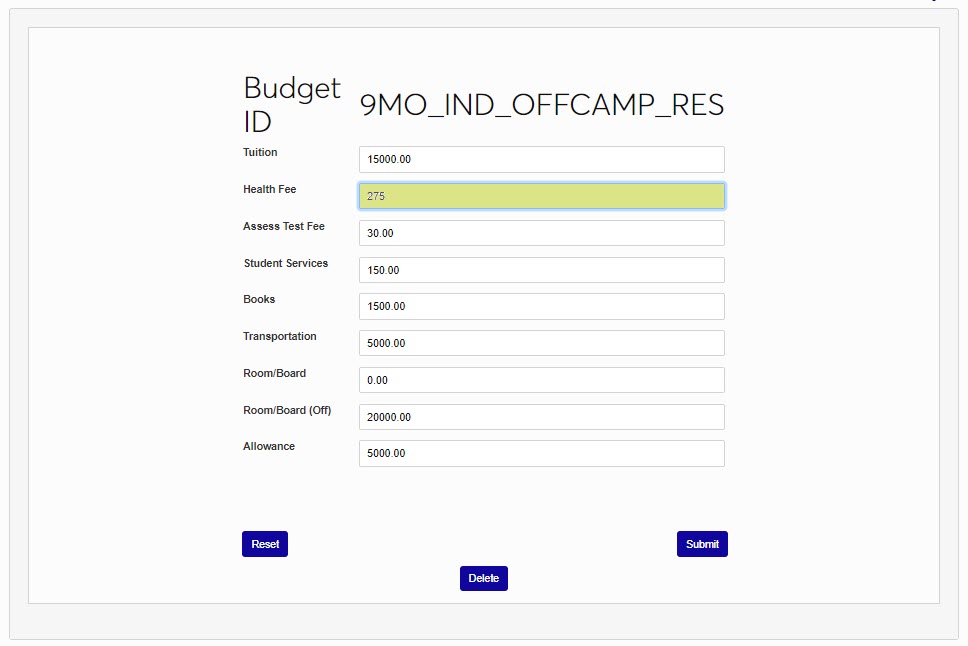
On the next page, the budget and it's elements display. The individual elements can be edited by clicking in the field and typing the updated value. To confirm the addition of the budget, click Submit.
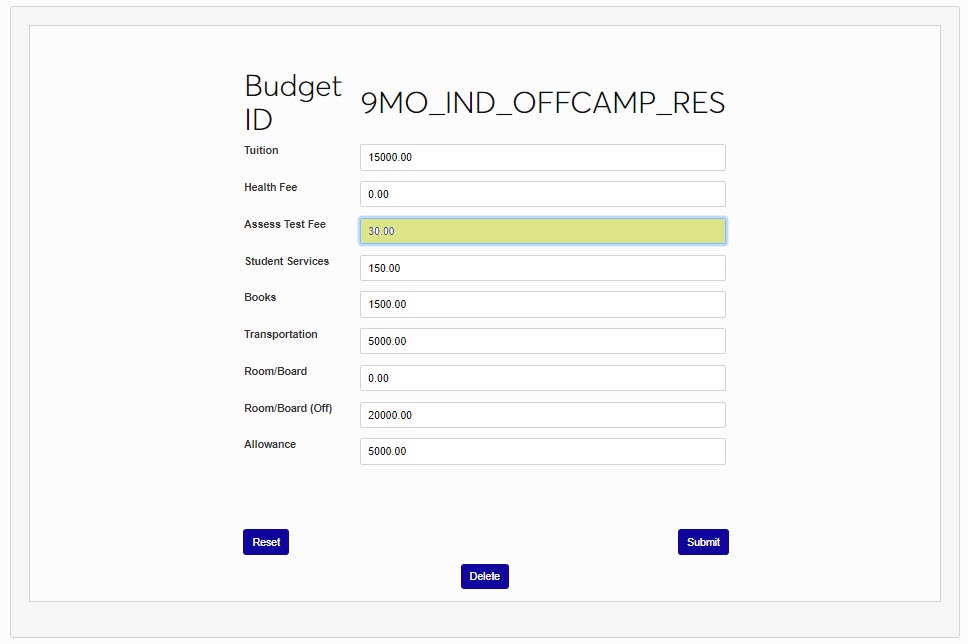
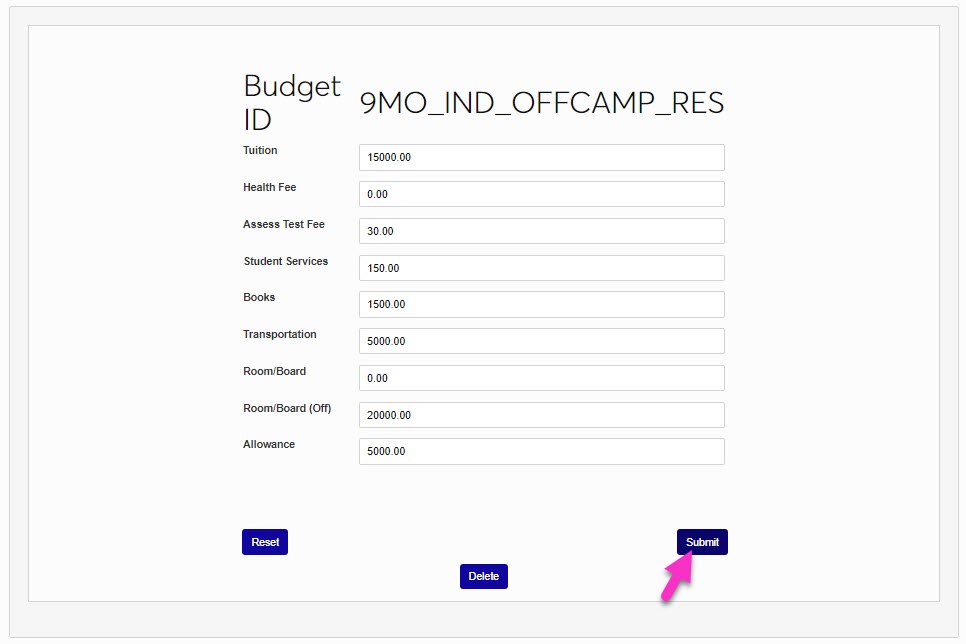
If a budget has already been added, the currently assigned budget and its corresponding values are displayed. Each of the budget element fields can be edited by clicking on Budget and then in each field to edit the field's values.
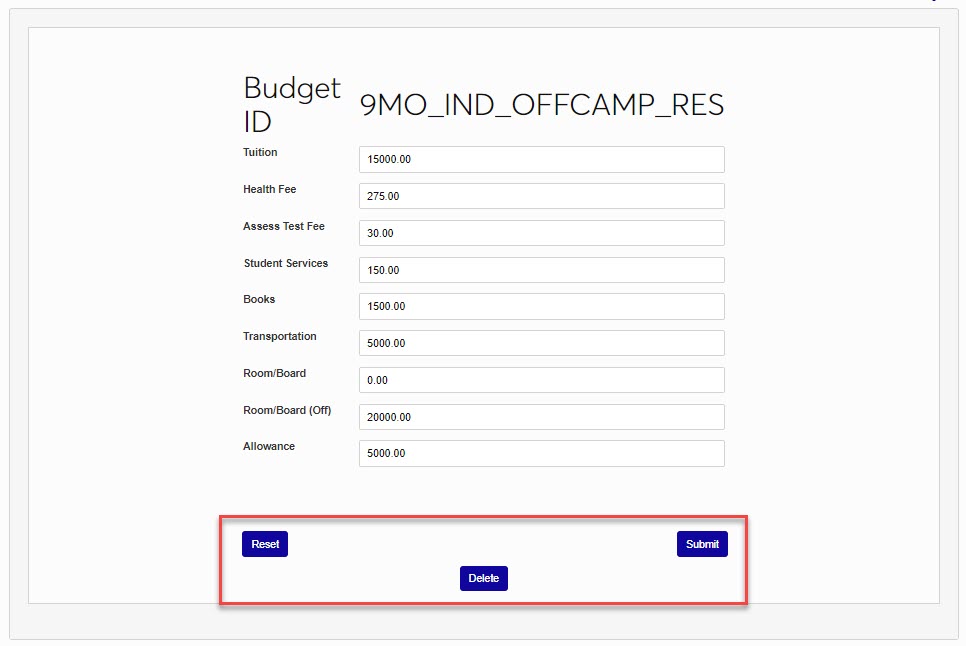
Click Submit to save any edits, Reset to return to the default value of the budget element, or Delete to remove the budget from the record.
EFC/SAI
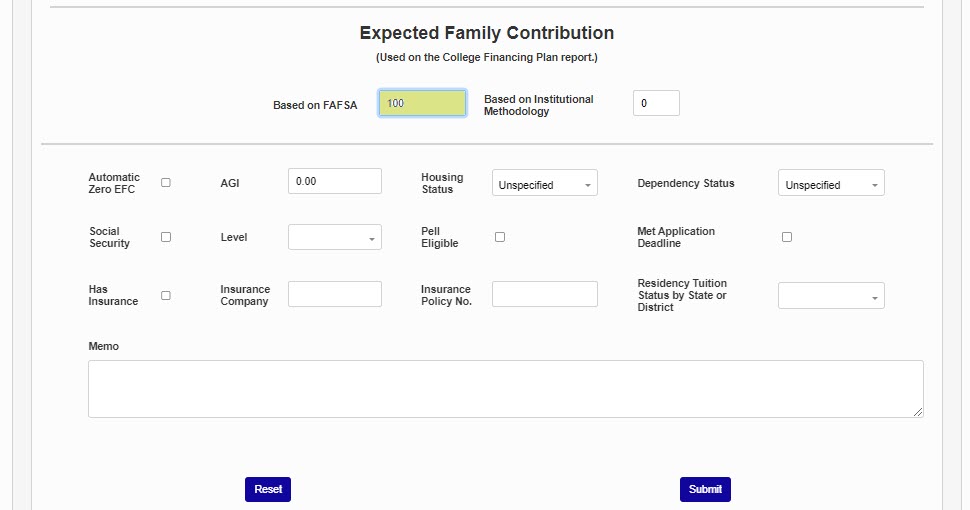
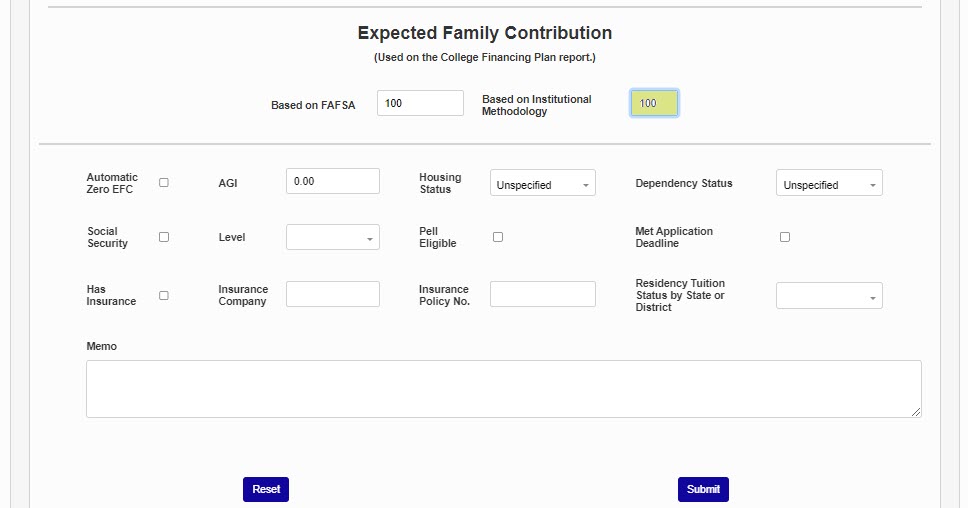
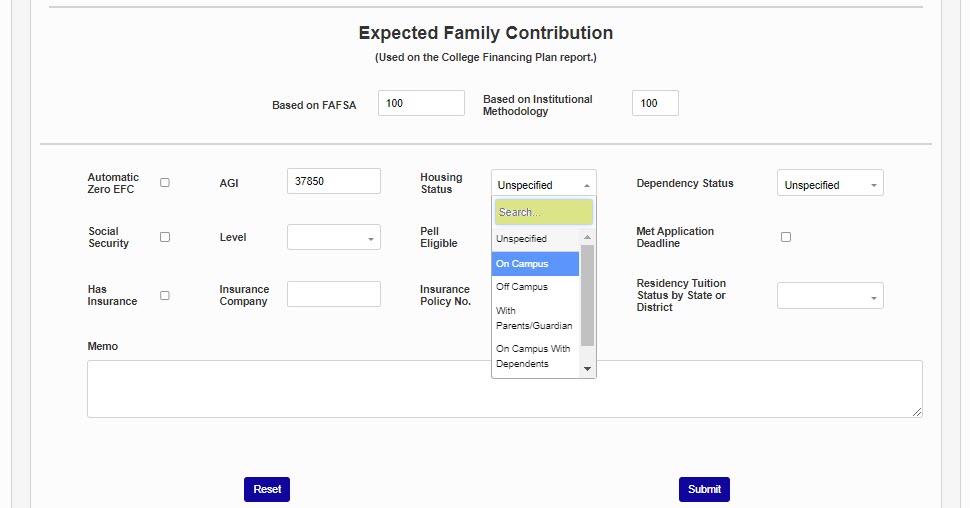
The Expected Family Contribution (EFC) and Student Aid Index (SAI) (depending on aid year being worked with) are pulled from the student's ISIR or can be manually entered. If no EFC is present, but a FAFSA has been filed with an EFC/SAI calculated, or Institutional Methodology has been used to calculate one, the EFC/SAI can be added.
Enter the FAFSA EFC or SAI in the Based on FAFSA field and/or the Institutional Methodology EFC or SAI in the Based on Institutional Methodology field.
Note
The following fields will be populated by importing an ISIR, if applicable to the student's circumstances. If no ISIR is present, they only need to be completed if institutional processes require doing so.
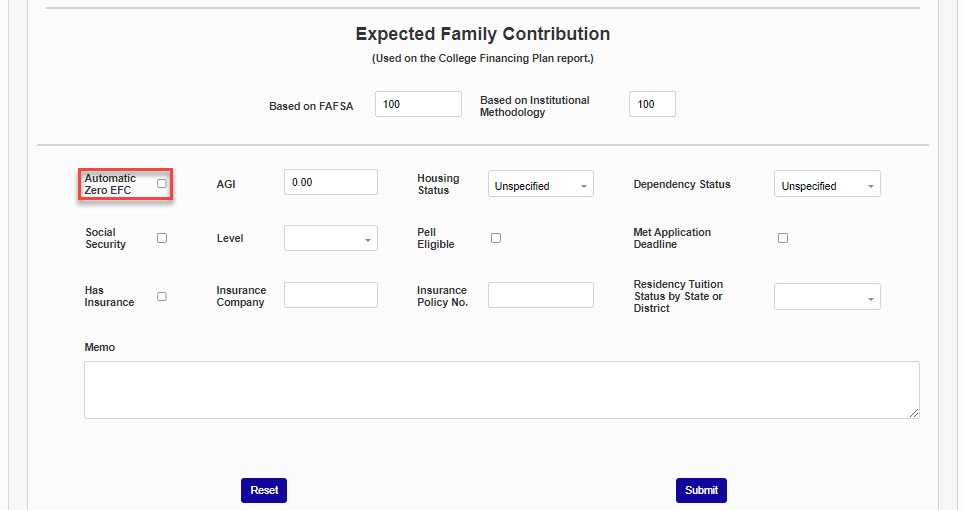
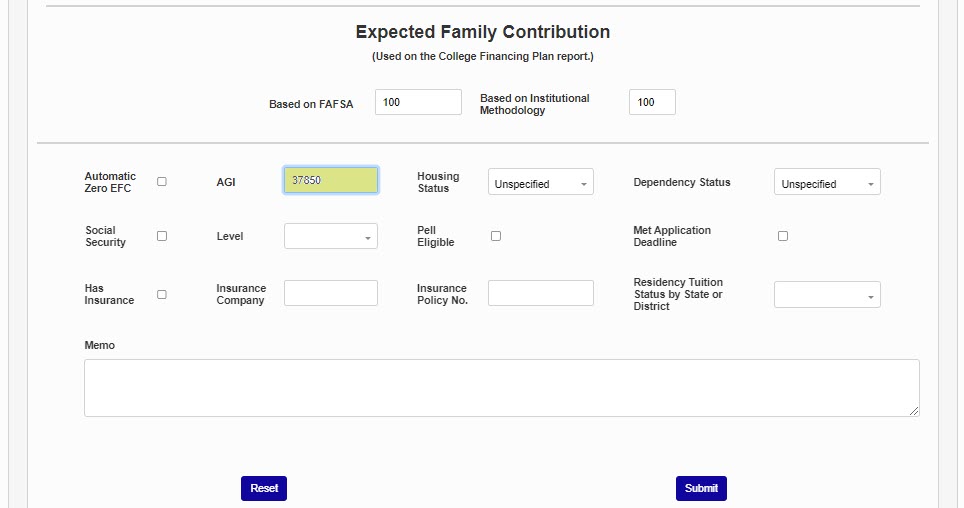
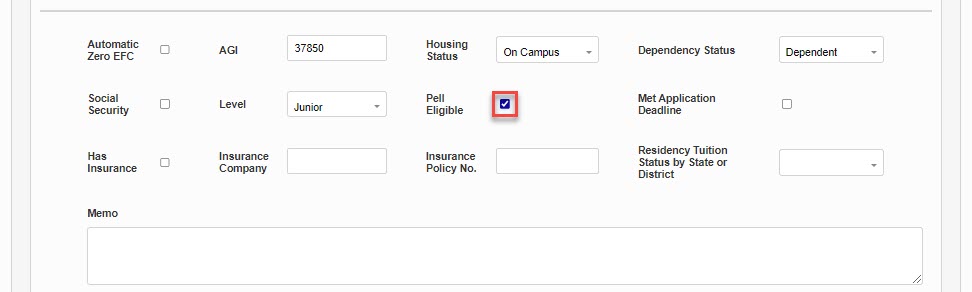
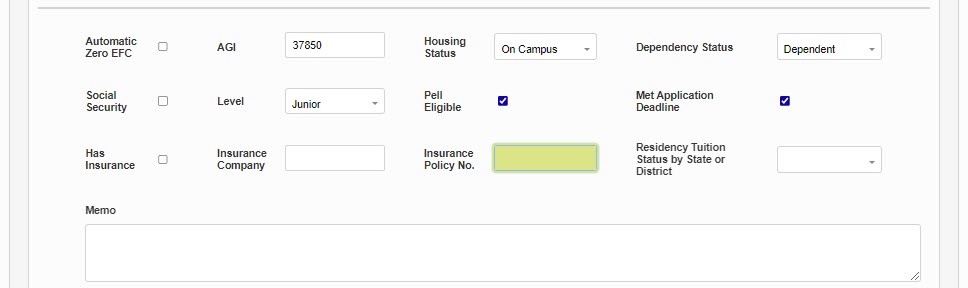
If the EFC is an Automatic Zero EFC, check the box. As of 2024-2025, the Automatic Zero and Simplified Needs tests are no longer used to calculate student eligibility in the SAI. The AGI field is used to store the student's Adjusted Gross Income.
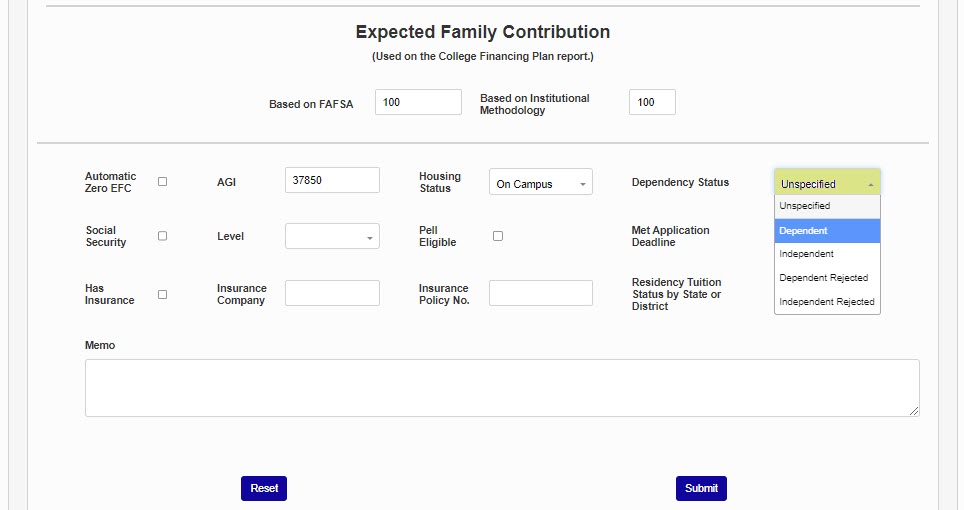
Use the Housing and Dependency Status menus to record the student's housing and dependency statuses.
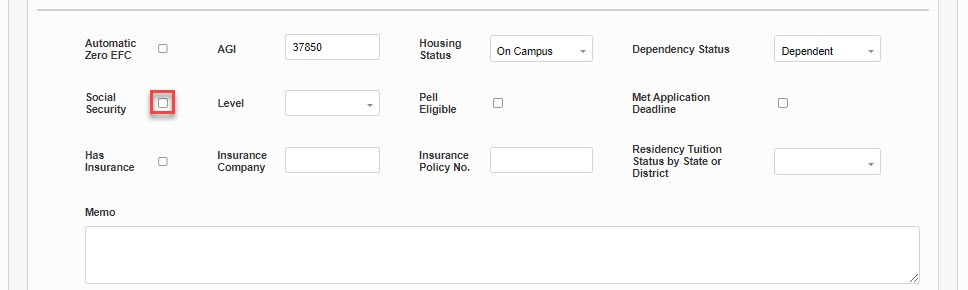
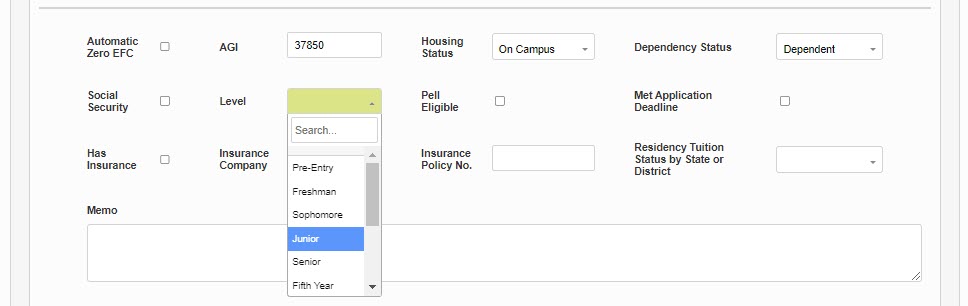
The Social Security box indicates that the student or household member reported on the FAFSA receiving Social Security benefits. The Level menu is used to record the level in college that the student selected on the FAFSA.
The Pell Eligible box indicates that the student is eligible for the Pell Grant, based upon the data in the FAFSA. The institution may have information that contradicts this. Review the Pell awarding guidelines if there is uncertainty.
Note
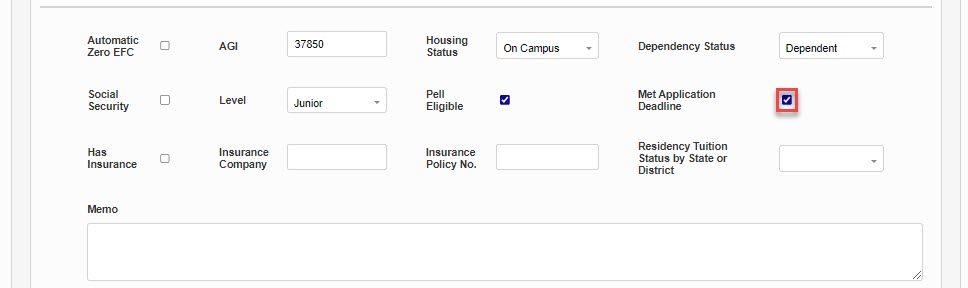
The fields covered below are populated manually, based on institutional processes and/or reporting needs.
If the institution has a FAFSA deadline or priority date, the Met Application Deadline box can be used to indicate that the student met the deadline. If student's are required to have insurance, the Has Insurance box can be used to record verification of insurance.
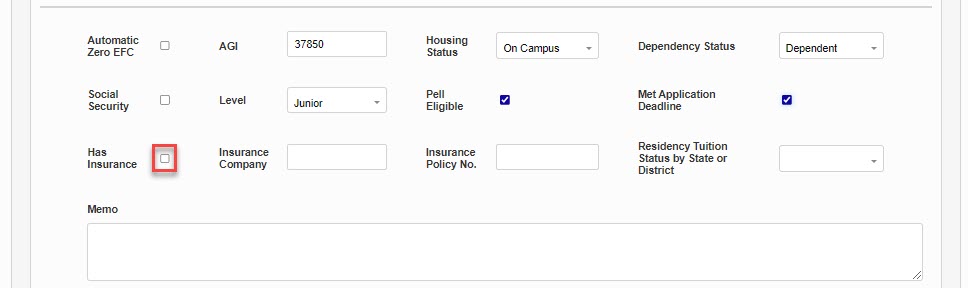
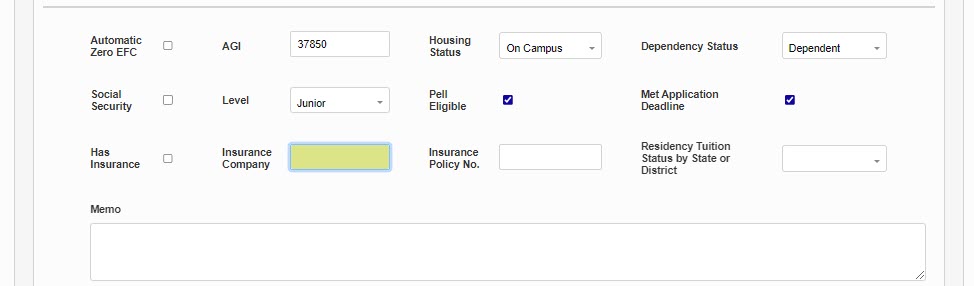
If insurance verification is being recorded, enter the Insurance Company name and Insurance Policy No.
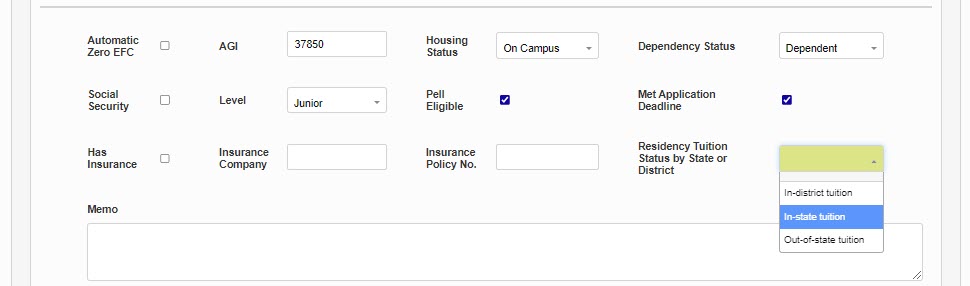
The Residency Tuition Status by State or District field is used in Gainful Employment reporting. This dropdown menu has three values: IS (In-state tuition), ID (In-district tuition), and OS (Out-of-state tuition). This field can be set manually here or in bulk using the Web Options setting.
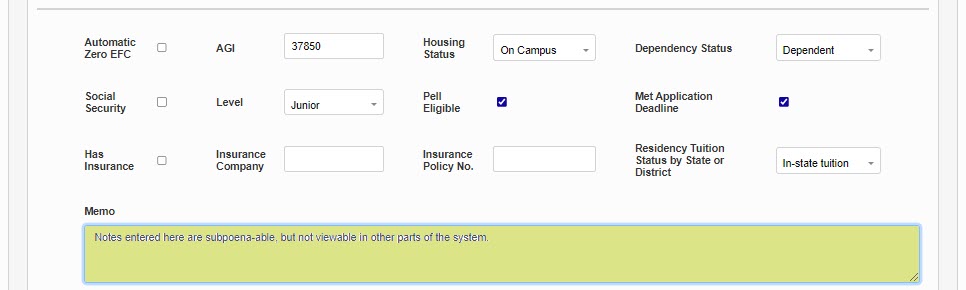
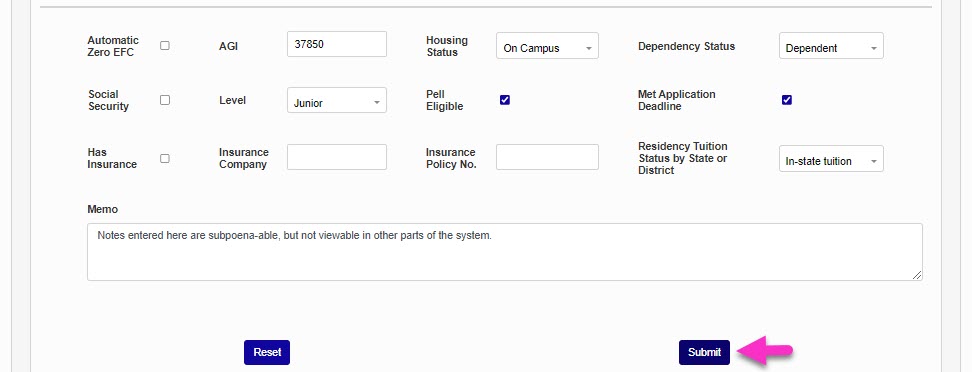
The Memo field is used for institutional note-keeping. Information entered here is not viewable elsewhere in the system. After making any updates, click Submit to save the changes.
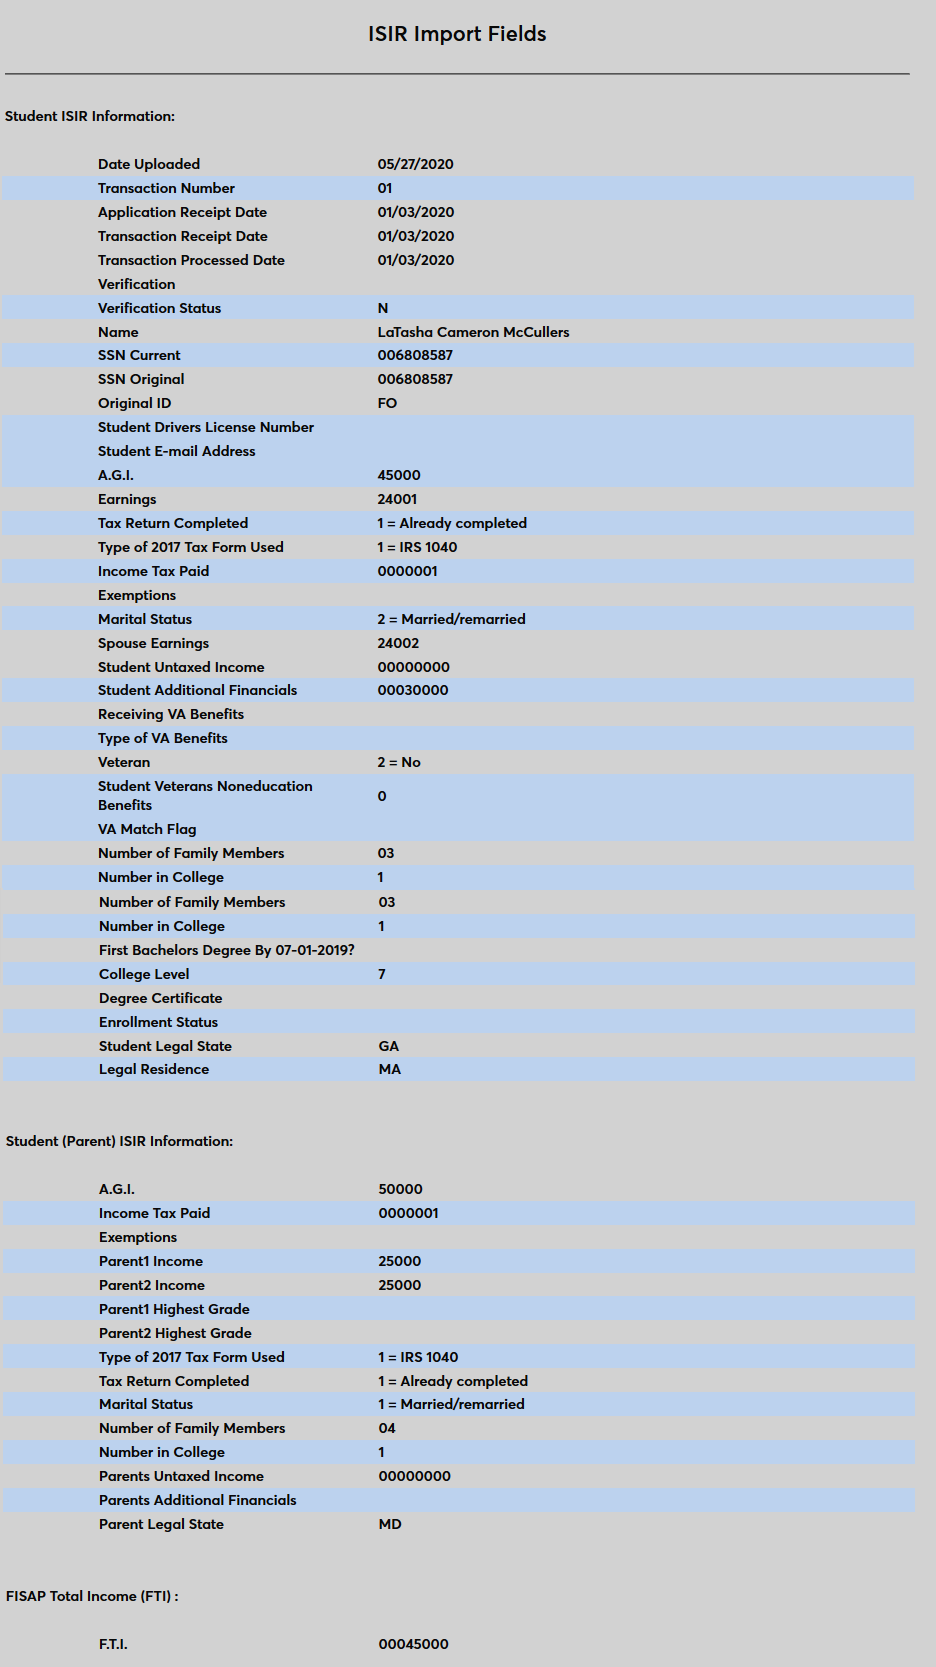
ISIR Record
To view a student's ISIR record, navigate to their Financial Aid record and click on the school year to be viewed. Then click ISIR Information at the bottom of the page.

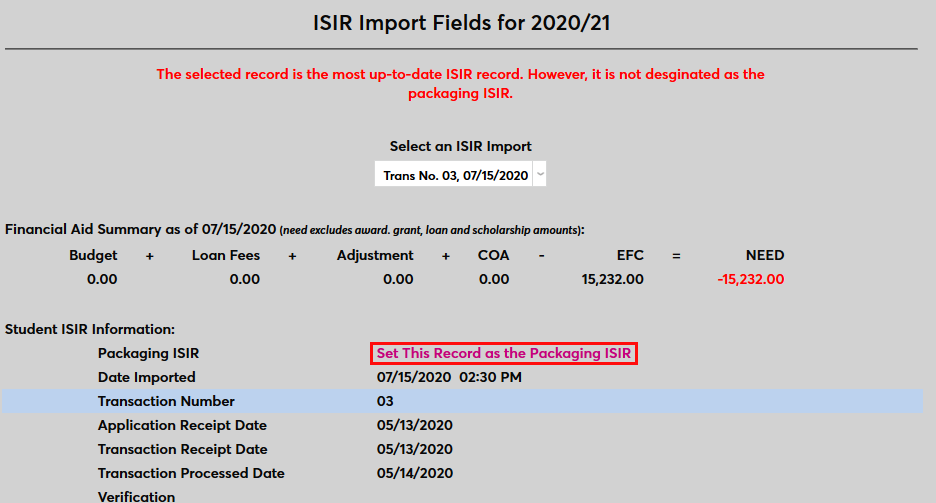
If more than one ISIR file has been imported for the user, a dropdown menu is available to view each set of data.
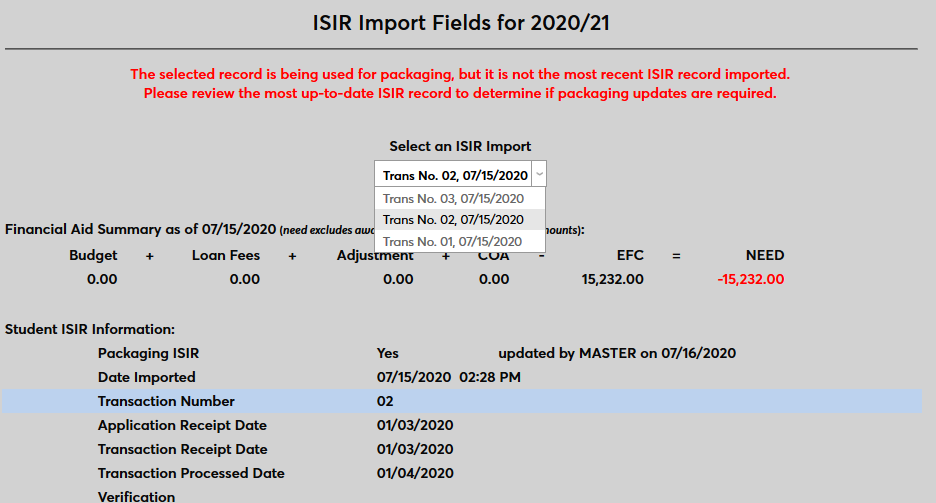
If the latest batch to be imported was not marked to be used in packaging, a note appears at the top of the page suggesting that administrators review the data. Click the Set as Packaging ISIR to change which ISIR import is being used for packaging.
The following image displays all of the fields that are imported from ISIR to SONIS:
If no ISIR information is available, an ISIR record can be imported using the Import ISIR utility.
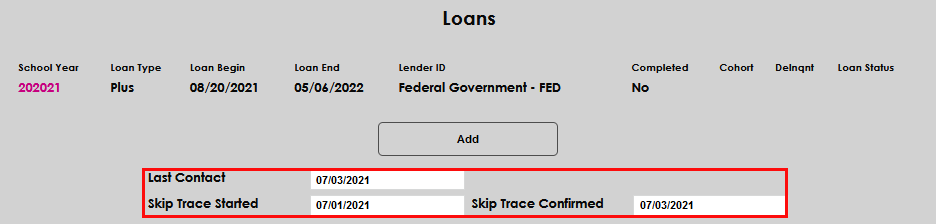
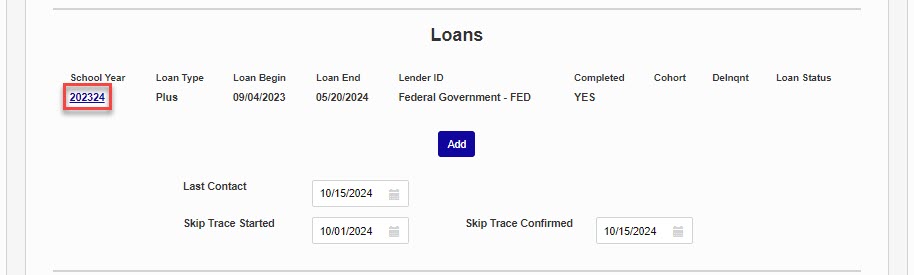
Loans
The Loans area allows users to create, manage, and award student loans, as well as any skip tracing activities.
Creating Loans
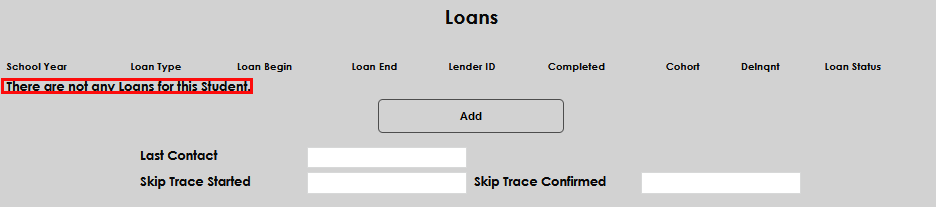
When you first enter the Financial Aid screen, the Loans section will display any loans the student currently has. If they have none, There are not any Loans for this student displays. Select Add to create a loan.

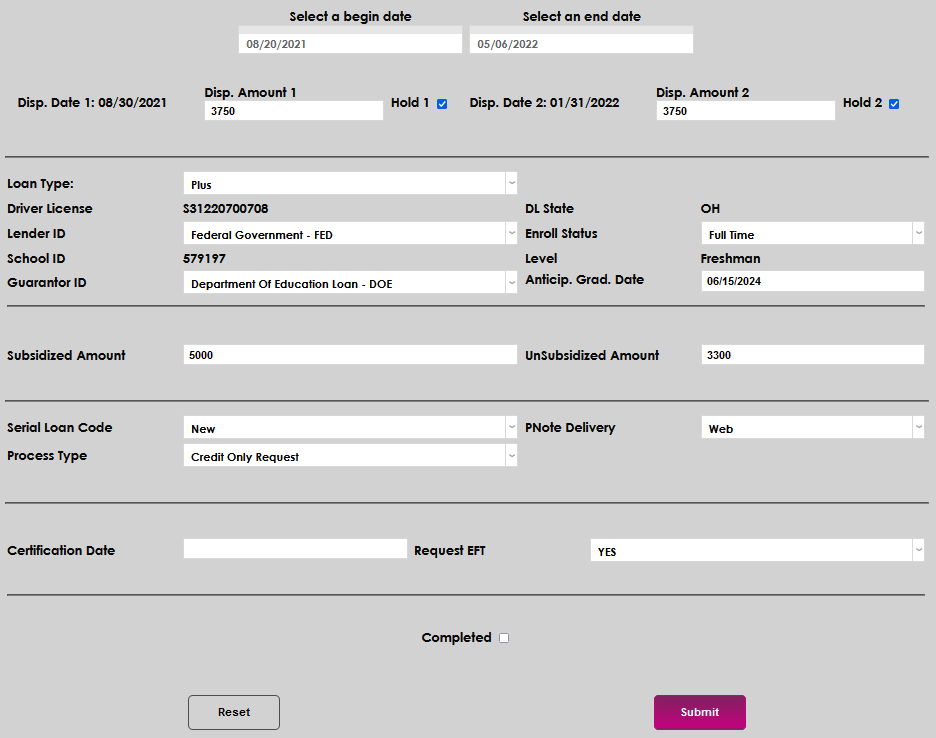
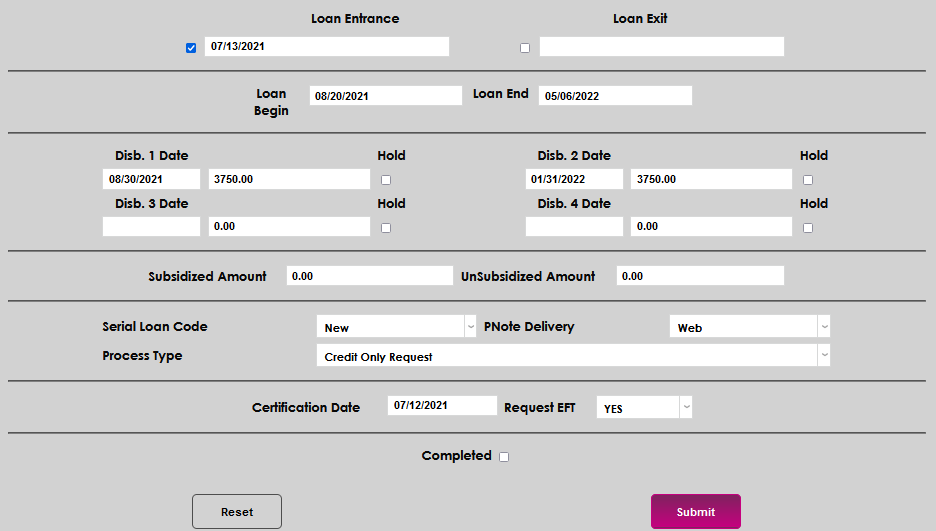
The next page will default to the most recent processing year. If loan start, end, and disbursement dates have not been set up for the year, red text will display notifying the user of the need to set up the details on the Fin Aid: Dates by School Year Systems menu page. If they have been set up, the associated dates will auto-populate.


Add the Disbursement Amount for each disbursement date that displays. If a disbursement should be held, check the Hold 1 or Hold 2 box, as appropriate.


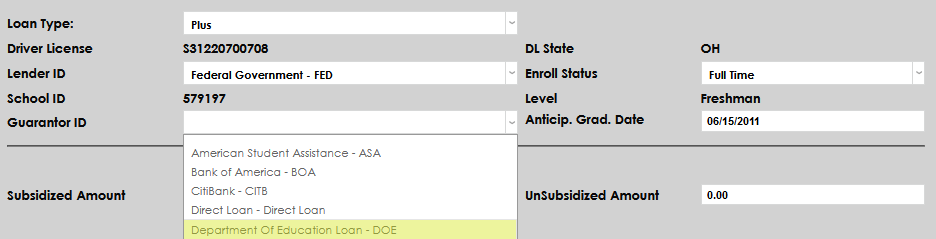
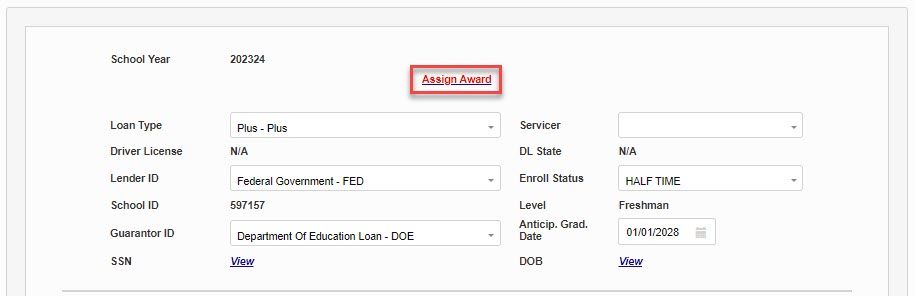
Choose the Loan Type from the dropdown. Driver License and DL State will populate from Biographic if they are available on the record. Enter the Lender ID and current or expected Enrollment Status.


School ID and Level will populate automatically. Select the correct Guarantor ID from the menu. Anticipated Graduation Date will auto-populate with the anticipated graduation date from Biographic. The field can be updated as part of the loan creation, if necessary.
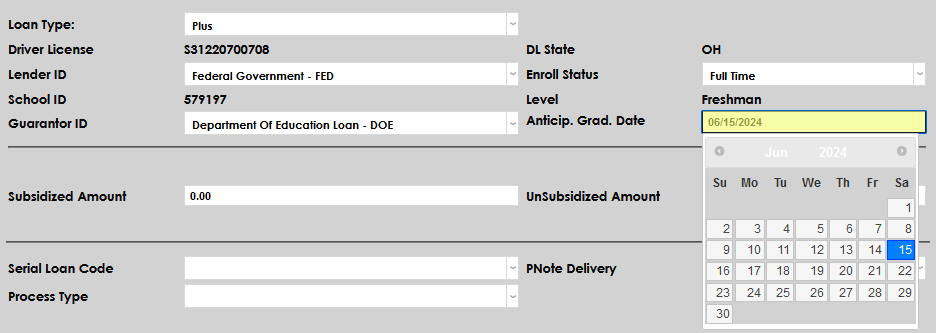
If the student will receive Subsidized or Unsubsidized loans for the first time that year, enter the total for each in the corresponding field. If they have previously received Subsidized or Unsubsidized loans, aggregate amounts can be entered in these fields.

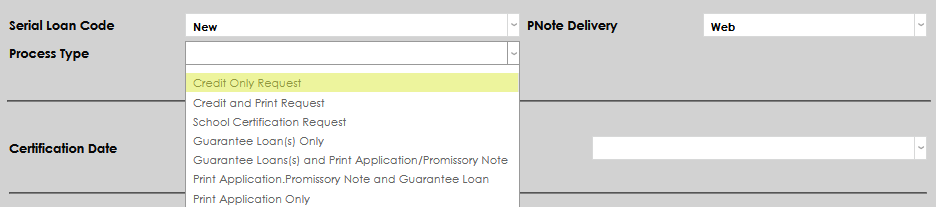
On the Serial Loan Code menu, indicate if the loan is New or Serial (continuing). Select how the promissory note will be delivered on the PNote Delivery menu. In the Process Type dropdown, select the type of processing necessary to complete the loan, as determined by the loan type and institutional processes and procedures.


If the loan is being certified at the time the record is added or was previously certified, enter the applicable date in the Certification Date field. If it will be certified in the future, the field cannot be left blank, but a future date may be entered. If the funds will be delivered by EFT to the institution, select Yes from the Request EFT dropdown. If they will be sent by paper check, select No.
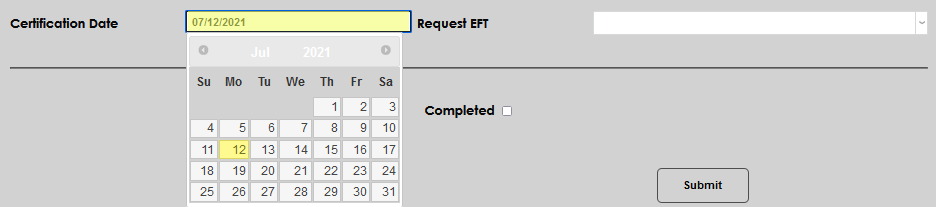

If all items associated with creating the loan are complete, check the Completed box. Click Submit to save the entered values.

Packaging Loans
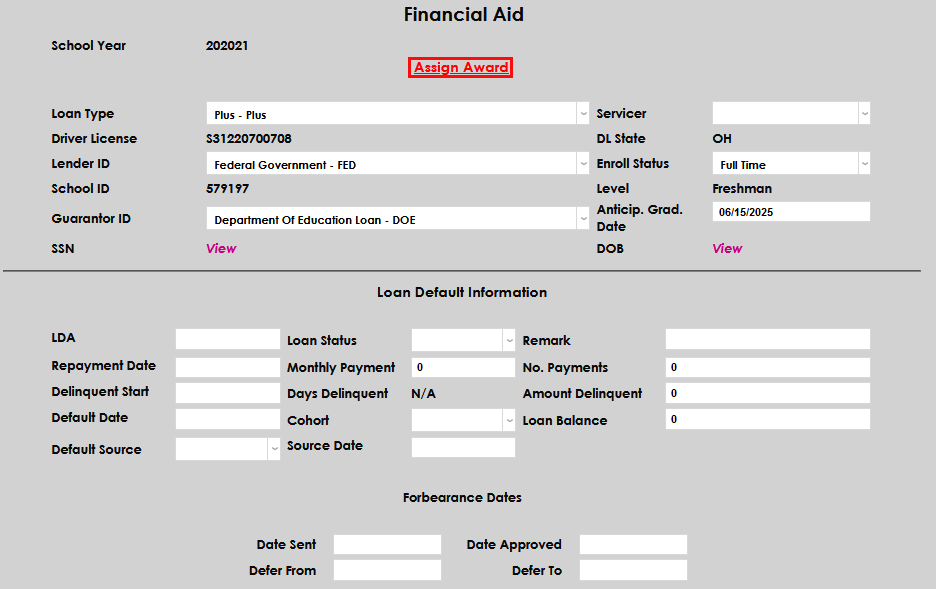
After selecting Submit, the user is taken to the Assign Award screen. On this multipurpose screen, any additional information can be entered regarding the loan, such as default details, entrance and exit counseling status, and/or forbearance details. If no details need to be added or changed, click Assign Award.
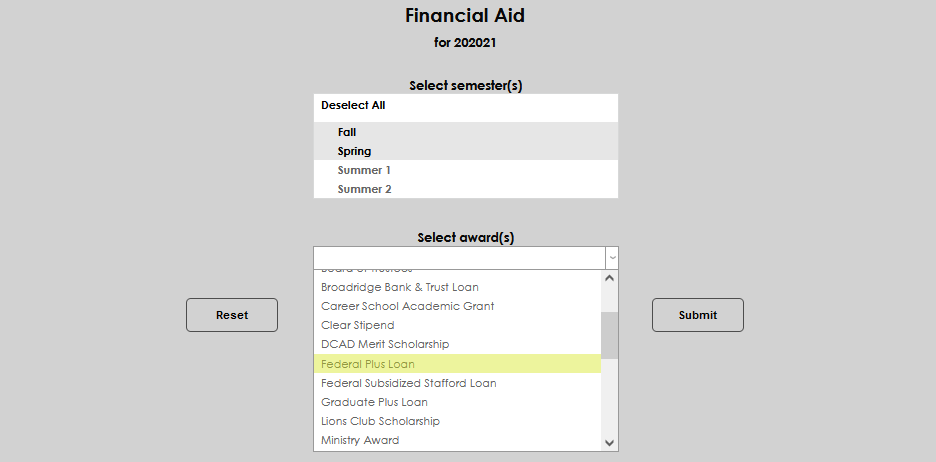
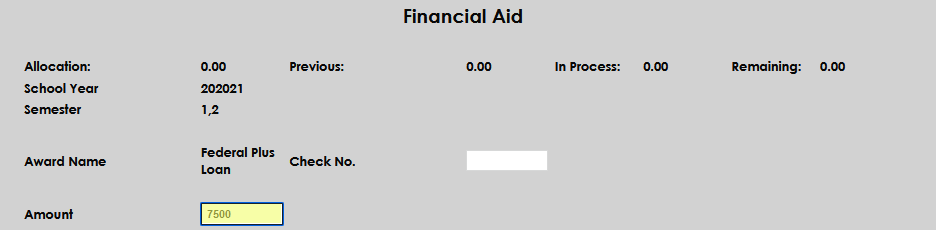
Select the Semester(s) the loan will be packaged for, select the Award Name, and click Submit.

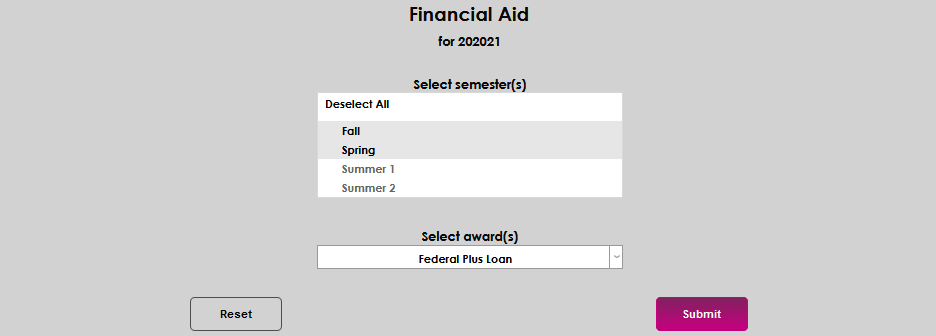
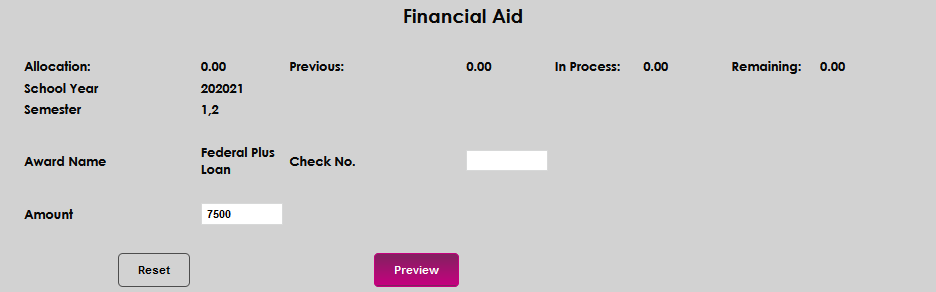
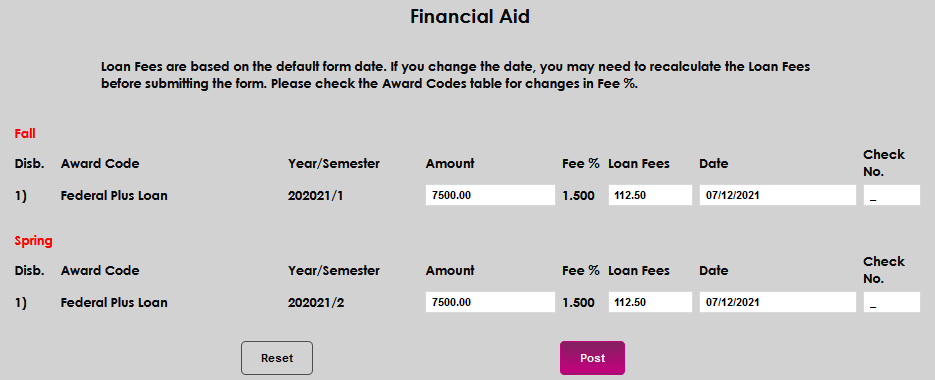
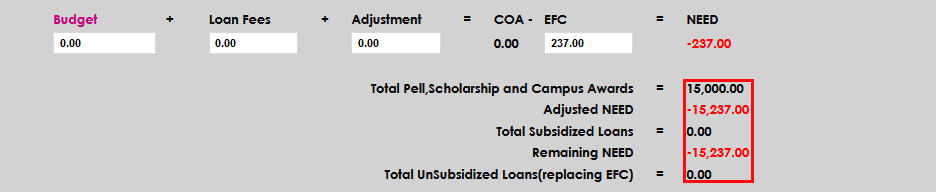
Enter the Amount for each disbursement of the loan. Click Preview. If all the details on the preview screen are correct, select Post. The award will be added to the Award Transactions summary, and be considered in the need calculation, as well as displaying on the Loans section of the initial Financial Aid screen.


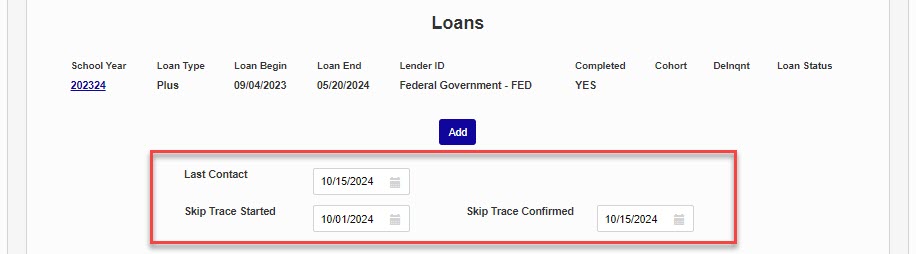
Skip Tracing
If the SONIS member institution participates in skip tracing, the Last Contact date, date Skip Trace Started, and Skip Trace Confirmed date can all be recorded in the fields provided in the Loans section.
Loan Counseling
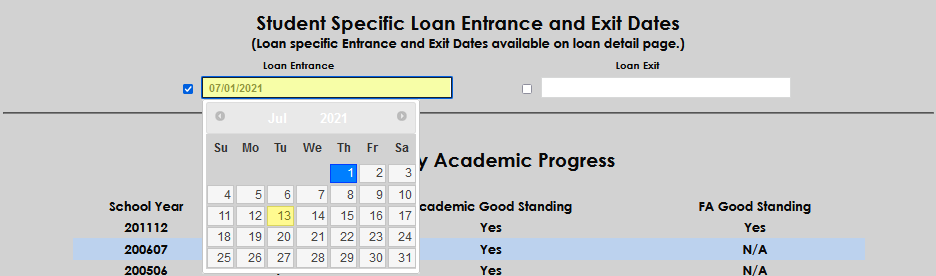
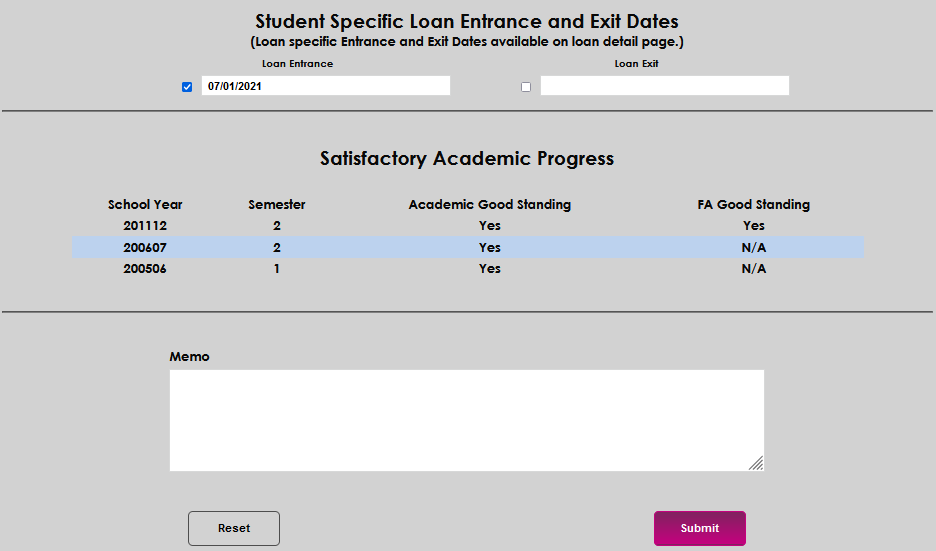
The Loan Counseling area allows users to track the completion of loan entrance and exit counseling. To record completion of counseling, the user simply checks the box next to either Loan Entrance or Loan Exit and today's date populates the field.


The field can be edited by clicking in the box and changing the date to the desired one. To remove the date, simply uncheck the box. To save, click Submit.

If the SONIS member institution requires or records entrance and/or exit counseling that is specific to a loan typology, the Loan Entrance and Loan Exit fields on the loan detail should be used. Simply click on the loan detail award year, check the Loan Entrance and/or Loan Exit box(es), modify the date(s) if necessary, and Submit the updates to save.


Satisfactory Academic Progress
The Satisfactory Academic Progress area provides a snapshot of the student's academic and financial aid satisfactory academic progress (SAP). The values are populated by system processes and cannot be edited or updated. Visit Satisfactory Academic Progress for detailed information on how academic standing is evaluated.
A row displays for each school year that has been evaluated.

The number of semesters the student was enrolled in each year is displayed. If Academic Good Standing and/or FA Good Standing has been evaluated, a Yes or No displays. If it has not been evaluated, N/A displays.


Loan Default Management
Loan default management is the process of keeping track of the status of repayment for the Federal student loans issued to students while they were enrolled at your institution. For some schools, these processes are required as a condition of providing Federal financial aid. For other schools, these processes are a best practice so that they do not end up in the position of it becoming a requirement due to a high Cohort Default Rate.
In general, the pages discussed below should be used to tag and monitor student accounts for defaults. Institutional processes may vary and can be strengthened with the addition of other steps, pages, and/or software.
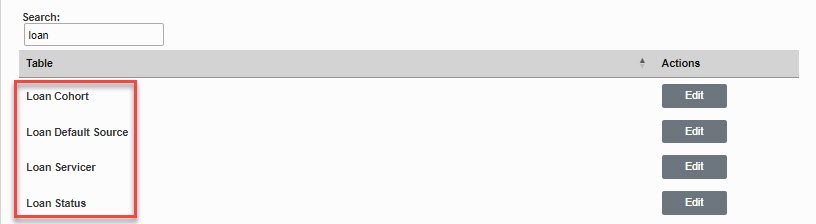
Setup
There are four tables that must be set up: Loan Cohort, Loan Default Source, Loan Servicer, and Loan Status. Each of these tables and their use are explained here.
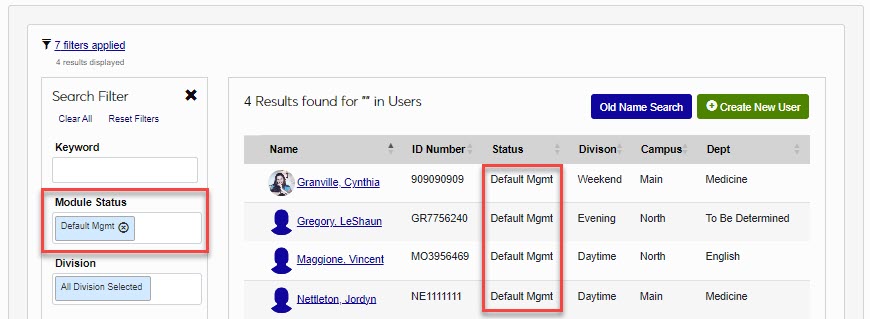
Loan Default is a module status and can be assigned to those users who are responsible for default management.
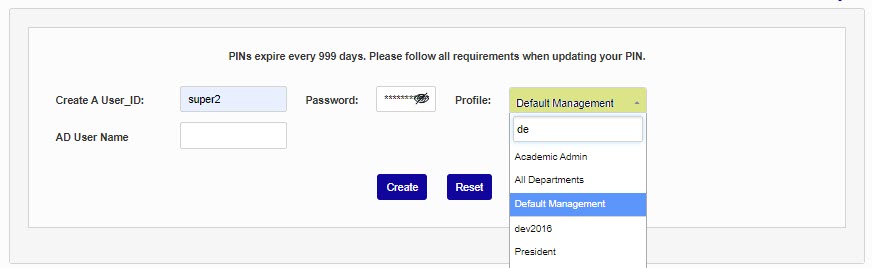
Additionally, user security profiles can be tailored to give those users with loan default management responsibilities access to whichever pages and utilities in SONIS that the institution decides are appropriate. Ensure the profile is given access to the Financial Aid page in the Users hub and the Loan Default Management Additional Privilege.
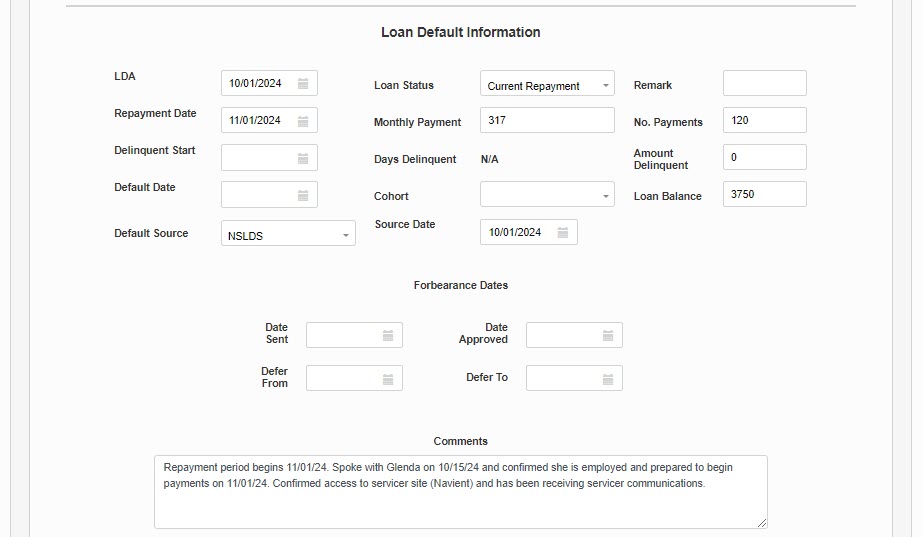
Financial Aid Page
With access to the Loan Default Management Additional Privilege, users will be able to view and utilize the skip tracing section and the Loan Default Information block (nested within the award year specific loan details page). All users with access to the Financial Aid page can enter loan entrance and/or exit counseling details.

Select the School Year of a loan to view and manage Loan Default Information. Loan Status, Cohort, and Default Source are dropdown menus that are populated by the corresponding tables. The Delinquent Start date determines the number of Days Delinquent and the value displayed in the Delnqnt column on the Financial Aid start page. The Remark field accepts up to 25 alphanumeric characters, while the Comments field has no character limit or restrictions. As with all SONIS pages, click Submit at the bottom of the page to save any entered or changed information.
Note
If the student has a loan with a Loan Status of In Default in SONIS, the Assign Award link at the top of the loans detail will not display.
Reports
There are six reports provided to assist with loan default management activities:
Loans: Days Delinquent - Filters are Campus, Loan Status, Cohort, and Days Delinquent. The results are listed by student and provide Date of Birth, Loan Status, Campus, Servicer, Last Contact, Days, Dates, and Address. The report can be displayed by PDF or Excel and the option to display SSN is provided.
Loans: Default Calculator - Filters are Campus and Cohort. The results are listed by Cohort and provide Campus, Student Name, Status, and Default. The report can be displayed by PDF or Excel, Full Detail or Default Detail can be toggled, and the option to display SSN is provided.
Loans: Default Summary - Filters are Campus and Cohort. The results are listed by Cohort and provide a calculation of the percentage of the Number of Defaults and Poll of Borrowers. The report is displayed in PDF.
Loans: Delinquent Borrowers - Filters are Campus, Loan Status, Cohort, and Days Delinquent. The results are grouped by cohort and listed by student and provide Date of Birth, Status, Campus, Servicer, Home Phone, Last Contact, and Days. The report can be displayed by PDF or Excel and the option to display SSN is provided.
Loans: Repayment Tracking - Filters are Campus, Loan Status, Cohort, and Forbearance Defer To Dates. The results are listed by student and provide Date of Birth, Status, Campus, Servicer, Last Contact, Sent to Servicer, Approved, Defer From, and Defer To. The report can be displayed by PDF or Excel and the option to display SSN is provided.
Loans: Student Status - Filters are Campus, Loan Status, Cohort, and Servicer. The results are grouped by Student, Campus, and Loan Status and provide Status, Servicer, LDA, Grad Date, and Default Date. The report can be displayed by PDF or Excel and the option to display SSN is provided.