SAML X.509 Certificate Configuration
Overview
While Jenzabar SONIS offers SAML and OAuth single sign-on through our Single Sign-On configuration utility, many clients found the setup process to be difficult and cumbersome. For this reason, SONIS also offers single sign-on using SAML x509 certificate authentication. This process is generally easier and more intuitive and should be adaptable to a variety of identity providers.
Note
The single sign-on process completely bypasses the normal SONIS username an password identity verification. Users can have a password that has expired or does not meet institutional password requirements and still log on using an SSO account.
Setup for All Identity Providers
Before beginning, ensure that the SAML box is checked under the SSO Methods heading in Web Options.

Setup
Create Application
As noted above, these instructions will be specific to Auth0, but the same process should work with slight modifications for OneLogin, Okta and other identity providers.
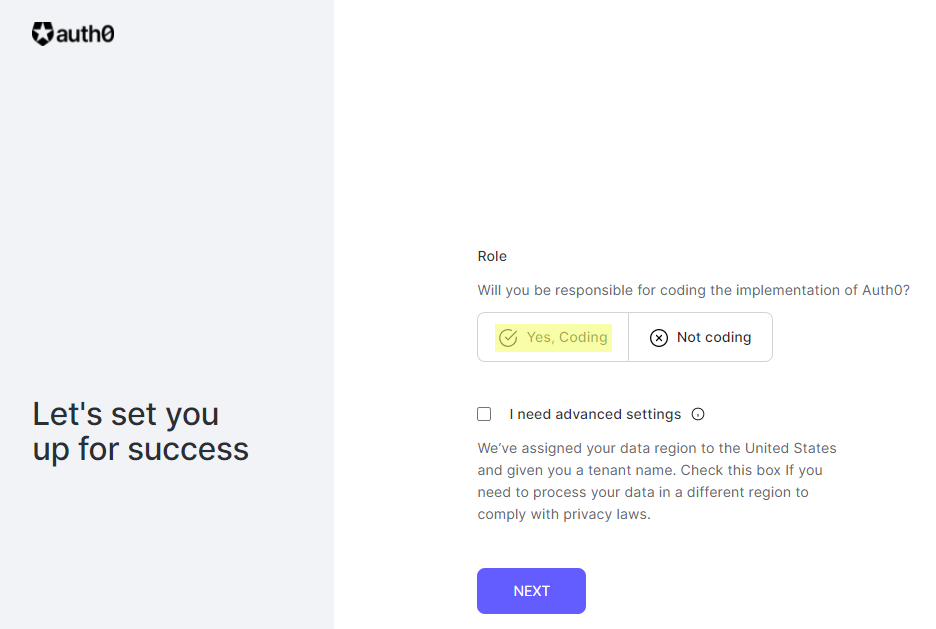
To use Auth0 for SONIS single sign-on, begin by creating an Auth0 account. This will require an email and password. Auth0 will send an email to validate the account. Follow the link in the email, answer Yes, Coding to the Role question, and click Next.
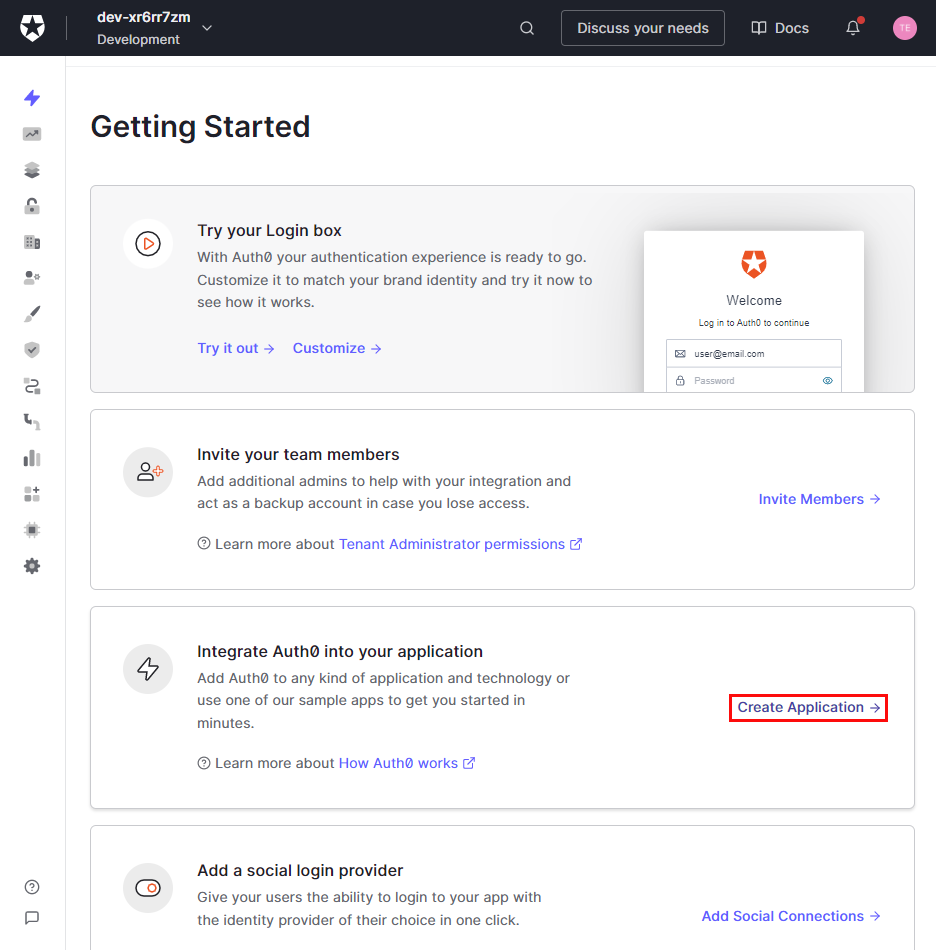
Once the account is created, select Create Application in the integrate Auth0 into your application section.
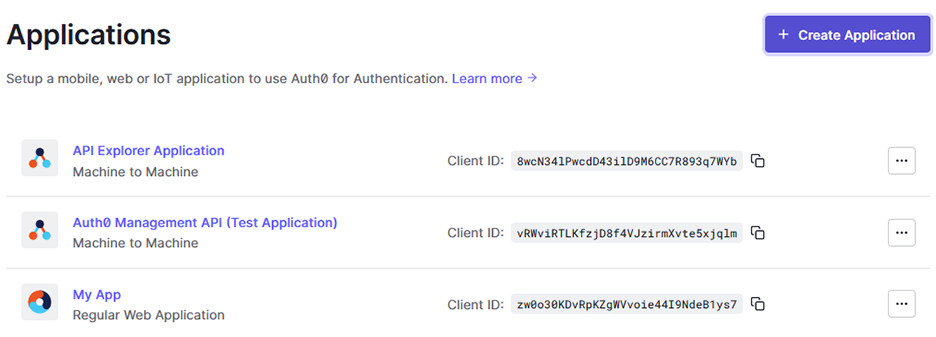
An application can also be created after the initial start process by navigating to Applications under the Applications menu and clicking Create Application.
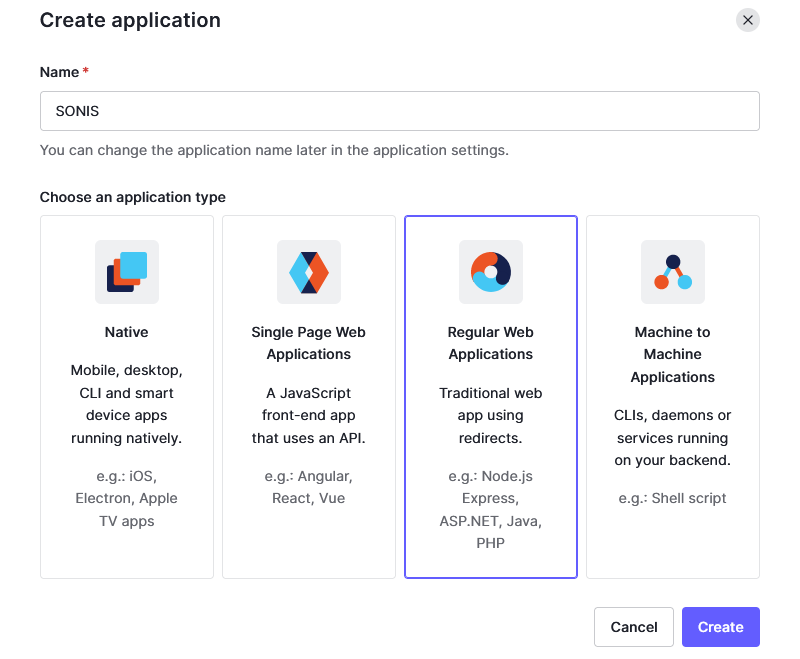
In the Create Application window, give the application a name and select Regular Web Applications as the type. Click Create to continue.
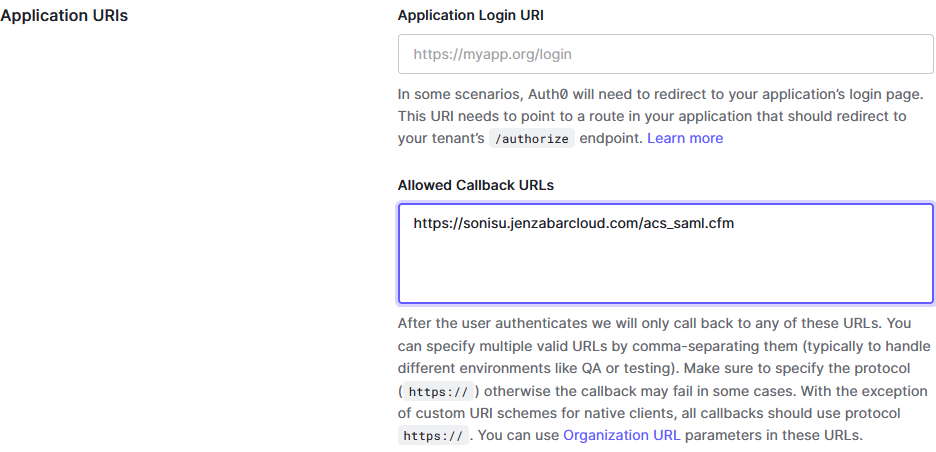
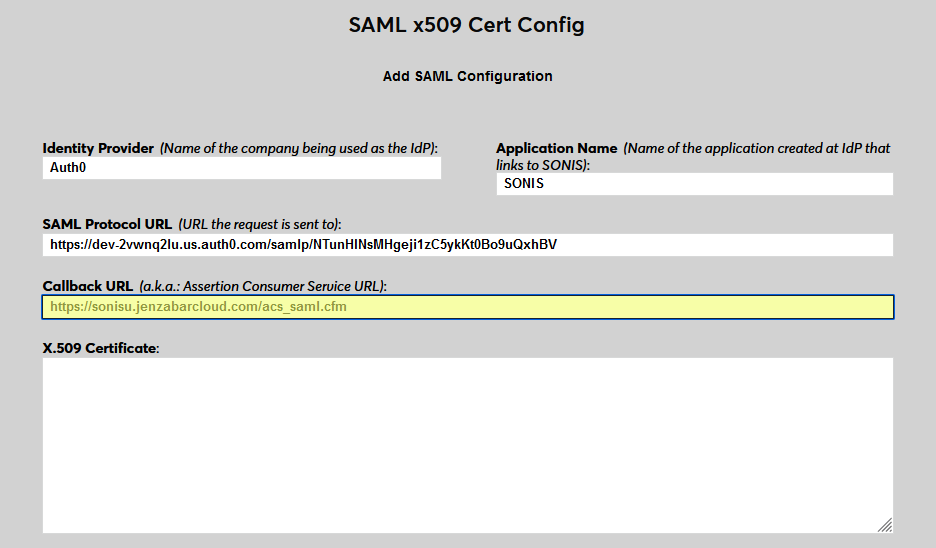
Under the application Settings, scroll down to the Application URIs. Add https://[yourdomain]/acs_saml.cfm to the Allowed Callback URLs field with [yourdomain] replaced by the local domain. For example: https://sonisu.jenzabarcloud.com/acs_saml.cfm. The Application Login URI box should be left empty.
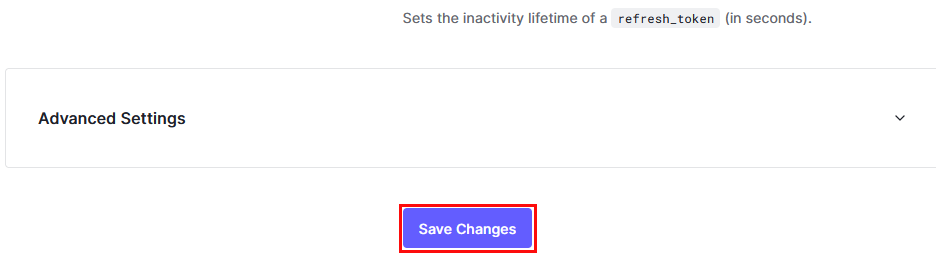
Click Save Changes at the bottom of the page to save this callback URL.
Configuration
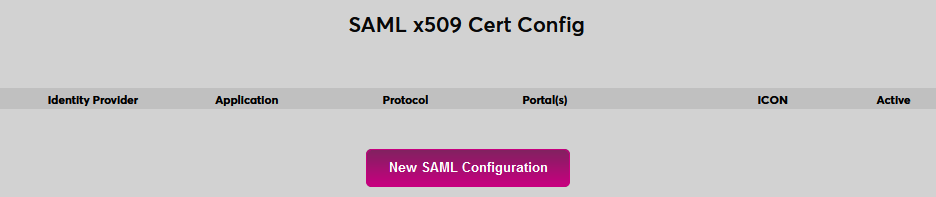
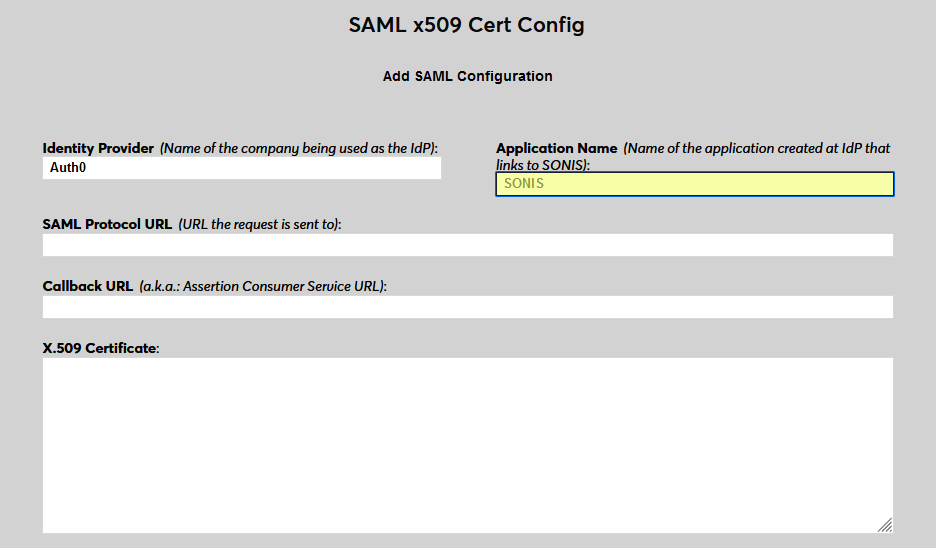
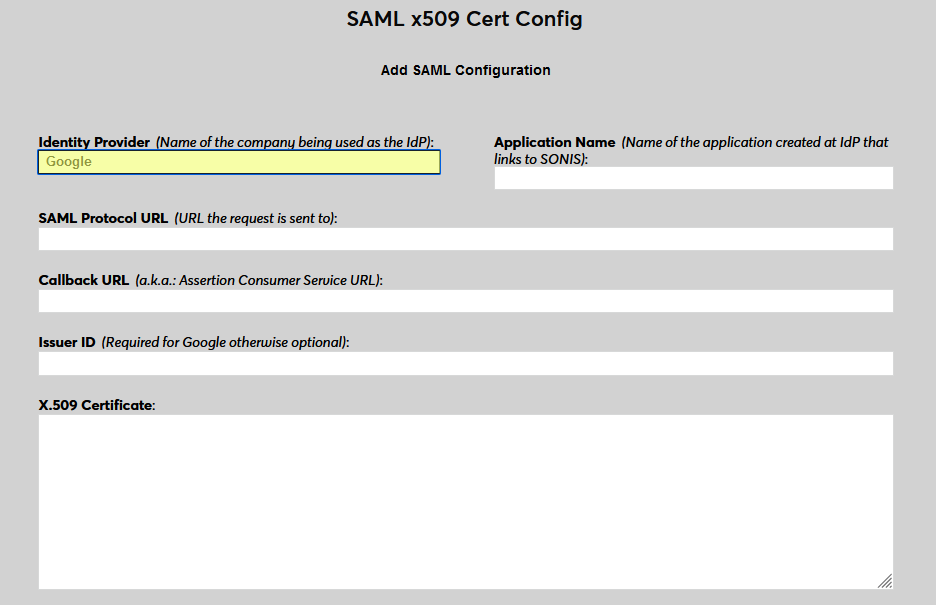
In SONIS, navigate to SAML x509 Certificate Configuration under the Systems menu. Click New SAML Configuration to begin.
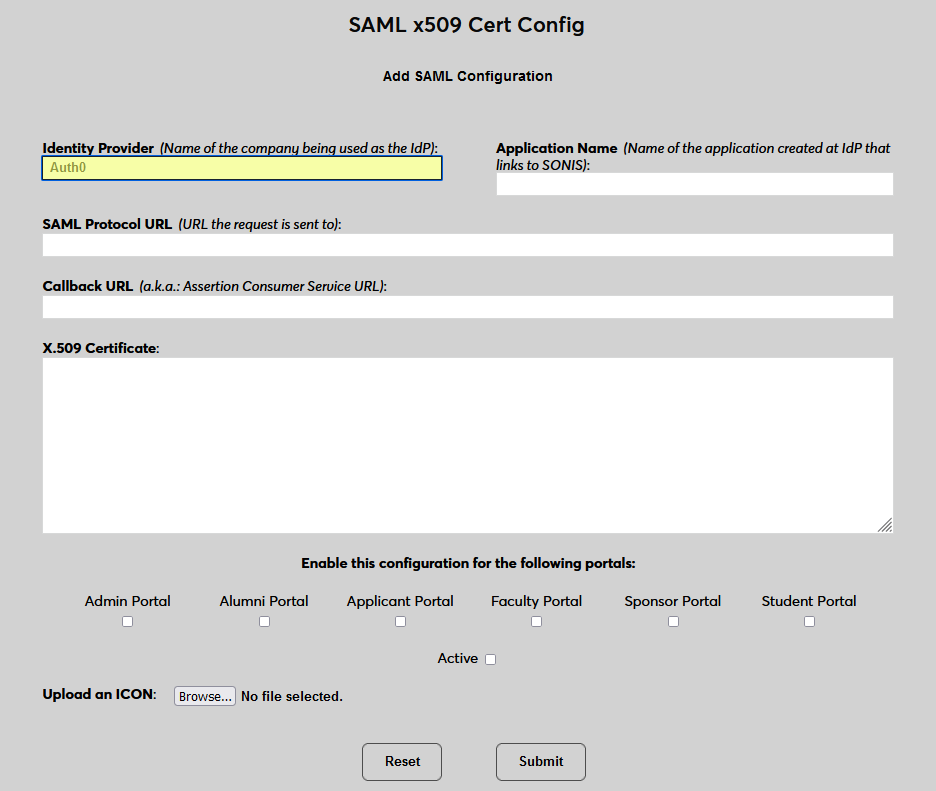
Enter Auth0 as the Identity Provider and enter the Application Name that corresponds to the application created in the previous steps.
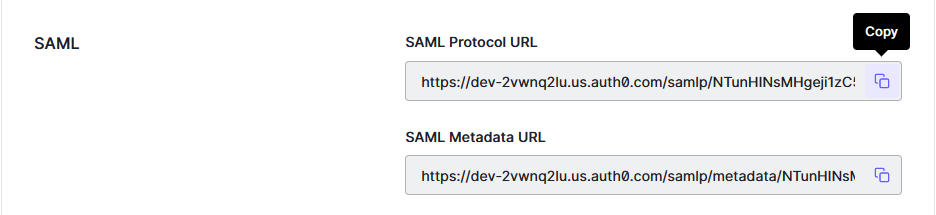
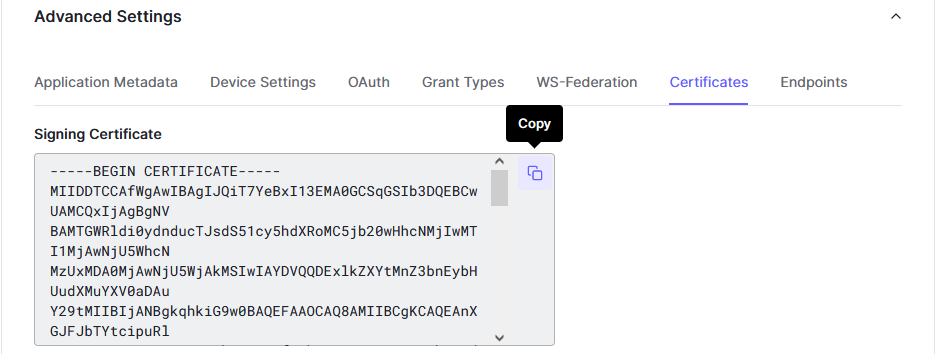
Back on the Auth0 site, return to the application Settings, scroll down to the Advanced Settings, and expand the menu. Select Endpoints to continue.

Scroll down to the SAML section and copy the SAM Protocol URL. Paste this value into the SAML Protocol URL field in SONIS.
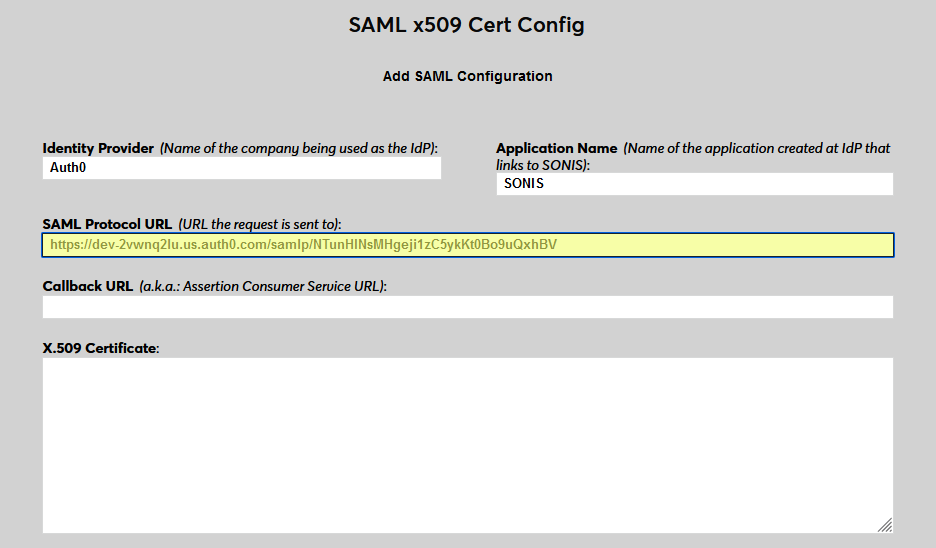
Next, enter the same Callback URL that was entered on the Auth0 site. The Issuer ID field is not used for Auth0 at this time.
Back in Auth0, select the Certificates tab in the Advanced Settings menu. Copy the Signing Certificate from Auth0 and paste it into the X.509 Certificate field in Jenzabar SONIS.
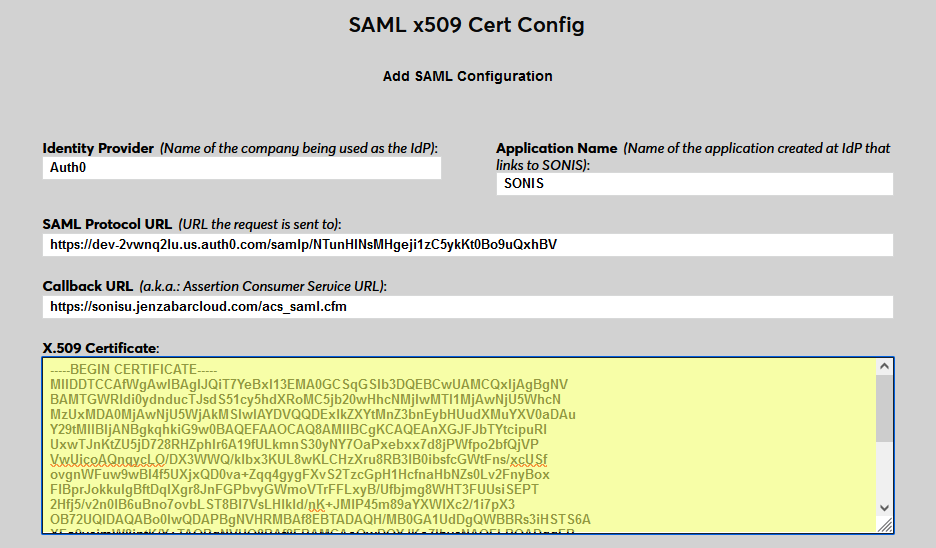
Click Submit to save the configuration values. Do not enable any portals at this time.
User Management
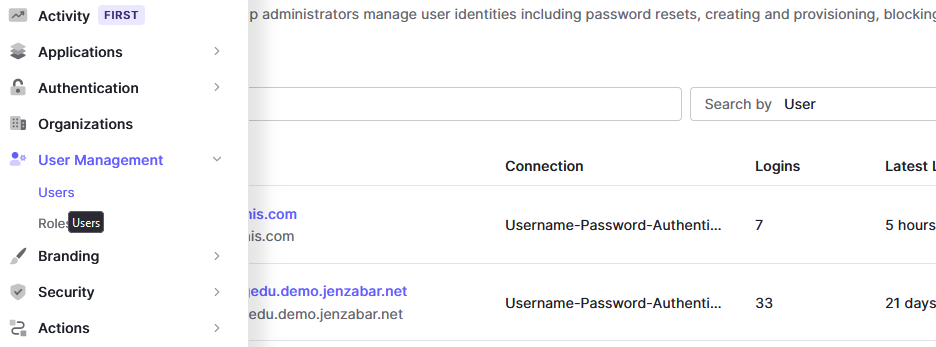
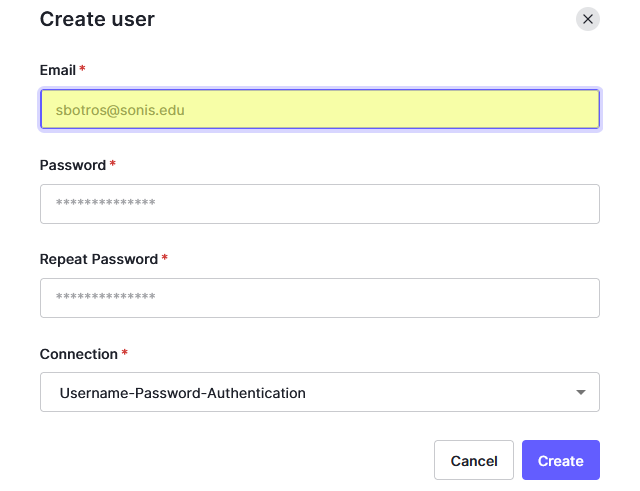
Before users can log in to SONIS with Auth0, they must have accounts in Auth0. Navigate to Users under the User Management tab and click Create User.

On the Create User page, enter the user's Email and create a Password for them. The association with SONIS is based entirely on the user's email address, so these values must match exactly. The user will need this password to associate their account with Auth0, so save the value so it can be sent to them.
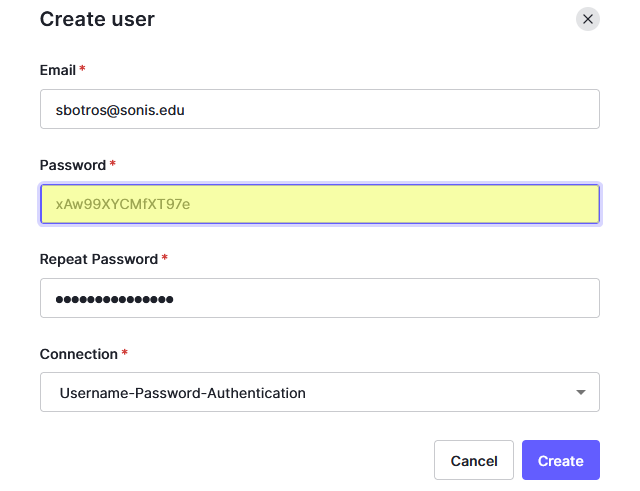
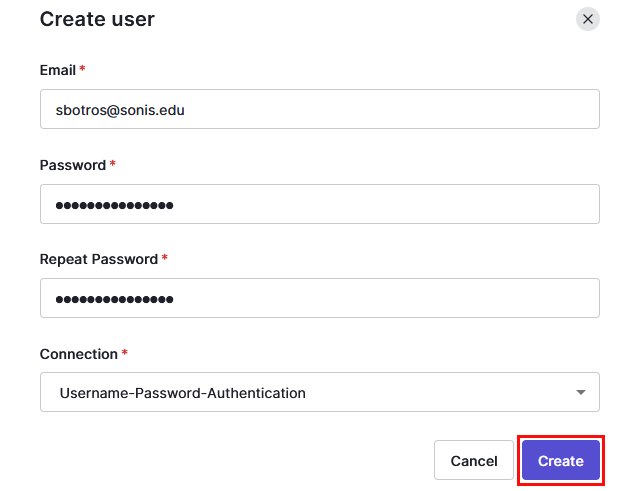
Click Create to finish adding the SONIS user to Auth0.
Note that Auth0 does not require the user to be given access to any applications, but this may be required by other identity providers.
Enable Login
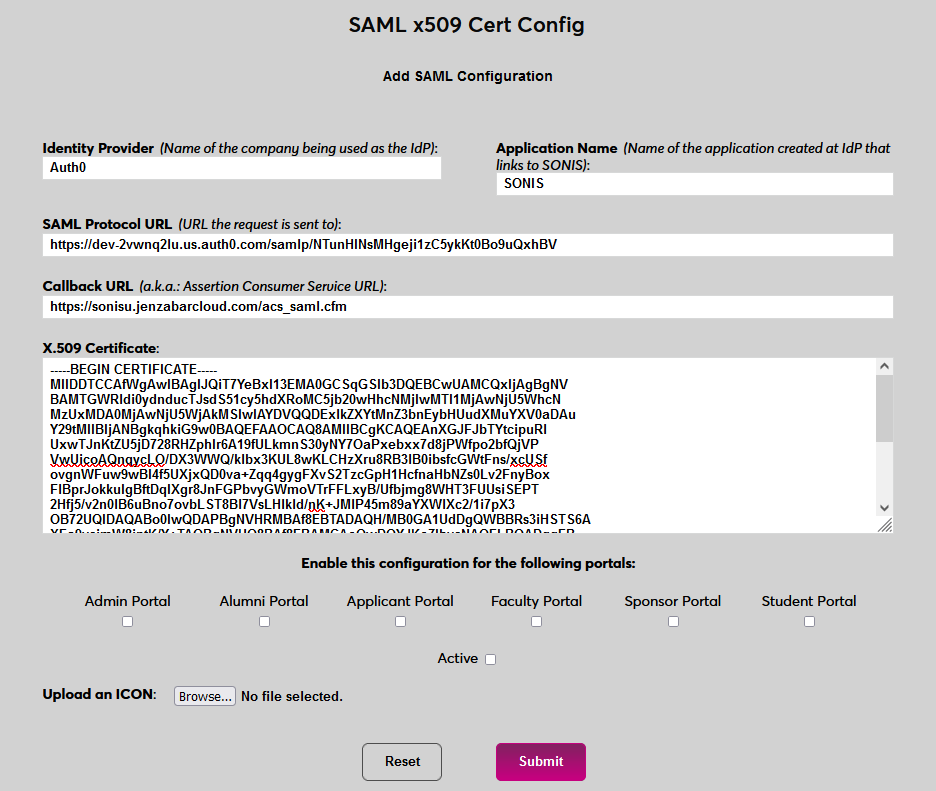
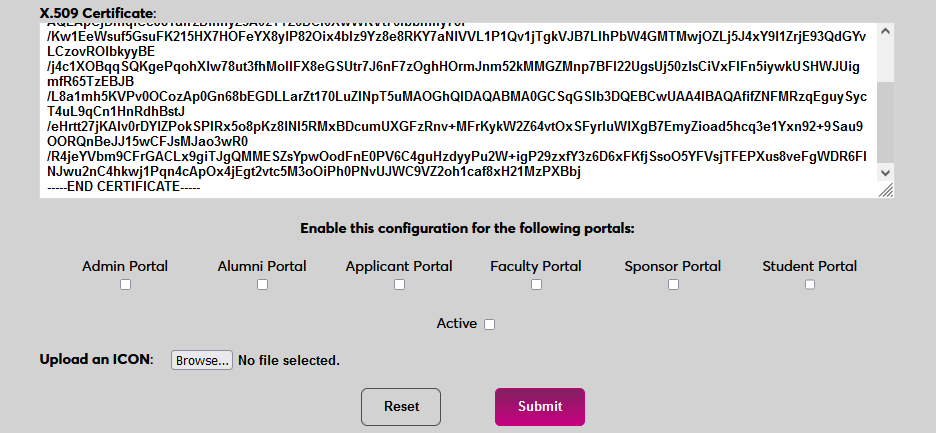
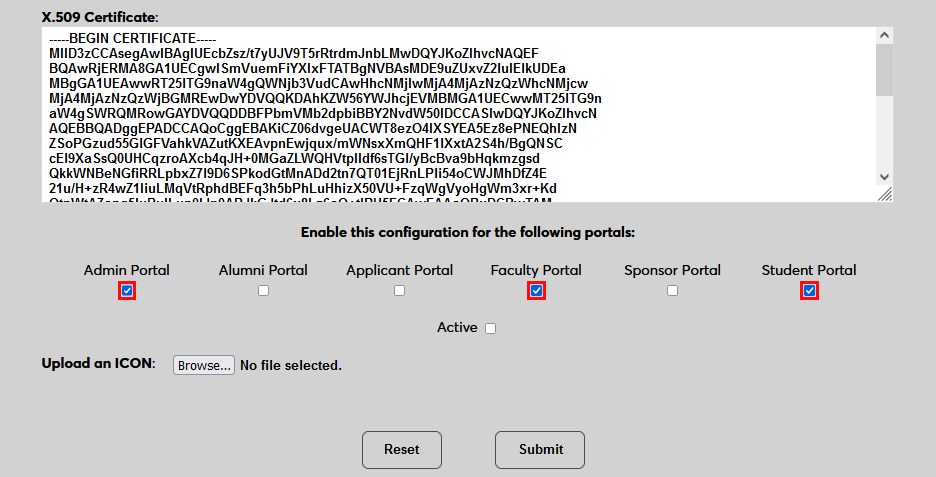
Once users have been added, they can use Auth0 to log in to SONIS. Navigate back to the SAML x509 Certificate Configuration page to turn the option on. Select the portals where Auth0 will be a login option.
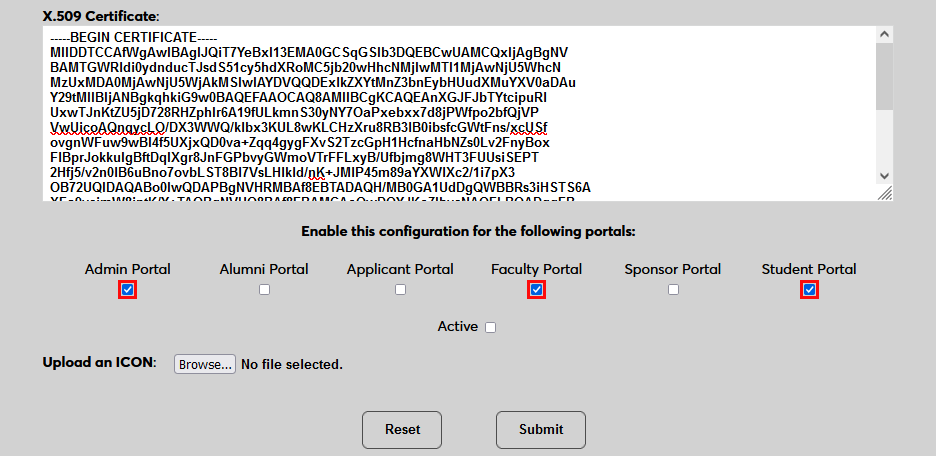
To upload an Auth0 logo, click Browse and locate the image file. Adding a new icon is optional. If no logo is added, a lock icon will appear for all configurations.
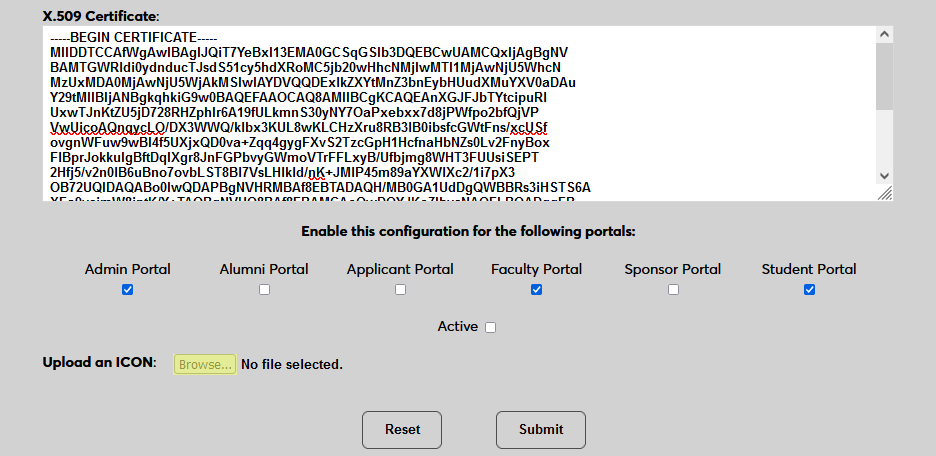
Check the Active box to set the login option as active and add the link to the selected portal(s).
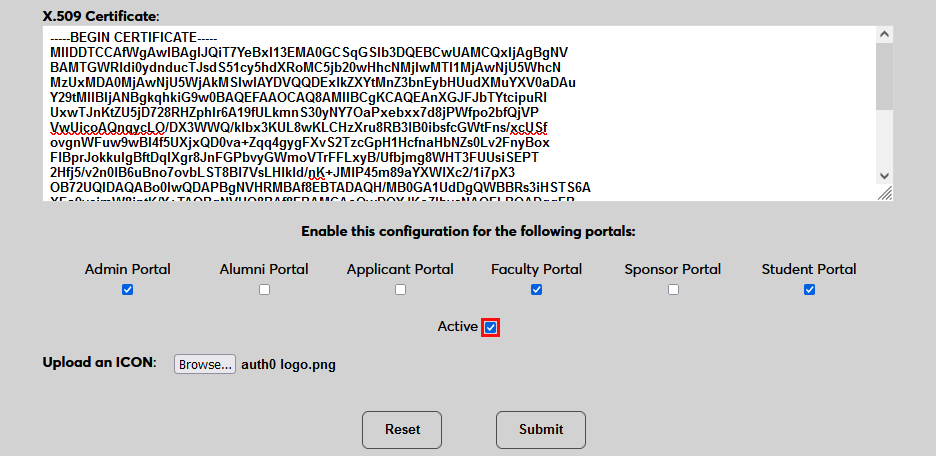
Click Submit to save the changes and activate the login option.

Manually Associating Users
There may be times when a user needs to be manually associated with Auth0 or another authenticator. For example, a single user has two different accounts with different SONIS IDs and the same email address, which would prevent them from signing in to Auth0 and associating account through the login page.
To manually associate a user, ensure that the Change Single Sign-On Property Value User Security privilege is active on the administrative account making the change.
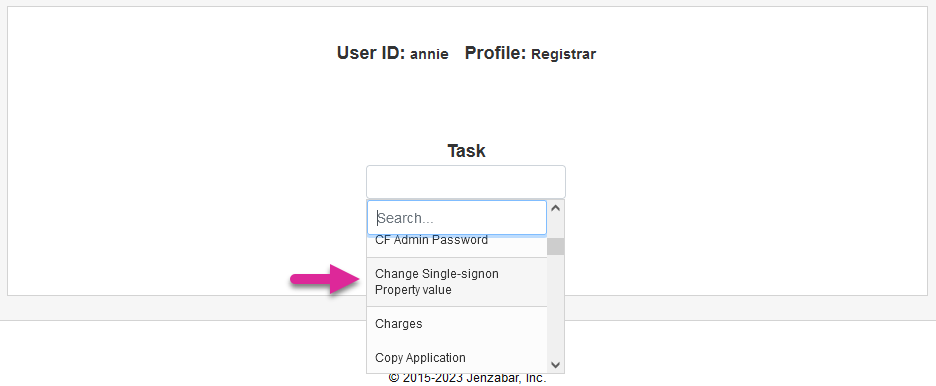
Then navigate to the user's Biographic page and click the View link labeled SSO Property. A new window will open.
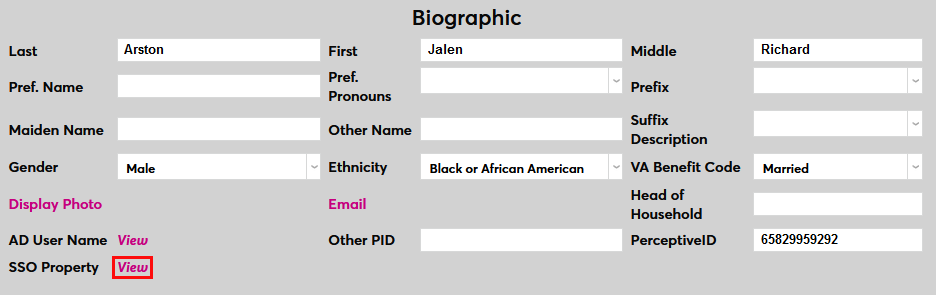
In the new window, click SAML x509 Certificate SSO Properties and then Add on the following page to continue.


If the user has more than one email address in their Address record, choose an email address to associate.
If the user has more than one module status, choose a status to associate.
Click Submit to complete the association.
The SSO Provider and User ID will be automatically added to this table once the user has manually logged in to SONIS using SAML x509 authentication. A second association can be added using the Add link or the association can be removed altogether by clicking Delete.

Note that a single email address can be associated with more than one module status, but a single module status cannot be associated with more than one email address.
Logging In
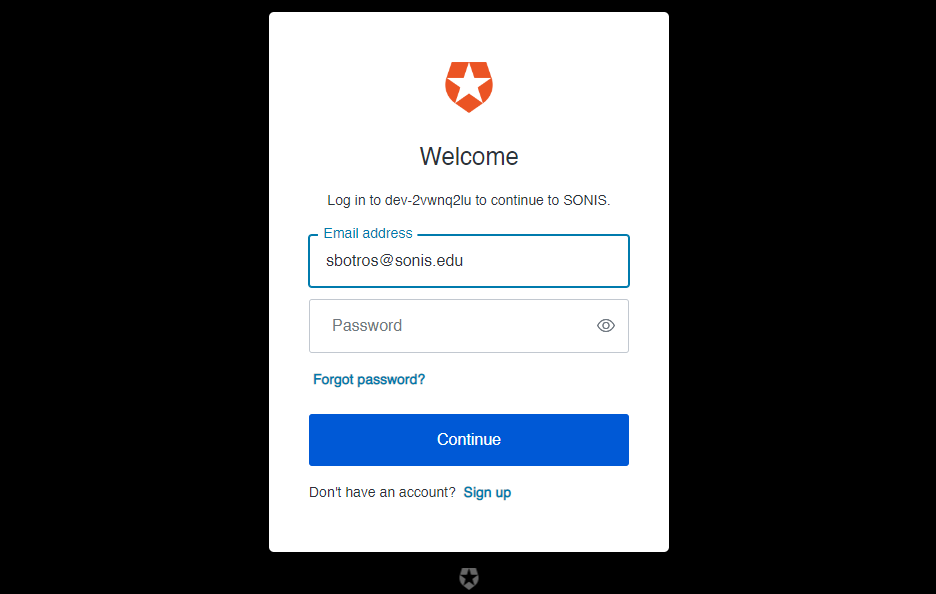
To log in to SONIS using Auth0 as the identity provider, click Log in with Auth0 from any login page where it has been activated.
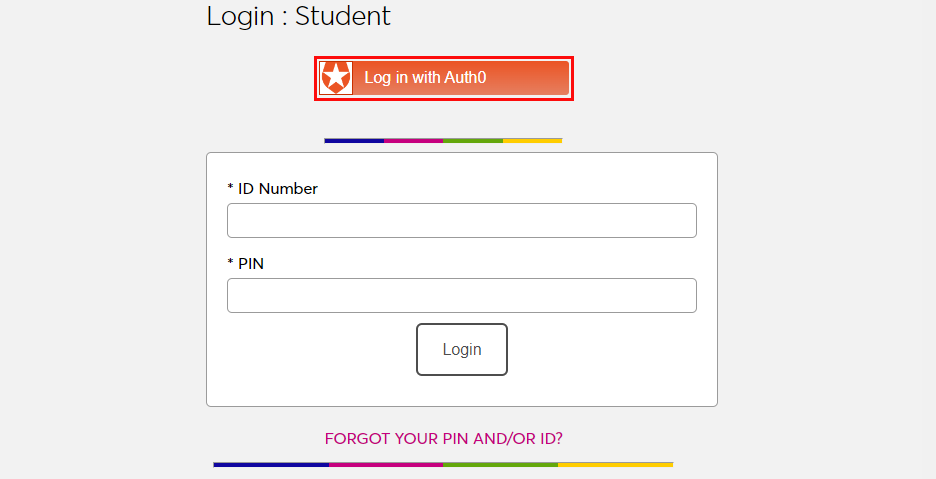
On the following page, enter the Email address and Password that were associated with the account in Auth0.
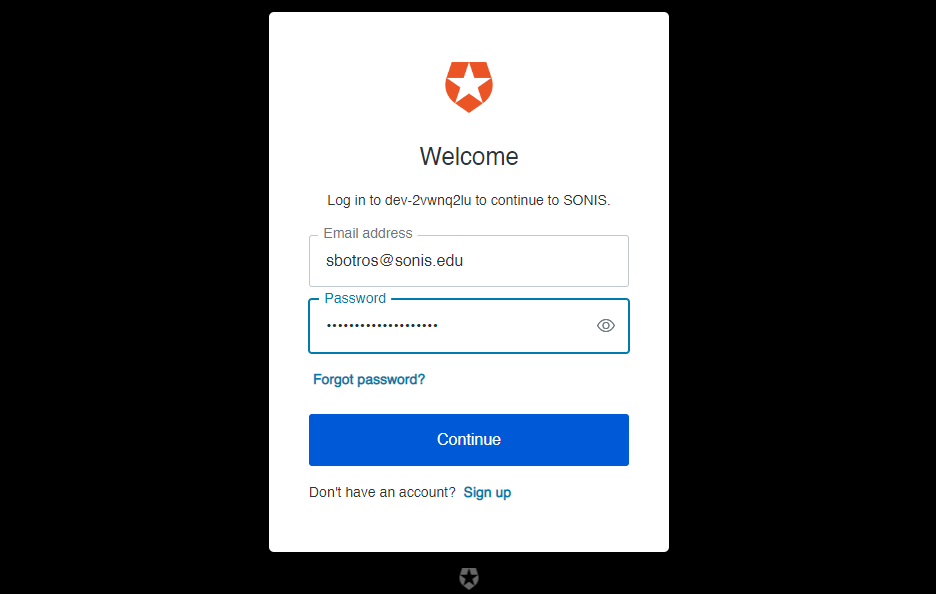
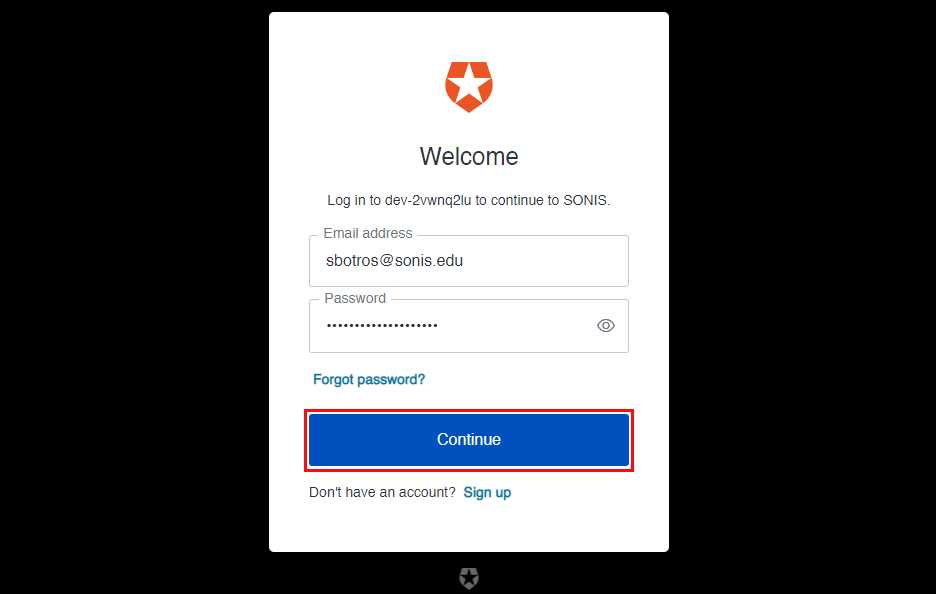
Click Continue to log in.
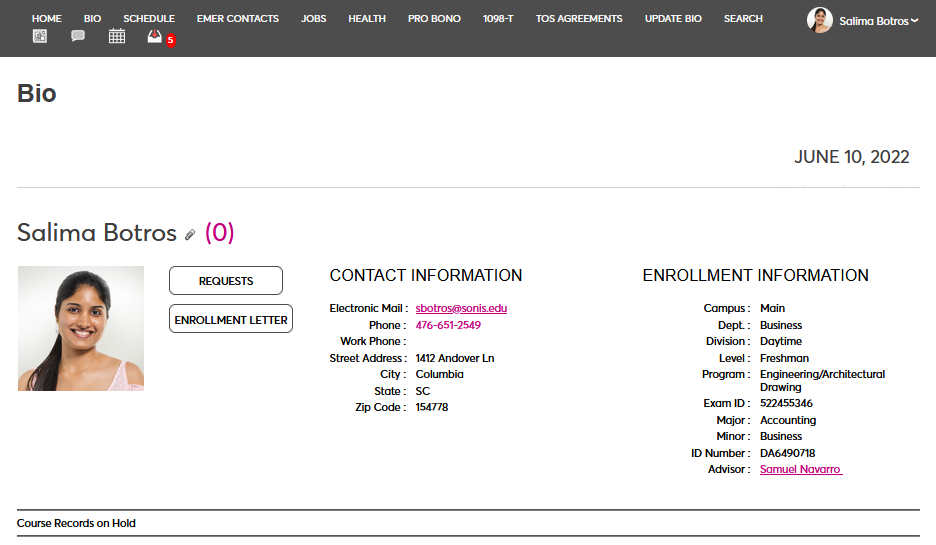
If the user's email address in Auth0 matches a primary or secondary email address in any Address record in SONIS, they will be immediately logged in.
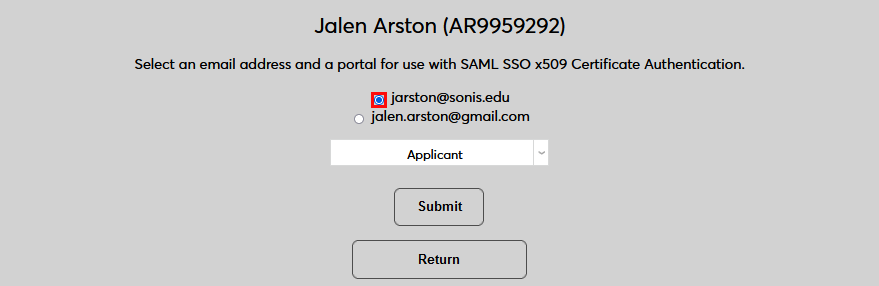
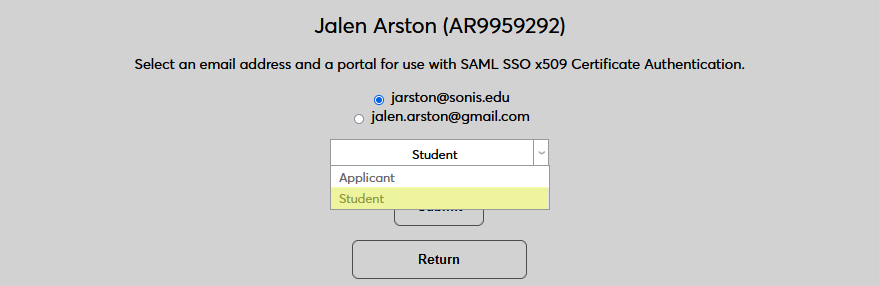
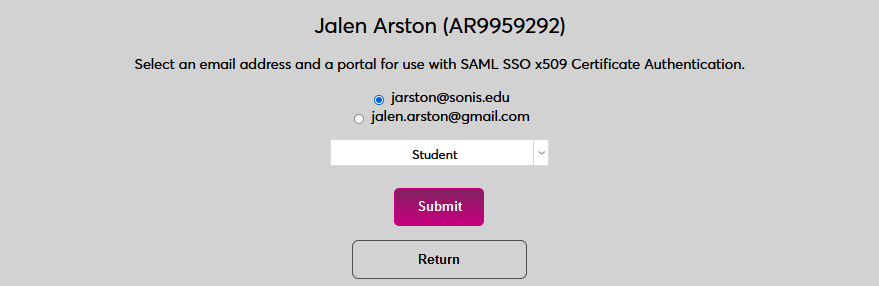
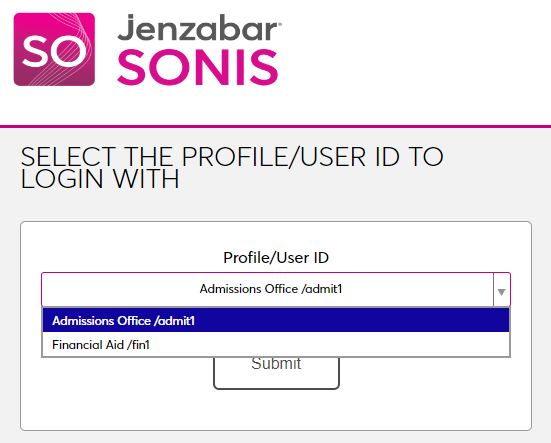
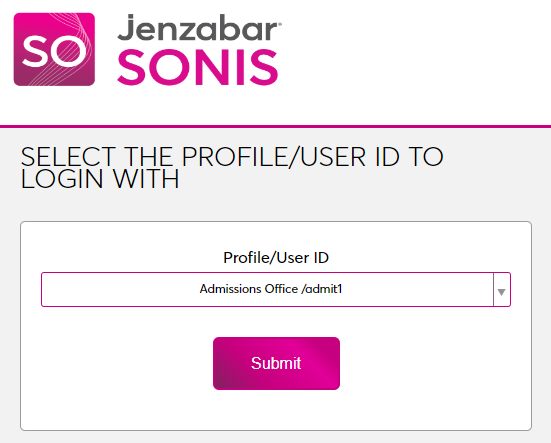
If an administrator has multiple accounts associated with the same email address, they will log in to Auth0 as normal. Once they've successfully logged in, they will be prompted to select an active account as the default account for single sign-on. Select an account from the Profile/User ID menu and click Submit.
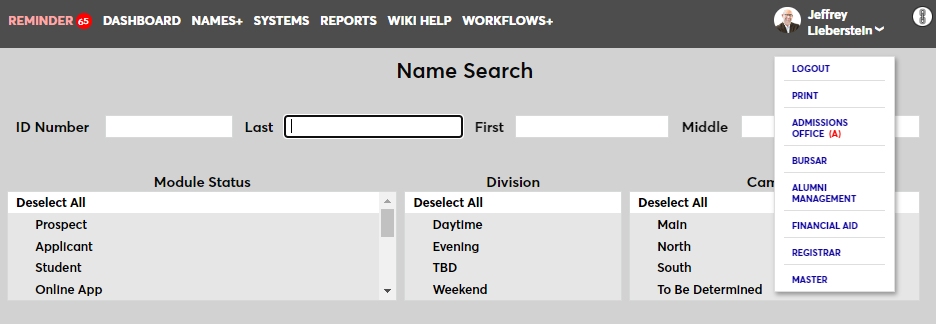
Once the user is logged in to SONIS, they can toggle between account using the account picker tool in the upper right-hand corner.
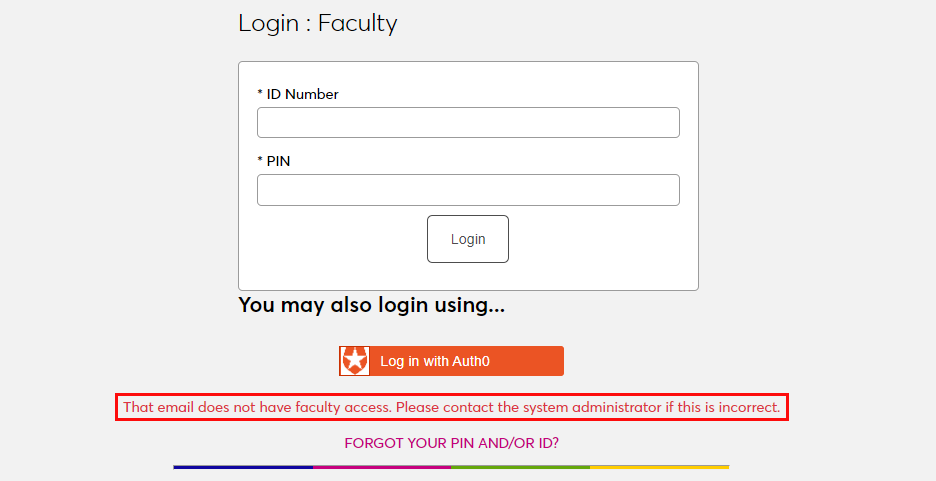
If the user successfully logs in to the identity provider, but their email address is not found in SONIS, they will see the following error message:
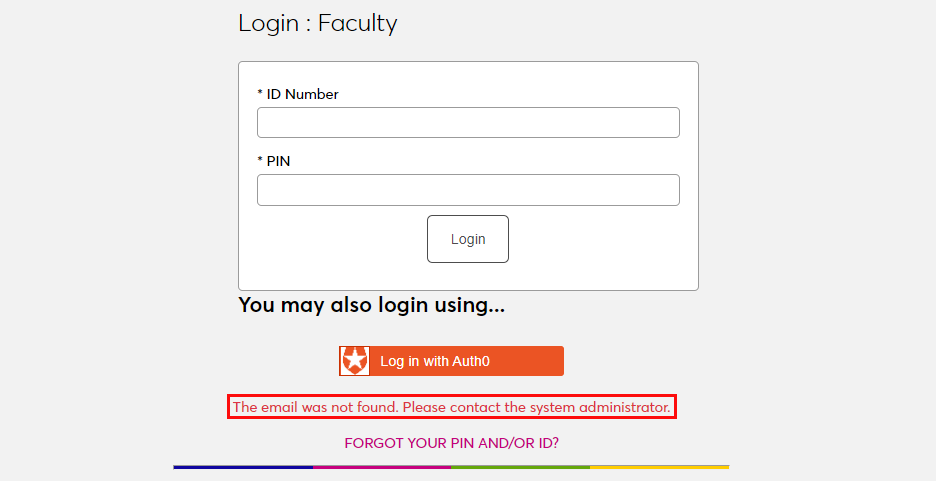
Ensure that the email address being used is listed in the user's Address record either in the primary or secondary field and attempt to log in again. The type of address record does not matter.
If the user attempts to log in to a portal that does not match their module status using single sign-on, they will see the following error message:
Instruct the user to log in to the correct portal.
If an email address is listed in the Address record of more than one user with the same module status, the system cannot create an association between the identity provider login and a SONIS account. The following error message will appear:
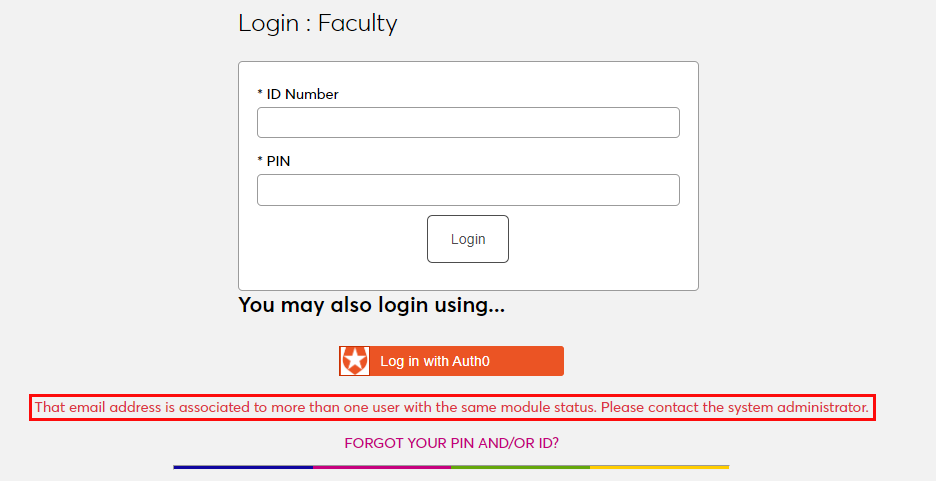
Ensure that the email address being used is only attached to one account and attempt to log in again.
There is also a generic Please contact the system administrator. error message that may appear. This message should only appear if there is a SONIS database error of some kind. Contact Jenzabar SONIS Support for troubleshooting.
Setup
Create Application
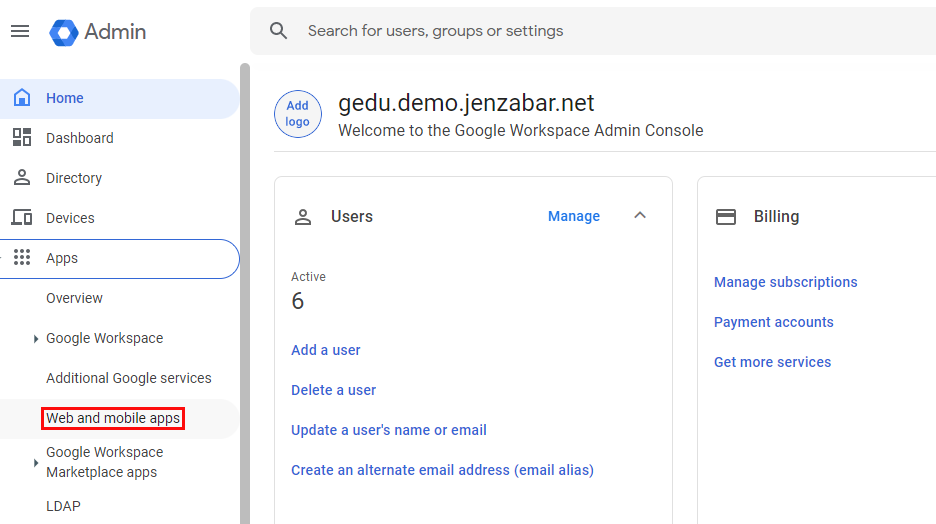
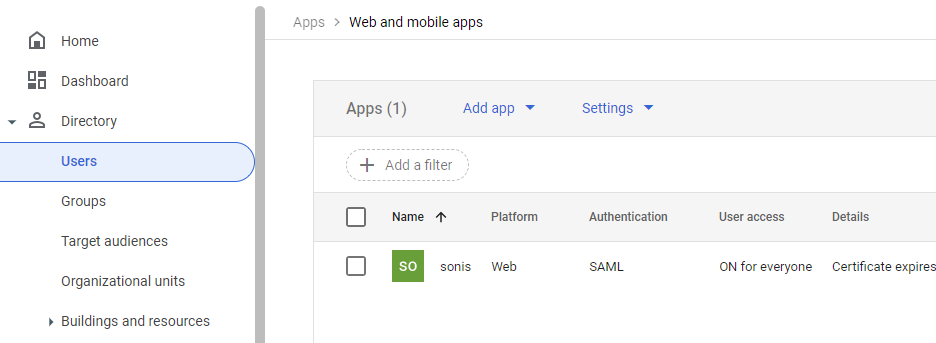
To use Google for SONIS single sign-on, begin by logging in to the Google Admin Console. Open the Apps menu and select Web and mobile apps to begin.
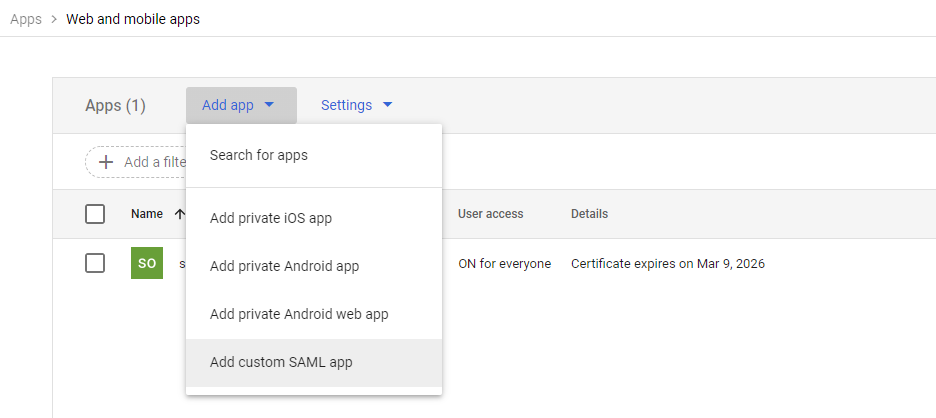
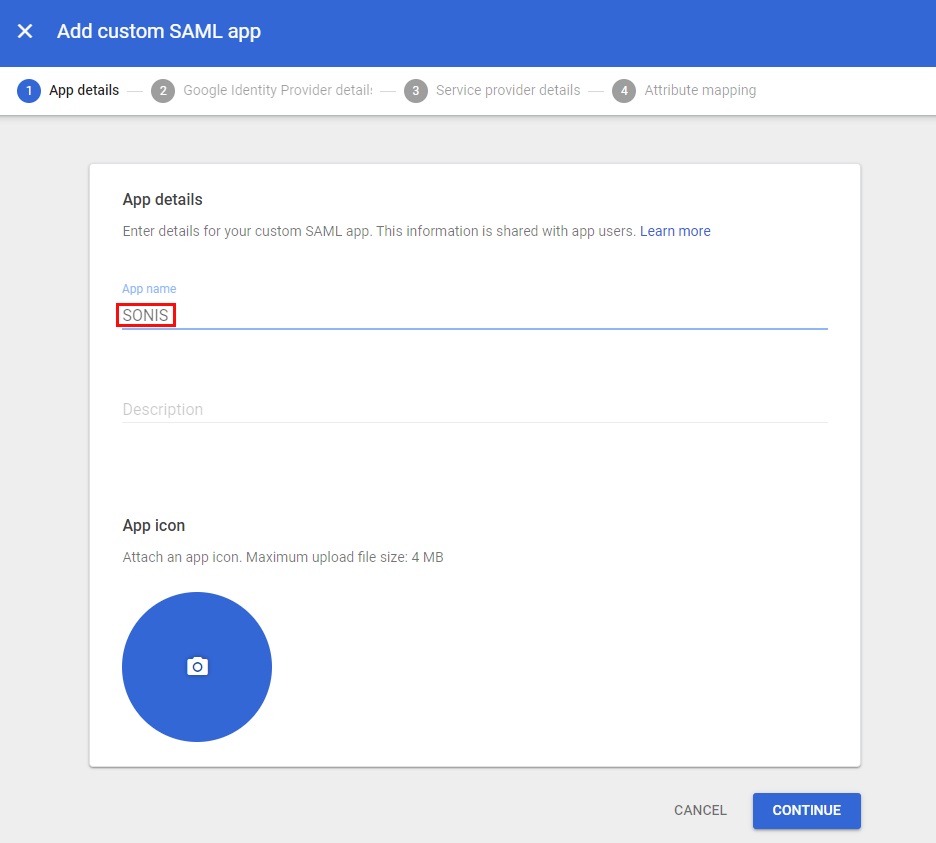
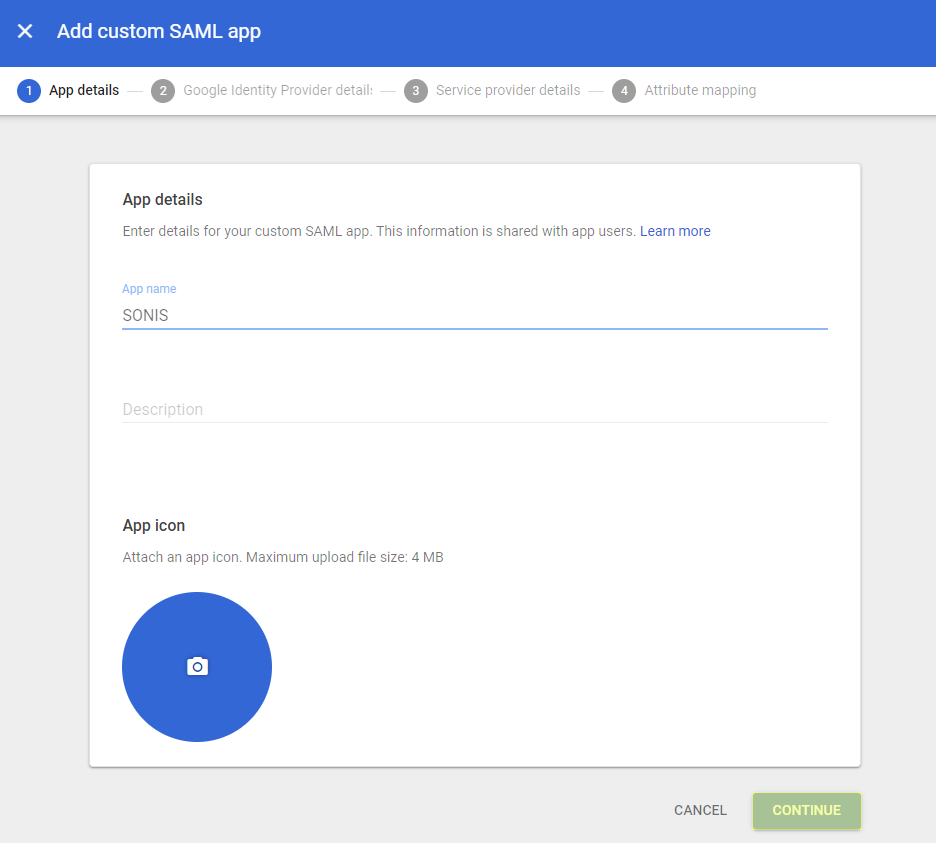
On the following page, select Add custom SALM app from the Add app menu to continue.
Name the application and click Continue. The description and icon are not required.
Configuration
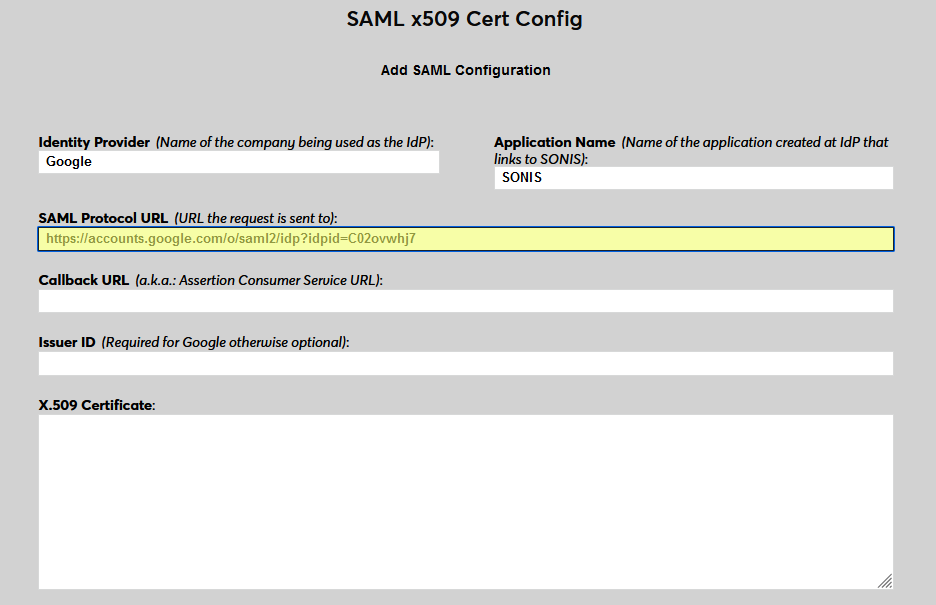
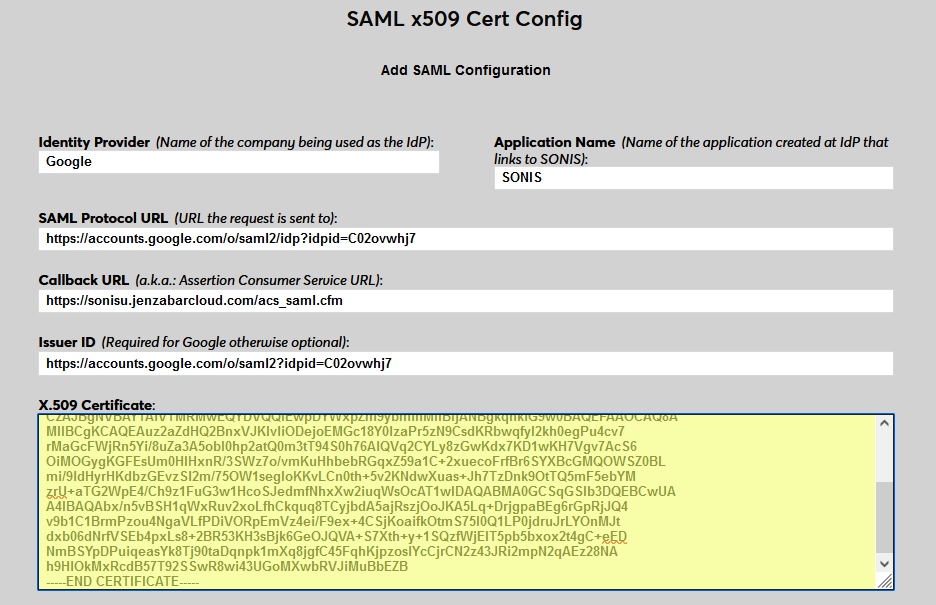
In SONIS, navigate to SAML x509 Certificate Configuration under the Systems hub. Click New SAML Configuration to begin.
Enter Google as the Identity Provider and enter the Application Name that corresponds to the application created in the previous steps.

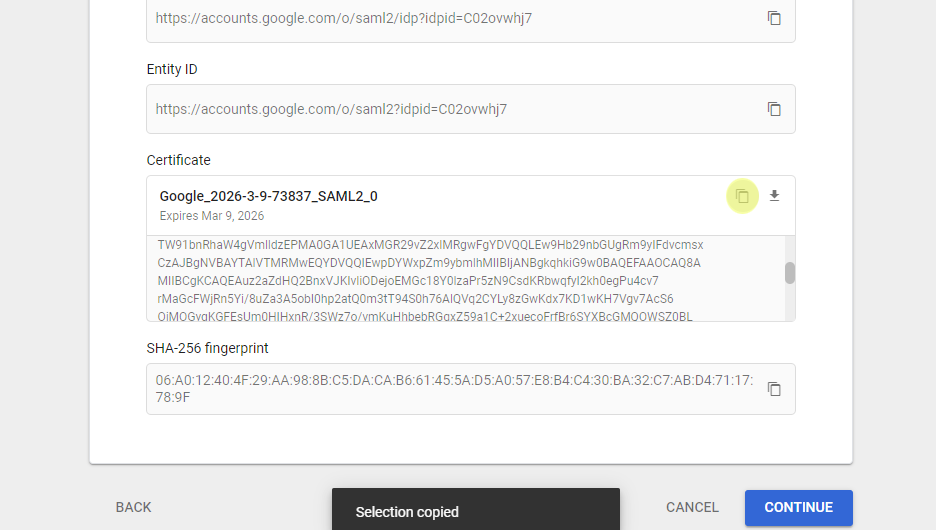
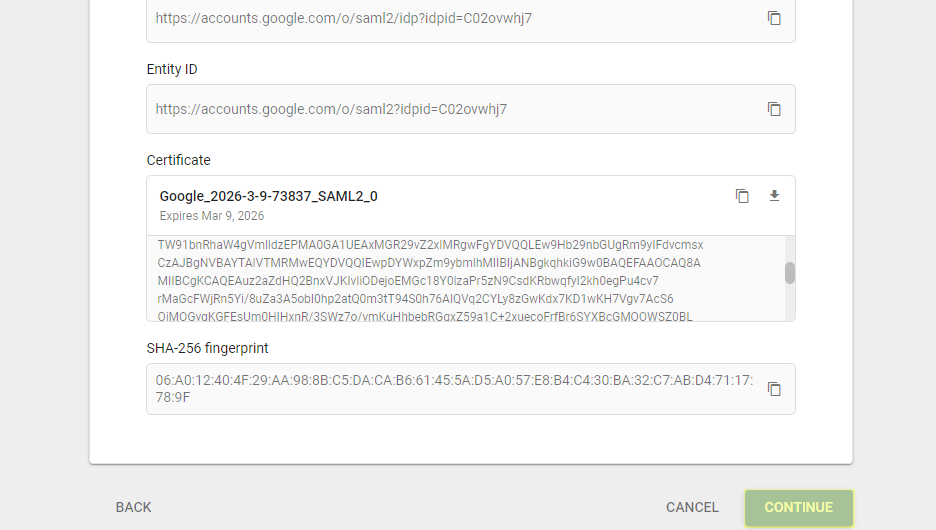
Back on the Google site, return to the application Settings, scroll down to the Advanced Settings, and expand the menu. Select Endpoints to continue.
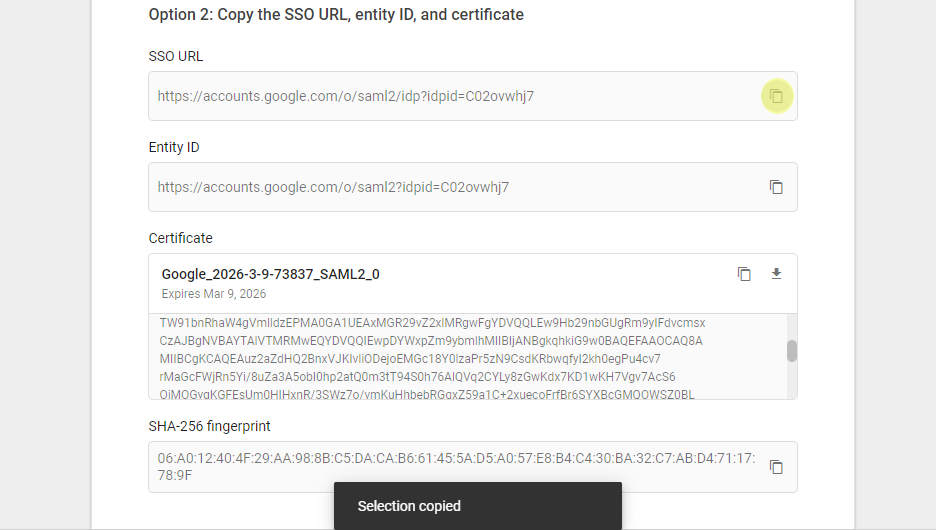
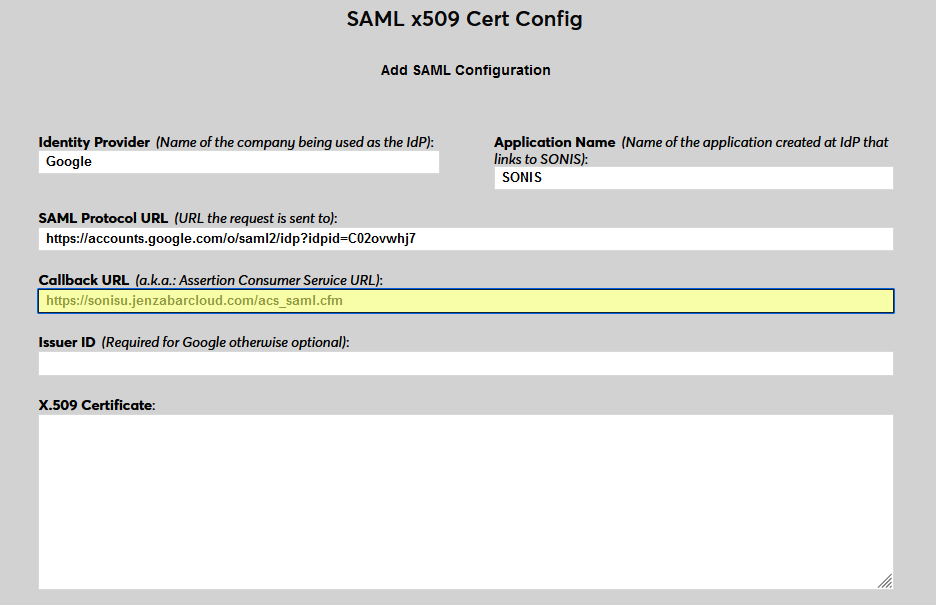
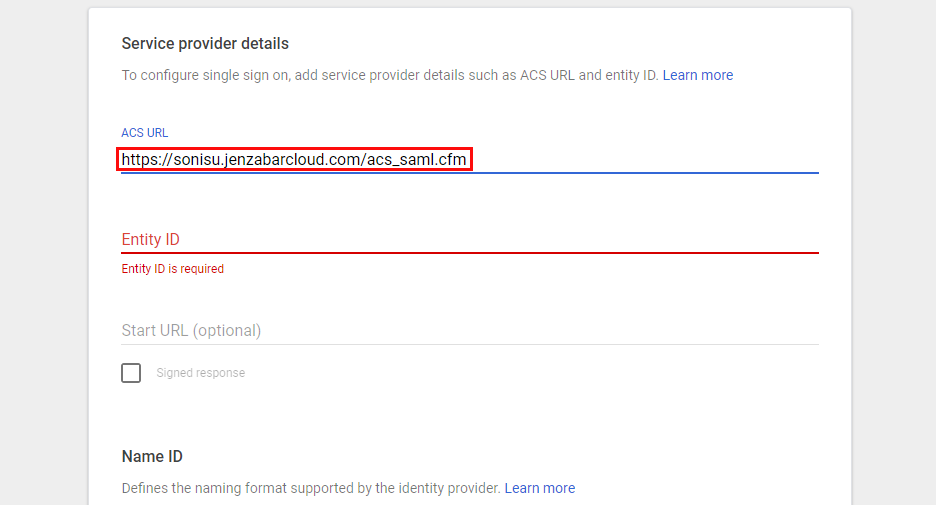
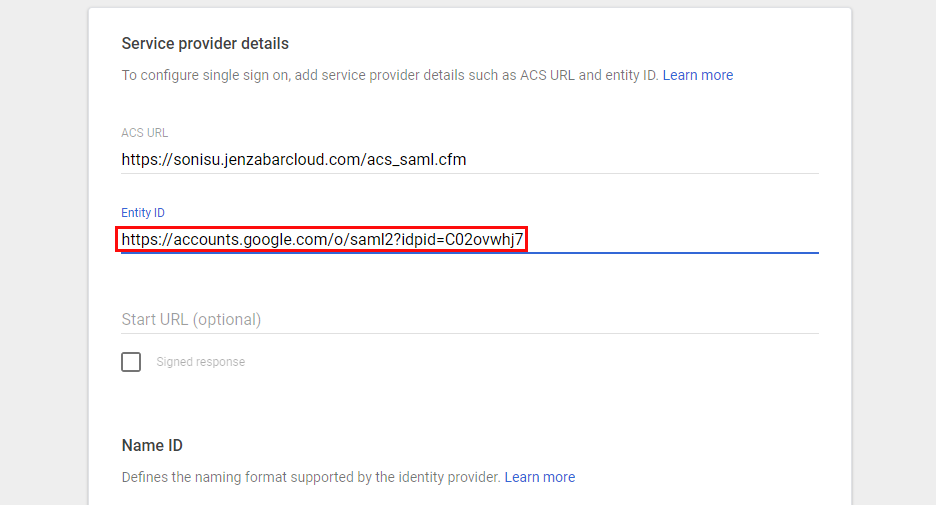
Add https://[yourdomain]/acs_saml.cfm as the Callback URL in Jenzabar SONIS with [yourdomain] replaced by the local domain. For example: https://sonisu.jenzabarcloud.com/acs_saml.cfm.
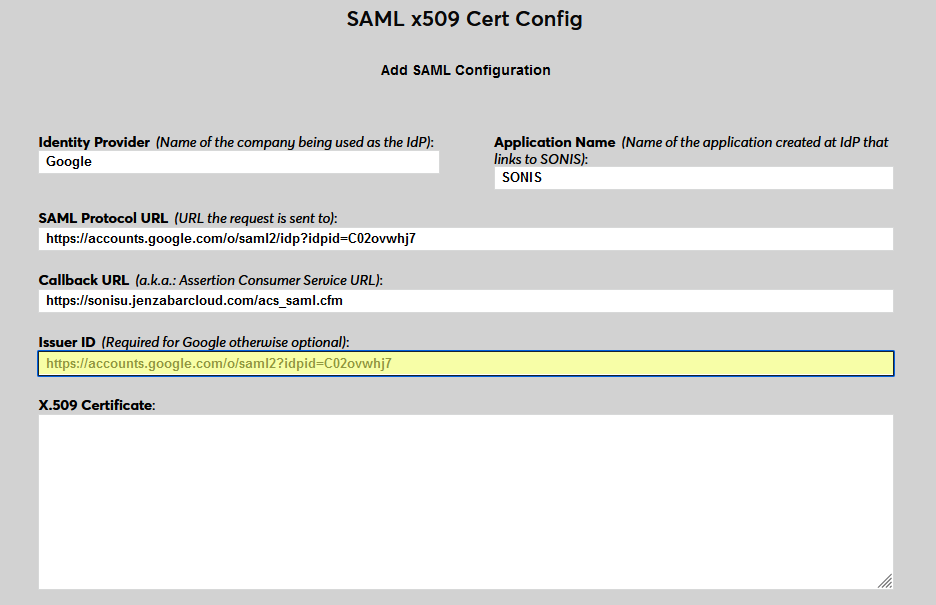
In Google, copy the Entity ID and paste this value into the Issuer ID field in SONIS.
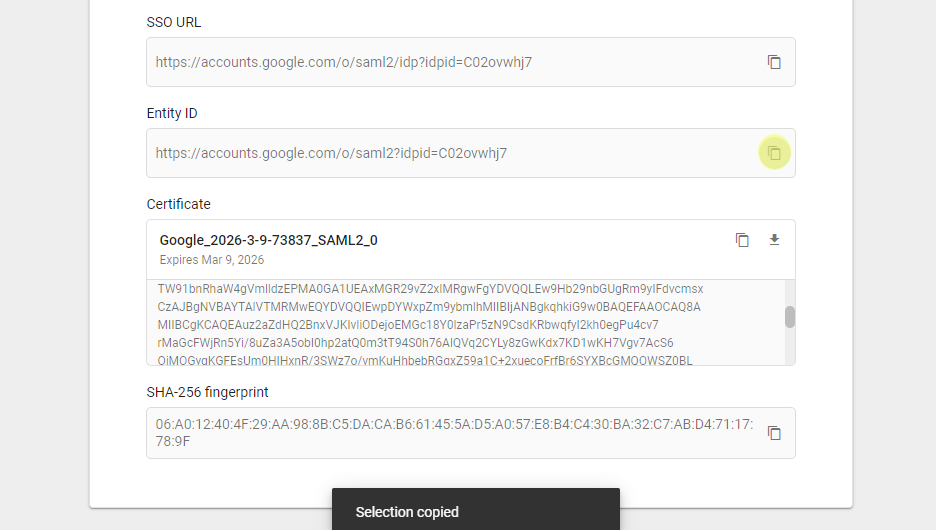
Copy the Certificate from Google and paste it into the X.509 Certificate field in SONIS.
Click Continue in Google.
On the next page in Google, enter the Callback URL from SONIS in the ACS URL field and the Issuer ID from SONIS in the Entity ID field.
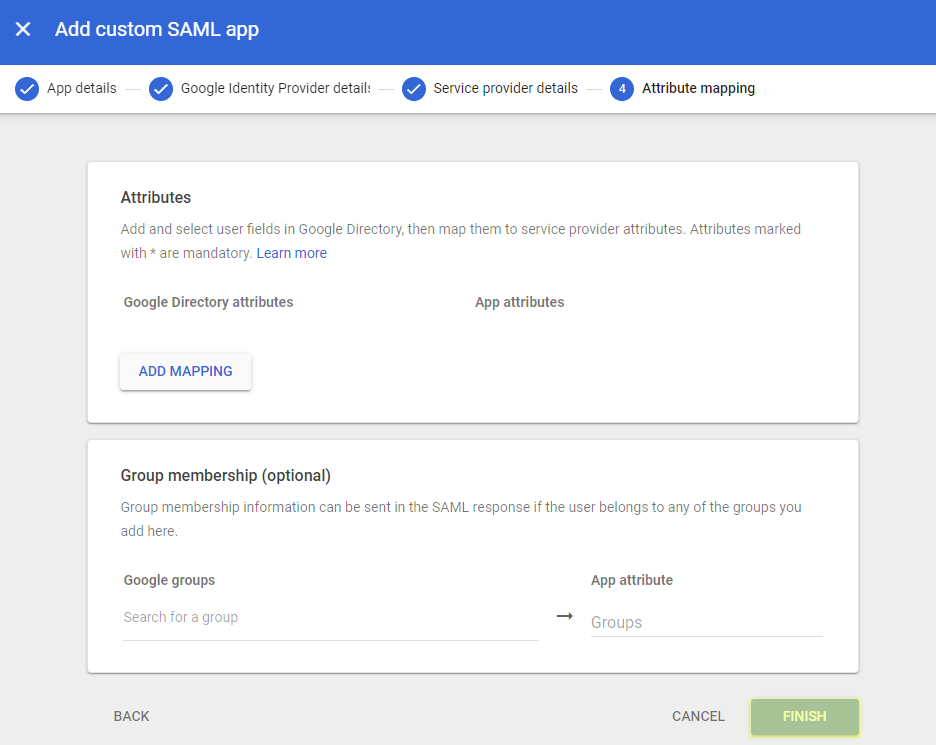
Click Continue and then Finish on the next page to create the app.
User Management
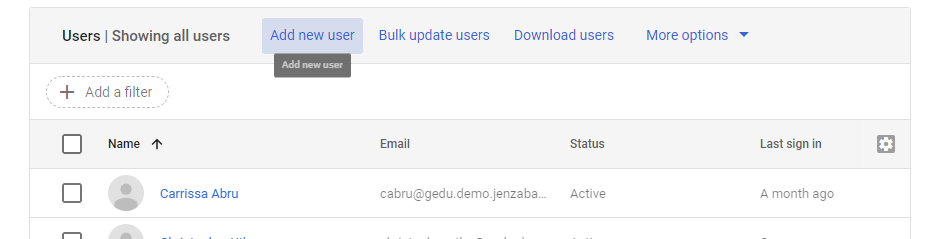
Before users can log in to SONIS with Google, they must have accounts in Google. Navigate to Users under the Directory menu and click Add new user.
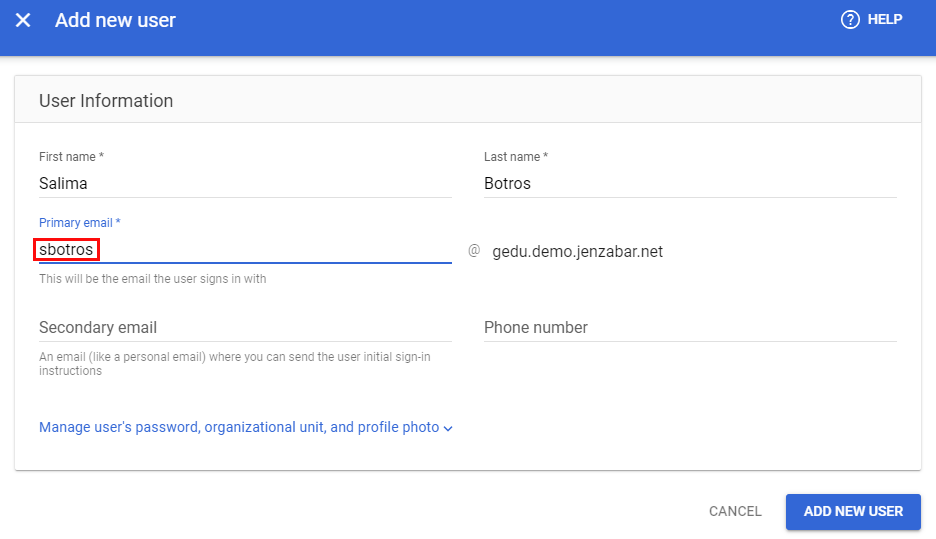
On the Add new user page, enter the user's First name and Last name and create an email for them at the domain that was entered when creating the account. The association with SONIS is based entirely on the user's email address, so this value must match the user's primary or secondary email address in one of their Address records.
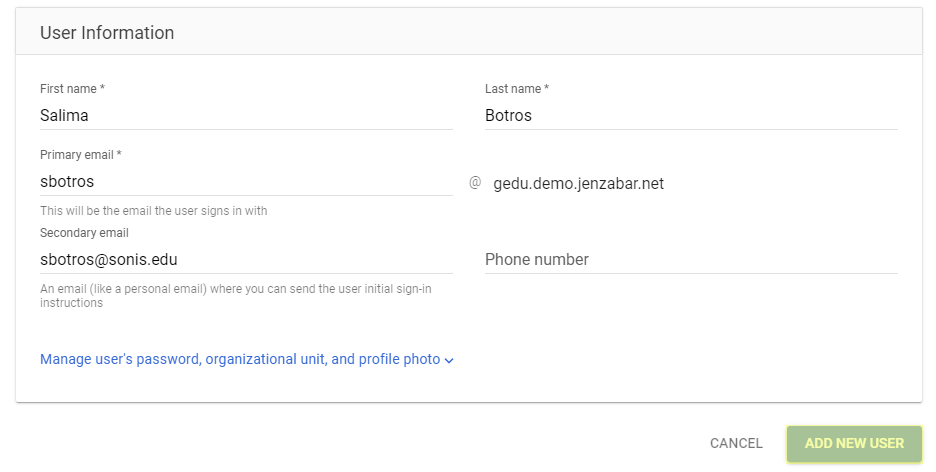
Google also recommends adding a secondary email address for the user. If the email being added here is new, the secondary email address can be used to send them initial sign-in instructions. Click Add New User to finish adding the SONIS user to Google.
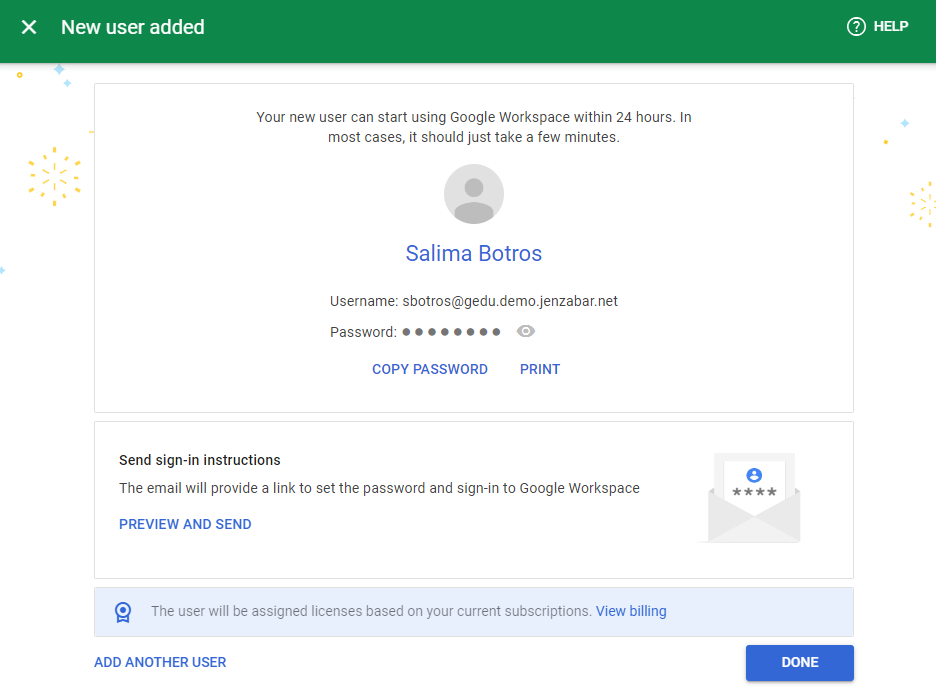
The following page offers an opportunity to copy the user's password or send sign-in instructions.
Note that Auth0 does not require the user to be given access to any applications, but this may be required by other identity providers.
Jenzabar SONIS also offers a way for Google Workspace users to create accounts for their SONIS users through the G Suite Admin Utility.
Enable Login
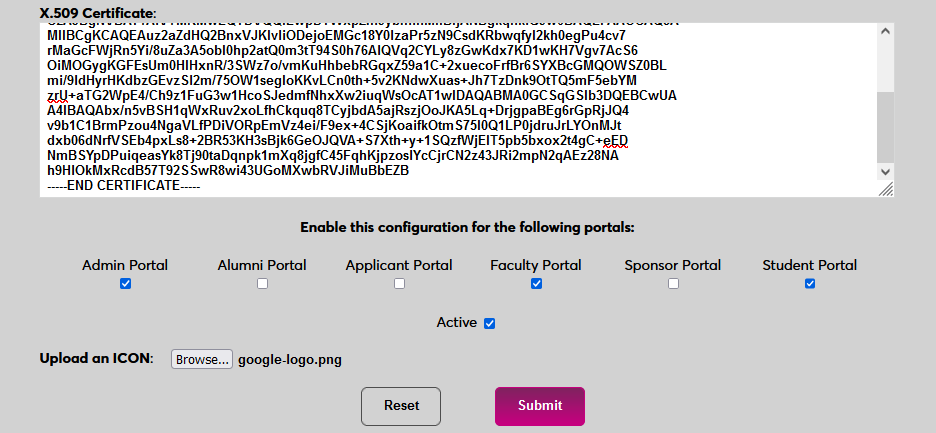
Once users have been added, they can use Google to log in to SONIS. Navigate back to the SAML x509 Certificate Configuration page to turn the option on. Select the portals where Google will be a login option.

To upload a Google logo, click Browse and locate the image file. Adding a new icon is optional. If no logo is added, a lock icon will appear for all configurations.
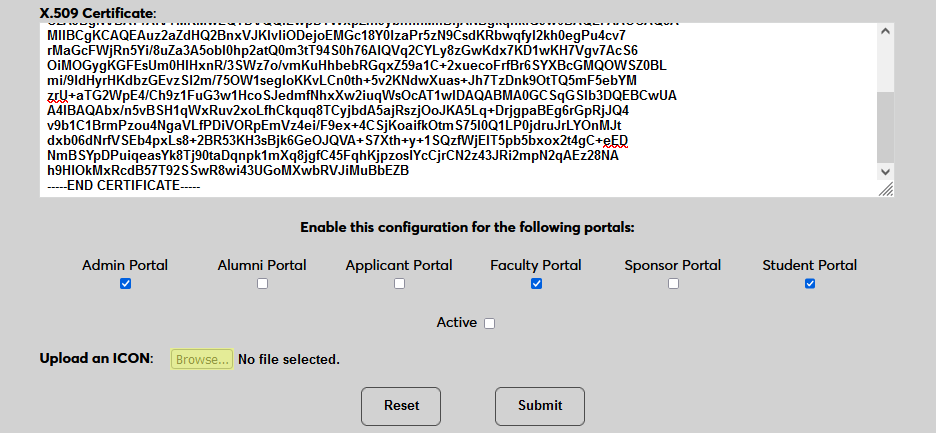
Check the Active box to set the login option as active and add the link to the selected portal(s).
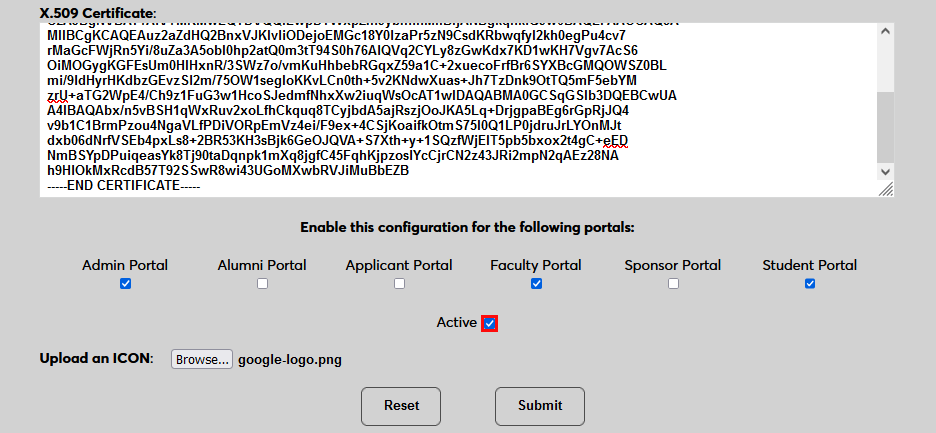
Click Submit to save the changes and activate the login option.
Manually Associating Users
There may be times when a user needs to be manually associated with Auth0 or another authenticator. For example, a single user has two different accounts with different SONIS IDs and the same email address, which would prevent them from signing in to Auth0 and associating account through the login page.
To manually associate a user, ensure that the Change Single Sign-On Property Value User Security privilege is active on the administrative account making the change.
Then navigate to the user's Biographic page and click the View link labeled SSO Property. A new window will open.
In the new window, click SAML x509 Certificate SSO Properties and then Add on the following page to continue.
If the user has more than one email address in their Address record, choose an email address to associate.
If the user has more than one module status, choose a status to associate.
Click Submit to complete the association.
The SSO Provider and User ID will be automatically added to this table once the user has manually logged in to SONIS using SAML x509 authentication. A second association can be added using the Add link or the association can be removed altogether by clicking Delete.
Note that a single email address can be associated with more than one module status, but a single module status cannot be associated with more than one email address.
Logging In
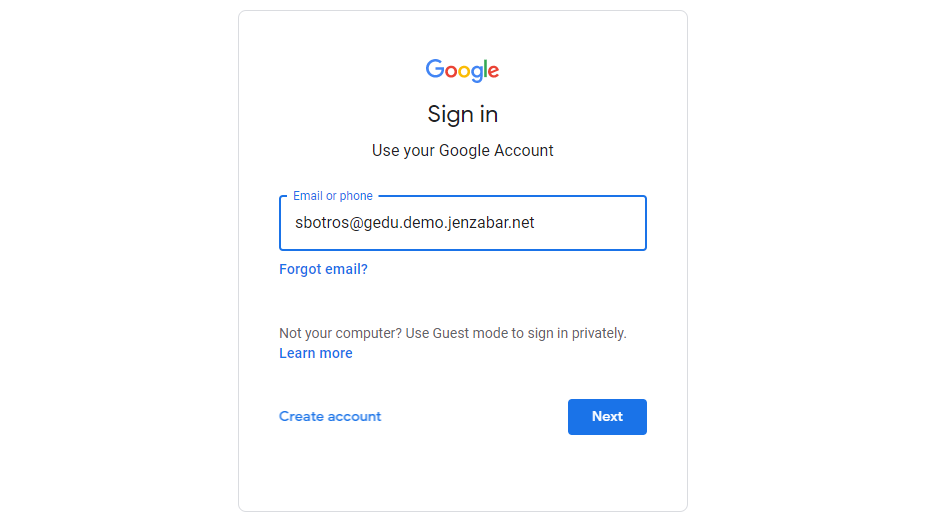
To log in to SONIS using Google as the identity provider, click Log in with Google from any login page where it has been activated.
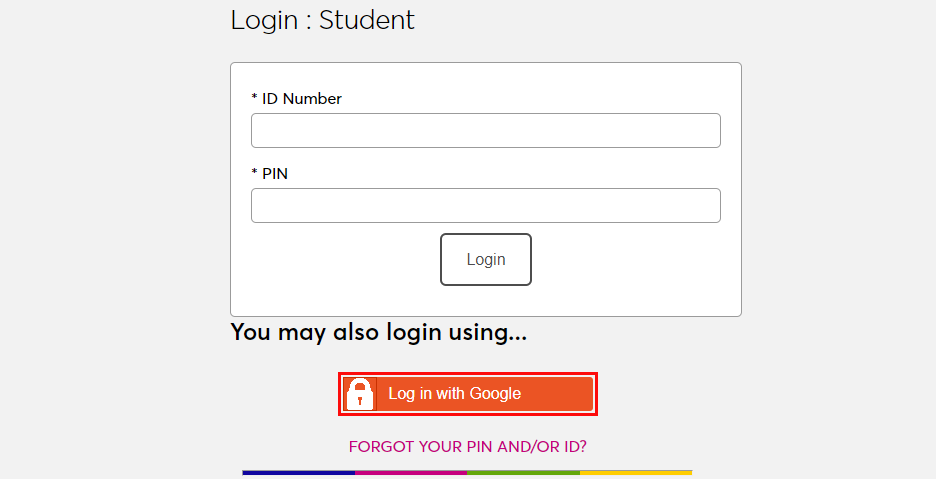
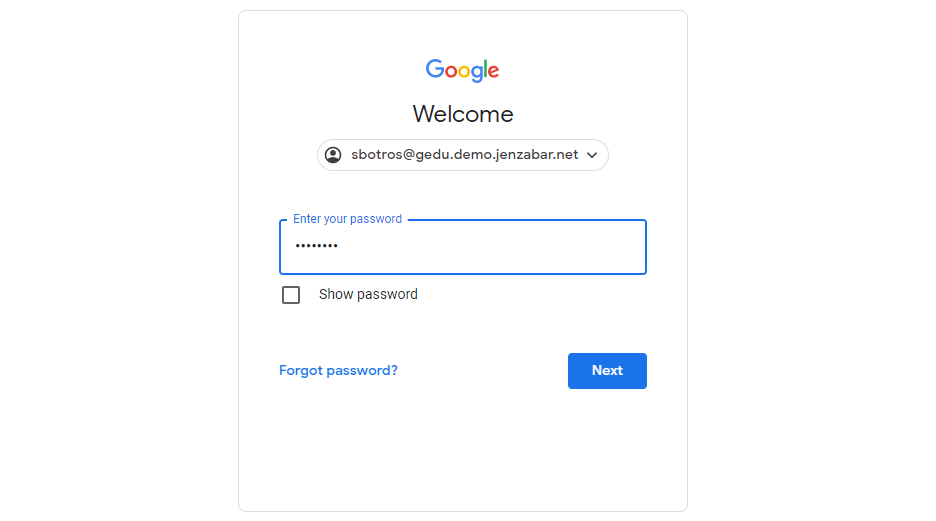
On the following pages, enter the Email address and Password that were associated with the account in Google.
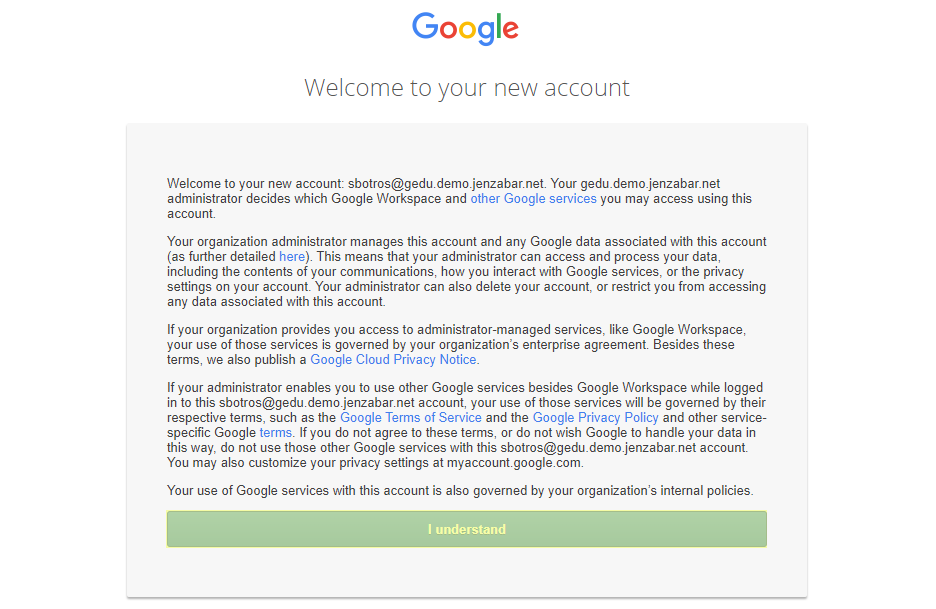
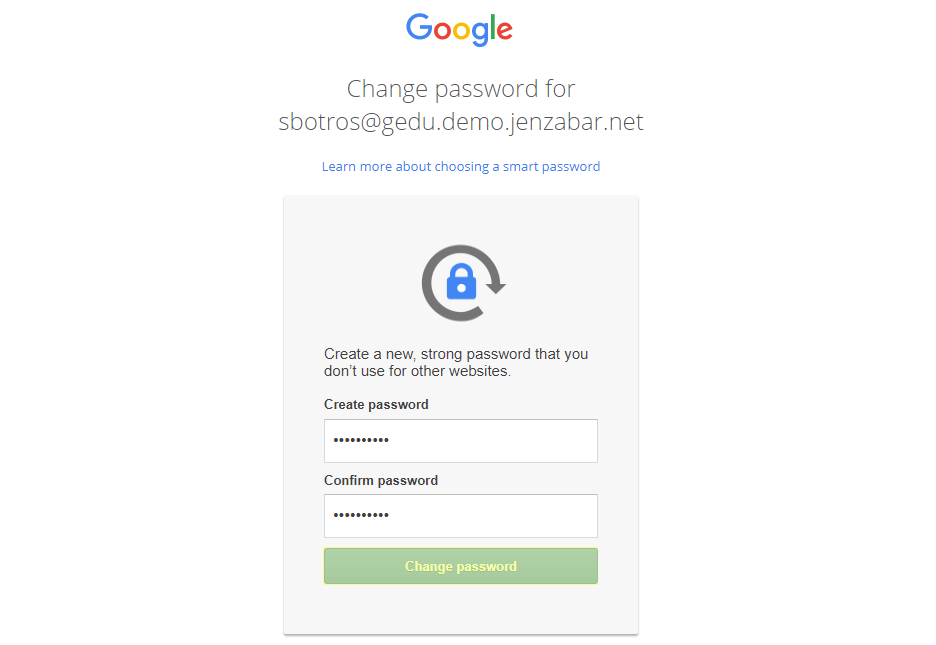
If the user is logging in with a newly created Google account, they will be asked to agree to Google's terms of service and create a new password.
Once the Google login process is complete, if the user's email address in Google matches a primary or secondary email address in any Address record in SONIS, they will be immediately logged in.
If an administrator has multiple accounts associated with the same email address, they will log in to Auth0 as normal. Once they've successfully logged in, they will be prompted to select an active account as the default account for single sign-on. Select an account from the Profile/User ID menu and click Submit.
Once the user is logged in to SONIS, they can toggle between account using the account picker tool in the upper right-hand corner.
If the user successfully logs in to the identity provider, but their email address is not found in SONIS, they will see the following error message:
Ensure that the email address being used is listed in the user's Address record either in the primary or secondary field and attempt to log in again. The type of address record does not matter.
If the user attempts to log in to a portal that does not match their module status using single sign-on, they will see the following error message:
Instruct the user to log in to the correct portal.
If an email address is listed in the Address record of more than one user with the same module status, the system cannot create an association between the identity provider login and a SONIS account. The following error message will appear:
Ensure that the email address being used is only attached to one account and attempt to log in again.
There is also a generic Please contact the system administrator. error message that may appear. This message should only appear if there is a SONIS database error of some kind. Contact Jenzabar SONIS Support for troubleshooting.
Microsoft Azure
Setup
Create Application
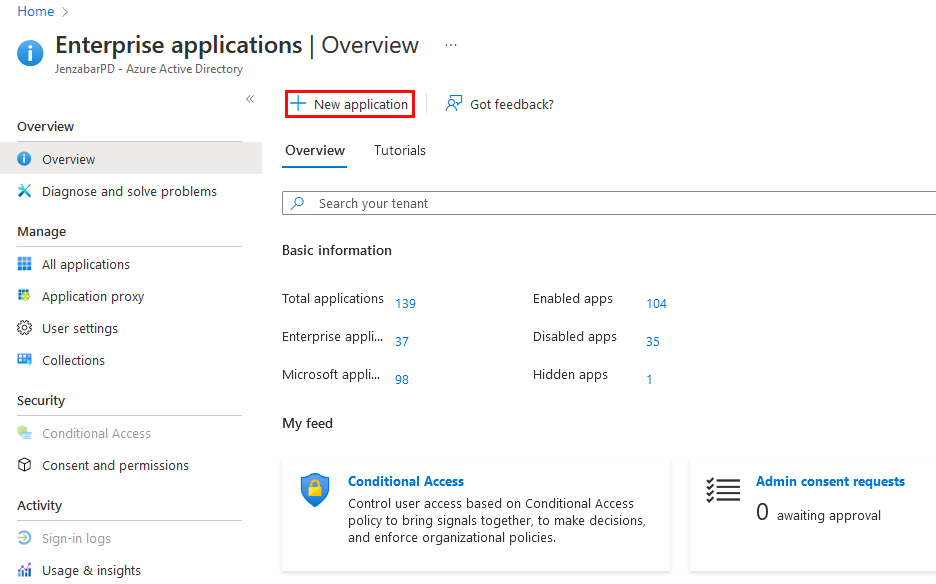
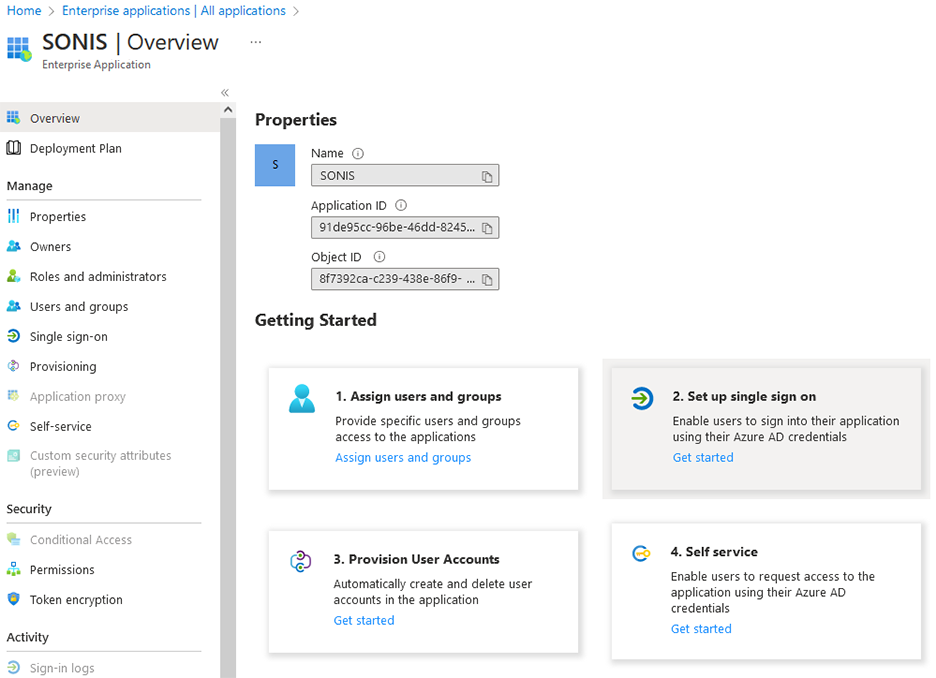
To use Microsoft Azure for SONIS single sign-on, log in to a paid Microsoft developer account account and navigate to the Enterprise applications section. Click New Application to begin.
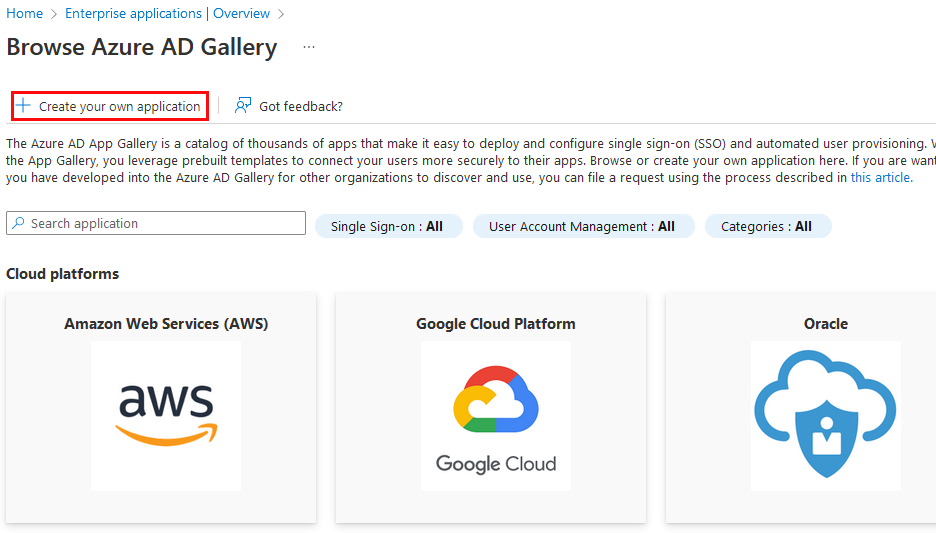
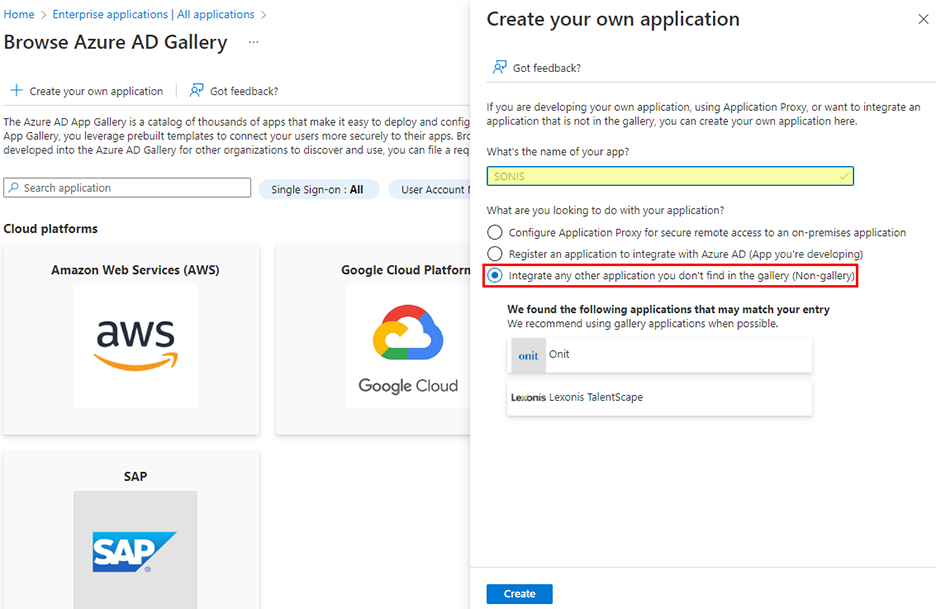
On the following page, click Create Your Own Application. A new window will open to the side. In this window, name the application and select Integrate any other application you don't find in the gallery (non-gallery). Then click Create to continue.
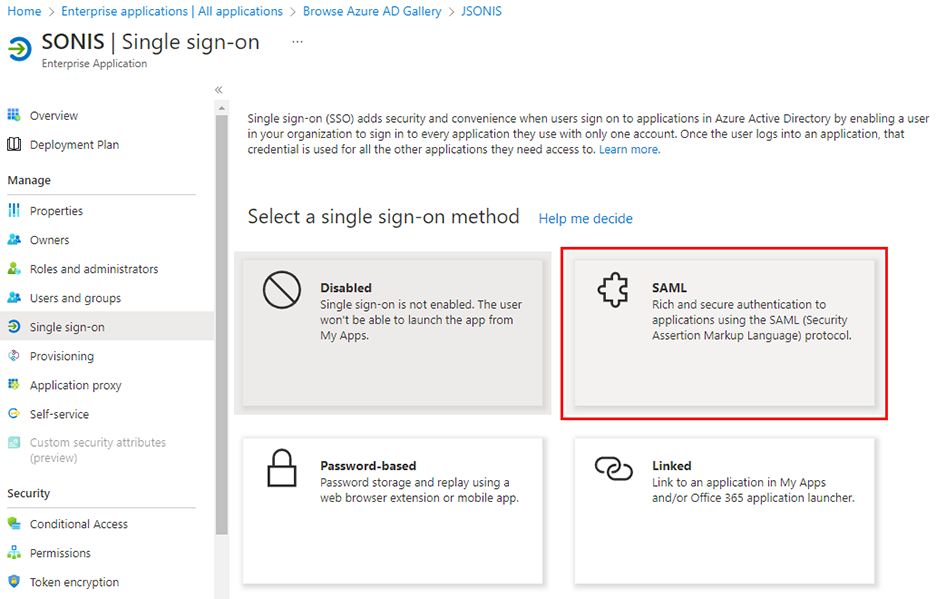
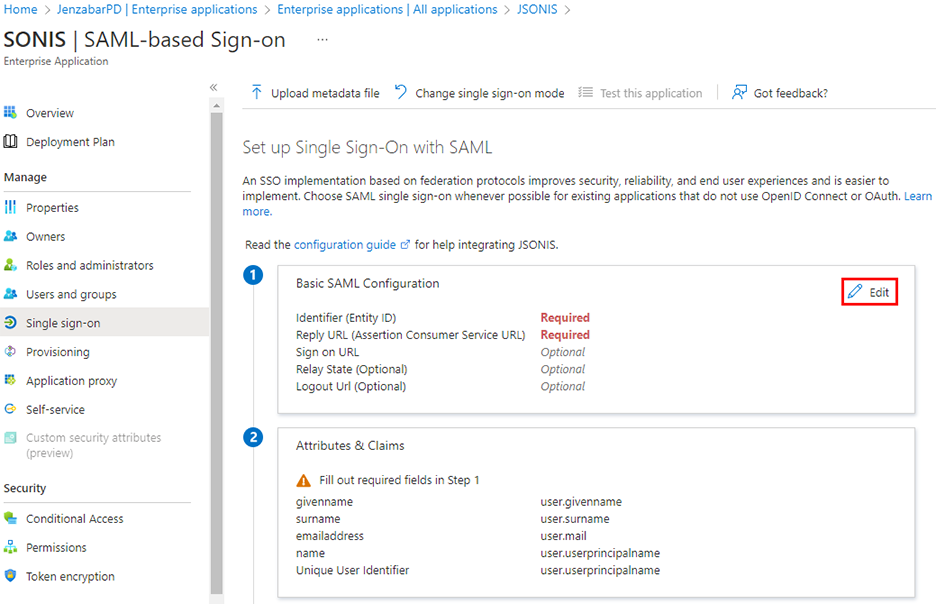
Once the application has been created, choose Single sign-on under the Manage menu and then select SAML as the single sign-on method.
From the Overview page, click Set up single sign on. Then click the Edit button in the Basic SAML Configuration section.
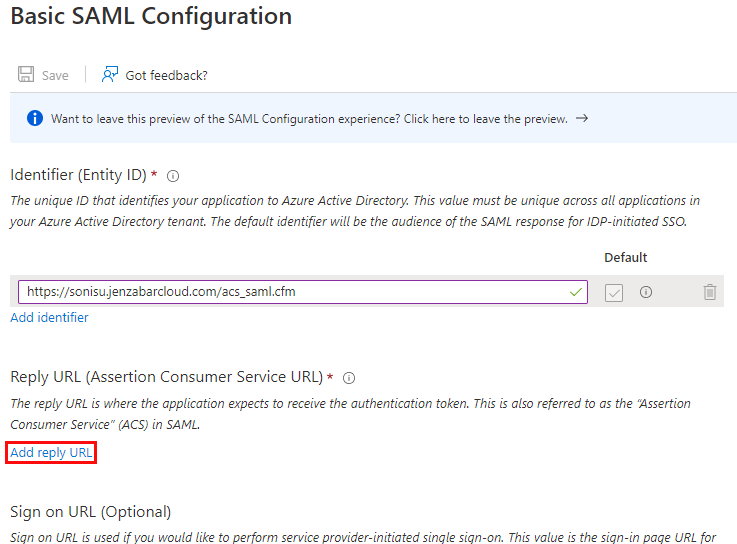
A new window will open to the side. In this window, click Add Identifier. In the reply URL field, add https://[yourdomain]/acs_saml.cfm with [yourdomain] replaced by the local domain. For example: https://sonisu.jenzabarcloud.com/acs_saml.cfm.
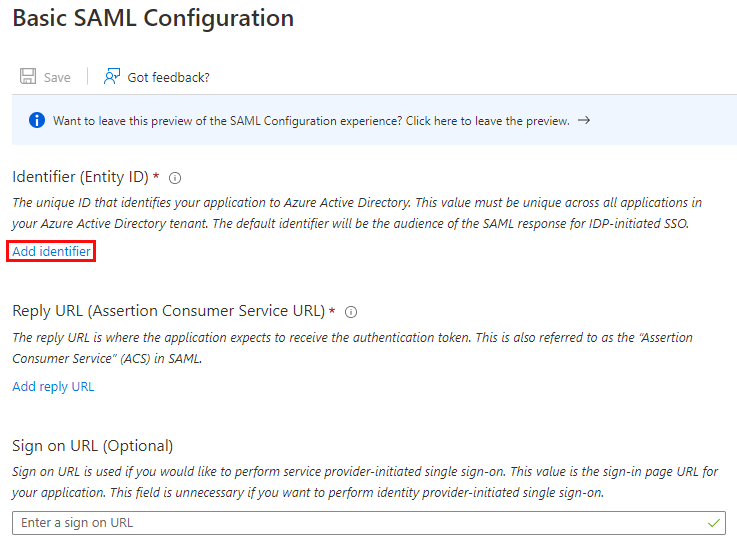
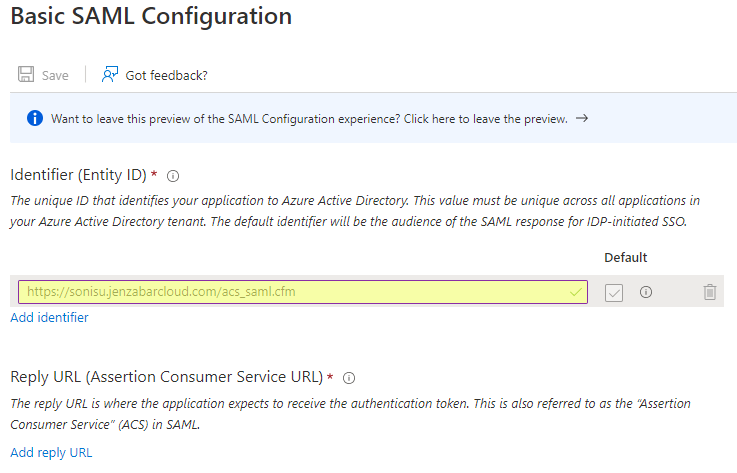
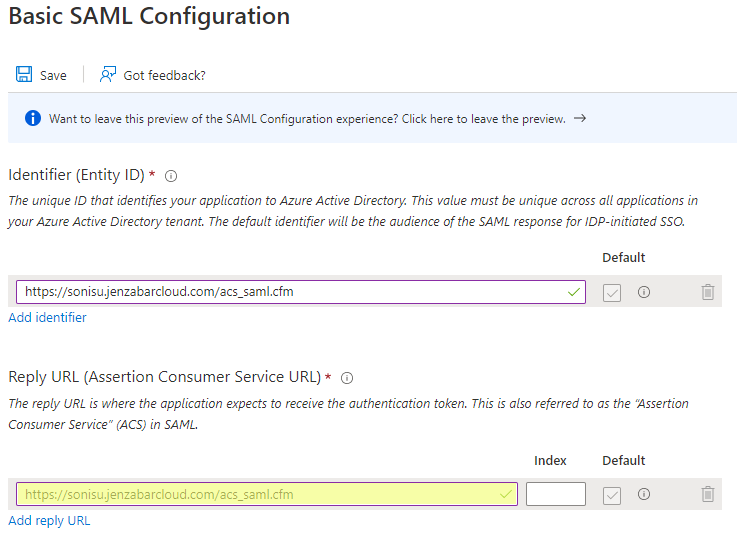
Next, click Add reply URL. In the reply URL field, add https://[yourdomain]/acs_saml.cfm with [yourdomain] replaced by the local domain. For example: https://sonisu.jenzabarcloud.com/acs_saml.cfm.
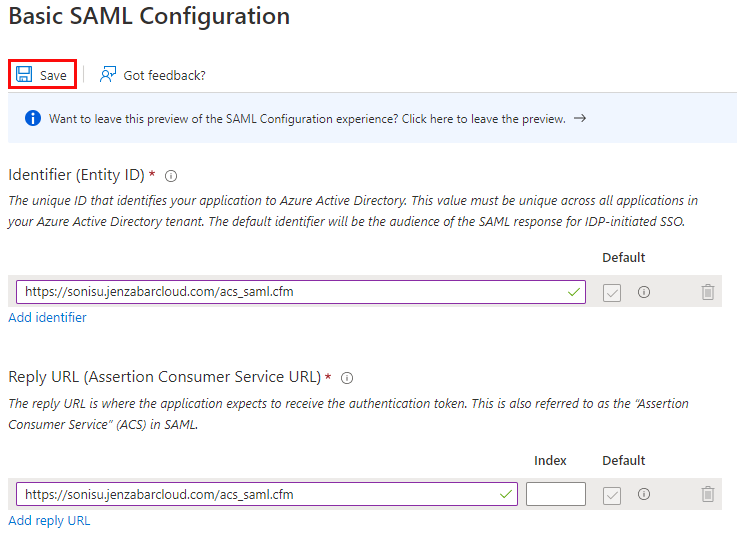
Once these values are in place, click Save to save the changes.
Configuration
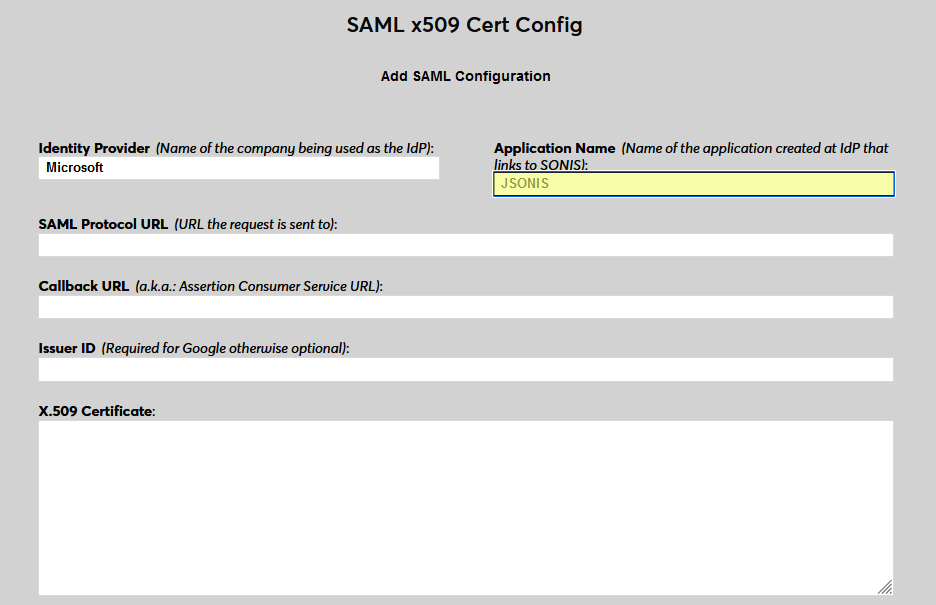
In SONIS, navigate to SAML x509 Certificate Configuration under the Systems hub. Click New SAML Configuration to begin.
Enter Microsoft as the Identity Provider and enter the Application Name that corresponds to the application created in the previous steps.
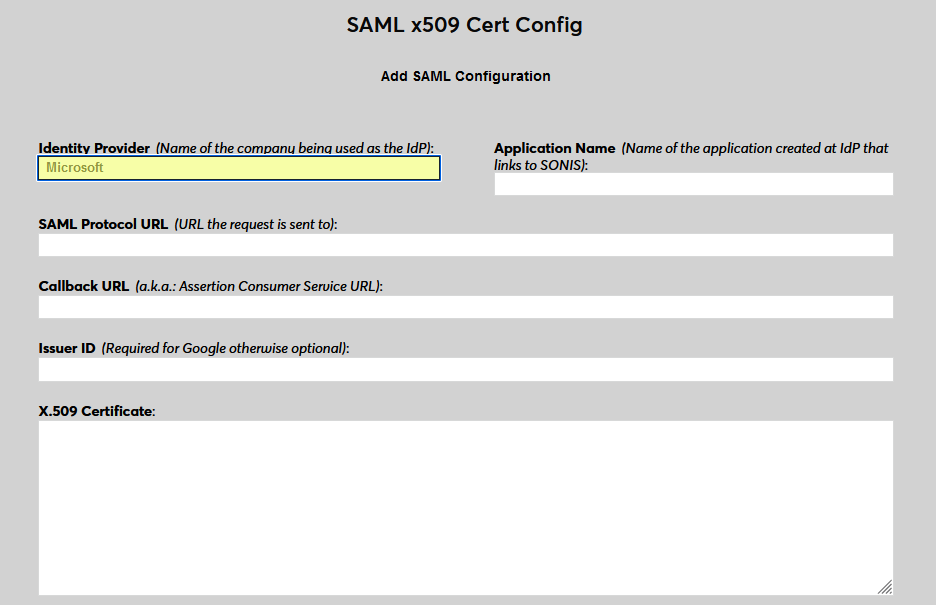
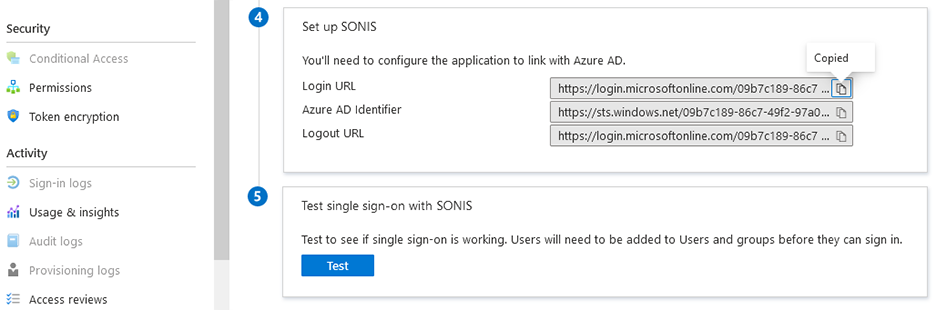
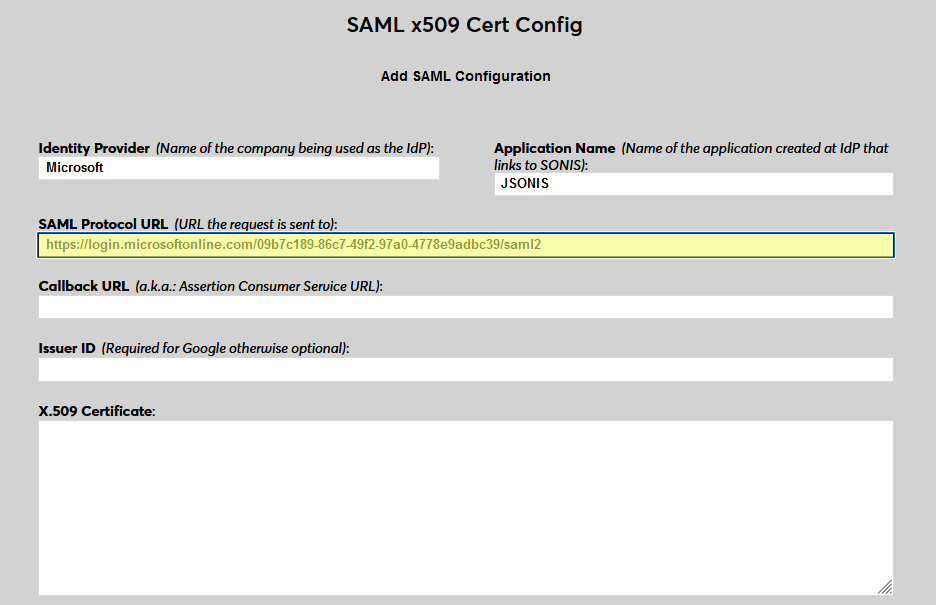
Back on the Microsoft Azure site, return to the Single sign-on page and scroll down to the Set up section. Copy the Login URL and paste it into the SAML Protocol URL field in SONIS.
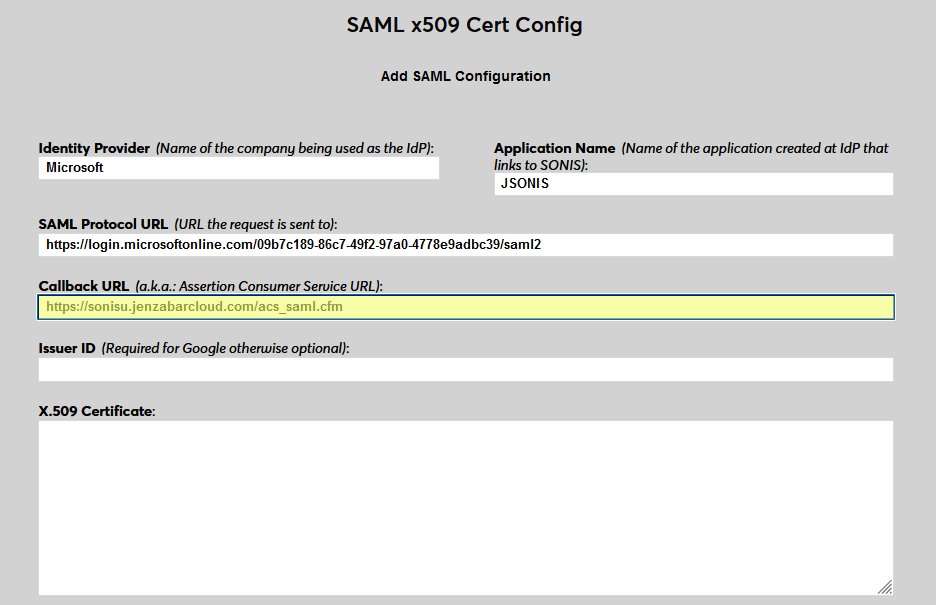
Next, enter the same value in SONIS as the Callback URL that was entered into Microsoft as the identifier and reply URL in Microsoft, https://[yourdomain]/acs_saml.cfm with [yourdomain] replaced by the local domain. The Issuer ID field is not used for Azure at this time.
Return to Microsoft and download the Federation Metadata XML.
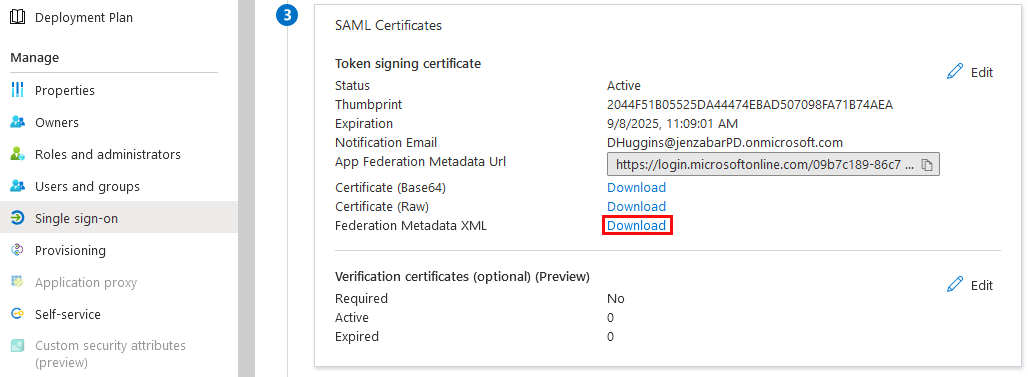
Once this data has downloaded, open it with Notepad or another text editor. Find the section of the code that begins with <X509Certificate> and ends with </X509Certificate>. Replace the opening tag with -----BEGIN CERTIFICATE----- and the closing tag with -----END CERTIFICATE----, making sure to include all five dashes on each side of the text.
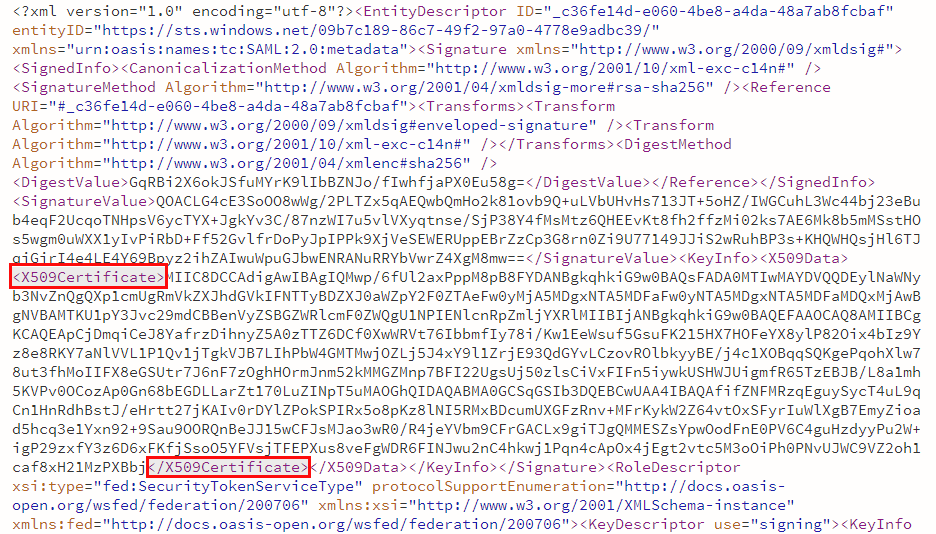
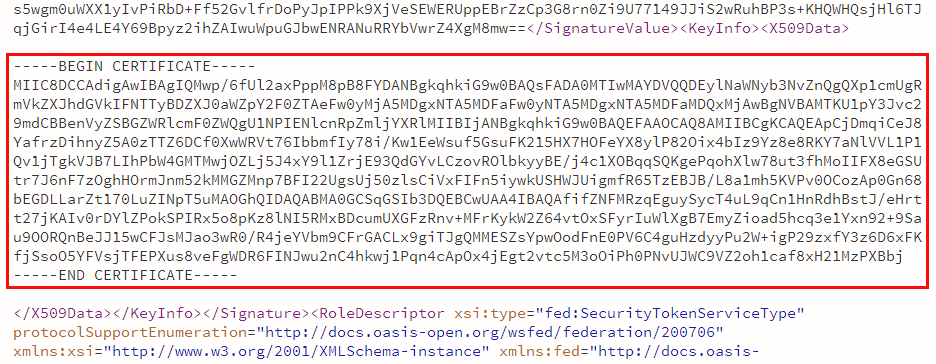
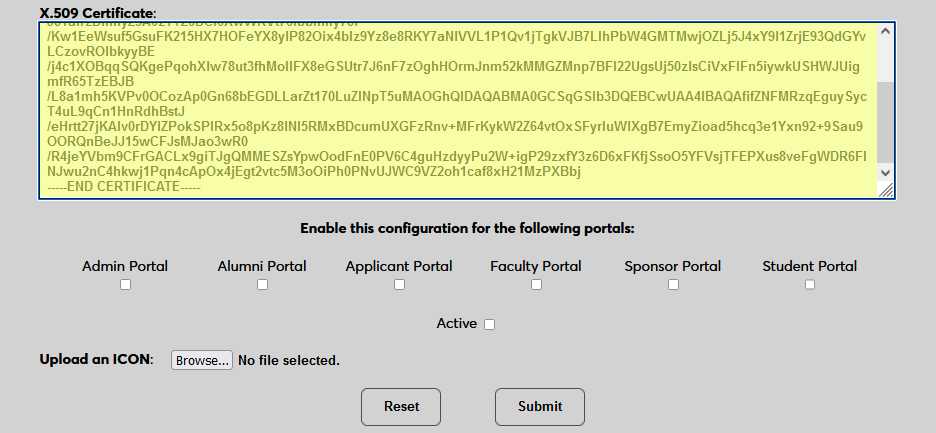
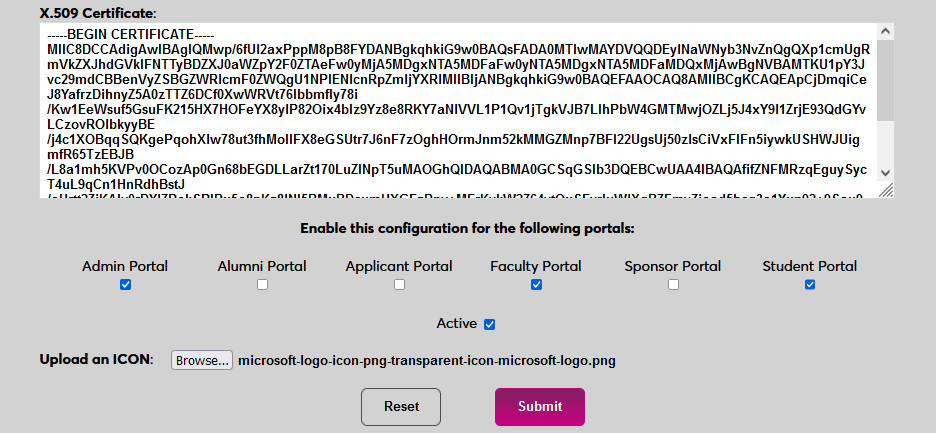
When these tags have been added, paste the entire text, including the tags into the X.509 Certificate field in SONIS. Click Submit to save the configuration values. Do not activate the SSO option at this time.
User Management
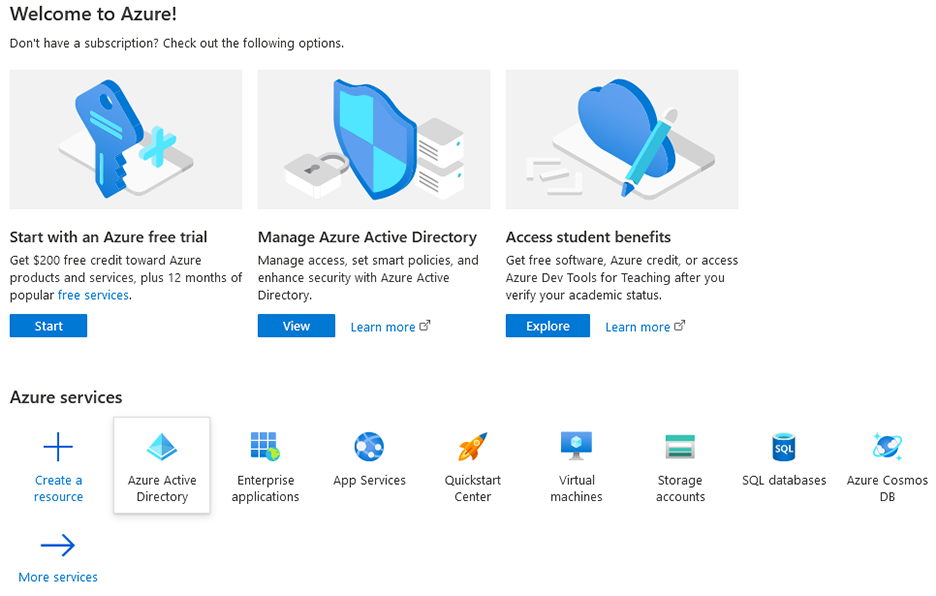
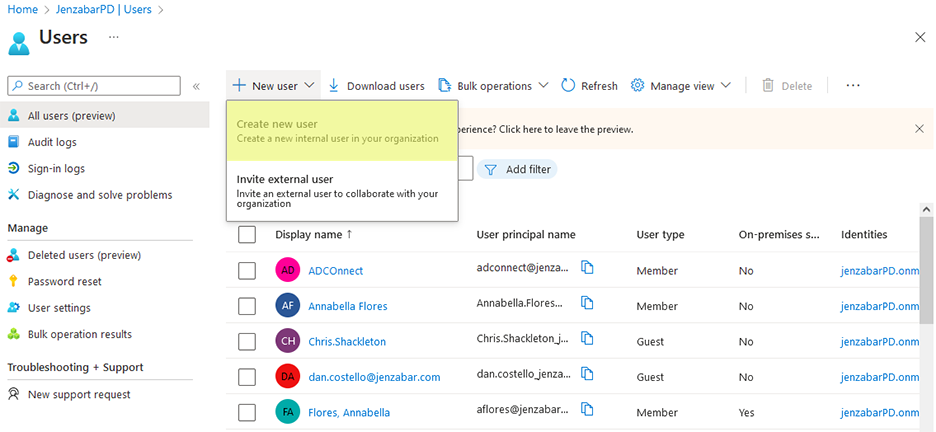
Before users can log in to SONIS with Azure, they must have accounts in Microsoft. Navigate to the Azure Active Director homepage to begin adding users.
Select Users under the Manage menu. Then click New user and select Create new user.
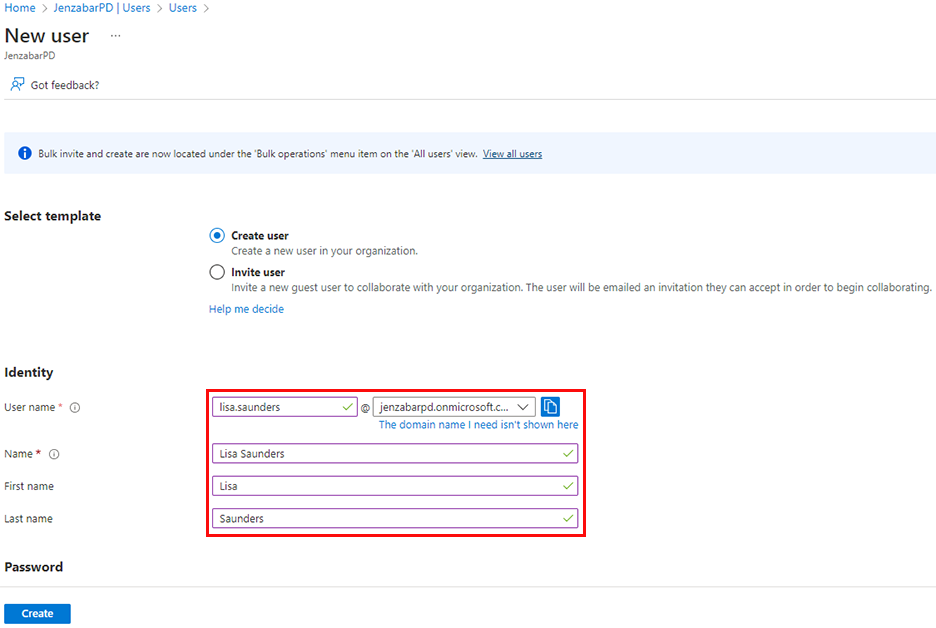
On the following page, leave the Create user option selected. Enter the Jenzabar SONIS user's Name and create a User name for them. This username, when combined with the specific Azure domain assigned to the client, will create an email address for the user. This email address must be found in one of the user's Address records in order for them to successfully log in to SONIS using Azure. Click Create to finish adding the user.
If the Assignment required? setting on the application Properties page is set to Yes, each user will also have to be assigned to the application. If this value is set to No, then any user can utilize it.
Enable Login
Once a user has been added to the Microsoft Azure account, they can use Azure to log in to Jenzabar SONIS. Navigate back to the SAML x509 Certificate Configuration page to turn the option on. Select the portals where Azure will be a login option.
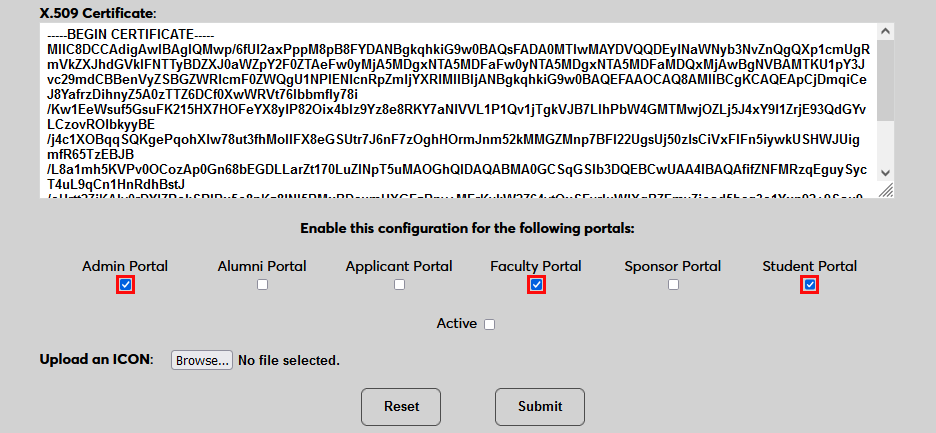
To upload a Microsoft logo, click Browse and locate the image file. Adding a new icon is optional. If no logo is added, a lock icon will appear for all configurations.
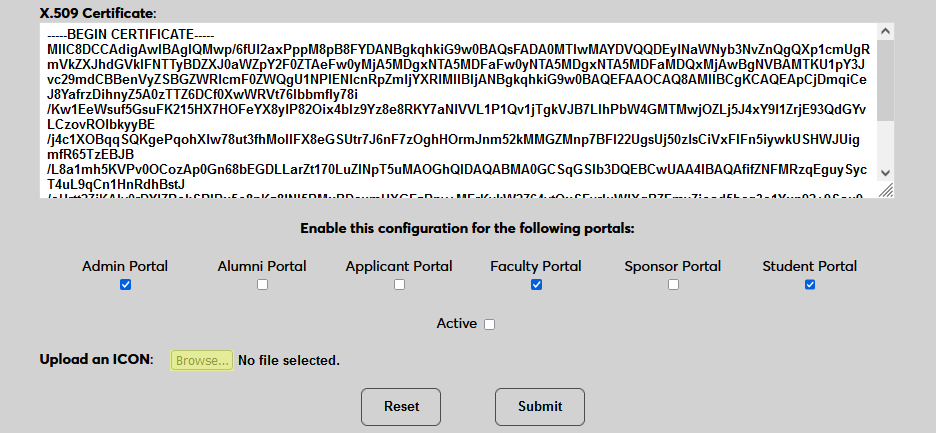
Check the Active box to set the login option as active and add the link to the selected portal(s).

Click Submit to save the changes and activate the login option.
Manually Associating Users
There may be times when a user needs to be manually associated with Auth0 or another authenticator. For example, a single user has two different accounts with different SONIS IDs and the same email address, which would prevent them from signing in to Auth0 and associating account through the login page.
To manually associate a user, ensure that the Change Single Sign-On Property Value User Security privilege is active on the administrative account making the change.
Then navigate to the user's Biographic page and click the View link labeled SSO Property. A new window will open.
In the new window, click SAML x508 Certificate SSO Properties and then Add on the following page to continue.
If the user has more than one email address in their Address record, choose an email address to associate.
If the user has more than one module status, choose a status to associate.
Click Submit to complete the association.
The SSO Provider and User ID will be automatically added to this table once the user has manually logged in to SONIS using SAML x509 authentication. A second association can be added using the Add link or the association can be removed altogether by clicking Delete.
Note that a single email address can be associated with more than one module status, but a single module status cannot be associated with more than one email address.
Logging In
To log in to SONIS using Microsoft Azure as the identity provider, click Log in with Microsoft from any login page where it has been activated.
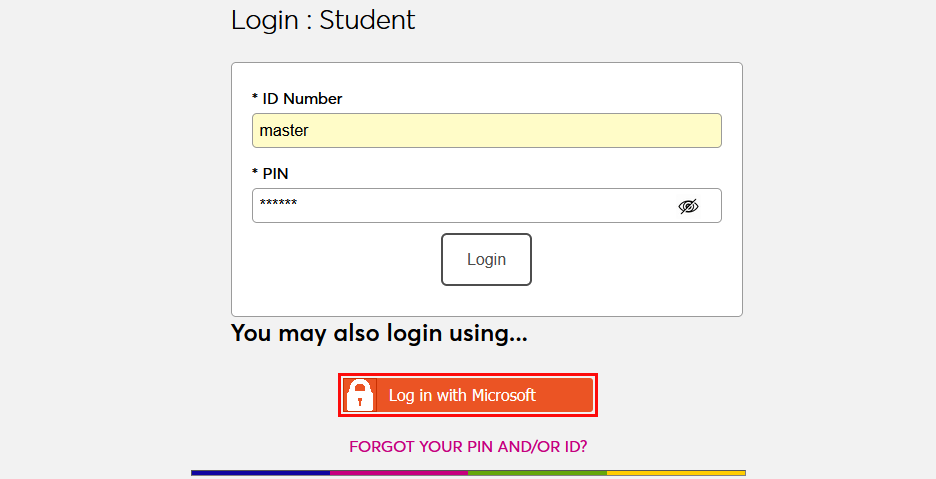
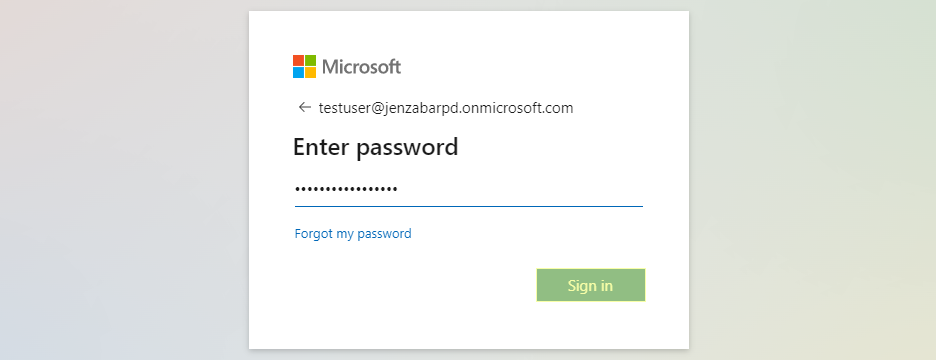
On the following page, enter the Email address that was associated with the account in Azure and click Next. Then enter the password for the account and click Sign in.
If the user's email address in Okta matches a primary or secondary email address in any Address record in SONIS, they will be immediately logged in.
If an administrator has multiple accounts associated with the same email address, they will log in to OneLogin as normal. Once they've successfully logged in, they will be prompted to select an active account as the default account for single sign-on. Select an account from the Profile/User ID menu and click Submit.
Once the user is logged in to SONIS, they can toggle between account using the account picker tool in the upper right-hand corner.
If the user successfully logs in to the identity provider, but their email address is not found in SONIS, they will see the following error message:
Ensure that the email address being used is listed in the user's Address record either in the primary or secondary field and attempt to log in again. The type of address record does not matter.
This error will also appear if the user has been successfully logged in to an identity provider where each user must be given access to the specific app used to connect to SONIS, such as OneLogin, and they were not given access. In this instance, simply grant access to the app and instruct the user to log in again.
If the user attempts to log in to a portal that does not match their module status using single sign-on, they will see the following error message:
Instruct the user to log in to the correct portal.
If an email address is listed in the Address record of more than one user with the same module status, the system cannot create an association between the identity provider login and a SONIS account. The following error message will appear:
Ensure that the email address being used is only attached to one account and attempt to log in again.
There is also a generic Please contact the system administrator. error message that may appear. This message should only appear if there is a SONIS database error of some kind. Contact Jenzabar SONIS Support for troubleshooting.
Okta
Setup
Create Application
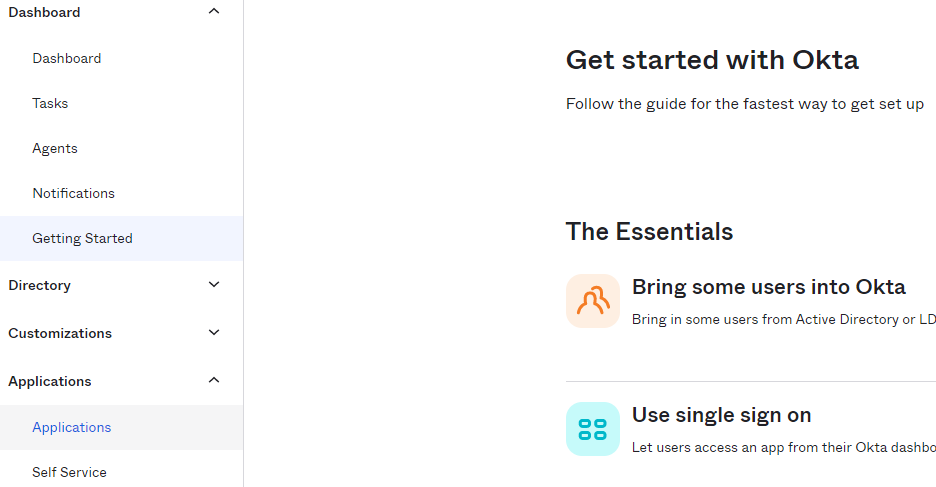
To use Okta for SONIS single sign-on, begin by creating an Okta Developer account. This will require an email and password. Log in to the account and click Admin in the upper right-hand corner. A new page will open. Note that this is only a trial account and a paid account will be needed for full implementation.
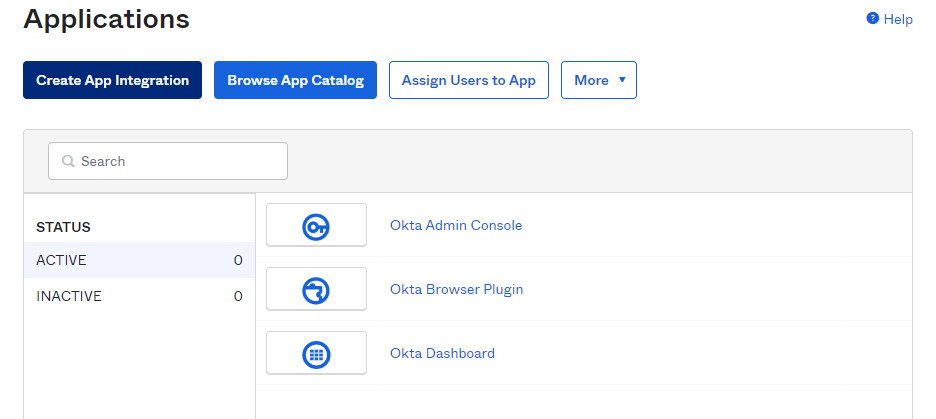
Select Applications from the left-nav menu. Then click Create App Integration.
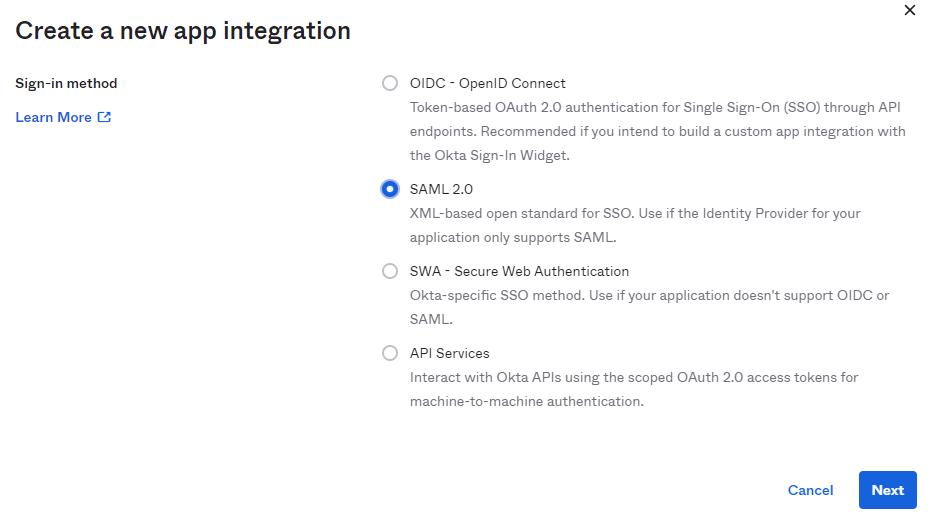
Select SAML 2.0 and then Next to continue.
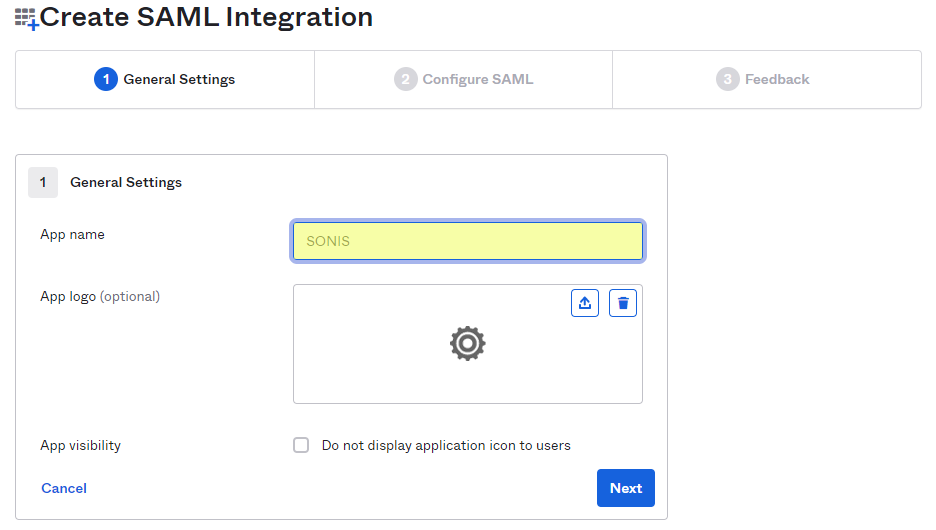
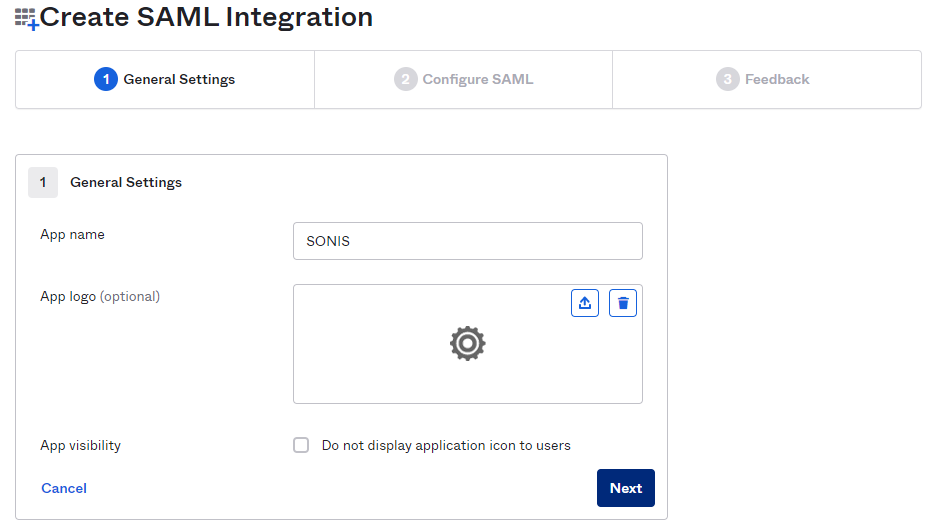
Create an App name and click Next.
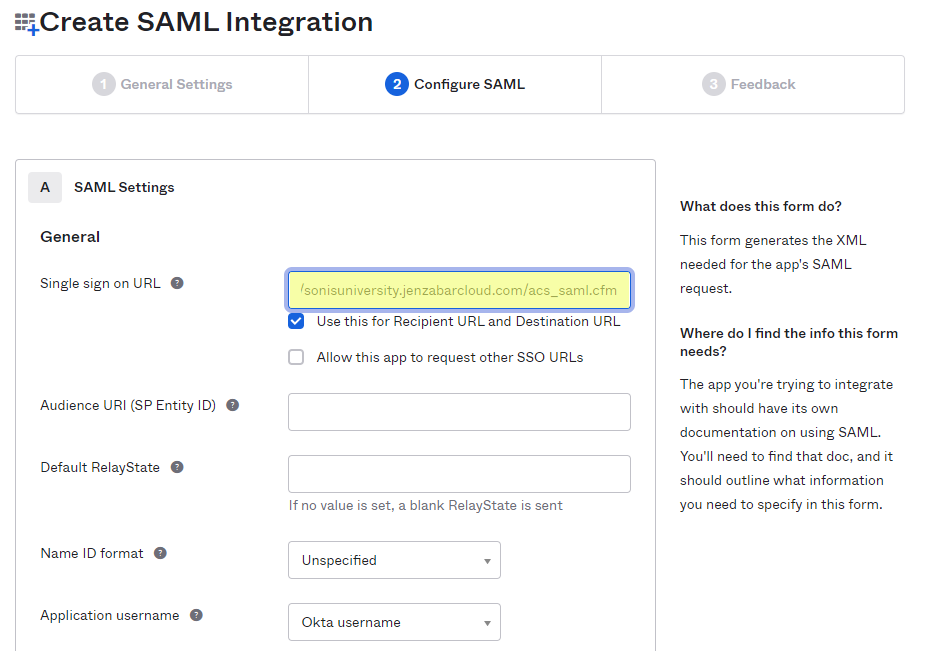
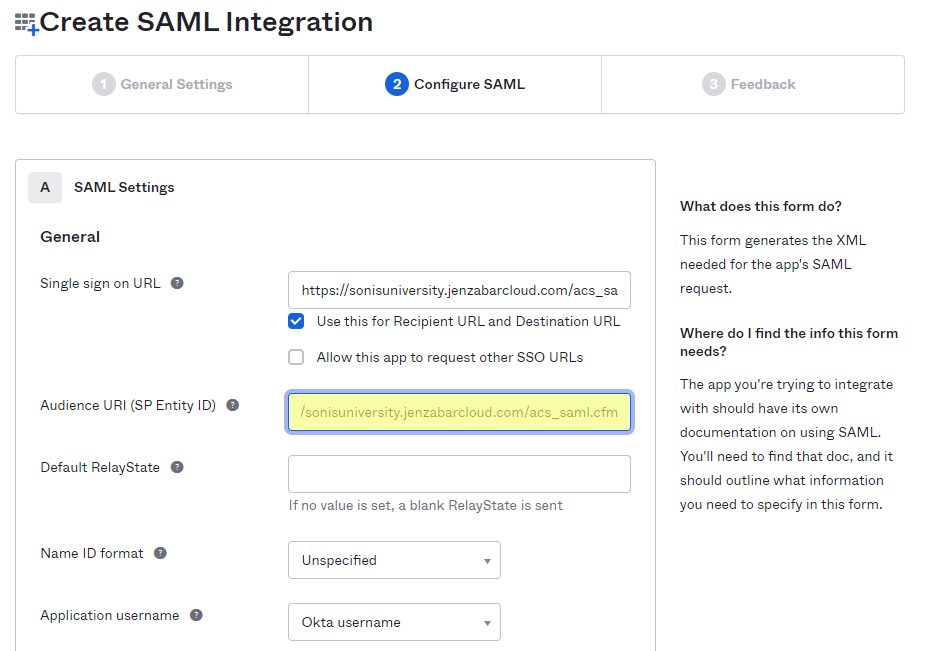
Add https://[yourdomain]/acs_saml.cfm as the Single sign on URL and the Audience URI (SP Entity ID). For example: https://sonisu.jenzabarcloud.com/acs_saml.cfm. Be sure to save these changes. Save this value as it will be needed again later. Leave the Use this for Recipient URL and Destination URL box checked.
Click Next to continue to the next page and, after answering the required survey questions from Okta, click Finish to complete the app creation process.
Configuration
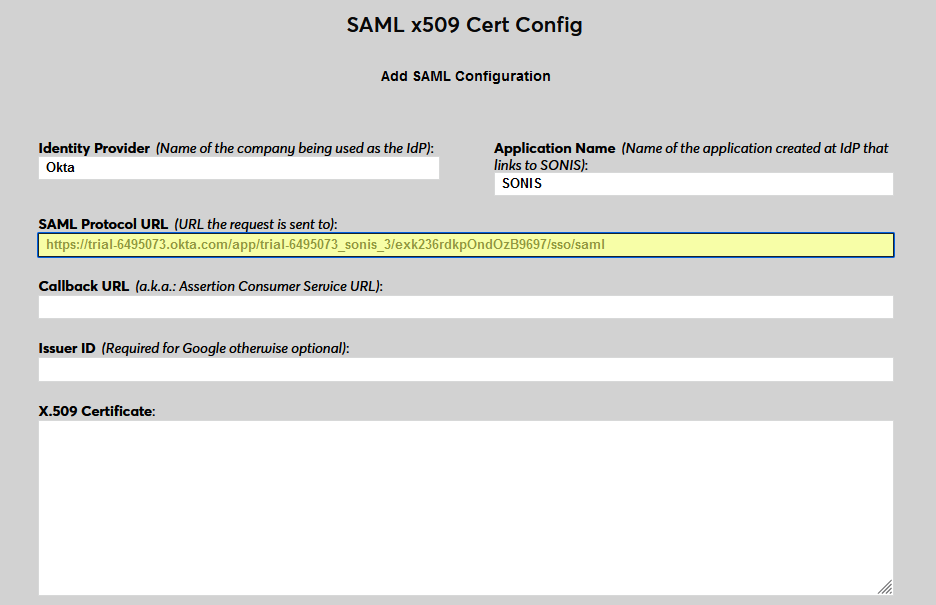
In SONIS, navigate to SAML x509 Certificate Configuration under the Systems hub. Click New SAML Configuration to begin.
Enter Okta as the Identity Provider and enter the Application Name that corresponds to the application created in the previous steps.


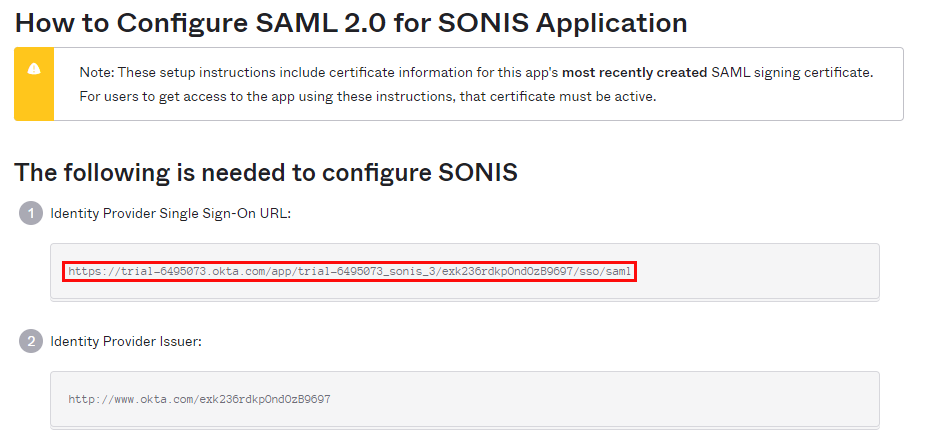
Back in Okta, return to the page for the SONIS application and scroll down the page to the SAML Signing Certificates section. Click the button labeled View SAML setup instructions. A new tab will open.
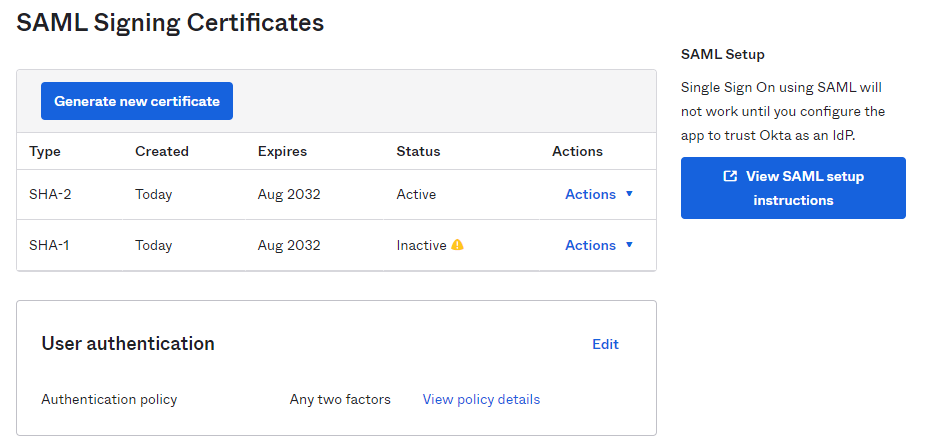
Copy the value labeled Identity Provider Single Sign-On URL from Okta into the SAML Protocol URL field in SONIS. Keep this tab open as it will be needed again in a moment.
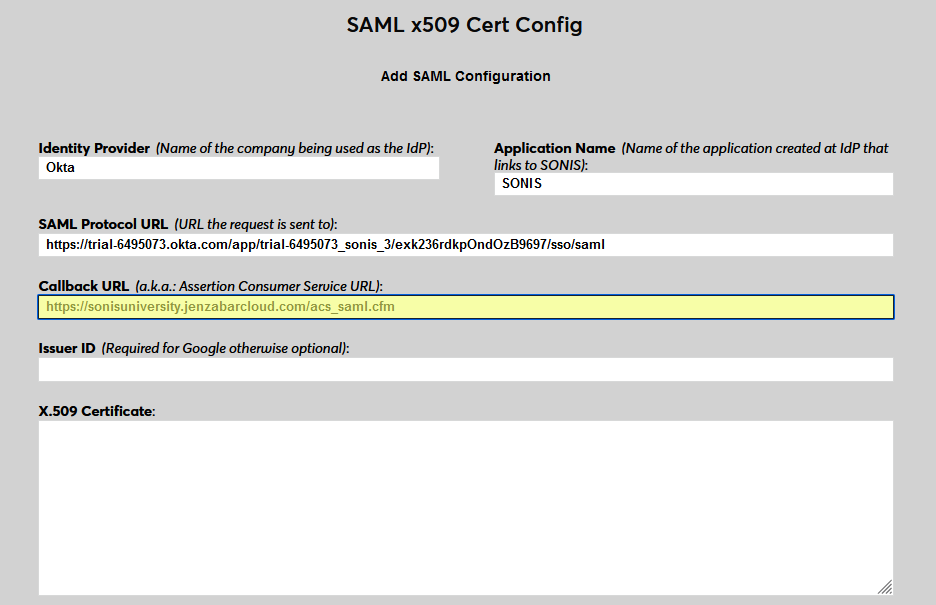
Next, enter the same personalized URL was inserted into the Single sign on URL and the Audience URI (SP Entity ID) fields in Okta as the Callback URL in SONIS. As a reminder, this is https://[yourdomain]/acs_saml.cfm. The Issuer ID field is not used for Okta at this time.
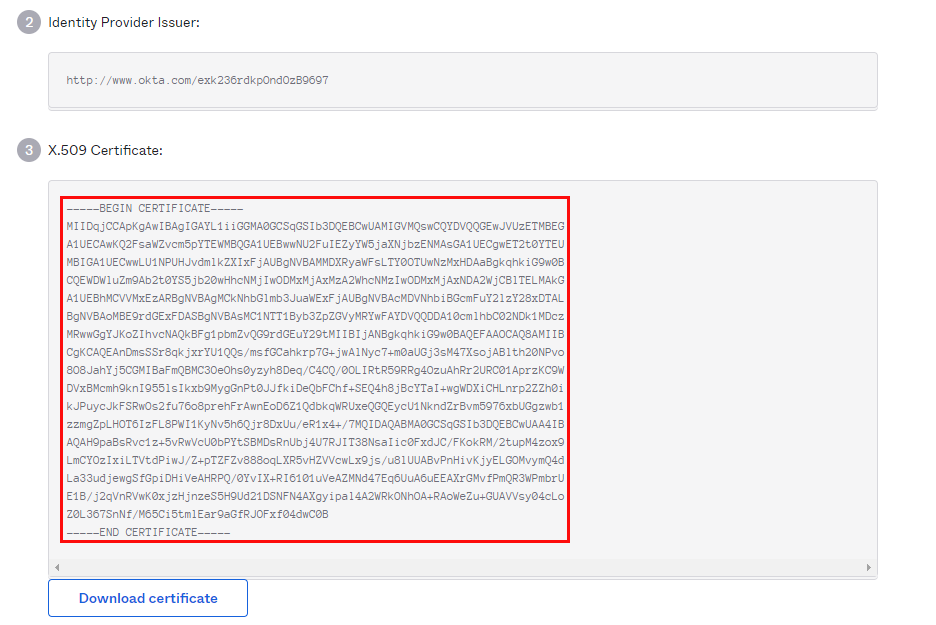
Return to the How to Configure SAML 2.0 for SONIS Application page in Okta. Copy the entire X.509 Certificate from Okta into the X.509 Certificate field in SONIS.
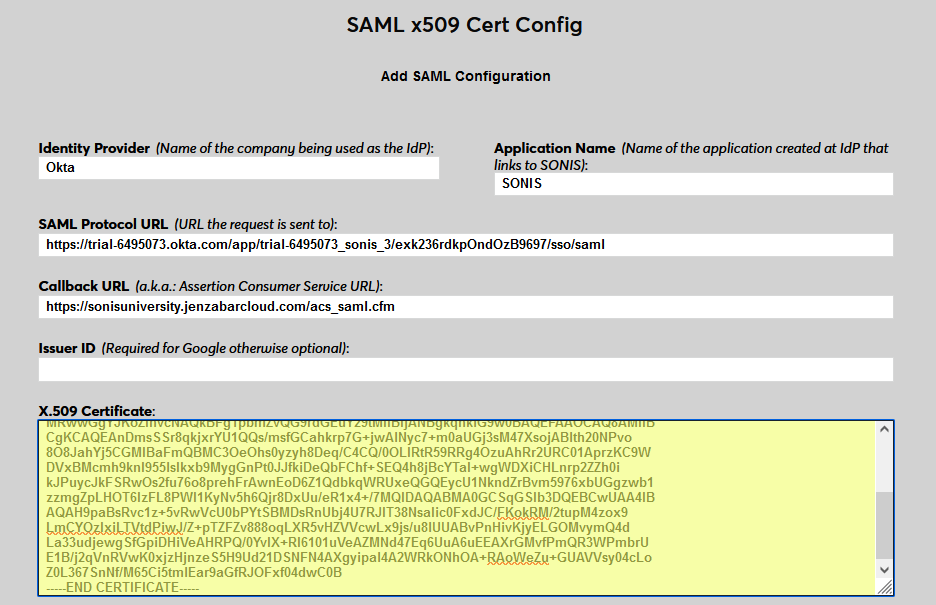
Click Submit to save the configuration values. Do not enable any portals at this time.
User Management
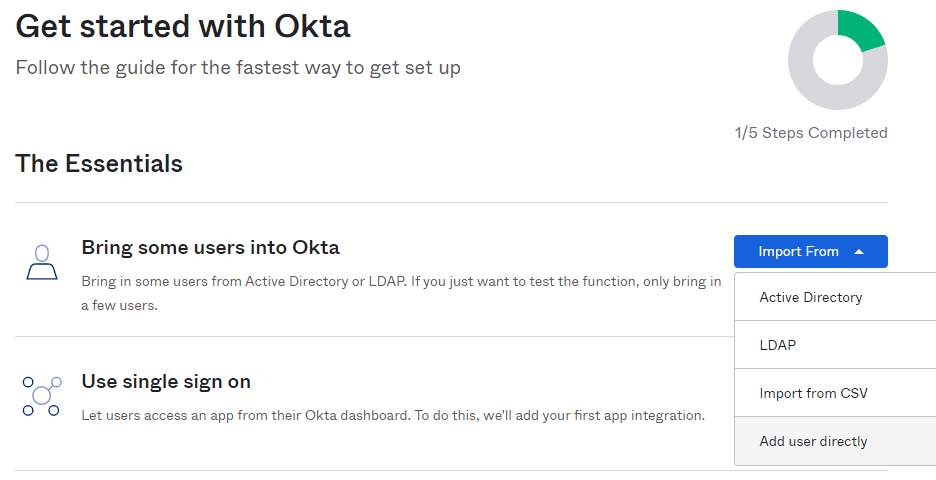
Before users can log in to SONIS with Okta, they must have accounts in Okta. From the Get Started page of the Okta Admin portal, select Import From and then Add Users Directly.
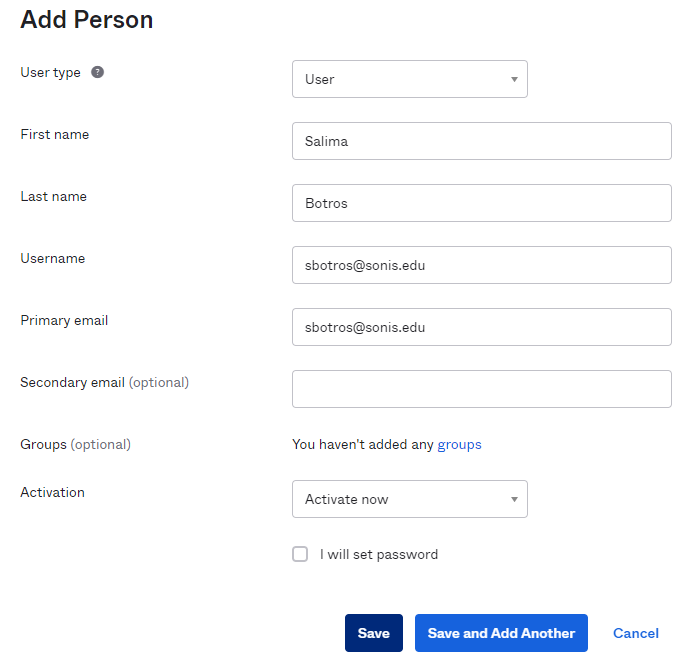
On the next page, click Add Person to continue.
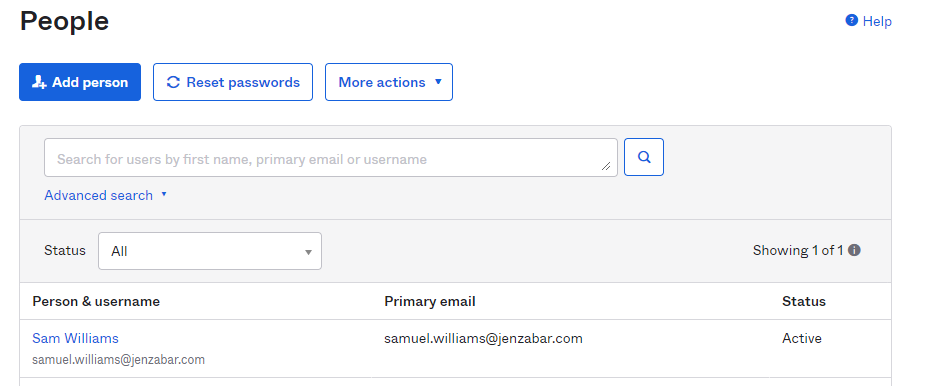
Enter the user's First Name and Last Name.
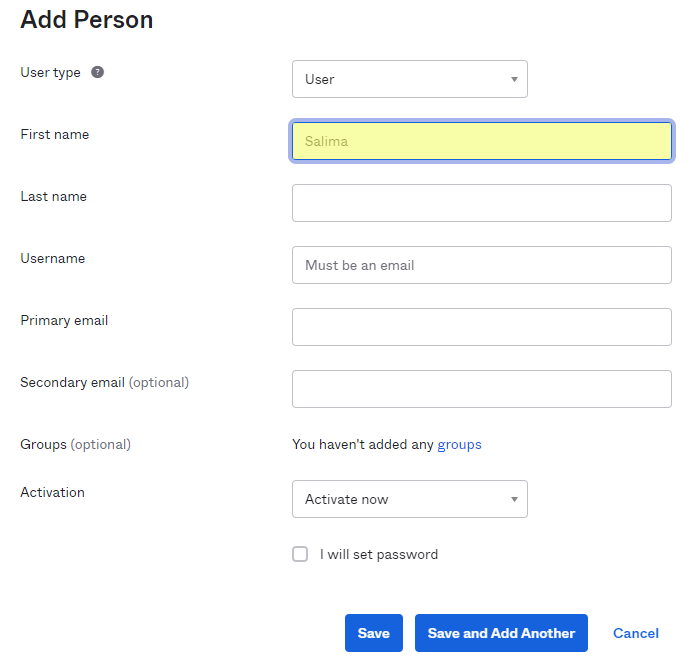
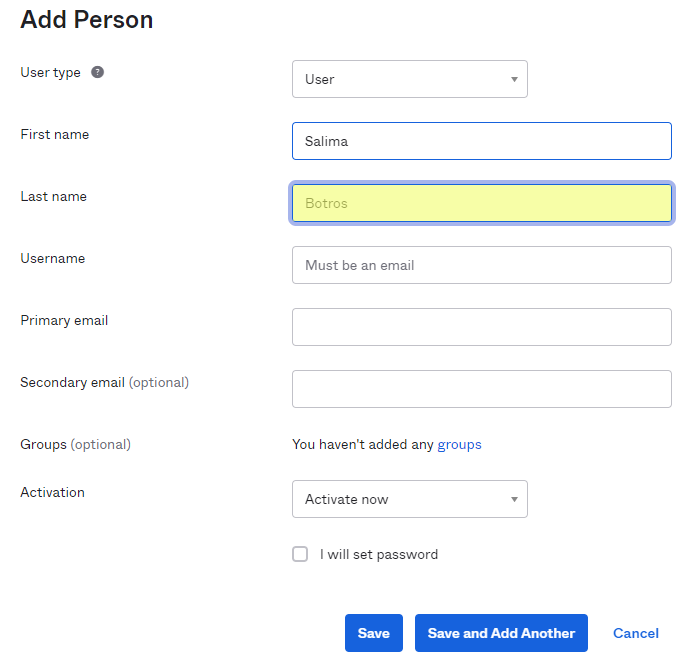
Enter a Username for the user. This must be an email address from one of their Address records in Jenzabar SONIS. The Primary email field in Okta will automatically mirror this value.
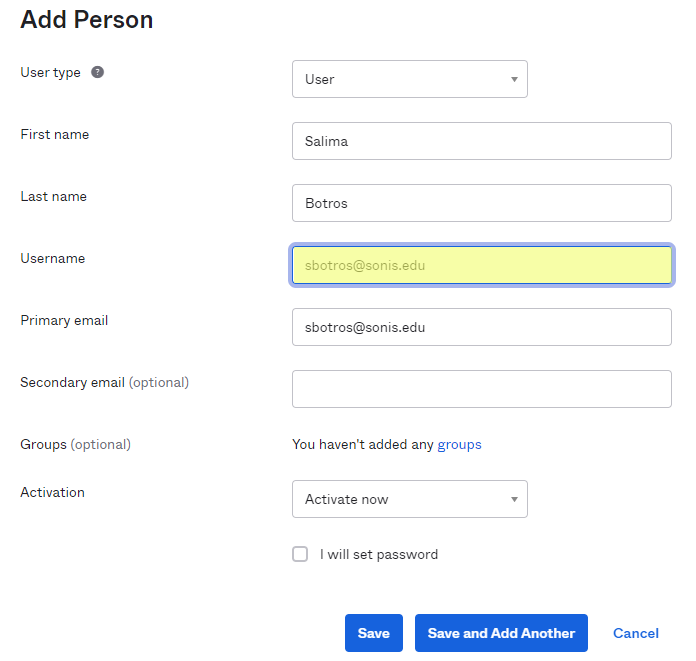
Click Save to complete the process. Note that each user will need to activate their account and set a new password using the activation email sent to them by Okta before they will be able to log into Jenzabar SONIS using Okta for the first time.
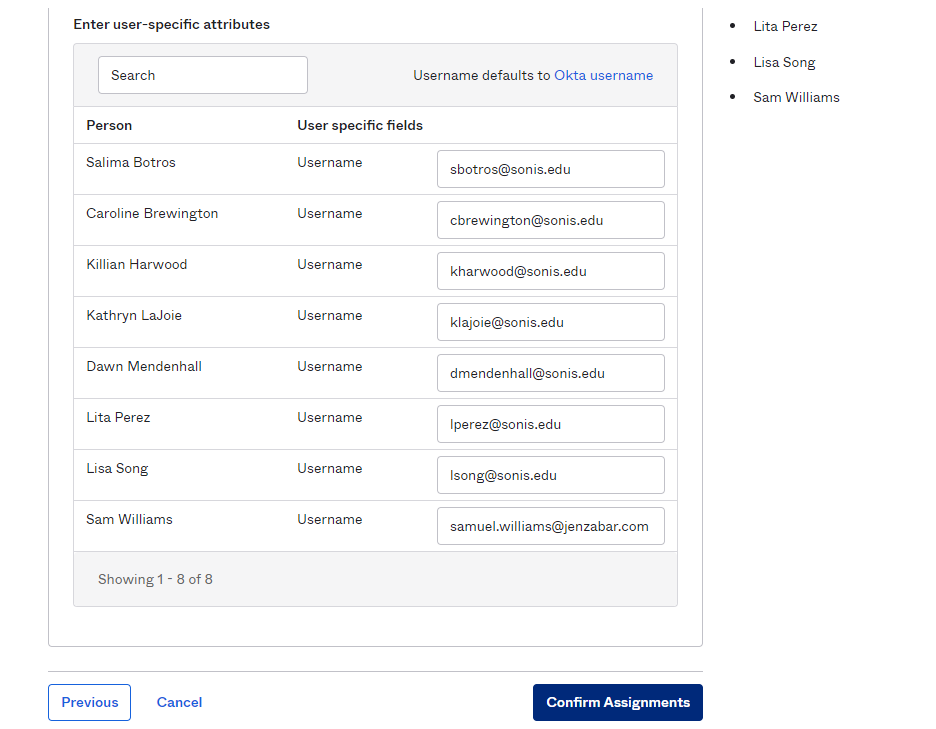
Each user who is added must be granted access to the SONIS application before they can log in. Navigate to Applications under the Applications menu and click on the settings button next to the SONIS application. Select Assign to Users.
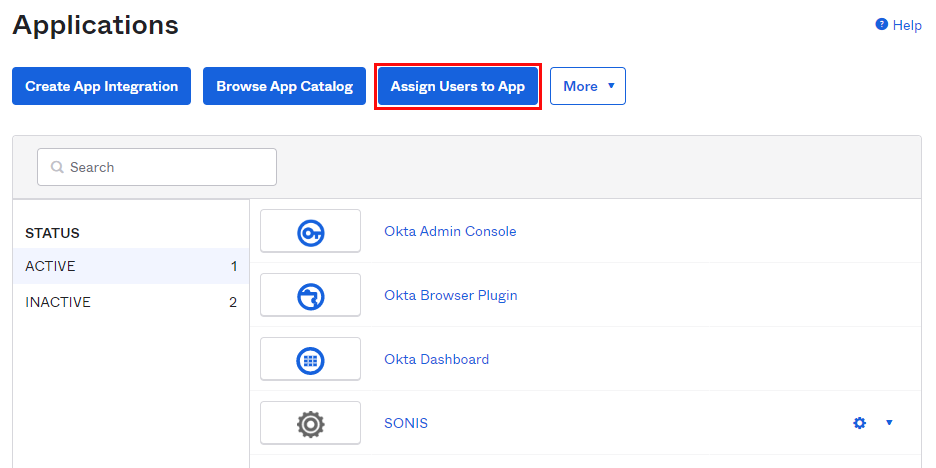
On the Assign Applications page, check the box that corresponds with the JenzabarSONIS application.
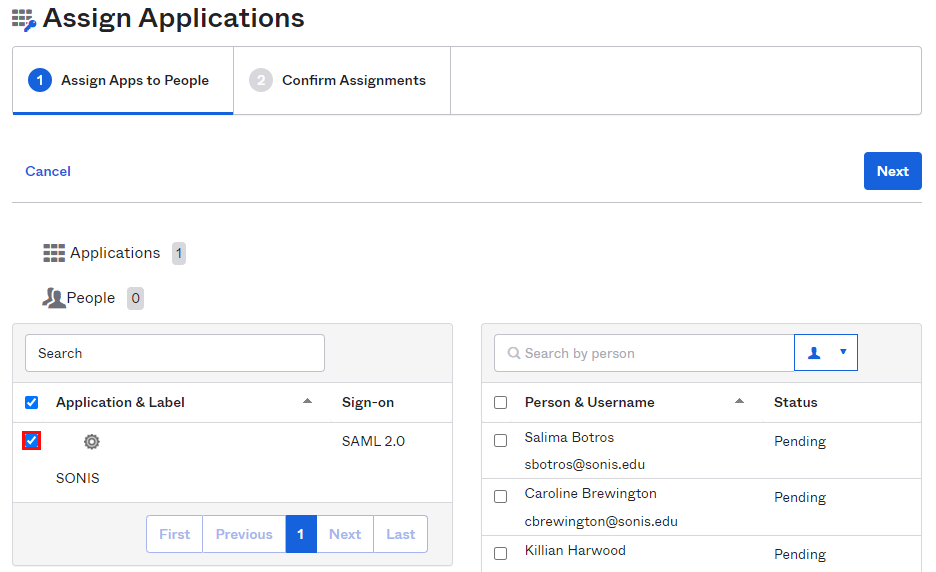
Check users individually or the box at the top to check all of them. Click Next to continue.
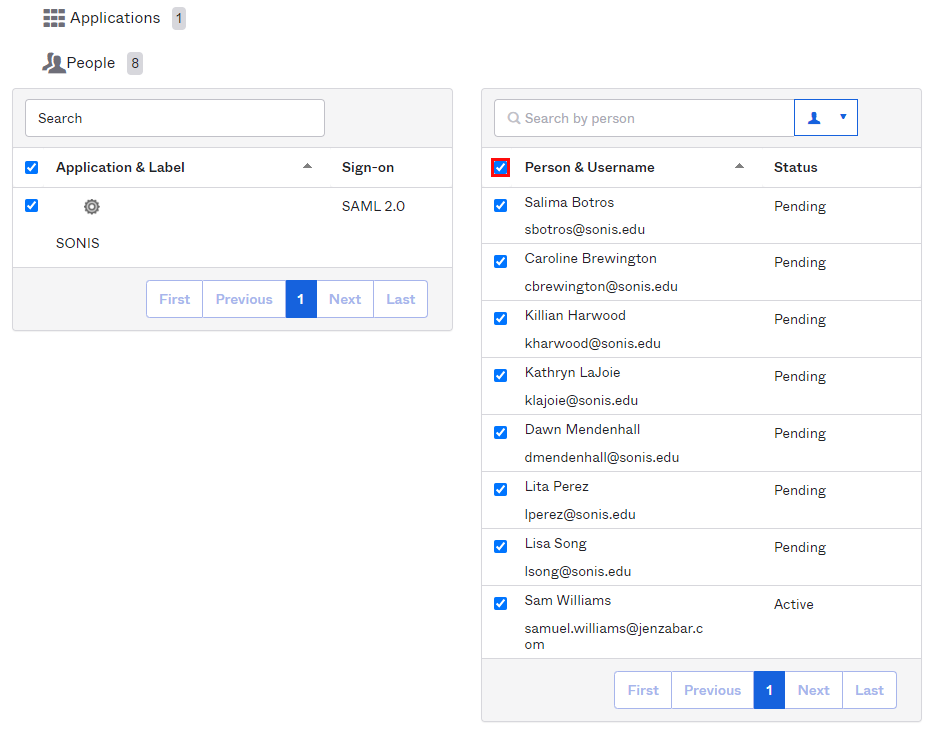
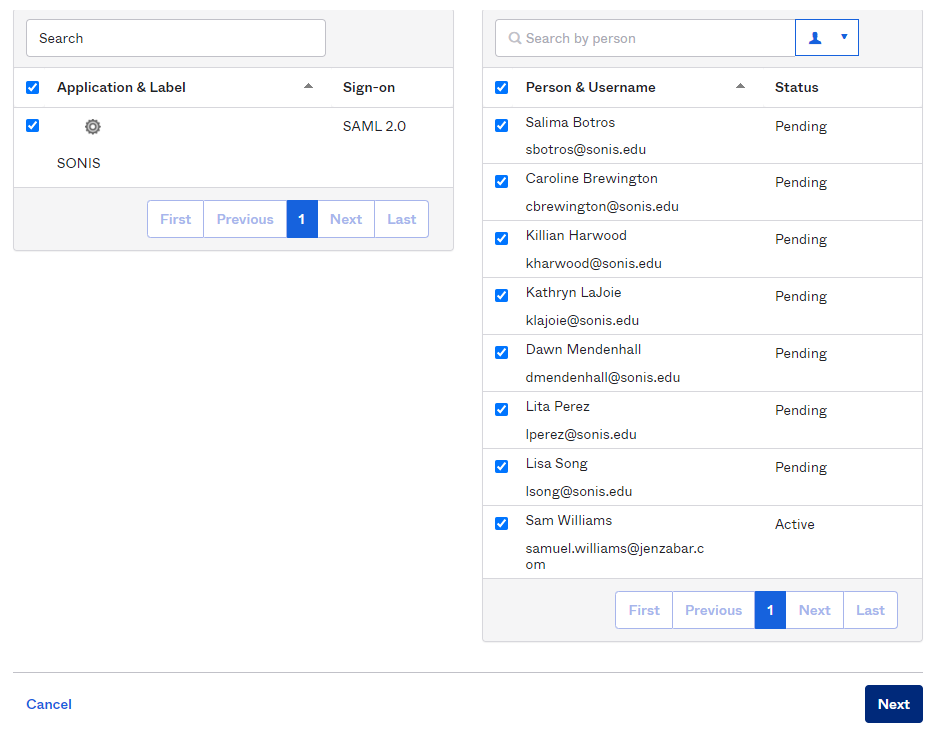
On the next page, click Complete Assignments to finish and grant the users access to the application.
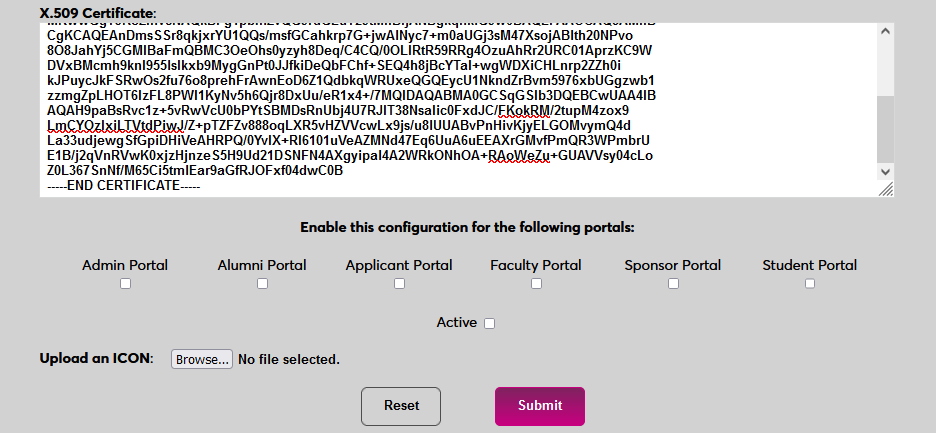
Enable Login
Once a user has received their password, they can use Okta to log in to SONIS. Navigate back to the SAML x509 Certificate Configuration page to turn the option on. Select the portals where Okta will be a login option.
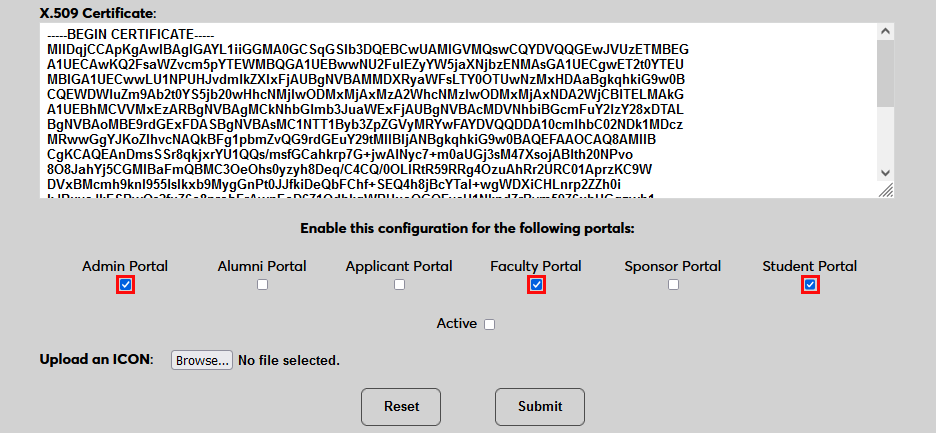
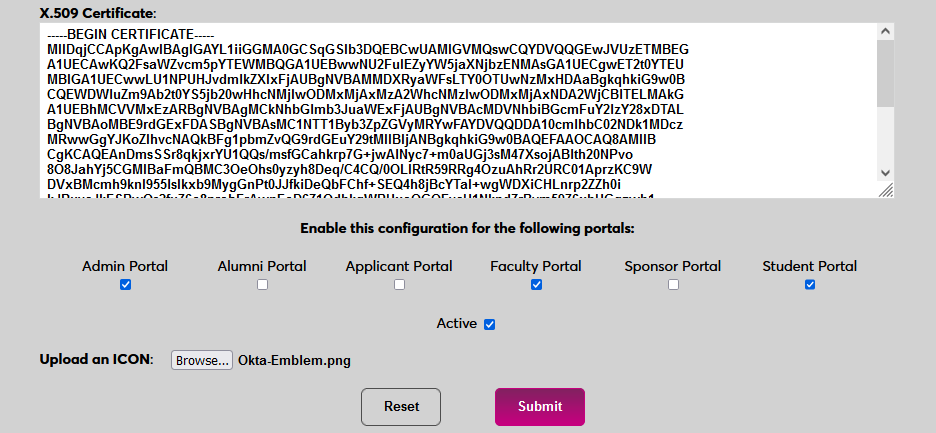
To upload a Okta logo, click Browse and locate the image file. Adding a new icon is optional. If no logo is added, a lock icon will appear for all configurations.

Check the Active box to set the login option as active and add the link to the selected portal(s).
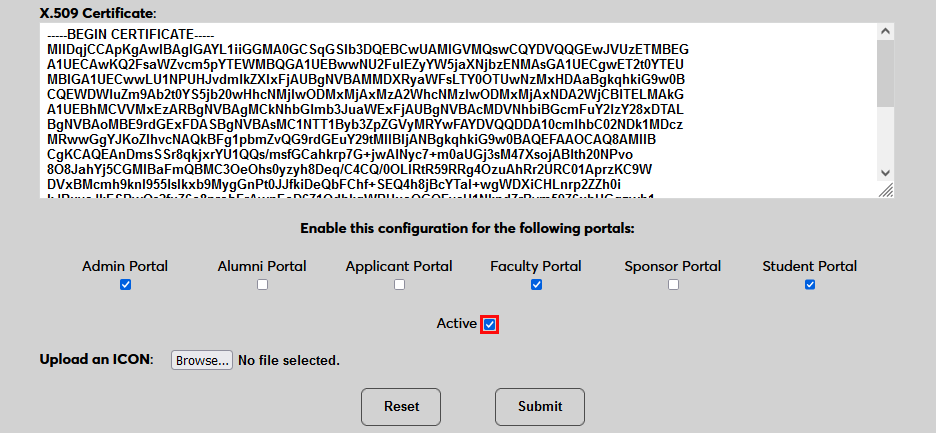
Click Submit to save the changes and activate the login option.
Manually Associating Users
There may be times when a user needs to be manually associated with Auth0 or another authenticator. For example, a single user has two different accounts with different SONIS IDs and the same email address, which would prevent them from signing in to Auth0 and associating account through the login page.
To manually associate a user, ensure that the Change Single Sign-On Property Value User Security privilege is active on the administrative account making the change.
Then navigate to the user's Biographic page and click the View link labeled SSO Property. A new window will open.
In the new window, click SAML x508 Certificate SSO Properties and then Add on the following page to continue.
If the user has more than one email address in their Address record, choose an email address to associate.
If the user has more than one module status, choose a status to associate.
Click Submit to complete the association.
The SSO Provider and User ID will be automatically added to this table once the user has manually logged in to SONIS using SAML x509 authentication. A second association can be added using the Add link or the association can be removed altogether by clicking Delete.
Note that a single email address can be associated with more than one module status, but a single module status cannot be associated with more than one email address.
Logging In
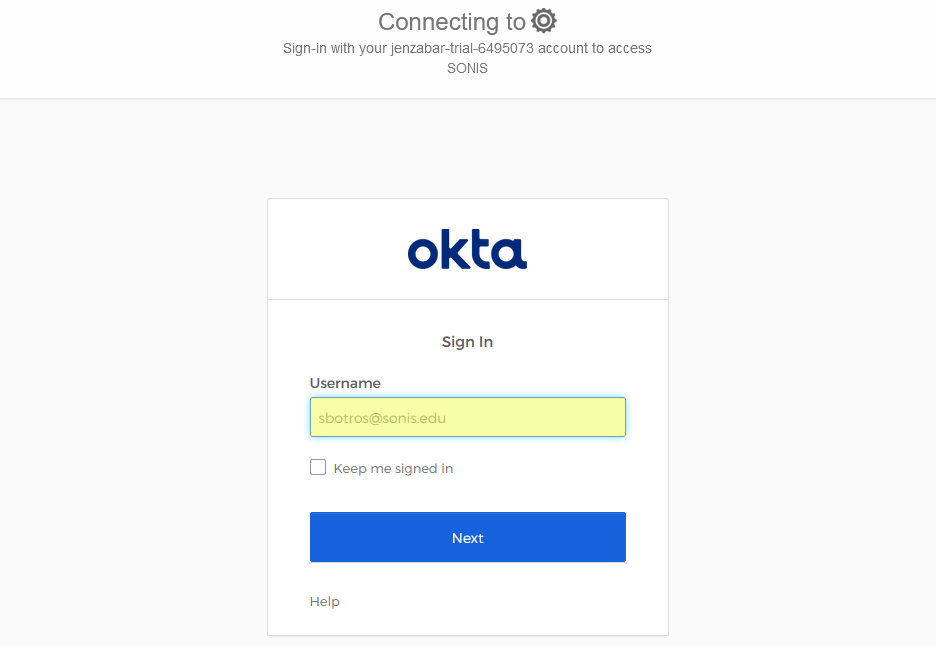
To log in to SONIS using Okta as the identity provider, click Log in with Okta from any login page where it has been activated.
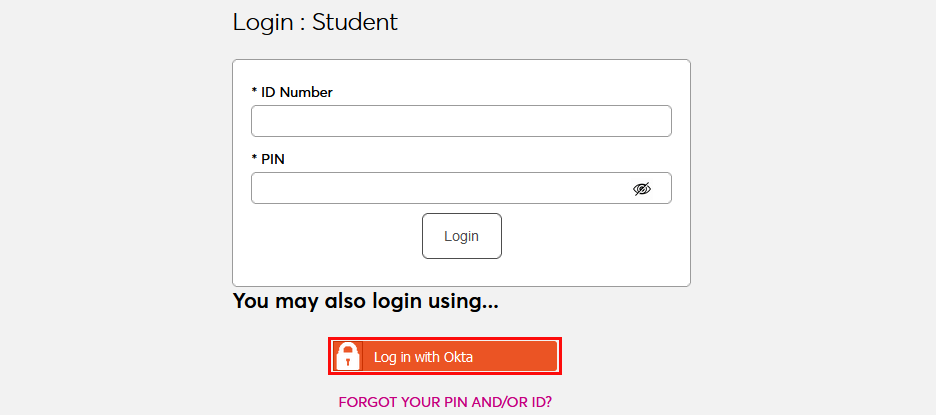
On the following page, enter the Email address that was associated with the account in Okta. Since Okta requires two-factor authentication, the user will be asked to provide their password and either a verification code that has been sent to them or a verification code from the Okta app.

If the user's email address in Okta matches a primary or secondary email address in any Address record in SONIS, they will be immediately logged in.
If an administrator has multiple accounts associated with the same email address, they will log in to OneLogin as normal. Once they've successfully logged in, they will be prompted to select an active account as the default account for single sign-on. Select an account from the Profile/User ID menu and click Submit.
Once the user is logged in to SONIS, they can toggle between account using the account picker tool in the upper right-hand corner.
If the user successfully logs in to the identity provider, but their email address is not found in SONIS, they will see the following error message:
Ensure that the email address being used is listed in the user's Address record either in the primary or secondary field and attempt to log in again. The type of address record does not matter.
This error will also appear if the user has been successfully logged in to an identity provider where each user must be given access to the specific app used to connect to SONIS, such as OneLogin, and they were not given access. In this instance, simply grant access to the app and instruct the user to log in again.
If the user attempts to log in to a portal that does not match their module status using single sign-on, they will see the following error message:
Instruct the user to log in to the correct portal.
If an email address is listed in the Address record of more than one user with the same module status, the system cannot create an association between the identity provider login and a SONIS account. The following error message will appear:
Ensure that the email address being used is only attached to one account and attempt to log in again.
There is also a generic Please contact the system administrator. error message that may appear. This message should only appear if there is a SONIS database error of some kind. Contact Jenzabar SONIS Support for troubleshooting.
OneLogin
Setup
Create Application
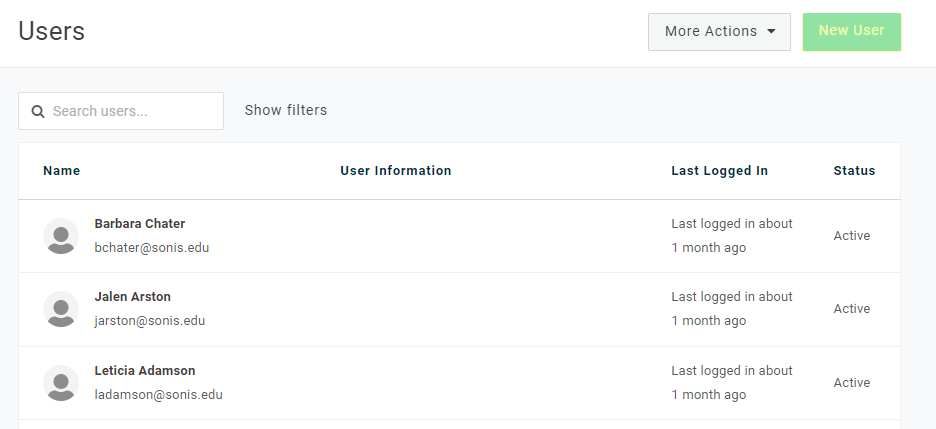
To use OneLogin for SONIS single sign-on, begin by creating a OneLogin Developer account. This will require an email and password. Log in to the account and navigate to the Administration section and select Applications. Note that free developer accounts only allow 25 users, so a paid account will be needed for full implementation.
On the following page, click Add App to begin the process of creating the application that will be used to connect OneLogin to SONIS.
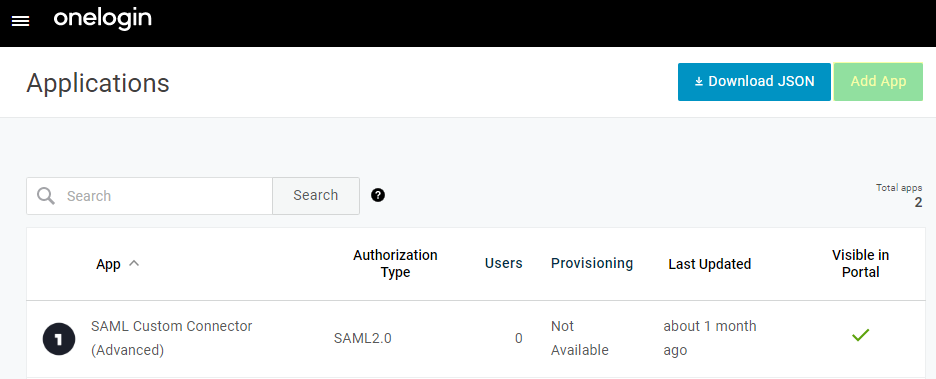
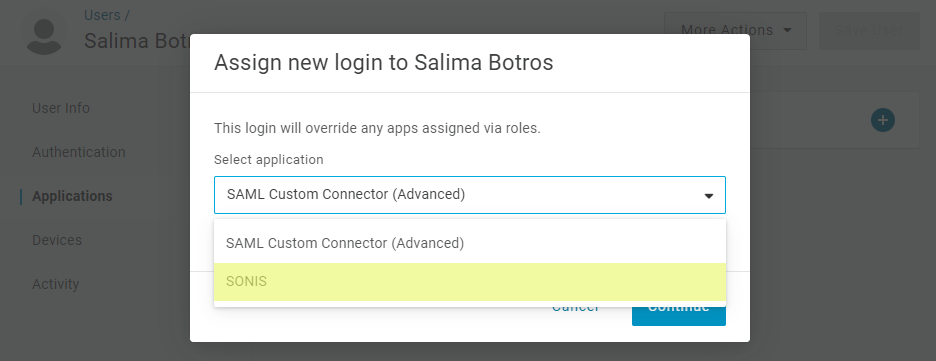
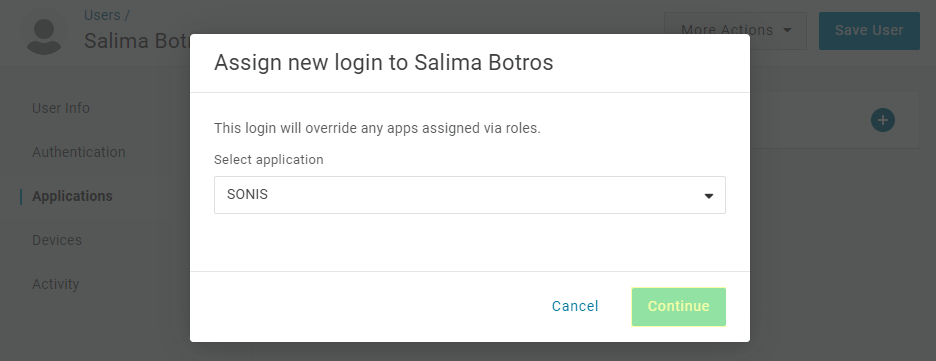
Search for SAML and select SAML Custom Connector (Advanced).
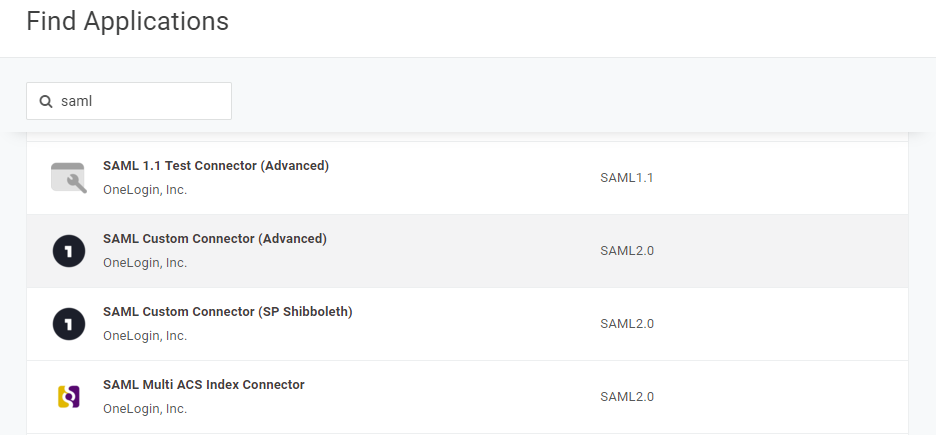
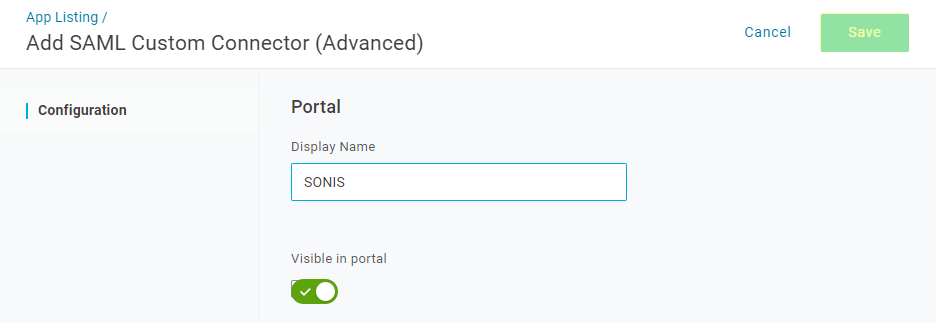
Create a Display Name for the application that will be easily identifiable among other OneLogin applications and click Save to compete the application creation process.
Return to the Applications page and select the newly created application to edit it.
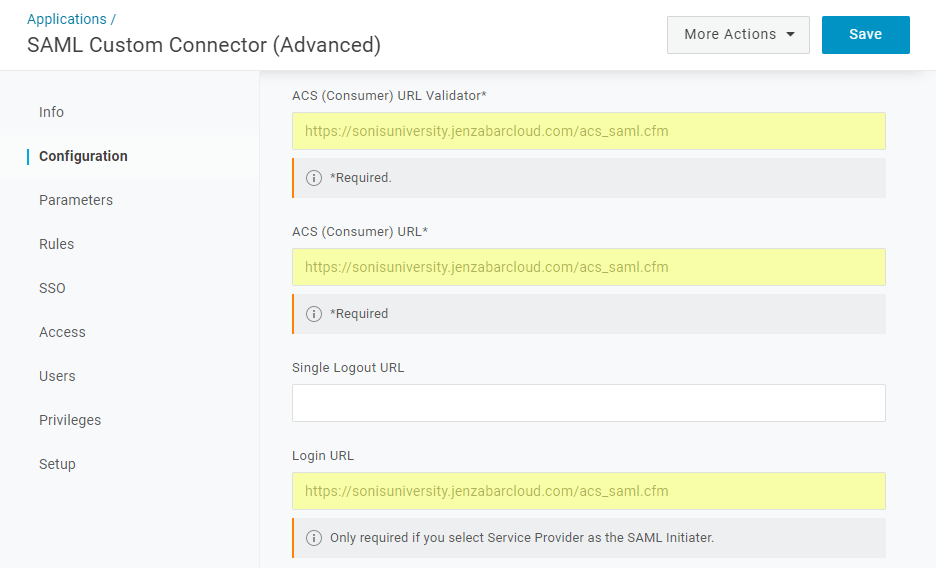
Add https://[yourdomain]/acs_saml.cfm to the ACS (Consumer) URL Validator, ACS (Consumer) URL, and Login URL fields with [yourdomain] replaced by the local domain. For example: https://sonisu.jenzabarcloud.com/acs_saml.cfm. Be sure to save these changes.
Configuration
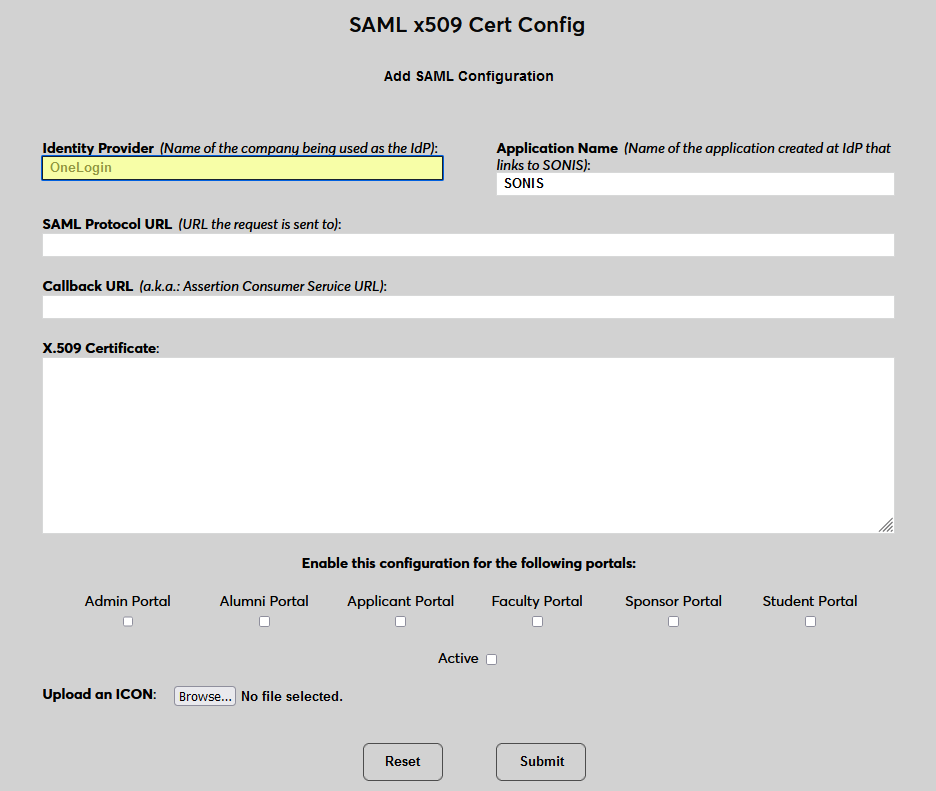
In SONIS, navigate to SAML x509 Certificate Configuration under the Systems hub. Click New SAML Configuration to begin.
Enter OneLogin as the Identity Provider and enter the Application Name that corresponds to the application created in the previous steps.

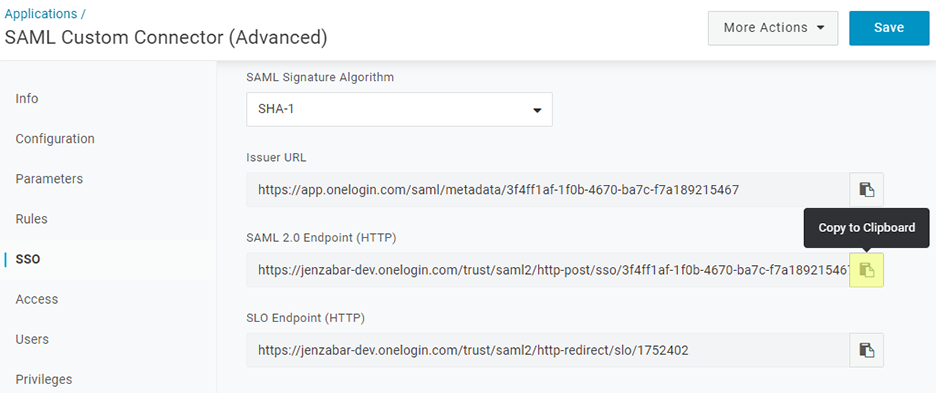
Back on the OneLogin site, return to the application and select SSO. Copy the value labeled SAML 2.0 Endpoint (HTTP). Paste this value into the SAML Protocol URL field in SONIS.
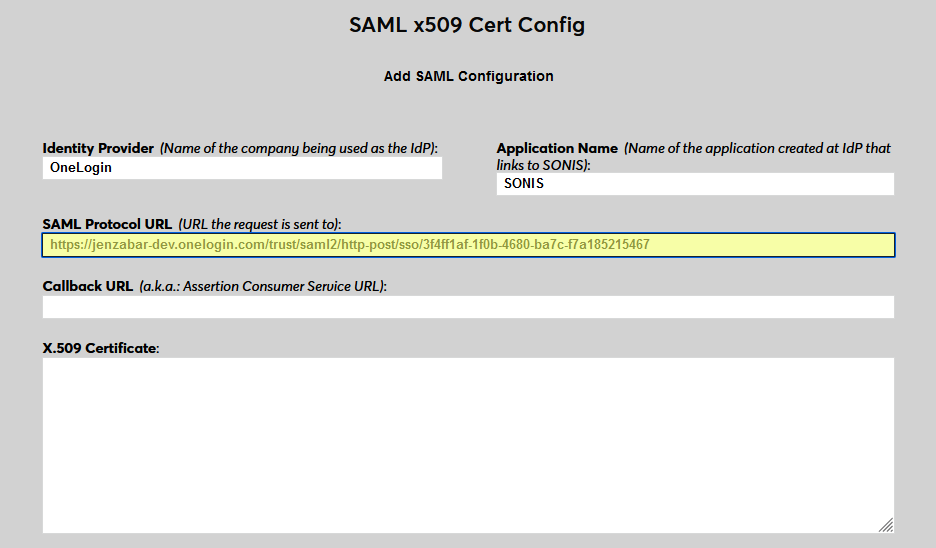
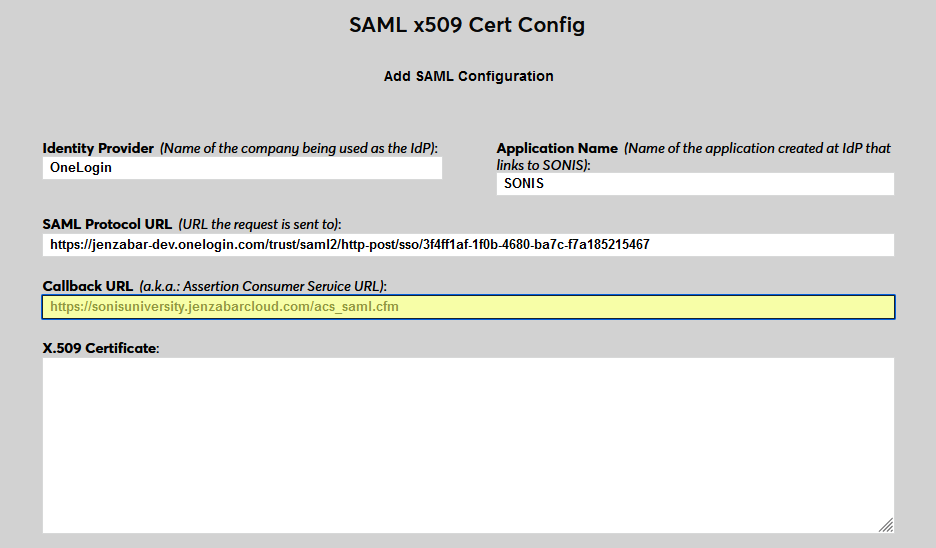
Next, enter the same personalized URL that was added to OneLogin as the Callback URL in Jenzabar SONIS. The Issuer ID field is not used for OneLogin at this time.
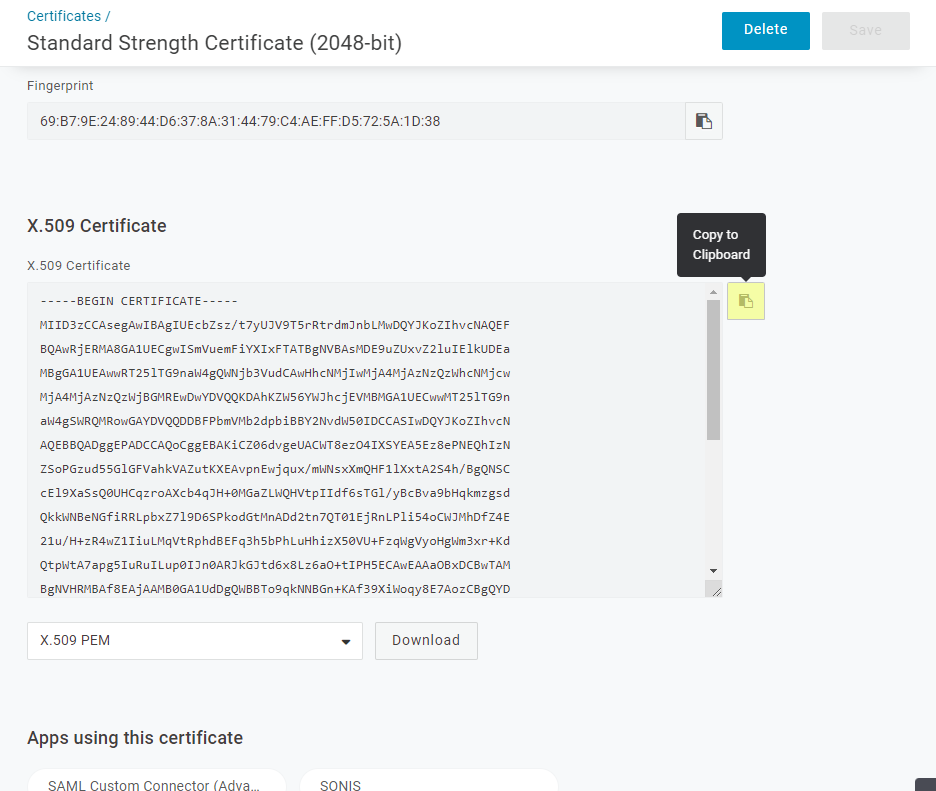
Back in the SSO menu on the OneLogin site, click View Certificate under the Standard Strength Certificate field.
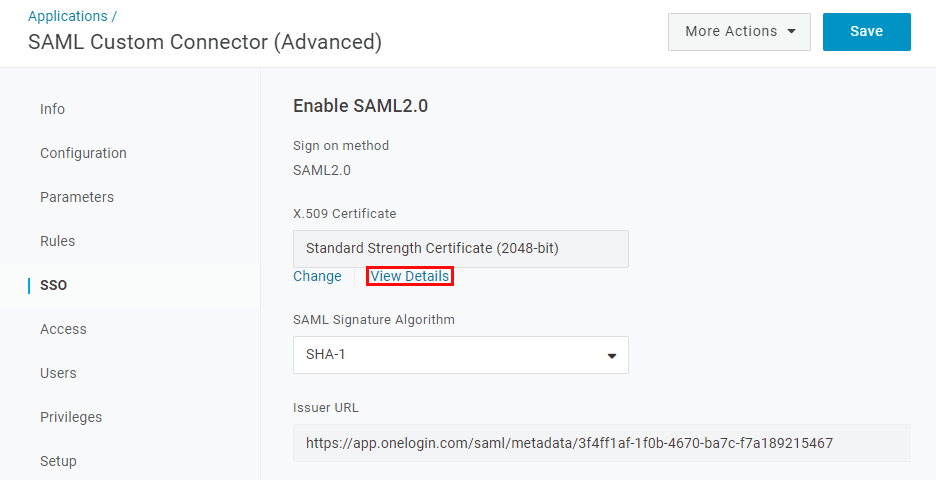
Copy the X.509 Certificate from OneLogin and paste it into the X.509 Certificate field in Jenzabar SONIS.
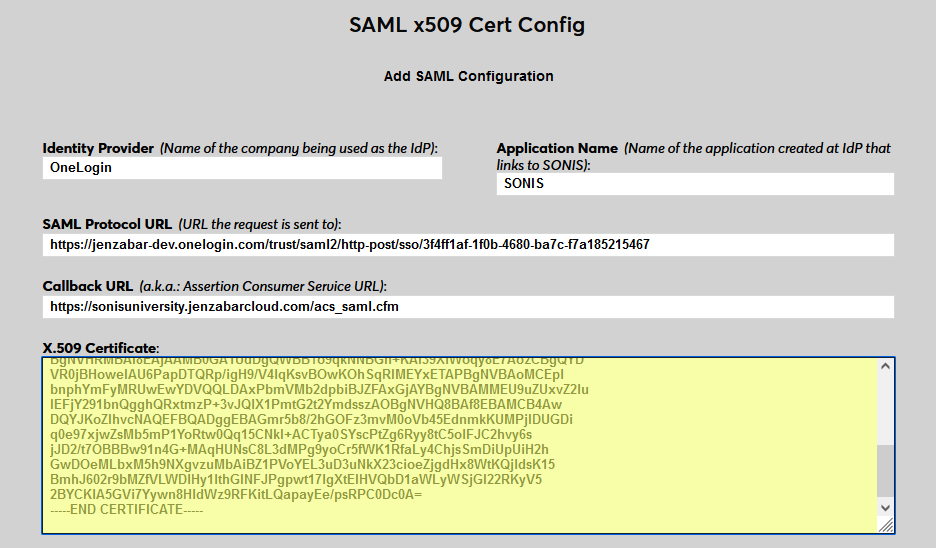
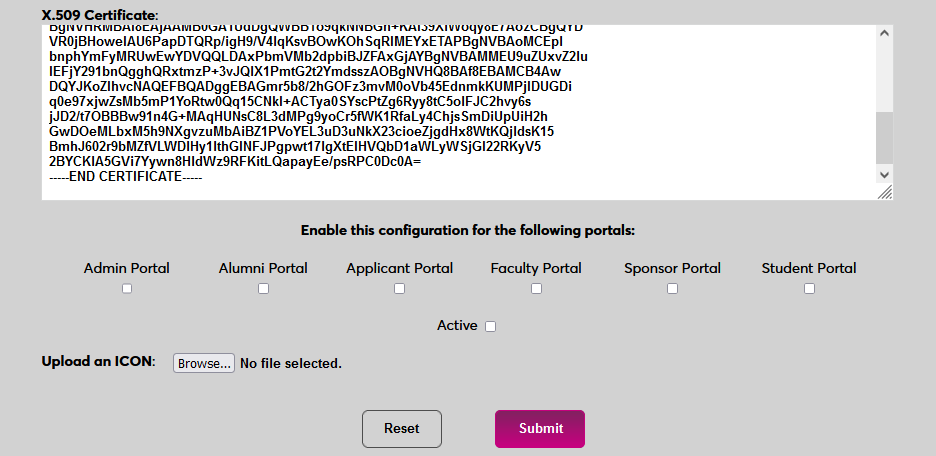
Click Submit to save the configuration values. Do not enable any portals at this time.
User Management
Before users can log in to SONIS with OneLogin, they must have accounts in OneLogin. From the Get Started page of the Okta Admin portal, select Import From and then Add Users Directly. This page is also available through the People option under the Directory tab.
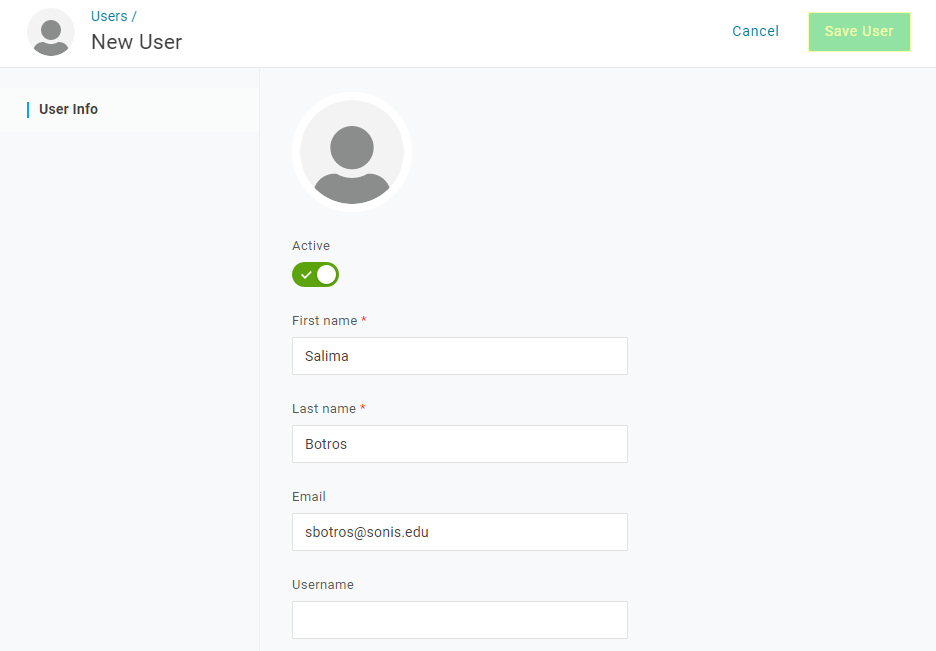
Add the user's First Name, Last Name, and Email Address and click Save User. The first two fields are required by OneLogin and the third is required by Jenzabar SONIS. The email address must match the primary or secondary email address in one of the user's address records.
Each user added must also be given access to the application that was created in the previous steps. Open the user's Application menu and click the + button to add an application.
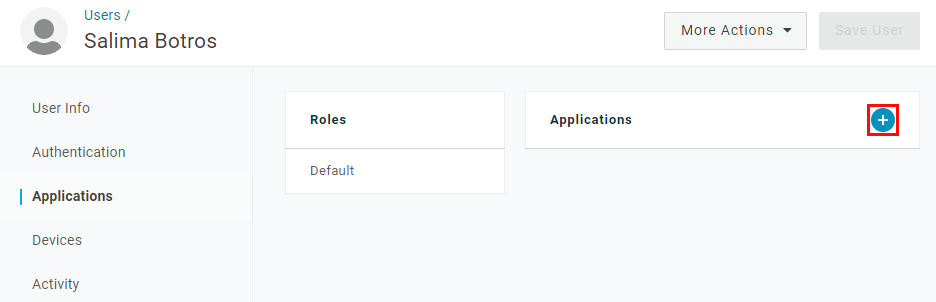
Select the application that's being used to connect to SONIS and click Continue.
No changes should be needed on the following page. Click Save to complete the process.

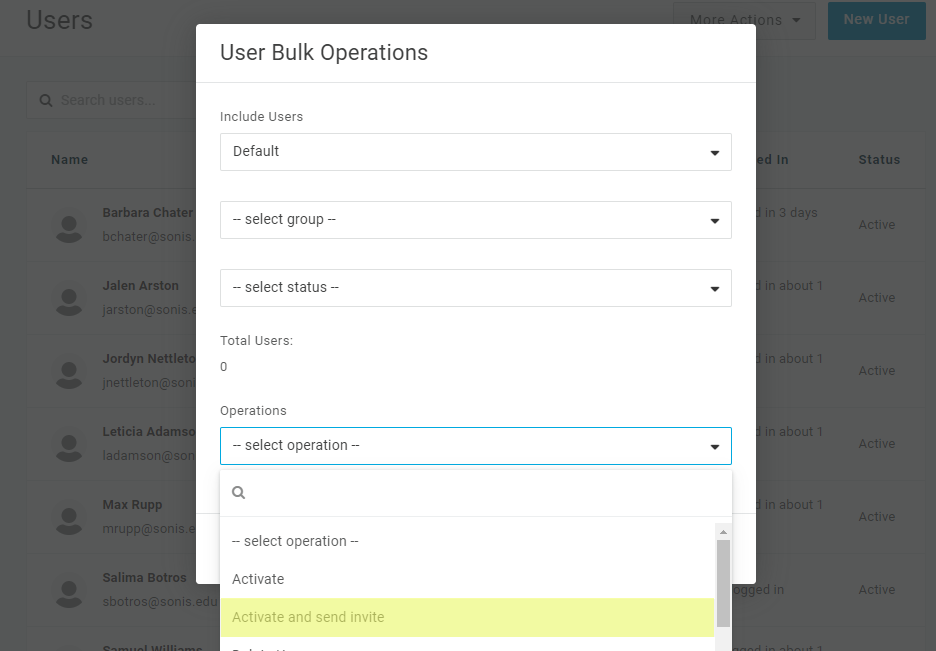
Once users have been added, return to the Users page and select Bulk Operations from the More Actions dropdown.
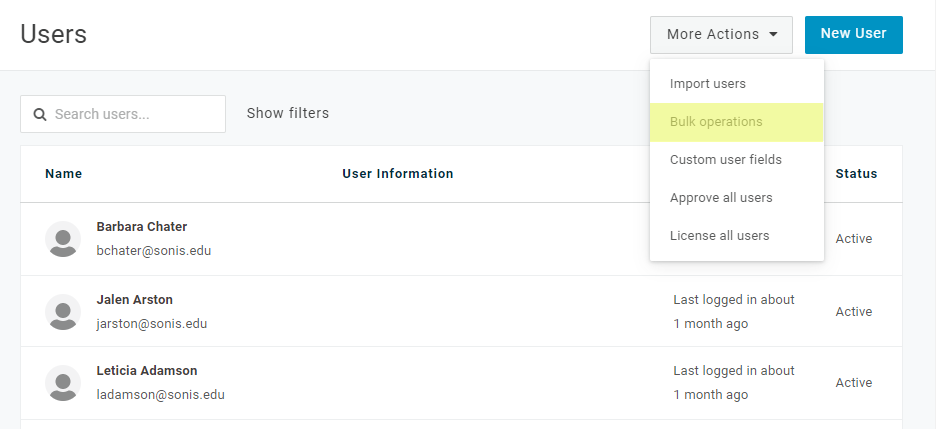
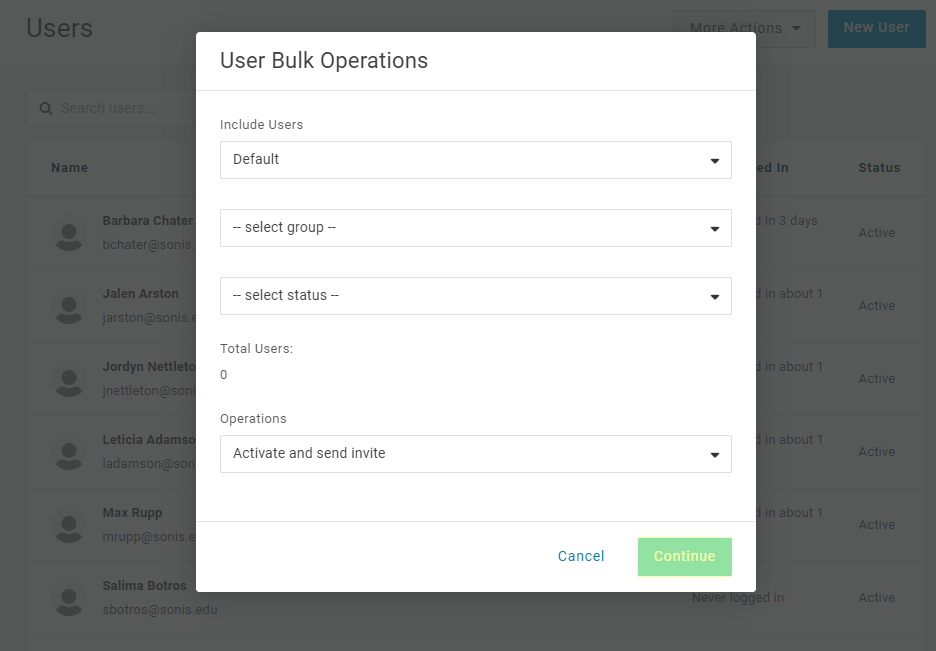
Select Default or whatever role you've assigned to SONIS users from the Include Users menu and Activate and send invite from the Operations menu.
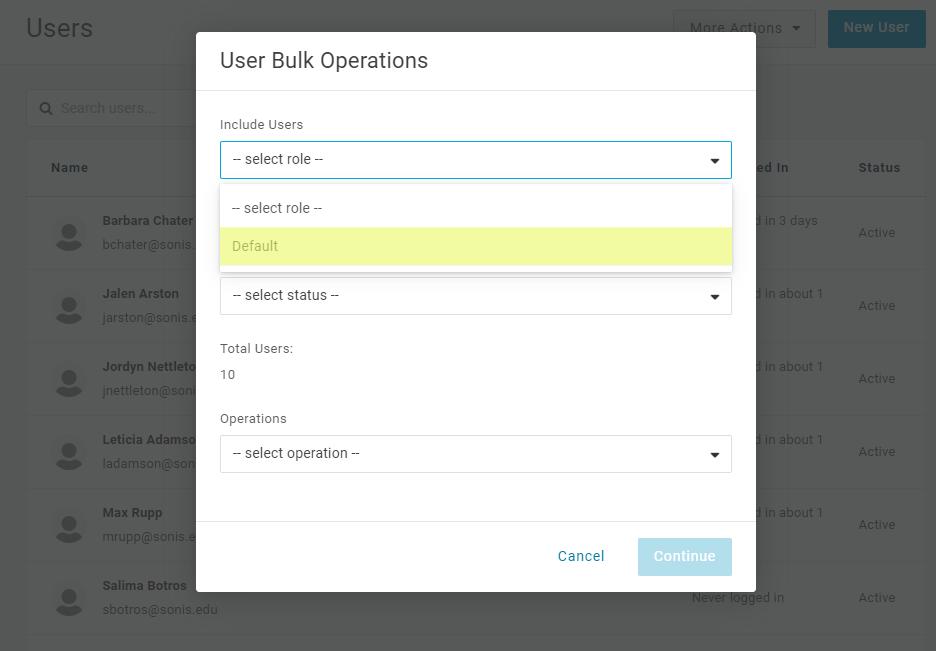
Click Continue to send an email to each user with their username and system-generated OneLogin password.
Enable Login
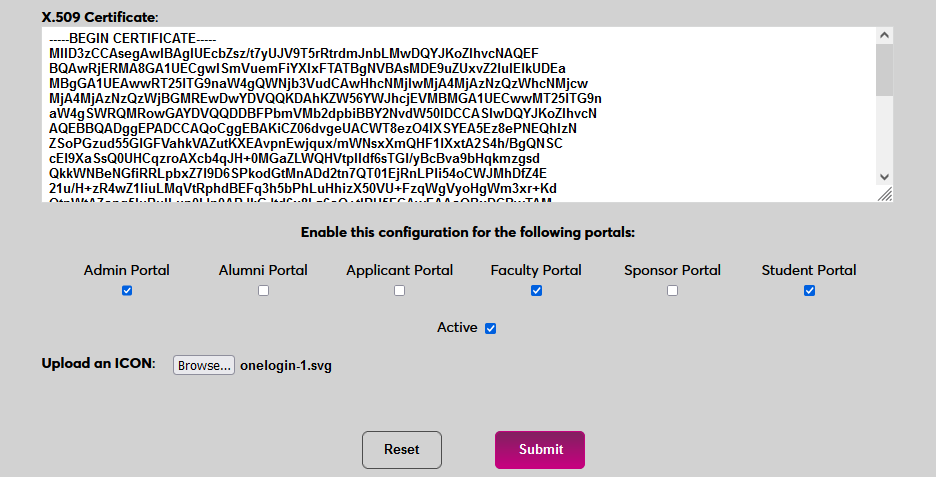
Once a user has received their password, they can use OneLogin to log in to Jenzabar SONIS. Navigate back to the SAML x509 Certificate Configuration page to turn the option on. Select the portals where OneLogin will be a login option.
To upload a OneLogin logo, click Browse and locate the image file. Adding a new icon is optional. If no logo is added, a lock icon will appear for all configurations.
Check the Active box to set the login option as active and add the link to the selected portal(s).
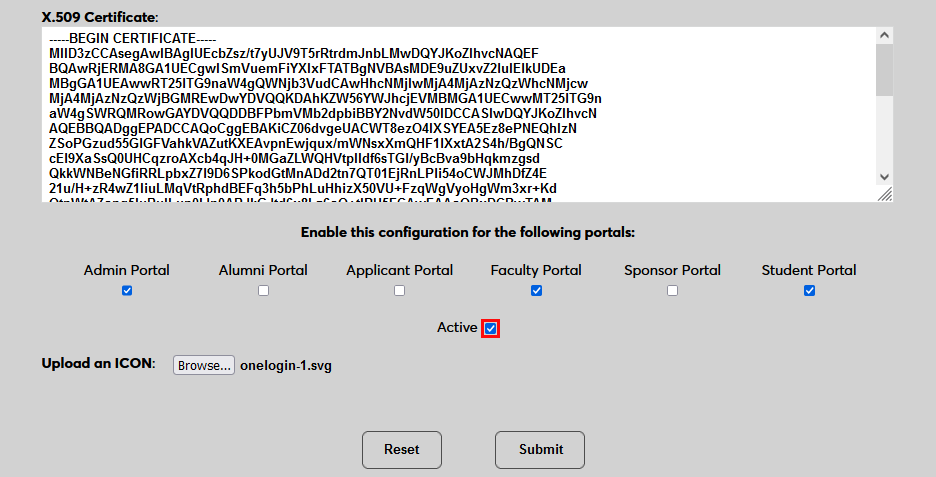
Click Submit to save the changes and activate the login option.
Manually Associating
There may be times when a user needs to be manually associated with Auth0 or another authenticator. For example, a single user has two different accounts with different SONIS IDs and the same email address, which would prevent them from signing in to Auth0 and associating account through the login page.
To manually associate a user, ensure that the Change Single Sign-On Property Value User Security privilege is active on the administrative account making the change.
Then navigate to the user's Biographic page and click the View link labeled SSO Property. A new window will open.
In the new window, click SAML x508 Certificate SSO Properties and then Add on the following page to continue.
If the user has more than one email address in their Address record, choose an email address to associate.
If the user has more than one module status, choose a status to associate.
Click Submit to complete the association.
The SSO Provider and User ID will be automatically added to this table once the user has manually logged in to SONIS using SAML x509 authentication. A second association can be added using the Add link or the association can be removed altogether by clicking Delete.
Note that a single email address can be associated with more than one module status, but a single module status cannot be associated with more than one email address.
Logging In
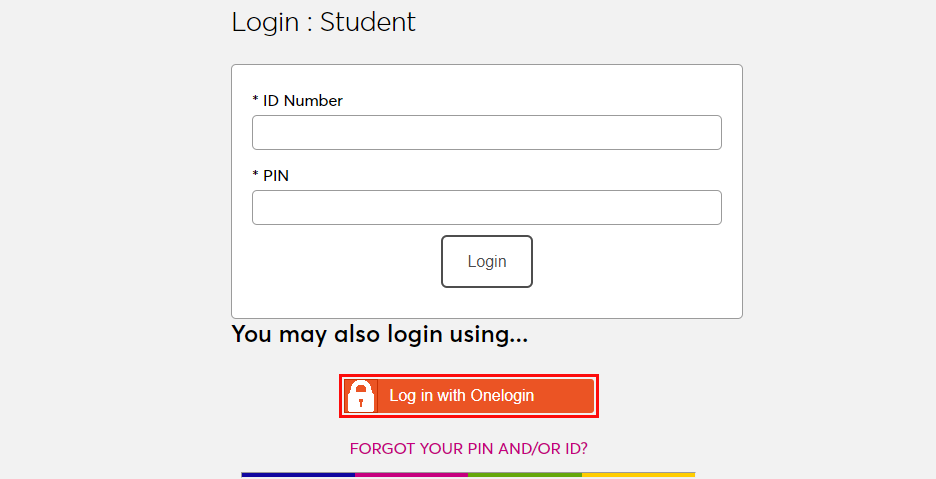
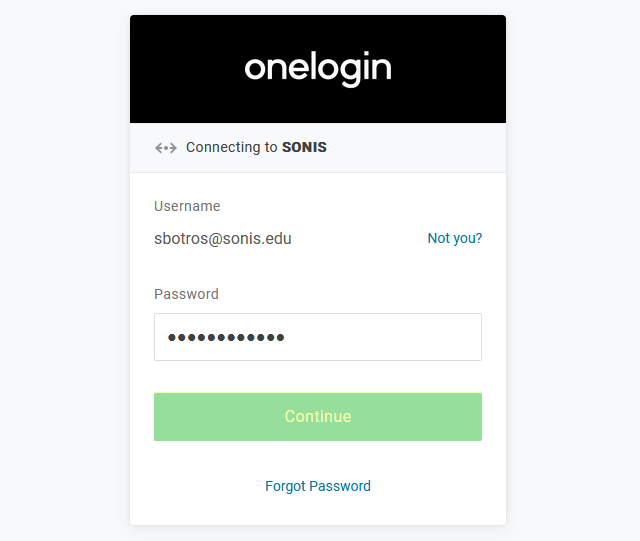
To log in to SONIS using OneLogin as the identity provider, click Log in with OneLogin from any login page where it has been activated.
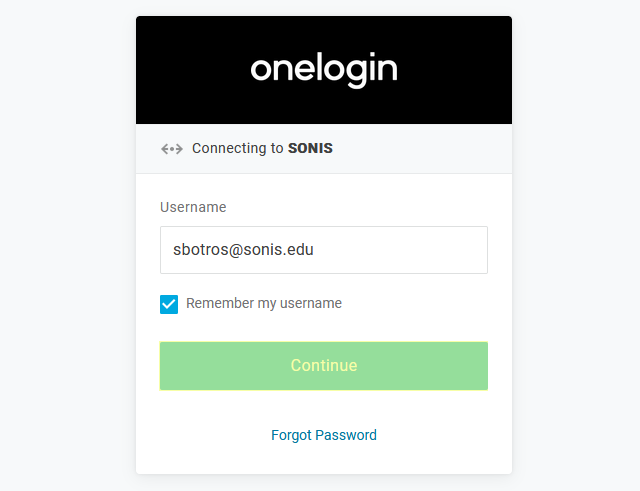
On the following page, enter the Email address and Password that were associated with the account in OneLogin.
If the user's email address in OneLogin matches a primary or secondary email address in any Address record in SONIS, they will be immediately logged in.
Administrators with Multiple
If an administrator has multiple accounts associated with the same email address, they will log in to OneLogin as normal. Once they've successfully logged in, they will be prompted to select an active account as the default account for single sign-on. Select an account from the Profile/User ID menu and click Submit.
Once the user is logged in to SONIS, they can toggle between account using the account picker tool in the upper right-hand corner.
Potential Errors
If the user successfully logs in to the identity provider, but their email address is not found in SONIS, they will see the following error message:
Ensure that the email address being used is listed in the user's Address record either in the primary or secondary field and attempt to log in again. The type of address record does not matter.
This error will also appear if the user has been successfully logged in to an identity provider where each user must be given access to the specific app used to connect to SONIS, such as OneLogin, and they were not given access. In this instance, simply grant access to the app and instruct the user to log in again.
If the user attempts to log in to a portal that does not match their module status using single sign-on, they will see the following error message:
Instruct the user to log in to the correct portal.
If an email address is listed in the Address record of more than one user with the same module status, the system cannot create an association between the identity provider login and a SONIS account. The following error message will appear:
Ensure that the email address being used is only attached to one account and attempt to log in again.
There is also a generic Please contact the system administrator. error message that may appear. This message should only appear if there is a SONIS database error of some kind. Contact Jenzabar SONIS Support for troubleshooting.