PowerFAIDS
PowerFAIDS Integration Overview
PowerFAIDS is a third party software that helps institutions to administer financial aid. Jenzabar SONIS provides users of PowerFAIDS functionality to share award information back and forth between the two systems.
The documentation on this page details the ins and outs of the SONIS integration with PowerFAIDS, focusing specifically on the desktop software. For more information on the way SONIS interacts with PowerFAIDS Cloud, see: PowerFAIDS Cloud Anticipated Awards, PowerFAIDS Cloud Disbursements, PowerFAIDS Cloud Programs Export, and PowerFAIDS Cloud User Export.
Once you've imported awards through PowerFAIDS, you can use the PowerFAIDS Anticipated Awards Utility to review awards. You can also use this utility to delete awards in bulk as long as they haven't been exported to your general ledger system.
SONIS Setup Prior To Importing/Exporting
SONIS's PowerFAIDS processes depend on certain data existing in SONIS prior to processing any imports from PowerFAIDS or creating export files within SONIS for processing in PowerFAIDS.
The following tables and functions are listed in the order they should be populated and/or created based on their dependencies.
System Default Tables
These tables are delivered to the SONIS member institution pre-populated. There is no utility for them because they can not be changed by users. System Default refers to tables that cannot be edited by users.
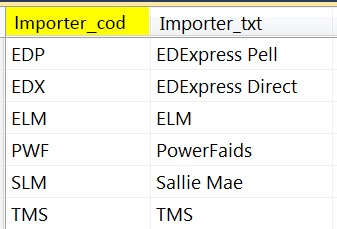
Importer
The Importer table is limited to third-party software that SONIS provides integration functionality for. In other words, a function has been added to SONIS that creates exports for importing data into the third-party software, in this case, PowerFAIDS. Importer_cod links the Importer table with the Importtcodes table, the associated function being the Financials menu Import Tcodes.
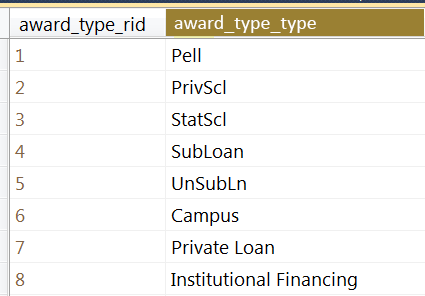
Award Type
The Award Type table is limited to those award types SONIS supports, as determined by the awards supported. This table provides linkage between the Award Type table and the Award table via the award_type_type.
PowerFAIDS Basic Tables
There are tables in PowerFAIDS called Basic Tables that will be used in many of the integration functions within SONIS. Generally, these Basic Tables are defined and populated during a PowerFAIDS implementation and are already in use. Each of the Basic Tables are located in the Systems area of PowerFAIDS.
• Campuses
• Divisions
• School Years
• Semesters
Awards Table in PowerFAIDS - Definitions
Table Field Name | Data Type (length) | Description |
|---|---|---|
all_memo | char(250) | Allocation memo or notes. |
campus_based | logical | Used to indicate the funds are campus-based federal funds. |
allocation | decimal | The full allocation amount for the funding year. |
directloan | yes/no | Whether or not the loan is a Direct Subsidized or Unsubsidized Loan. |
amt_1 | decimal | Amount of the award. |
disbursements | int | The number of disbursements scheduled for the full award. |
award_type_type | int | The general source type of the award. |
enrollstat_cod | char(2) | The code for the enrollment status being reported to COD. |
awd_cod | char(8) | Award code (elsewhere 'awd_id'). |
loan_fee_perc | decimal | The loan fee percentage. |
awd_note | char(250) | Any notes about the award. |
pf_id | char(8) | PowerFAIDS ID for the award. |
awd_txt | char(50) | Award's full name. |
title4 | logical | The loan is eligible for loan forgiveness under Title IV. |
Transaction Codes in SONIS
There must be Transaction Codes for Awards in Table Maintenance to proceed with the following setup.
It should be set up as shown below. Those columns not shown should be filled in with either a 0 (zero) or space depending on the data type (i.e. character, number, 1/0 (yes/no).
act_type | act_code | tcode | refer_id | explanation |
|---|---|---|---|---|
a | = | AW | Award | only required t-codes |
b | + | IF | Internet Fee | School general charge |
b | - | OP | Over Payment Refund | Student school-related credit |
c | + | TN | Tuition - Nursing | School charge for specific programs, etc. |
c | - | XL | Fed Sub Stafford Loan | Student credit for loans, grants, etc. |
h | + | KY | Key Deposit | School housing-related charge |
The setup for AW in Table Maintenance is shown below. All other settings should be a <space> or <0> (zero), depending on the datatype.

See Transaction Codes for detailed information on t-codes.
PowerFAIDS-Specific Tables
PowerFAIDS Award Codes
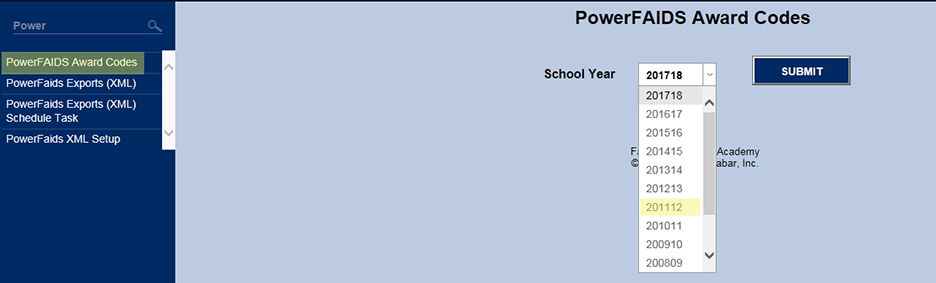
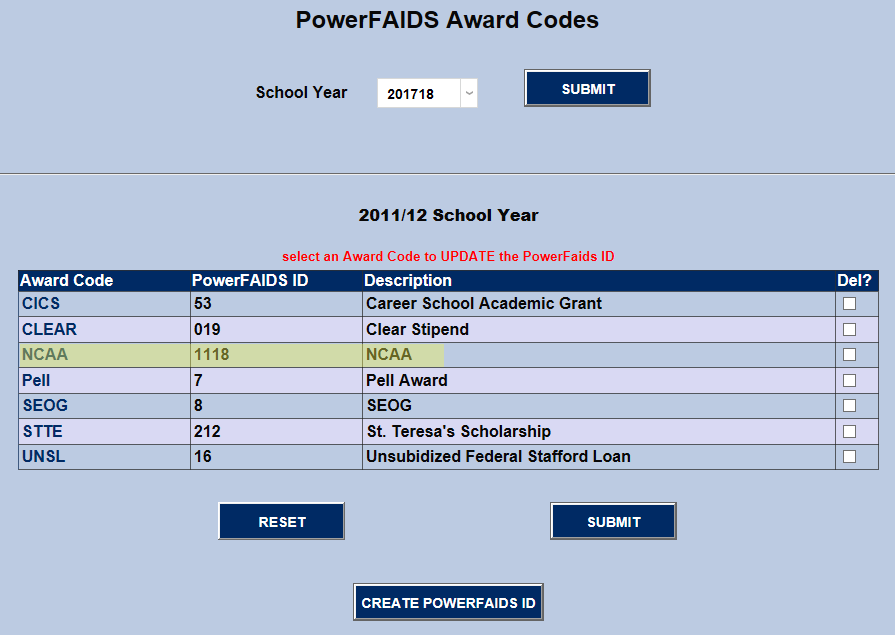
This Systems function assigns specific PowerFAIDS IDs to SONIS award codes that have been created in Award Codes.
The first step is to select a school year which the award code will be associated with.
Once selected, the user should focus on the bottom portion of the page. The top portion is used to change the school year.
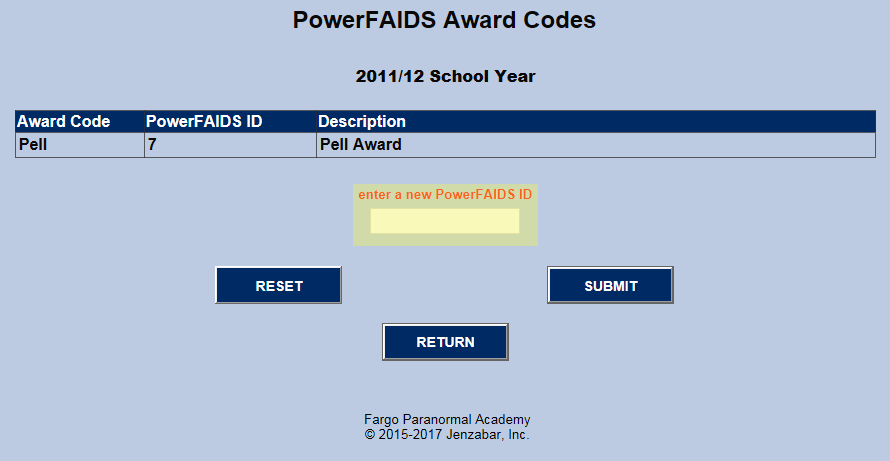
Listed at the bottom are all of the assigned PowerFAIDS award codes for the selected school year. The award can be assigned a different PowerFAIDS ID by clicking a specific Award Code.
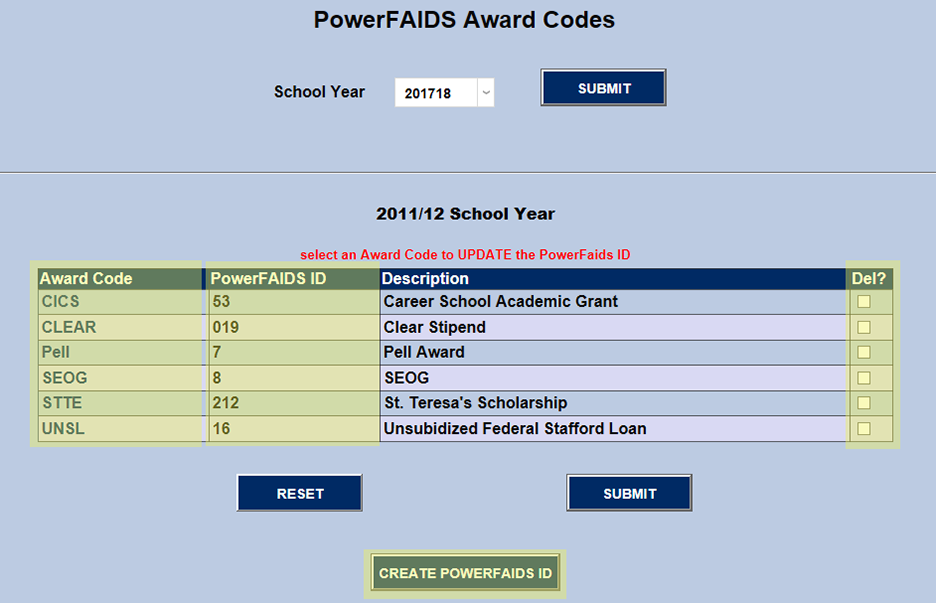
For example, when the PELL Award Code is selected, a text box opens for the new PowerFAIDS ID. Simply enter it and click Submit.
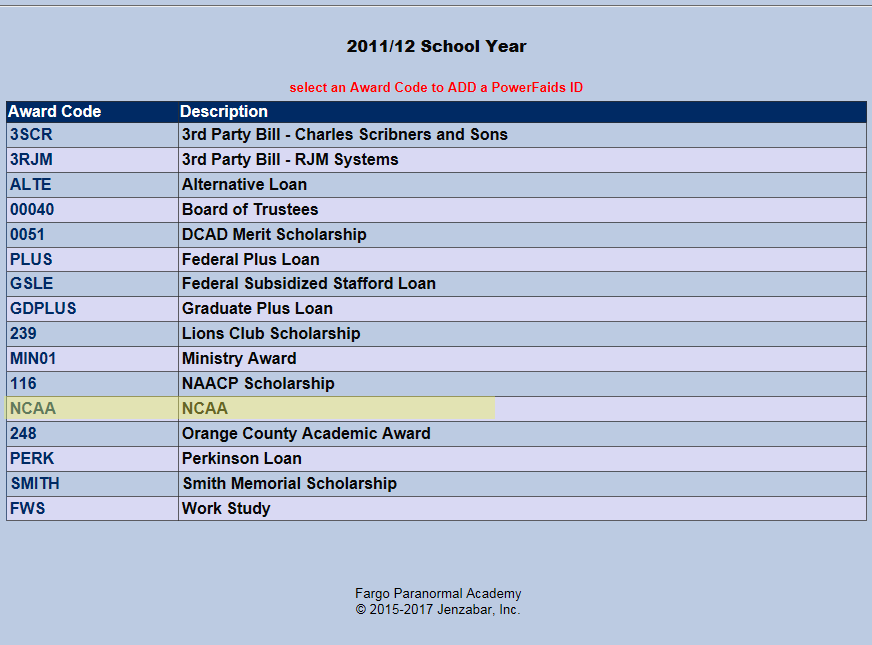
When the CREATE PowerFAIDS ID button is clicked the Award Codes that are not assigned to a PowerFAIDS ID for the selected school year will display. In the example, NCAA is clicked.
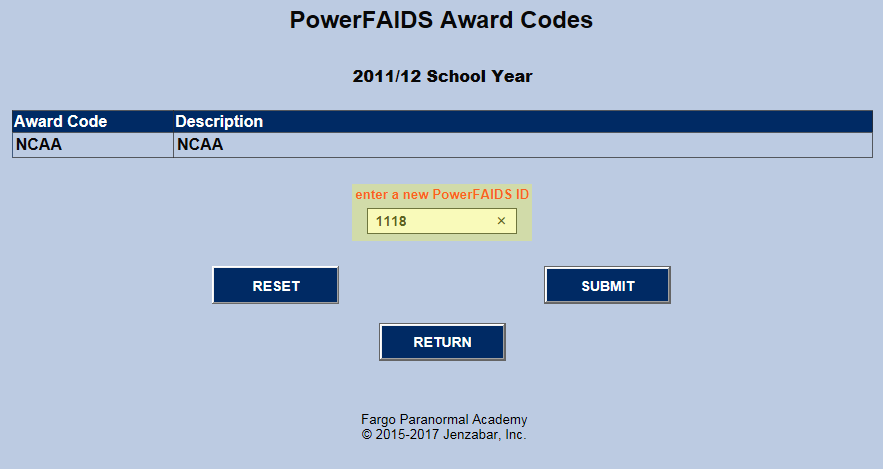
As with reassigning Award Codes a PowerFAIDS ID, an UNASSIGNED Award Code should be clicked, and the PowerFAIDS ID should be entered for assignment to the selected Award Code.
When the new Award Code assignment has been submitted, the unassigned Award Codes display again. Note that NCAA is now missing from the UNASSIGNED list of Award Codes.
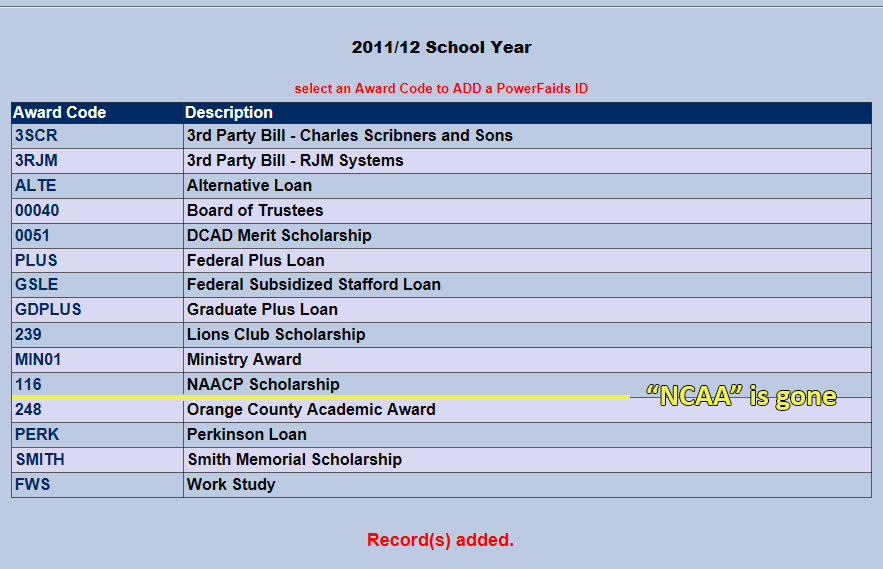
However, when the user returns to the beginning of the function and selects a school year, NCAA appears in the list of ASSIGNED Award Codes.
Therefore, the NCAA Award Code can be referenced in the PowerFAIDS import/export files as 1118.
Imports
Import T-Codes
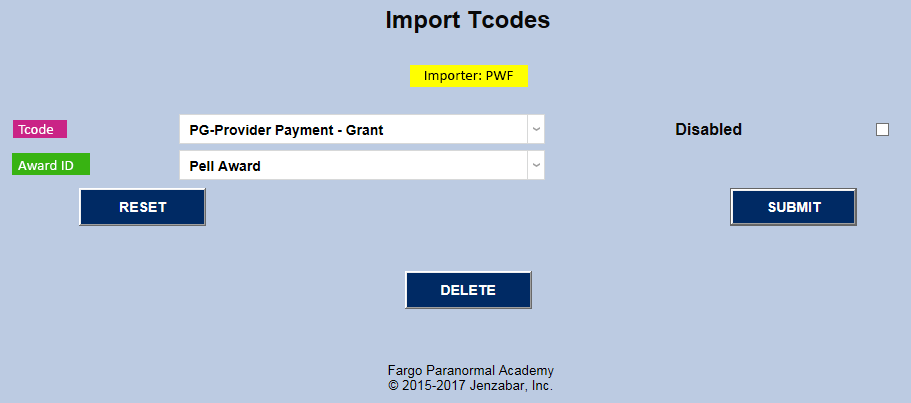
This function sets up T-CODES and AWARDS associated with PowerFAIDS imports into the IMPORTTCODES table.
The primary columns are defined below:
awd_id (string) - the award ID or code
loan_cod (string) - Loan Code does not apply to PowerFAIDS.
disabled (yes/no) - whether or not the import t-codes can be used
tcodes (string) - the import transaction code
importer_cod (string) - 'PWF' for PowerFAIDS
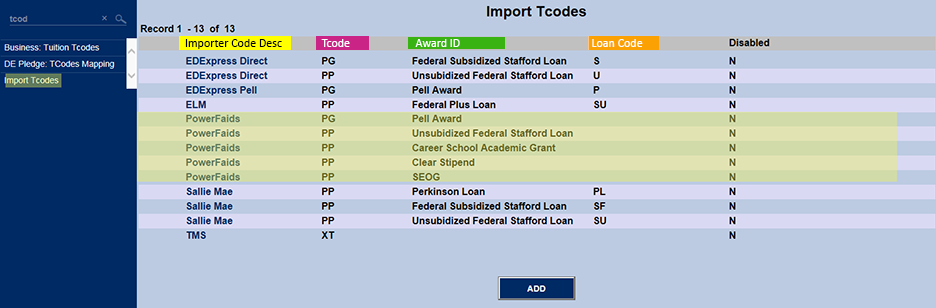
The links in the Importer Code Description listed in that row.
The ADD button takes the user to the same template.
FINAIDSEM Table
The first step for all of the PowerFAIDS functions is to set up each annual import/export in Table Maintenance. Find PowerFAIDS Setup in the list and click on it.
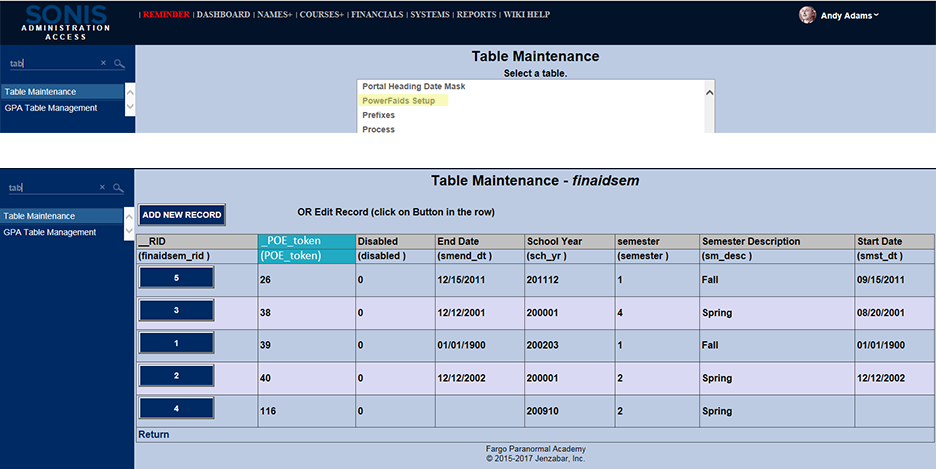
disabled (yes/no) - Disabling prevents any PowerFAIDS spreadsheet for the same school year/semester from importing. | semester (string) - The code for the semester. |
finaidsem_rid (number) - The row ID of the table FINAIDSEM. | sm_desc (string) - The full text of the semester. |
POE_token (string) - X | smend_dt (date) - The date when the semester starts. |
sch_yr (string) - The school year being used. | <smst_dt (date) - The date when the semester ends. |
Exports
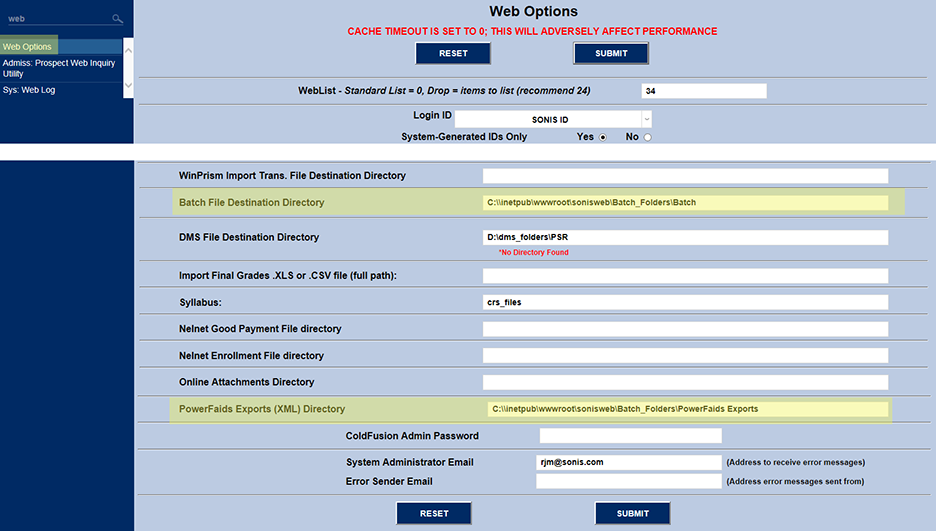
Web Options
Before exporting data, the Batch File Destination Directory and PowerFAIDS Exports XML Directory must be set to point to a location for these files to be stored.
PowerFAIDS Export Custom Tags
The export file is basically several pairings of a tag followed by a value for that tag. For example, the tag Campus may be stored in positions 1510 through 1515. Its value Main would be stored in positions 1516 through 1525.
In that section of the file, it would appear as "CampusMain". Since there are 10 spaces for the value of Campus and Main is only 4 characters, the remainder of the 1516 through 1525 range must be filled with spaces so that the next tag begins in position 1526.
The majority of the tags are hard-coded in the file, but space is set aside for Custom Tags.
Custom Tags are school-specific tags assigned to otherwise blank strings in the export file.
These Custom Tags are set up in Table Maintenance.

Notice that Affiliation Code Tag includes the word tag, whereas ATB Transcript Received does not. This distinguishes tags from values.
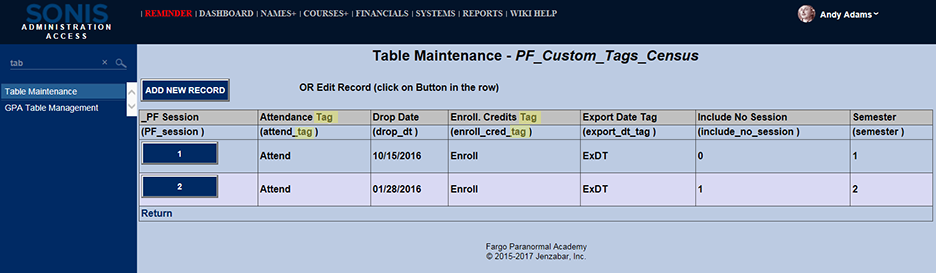
PowerFAIDS Export Custom Tags Census
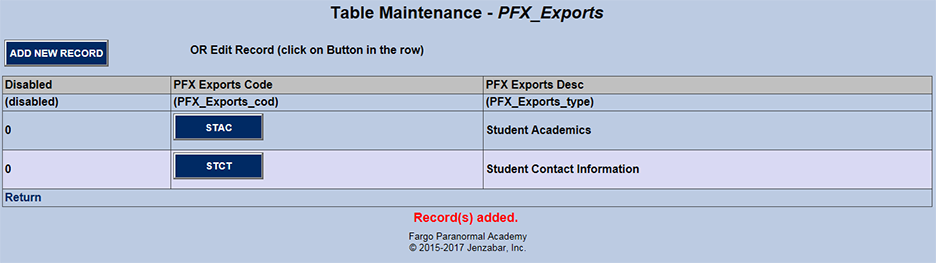
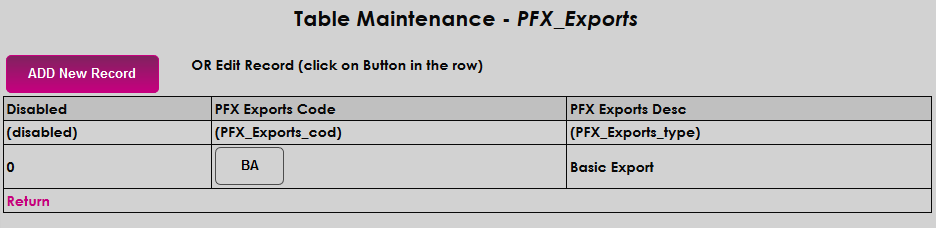
PFX_Exports Table
The PFX_Exports_Code is a PowerFAIDS value that identifies the format and content of the export file. This is required because each export file is different in format and content, and therefore, a different extractor is required for each file.
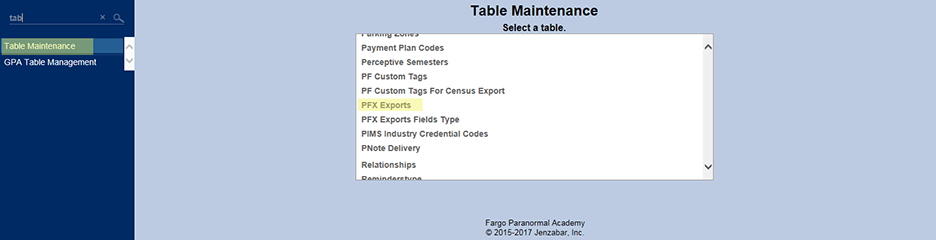
PFX Export Codes should relate somehow to the data that is being exported to PowerFAIDS.
PowerFAIDS XML Setup
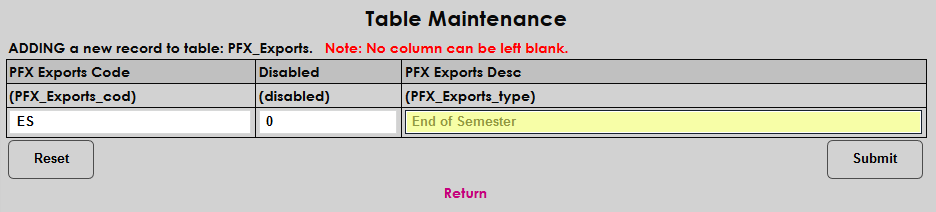
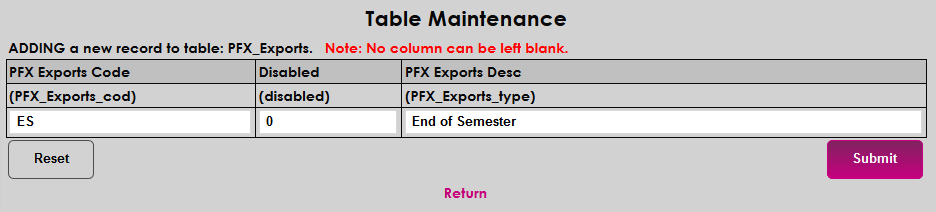
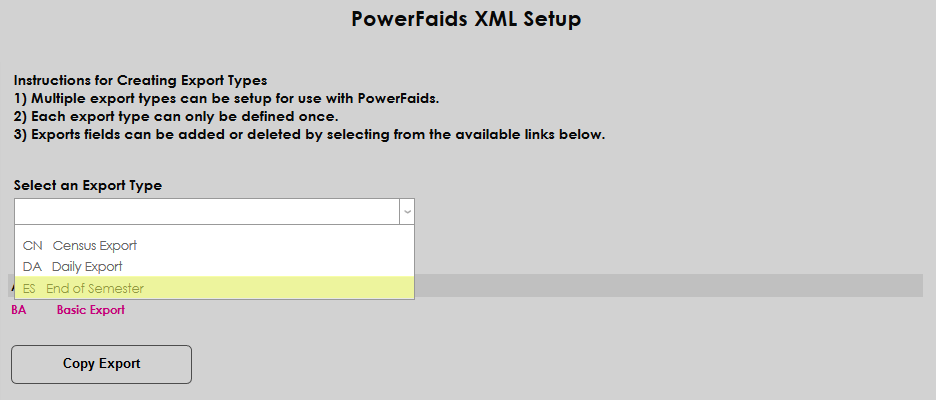
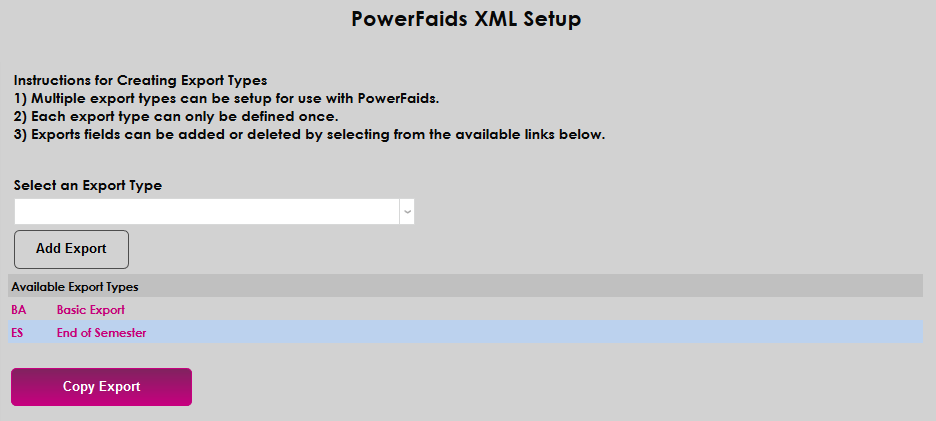
SONIS PowerFAIDS users can have more than one export type with different fields included. A Basic Export type is created by default, but additional types must be added through the PowerFAIDS Exports table in Table Maintenance. To add a new export type, click Add Record.
Enter a code that will be used by the SONIS system to store the export type. The code can be between one and four characters.
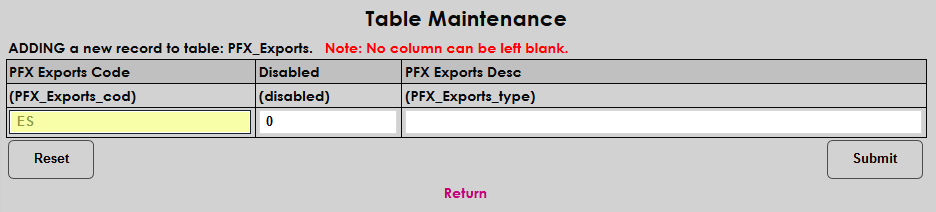
Enter a longform Export Description. The field has a 30 character limit.
The Field Types included in exports can also be controlled through Table Maintenance.
To set the fields included in a new export, select the Export Type and click Add Export.
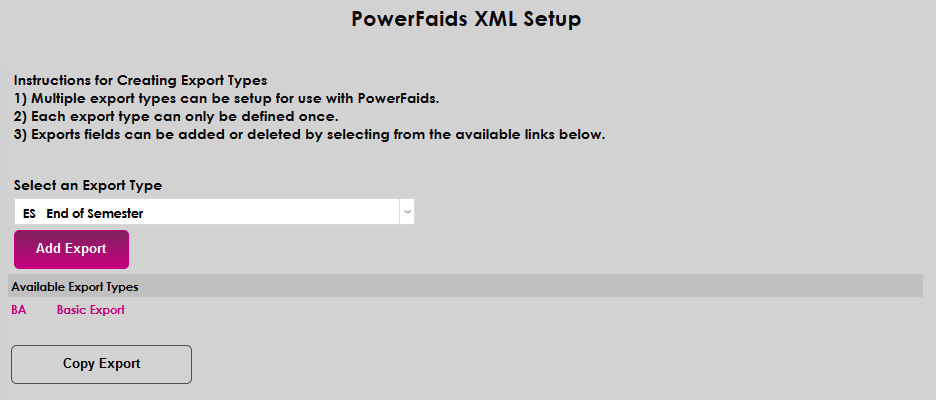
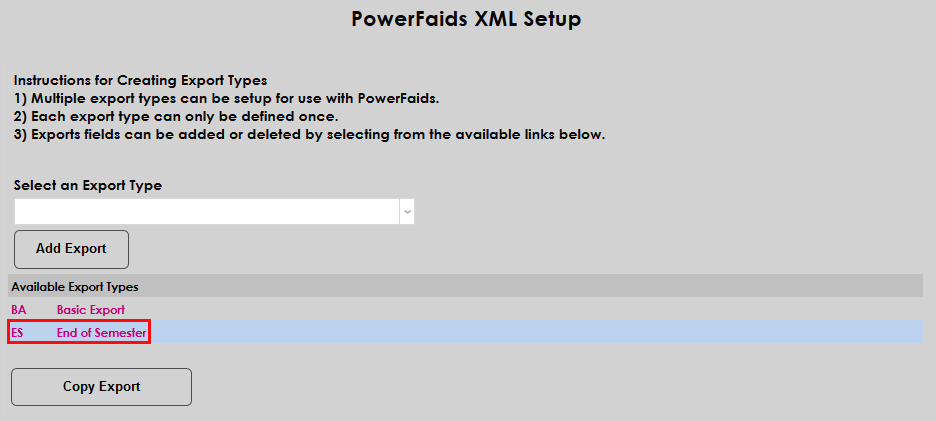
Once it's been added to the list of Available Export Types, click the name of the export type to edit it.
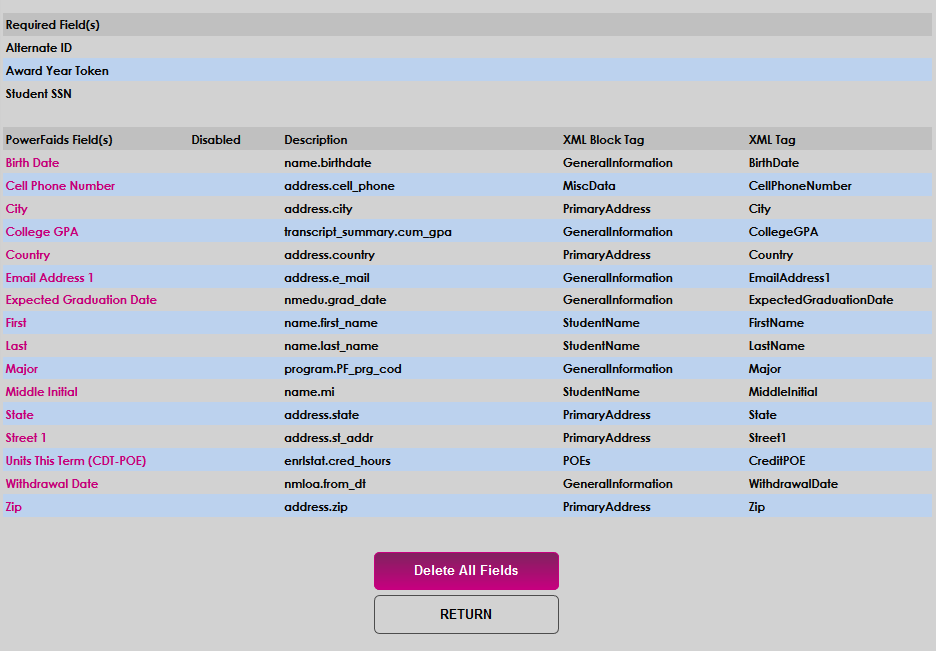
On the following page, three required fields are listed — Alternate ID, Award Year Token, and Student SSN. These fields will be included in every export regardless of other changes made.
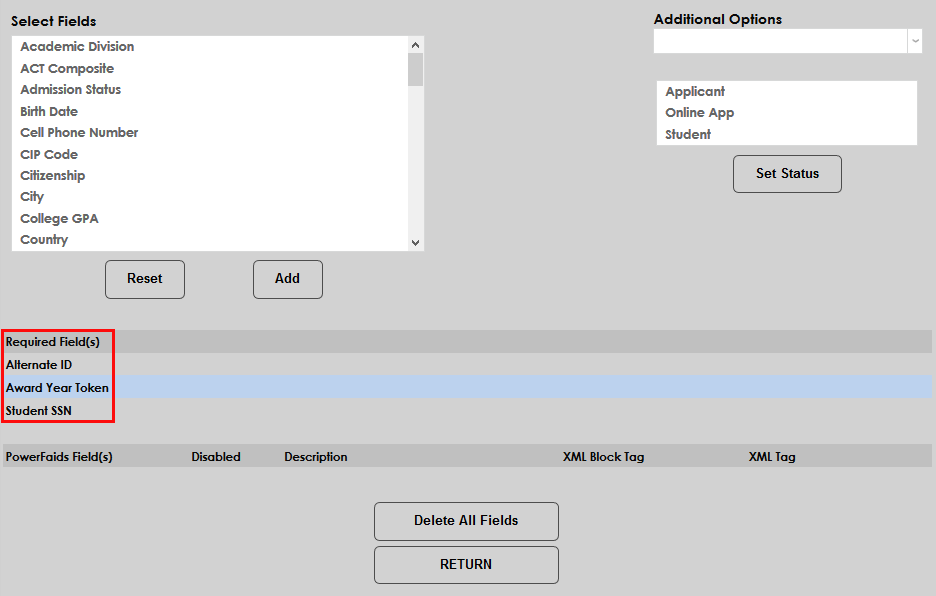
Select additional fields to be included in the export and click Add. Multiple dispositions can be selected.
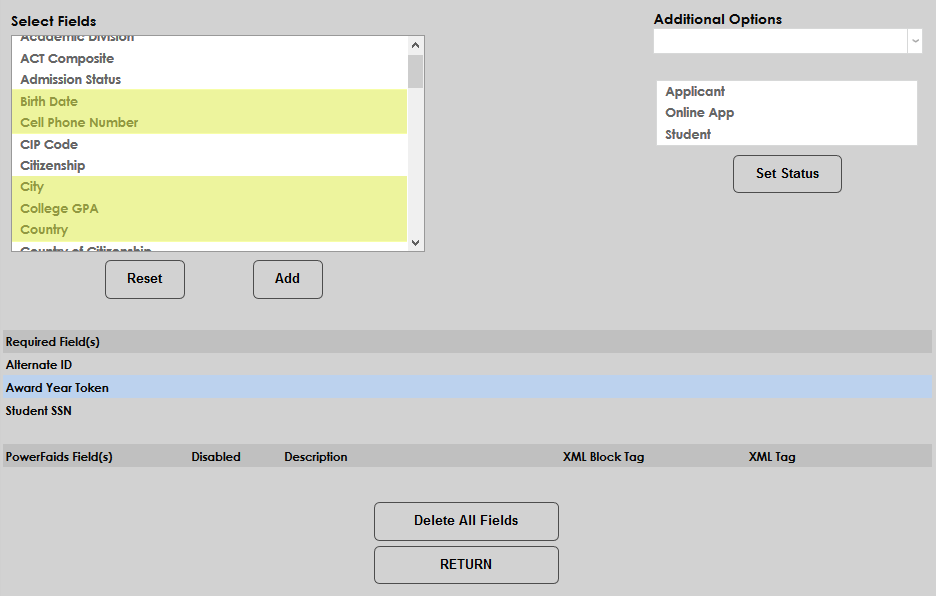
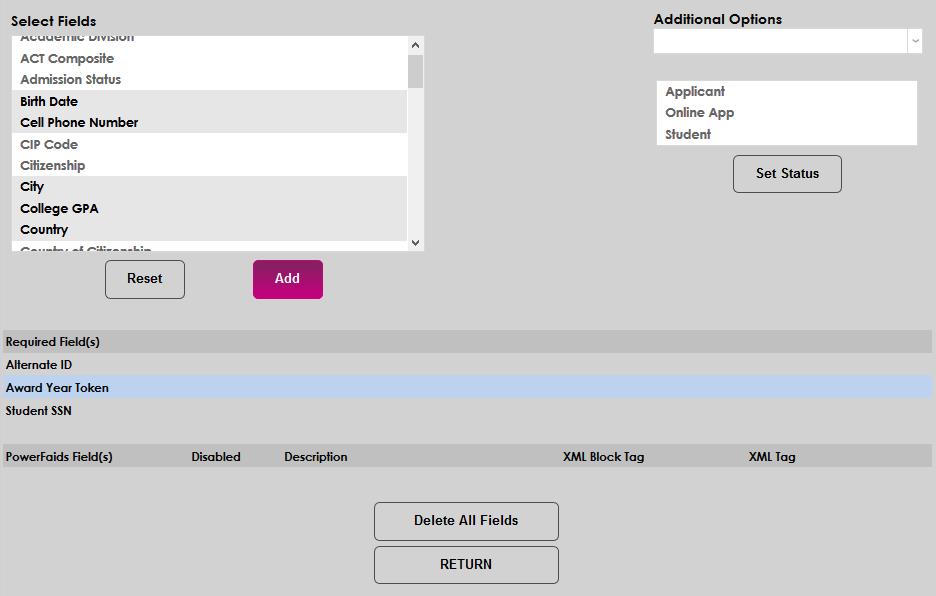
The following fields are available:
Data Element Description | Data Element Description | Data Element Description |
Academic Division | Enrollment Status This Term | Race/Ethnicity |
ACT Composite | Entrance Interview Date | SAT Math |
Admission Status | Exit Interview Date | SAT Verbal |
Birth Date | Expected Graduation Date | Special Programs |
Cell Phone Number | First | State |
CIP Code | Hispanic/Latino | Street 1 |
Citizenship | Last | Street 2 |
City | LOA Start Date | Telephone |
College GPA | Major | Title/Gender |
Country | Middle | Transfer Student |
Country of Citizenship | Middle Initial | Units This Term |
Date of Withdrawal | Preferred | Veteran Status |
Email Address 1 | Program Academic Year in Weeks | Withdrawal Date |
Email Address 2 | Program Credential Level | Zip |
Enrollment Date | Published Program Length | |
Enrollment School Code | Published Program Type |
Complete “Data Element Descriptions” are found in the PowerFAIDS User’s Guide: External Update XML Common Import Record Layout.
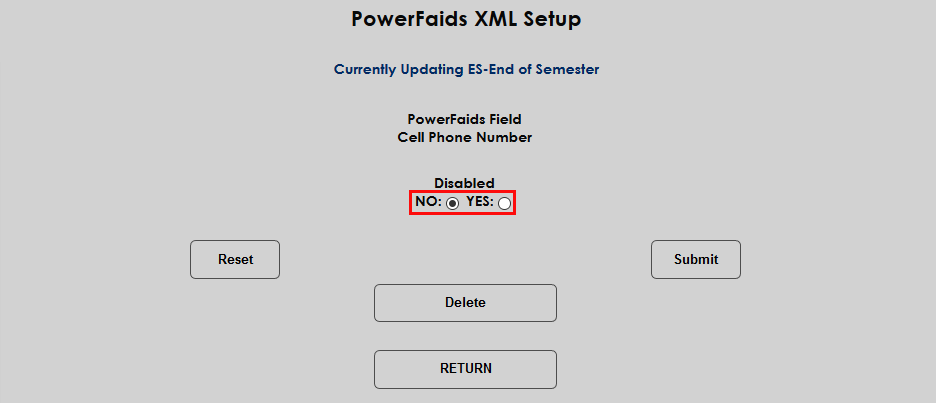
Once fields have been added, they can be altered individually by clicking on the name of the field under the PowerFAIDS Fields column.
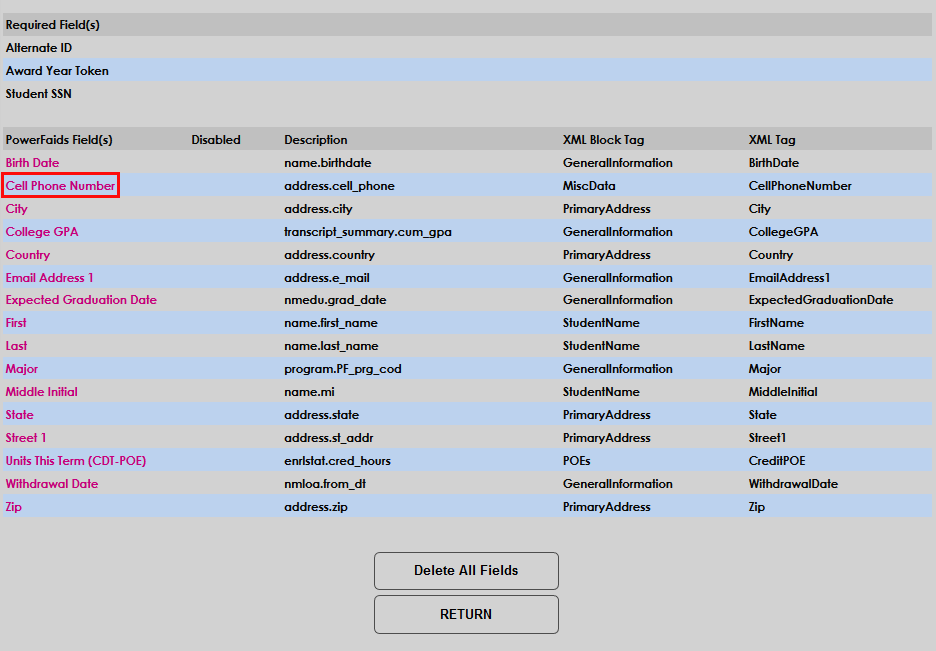
Each field can be Disabled using the Yes/No radio buttons or click Delete to remove the field entirely.

Back on the field select page, users can click Delete All Fields to delete the optional fields and start over.
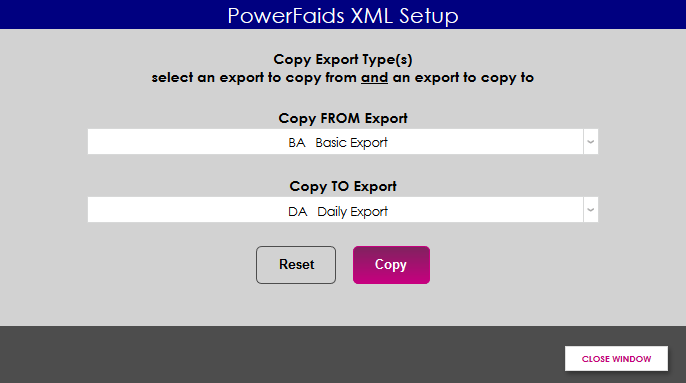
For a faster way to set up a new Export Type that will be similar to an existing type, click Copy Export on the start page.
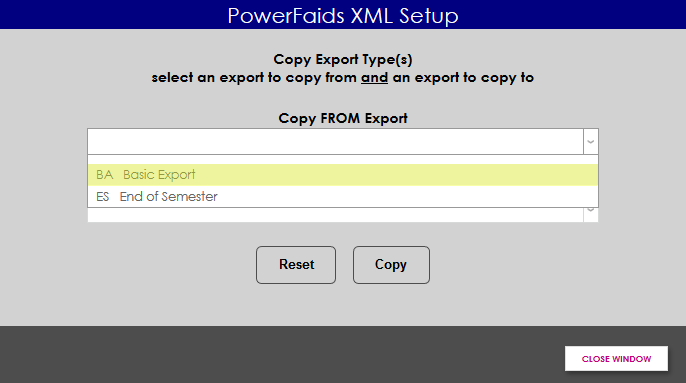
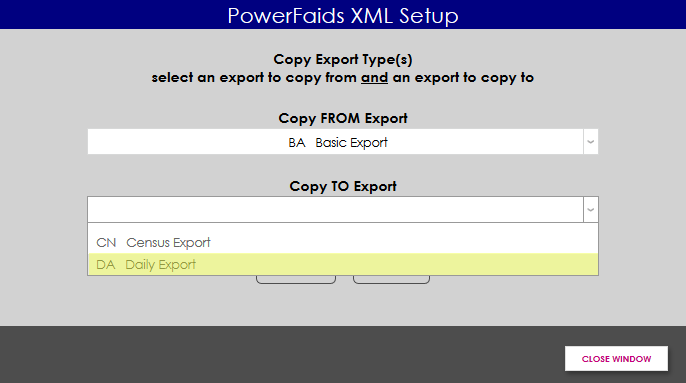
When the Copy button is clicked, a new window pops up. Select an existing export to Copy From and a new export to Copy To and click Copy to finalize the process.
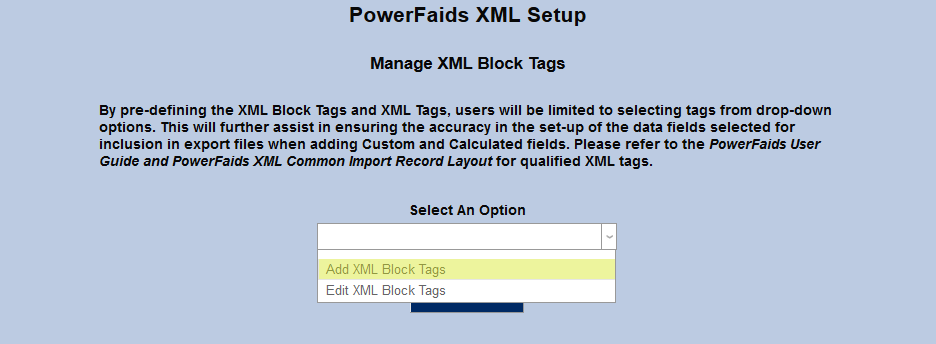
To create and edit block tags, navigate to the PowerFAIDS XML Setup utility under the Systems menu and select Define XML Block Tags from the dropdown menu on the right side of the page.
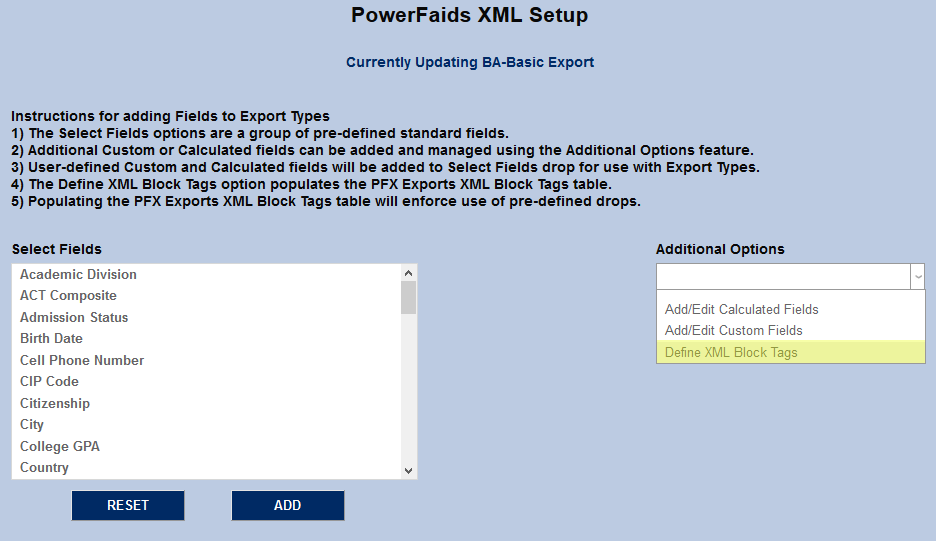
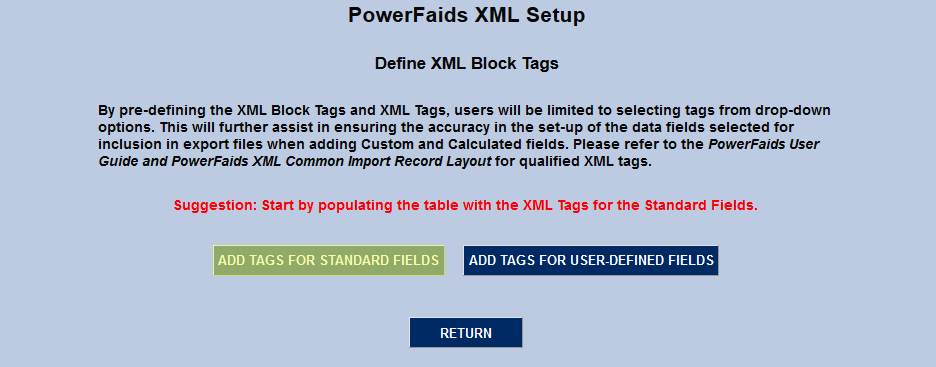
Upon selecting this option, users can proceed with adding their own custom XML tags or begin by adding the XML tags for the standard fields already defined for use with the exports. The latter is preferable and will lend itself to improved accuracy in the export file creation process.
Note: If user-defined field tags are added to the XML Block Tag table, without having added the standard fields tags, the option to Add Tags for Standard Fields will no longer be available as an option. As such, it is highly recommended that the Standard Fields Tags be added first.
On the following page, administrators can choose to Add XML Block Tags or Edit XML BLock Tags.
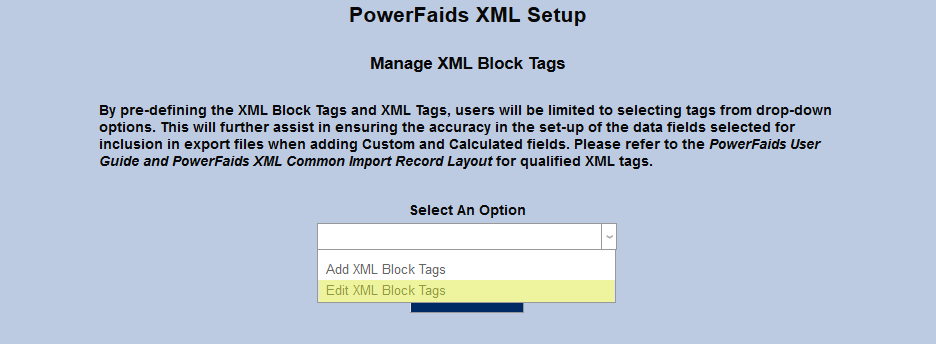
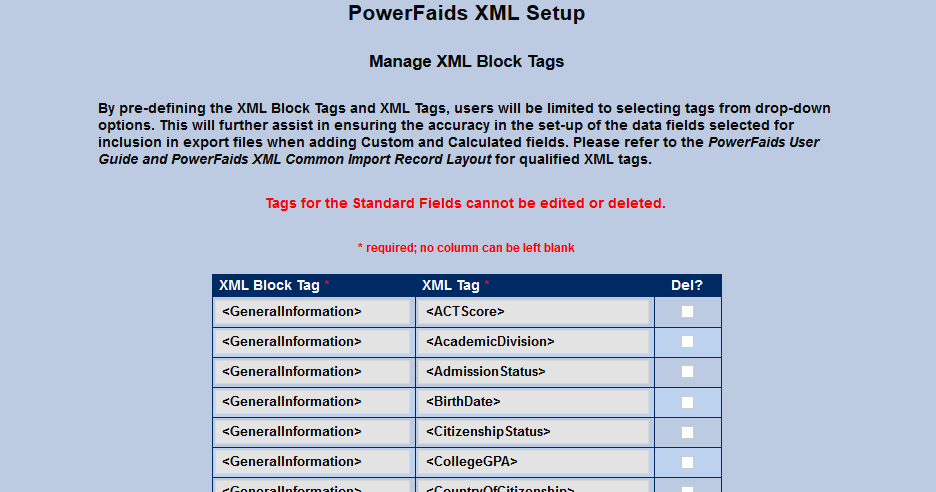
Choosing the edit option will bring up a list of existing block tags. Select a block tag to make edits.
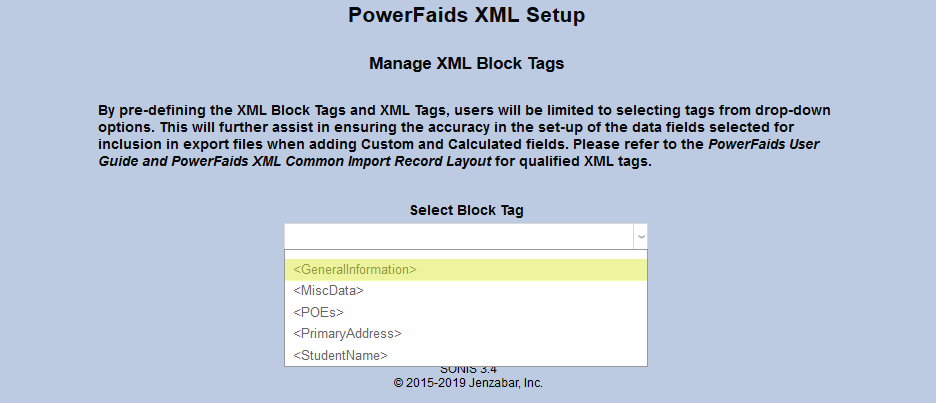
Selecting a block tag category provides a list of the XML block tags and associated XML tags that are now available in the table and for use in custom and calculated fields.
Using the Add XML Block Tags option, users can add their own pre-defined tags. The XML Common Import Record Layout PowerFAIDS User Guide (Appendix C) should be used as a reference to ensure the additional of qualified tag pairs.
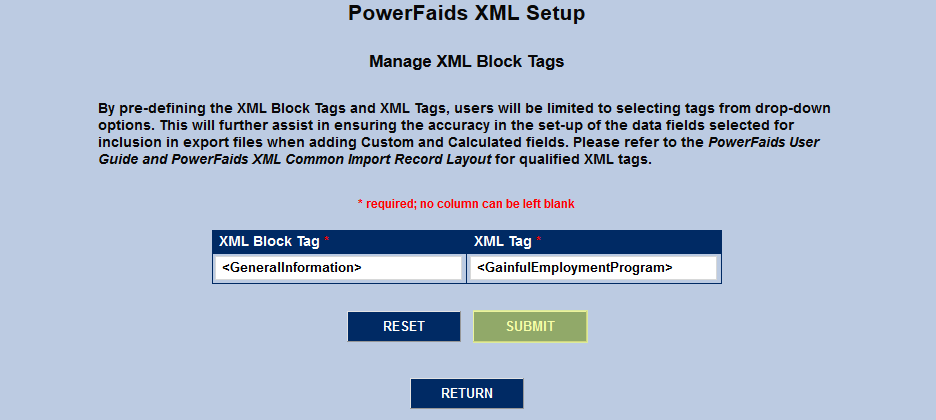
Once back to the Edit XML Tags option, the user-defined field is available and can be updated or deleted as desired.
Once any data resides in the XML Block Tags Table, users will no longer have the option to perform freeform data entry in to the tags fields when adding custom or calculated fields. The previous input fields will convert to drops, linking block tags to their associated XML tags.
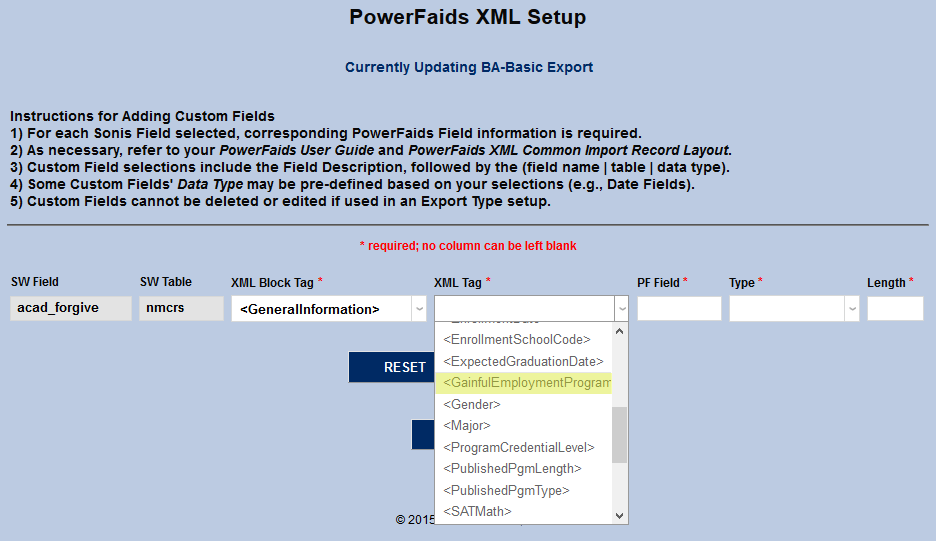
If the user changes the original XML Block Tag selection, the options available for selection in the XML Tag drop will also update. However, precautions should be taken to ensure that any change in the XML Block Tag will match the original SW Field and SW Table data originally selected for inclusion with the field.
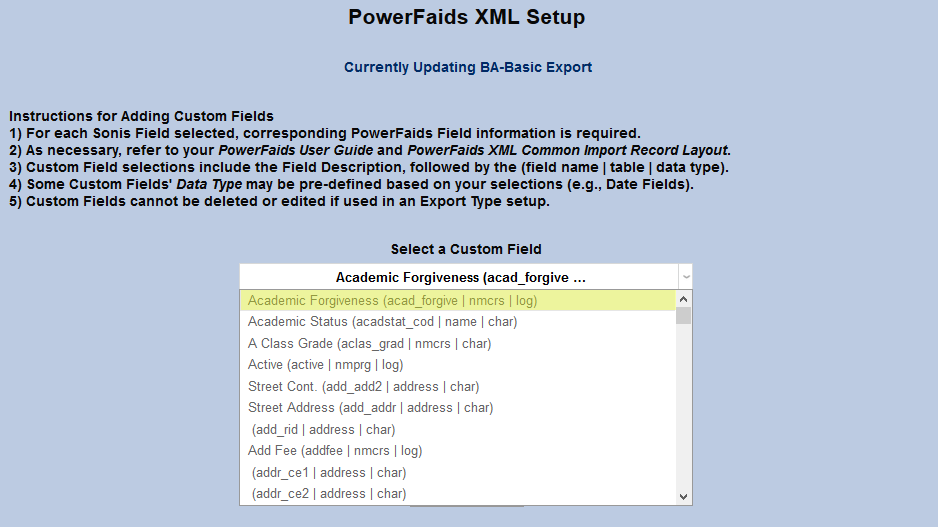
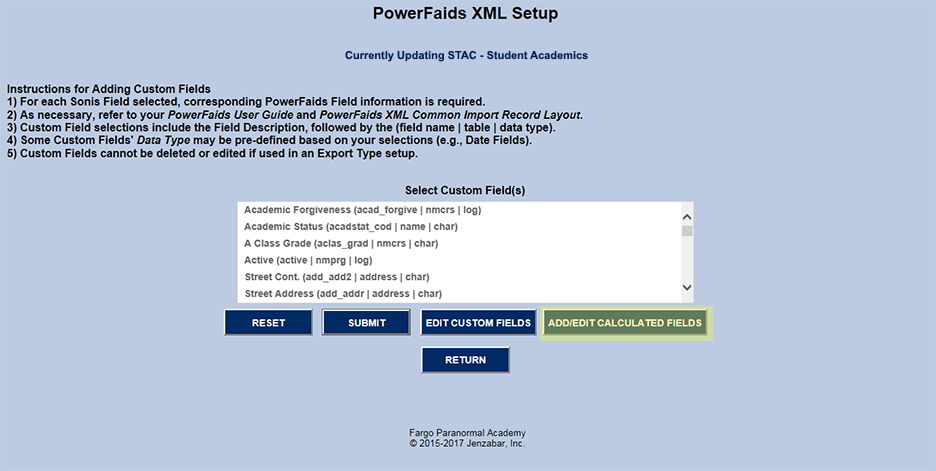
In addition to the standard set of PowerFAIDS fields, users can add custom fields to the XML file by selecting the “Add/Edit Custom Fields option . These fields use PowerFAIDS custom tags.
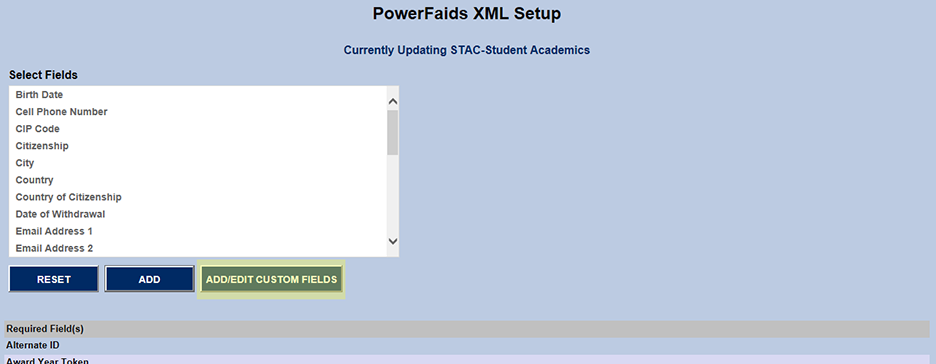
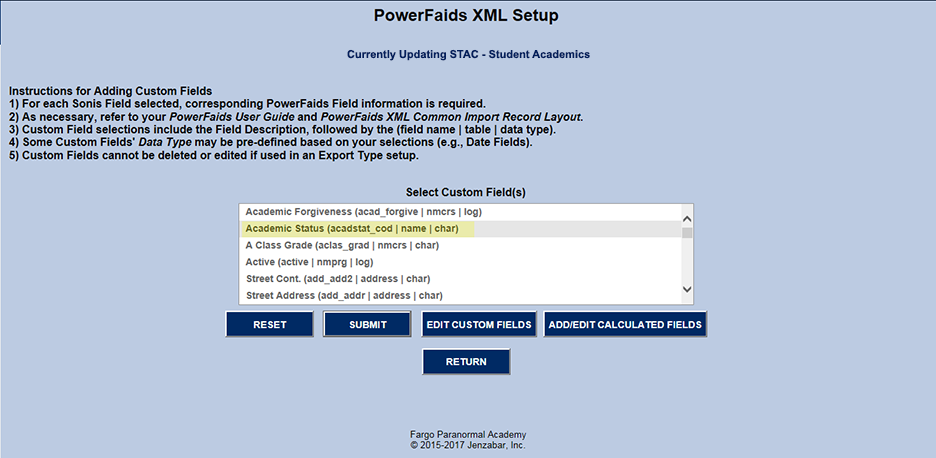
The Select Custom Field(s) option includes data from the NAME, NMCRS (NAME COURSE), ADDRESS and NMPRG (NAME PROGRAM) tables. Even the tables’ extra fields (e.g., <table name>.ce1, <table name>.fe1, <table name>.ne1, etc.) for institutions using them are available. These fields are SONIS fields for which there are no equivalents in PowerFAIDS.
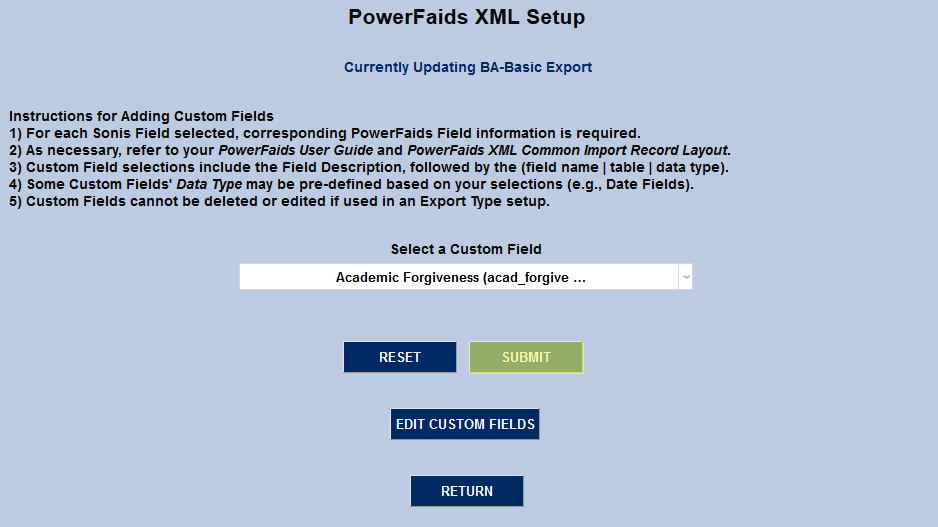
Custom Field(s) can be selected for addition to an XML export file. Submit moves the process to the next step.
Note: "Custom" is a term PowerFAIDS uses to describe fields that SONIS has that PowerFAIDS does not use. The term should not be confused with how SONIS typically uses "custom" to describe functional additions or changes for a specific customer.
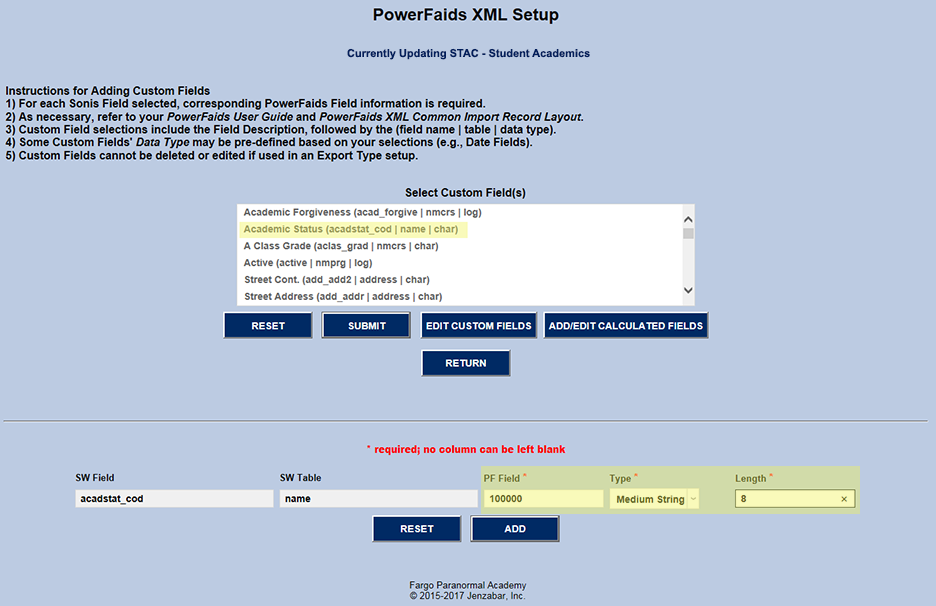
When PowerFAIDS custom fields are first submitted, the setup requires three fields to finish the association between SONIS data and PowerFAIDS data. A “PF Field” should be a 6-digit numeric to separate it from the other fields that are alpha. It is up to each customer to keep a record of these numbers and to what SONIS field they are related.
Note: It is suggested that 0 (zero) be avoided as the leading digit because of how many systems drop leading zeros.
Type and Length should be based on those settings in SONIS. The SONIS datatypes vary from those used by PowerFAIDS. For that reason, the information below indicates how to translate those data types.
For additional SONIS datatypes and lengths, refer to Data Dictionary Search.
PowerFAIDS | SONIS |
String (maxlength = 5) | Char(5) or fewer |
Medium String (maxlength = 15) | Char(6-15) |
Long String (maxlength = 50) | Char(16-50) |
In the example below, “work_phone” was selected from the “Select Custom Field(s)” list. The table in which “work_phone” is found (i.e., ADDRESS) and the column (i.e., “work_phone”) are saved to the export file.
The user must assign “NAME.work_phone” a “PF_Field”. It is strongly recommended that users create “PF_Field”s with integers only (ex. 200000). These numbers will need to be saved in a local spreadsheet or some place for both look-up and subsequent field number assignment.
It is also recommended that tables be assigned a number. Then each field used as a “PF Field” from that table has that table number as its initial number. PowerFAIDS doesn’t care what is assigned as the “PF Field” as long as it is unique. However, by following this simple method, naming PF fields can assure that they're unique and the user will immediately know in what table a field in the XML file traces back to in SONIS.
Table No. | Table Name | SONIS Field | PowerFAIDS Field | Datatype | Length |
|---|---|---|---|---|---|
1 | NAME | acadstat_cod | 100000 | Medium String | 8 |
corporate | 1000001 | Integer | 1 | ||
2 | ADDRESS | memo | 200000 | Long String | 50 ** |
work_phone | 2000001 | Long String | 30 | ||
3 | NMCRS | advanced_standing_hours | 300000 | Decimal | 5 |
course | 300001 | Medium String | 10 | ||
enrol_date | 300002 | Date | 10 | ||
inst_txt | 300003 | Long String | 50 | ||
** This field is longer in SONIS and may be truncated. | |||||
In the example below, the SONIS field, acadstat_cod, has been selected. The administrator uses the chart above to get the required PowerFAIDS: values to enter into the "PF Field", "Type" and "Length" fields. This setup allows the two systems to share "acadstat_cod"/"100000" data.
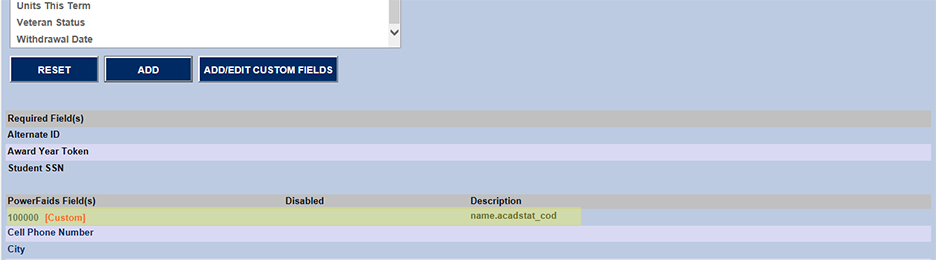
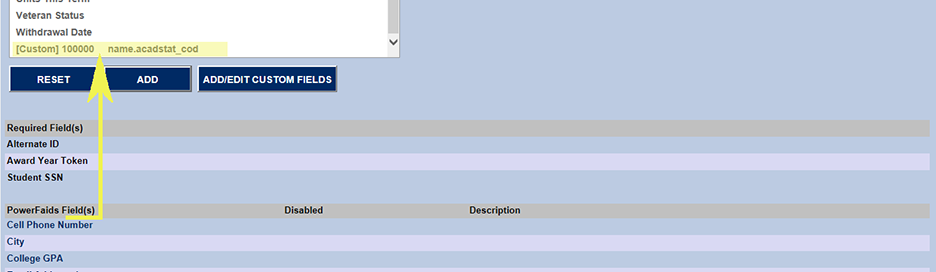
Once it is ADDED, it is added to the PowerFAIDS Field(s) list. The field is identified as a custom field with [Custom].
To DELETE a field from the PowerFAIDS Field(s) list, click the field name (see above). Doing so takes the administrator to the deletion page. Simply click the DELETE button (see below).
The DELETE option is typically used to correct entry errors. For example, if the "PF Field" was entered incorrectly, that custom field must first be deleted.
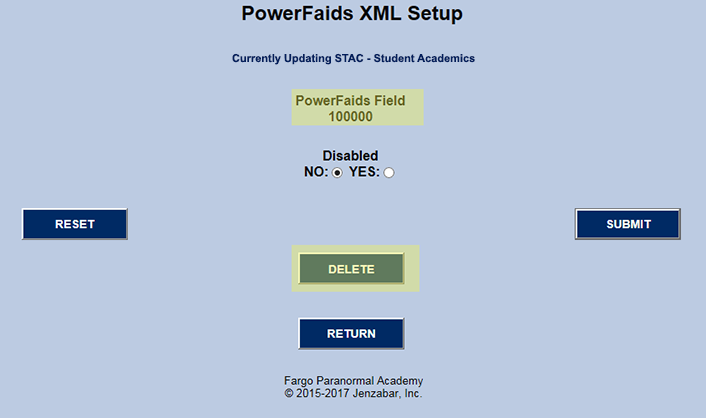
However, this function does NOT totally delete the custom tag from SONIS. Rather, the field is removed from PowerFAIDS Field(s) and added to Select Field(s) for later use.
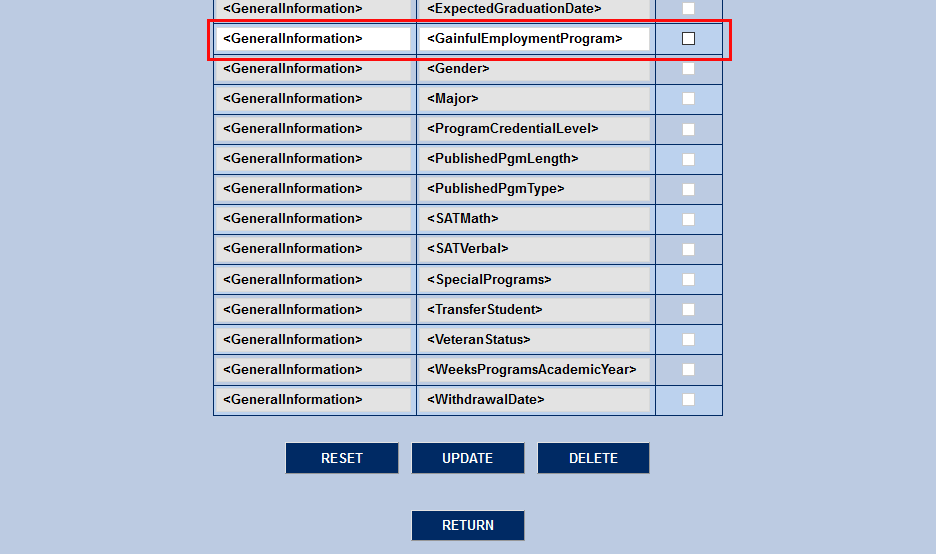
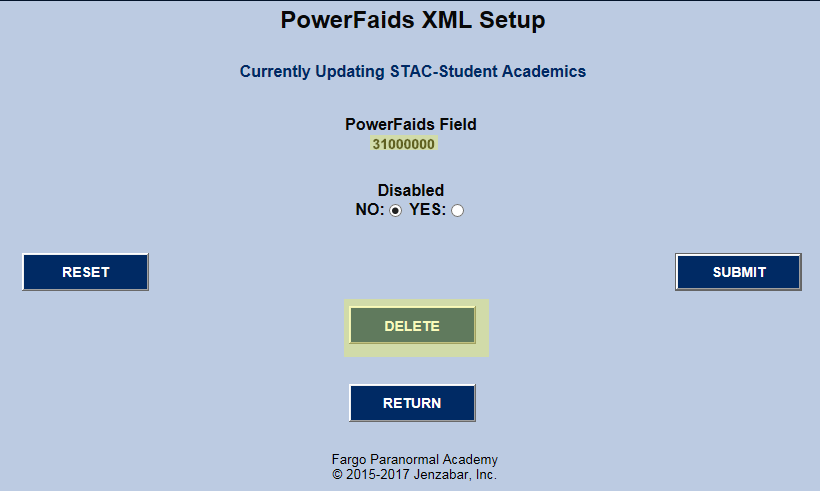
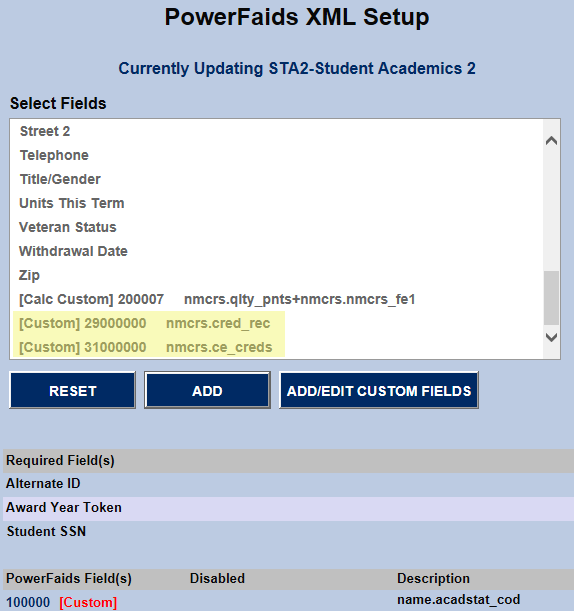
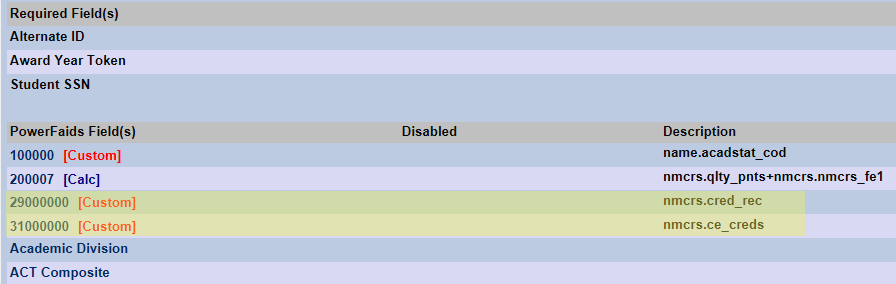
Custom Fields that are in use in an Export Type cannot be edited. In the example below, there are two Custom Fields ("31000000" and "29000000") that need to be edited because PowerFAIDS fields have to have an integer name rather than a alphabetic name.
Refer to the PowerFAIDS User Guide for assistance in choosing the correct PowerFAIDS Fields values. The values used in this documentation are not necessarily reflective of those that should be actually used.

Click on the "31000000" to open the page where it can be deleted.
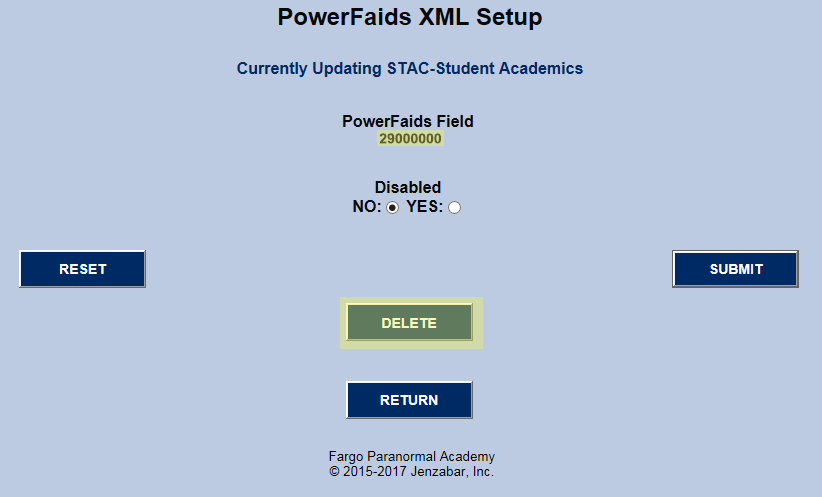
Click on the "29000000" to open the page where it can be deleted.
Both Custom Fields have been return to the list for selection. Click "ADD/EDIT CUSTOM FIELDS". Nothing needs to be highlighted.
When the above button is clicked, the "EDIT CUSTOM FIELDS" button becomes available.
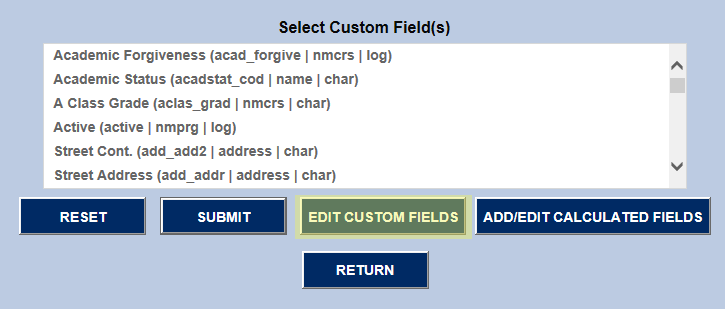
When the above button is clicked, SONIS looks for Custom Fields not assigned to the Export Type "STAC (Student Academic)". If there are any, those custom fields are displayed for editing or deleting.
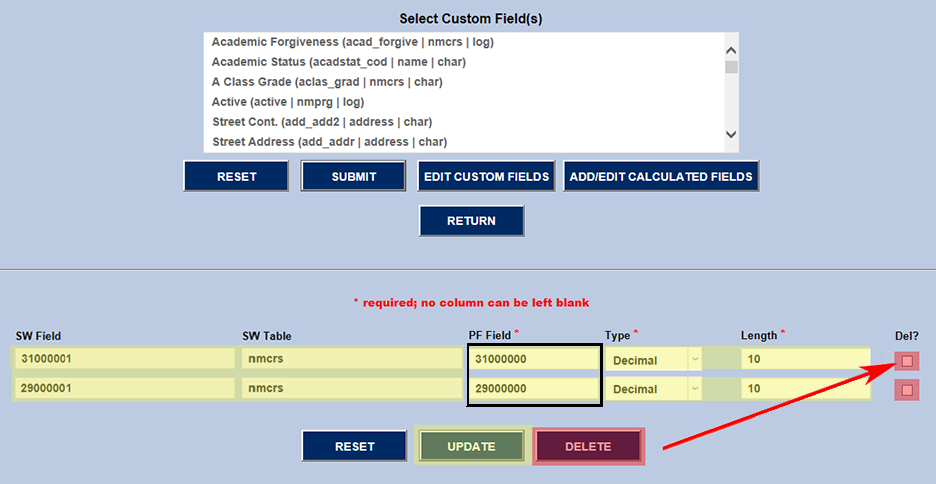
The image below shows both of the Custom Fields (i.e. "31000000" and "29000000") that were earlier unassigned (i.e. Deleted) from the Export Type "STAC (Student Academic)".
DELETE - To delete one or both of the Custom Fields, the user must first check the "Del?" checkbox for those Custom Fields AND click the "DELETE" button.
UPDATE - In the example below, the "PF Field" was changed to it's correct numerical name. Clicking "UPDATE" saves the changes.
The two updated Custom Fields are available for assignment to the Export Type "STAC (Student Academic)".
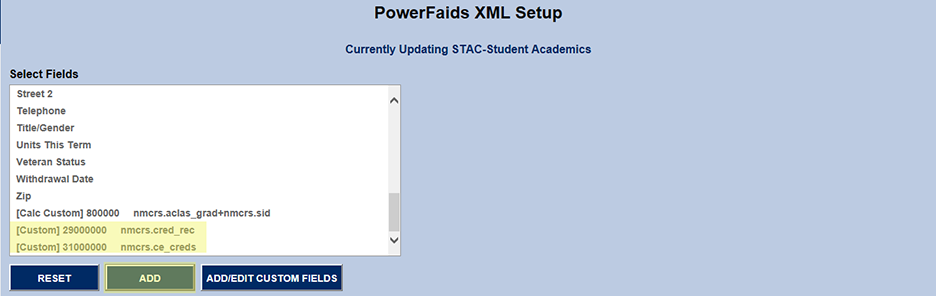
When the Custom Fields are highlighted and the "ADD" button is clicked, the two edited Custom Fields are reassigned to the Export Type "STAC (Student Academic)".
In addition to custom fields, SONIS allows for custom calculated fields.
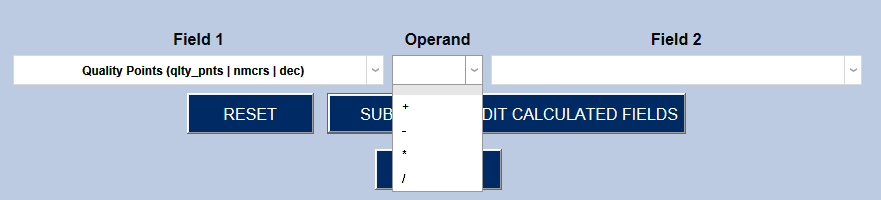
The term “calculated” suggests mathematical equations like: #current_pts# + #previous_pts# = #grand_tot” (i.e. 33 + 267 = 300), but when an operand is used with both numeric and alpha values (ex. +), it can be used in both instances.
The “ADD/EDIT CALCULATED FIELDS” button calls a page of equations/options. Once “Field 1” is selected, the “Operand” drop displays the operands that can be used with “Field 1”. Since “Field1” is a “[dec]” (i.e. decimal), the standard four mathematical operands are available.
Refer to Figure 13 for filling out “PF Field”, “Type” and “Length”. Custom calculated fields use the same process as described for custom fields when it comes to those three values.
If incompatible datatypes are selected, an error message will result. For example, in Figure 19 below, “Field 1” (NMCRS.qlty_pts) is a decimal using division (“/”) as its operand. However, “Field 2” (ADDRESS.addr_de1) is a date. It makes no sense to divide 8 by 11/29/2016. Generally this happens when a field is mistakenly chosen instead of the one next to it. Extreme care should be taken when creating custom calculated fields.
Note: Depending on the CSS used, as well as screen resolution, the message may require scrolling before it can be seen. If ADD is clicked and the page doesn’t change, the page should be scrolled to check for an error message.

In the example below, two decimal fields are added together, which is a computation.
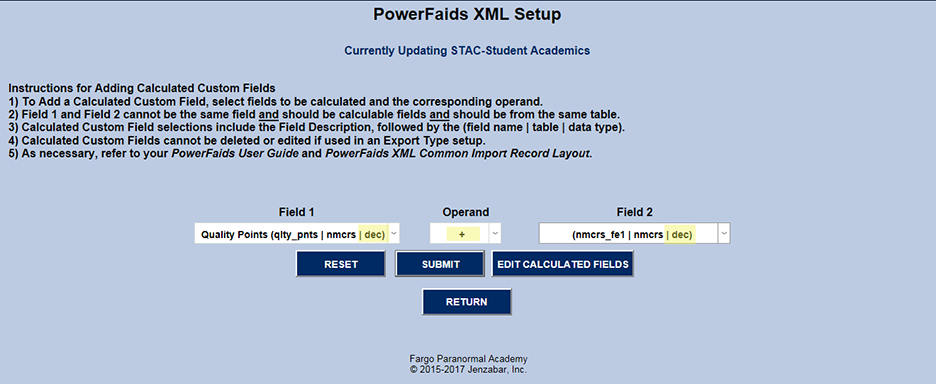
Upon submission the user is taken to a page where they can make last minute changes before clicking the "ADD", which assigns the Custom Field to the Export Type "STAC (Student Academics)".

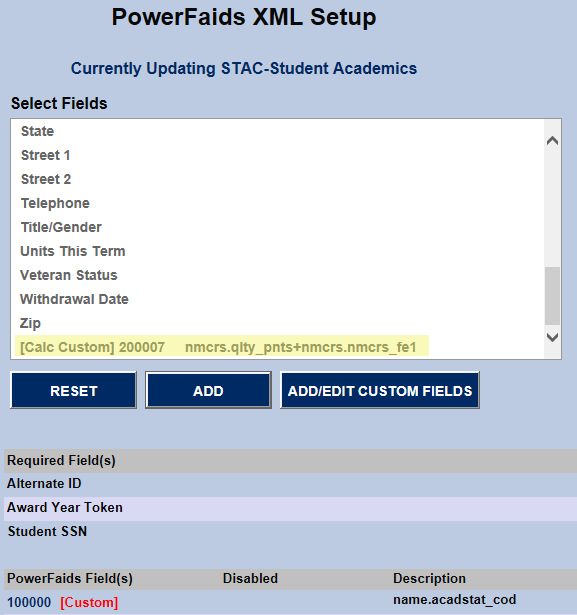
The image below confirms that the "200007 [Calc]" PowerFAIDS Field has been added. When a custom calculated field is saved, it is saved to “PowerFAIDS Field(s)” followed by [Calc] to identify it as a custom calculated field. Its expression is saved as its “Description”.

As with non-calculated PowerFAIDS Fields, when the user clicks the name of the calculated PowerFAIDS Fields, it can be DELETED or DISABLED.
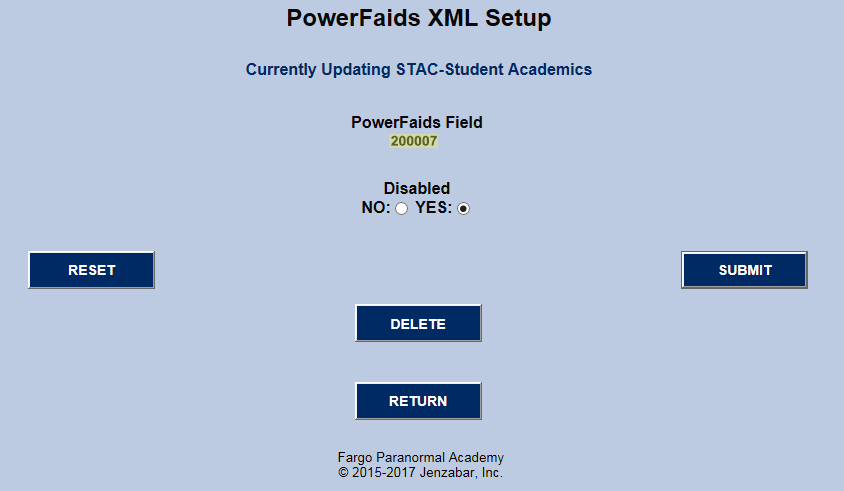
When DISABLED, Disabled appears to mark the PowerFAIDS field. This suppresses its inclusion in the Export Type's XML export file, but it remains listed so that the user can easily enable it later.

As explained previously for non-calculated custom fields, when a calculated custom field is deleted, it is returned to the list of custom fields that can be selected for inclusion in the Export Type, STAC (Student Academics).
That custom field can now be edited by clicking the ADD/EDIT CUSTOM FIELDS button.
The user then clicks "EDIT CALCULATED FIELDS".
SONIS looks for calculated custom fields that are NOT assigned to an Export Type, which includes the "PowerFAIDS Field", 200007 [Calc], that was just deleted from the Export Type.
This edit/delete template varies slightly from the one for non-calculated custom field described earlier. Here there are radio buttons at each end of the calculated field. The "EDIT" radio button must be turned on and the "EDIT" button must be clicked. The "Del?" and "DELETE" are used in conjunction as well.
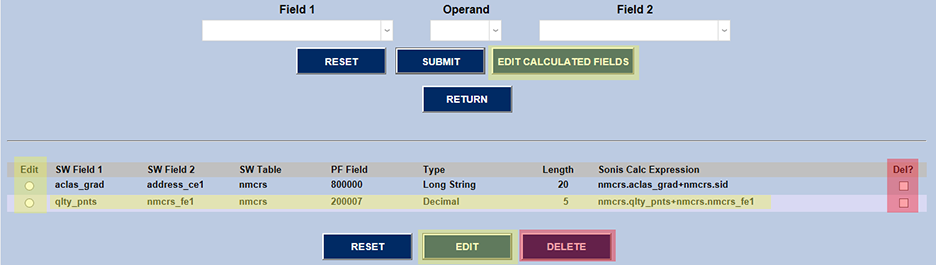
When "EDIT" is selected, the calculated custom field template displayed allows for edits. Assuming the changes are correctly entered, the "UPDATE" button saves them. Then the calculated custom field is ready to be added back to the Export Type, "STAC (Student Academics)".

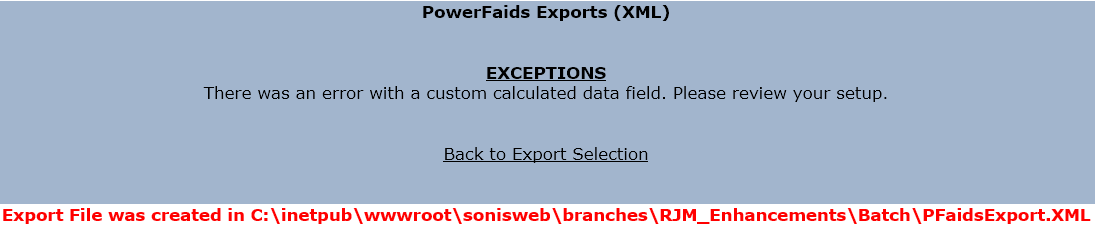
As calculated fields are user-defined, errors may occurs that SONIS has not anticipated. Should the export process identify a problem with a user-defined “Custom Calculated” data field, the export file will still be created, but an exceptions error message will display on the screen to notify the user of potential file errors. When this type of exception occurs, data for the calculated field in error is excluded from the XML export file.
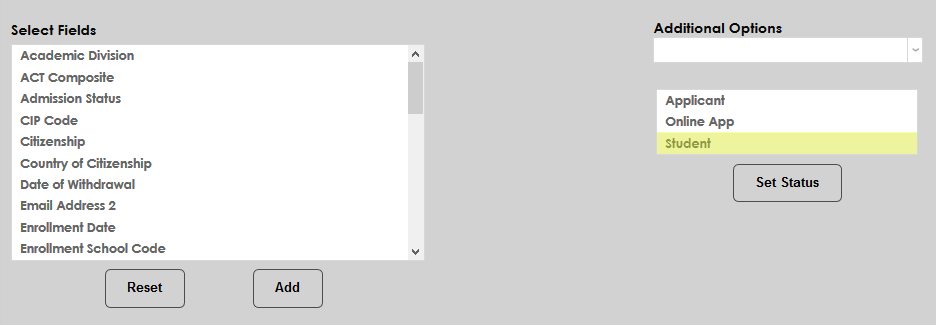
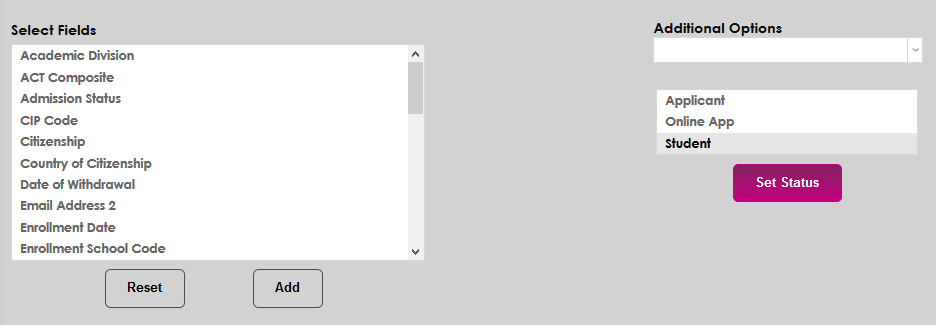
Each export type can be set to include a single or multiple module statuses. This allows PowerFAIDS users to export applicant data, which was previously not an option. Select one more more module statuses and click Set Status. Only students of this status will be included in the export.
The PowerFAIDS Export timed task can be used to create a PowerFAIDS export file on a regular interval. This "flat file" with a .txt extension is automatically saved in the designated batch folder when the process is run. Note that this is a separate process from the XML export. See Timed Task Scheduler for more information on setting up timed tasks.
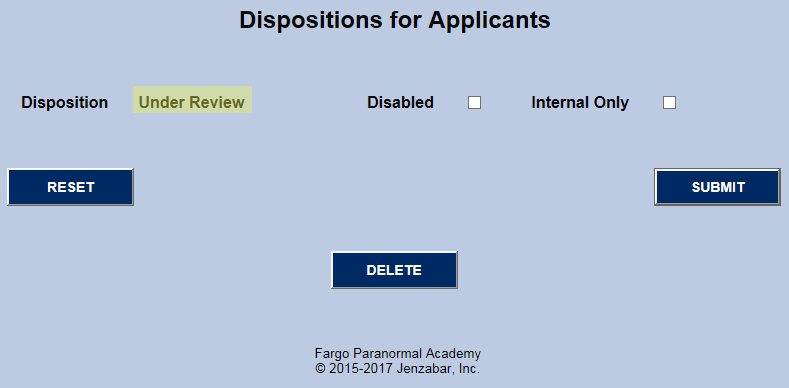
The disposition options of an applicant's APPLICATION are created, edited, and deleted from this page. To create a new DISPOSITION, simply click the ADD button. For all other actions, click the name of the DISPOSITION.
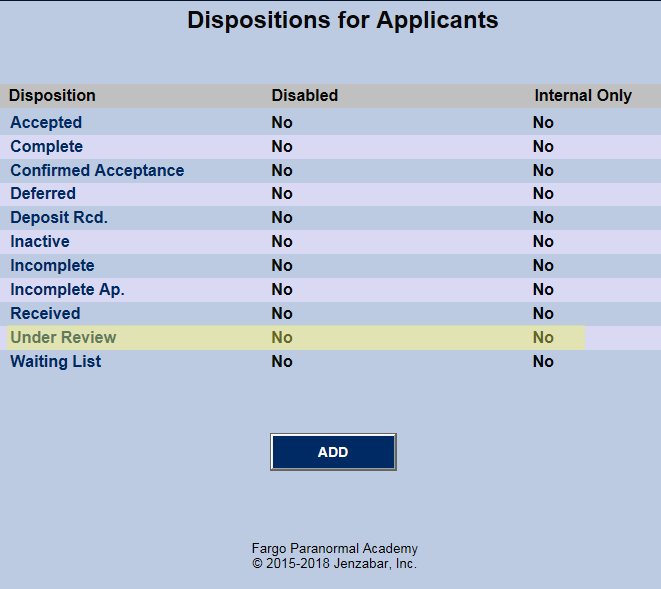
Note: The ADD template is not shown because it looks much like the EDIT/DELETE template below, except for having to give the new DISPOSITION a unique name.
Internal Only: If a school has a DISPOSITION that they do not want to be displayed for the applicant to see, Internal Only should be checked.
Importing
PF - Ant. Awards
The function PF Ant. Awards, available from the Financials menu, imports an Excel spreadsheet from PowerFAIDS into the SONIS PF_Import table (see below). From there, PF_Import values are used in conjunction with other SONIS tables to create and/or update SONIS transactions.
As of SONIS Version 3.8, .xls and .xlsx file types can both be imported. The chart below details the fields and data points in the file.
PF_IMPORT (TABLE) | <variable> indicates a PowerFAIDS variable. Refer to PowerFAIDS documentation for additional information. |
Alternate_ID (string) - where PowerFAIDS stores the SONIS PID (i.e. "soc_sec") | POE_Dcycle_Seqn (string) - saved to TRANSACT.POE_Dcycle_Seqn |
Award_Trans_token (string) - saved to TRANSACT.pf_AA_ID | poe_dist_1 (yes/no) - saved to TRANSACT.poe_dist_1 |
date_maint (datetime) - the date a record is created or last updated | poe_dist_2 (yes/no) - saved to TRANSACT.poe_dist_2 |
Disbursed_AMT (string) - always set to zero (0) | POE_token (string) - X |
Disbursement_number (string) - saved to TRANSACT.Disbursement_no | Processing_Flag (number) - used in conjunction with "URL.processed" to determine if the record is: 0 - Student not found in SONIS. 1 - Add a transaction record. 2 - Update the matching transaction record. 3 - The award was not found. 4 - The POE_Token was not found. 5 - The disbursement has already been made. 6 - There is no money to be awarded. |
first_name (string) - the student's first name | Scheduled_amount (string) - saved to TRANSACT.offered |
FUND_AY_TOKEN (string) - used to match with PF_ID.pf_id | Scheduled_date (string) - SONIS converts to date format |
Fund_Ledger_Number (string) - not used (i.e. blank) | Sonis_ID (string) - unique PID (i.e. "soc_sec") in SONIS |
FUND_Name (string) - FUND_Name is used for displaying only; PF_ID.awd_cod is used for matching. | Stu_Award_token (string) - saved to TRANSACT.PF_Stu_awd_token |
last_name (string) - the student's last name | Student_SSN (encrypt. string) - the student's Social Security Number (SSN) encrypted |
Middle_Init (string) - the student's middle initial | time_maint (string) - the time a record is created or last updated |
operator (string) - the first 8 characters of the administrator's user ID | transact_num (number) - set from TRANSACT.transact_rid |
PF_Import_rid (number) - PF_IMPORT's PK is not used |