Jenzabar Financial Aid Integration
Overview
Jenzabar Financial Aid is a state-of-the-art automation, packaging, and reporting system for higher education financial aid. It offers group processing, real-time data, automatic recalculation, and much more. Jenzabar SONIS administrators can send data from the SONIS system to JFA through the JFA API. The process can be run manually or on a set up to run on a schedule through the SONIS Timed Task Scheduler and Notification Assignments system.
Note
All awards disbursed via Jenzabar Financial Aid import must match anticipated awards previously imported from Jenzabar Financial Aid. Jenzabar Financial Aid award disbursements will not match anticipated aid created in SONIS.
A utility called JFA Insight is included in the Systems hub. This utility is designed to help troubleshoot issues that may occur when transferring files between JFA and Jenzabar SONIS. It should only be used by system administrators and in coordination with Jenzabar SONIS Support.
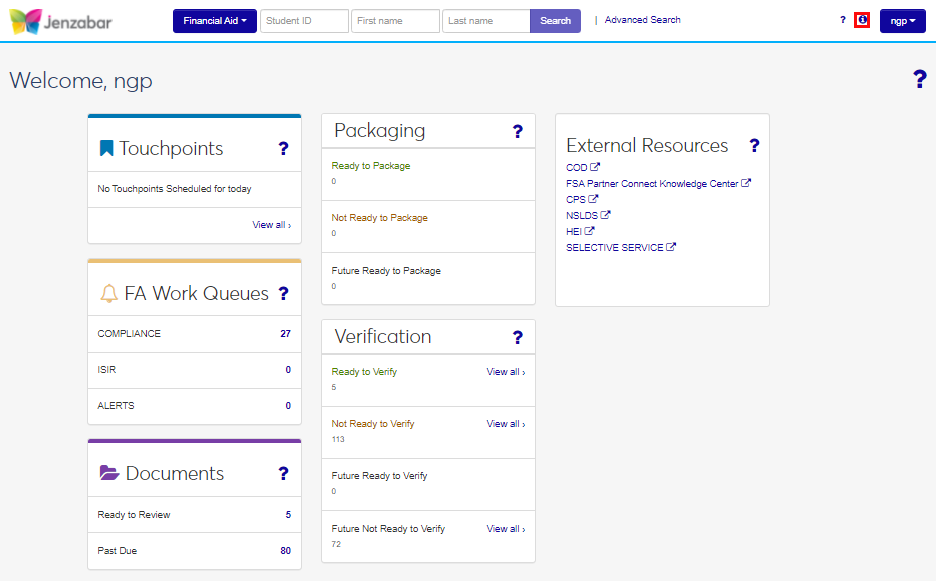
For additional help using Jenzabar Financial Aid, user documentation is available within the Jenzabar Financial Aid database. To access this documentation, log in to the institution's Jenzabar Financial Aid database, and click the information icon in the top right.
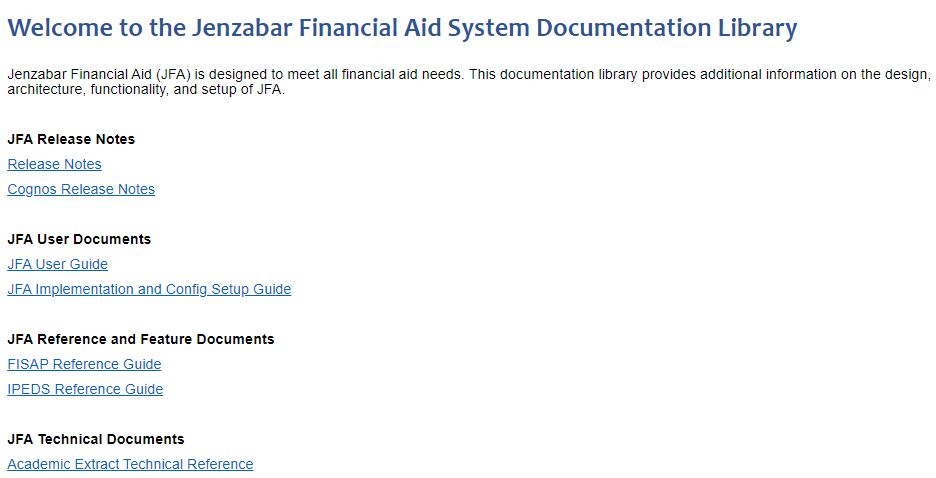
After clicking the icon, a new browser window will open and display the Jenzabar Financial Aid documentation library.
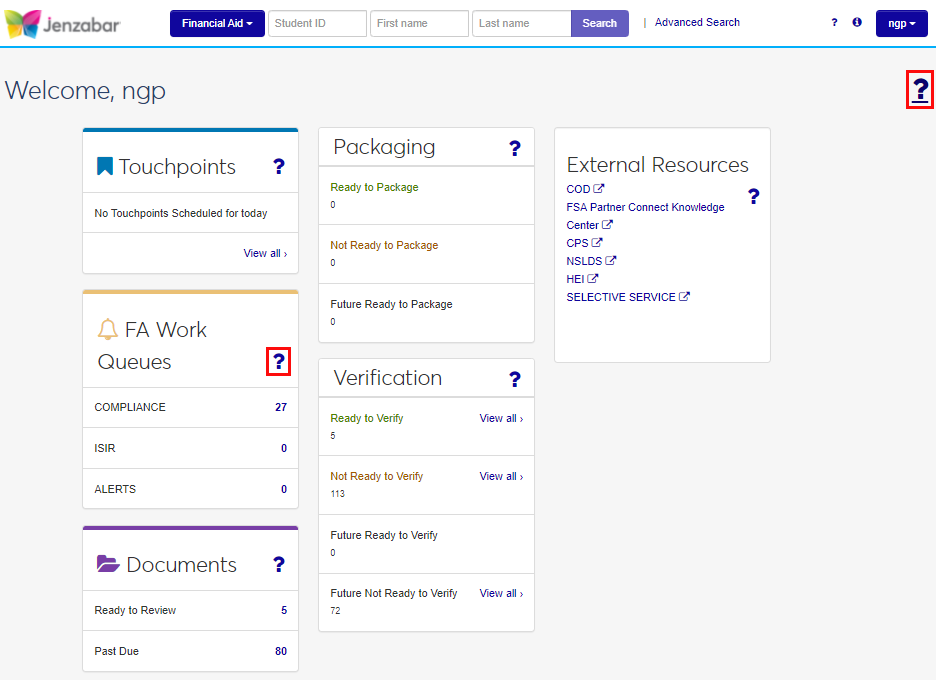
Function-specific help documentation is available within Jenzabar Financial Aid. Click the question mark (?) at the top of a page to view page help and the question mark (?) in other areas for details about that specific section.
SONIS Setup
Before user data can be sent to Jenzabar Financial Aid, each user to be pushed must have several required records that are needed by the Jenzabar Financial Aid system in order to process financial aid correctly. These fields are located in various places in the SONIS system.
Biographic
The first set of field that must be correctly populated are located on the user's Biographic page.
Name
Ensure that each user to be exported has a First Name and a Last Name.
Date of Birth
Next, ensure the each user has a properly formatted Date of Birth. To enter or edit a user's date of birth, click on the DOB link to open the birthdate in a new window.


Level
A user's Level is not required but can be sent to Jenzabar Financial Aid.
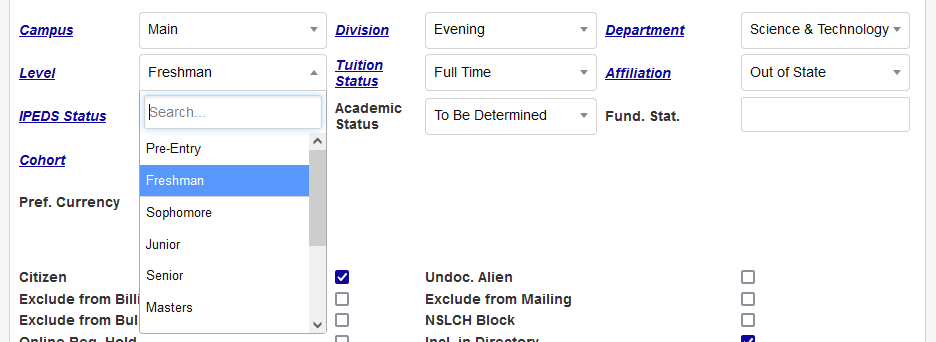
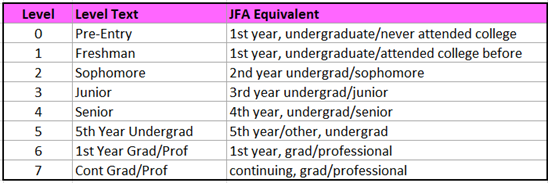
Levels are created and edited using the Levels table in Table Maintenance. Each level should have an accompanying JFA Level, which will is used by Jenzabar Financial Aid to determine each student's level.
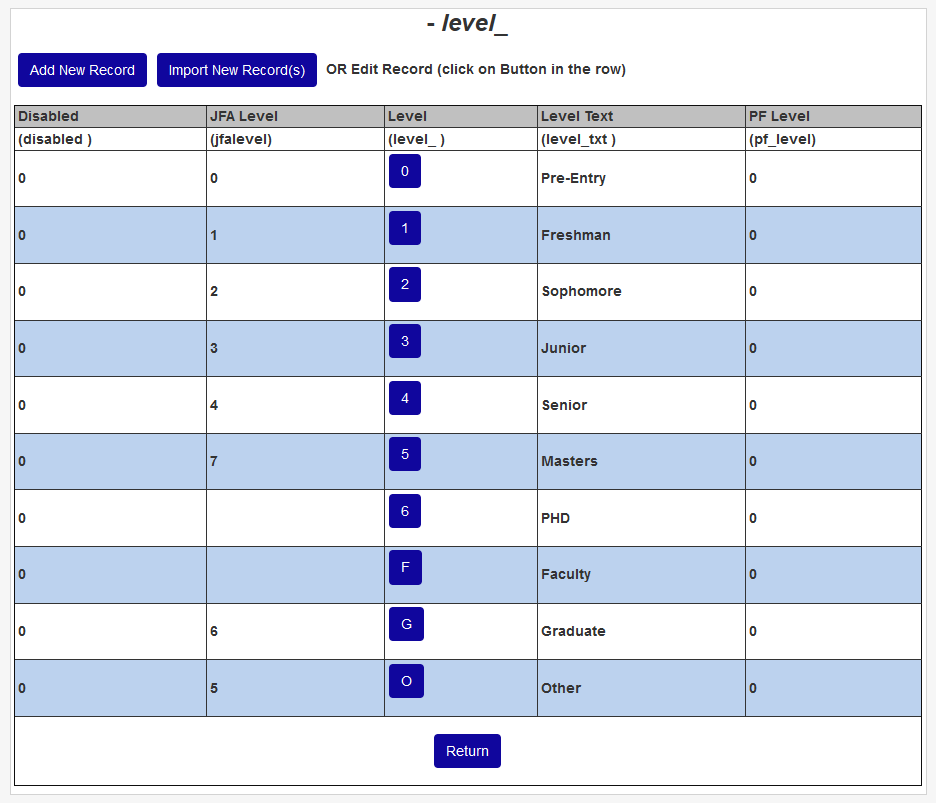
The following chart offers a guide to ensuring that each school's levels are compliant with the level designations in Jenzabar Financial Aid.
Note
Students who are not financial aid eligible, such as dual-enrolled high school students, should be given a SONIS level with a blank in the JFA Level field. This will ensure that Jenzabar Financial Aid recognizes these students as ineligible for aid.
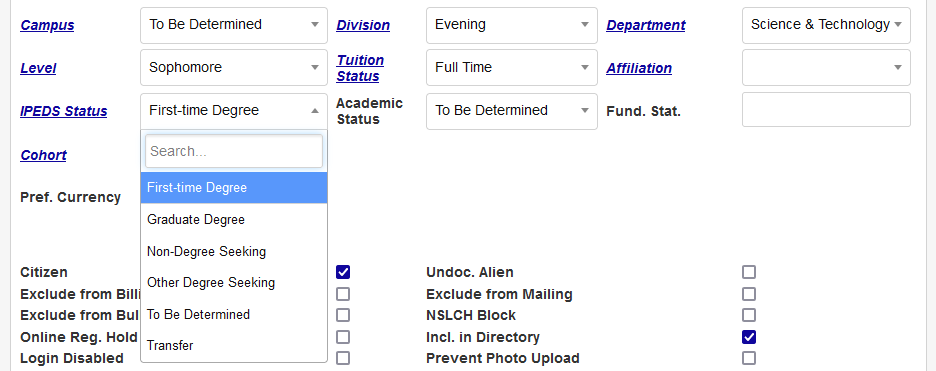
IPEDS Status
Finally, each user must have an IPEDS Status. At a minimum, first-time degree seeking students must be marked. Choose a status from the IPEDS Status dropdown menu. Click Submit to save any changes that have been made on the page.
Address
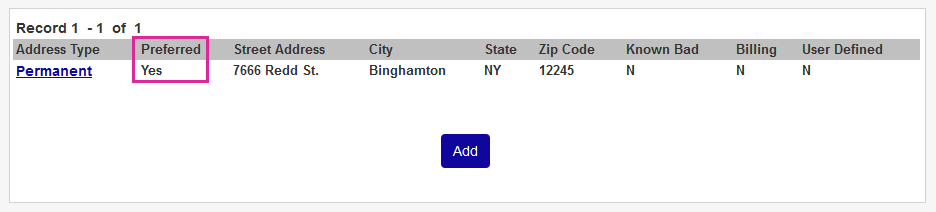
SONIS also sends address information to Jenzabar Financial Aid. Navigate to each user's Address to view and update these fields. SONIS will always export the user's Preferred address.
First, ensure that every user has a valid email address.
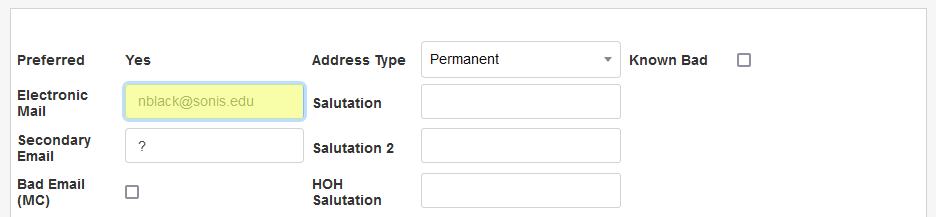
Additionally, each user should have a valid physical address, including at least the Street Address and City fields. If the user is in the US, the State and Zip Code fields should also have valid data, but leaving these fields blank will not trigger an error since they do not apply to international users.

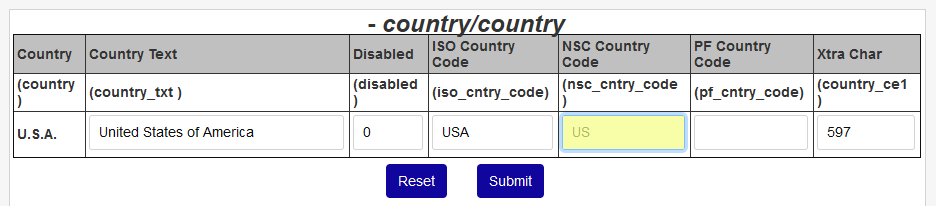
Each user must have a valid Country selected as well. However, SONIS doesn't send the long form of the country but rather the two-character NSC code. The NSC country code is entered by editing the Country table in Table Maintenance under the Systems menu. Country codes are listed on the National Student Clearinghouse website. If no country code is found on a record, the Country Code will be defaulted to US (United States of America).

Education
Additionally, each user needs a valid Education record. Ensure that each user to be exported has a correct Anticipated Graduation Date where applicable. This field is not required, but recommended.

Each user must also have an active Program with a valid Start Date attached to their education record.

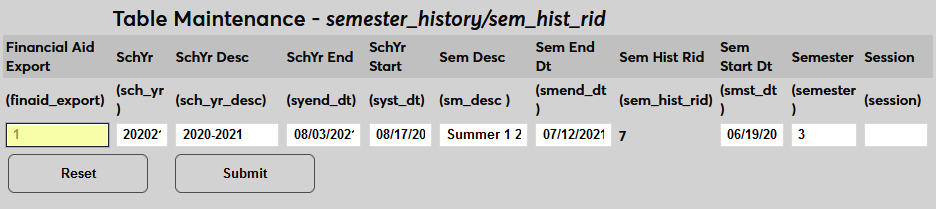
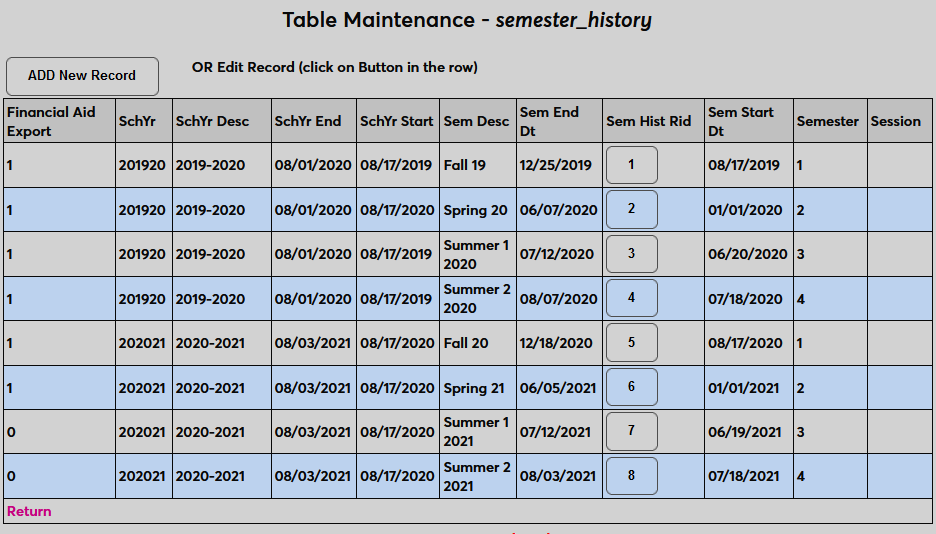
The From Date must match a valid date semester start date in the Semester History table under Table Maintenance.
Program
Each program must have an appropriate CIP code attached. Programs are created and edited via the Programs table under the Systems menu. CIP codes can be located from the US Department of Education website. CIP codes in SONIS must not include a decimal to ensure proper Clearinghouse processing, but the decimal is added back when the value is sent to Jenzabar Financial Aid.
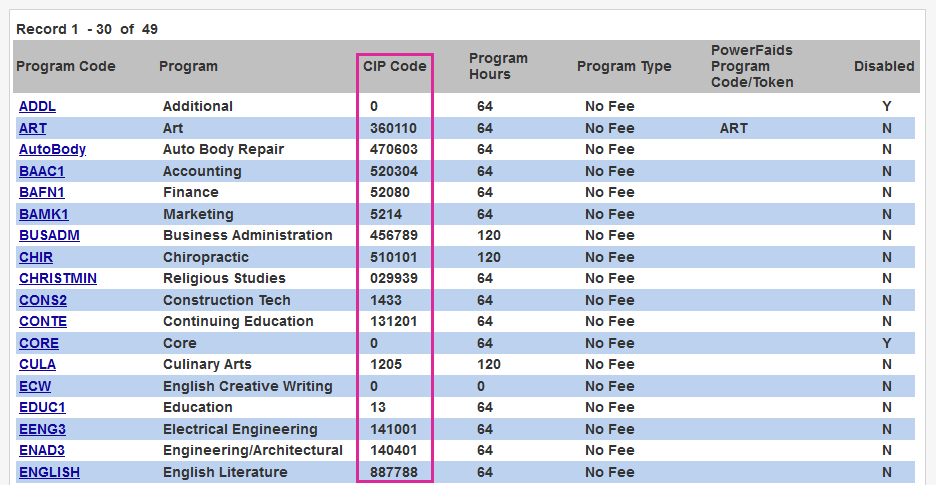
Additionally, each program must have a Program Length in Months specified. This value will be used to calculate the program length in years, months, and weeks that are sent to Jenzabar Financial Aid. So, for example, a four-year program would be entered as 48 months. An eight-week program would be specified as two months. Fractional and decimal values are not allowed at this time.

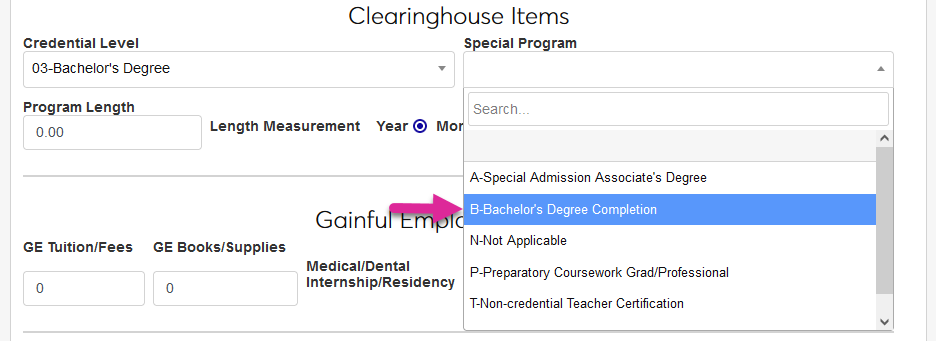
Programs must also have a value selected from the Special Program menu in the Clearinghouse Items section. This value is used to determine awards eligibility.
Semester History
A school year/semester record should exist in this table for, each term in which an applicant or prospect has expressed an interest, each term in which a student or applicant has applied, each term in which a student has enrolled, and each term in which a student or alumni is designated as having graduated. Semester History records must go back at least as far as the oldest important dates for the students being sent to Jenzabar Financial Aid. For example, a student’s start date or an applicant’s application date. Without the correct Semester History data in place, other date records will be sent as blank.
Additionally, each semester to be exported to Jenzabar Financial Aid must have a 1 in the Financial Aid Export field. Any semester that will not be exported by Jenzabar Financial Aid should have a 0 in the field.
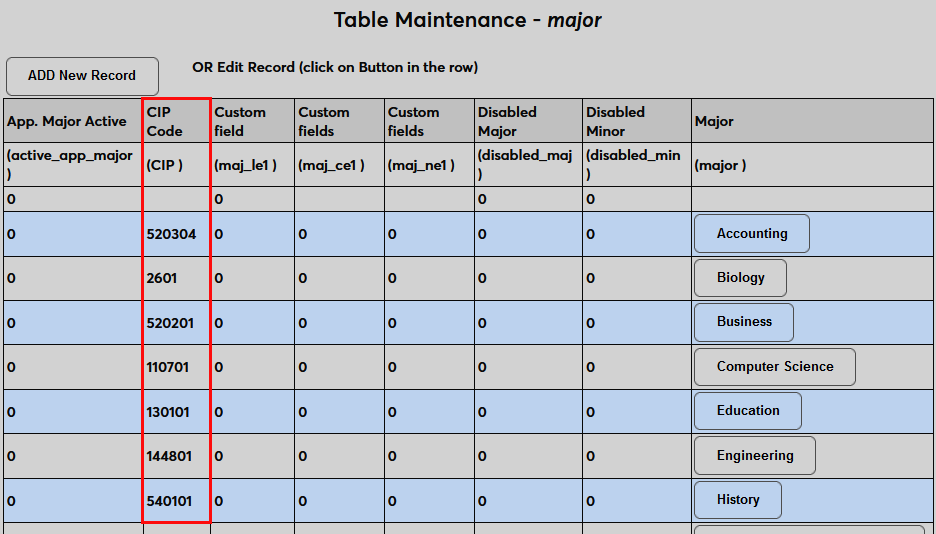
Major/Minor
SONIS can also send major and minor information to Jenzabar Financial Aid. Majors and minors can be added to a record through the Majors/Minors page. These fields are optional.
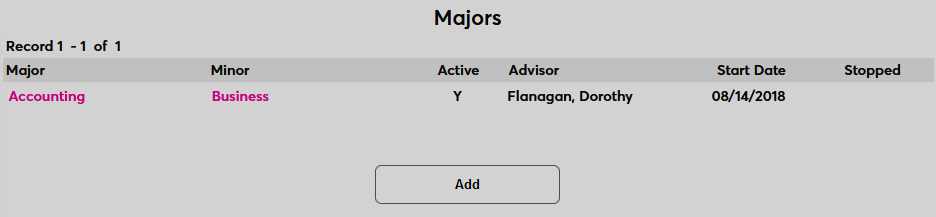
In order for the data to be transferred successfully, each major and minor must have the proper CIP code attached. Majors are created and edited from the Major/Minor table under Table Maintenance. CIP codes can be located from the US Department of Education website. CIP codes in SONIS must not include a decimal to ensure proper Clearinghouse processing, but the decimal is added back when the value is sent to Jenzabar Financial Aid.
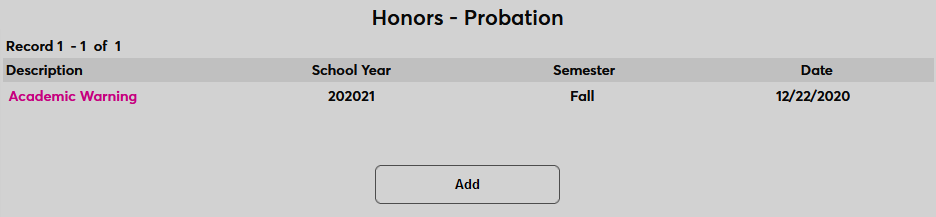
SAP
Each student should also have their Satisfactory Academic Progress applied for the last completed or enrolled semester. This information is required by Jenzabar Financial Aid, but can be added manually or from another source if SAP data is not stored in SONIS.
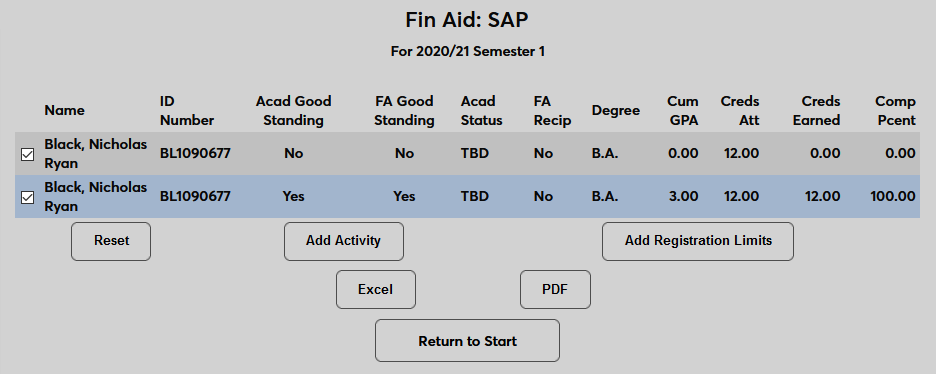
If the student is not in good standing, it should be noted in their Honors/Probation record.
Leave Status
For those designated as on a leave of absence, dismissed, withdrawn, etc., a Leave Status record should exist for each qualifying school year/semester. If a return date is known for the Leave Status, it should be noted in the Projected Date field. Leave Status records should not be made active prior to the start of the semester in question to prevent inaccurate enrollment reporting. This information is required by Jenzabar Financial Aid if the student has taken a leave, but can be added manually or from another source if leave data is not stored in SONIS. It is not required for students who have not been on a leave of any kind and can be left blank in these instances.
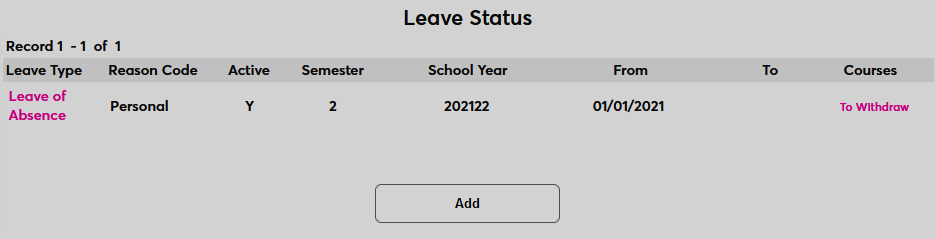
All leave of absence records are considered a withdrawal for the purposes of Jenzabar Financial Aid. The User Export uses the School Year and Semester records to determine whether a withdrawn student should be included in the export to Jenzabar Financial Aid or not.
Attendance
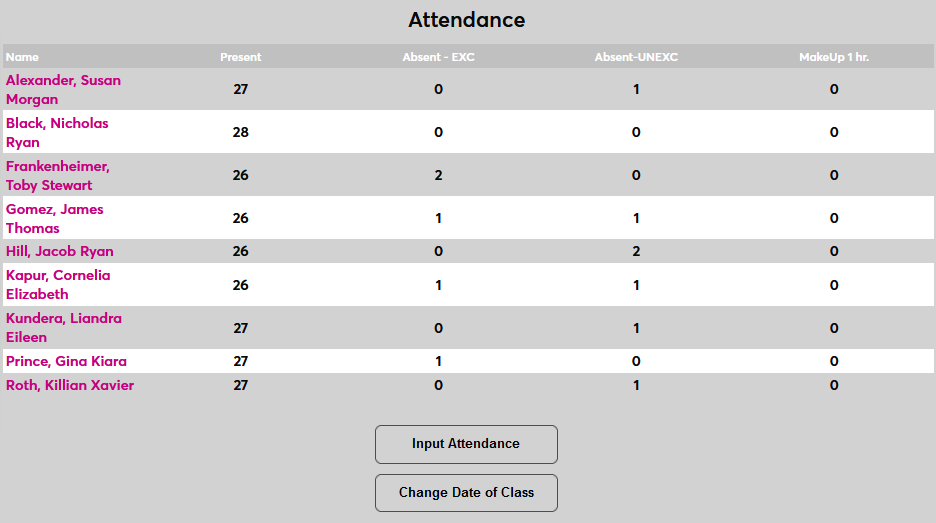
Along with the Leave Status and for accuracy in course enrollments information, Attendance records should be included for all courses included in financial aid determinations. Attendance is entered from the Course Section menu and can be viewed on an individual basis as part of a user's Courses record. This data is optional but recommended.

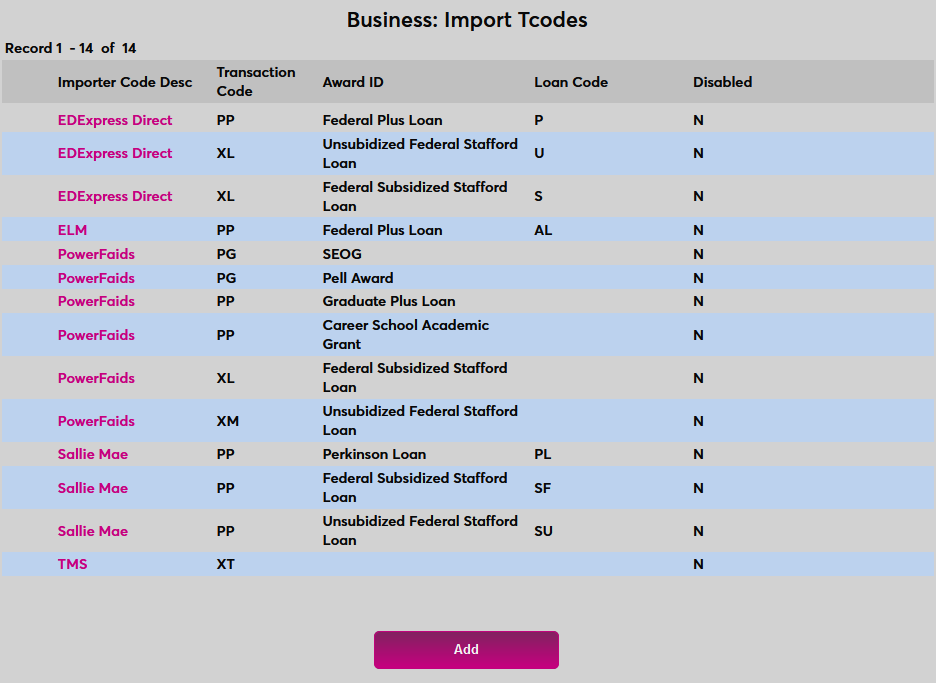
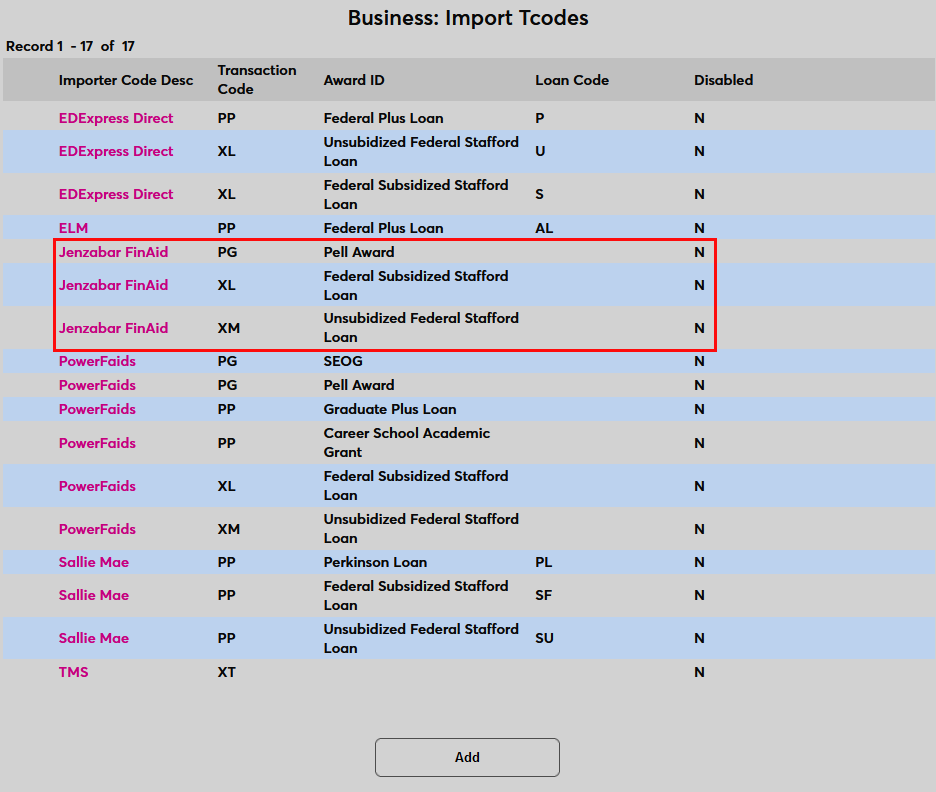
Import T-Codes
As with other financial systems, awards and other financial data cannot be imported from Jenzabar Financial Aid to SONIS unless import T-codes have been created. To set these up, navigate to Import Tcodes under the Systems menu and click Add to begin.
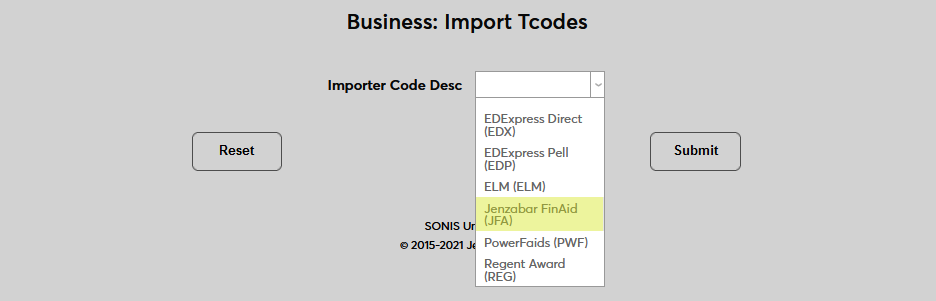
On the following page, select Jenzabar Financial Aid from the Importer Code Description menu and click Submit.
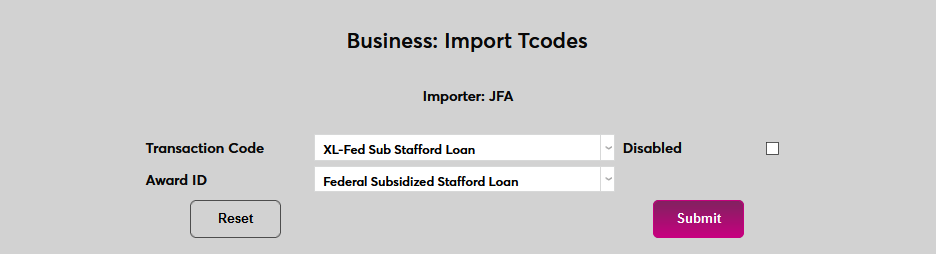
Create the needed import mappings by selecting a t-code from the Transaction Code field and matching it with the appropriate award from the Award ID field.
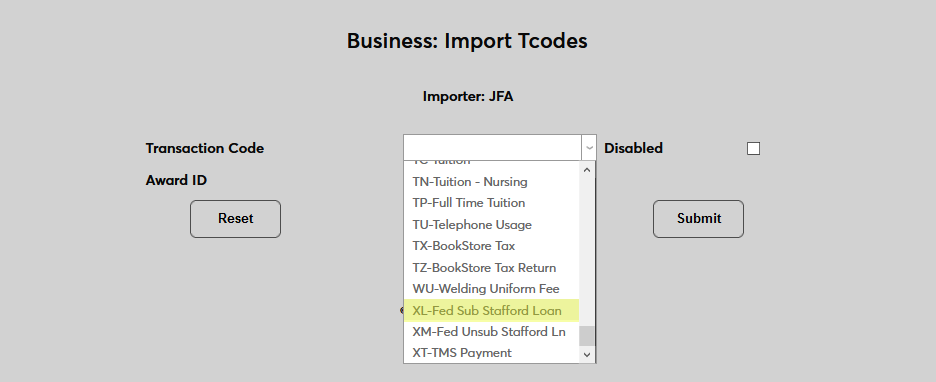
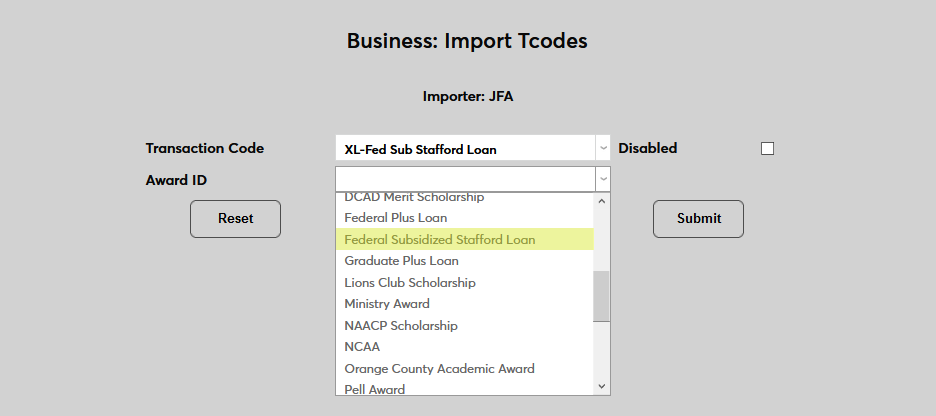
Click Submit to save the mapping and repeat the process until all Jenzabar Financial Aid awards are paired with a transaction code.
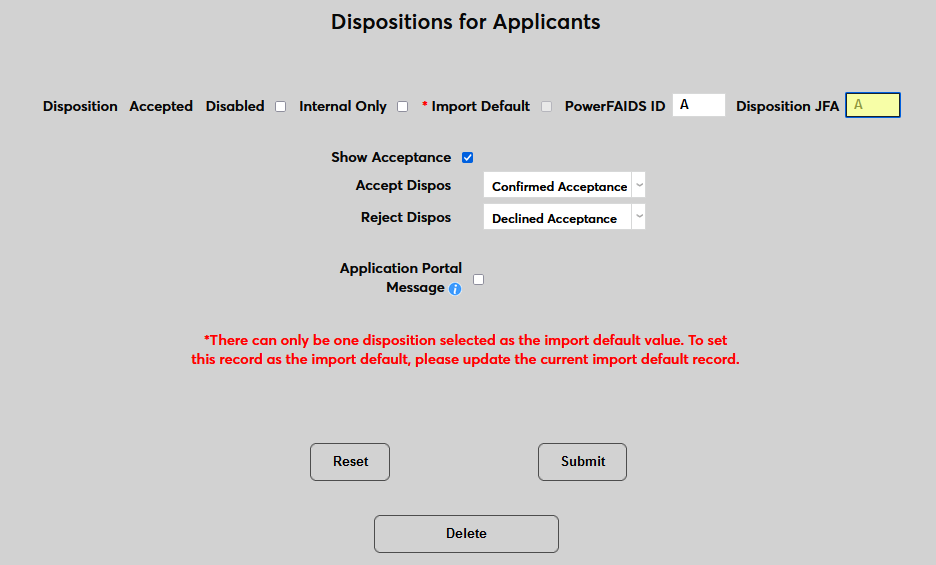
Dispositions for Applicants
The Jenzabar Financial Aid User Export can limit the applicants exported based on their disposition. To add dispositions to this filter, navigate to the Dispositions for Applicants page under the Systems menu. Click on an existing disposition to make changes.
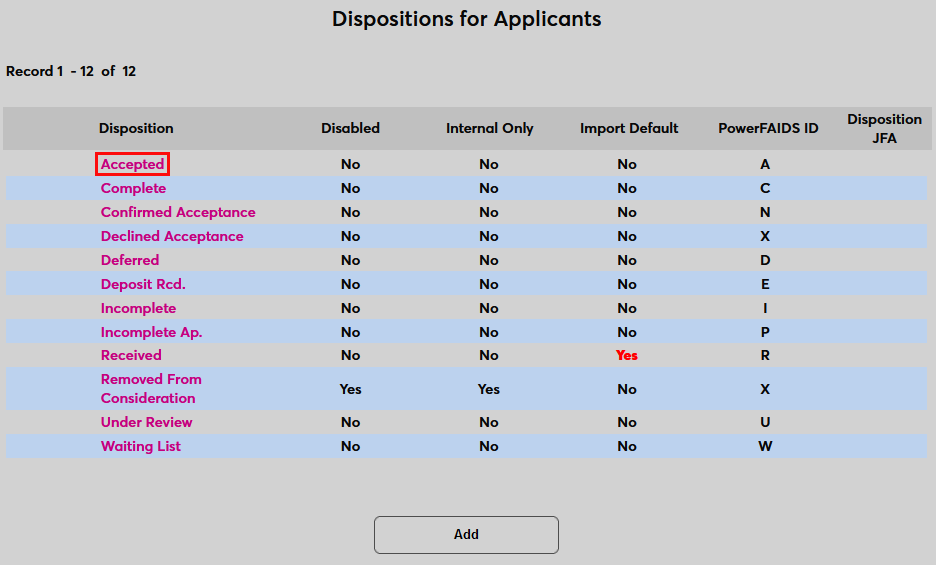
Create a single-character identifier for the disposition that will be used in the Jenzabar Financial Aid table. This identifier must be unique for each disposition that will be included in the Jenzabar Financial Aid transfer. Submit the page and repeat the process on all dispositions whose associated applicants should be sent to Jenzabar Financial Aid at any time.
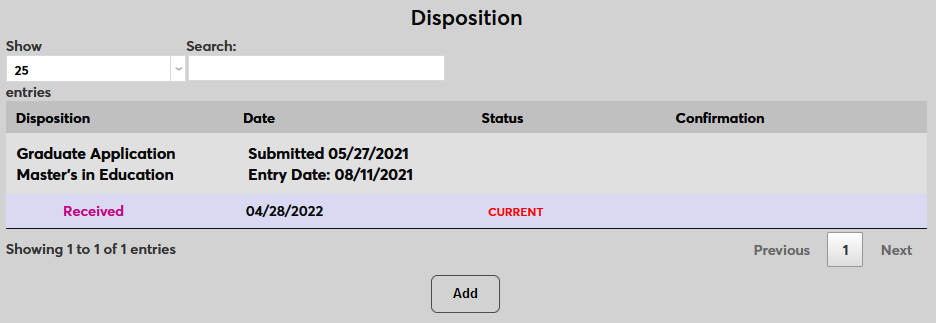
Some dispositions may be automatically assigned to applicants based on certain events. They can be manually set using the Disposition Records page.
For more information on how dispositions work in SONIS, visit the Dispositions for Applicants article.
Financial Aid Eligible Courses
SONIS bases a student's financial aid eligibility on the course hours they are taking, but not all courses are eligible for Title IV financial aid. Every home institution course in the Jenzabar SONIS system includes a Financial Aid Eligible checkbox on the Course Add/Edit page. By default, this box is checked. If a course is not financial aid eligible, uncheck the Financial Aid Eligible box and click Submit to save the change. SONIS will not use courses marked as ineligible when calculating a student's financial aid eligibility for export to JFA.

User Export
API Settings
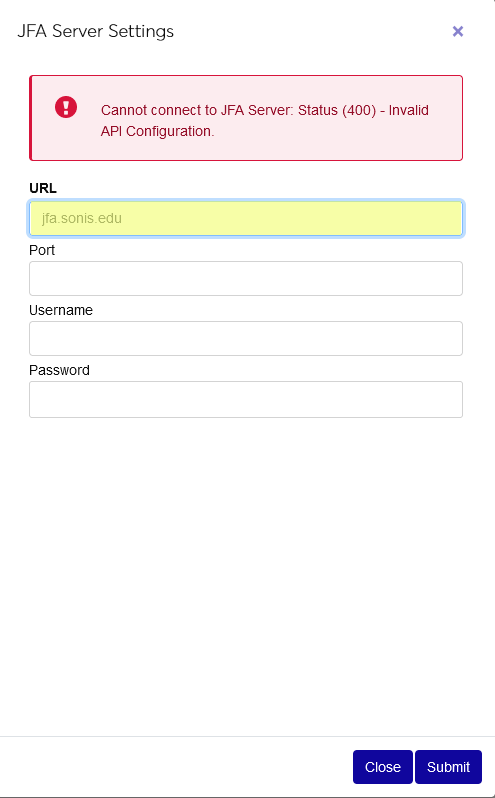
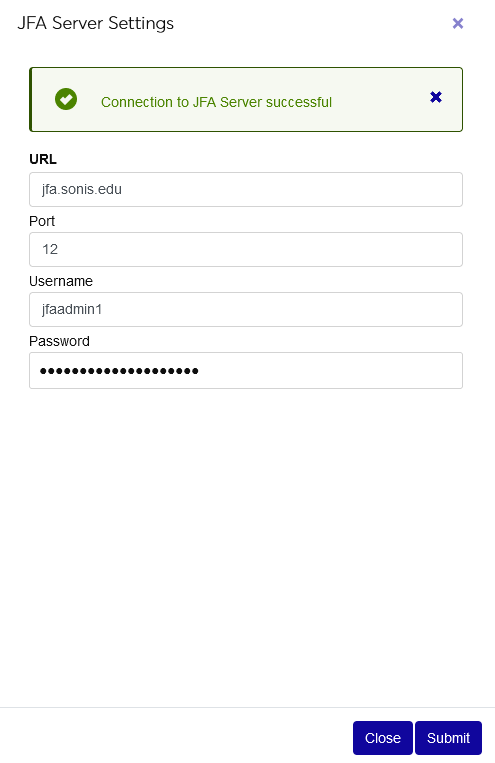
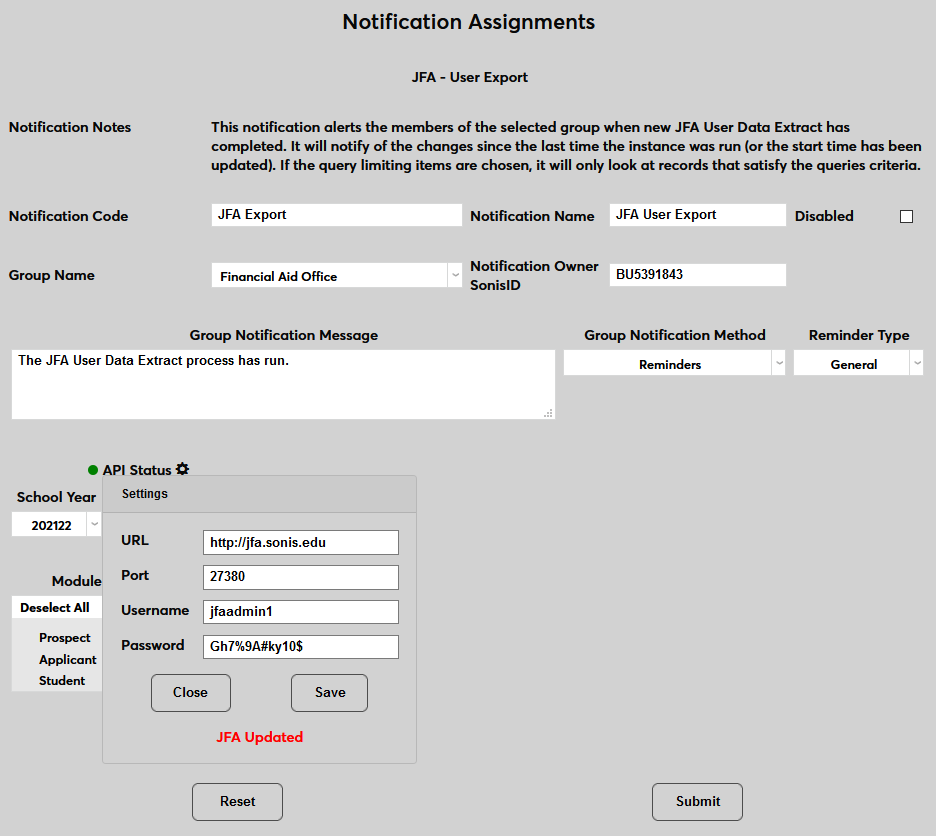
Once the required user data is in place, it can be exported to Jenzabar Financial Aid. Navigate to JFA – User Export under the Financials menu to set up the API that is used to transfer the data from SONIS to Jenzabar Financial Aid. Click the Settings button to begin.
The SONIS system will automatically attempt to establish a connection to Jenzabar Financial Aid and a warning message will appear noting that the connection is not yet working. Enter the location of the Jenzabar Financial Aid installation on the local network under the URL field.
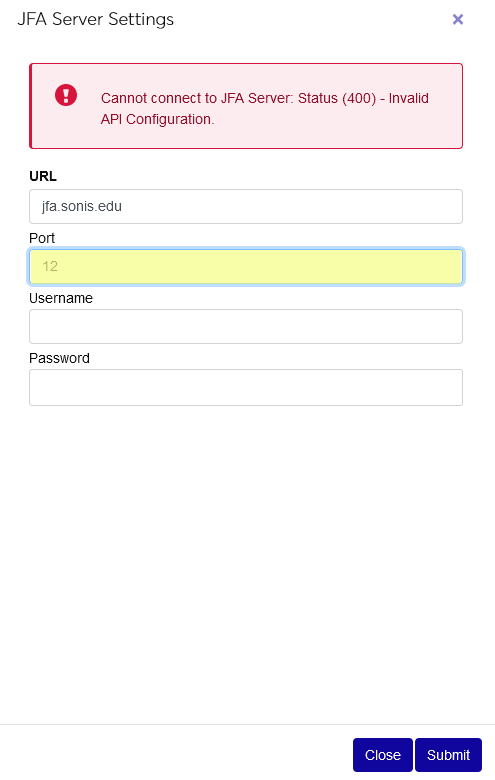
Enter the network port where Jenzabar Financial Aid can be accessed in the Port field.
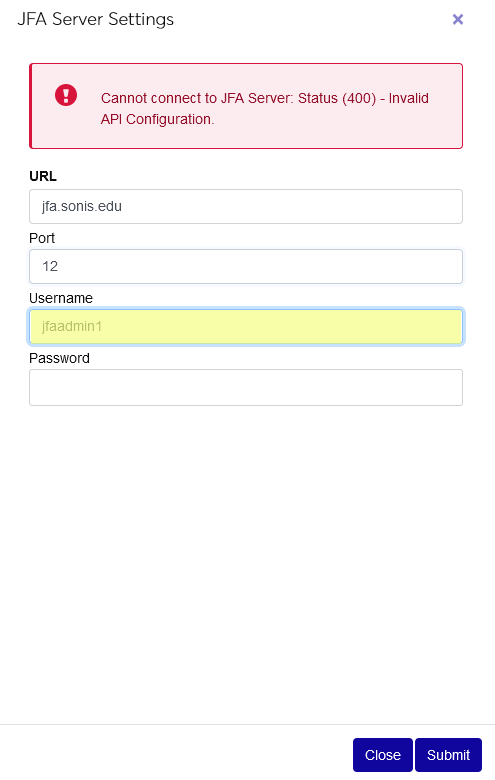
Enter the administrator’s Jenzabar Financial Aid username under the Username field and the password under the Password field.
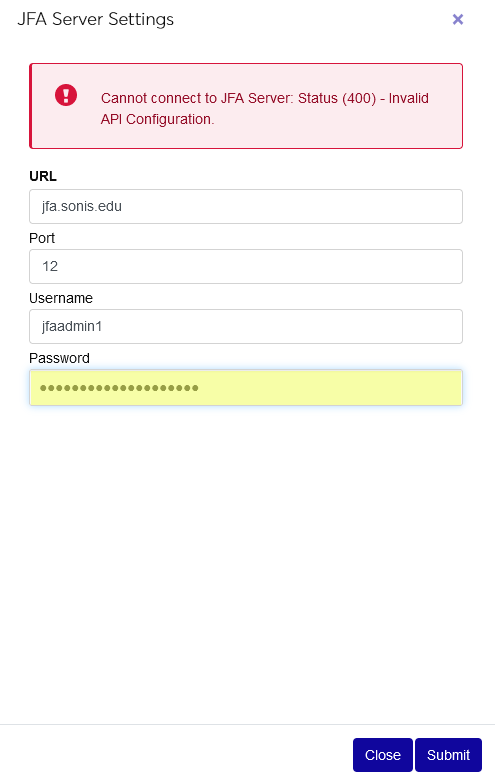
Click Save to save the settings.
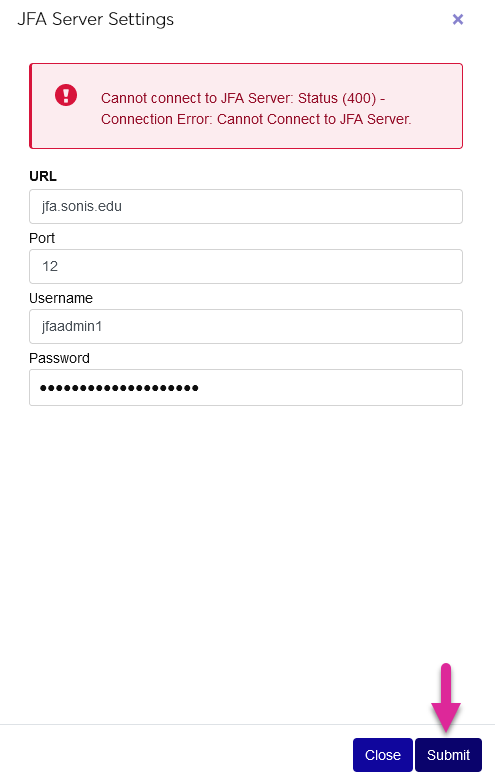
If the settings are correct and the system successfully connects to Jenzabar Financial Aid, the red error message will be replaced by a blue success message.
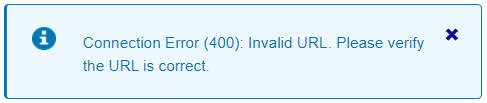
If an Invalid URL error message appears, this means that the URL is formatted incorrectly. For example, leaving out a T in the http portion of the address.
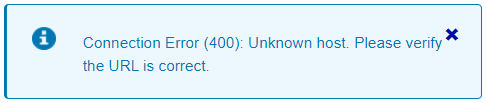
If an Unknown Host error appears, this means that the URL is formatted correctly, but SONIS is unable to find the specified server. This likely means that the URL is incorrect.
If a Target Server failed to respond error appears, this means that SONIS found the server but no ping was returned. This likely means that the specified port is incorrect.

If an Unauthorized error appears, incorrect login credentials have been entered.
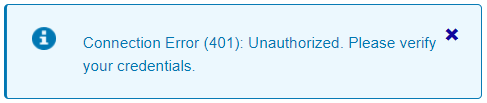
Correct the error and try again. Reach out to Jenzabar SONIS support if these errors persist.
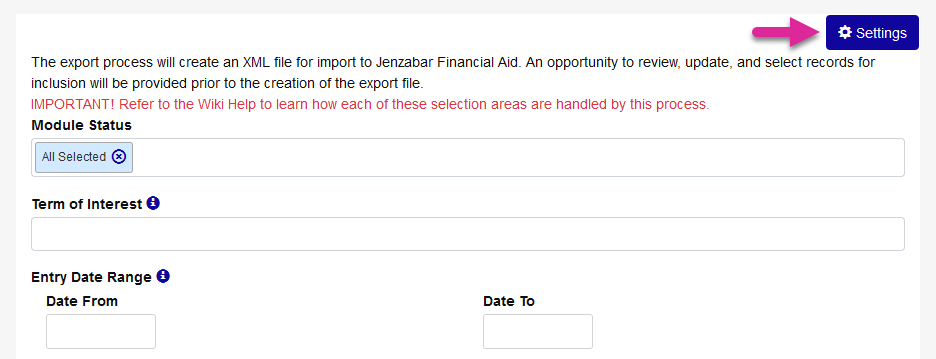
Export
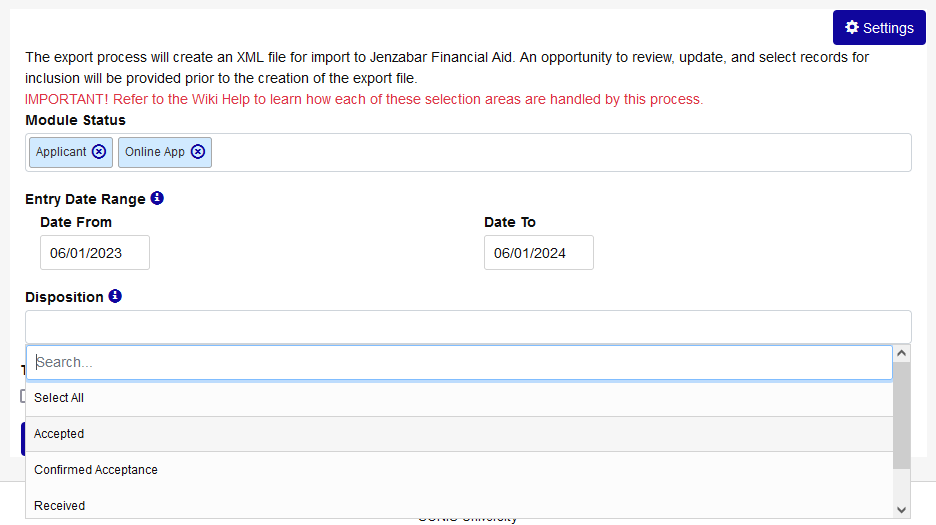
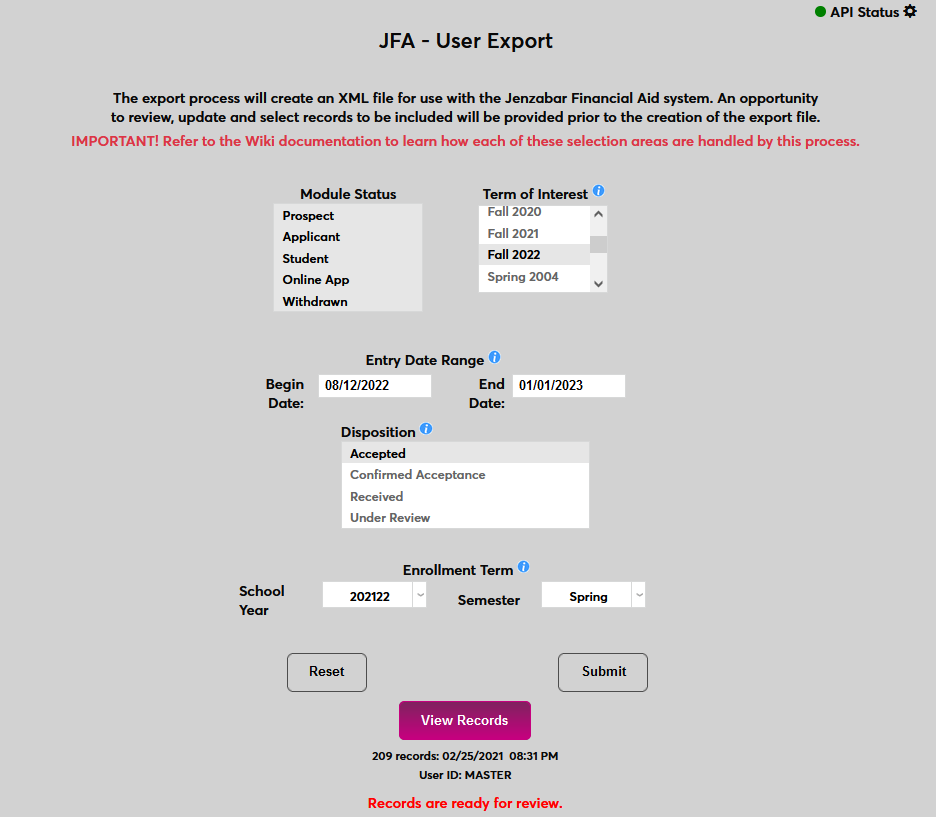
Once the API has been set up correctly, the export file can be built. Select one or more module statuses to include in the file from the Module Status menu.
Prospect
When a module status of Prospect is selected, a Term of Interest menu will display. Only prospects with the selected term of interest in their records will be included in the export.

Applicant/Online App
When a module status of Applicant and/or Online App is selected, an Entry Date Range menu will display. Only applicants with an entry date within the selected range will be included in the export, regardless of the school year and semester criteria selected.
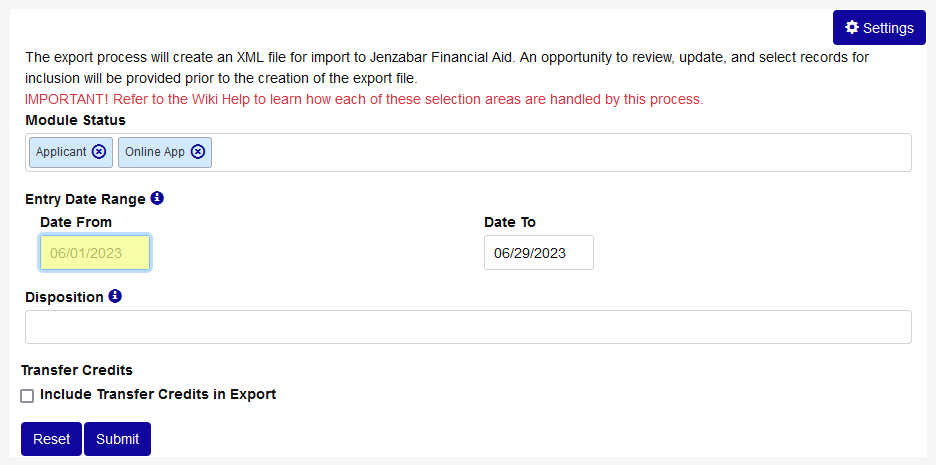
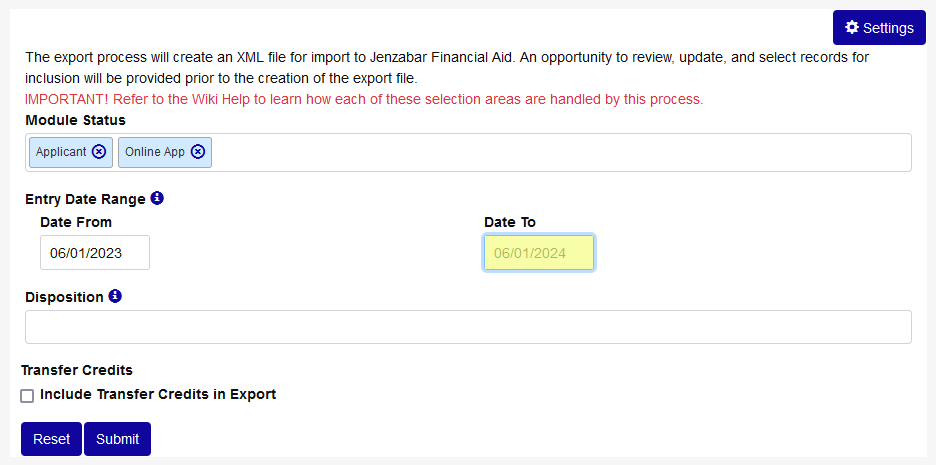
The Disposition menu that displays works in the same manner. Only applicants with the selected disposition or dispositions will be included in the export.
Student
When a module status of Student is selected, all users with a student module status will be included. Use the School Year and Semester menus to determine the students' enrollment term. This is used to determine the academic year begin date, academic year end date, and weeks in program data.

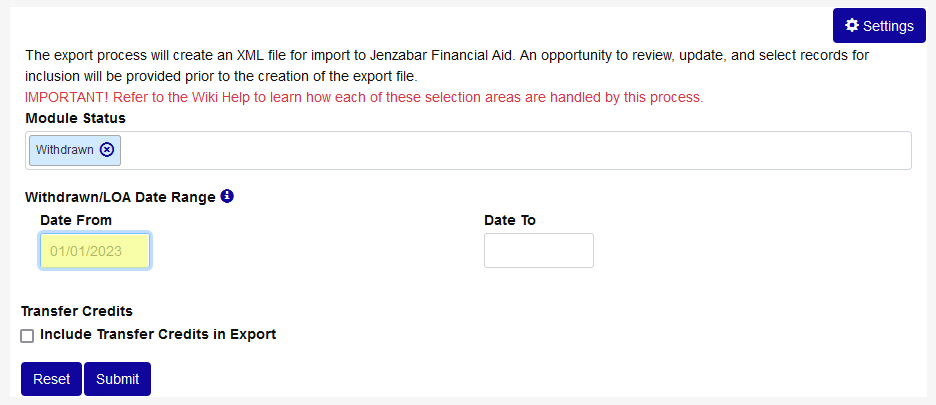
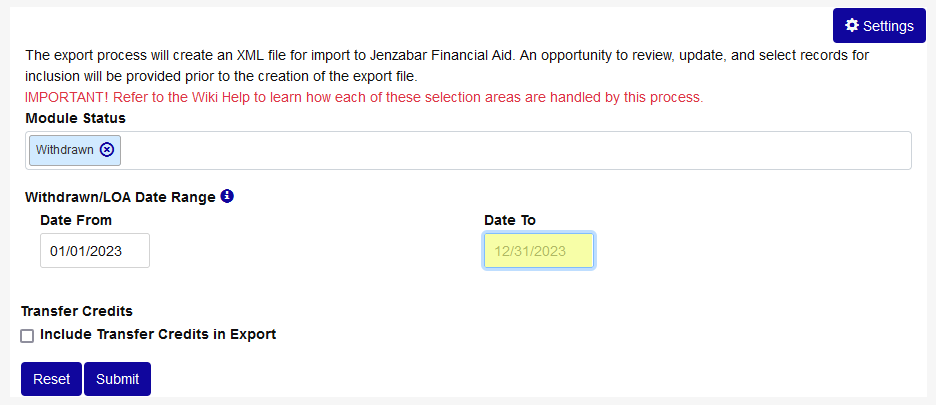
Withdrawn
When a module status of Withdrawn is selected, Withdrawn/Leave of Absence Date Range fields will appear. Only students with an active withdrawal or leave of absence within the selected dates will be included in the export.
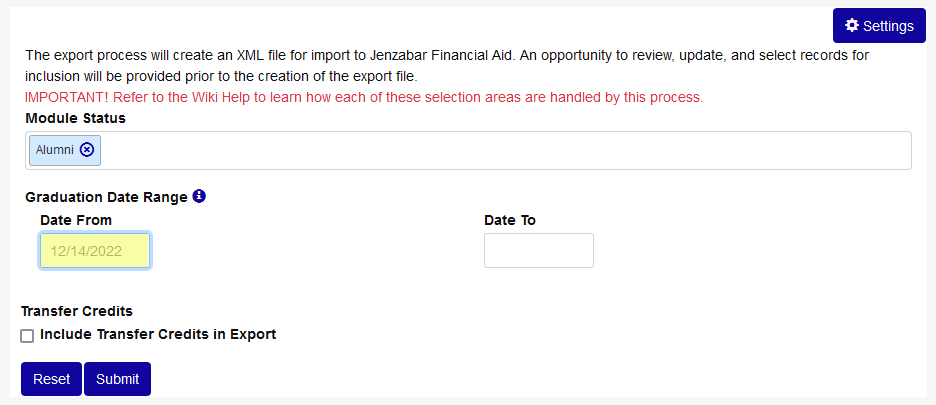
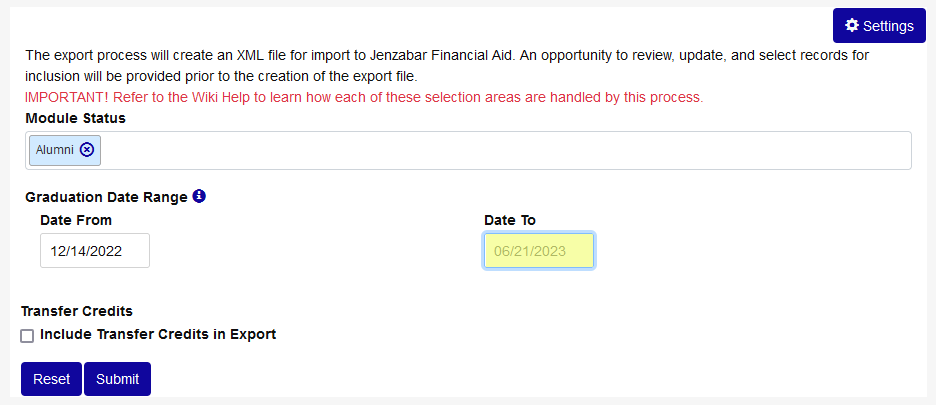
Alumni
When a module status of Alumni is selected, Graduation Date Range fields will appear. Only students with a graduation date on a home education record that falls between the two selected dates will be included in the export.
Check the Transfer Credits box to include transfer credits in the export or leave it unchecked to leave them out. This setting applies to all users being sent to Jenzabar Financial Aid regardless of module status.
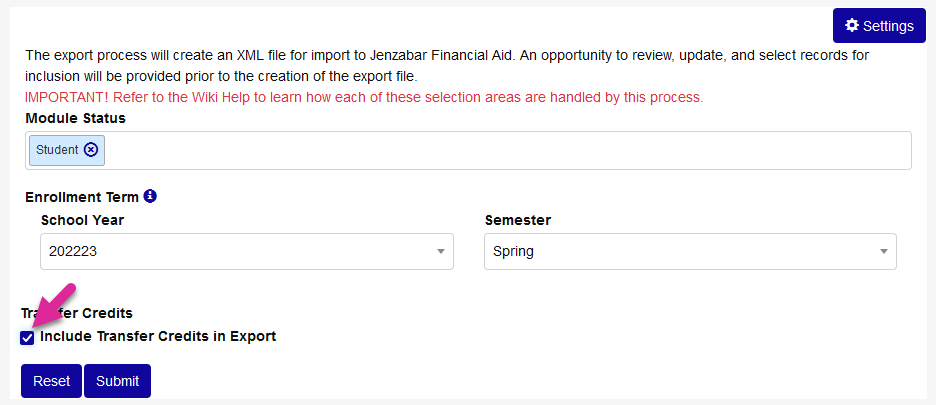
Click Submit to save create the export file. With the exception of the transfer credits toggle, each user's full academic history is included in the export regardless of the other selections.
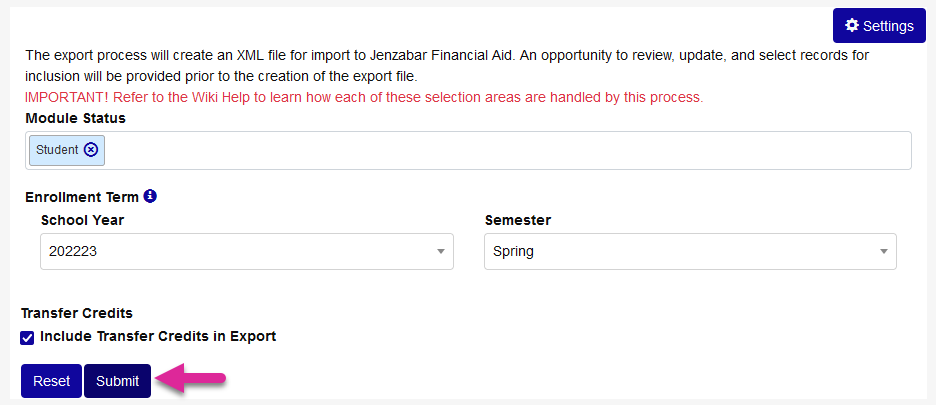
When the process has run, the number of records, the date and time, and the ID of the user who created the file will display at the bottom of the page. Click View Records to continue.
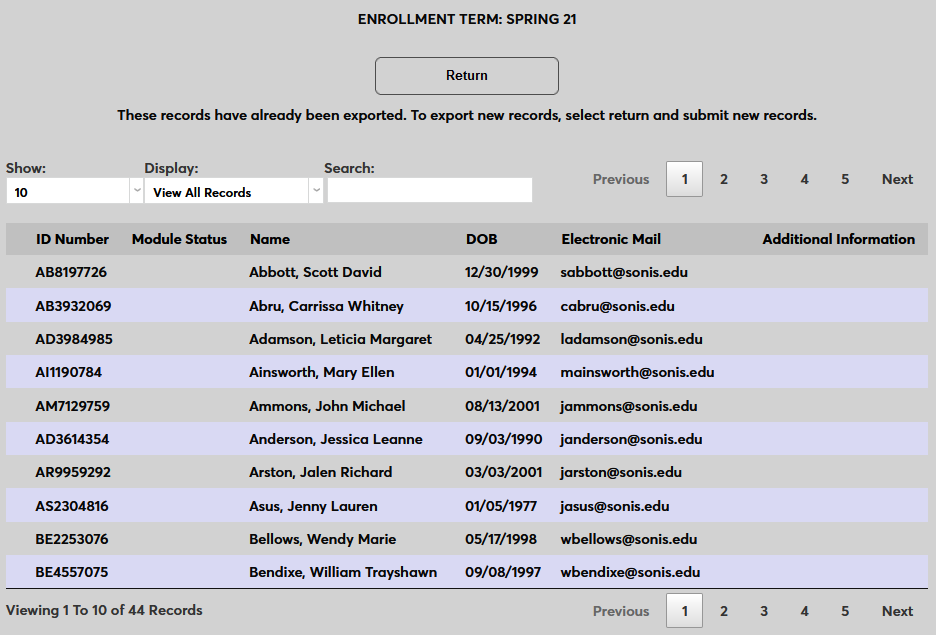
On the following page, a message lists the number of records that are invalid due to missing data. These records must be updated with all the required data before they can be sent to Jenzabar Financial Aid.
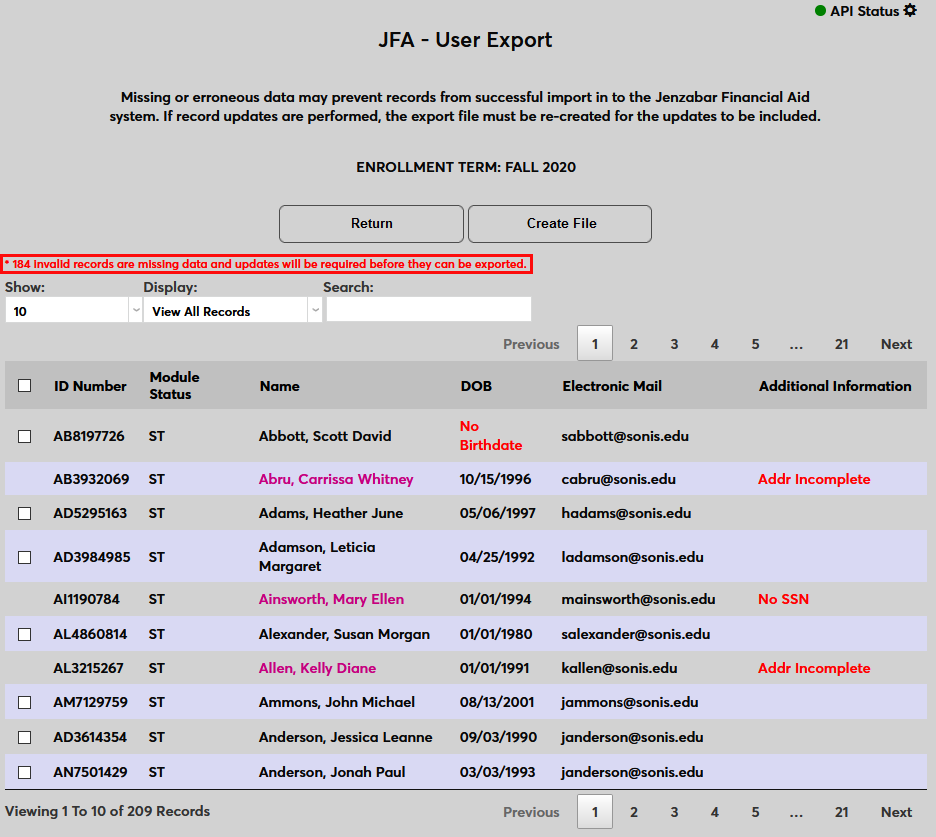
The Show menu controls how many records are displayed on each page.
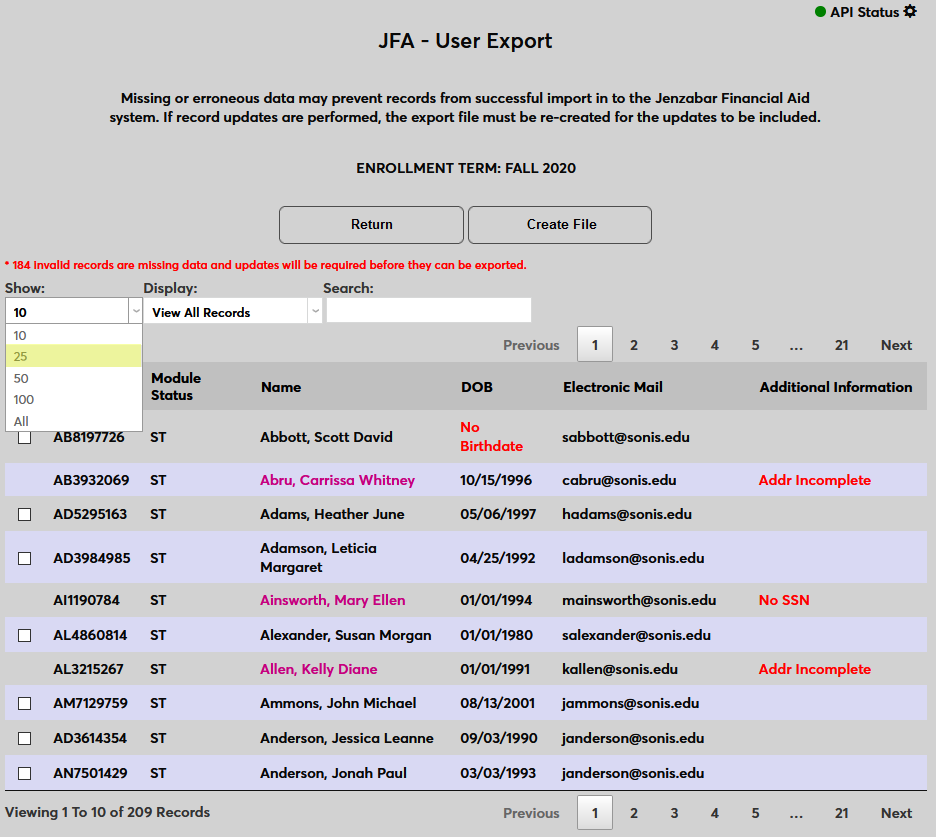
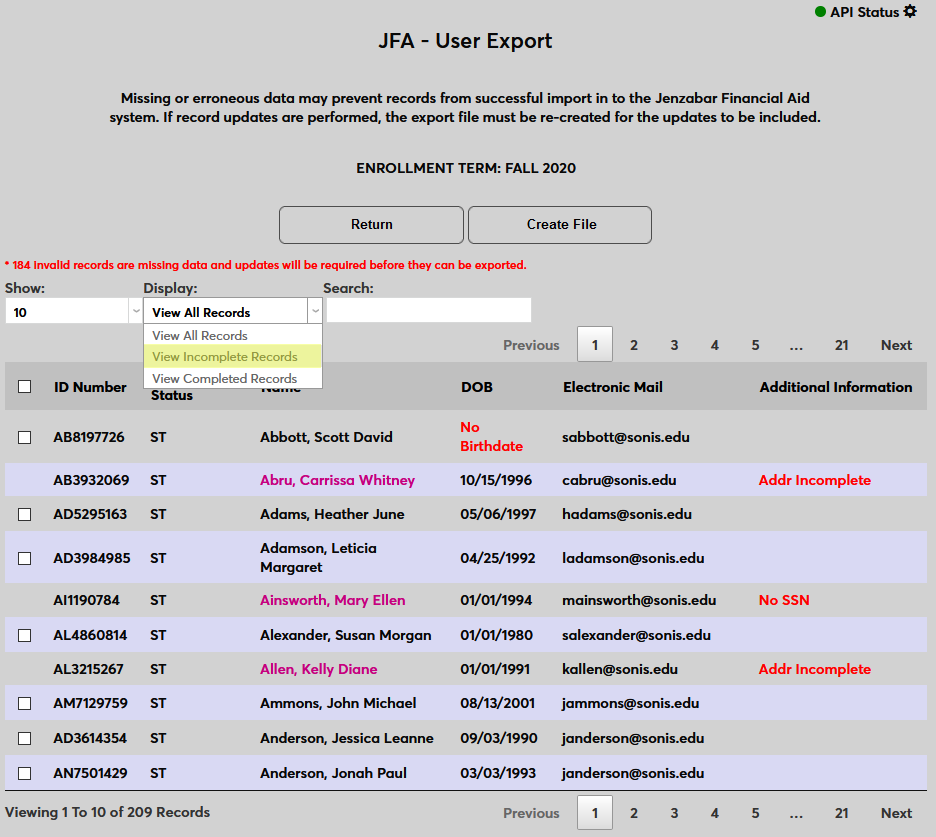
The Display menu can be set to display all records, incomplete records, or complete records.
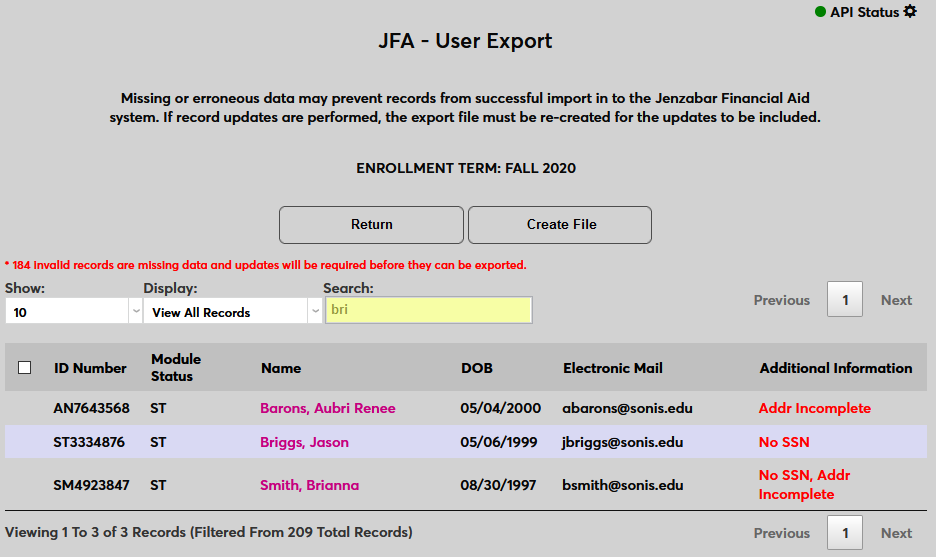
The Search field searches all columns. The search is dynamic, displaying results as characters are typed.
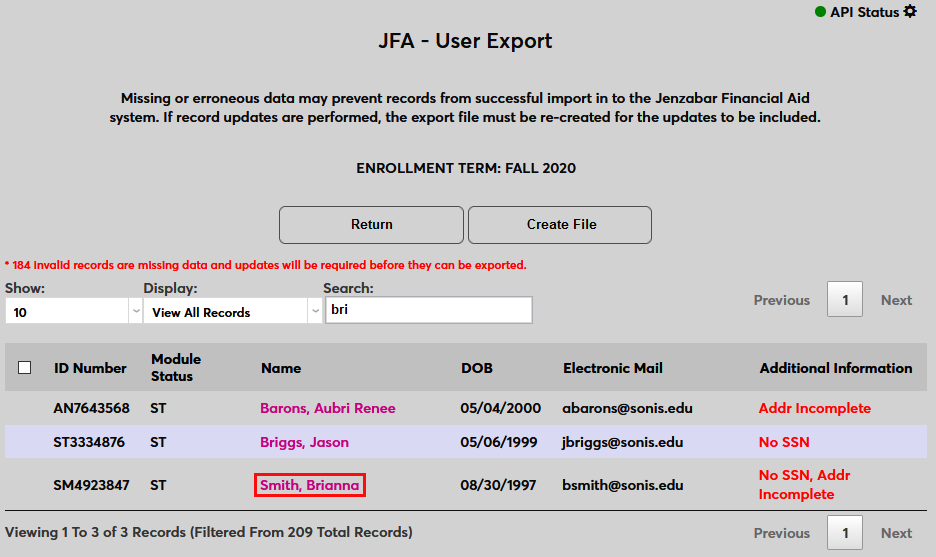
To supply missing data, click on the user’s name.
On the following page, enter the required data and click Save to save the changes. Users who are restricted from viewing or editing social security numbers and dates of birth on other pages will also be unable to access them here.

Once the required data has been provided, use the checkboxes on the left-hand side of the page to select individual records to include in the file or use the checkbox in the top row to select all valid records.
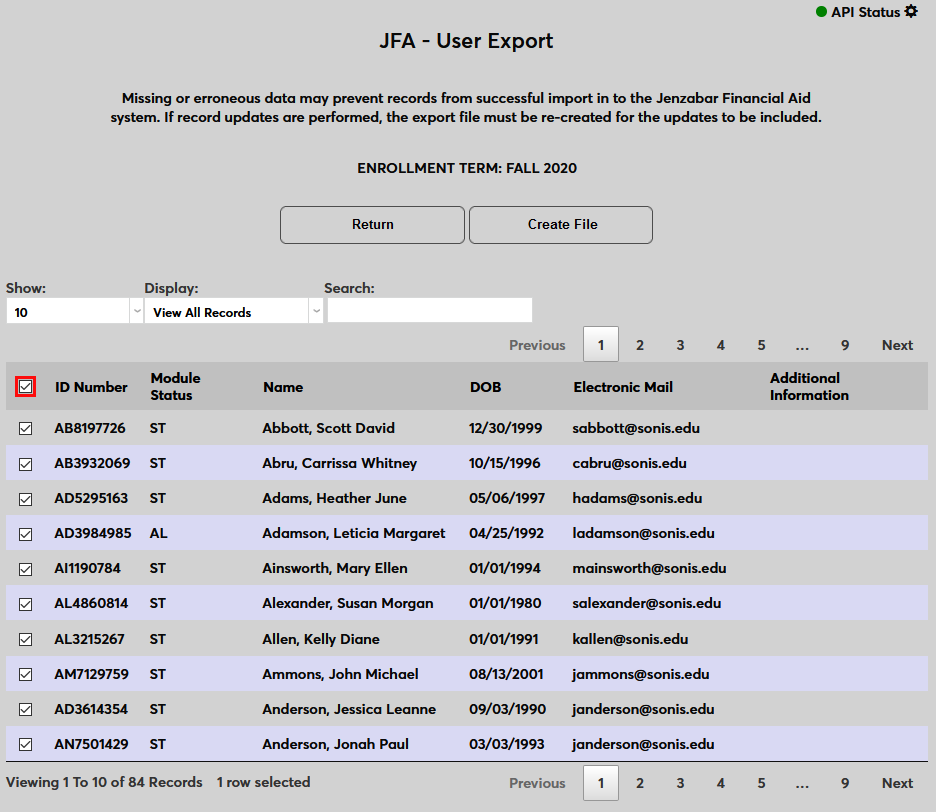
Click Create File to send create the export file and immediately transfer the records to Jenzabar Financial Aid.
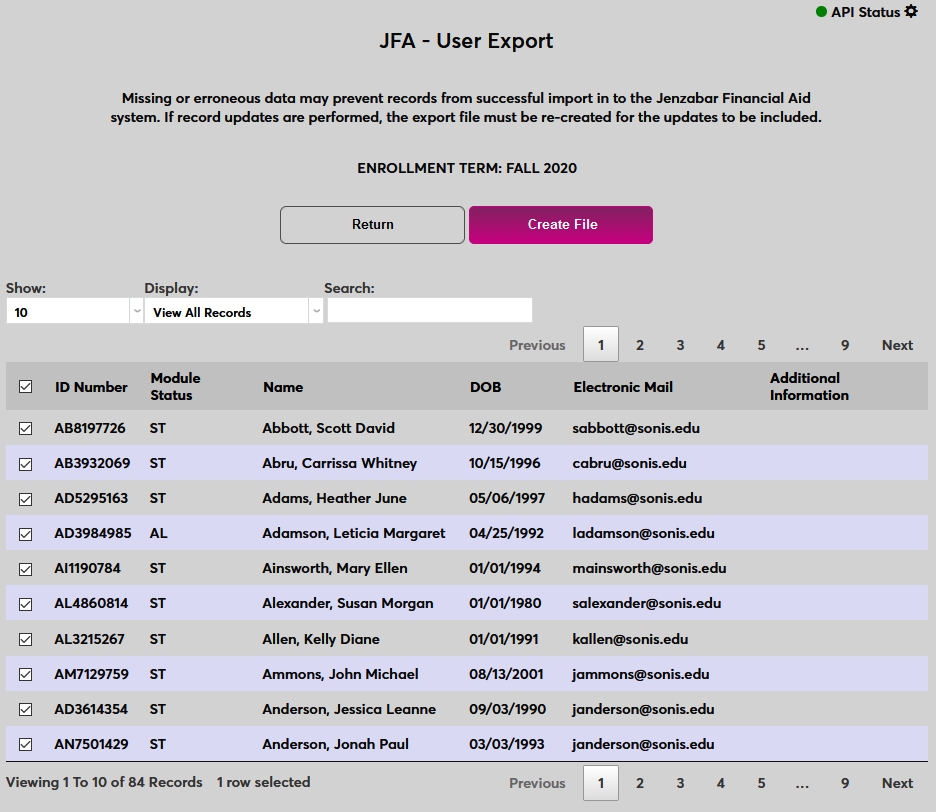
Once the Create File option has been selected, the export file creation process will begin. When the process is finalized, users will be returned to the main Jenzabar Financial Aid User Export page and provided an update on the status of the export file’s creation. The update will include the location of the saved file, how many records were included and the Jenzabar Financial Aid Response on whether the contents of the export file were successfully transferred to the Jenzabar Financial Aid system. The file can be accessed through the Batch Folder File Downloader. Click View Records to see the records that were sent.

Export Notification Assignment/Timed Task
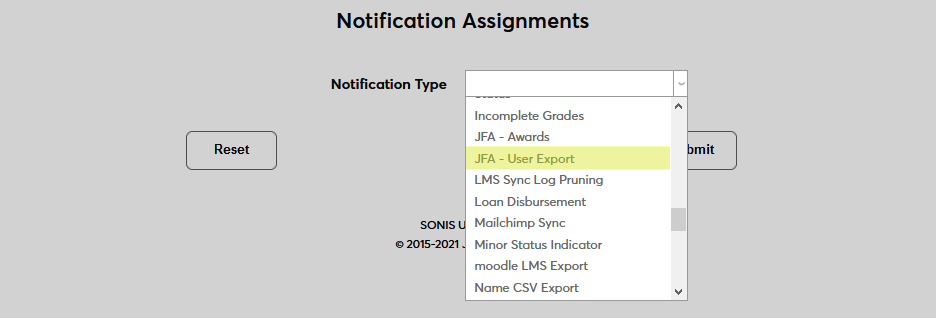
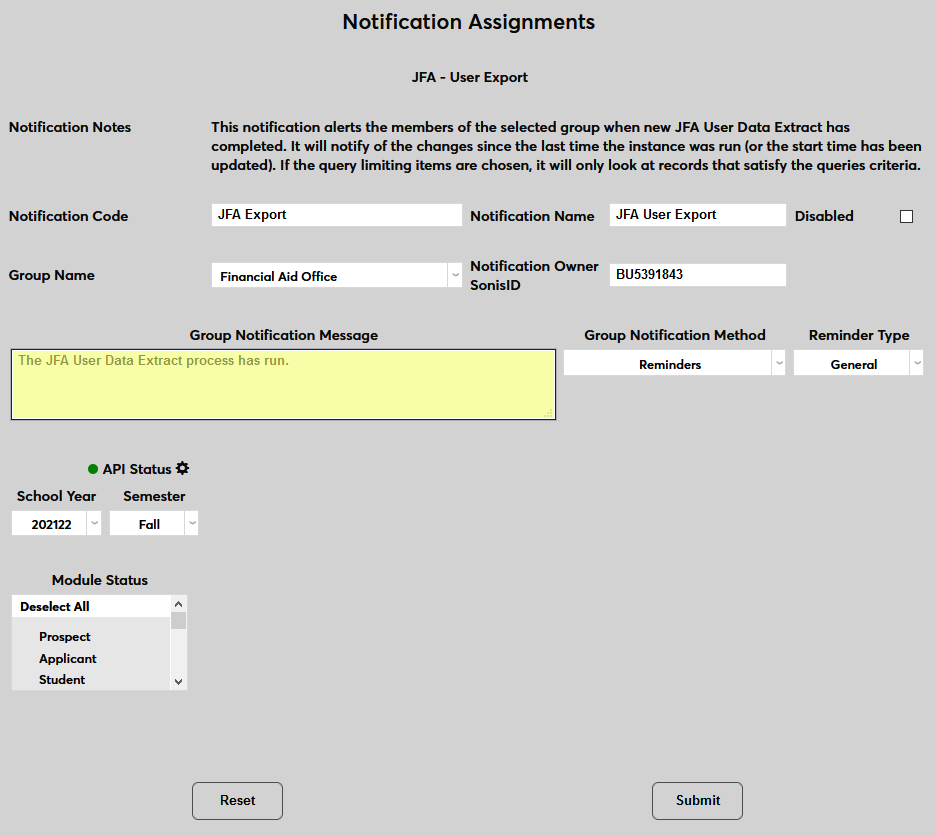
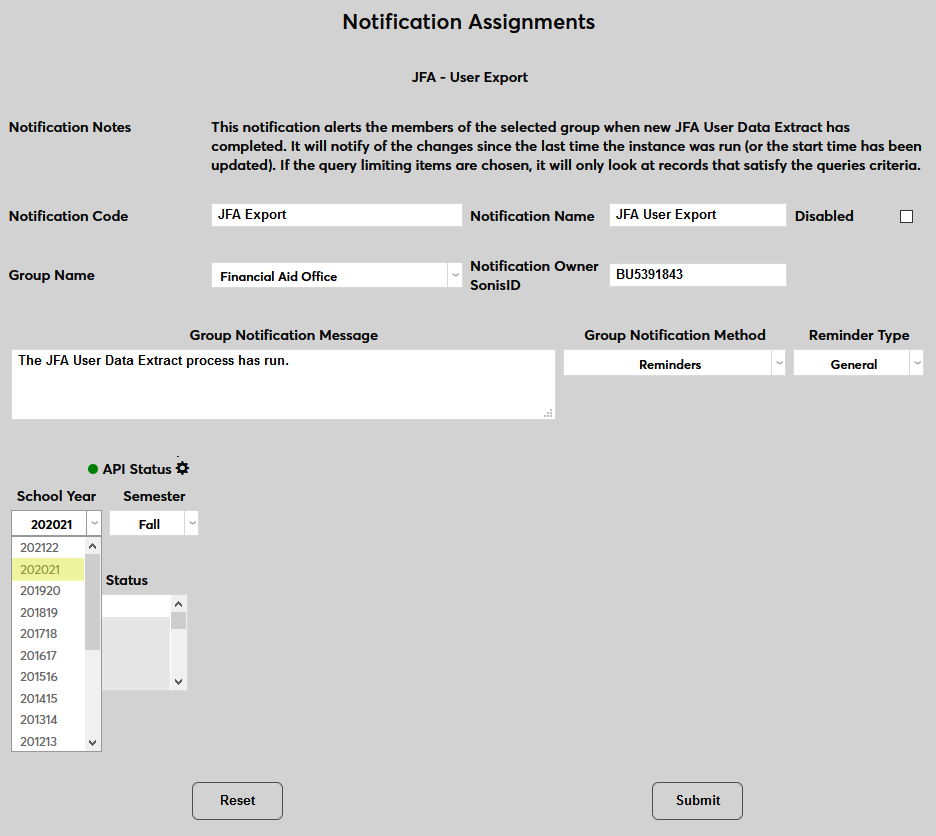
SONIS also offers a notification assignment and timed task that can be used to automatically export students to Jenzabar Financial Aid. To begin setting them up, navigate to Notification Assignments under the Systems menu and click Add.
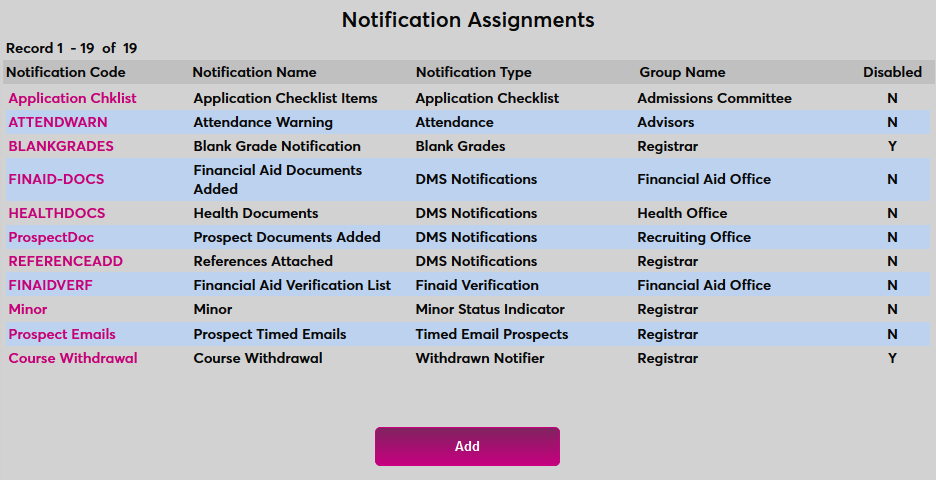
Select JFA - User Export from the Notification Type drop-down menu and click Submit.

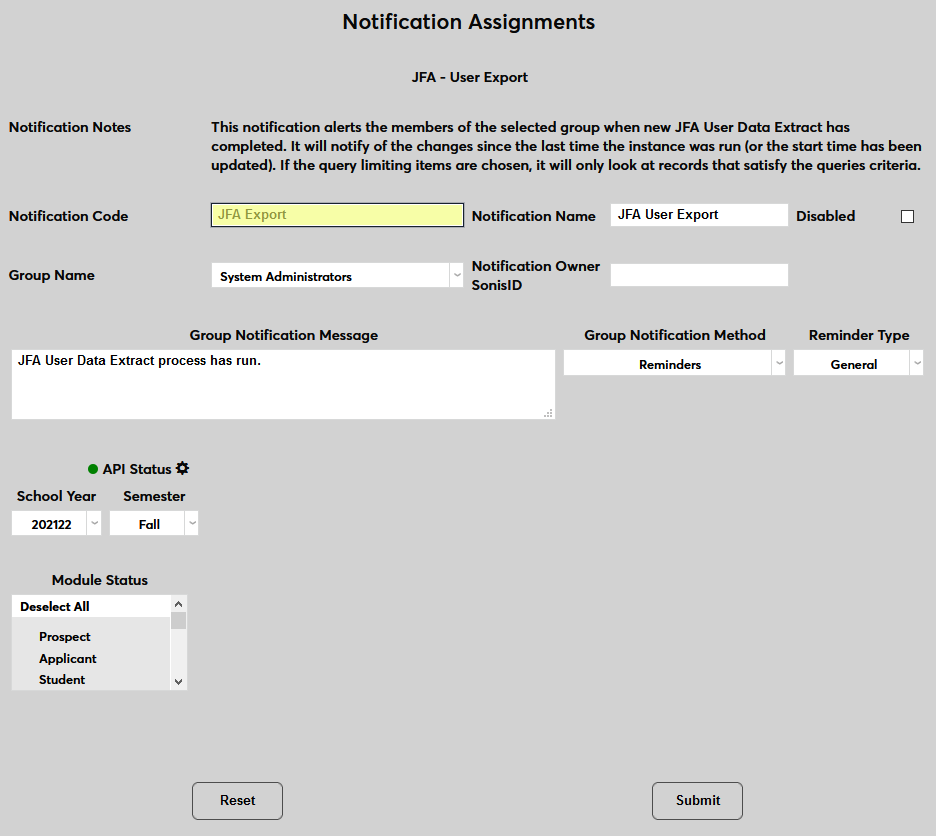
Next, create a Notification Name, a descriptor of the notifier's purpose with a 50 character limit, and a Notification Code, a shorter version of this name with a 20 character limit that the SONIS system will use internally to identify the notifier.
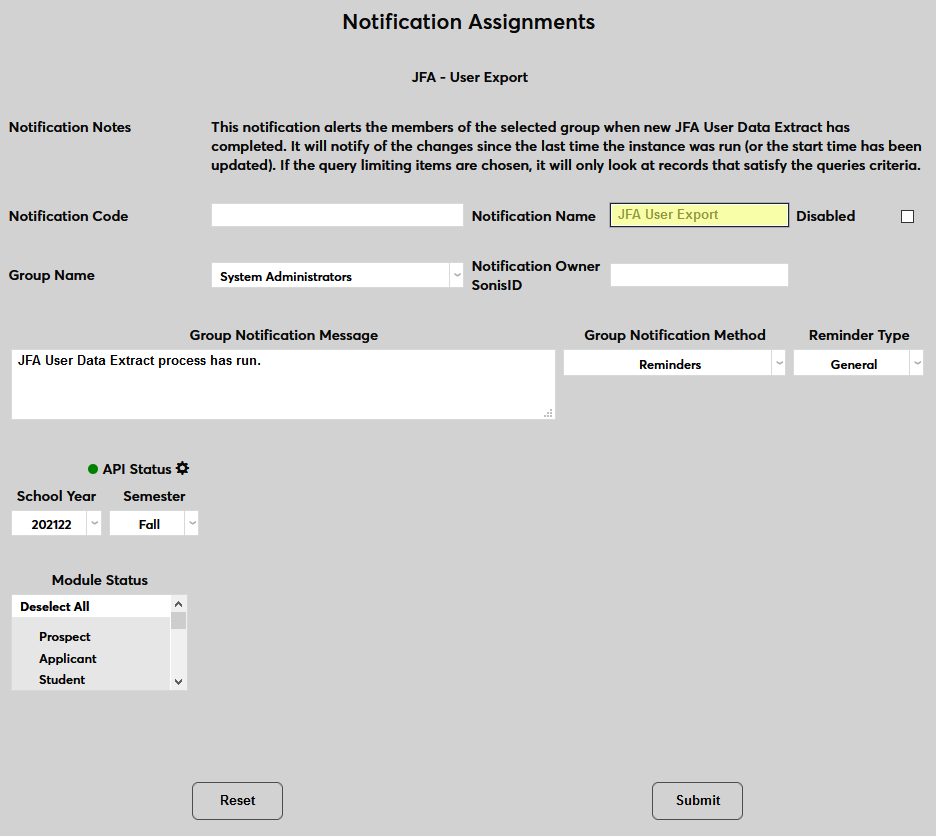
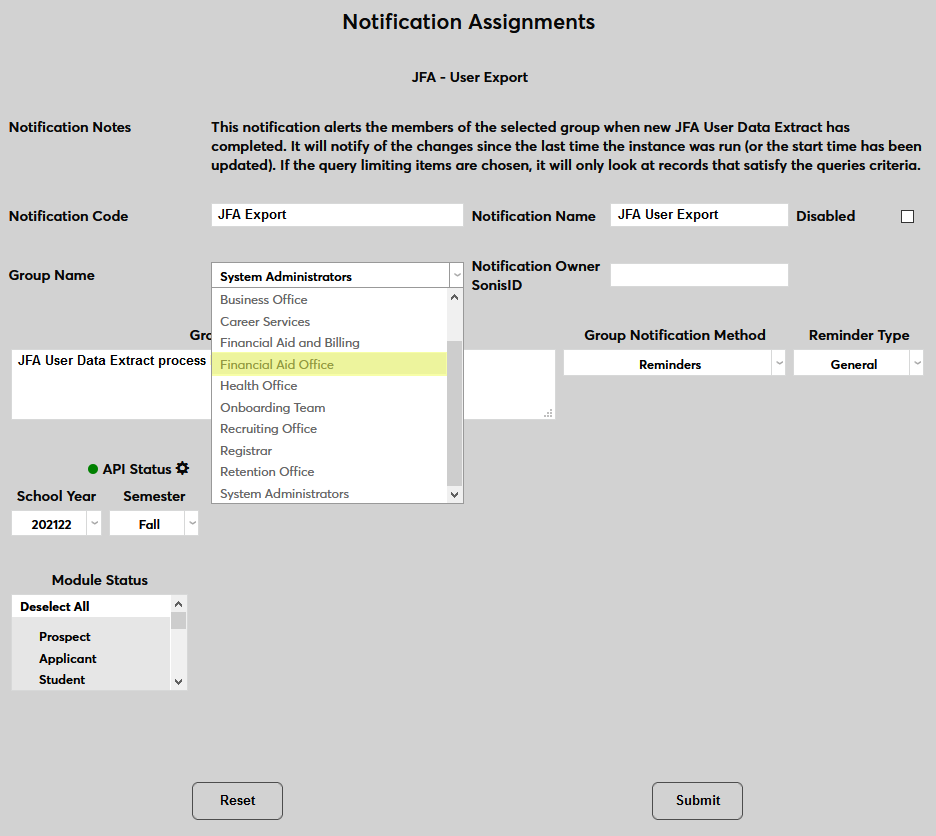
Select a group of staff members to receive the notification from the Group Name drop-down menu. Groups can be added and edited through the Table Maintenance utility.
Enter the ID of the faculty or staff member who will be managing this notification in the Notification Owner SonisID field.

Create a Group Notification Message that will be sent to the group members when the task takes place.
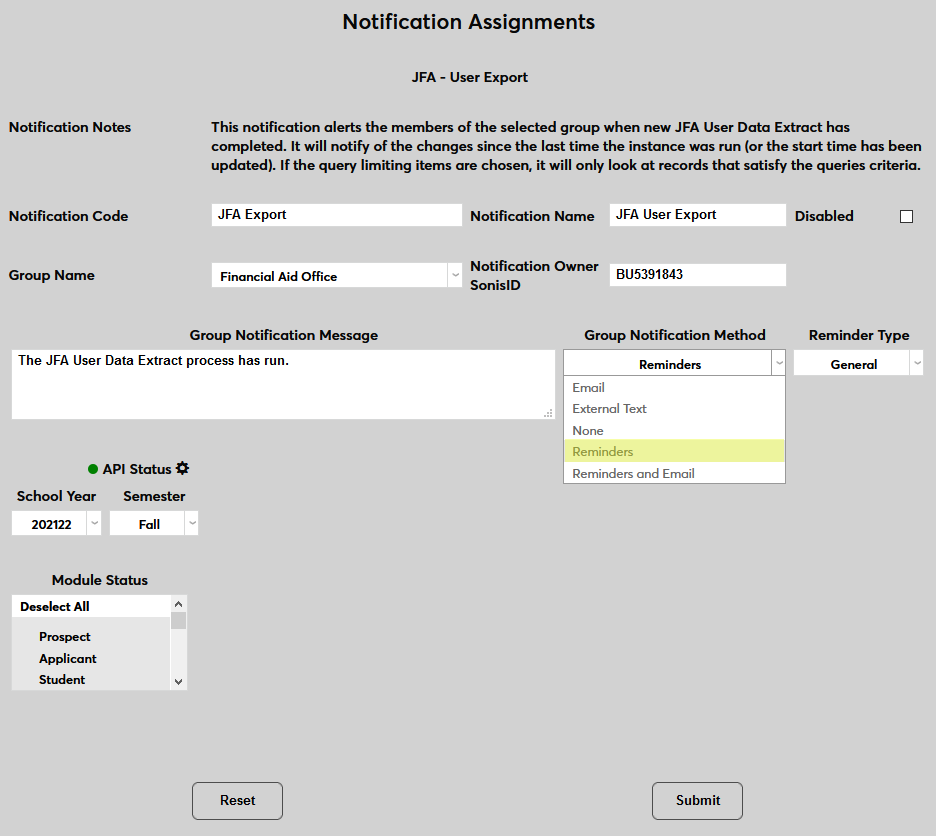
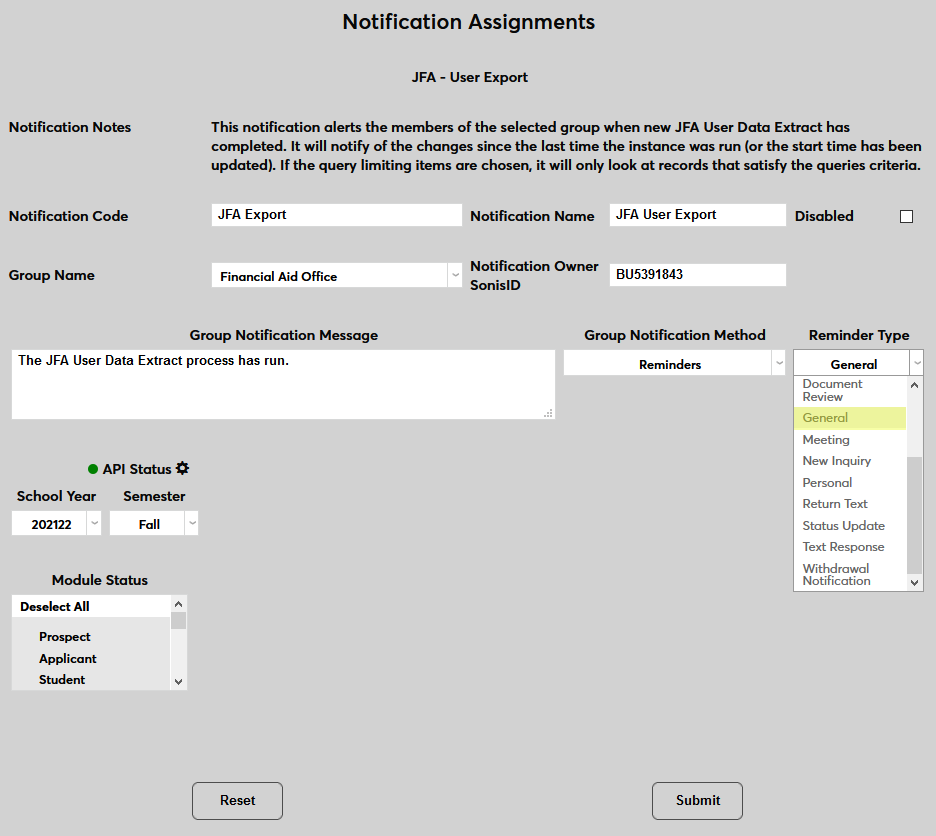
The Group Notification Method drop-down menu designates whether the group and individual users will receive an in-system reminder, an email, a text, or no notification when the process is triggered. The Reminder Type drop-down can change how the in-system reminder displays. This list can be created and edited via the Table Maintenance utility.
The API setup data saved during the manual transfer process should be saved here as well and the status light should be green. Click the settings wheel if changes need to be made. If the connection is down for whatever reason, the process will still run, saving the file in the batch folder. However, the file will not be sent to Jenzabar Financial Aid unless the status is green at the time when the notification is set to run.
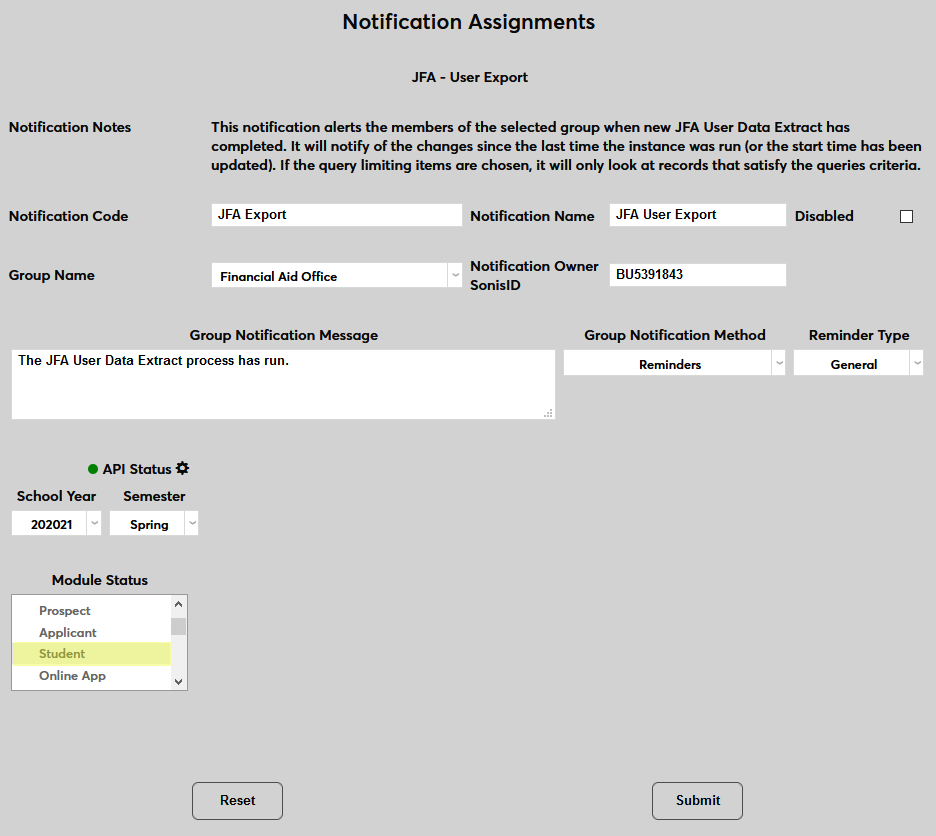
Select a School Year and a Semester for the transfer. As with the manual process, these selections do not affect which users are included in the export. Rather, they are used to designate GPA, SAP, leave status, honors/probation, and other semester-specific data in the export.
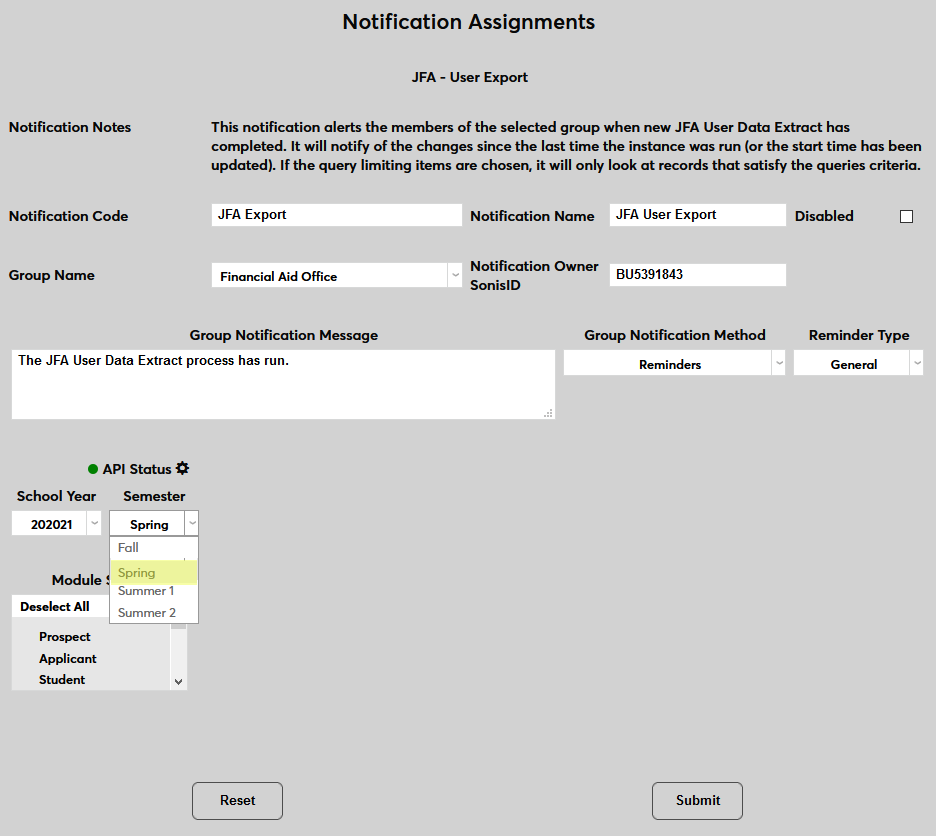
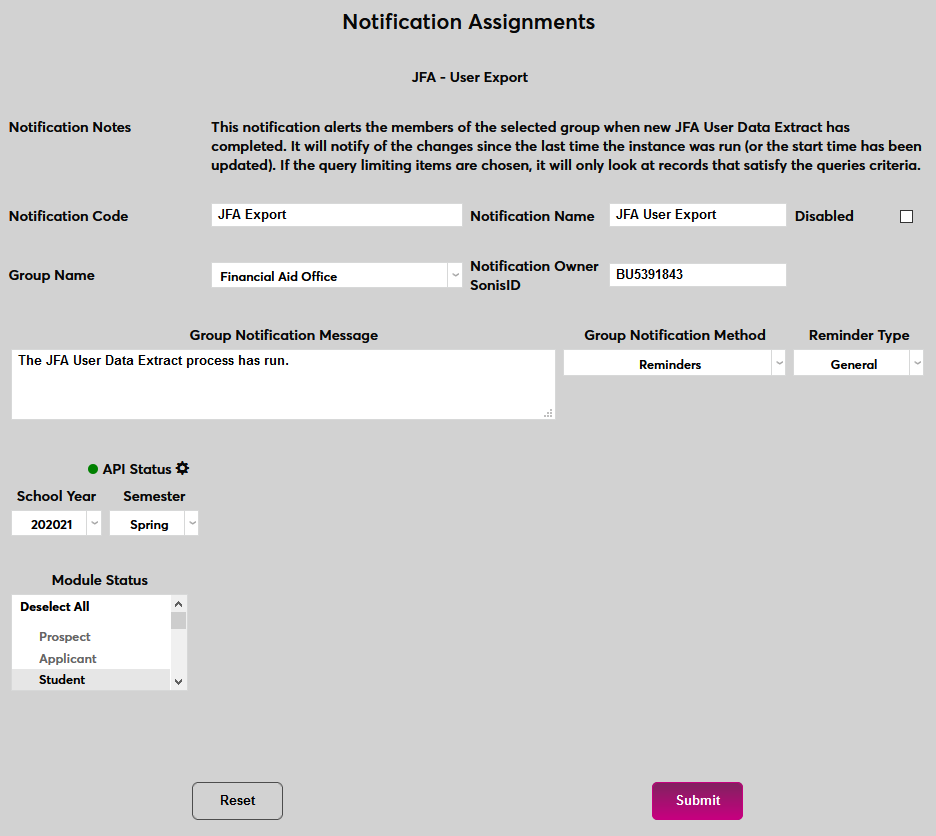
Select one of more Module Statuses to include in the report. Only users with the selected status will be included.
Click Submit to save the changes and create the notifier.
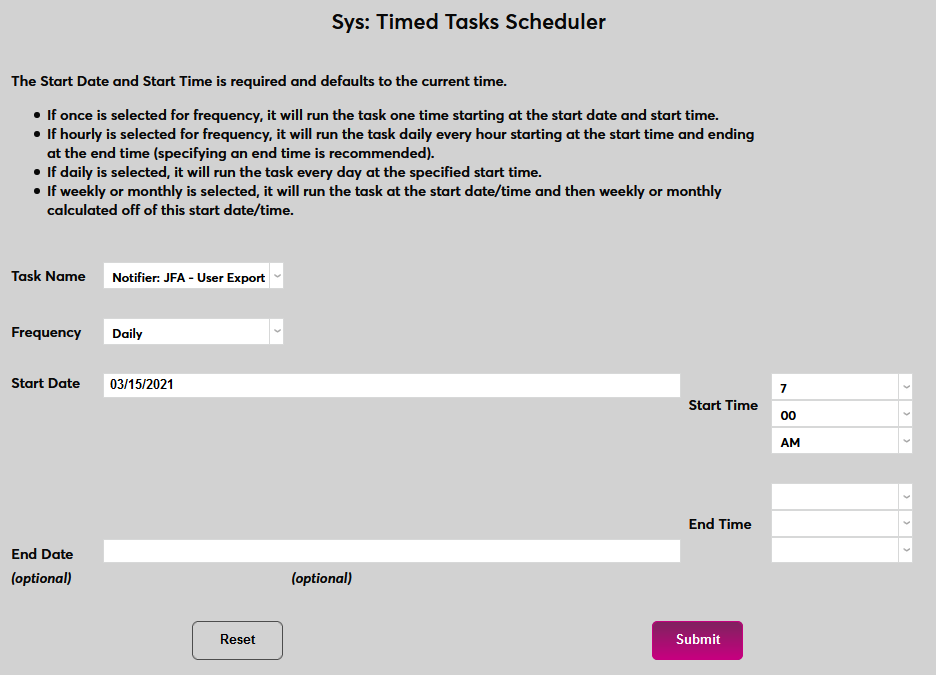
In order for the notifier to run, a timed task must be set up. Navigate to the Timed Task Scheduler under the Systems menu and click Add to create a new task.
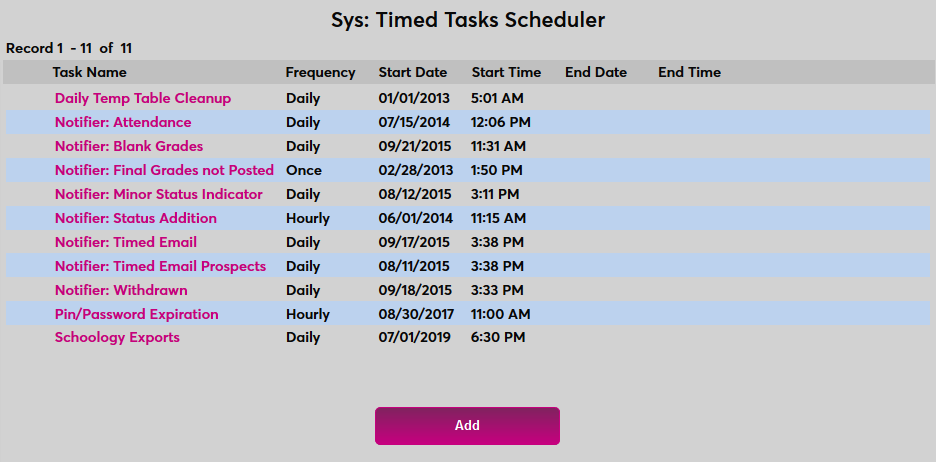
Select Notifier: JFA - User Export from the Task Name drop-down menu.
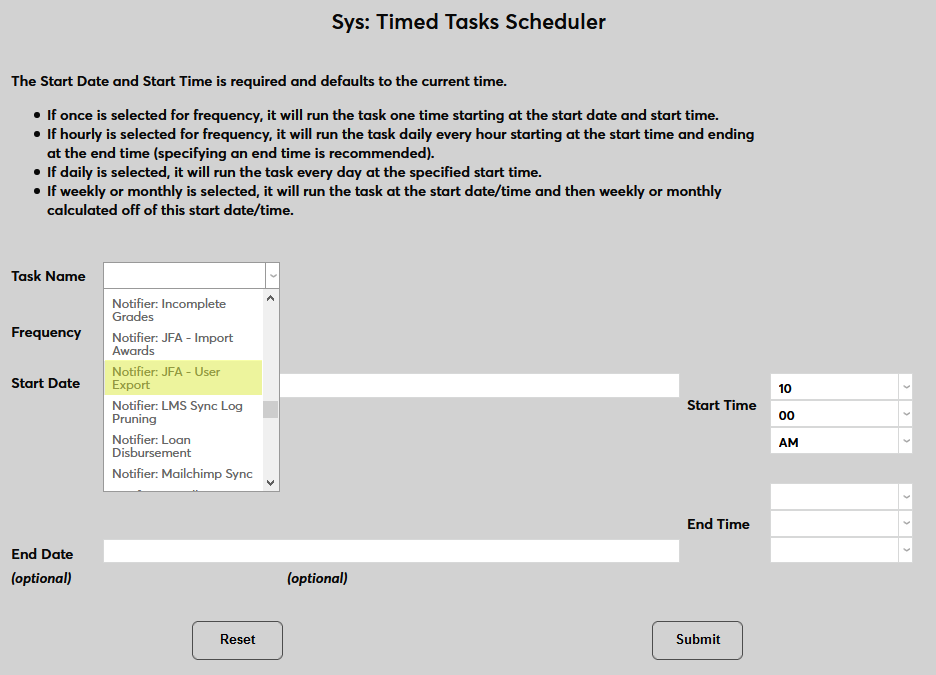
Select how often the task should occur with the Frequency dropdown.

The Start Date and Start Time will automatically be set to the current date and time but can be changed to suit individual preferences. The End Date and End Time are optional.
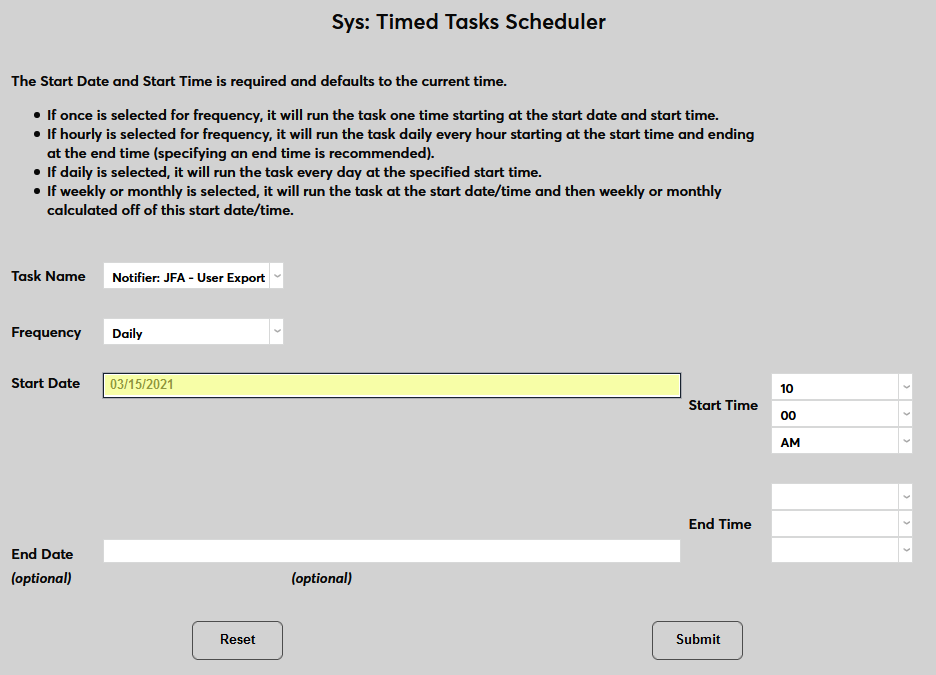
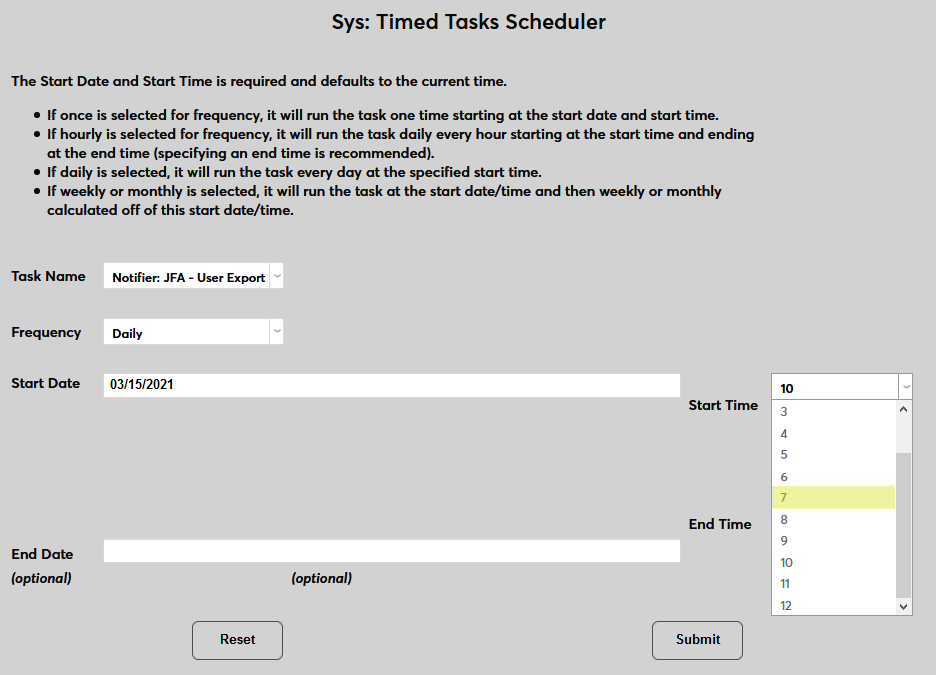
Click Submit to save the changes and activate the timed task.
Custom Content
You can send additional SONIS data in the User Export that will be stored in custom fields you create in JFA.
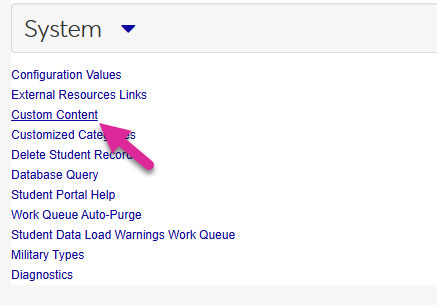
To prepare JFA to accept custom SONIS content, log in to JFA and navigate to the Administration page under the Financial Aid drop-down menu. Select Custom Content from the System menu at the bottom of the page.
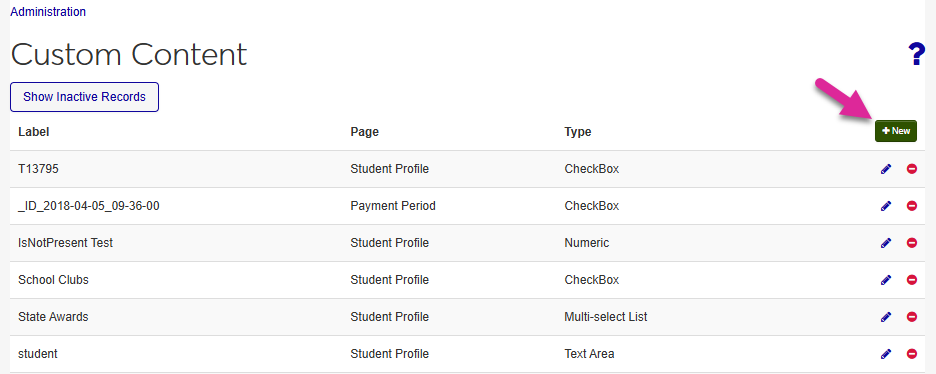
On the following page, click New to create a new JFA field.
Choose the JFA Page where your new field will appear. In most cases, this will be the Student Profile.
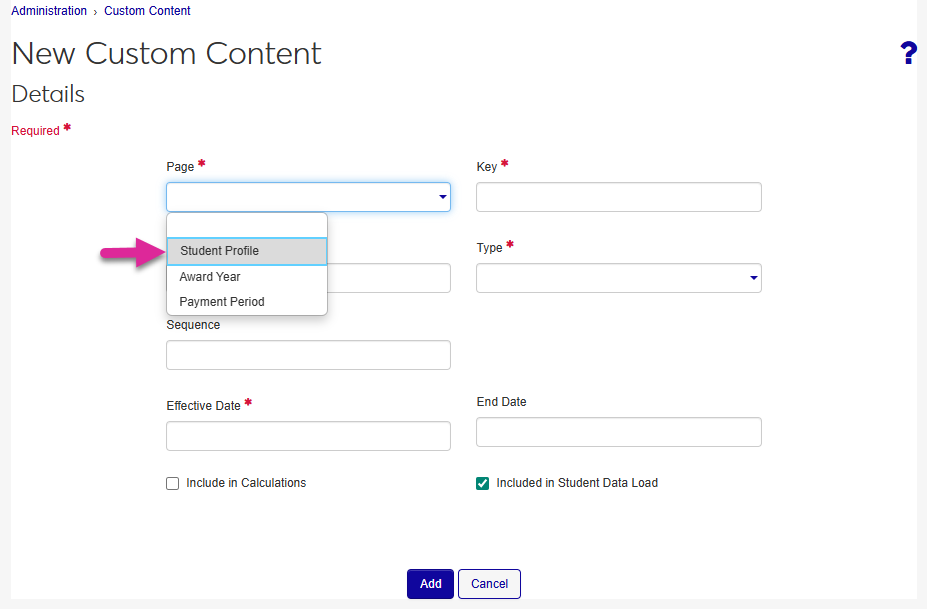
Create a Key for your field. This field holds up to 100 alphanumeric characters and must be a unique value. You'll use this to create a link between your SONIS data and the JFA field, so save the value you create here for later use.

Create a matching Label for the field. This value is what will display on the field in JFA. The field holds up to 100 alphanumeric characters and must be a unique value.
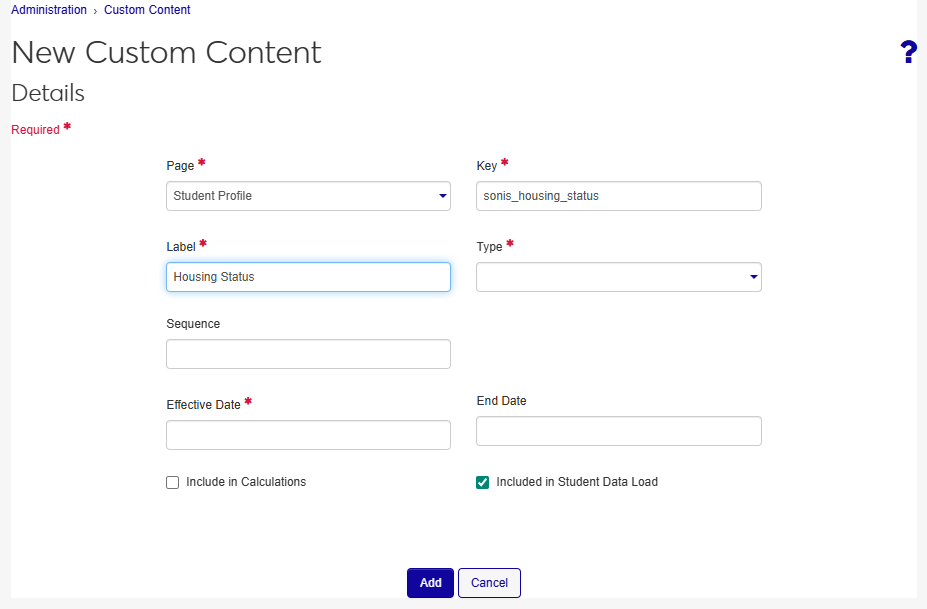
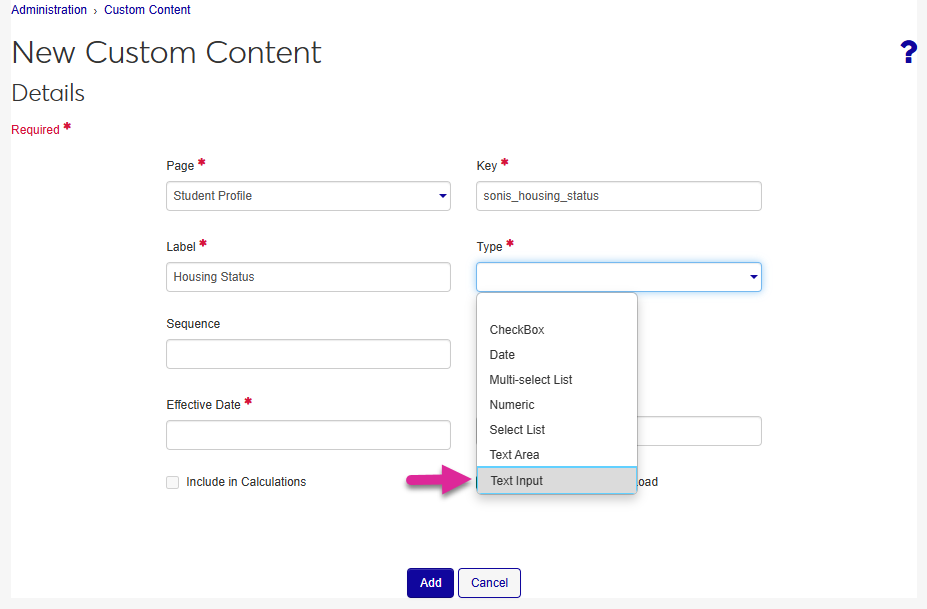
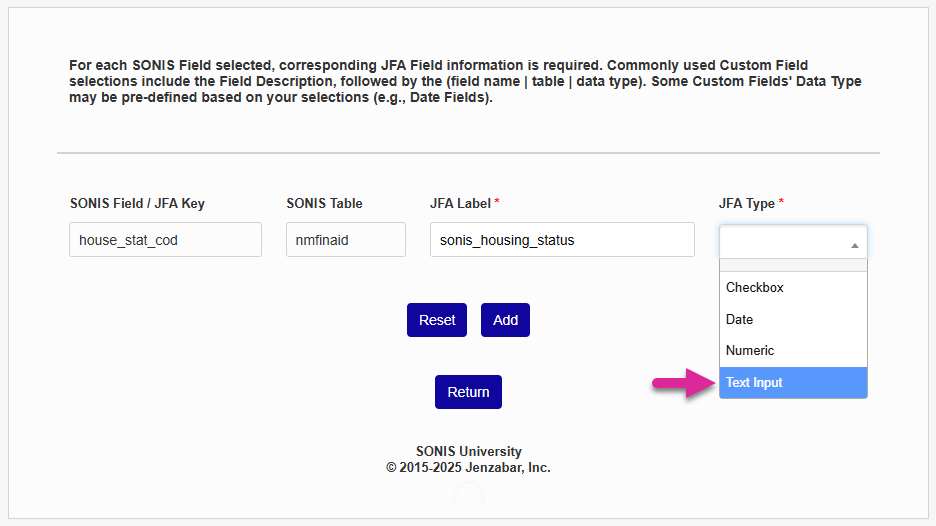
Select the Type of content you will be exporting to JFA. Only these four field types can be used to store SONIS data.
Checkbox: Used for true or false questions. Checked for true; unchecked for false.
Date: Used for date inputs only. Cannot be included in calculations.
Numeric: Content must be a numeric value.
Text Input: Smaller, sentence-shaped field that can hold any text. 1,000-character limit.
Set an Effective Date for the content. This is the date when the content you import will first be accessible through JFA. It can be today's date or a future date.
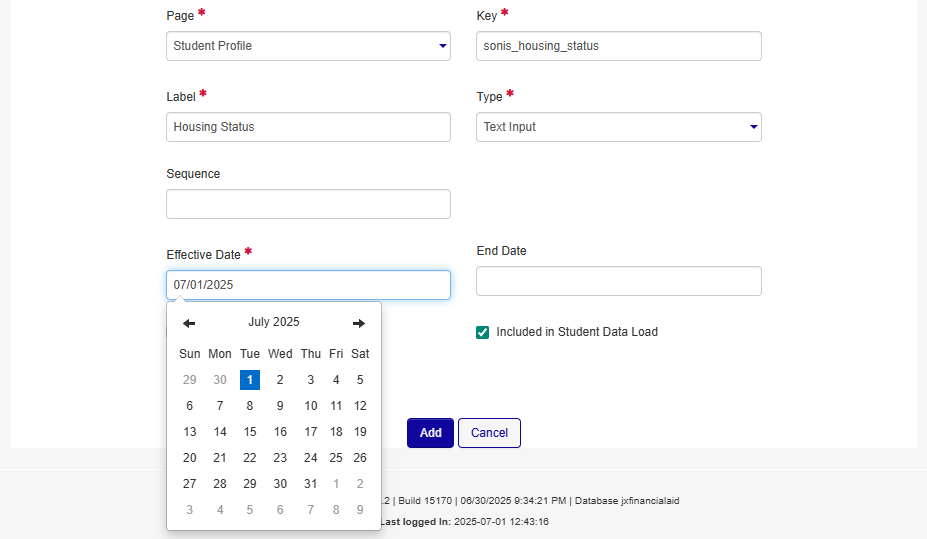
The additional fields on this page are optional and not used by SONIS. Click the ? on this Jenzabar Financial Aid page if you have questions about their purpose.
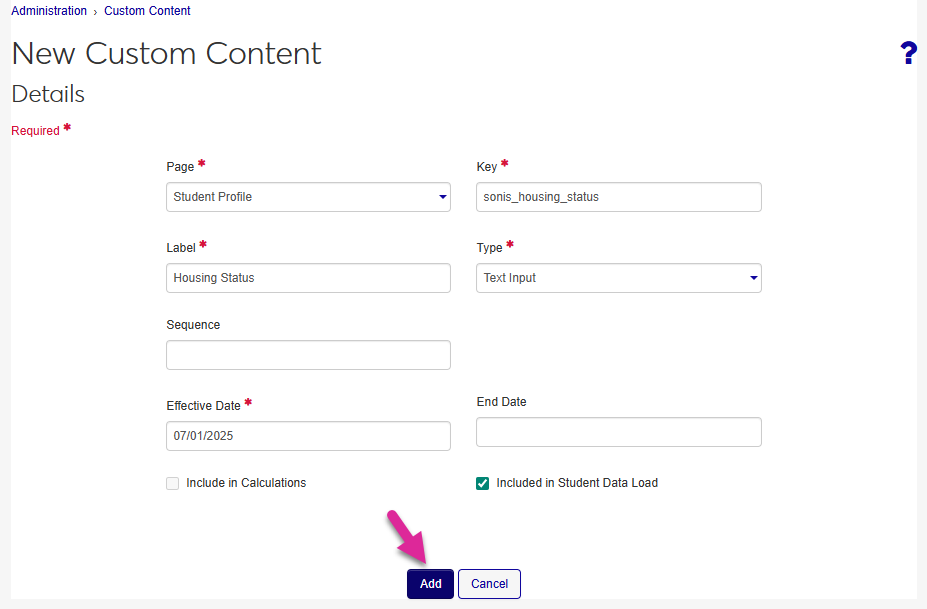
Click Add and then Yes when prompted.
You will need to repeat this process for each piece of SONIS data that you wish to export to JFA.
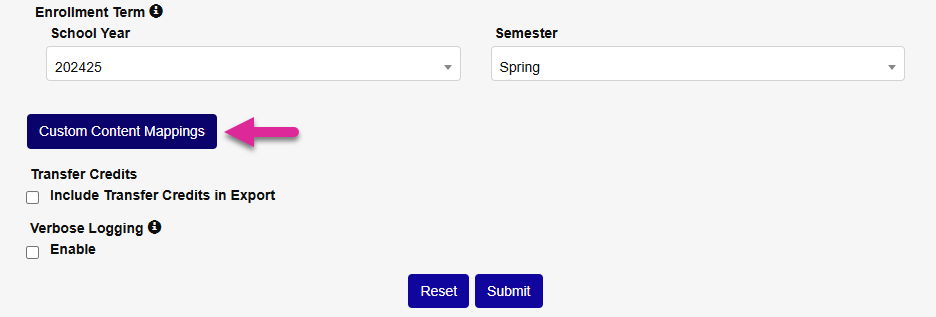
Click the Custom Content Mappings button at the bottom of the User Export page under the SONIS Financials hub.
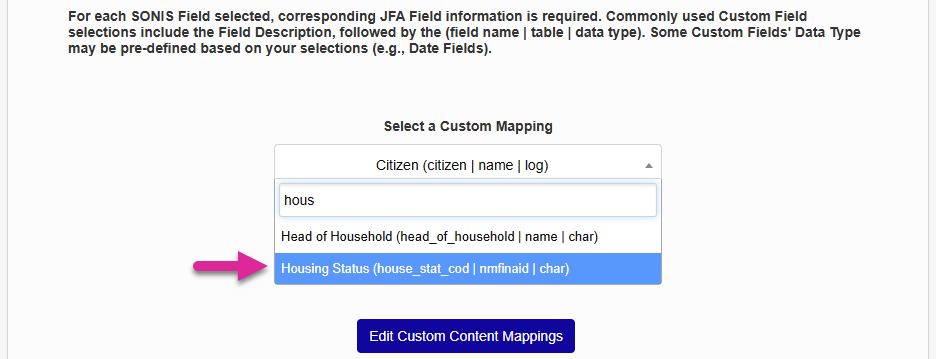
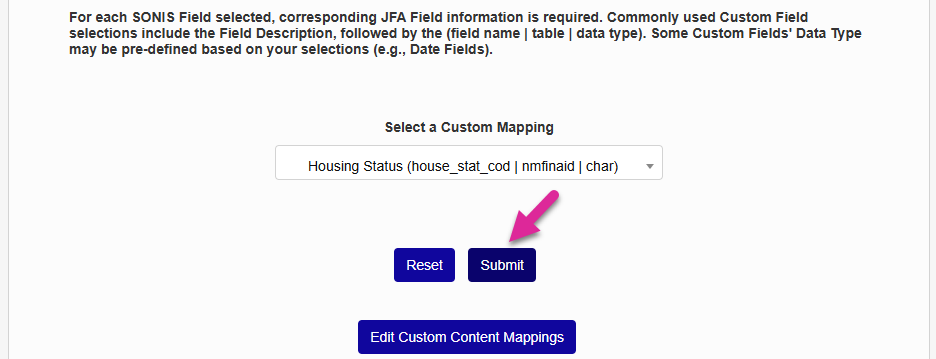
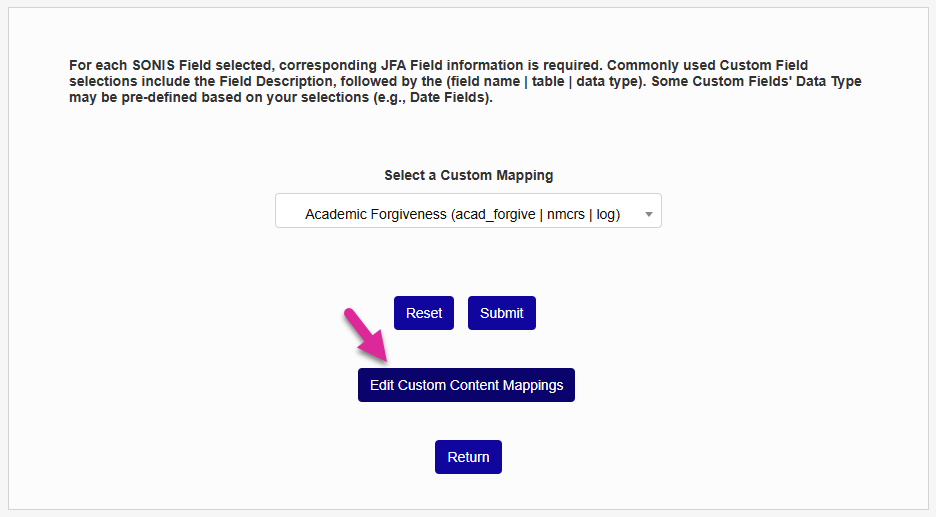
Select a Custom Mapping from the drop-down menu and click Submit. This is the field from SONIS that you'll be sending to JFA.
On the following page, the SONIS Field and SONIS Table are locked in based on your previous selection.
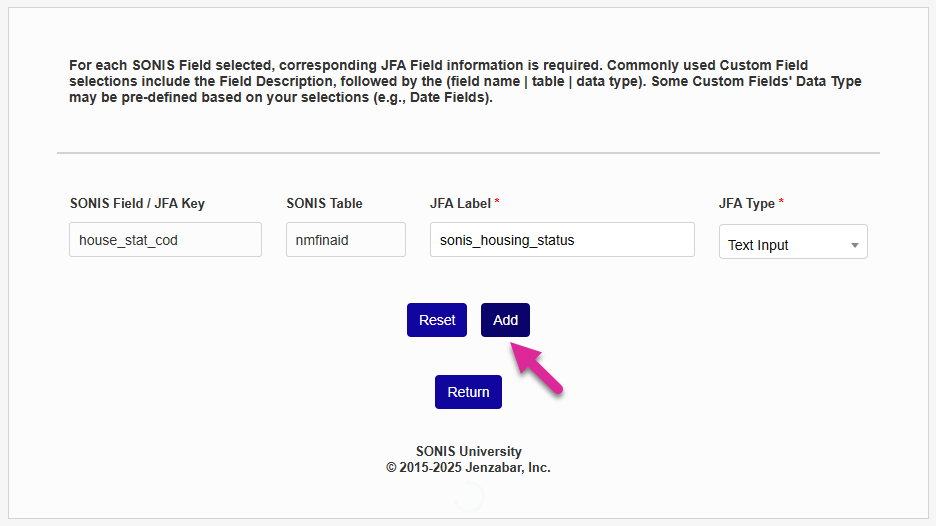
Enter the JFA Key that you used when creating the field where the data will populate on JFA.
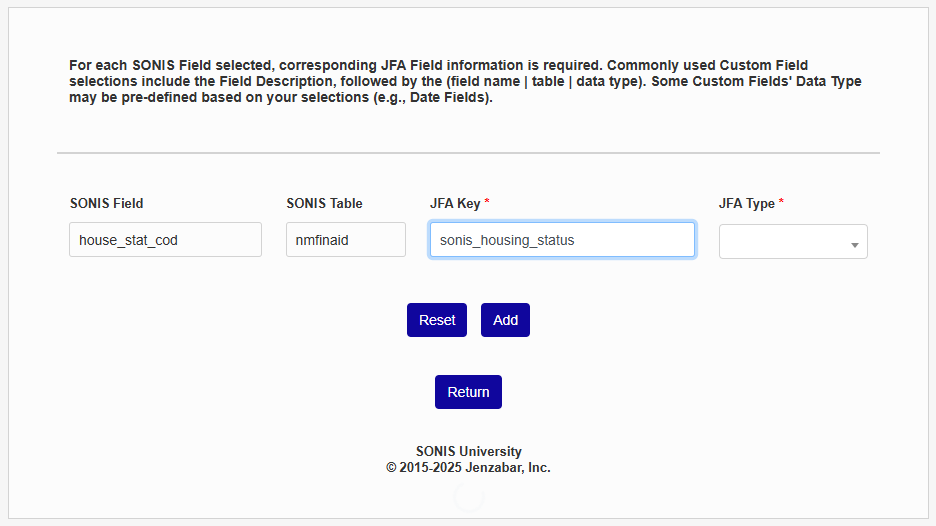
Select the JFA Type that matches the type you selected in JFA.
Click the Add button to save the field mapping. Your next export to JFA will include this data.
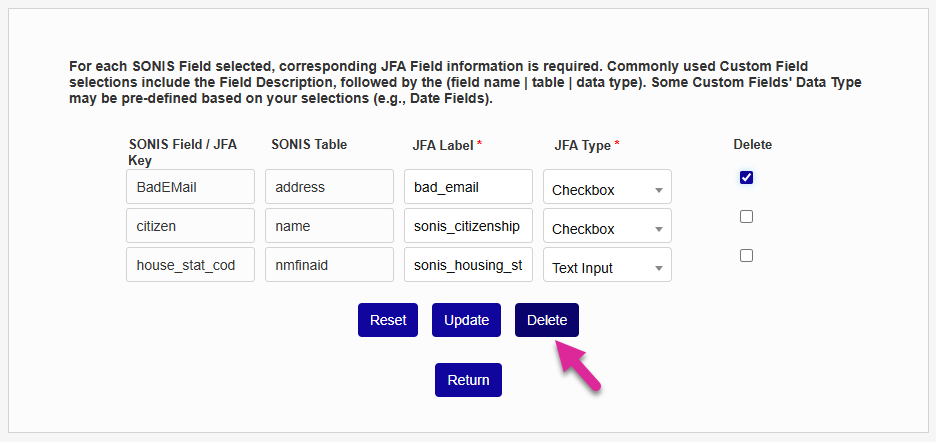
Once you've created mappings, click Edit Custom Content Mappings to make changes.
You can edit the JFA Label or select a new JFA Type if the data isn't exporting properly or there have been changes in Jenzabar Financial Aid. Once you've made the needed changes, click Update to save the mapping(s).
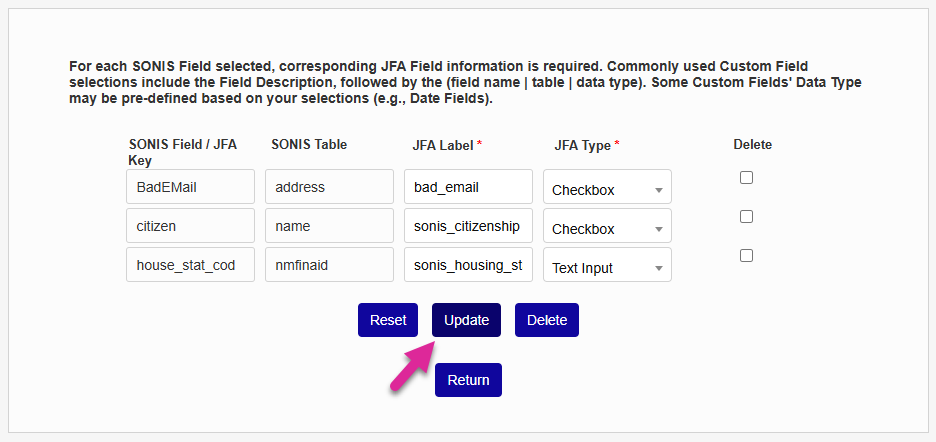
To remove a mapping entirely and prevent the data from being exported, check the Delete box for that row and click Delete.
Jenzabar Financial Aid Setup
Export Configuration
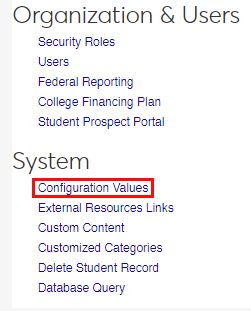
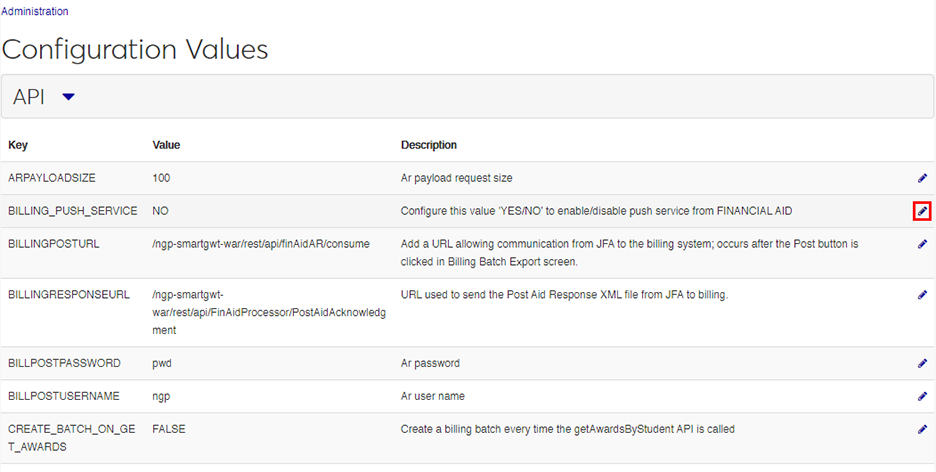
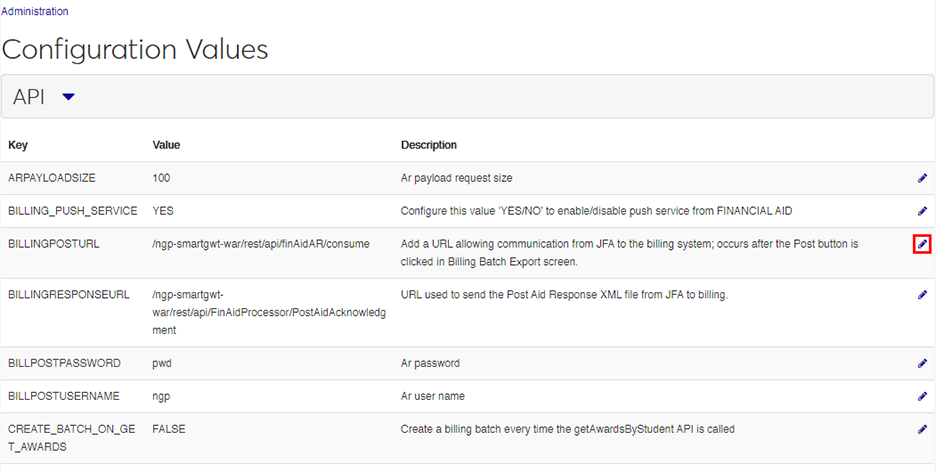
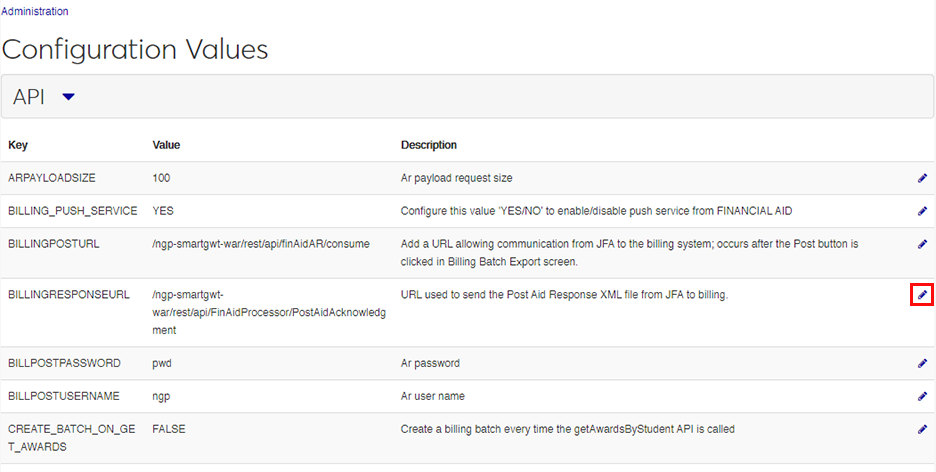
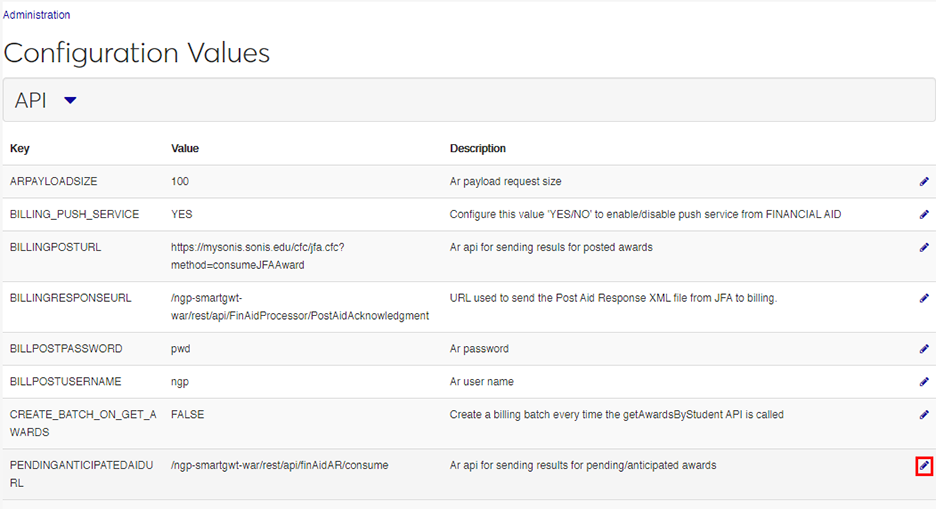
Before transferring anticipated awards and disbursements to SONIS from JFI, a few settings have to be altered. To set up the API from the Jenzabar Financial Aid end, navigate to the Administration panel and click Configuration Values under the System heading.
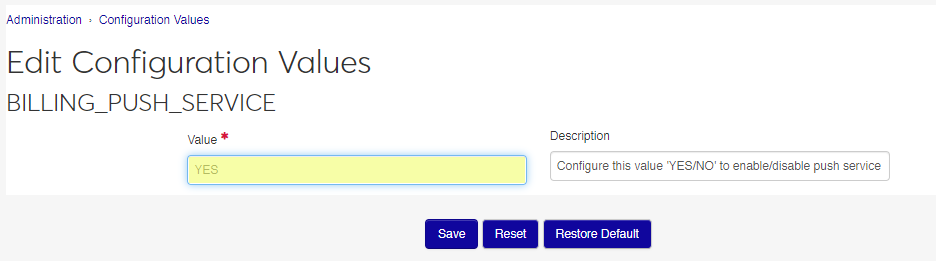
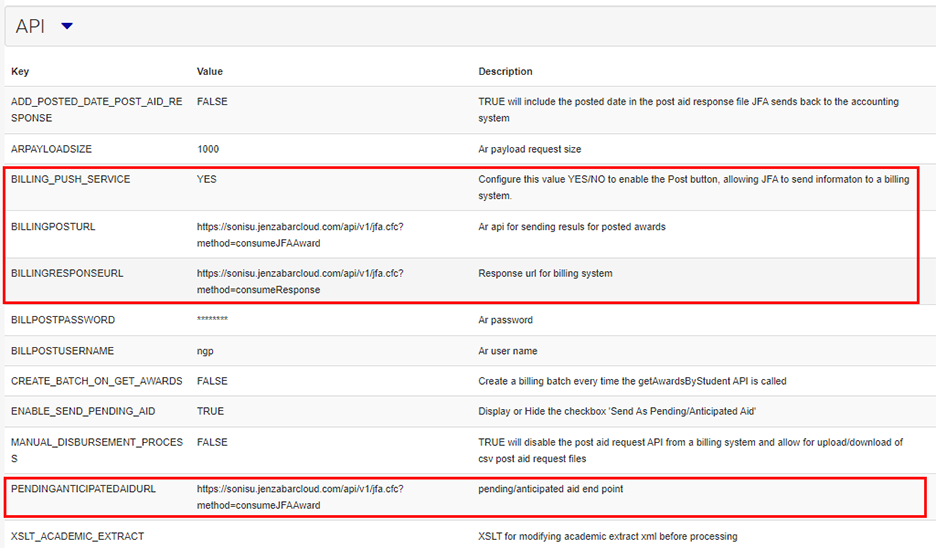
On the Configuration Values page, open the API tab. Click the Edit Row button on the BILLING_PUSH_SERVICE row. Change the value to YES and click Save.
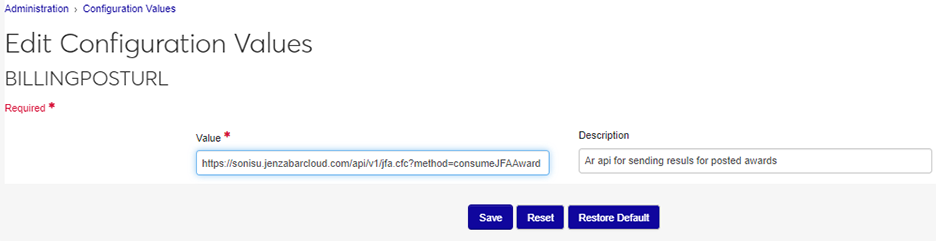
Next, click the Edit Row button on the BILLINGPOSTURL row. Enter the following URL: <client SONIS URL>/api/v1/jfa.cfc?method=consumeJFAAward. Replace the <client SONIS URL> portion of the URL with the location where SONIS is accessed on your local system. Click Save to save the change.
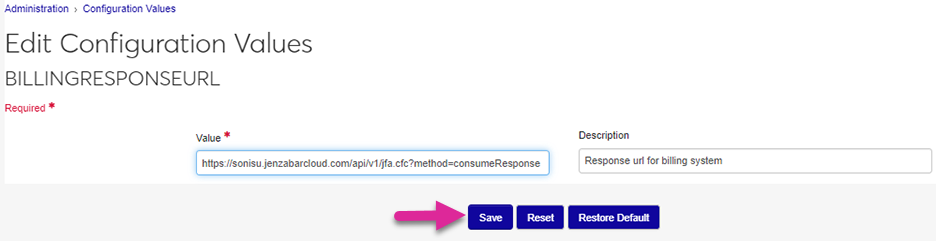
Edit the BILLINGRESPONSEURL field as well. Enter the following URL: <client SONIS URL>/api/v1/jfa.cfc?method=consumeResponse. Replace the <client SONIS URL> portion of the URL with the location where SONIS is accessed on your local system. Click Save to save the change.
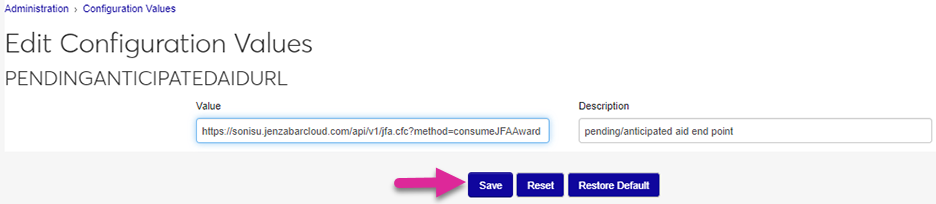
Finally, edit the PENDINGANTICIPATEDAIDURL field. Enter the following URL: <client SONIS URL>/api/v1/jfa.cfc?method=consumeJFAAward. Click Save to save the change.
When the API setup is complete, the configuration page should look like the following image:
External Codes
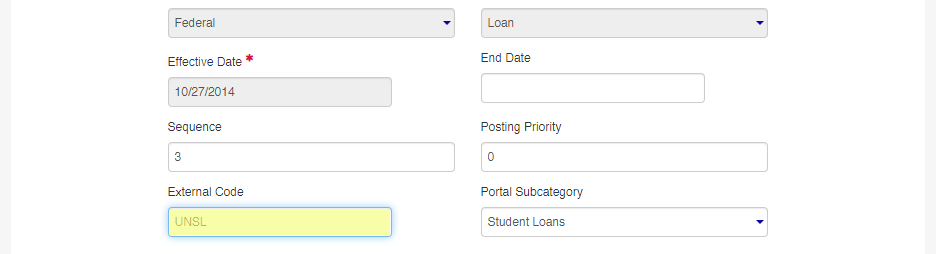
The Jenzabar Financial Aid interface with SONIS also includes an optional feature that can make it easier to send data. By default, SONIS recognizes awards sent from Jenzabar Financial Aid based on the data in the Award Type Code field, which is located on the Awards setup page under the Administration menu.
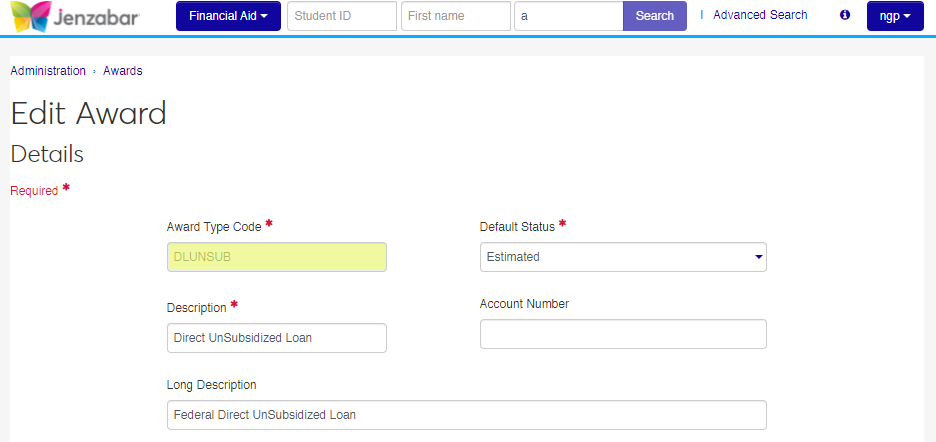
However, if this value does not match the Award Code for the loan in SONIS, clients can use the External Code field on the same page to supersede it. If there is a value in the External Code field, SONIS will use this value rather than the Award Type Code value to match exported awards.
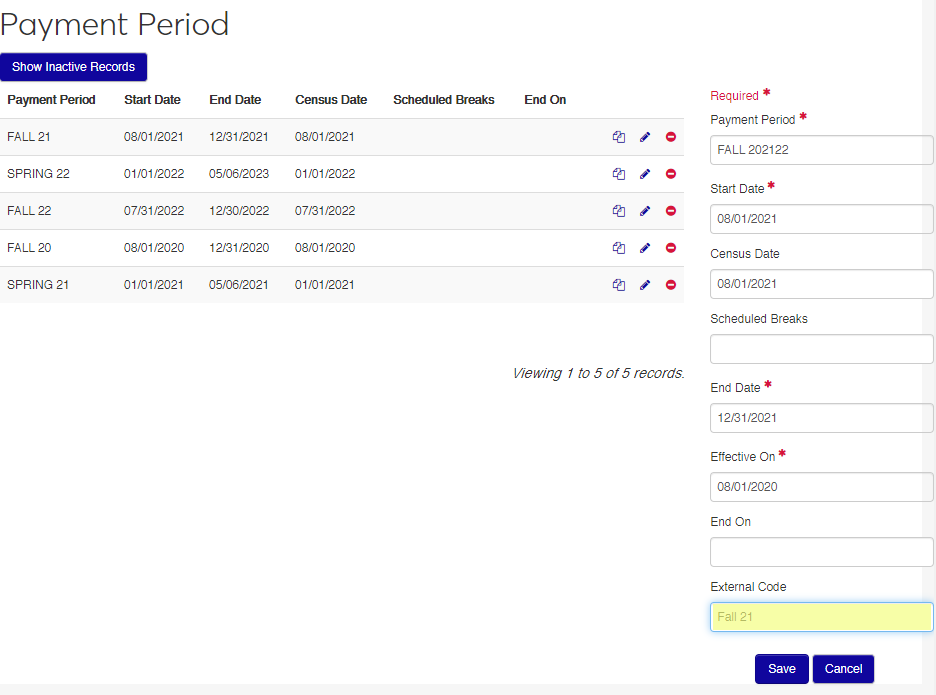
An External Code field is available on the Payment Period setup page as well. If the value used in the Payment Period field doesn't match the Semester Description in the Semester History table in SONIS, clients can place a matching value in the External Code field that will supersede the standard value and allow a match.
Batches With Wrong External Codes
If either an anticipated award or a disbursement batch has been created in Jenzabar Financial Aid, or sent from Jenzabar Financial Aid to SONIS, with one or more incorrect external codes, this is considered a data error and must be corrected.
Wrong external code sent in anticipated award batch to SONIS, error realized before disbursement batch sent: to correct, void the anticipated award in SONIS, correct external code in Jenzabar Financial Aid, recreate the anticipated award(s) originally sent with the wrong code, and resend to SONIS. After the anticipated award shows correctly in SONIS, create and send the disbursement batch.
Wrong external code sent in BOTH anticipated award and disbursement batches to SONIS: to correct, void both the anticipated award and disbursement records in SONIS, cancel the award(s) in the student's package in Jenzabar Financial Aid, correct the external code(s) in Jenzabar Financial Aid, recreate the award(s) in the student's package, create and send anticipated award batch to SONIS, and create and send a new disbursement batch to SONIS.
Anticipated Awards
Creating Batch
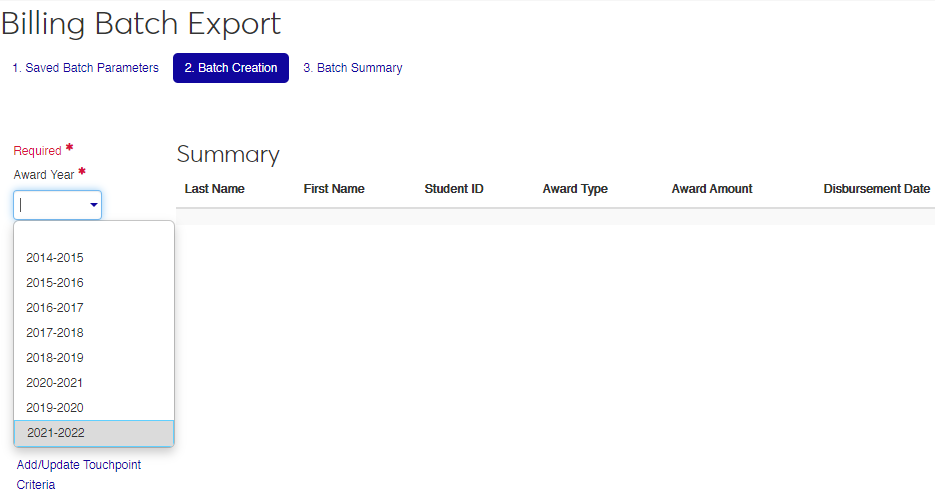
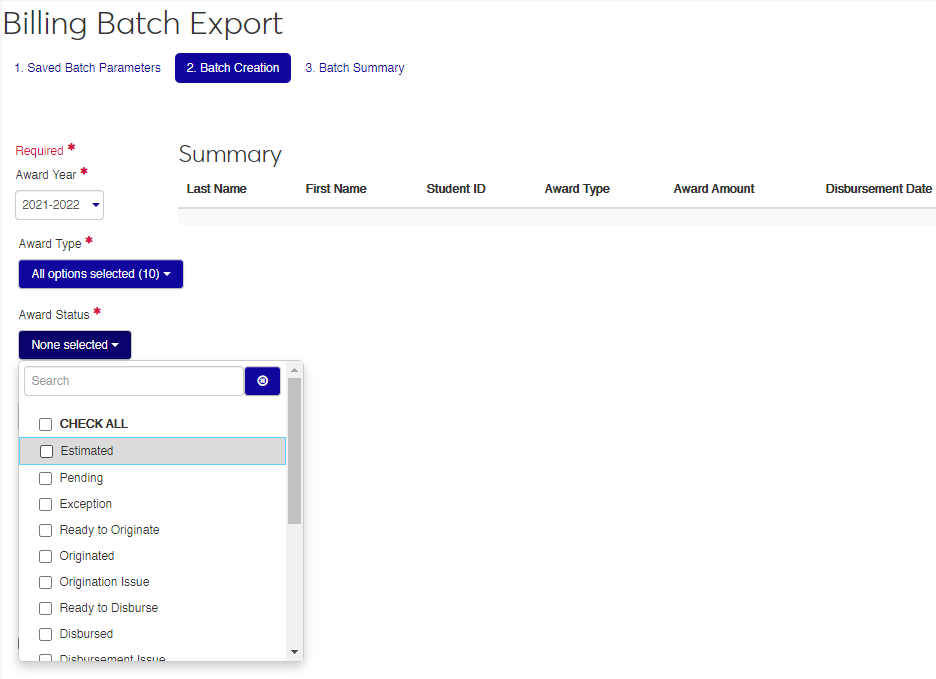
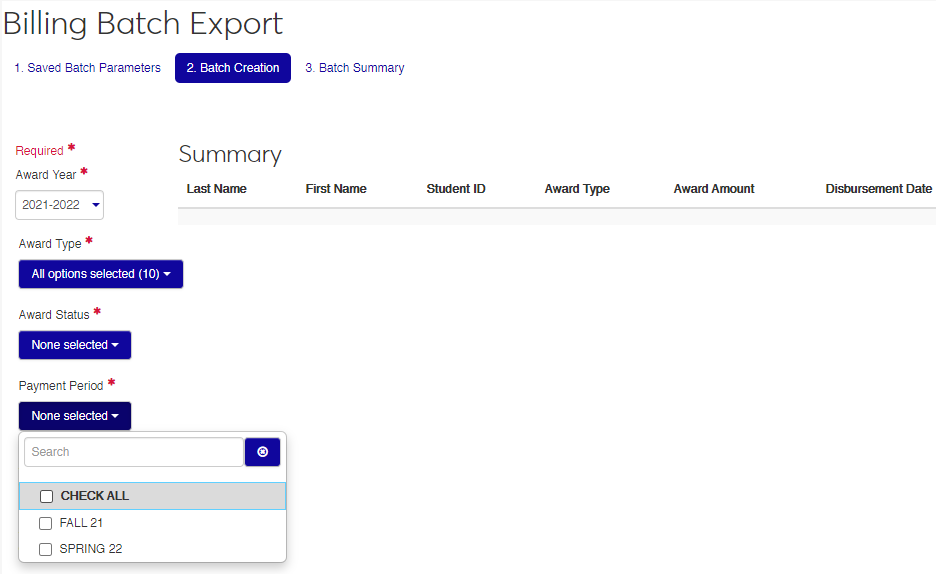
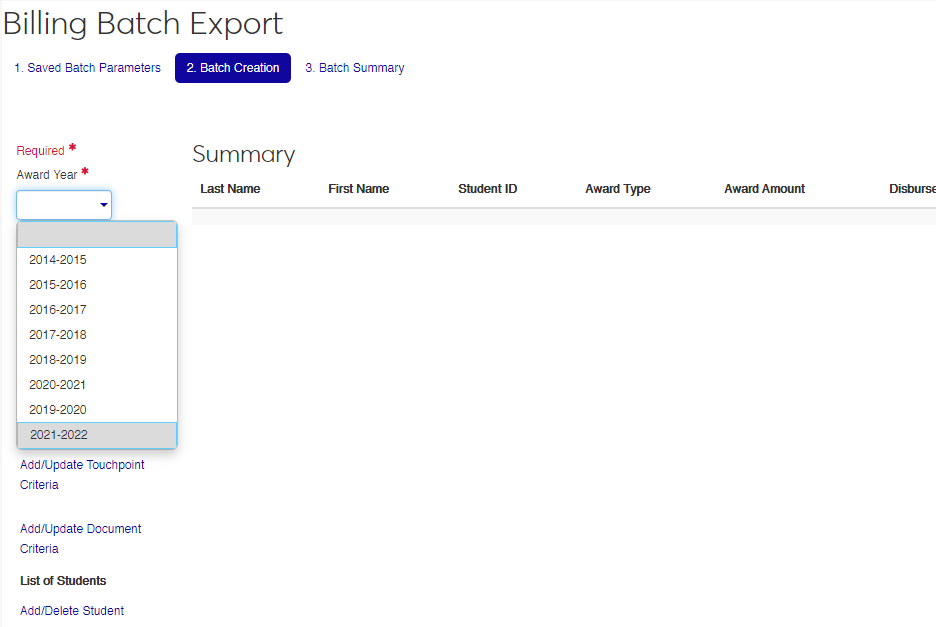
Once anticipated awards have been assigned in Jenzabar Financial Aid, navigate to Billing Batch Export under the Operations menu and click Batch Creation to begin creating an awards batch to send to SONIS. Select an Award Year to be included in the file.
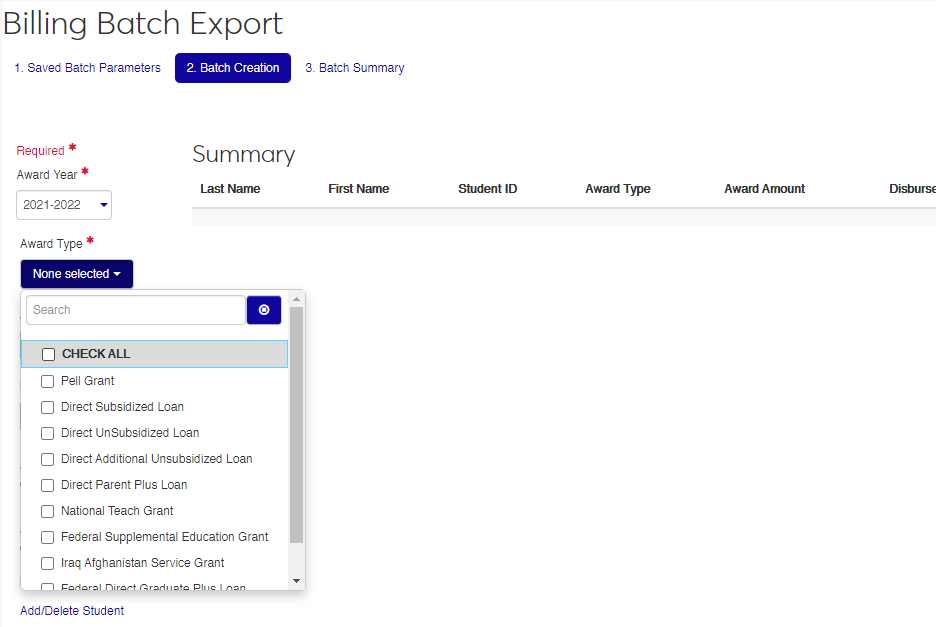
Next, select the Award Types that will be included in the file. These award codes must match the award codes in SONIS.

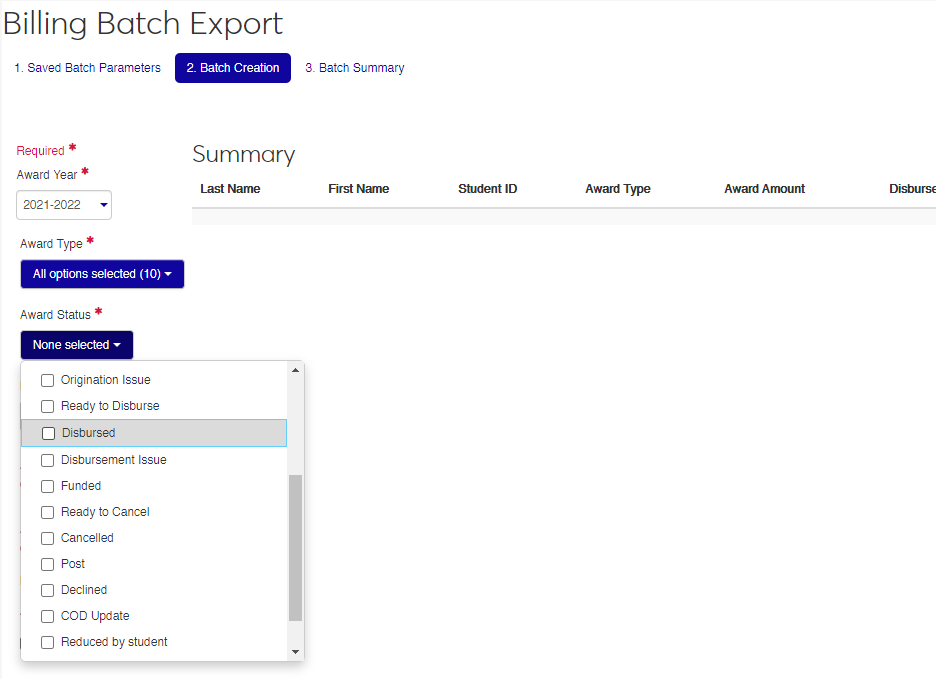
Check the Award Statuses to include in the file. Check only the award status or statuses that are used to designate anticipated awards in the Jenzabar Financial Aid system.
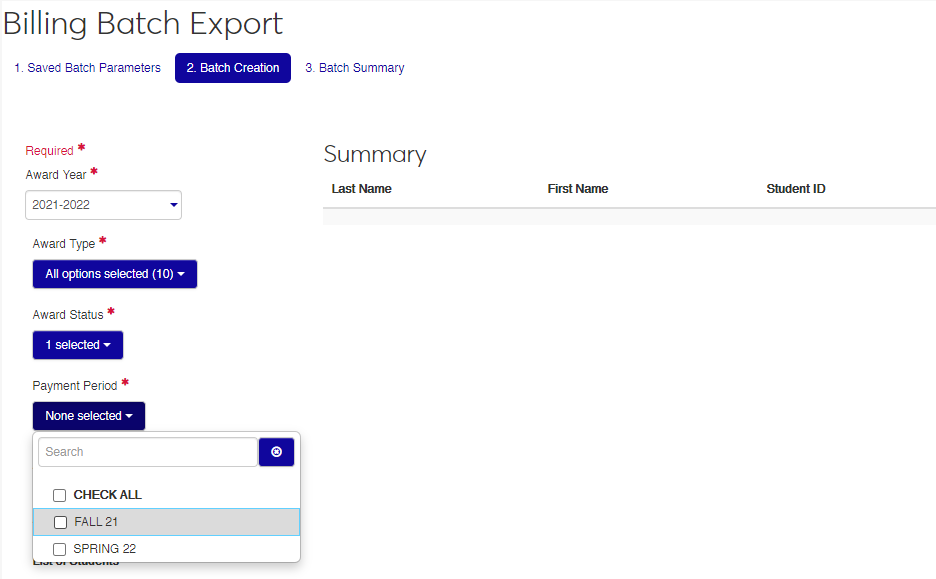
Select the Payment Period or periods to be included in the file.
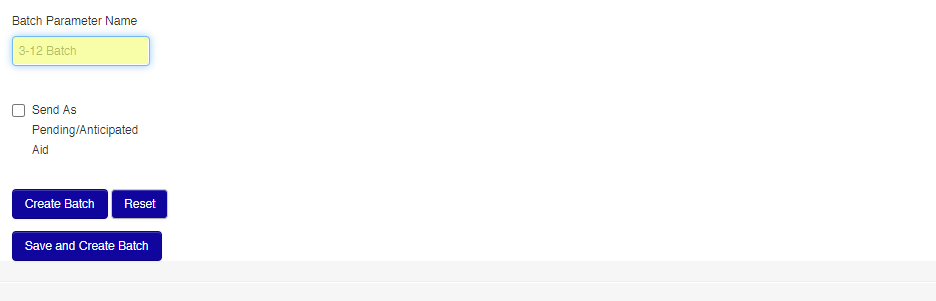
Create a unique name for the Batch Parameters. These can be accessed later through the Saved Batch Parameters tab.
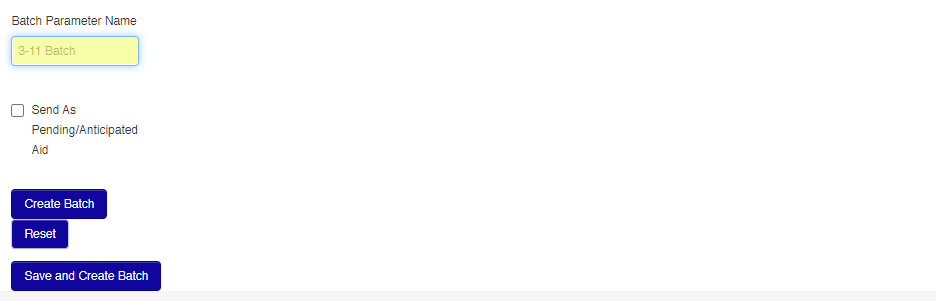
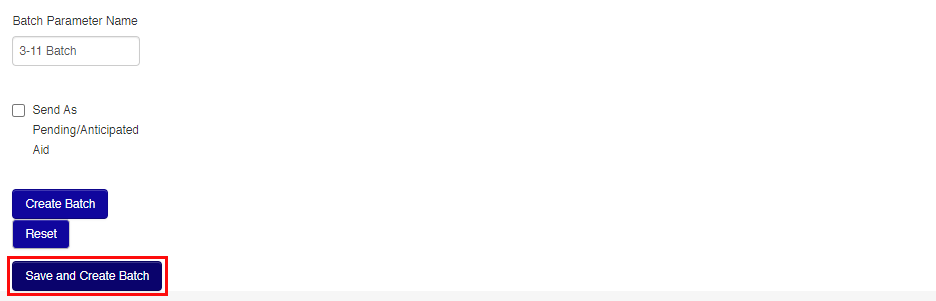
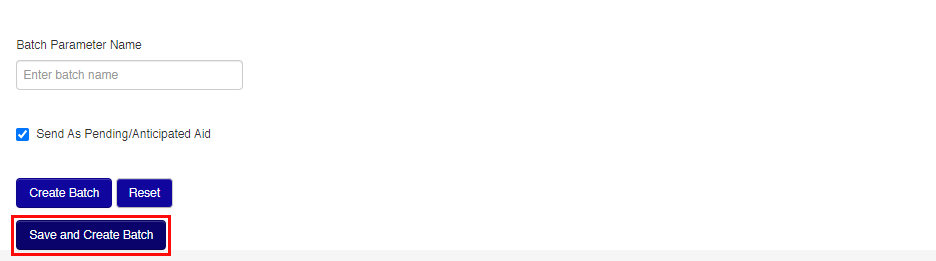
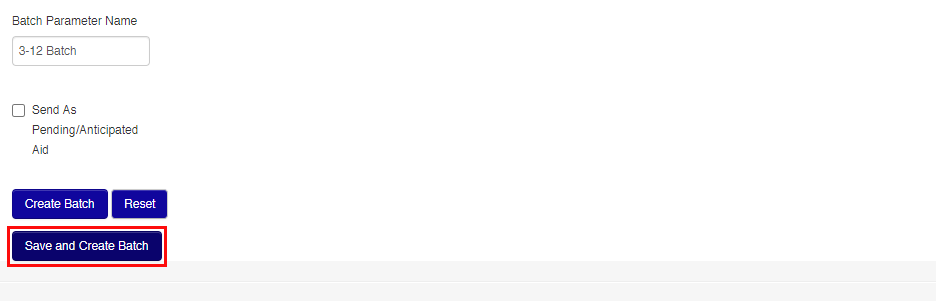
Check the Send As Pending/Anticipated Aid box and click Save and Create Batch to continue.
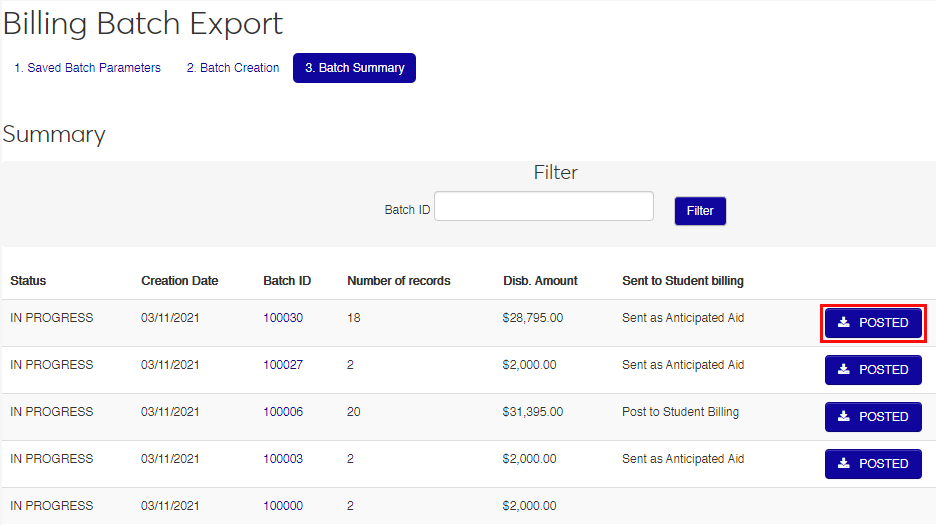
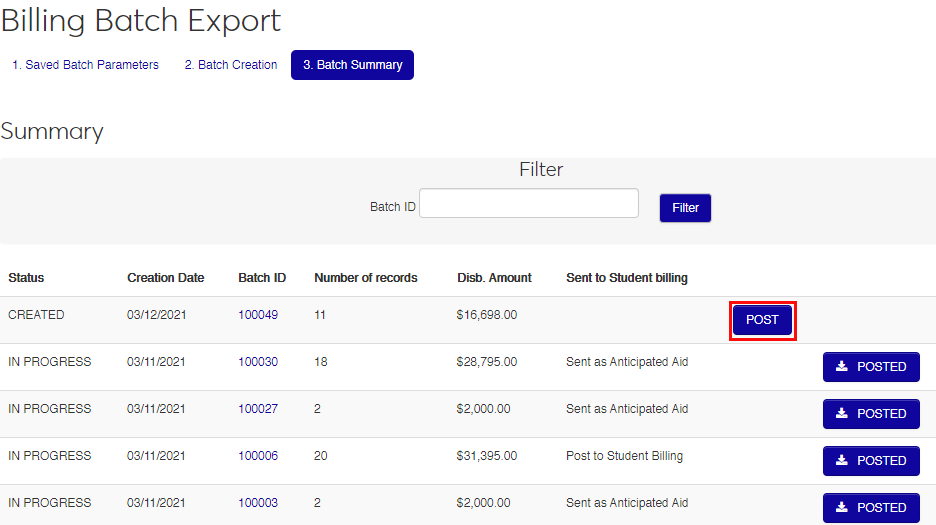
To send the batch to SONIS, navigate to the Batch Summary tab, locate the created batch, and click Post. If the API is functioning correctly, the data should be immediately transferred to SONIS.
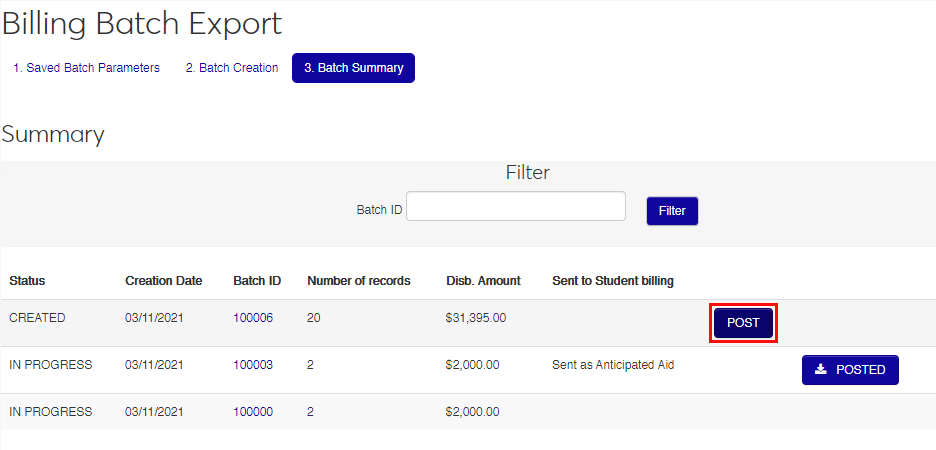
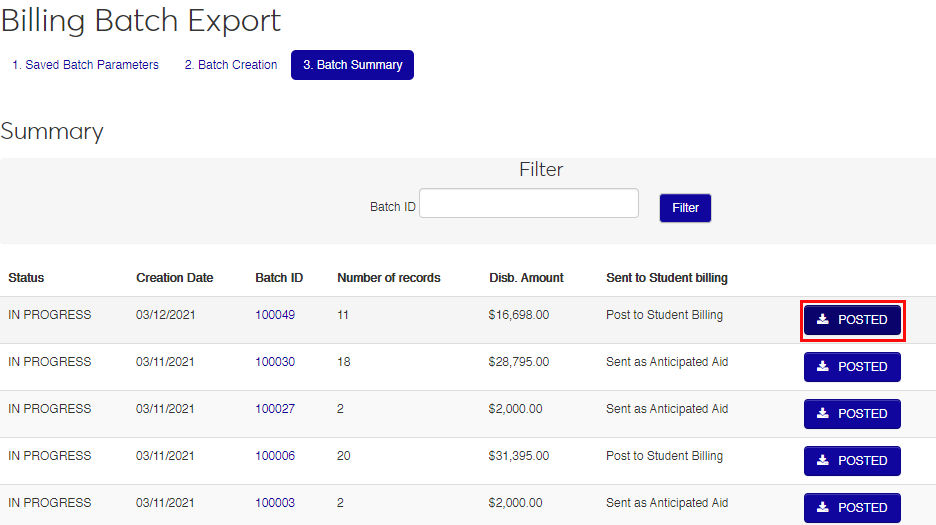
Once a bill has been posted, users can click the Posted button to download the XML file for record keeping or manual import to SONIS.
Posting Awards
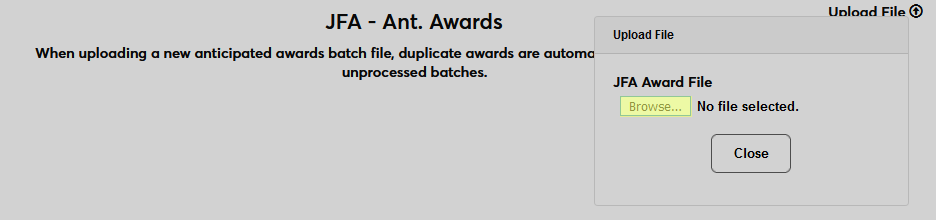
If the API is not functioning for whatever reason, awards can be sent to SONIS manually. Click the Upload File button in the top-right corner to open the uploader.

Click the Browse button to locate and select the XML file. Once the file has been selected, the records will be uploaded to SONIS.
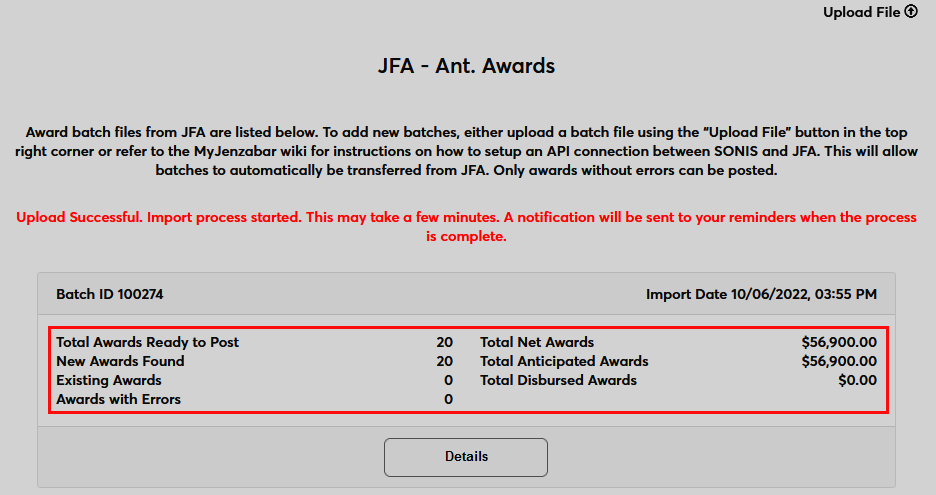
Once the anticipated aid records have been sent to SONIS, a summary displays key information about the file. Click the Details button to continue processing.
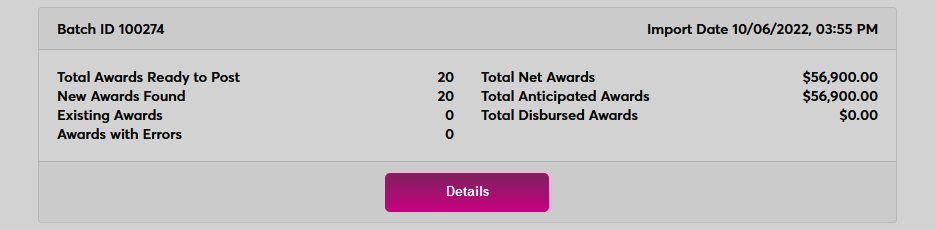
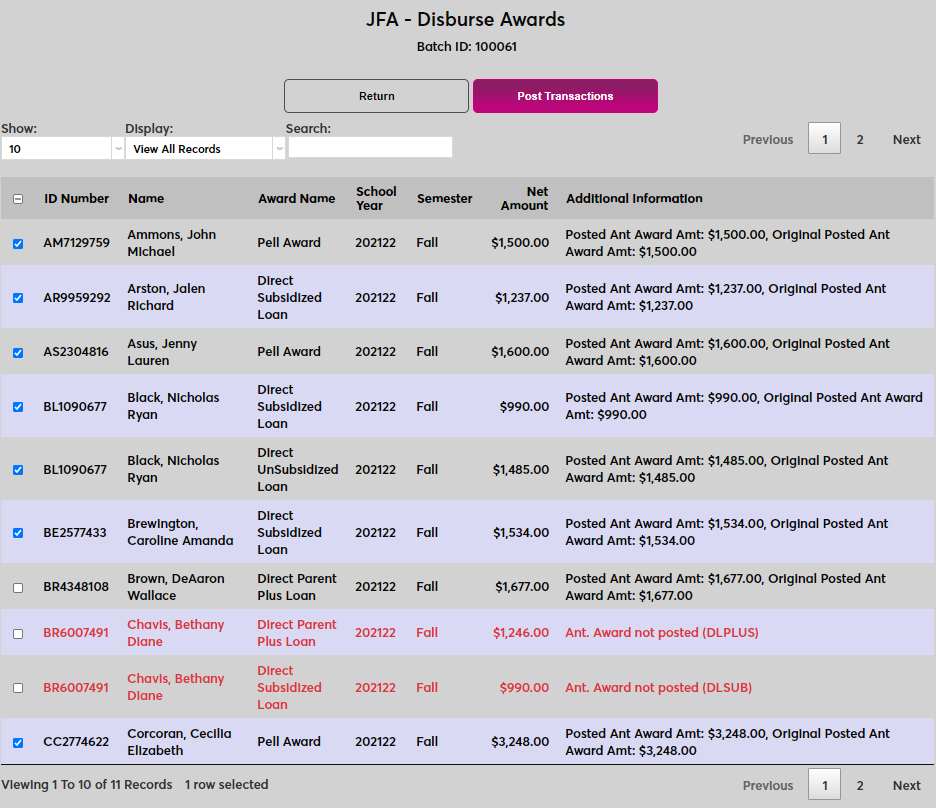
On the following page, use the Show menu to change the number of records shown on each page and the Display menu to toggle between all records, complete records, and incomplete records.
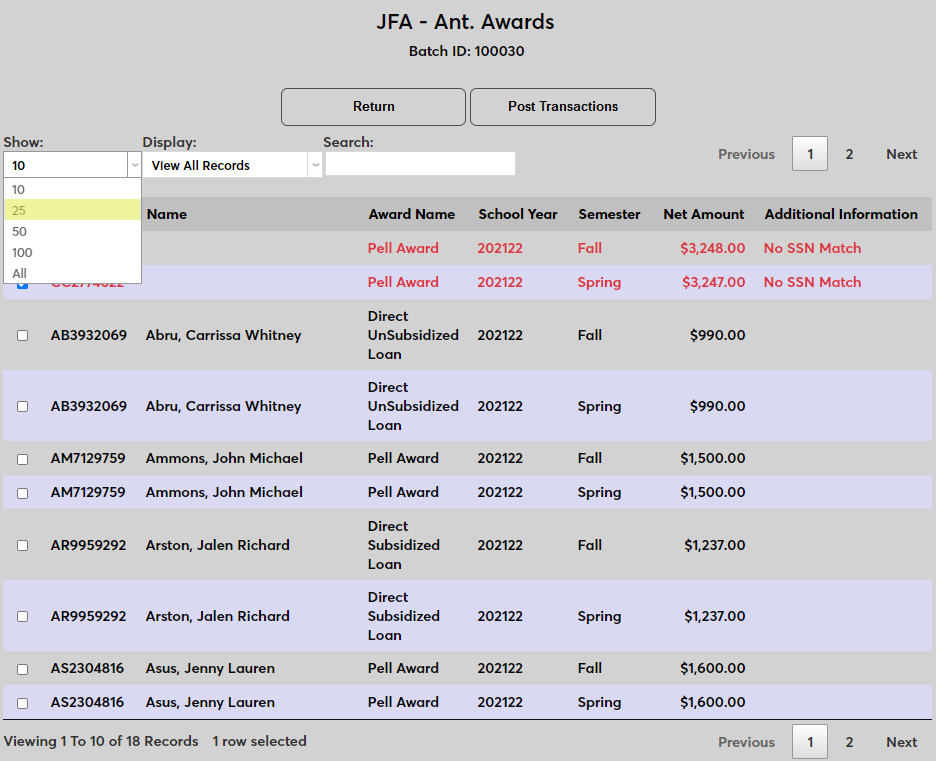
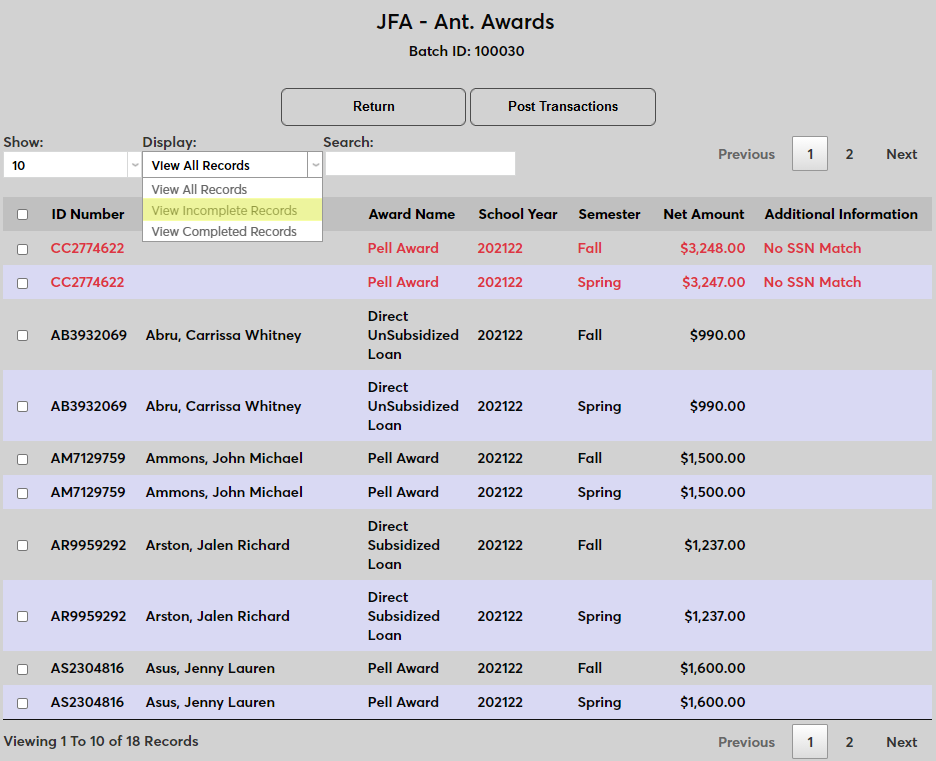
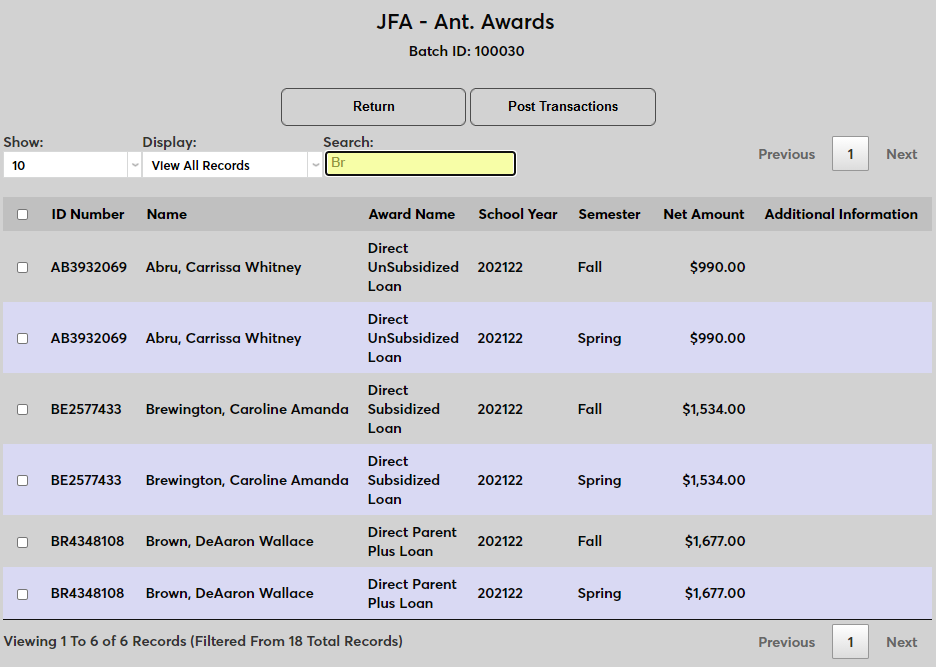
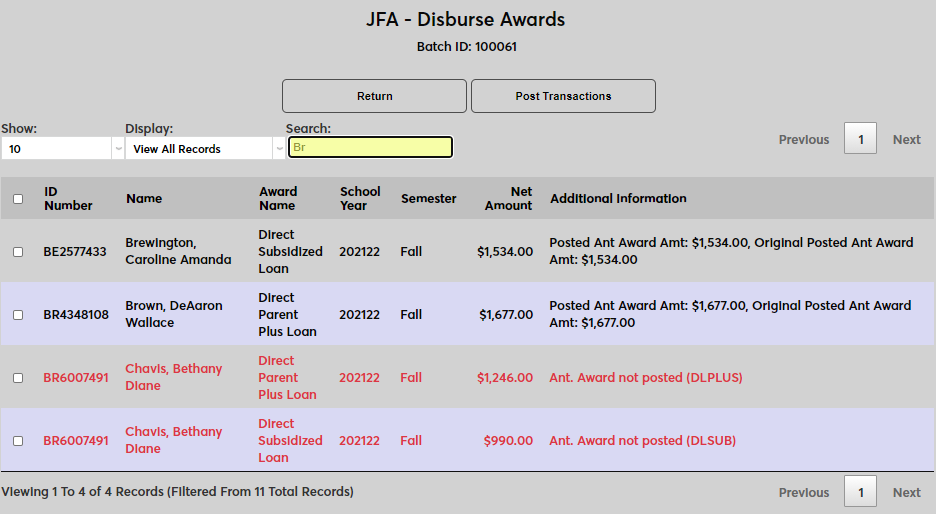
A Search field is available to search for a specific record or records. The search pulls results from all fields other than the Additional Information field and will filter results as characters are typed.
Select the records to be posted and click the Post Transactions button.
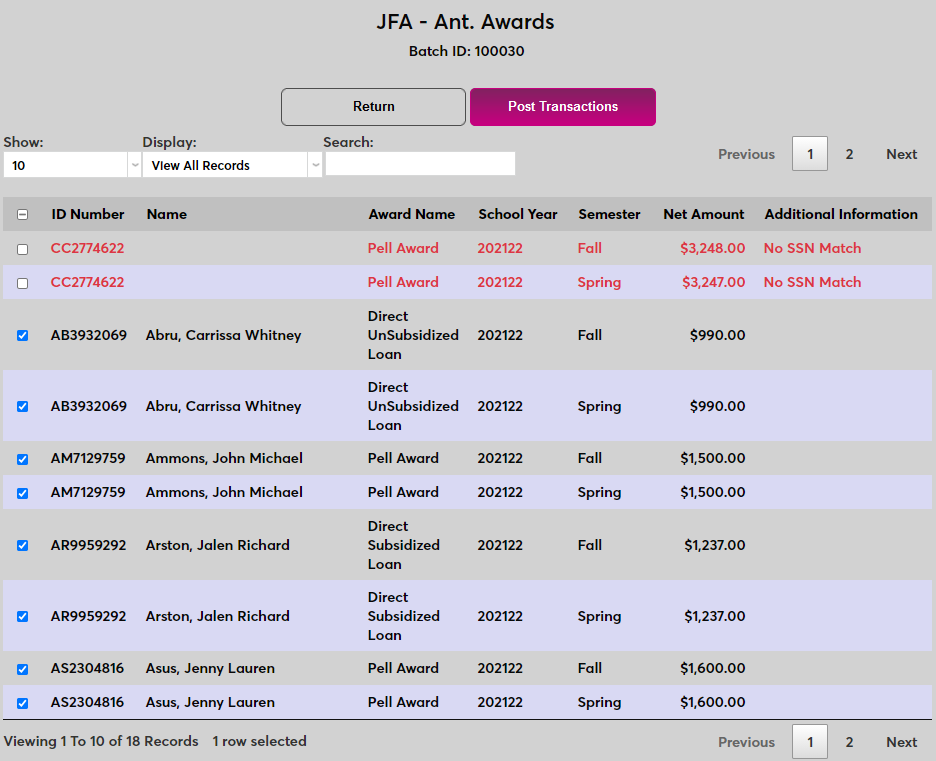
When records have been posted, any remaining, unposted records with errors are deleted. Unposted records without errors remain and can be posted later.
Reminders
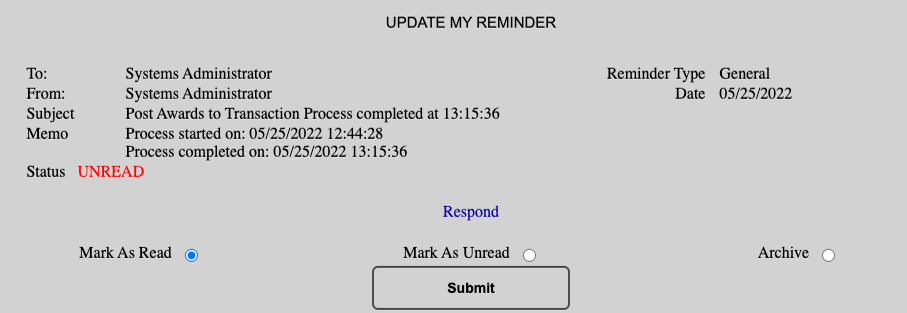
When a large file is imported to SONIS from Jenzabar Financial Aid, the process can take a while to complete. For this reason, an automatic reminder function was added. Administrators can navigate away from the Jenzabar Financial Aid Anticipated Awards page and do other things in the system and will be notified when the process completes. This notification will go to whoever initiated the import.

Batch Deletion
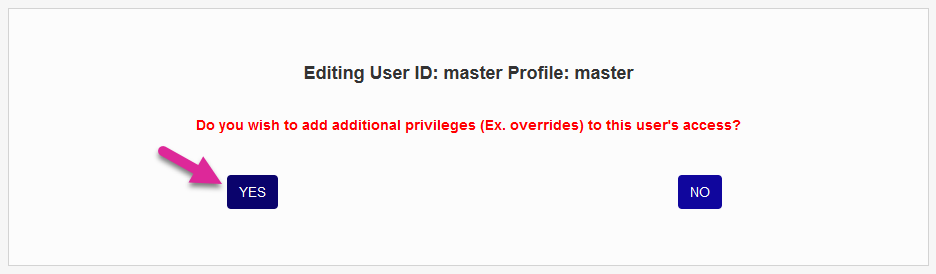
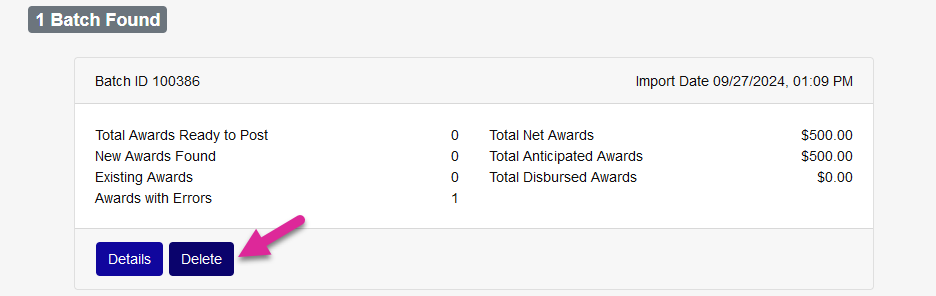
Sometimes an administrator may import a batch from JFA, either through the API or the manual upload process, that should not have been imported. Errant batches that are unposted can be deleted from SONIS by users who have the appropriate security access.
To give a user permission to delete unposted batches, select the user and then navigate to their User Security page. Select the User ID that they'll be using for this task and click Edit. Skip through to the Additional Privileges menu and click Yes to make changes.
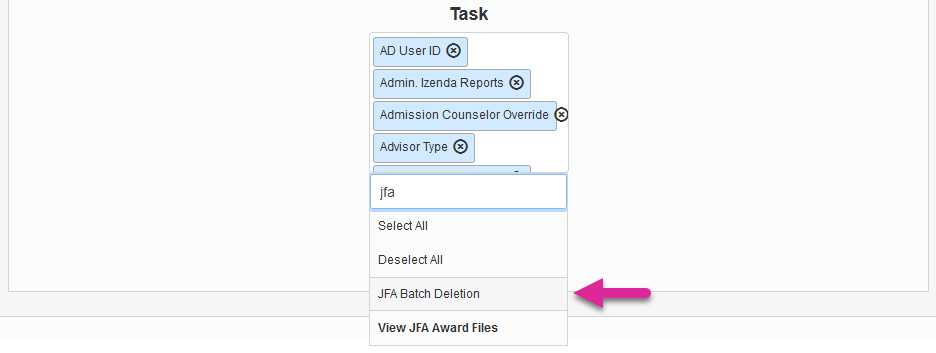
Select JFA Batch Deletion from the Task menu and click Submit.
Once an administrator has the User Security permission, a Delete button will appear on each batch summary. Click the button to remove the batch from the list.

Note
If you accidentally remove a batch that should not have been deleted, simply import the batch again from JFA using the Upload File option.
Disburse Awards
Note that the JFA disbursement process does not adhere to the No Post To Billing nor Post Transactions on or before date setting in System Variables.
Creating Batch
Once awards have been disbursed in Jenzabar Financial Aid, navigate to Billing Batch Export under the Operations menu and click Batch Creation to begin creating an awards batch to send to SONIS. Select an Award Year to be included in the file.
Next, select the Award Types that will be included in the file. These award codes must match the award codes in SONIS.
Check the Award Statuses to include in the file. Check only the award status or statuses that are used to designate disbursed awards in the Jenzabar Financial Aid system.
Select the Payment Period or periods to be included in the file.
Create a unique name for the Batch Parameters. These can be accessed later through the Saved Batch Parameters tab.
Leave the Send As Pending/Anticipated Aid box unchecked and click Save and Create Batch to continue.
To send the batch to SONIS, navigate to the Batch Summary tab, locate the created batch, and click Post. If the API is functioning correctly, the data should be immediately transferred to SONIS.
Once a bill has been posted, users can click the Posted button to download the XML file for record keeping or manual import to SONIS.
Posting Awards
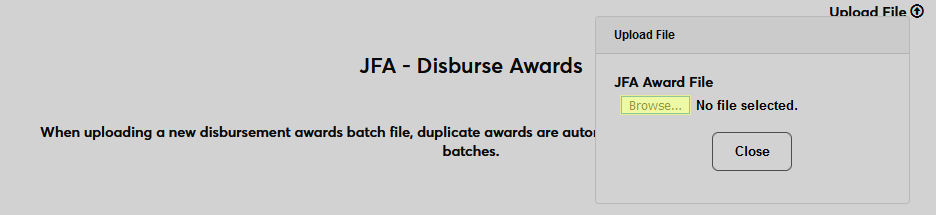
If the API is not functioning for whatever reason, awards can be sent to SONIS manually. Click the Upload File button in the top-right corner to open the uploader.

Click the Browse button to locate and select the XML file. Once the file has been selected, the records will be uploaded to SONIS.
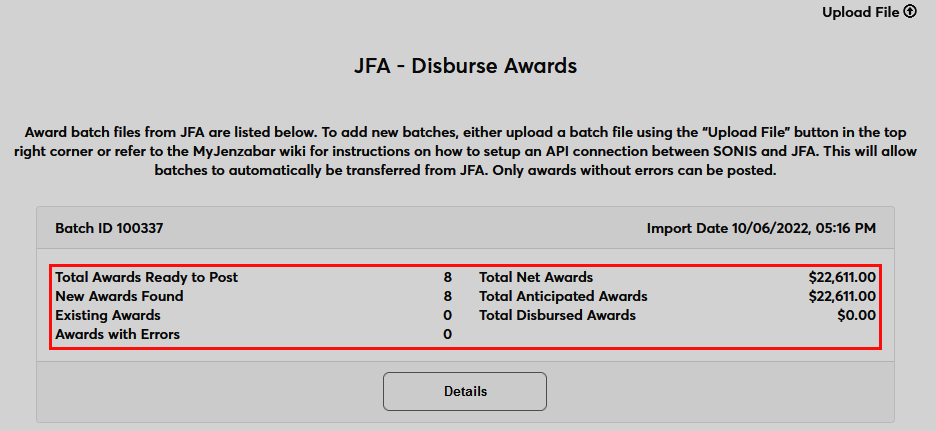
Once the disbursement records have been sent to SONIS, a summary displays key information about the file. Click the Details button to continue processing.
On the following page, use the Show menu to change the number of records shown on each page and the Display menu to toggle between all records, complete records, and incomplete records.
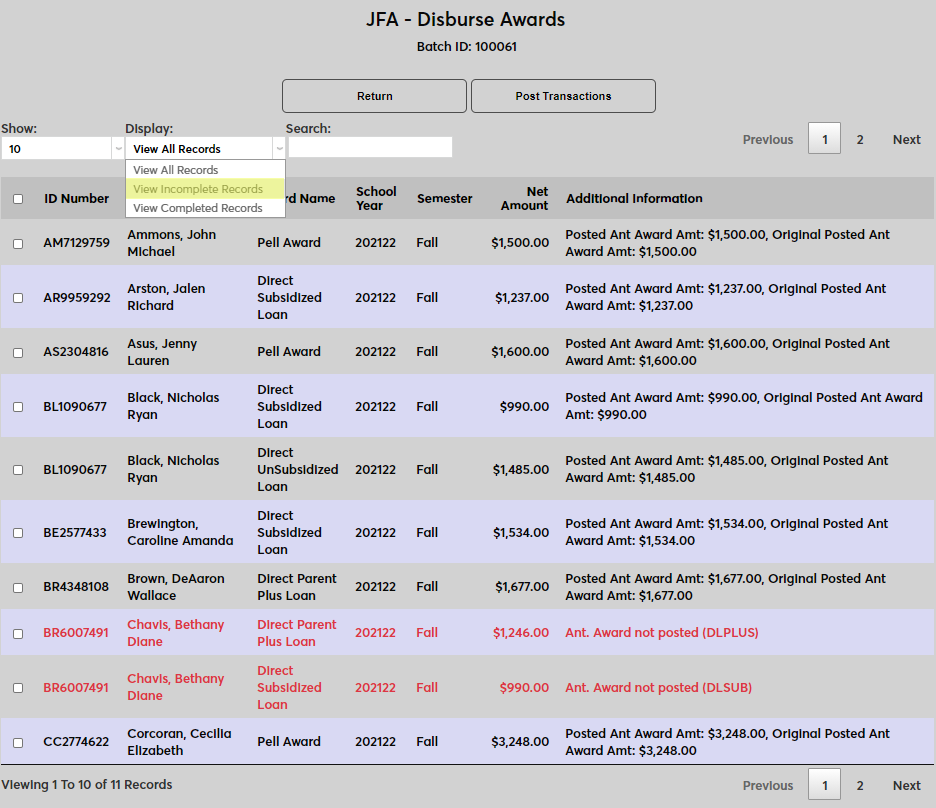
A Search field is available to search for a specific record or records. The search pulls results from all fields other than the Additional Information field and will filter results as characters are typed.
Select the records to be posted and click the Post Transactions button.
When records have been posted, any remaining, unposted records with errors are deleted. Unposted records without errors remain and can be posted later.
Reminders
When a large file is imported to SONIS from Jenzabar Financial Aid, the process can take a while to complete. For this reason, an automatic reminder function was added. Administrators can navigate away from the JFA Disburse Awards page and do other things in the system and will be notified when the process completes. This notification will go to whoever initiated the import.
Delete Batch
Sometimes an administrator may import a batch from JFA, either through the API or the manual upload process, that should not have been imported. Errant batches that are unposted can be deleted from SONIS by users who have the appropriate security access.
To give a user permission to delete unposted batches, select the user and then navigate to their User Security page. Select the User ID that they'll be using for this task and click Edit. Skip through to the Additional Privileges menu and click Yes to make changes.
Select JFA Batch Deletion from the Task menu and click Submit.
Once an administrator has the User Security permission, a Delete button will appear on each batch summary. Click the button to remove the batch from the list.
Note
If you accidentally remove a batch that should not have been deleted, simply import the batch again from JFA using the Upload File option.
Response to JFA
Once a Jenzabar Financial Aid disbursement batch has been processed, a response is sent to Jenzabar Financial Aid alerting that system that the process has completed. This response from SONIS is what triggers Jenzabar Financial Aid to update an award's status to Funded.
Users can verify that Jenzabar Financial Aid received the response by navigating to the Batch Summary page and clicking the Post Aid Response button to view the results.
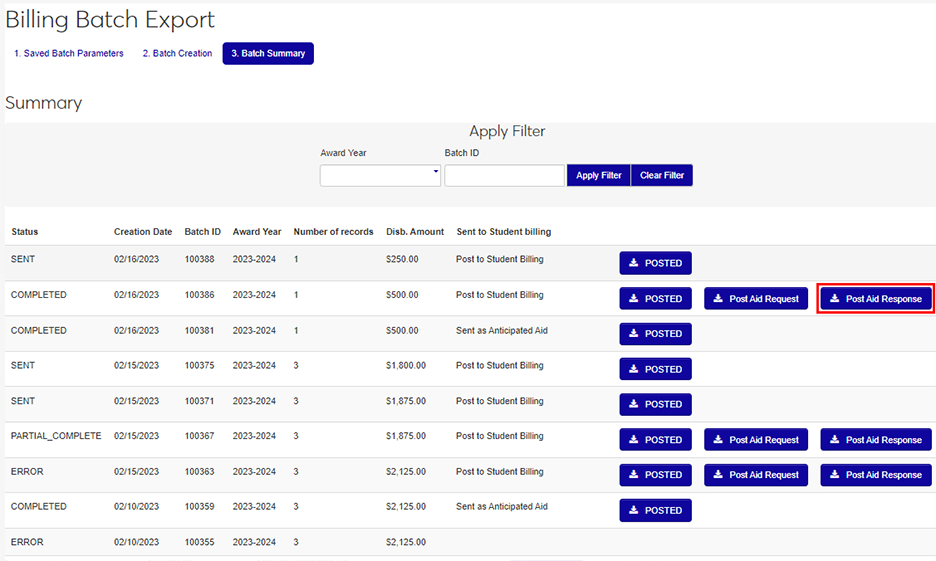
If the Post Aid Response button is not present for the batch, then Jenzabar Financial Aid did not receive a response from SONIS. To troubleshoot, ensure that the API Settings are correct and the connection dot is green.
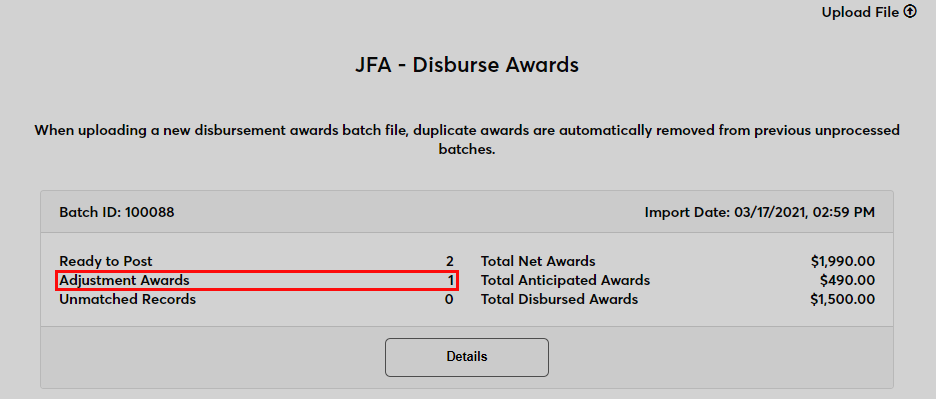
Adjusting Awards
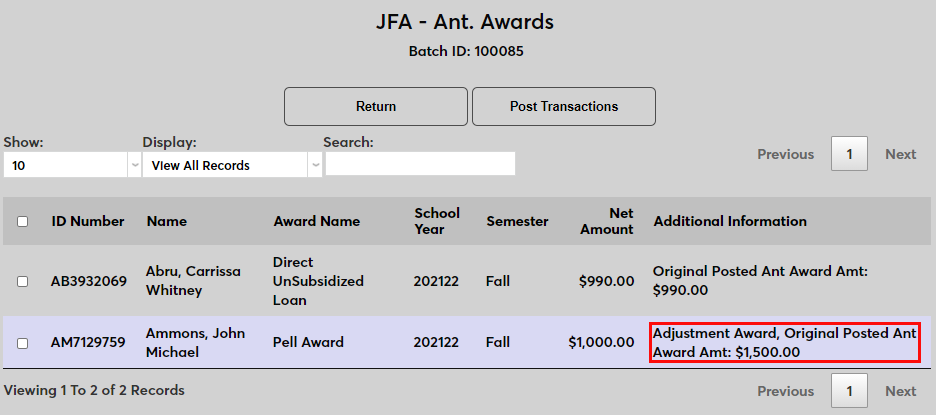
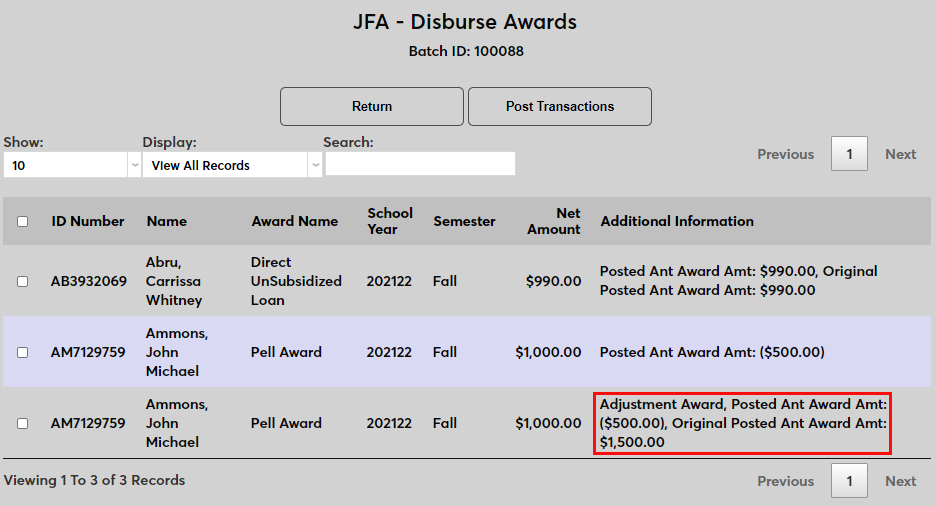
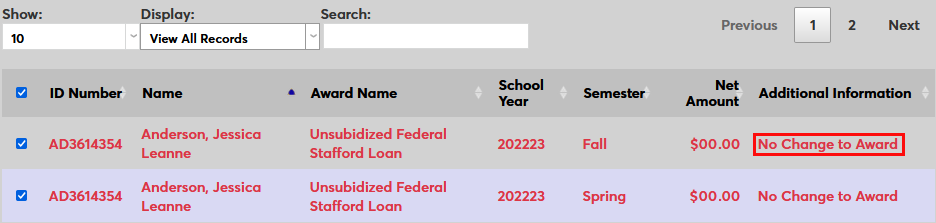
Once awards have been disbursed, changes in the totals can be made by importing an adjusting award. The import process is the same, but the results are displayed differently. On the Anticipated Awards page, the number of Adjustment Awards is listed on the launch page.
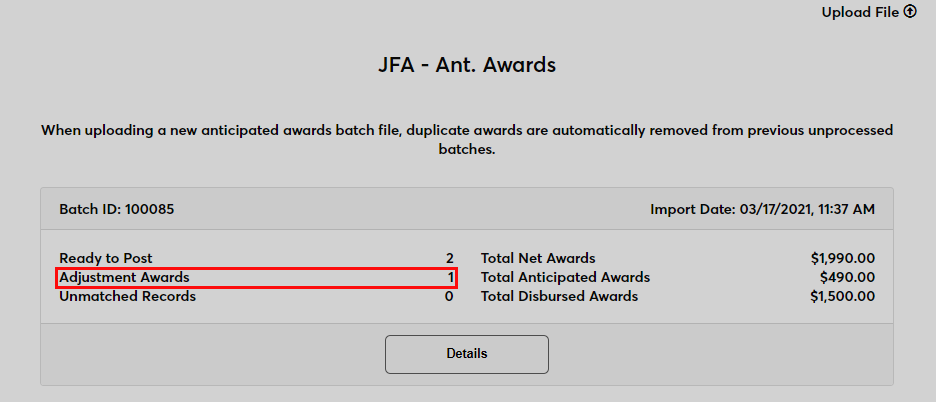
The Details page displays both the Net Amount in its own column and the Original Posted amount under the Additional Information column.
Once the anticipated awards have been posted, send a disbursement batch and post the updated total from the Disburse Awards page. The same notations appear on both pages.
If there is no change in the amount being disbursed, a No Change to Award message will appear. These records cannot be imported.
Billing History
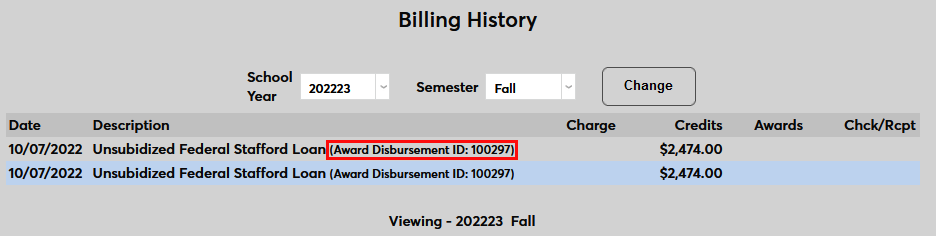
Each Jenzabar Financial Aid award record includes a unique identifier that originates in Jenzabar Financial Aid and is imported to SONIS along with the other details. This ID number is listed with each transaction in the user's Billing History record.
Awards Notification Assignment/Timed Task
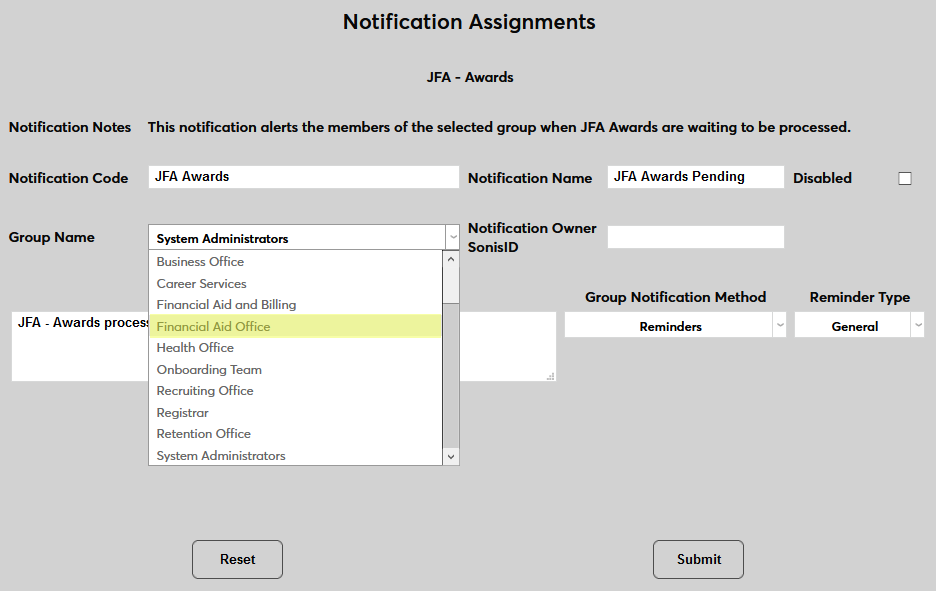
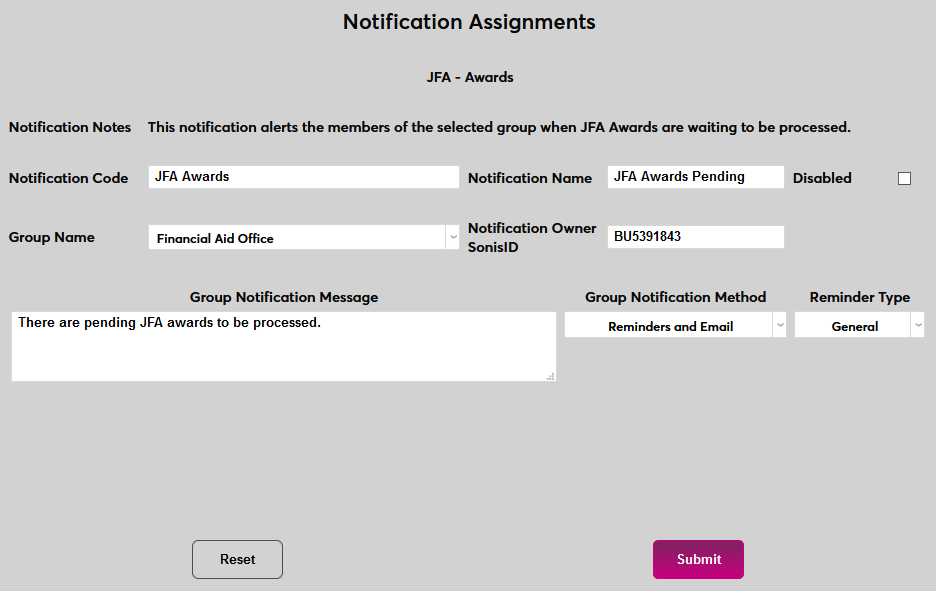
The JFA Awards notification assignment and timed task work a bit differently than most. They are designed to alert users when there are outstanding awards that are waiting to be processed. To begin setting them up, navigate to Notification Assignments under the Systems menu and click Add.
Select JFA - Awards from the Notification Type dropdown menu and click Submit.


Next, create a Notification Name, a descriptor of the notifier's purpose with a 50-character limit, and a Notification Code, a shorter version of this name with a 20-character limit that the SONIS system will use internally to identify the notifier.
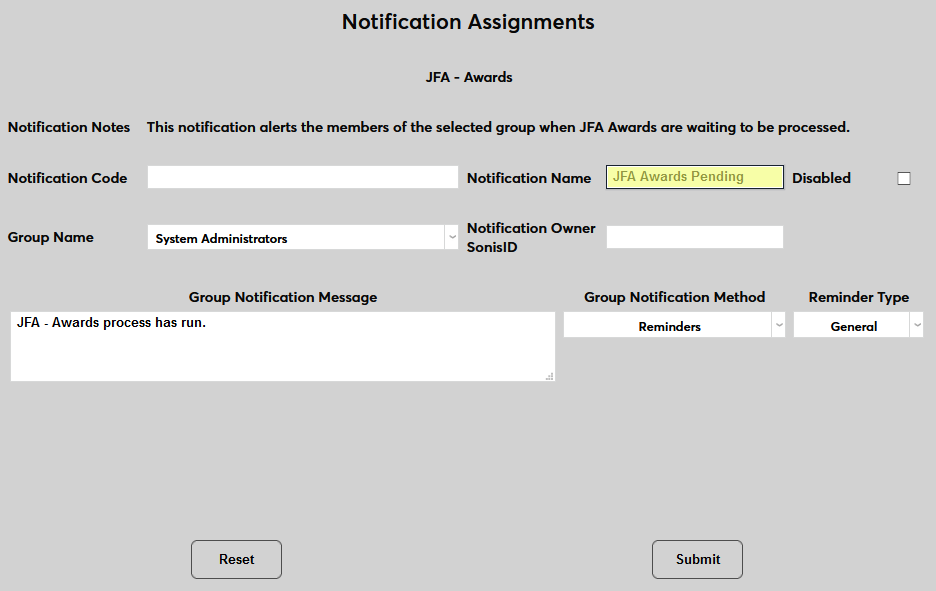
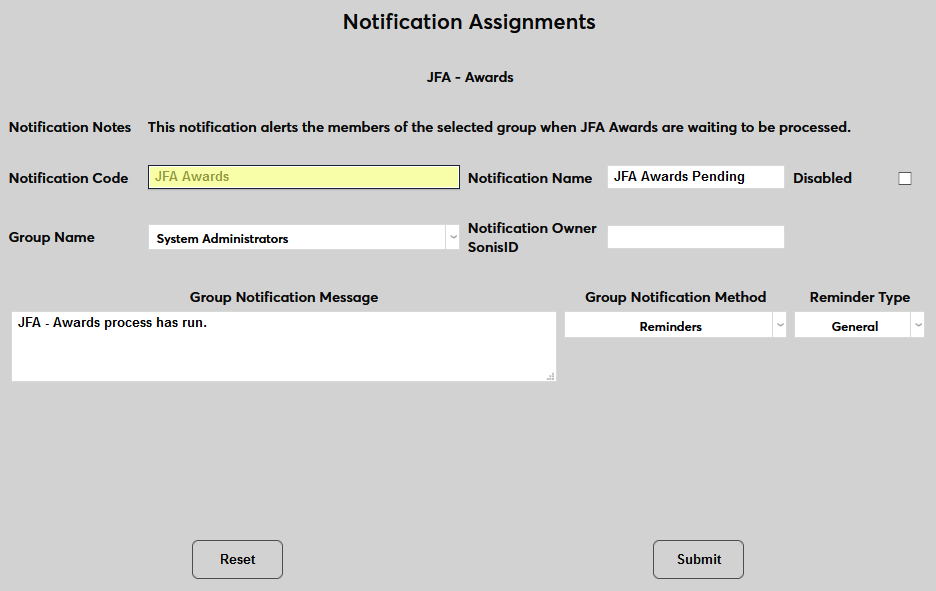
Select a group of staff members to receive the notification from the Group Name drop-down menu. Groups can be added and edited through the Table Maintenance utility.
Enter the ID of the faculty or staff member who will be managing this notification in the Notification Owner SonisID field.
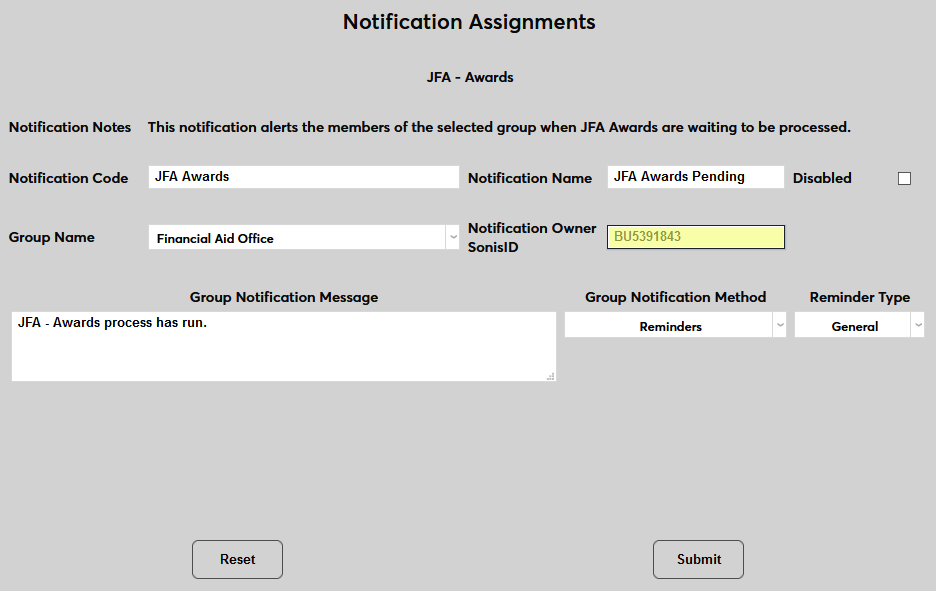
Create a Group Notification Message that will be sent to the group members when the task takes place.

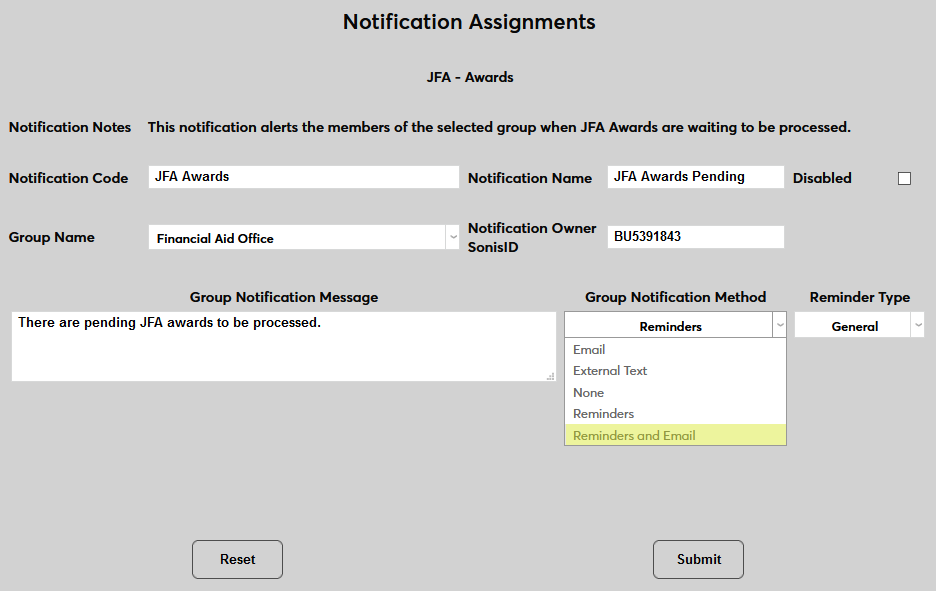
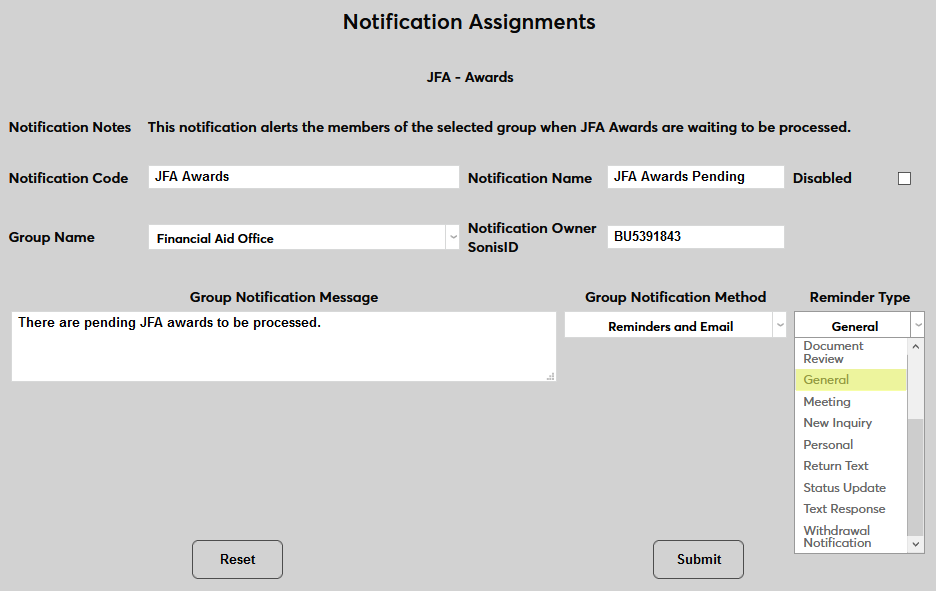
The Group Notification Method drop-down menu designates whether the group and individual users will receive an in-system reminder, an email, a text, or no notification when the process is triggered. The Reminder Type drop-down can change how the in-system reminder displays. This list can be created and edited via the Table Maintenance utility.
Click Submit to save the changes and create the notifier.
In order for the notifier to run, a timed task must be set up. Navigate to the Timed Task Scheduler under the Systems menu and click Add to create a new task.
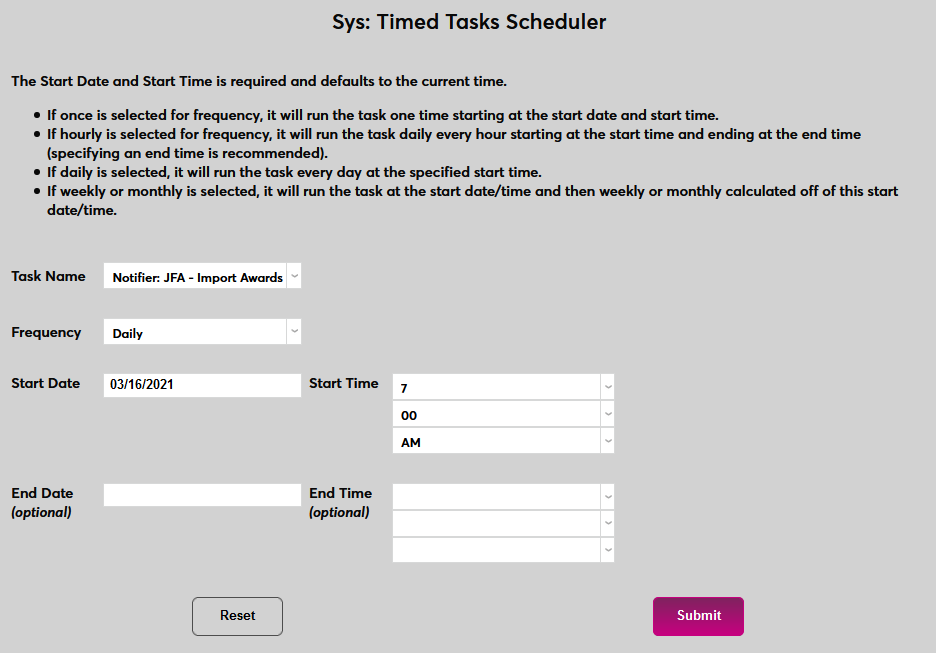
Select Notifier: JFA - Import Awards from the Task Name dropdown menu.
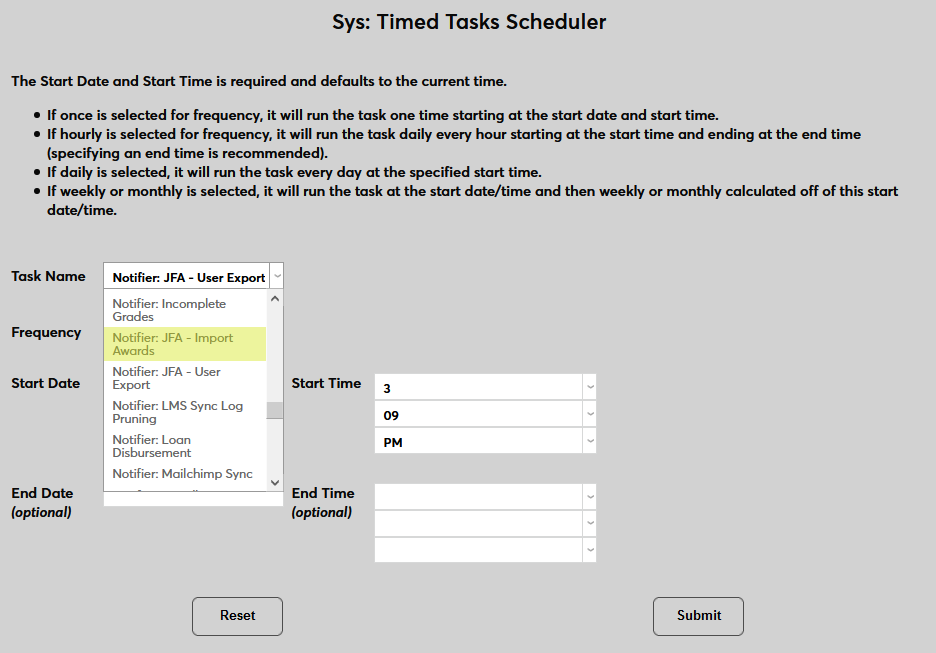
Select how often the task should occur with the Frequency dropdown.
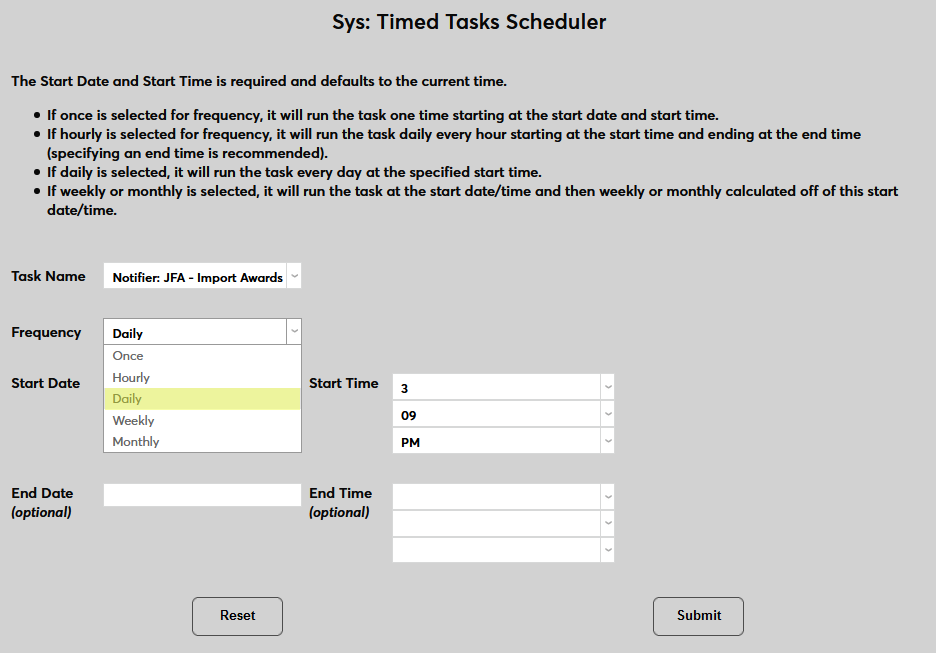
The Start Date and Start Time will automatically be set to the current date and time but can be changed to suit individual preferences. The End Date and End Time are optional.
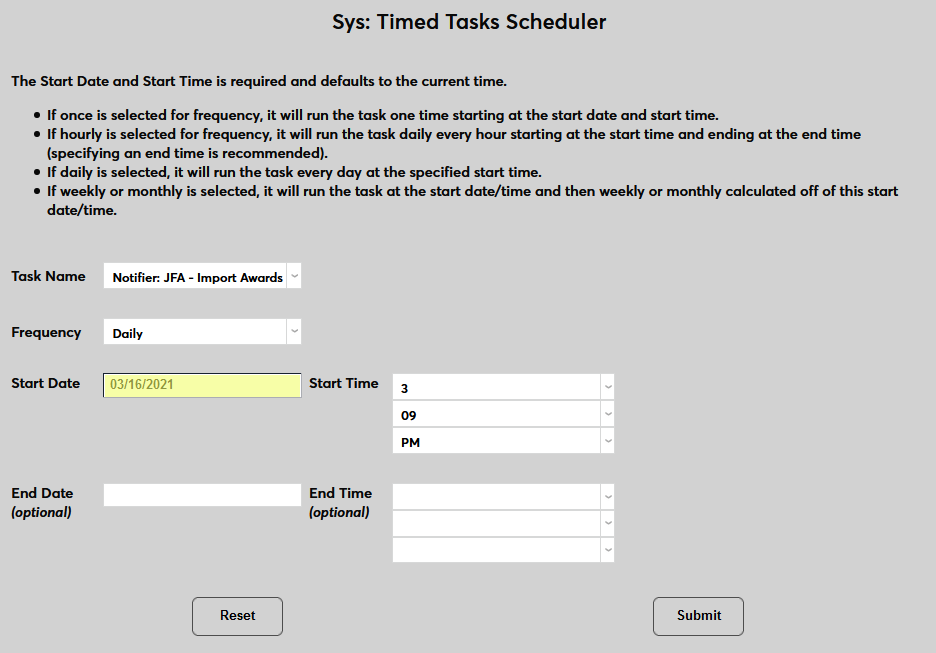
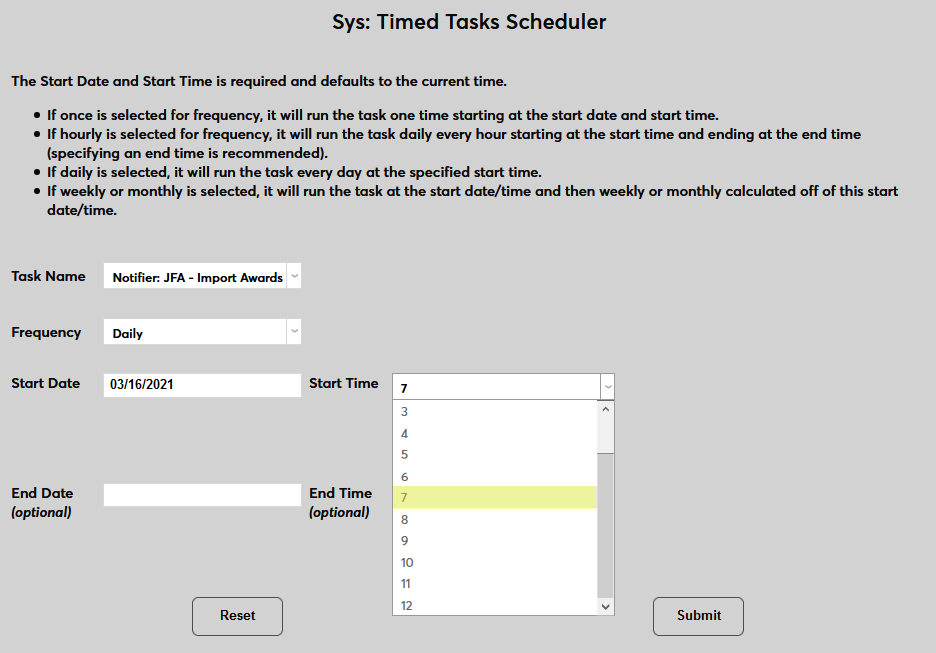
Click Submit to save the changes and activate the timed task.
Social Security Number
Each user should have a valid social security number if they have been assigned one. Students from outside of the US are not required to have a value in this field. Click on the SSN link to enter or edit a user's social security number in a new window.