PowerFAIDS Cloud: Users Export
Overview
With the move to being a cloud-based solution, PowerFAIDS now allows the import of .CSV files. The PF Cloud Users Export utility, available from the Financials menu, accommodates this need and produces .CSV export files. Initial setup is required and covered in detail below. All specifications for this export were developed using the PowerFAIDS Cloud SII File Layout Technical Reference document, which is available in the PowerFAIDS Resource Center. A sample file can be viewed or downloaded on MyJenzabar here.
Setup
Prior to creating any export files that will be imported to PowerFAIDS, ensure that the following areas within SONIS are appropriately set up.
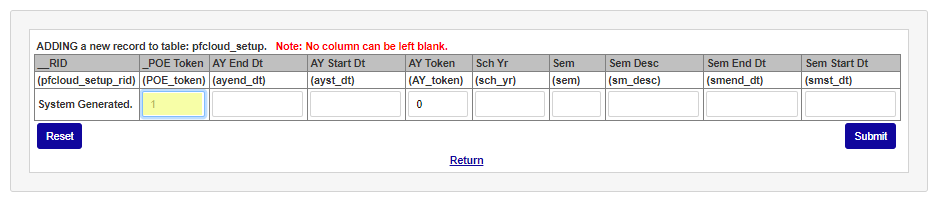
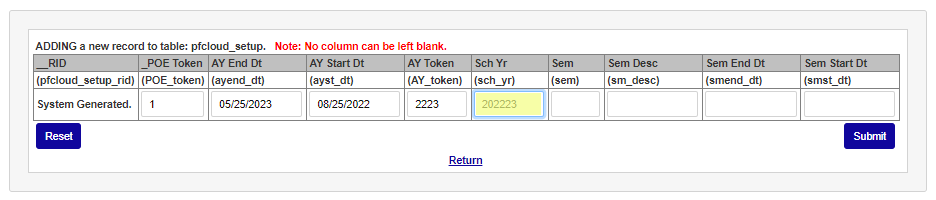
PowerFAIDS Cloud Setup Table
All columns on this table must be completed for each academic year and semester where data will be exported. Select PowerFAIDS Resource Center from the Table Maintenance menu and click Add New Record. Enter the POE Token used within PowerFAIDS for the term period being defined.

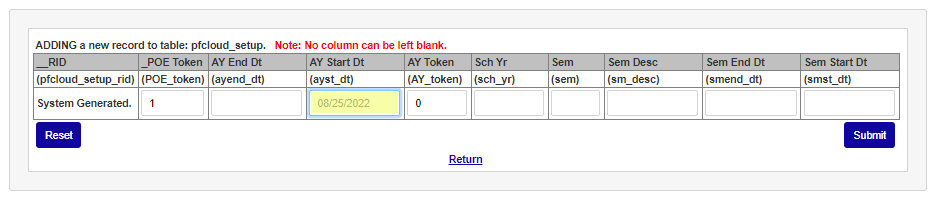
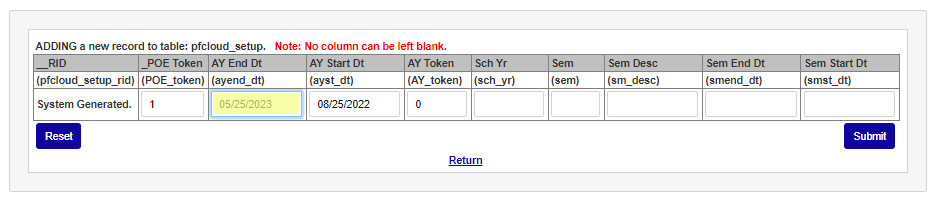
Enter the academic year start date in the AY Start Dt field and the academic year end date in the AY End Dt field.
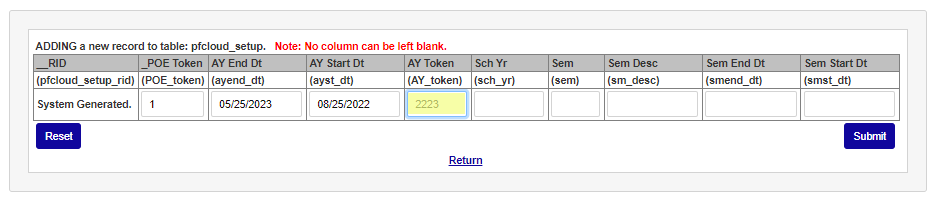
Enter the PowerFAIDS token for the academic year being setup in the AY Token field. Enter the school year code used in SONIS in the Sch Yr field.
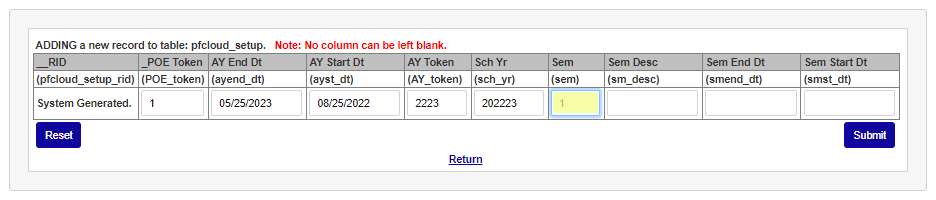
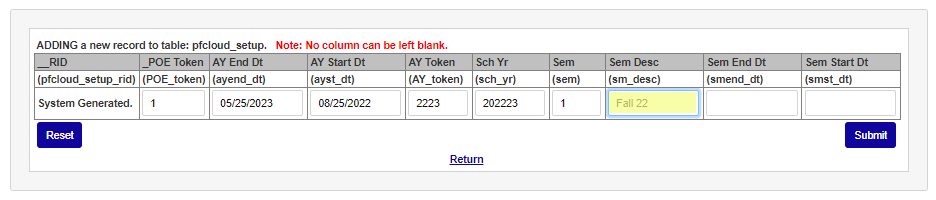
Enter the semester number used in SONIS for this POE in the Sem field. Enter the name of the semester in the Sem Desc field.
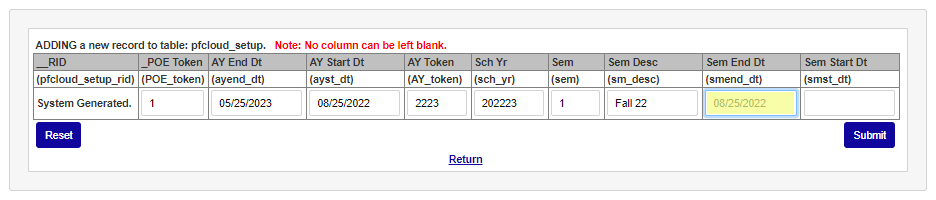
Enter the last day of the semester in the Sem End Dt field and the first day of the semester in the Sem Start Dt field.
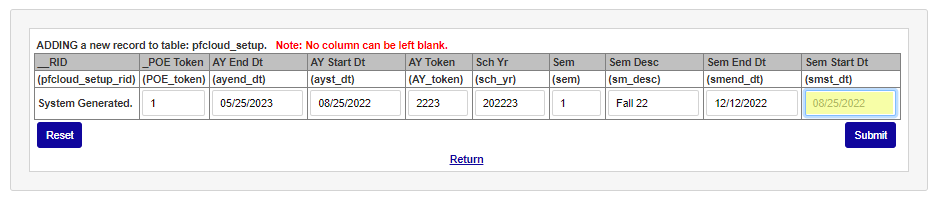
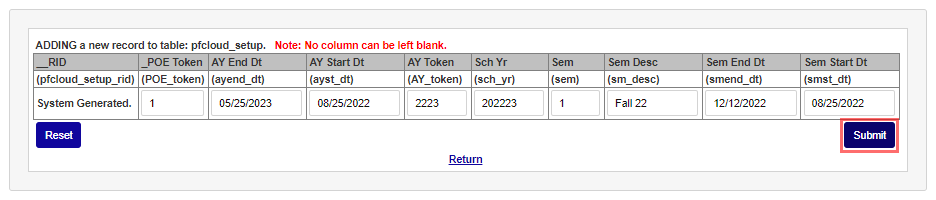
Click Submit to save the entry. Repeat these steps for any semester or term that information will be sent to PowerFAIDS.
PowerFAIDS Program Code/Token
On the Systems menu page Programs, enter the PowerFAIDS Program Code (this is called the Program Token in PowerFAIDS). The code should be entered for every financial aid eligible program. To enter the token, click the Program Code link and enter the PowerFAIDS Program Code/Token in the field.
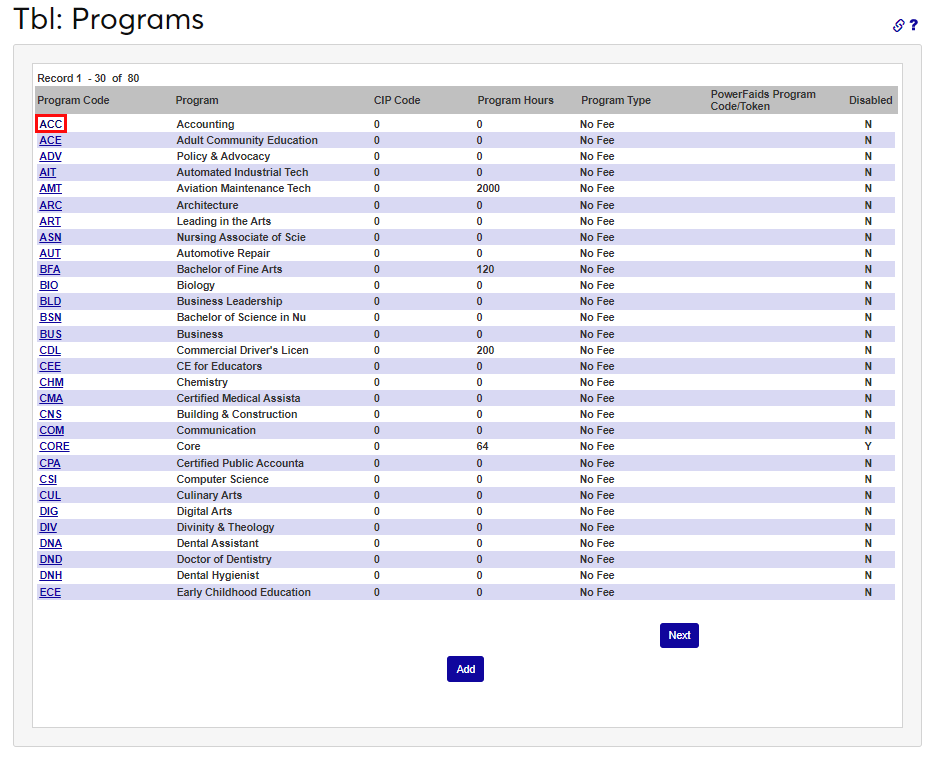

Scroll to the bottom of the page and click Submit to save the entry. Repeat this process for each financial aid eligible program.
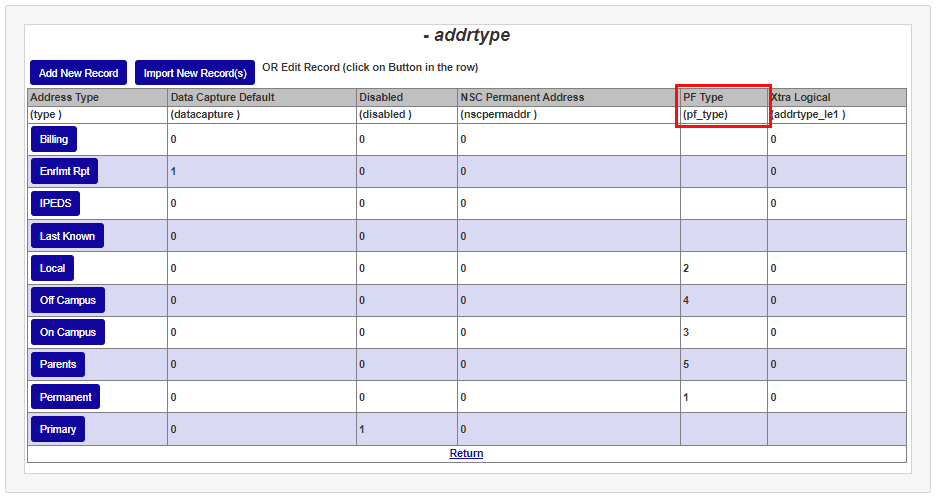
Address Types
Utilizing the SII File Layout Technical Reference, Pay Student Section, Address Type, ensure the address type that will be included in the export has the appropriate code in the PF Type field.
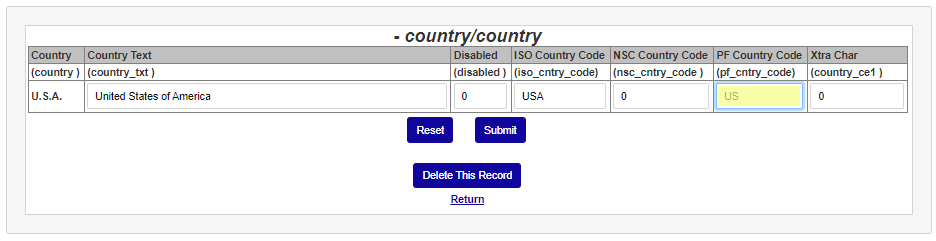
Country Table
Utilizing the SII File Layout Technical Reference provided by PowerFAIDS, enter the PowerFAIDS Country Code, as listed in the Valid Country Code List, in the Country table.
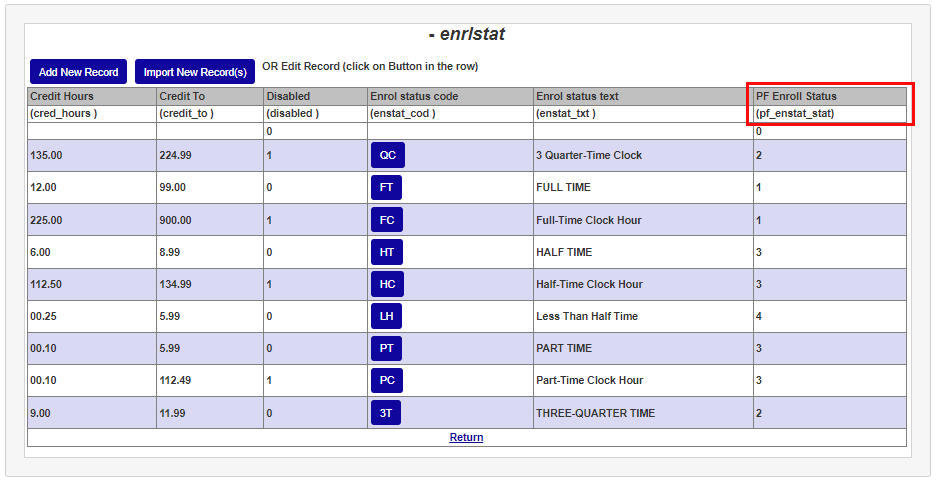
Enrollment Status
Utilizing the SII File Layout Technical Reference, Pay Period Section, Enrollment Values, ensure the PF Enroll status column has the appropriate value entered for each enrollment status.
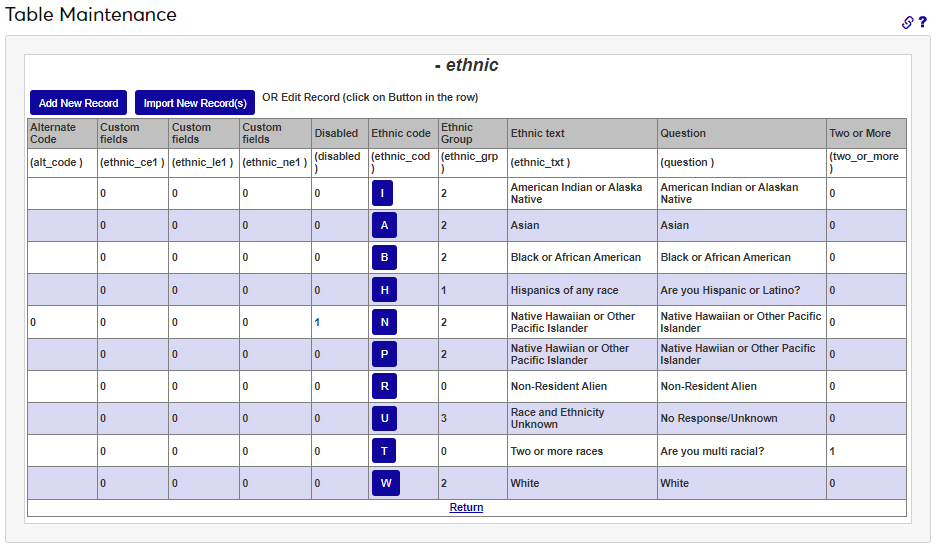
Ethnic Codes Table
Utilizing the SII File Layout Technical Reference, Student Section, Race Values, enter the appropriate ethnicity values in the Ethnic Code table making sure to coordinate the Jenzabar SONIS codes with the PowerFAIDS values.
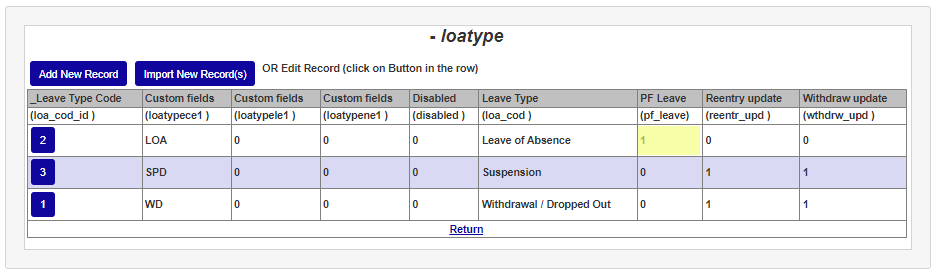
Leave Type
In the Leave Type table, ensure the Withdraw Update is set to 1 for leave types that are considered withdrawals.
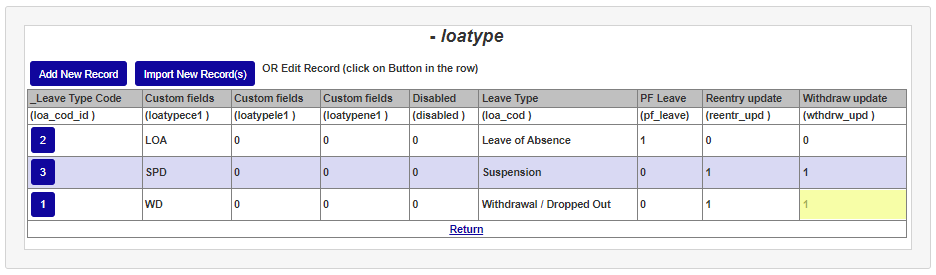
In the PF Leave field, confirm that leave types considered to be a leave of absence are set to 1.
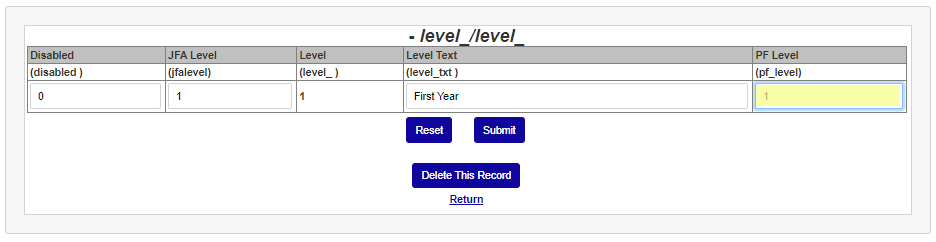
Level Table
Utilizing the SII File Layout Technical Reference, Payment Period Section, enter the Year in School values in the Levels table PF Level field, making sure to match the SONIS levels with the PowerFAIDS levels.
Creating User Export Types
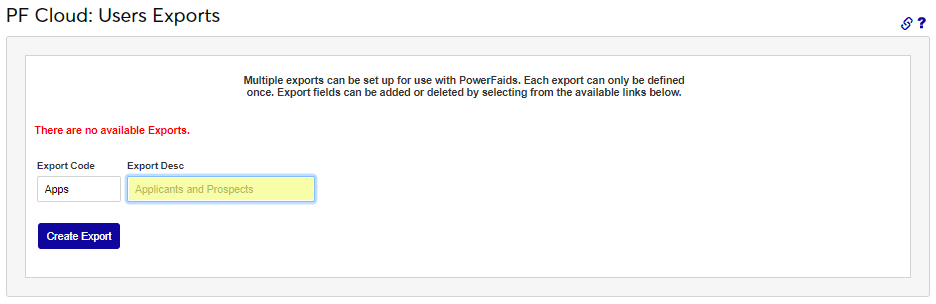
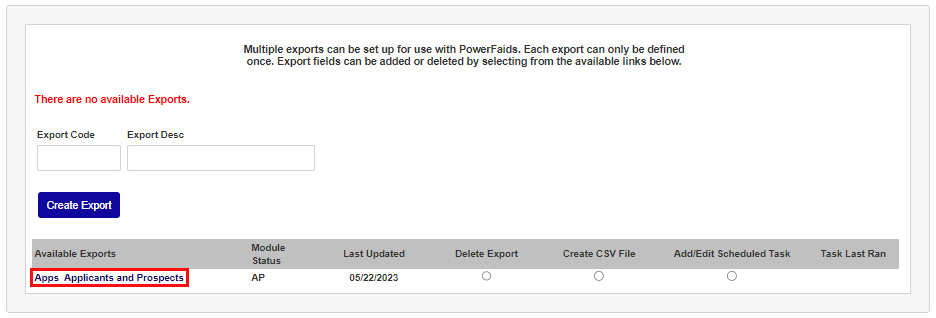
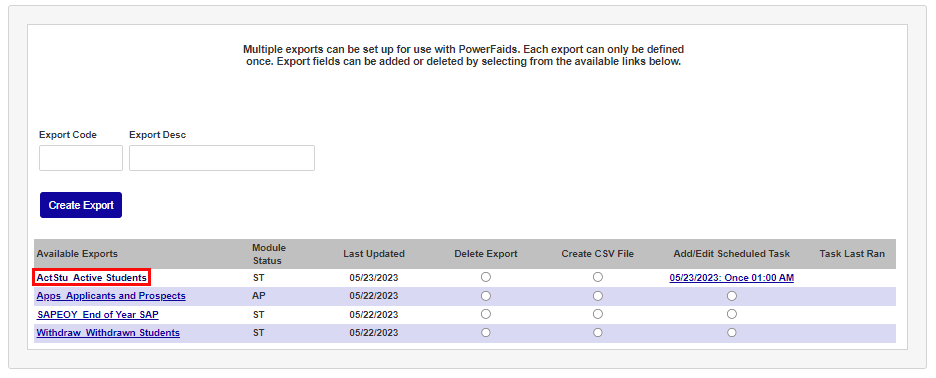
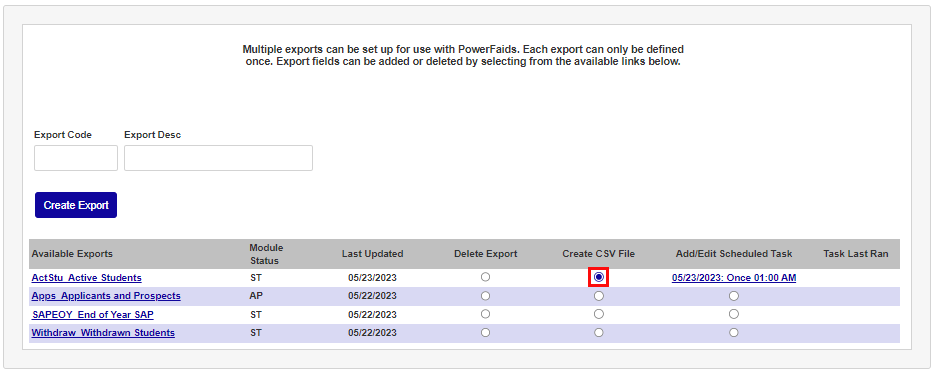
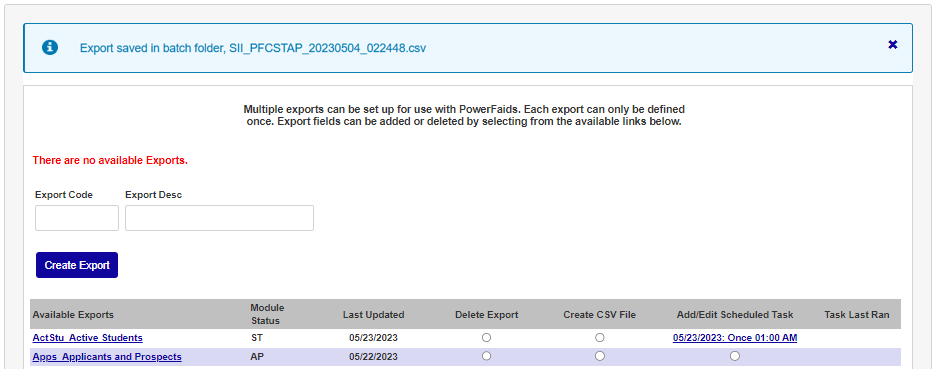
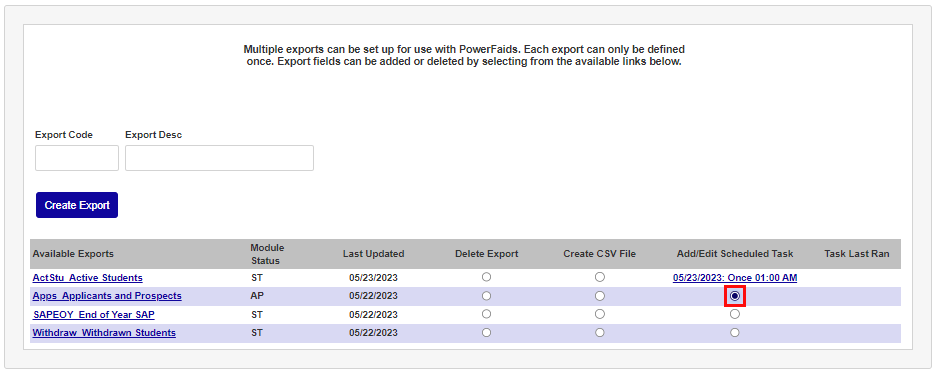
When required tables are set up as needed, the user can proceed to the Financials menu PF Cloud: Users Exports page to create the needed .CSV export files. When users initially access the Users Exports page and no exports have been created, the option to create exports is immediately available. There is no limit to the number of exports that can be created for use with PowerFAIDS Cloud, however, each export can only be defined once. Export fields will be added or deleted by selecting data options within this utility. To begin creating an export, enter up to 8 alphanumeric characters that represent the name of the export being created in the Export Code field.
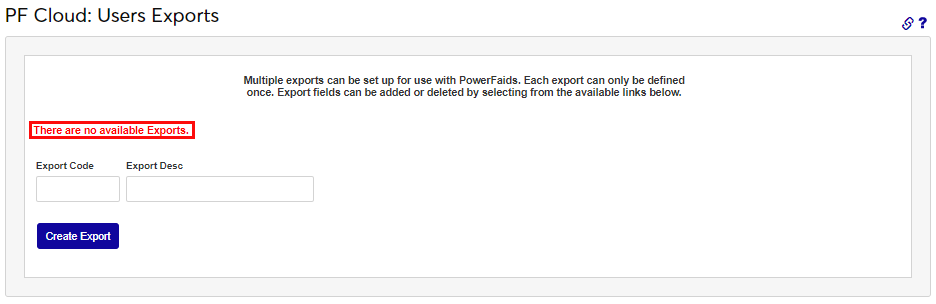
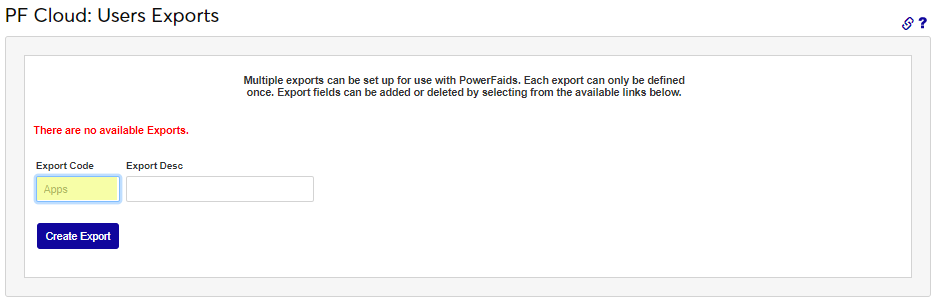
Enter up to 35 alphanumeric characters that describe and/or name the export being created in the Export Desc field. Click Create Export. Continue creating the names and codes of exports until all necessary exports have been created. If a code that was previously used is entered, an error message will display to the user.

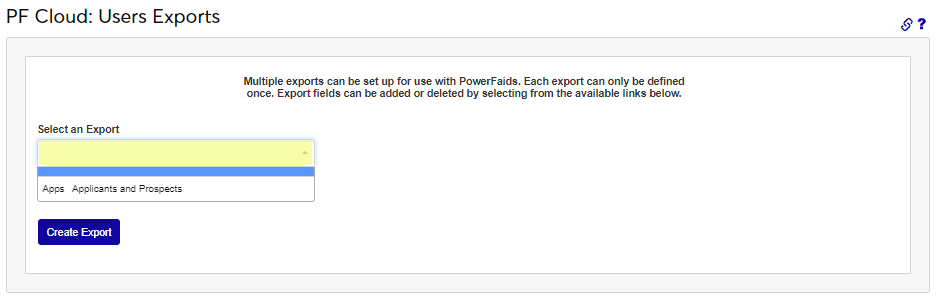
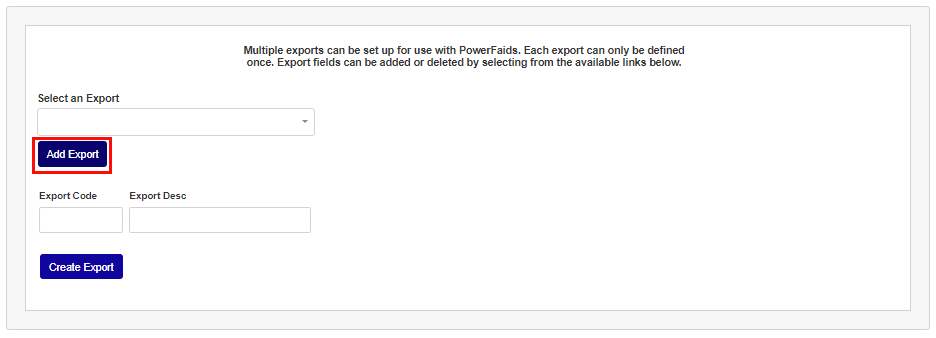
After clicking Create Export, select the export name from the Select an Export dropdown and click Add Export. This step finalizes the creation of the export and adds it to the list of Available Exports. Any export names that remain in this menu have not been added to the Available Exports and therefore have not been completely setup.
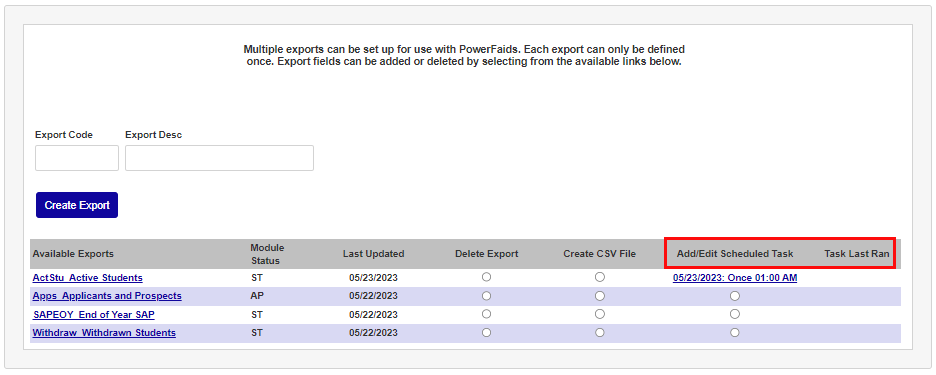
As exports are added, they are displayed in the Available Exports list. In addition to the name, the user is shown the Module Status of students that will be included in the export, and other status indicators about each export. To complete the setup of an export by adding the data fields that will be included, click the name of the export.
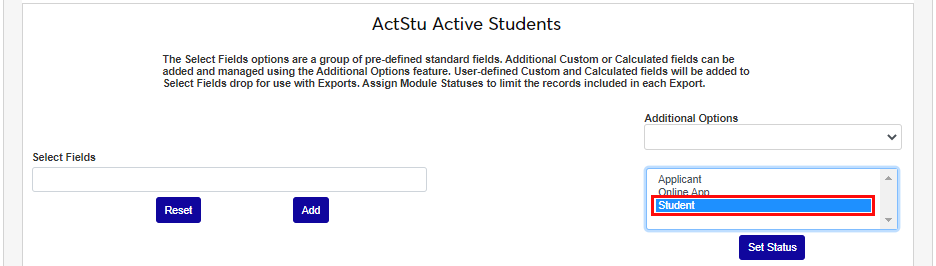
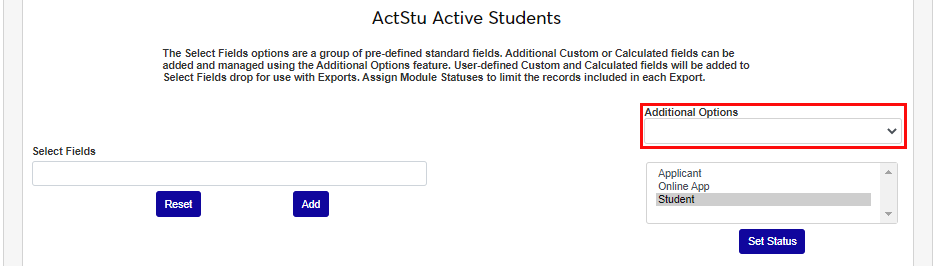
Module Status
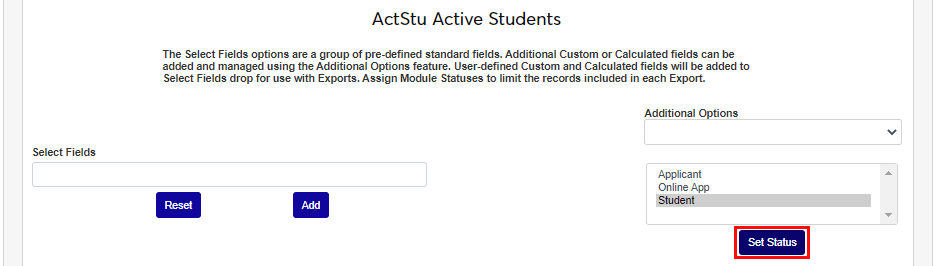
Set the Module Status of the users that will be included in the export. Setting the module status determines the data fields that will display for selection in the Select Fields menu. Click Set Status to save the module status.
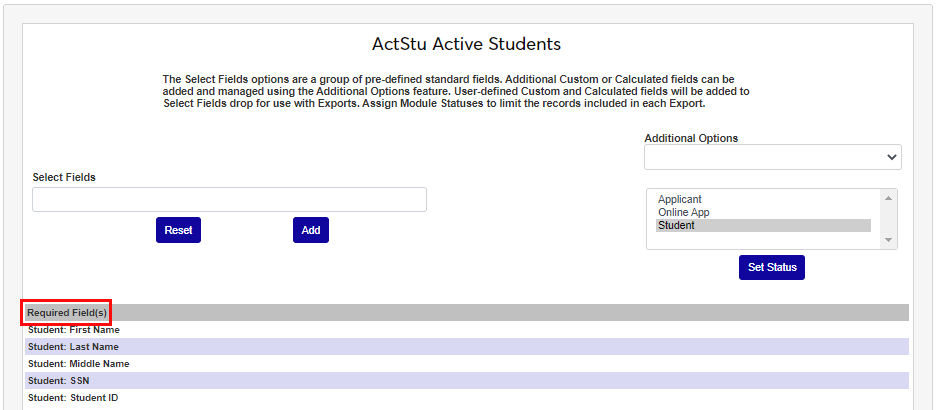
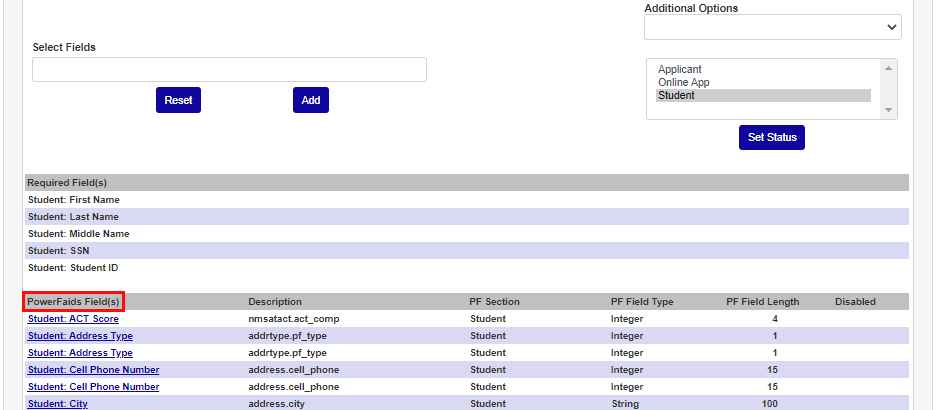
All exports will automatically include the list of data elements and identifiers that are required for record matching. These are displayed in the Required Fields section.
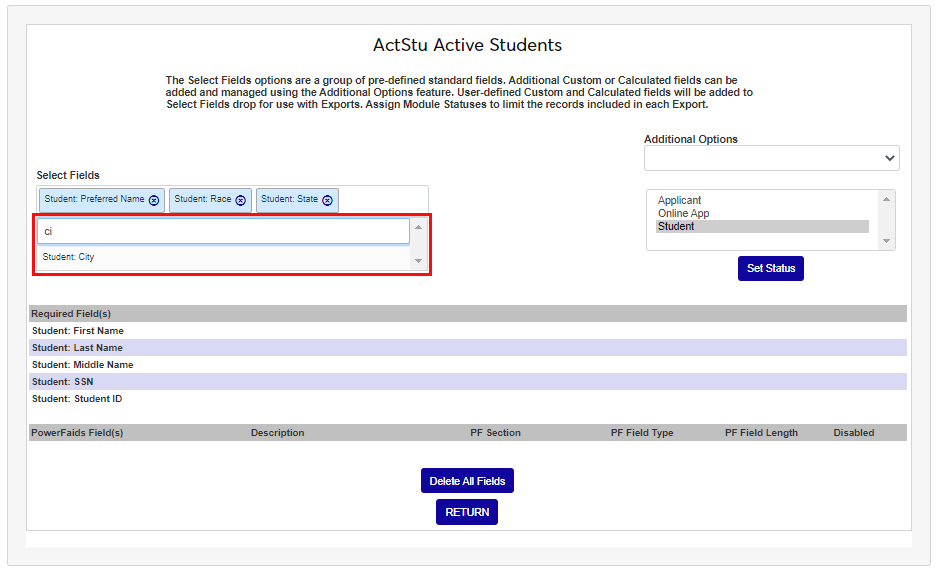
Select Fields
The list of Select Fields is equivalent to the data elements in the PowerFAIDS Cloud SII File Layout Tech Reference document and the labeled with section names, accordingly. The section names are: Academic Year, Payment Period, Program, and Student. This is a multi-select list. Select each desired data element by scrolling through the dropdown and clicking the element. If the element name is known, typing it in will search the list and provide matching options. Click Add to associate the fields with the export.
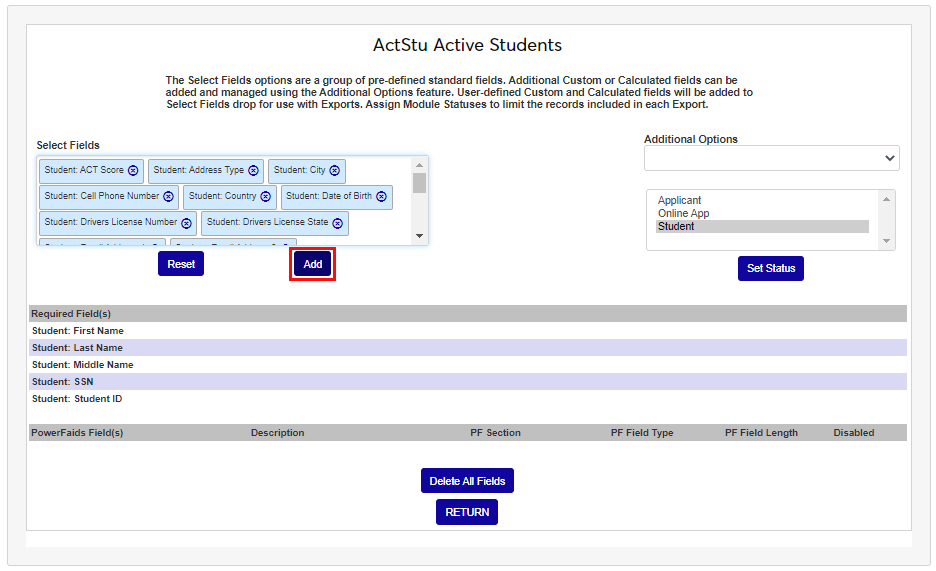
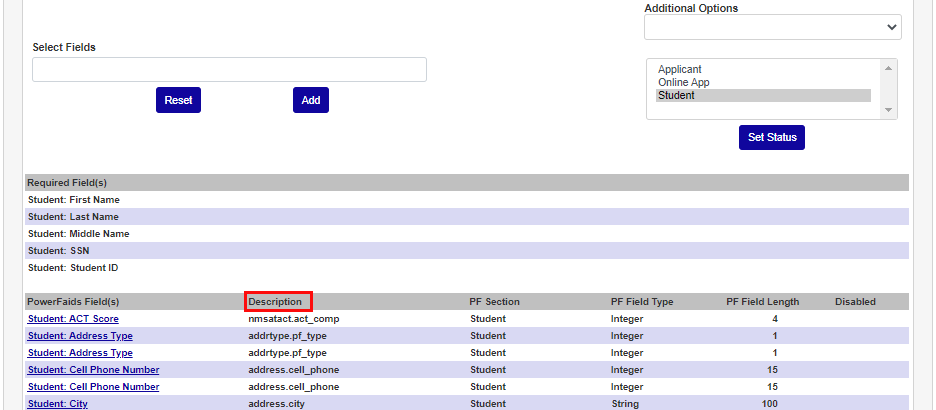
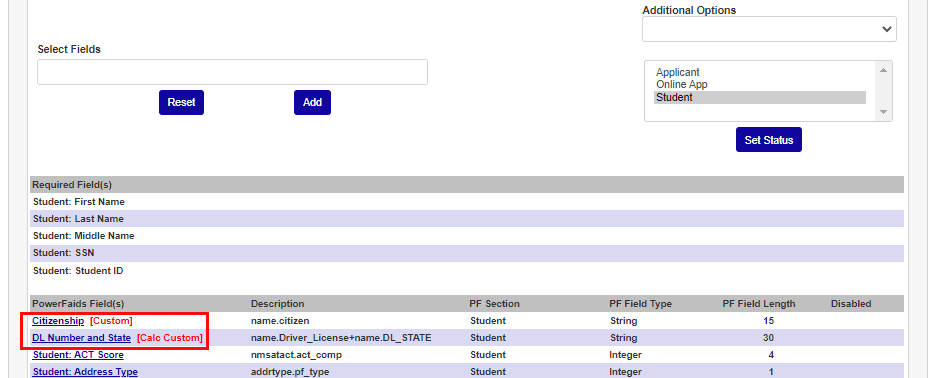
As Select Fields are added, users are provided with a summary of the data elements included in the export, and a description of the SONIS table and column from which the data will be pulled.
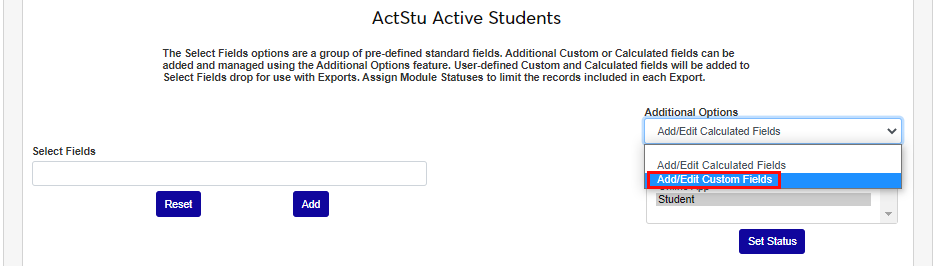
Custom & Custom Calculated Fields
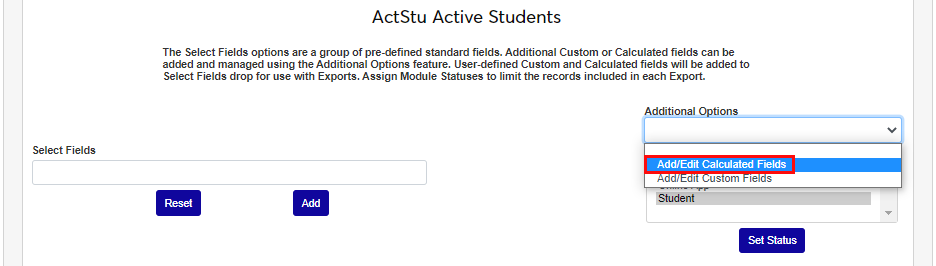
The Additional Options menu provides the opportunity to add custom data fields to the export that are specific to PowerFAIDS. Custom Fields and Calculated Fields include predefined data elements from these SONIS tables: address, name, nmcrs, nmprg, and nmmodst. Both options require users to identify the location where the information will be stored in PowerFAIDS.
It is important to note that when adding custom and/or custom calculated fields, the user must ensure that the resulting data element will have a single value per student record. If there are multiple values for a record, the data columns within the .CSV export file will be misplaced and/or incorrect, and it is not likely to be able to be imported into PowerFAIDS successfully.
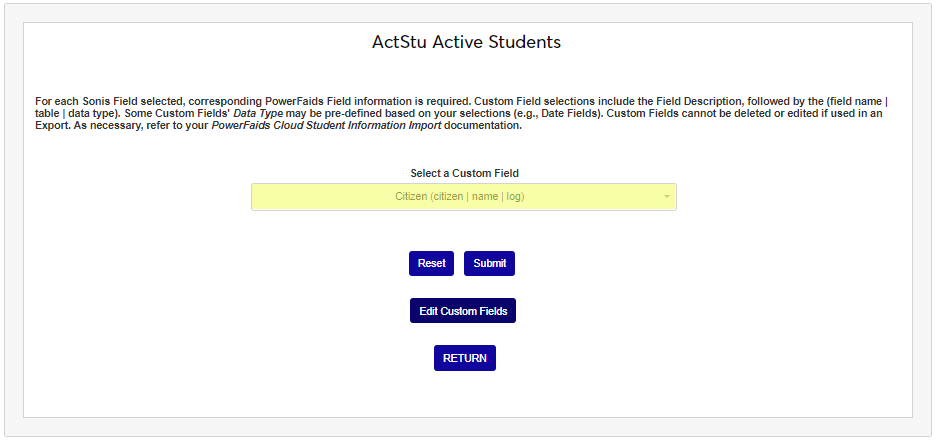
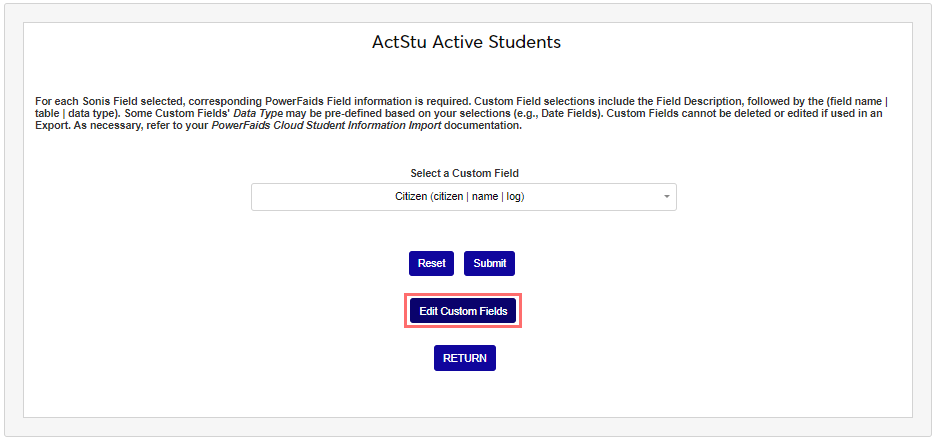
Click Add/Edit Custom Fields to begin.
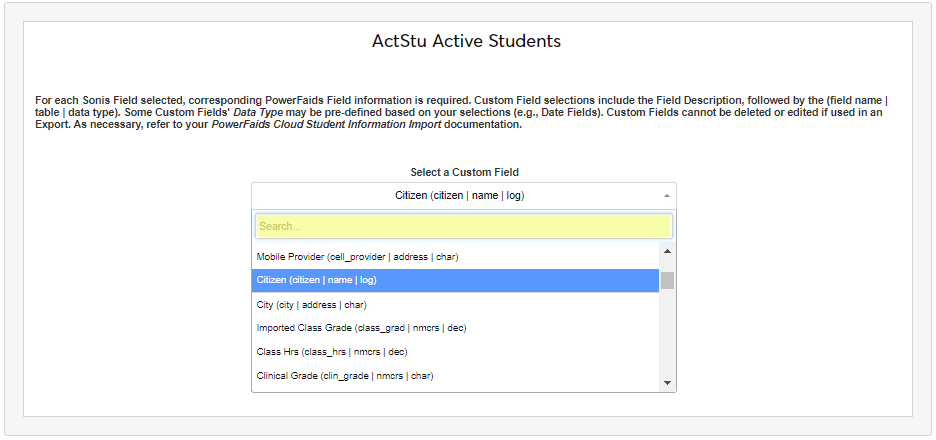
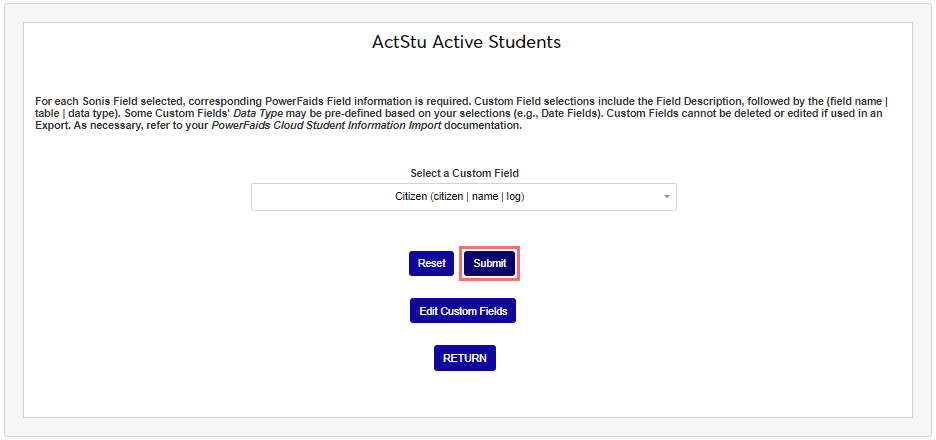
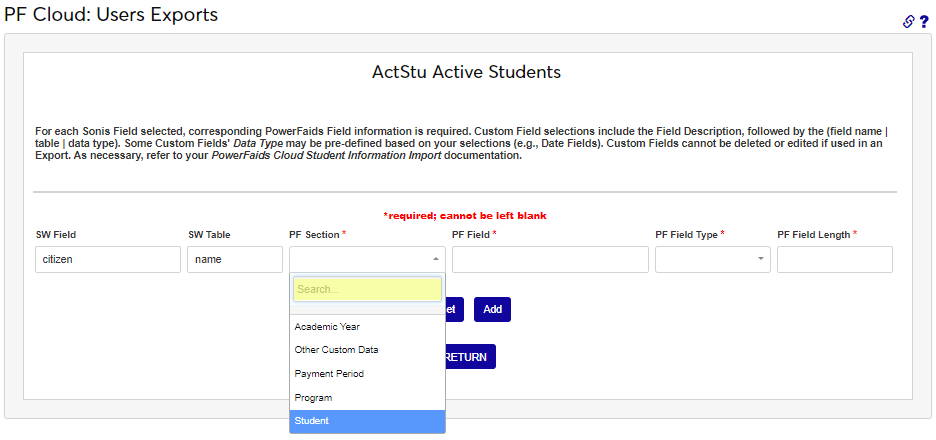
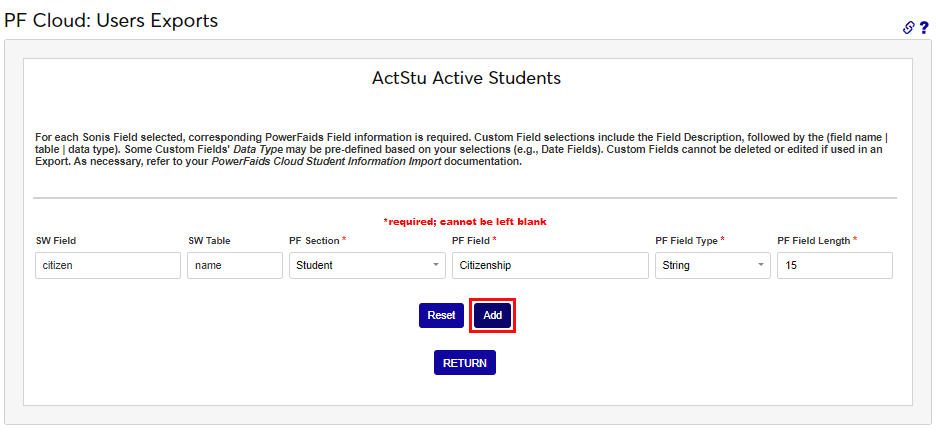
For each SONIS data field selected, a corresponding PowerFAIDS data field is required. Some Custom Field selection options include the field description, followed by the field name, table, and data type, others will not have the field description. Some data types may be pre-defined, such as date fields. When Custom Fields are used in an export, they cannot be deleted or edited, so take care to select and define them appropriately. It may be necessary to refer to the PowerFAIDS Cloud Student Information Import documentation. Select the desired custom field(s) from the Select a Custom Field dropdown and click Submit.
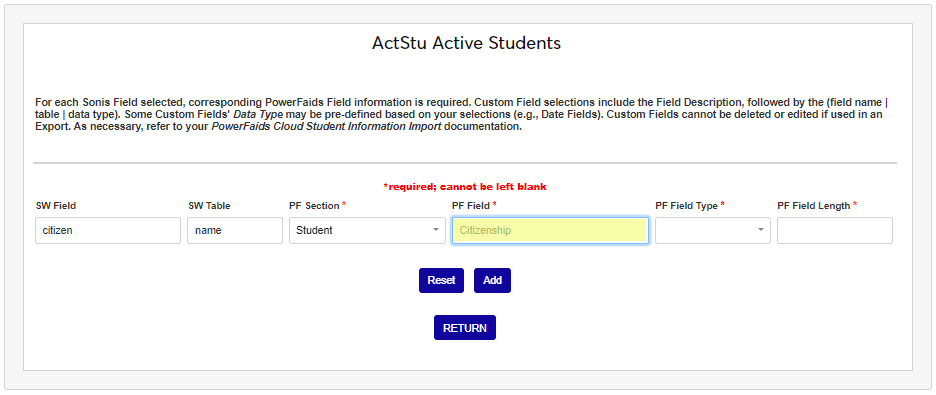
The field and its associated SONIS table display. The user must select the PowerFAIDS elements that determine where the data from the export will be imported to within PowerFAIDS. Start by choosing the PowerFAIDS section from the PF Section menu. Enter the name of the field the data will be imported to in PF Field. This field accepts up to 75 alphanumeric characters and symbols.
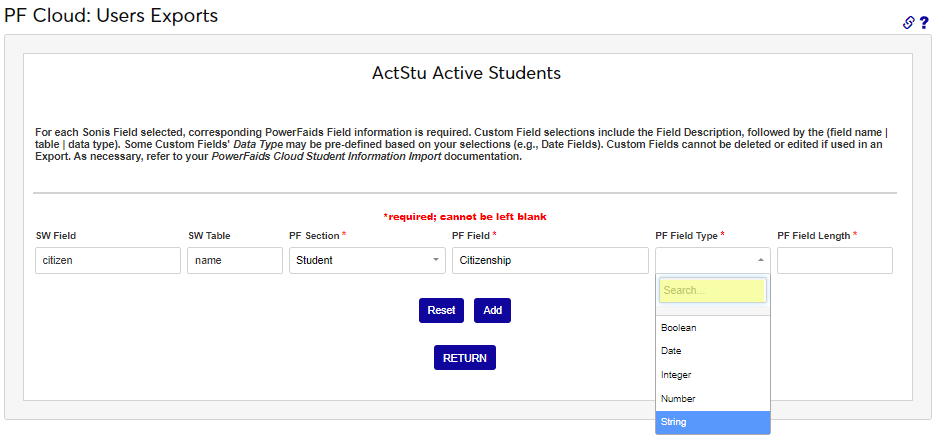
In the PF Field Type dropdown menu, select the type of data that is accepted by the field the data is being sent to. This should be the same format as the data being sent from SONIS. Enter the number of characters accepted in the PowerFAIDS field in PF Field Length.
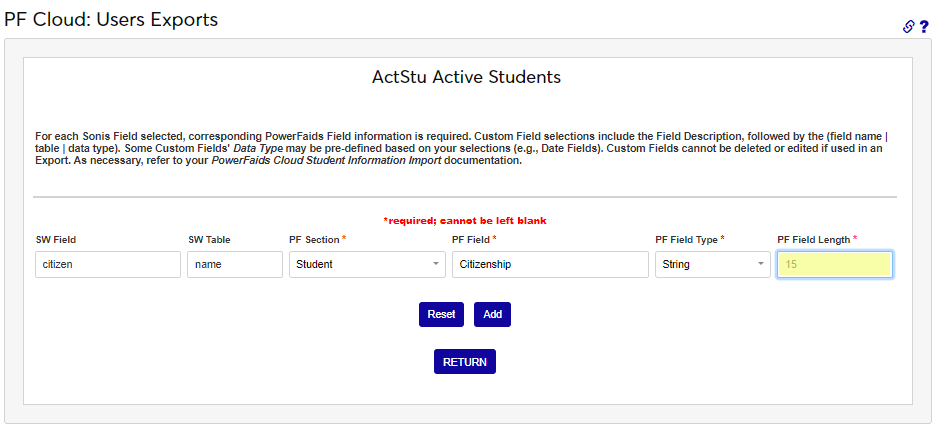
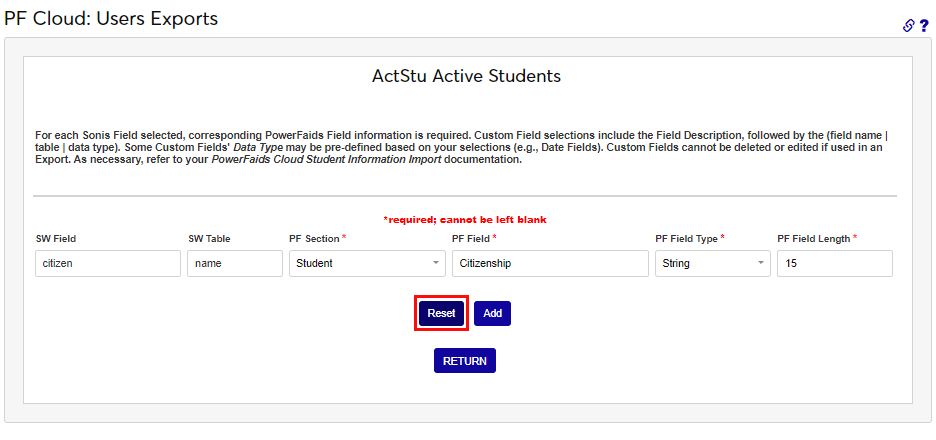
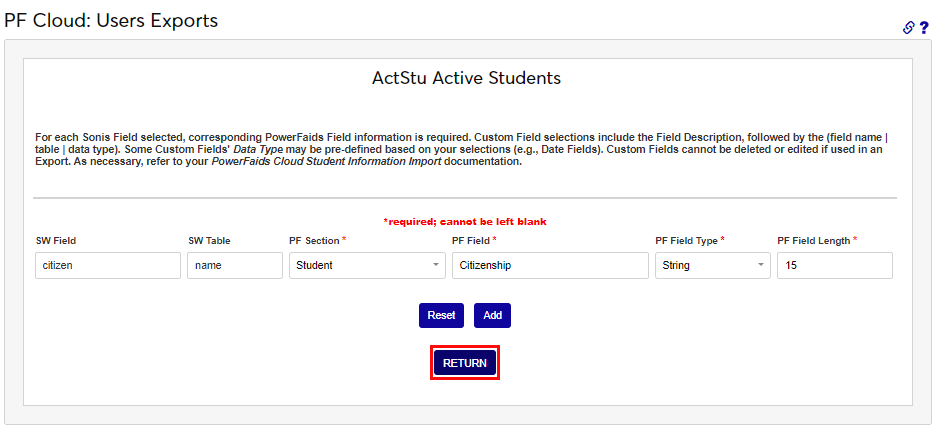
Click Add to finalize the creation of the custom field, Reset to clear the entered values, or Return to return to the custom field selection page.
If a Custom Field that was added needs to be edited, simply select it in the Select a Custom Field dropdown and click Edit Custom Fields.
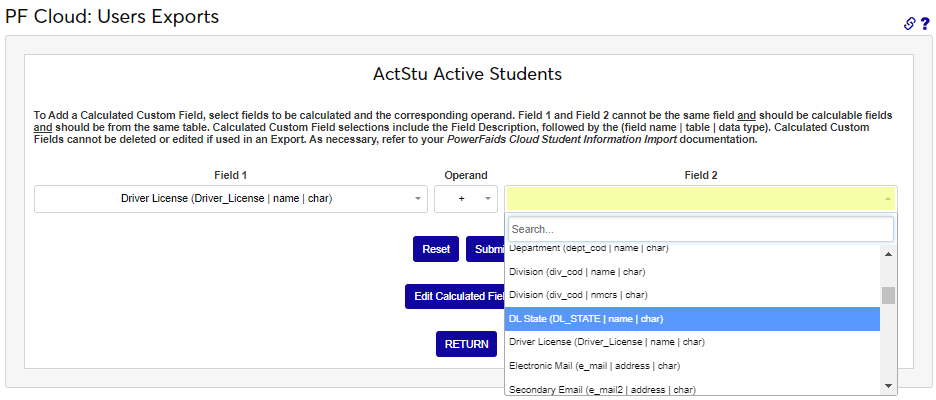
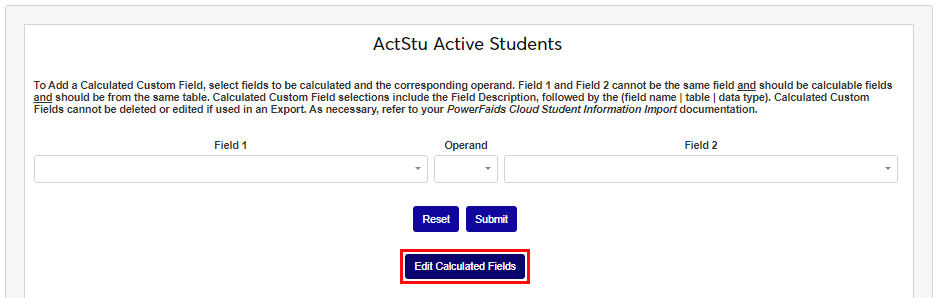
The Add a Calculated Custom Field option allows for the calculation or concatenation of two data elements. Fields and operators are selected by the user from the dropdowns. The fields must be unique, have calculatable values, and should be from the same table. Click Add a Calculated Custom Field to begin adding calculated custom fields. From Field 1, select the first data element that will be part of the desired calculation or concatenation.
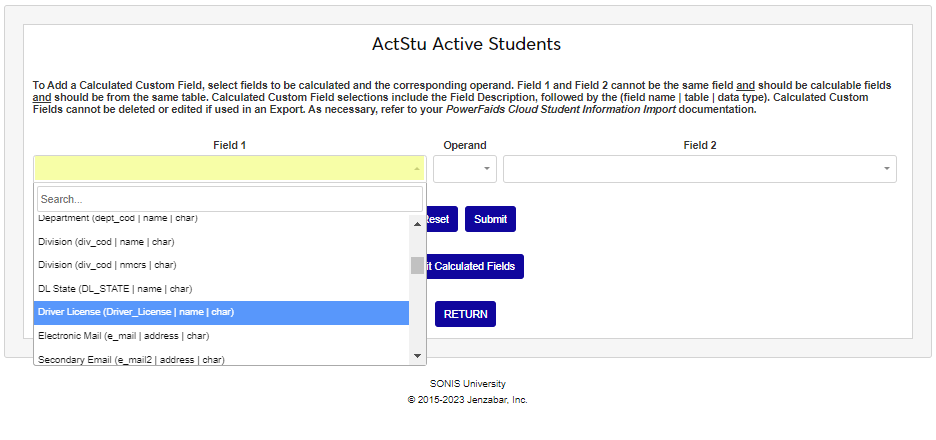
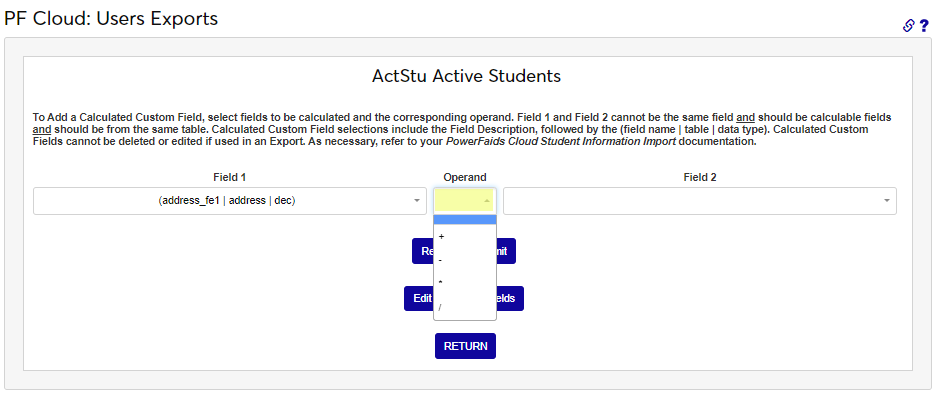
In the Operand menu, select the operator that will be used to join (concatenate) or calculate the data elements. Depending on the data element selected in Field 1, not all operators may display. This is because some values can only be concatenated, they cannot be calculated. For example, Driver's License is not numerical and cannot be subtracted from Driver's License state, but Invoice Amount is numerical and could be subtracted from Anticipated Aid. From Field 2 select the second data element.
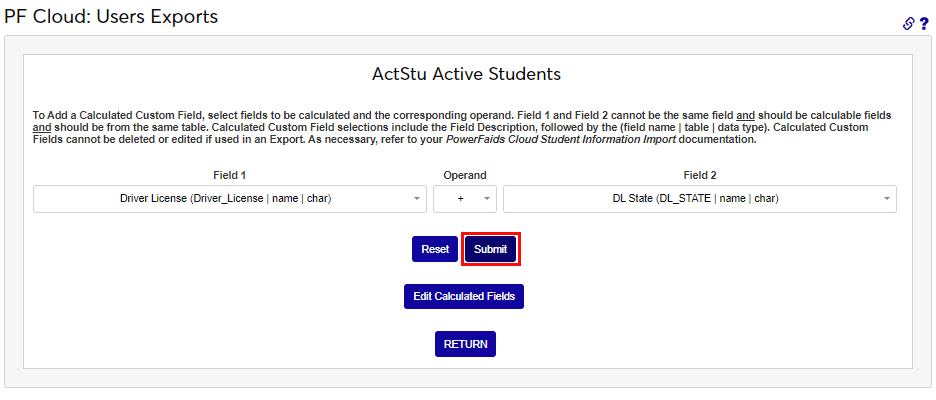
Click Submit to save the entries and proceed to the next page. Just like Custom Fields, Calculated Fields must be associated with a location in PowerFAIDS. Select the appropriate PF Section.

Enter up to 75 alphanumeric characters or symbols that identify the name of the field in PowerFAIDS where the data will be stored. Select the type of data field from the PF Field Type menu.
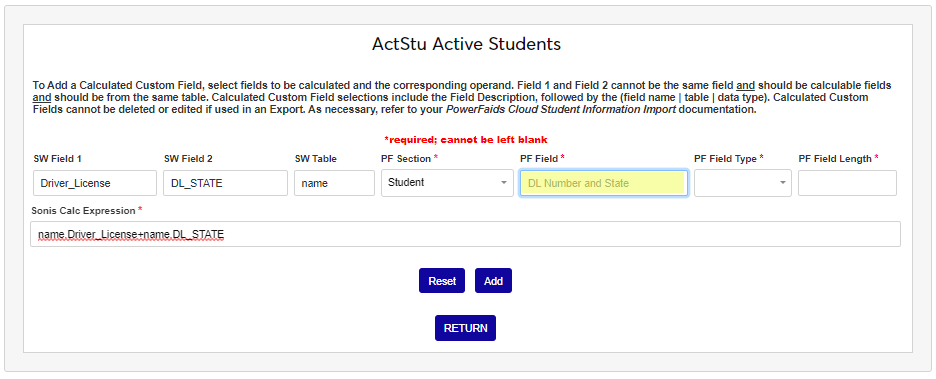
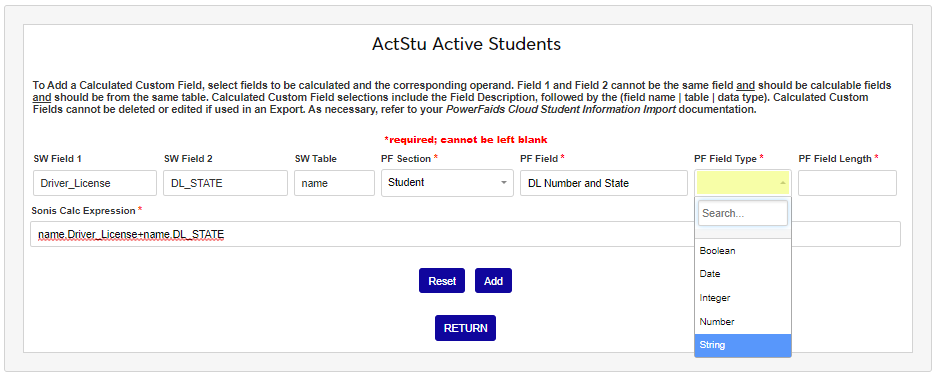
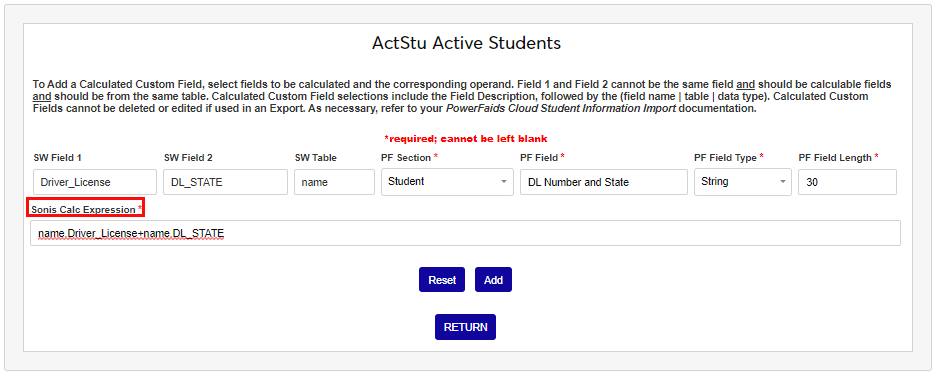
Enter the number of characters allowed in the field in the PF Field Length. The SONIS Calc Expression field automatically populates with the written description of the fields and operator chosen.
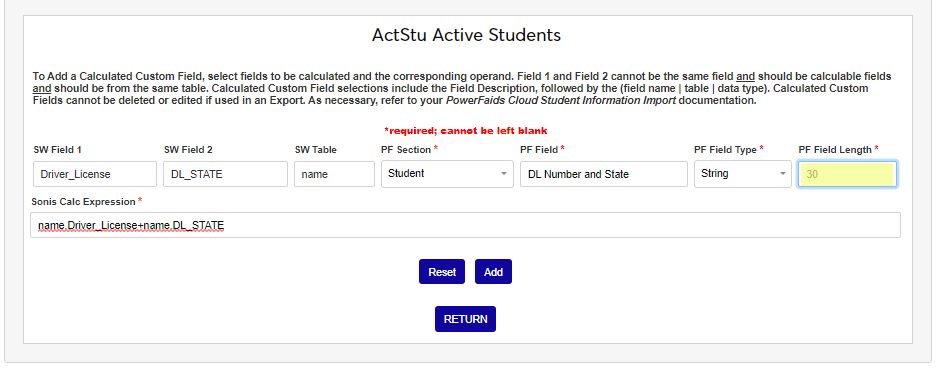
Click Add to complete the creation of the calculated value. Reset can be used to erase all entered values without saving. Return is used to exit the page and return to the code creation page without saving any values. Both Custom Calculated and Custom fields are added to the list of values in the export after they are added.

Editing Custom & Calculated Fields
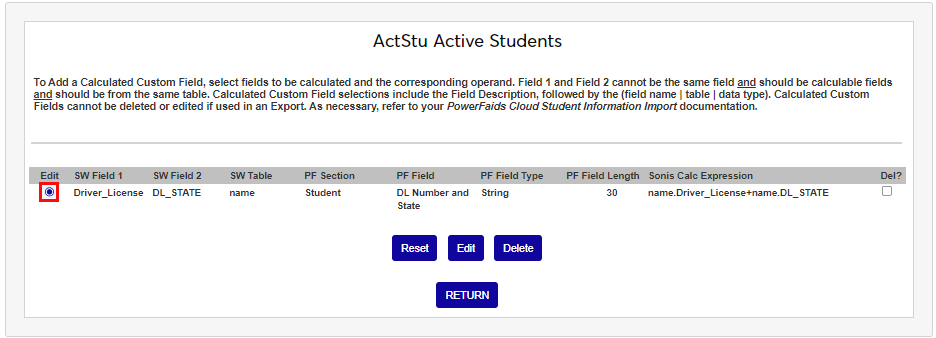
If a custom or calculated custom field needs to be edited, it must first be removed from all exports in which it's included. Enter the export by clicking its name, then click the name of the data element to be deleted.

Click the Delete button to delete the data element from this export. It does not delete the data element entirely; it only removes it from being associated with the export. The element can be accessed by selecting the related Additional Options and then clicking Edit Calculated Fields.
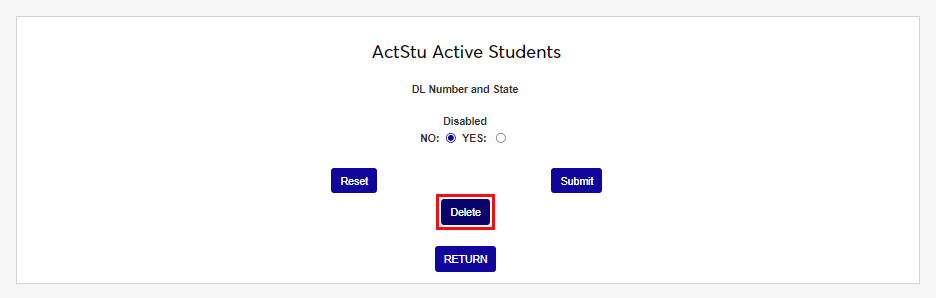
Click the Edit radio button and the Edit button.

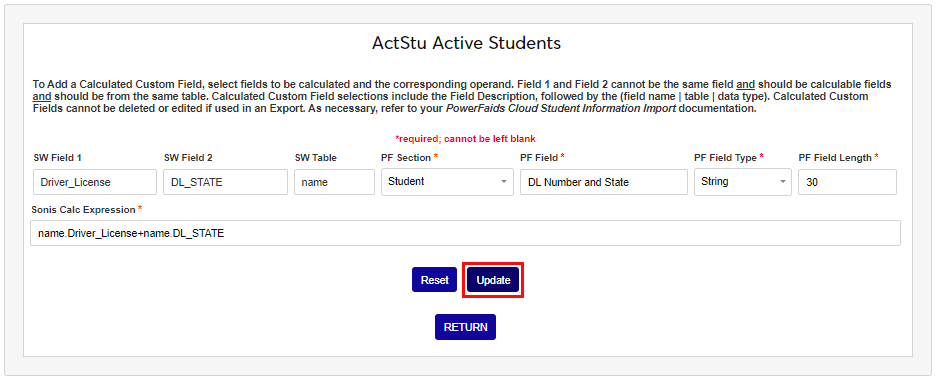
Make the needed updates or edits and click Update. After updating, follow the steps above to add the element back to any necessary exports.
Creating and Managing Export Files
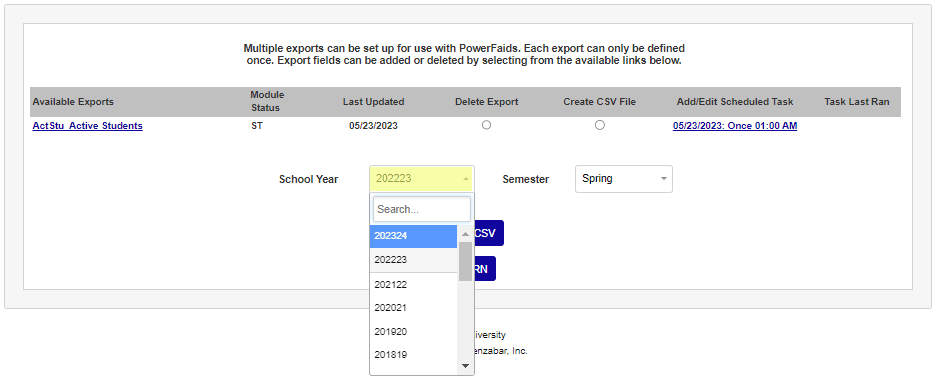
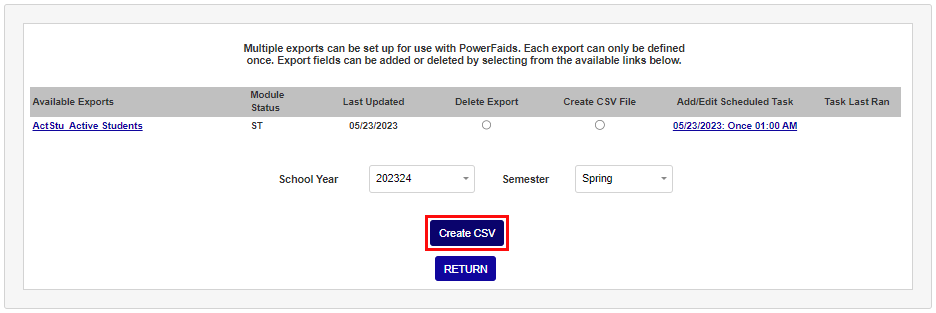
Users can create, manage, and schedule the export .CSV files on the Financials PowerFAIDS Cloud: Users Export page, and manage the names and active status of them on the PowerFAIDS Cloud User Exports table page. To create an export file, or add a scheduled task, click the Create CSV File radio button. On the next page, select the School Year the export is to be created for.
Select the Semester the data should be exported for. If Applicant type Module Statuses were selected to be included in exports when this export type was created, select applicant Disposition(s), if desired. This field is not required.
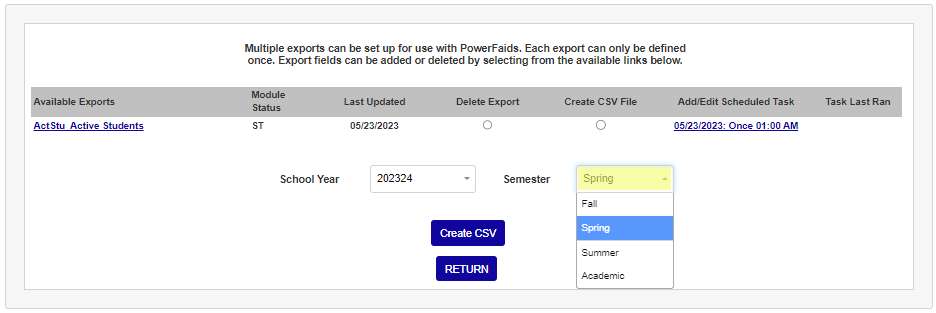
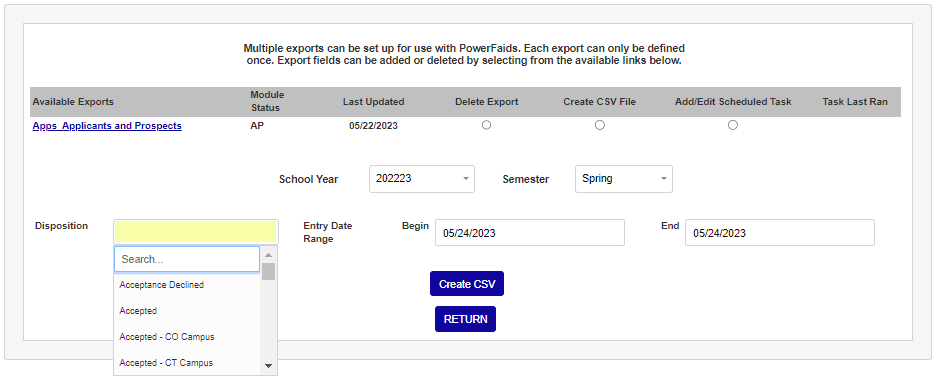
If needed, enter Entry Date Range Begin and End dates. Click Create CSV to create the file.
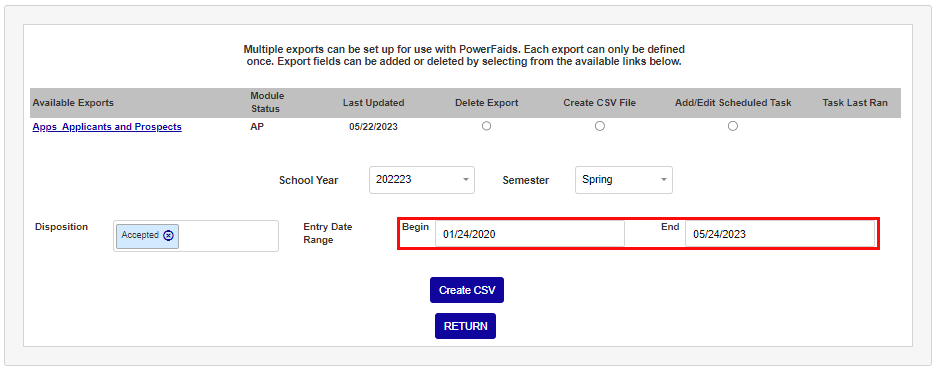
A message will be displayed to the user confirming the creation of the file and the location it can be retrieved from. Messaging also exists advising against interrupting the file creation process, for example, by using the back button or refreshing the page. If the file will take a lengthy amount of time to create manually, it is recommended to used the Scheduled Task.
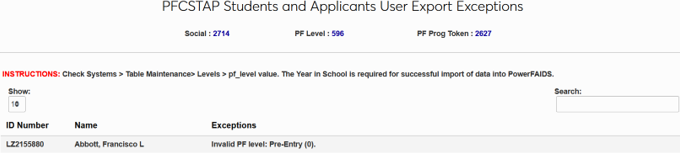
If the file creation results in any exceptions, or errors, that are likely to prevent a successful import into PowerFAIDS, an alert message will display. Selecting to view the reported exception(s) advises the user of affected records and the related issue so that the exception can be corrected. An option is provided to export the exceptions to Excel for later resolution and/or record-keeping purposes.

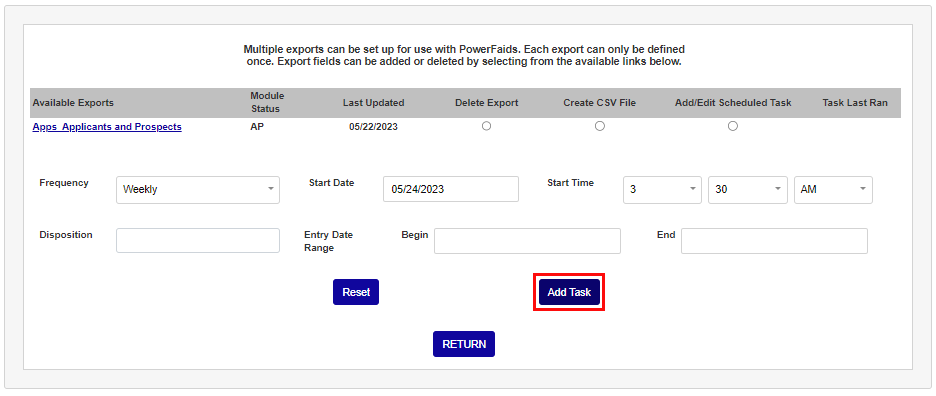
Scheduling Export Creation
To schedule exports to create automatically on a timed interval, click Add/Edit Scheduled Task radio button. Select the Frequency on which the export should be created.
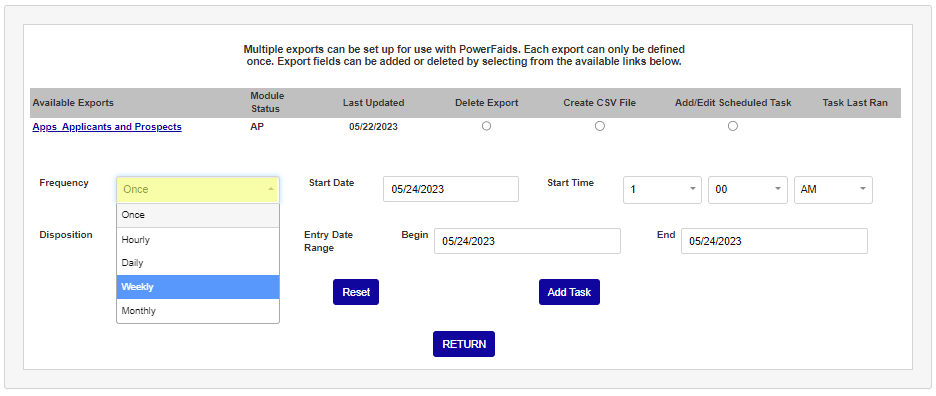
Enter the first date the file should be created automatically on this schedule in the Start Date field. Select the Start Time using the dropdown menus.
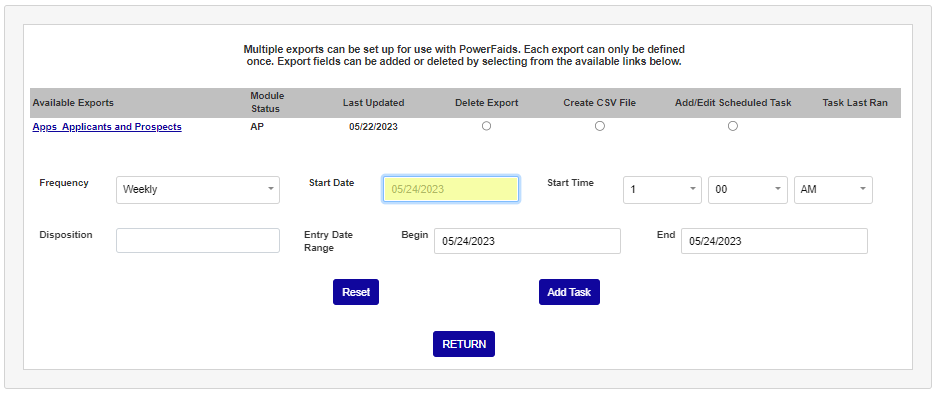
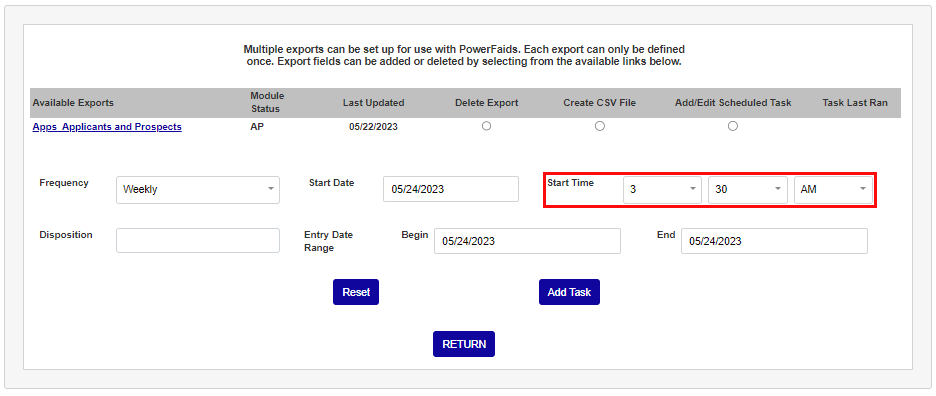
The Disposition and Entry Range Begin and End field only display if the export includes Applicant module statuses and should be utilized as described in the previous section. Click Add Task to complete scheduling of the automatic export creation. After scheduling, the schedule will display on the main page, along with the last time the task ran.
Exports that have been scheduled to run at a specific interval can also be modified in more detail using the Timed Tasks Scheduler.