Heartland ECSI Integration
Overview
Heartland is a multi-faceted company that offers student loan management and payment gateway systems among other services. Jenzabar SONIS integrates with the Heartland ECSI payment gateway for credit card and bank account payment and refund processing. Schools can choose which types of payments and refunds should be processed with Heartland and can take advantage of their credit card or bank account processing system or the institution's existing system.
Note
Before attempting to integrate Jenzabar SONIS with Heartland ECSI, create a Heartland ECSI developer account and ensure that everything is properly set up for the institution's needs on their end. Certain values from Heartland are required for the SONIS setup.
Heartland Campus Code
SONIS offers the option of sending the user's campus code to Heartland for the purposes of account separation. For clients who wish to use this option, they must first create the association between the SONIS campuses and their Heartland ECSI campus codes. Navigate to Table Maintenance in the Systems hub and follow the guidance to set up the Heartland ECSI Campus Code(s).
Providers Account Setup for Payment Processing
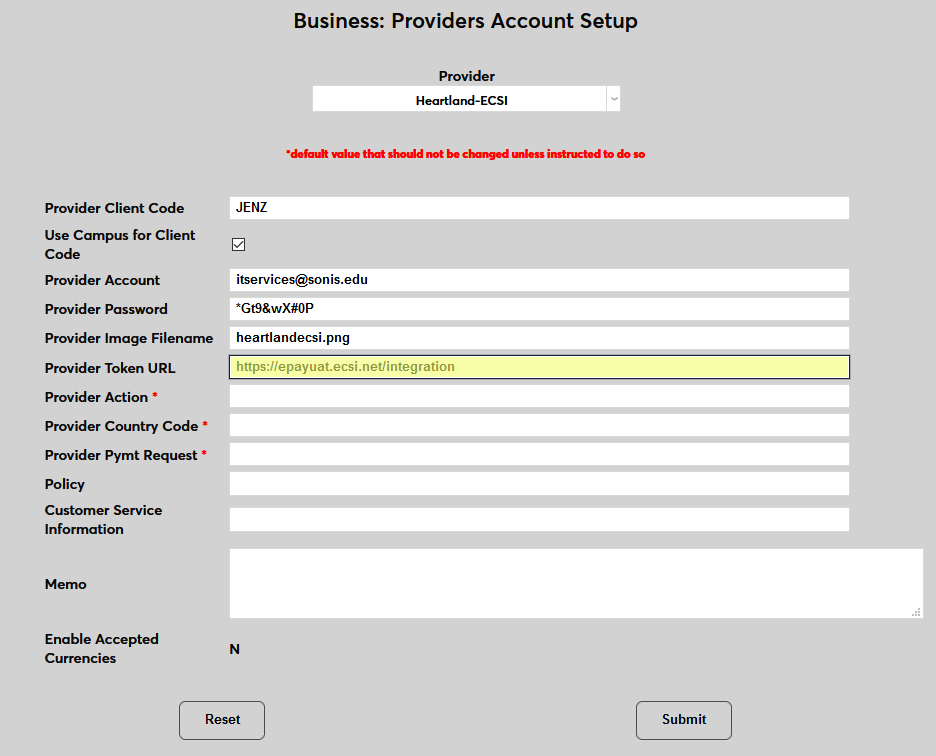
To set up the Heartland account in SONIS, navigate to the Providers Account Setup page in the Systems hub. Select Heartland-ECSI from the Provider dropdown menu.

When the account setup fields appear, begin by filling in the Provider Client Code. This value comes from the Heartland ECSI website and is specific to each individual account.
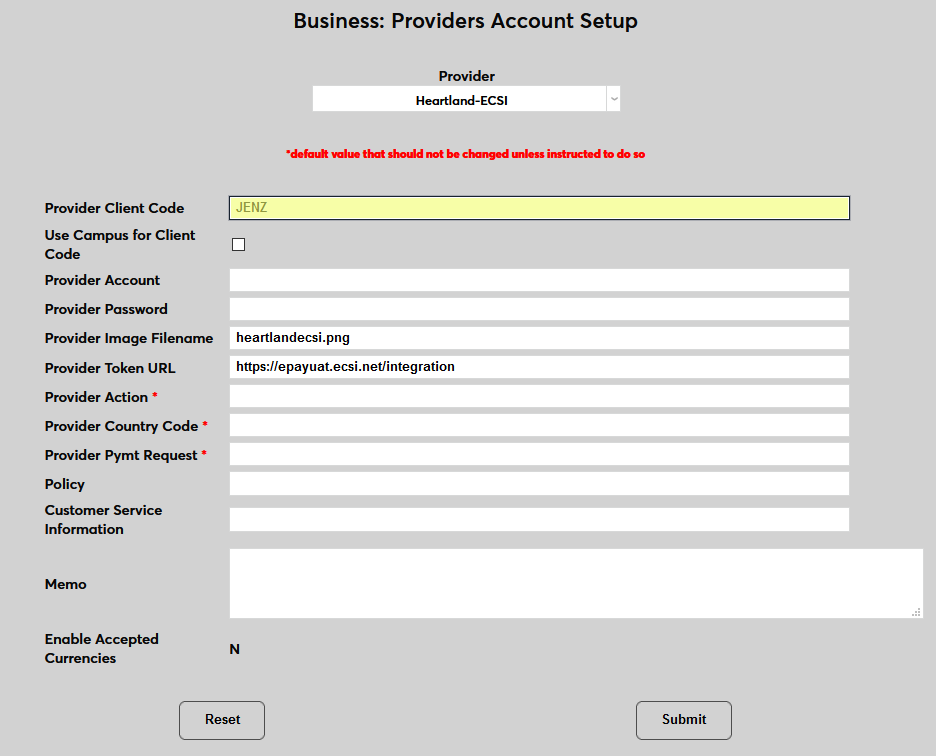
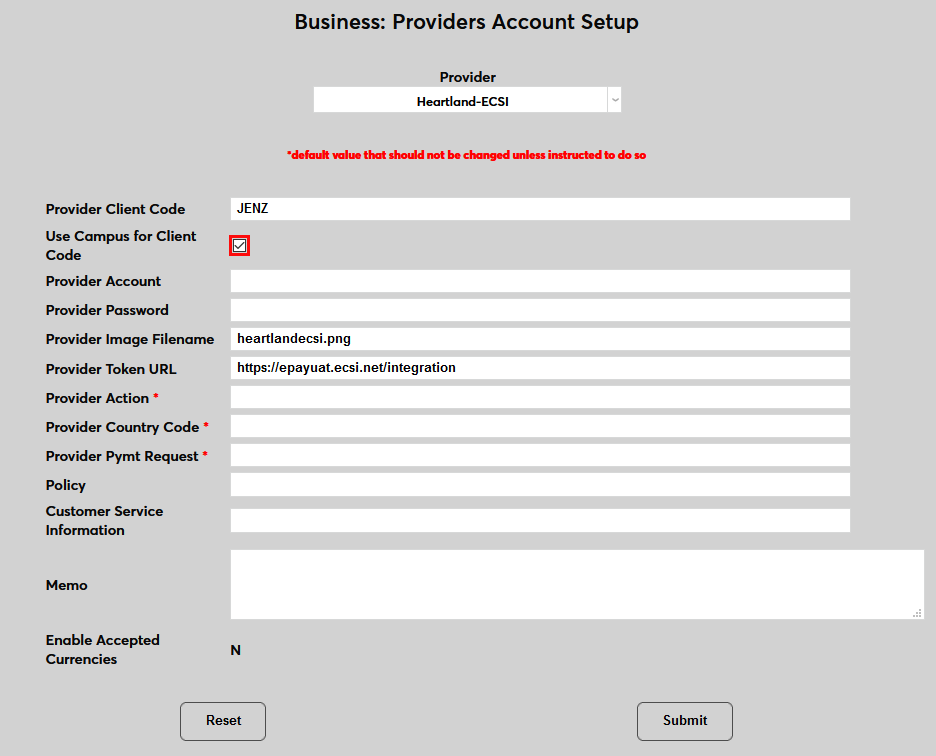
Check the Use Campus Code for Client Code box to send the ECSI campus code that matches the user's designated campus instead of the Provider Client Code. Leave this box unchecked to send the Provider Client Code.
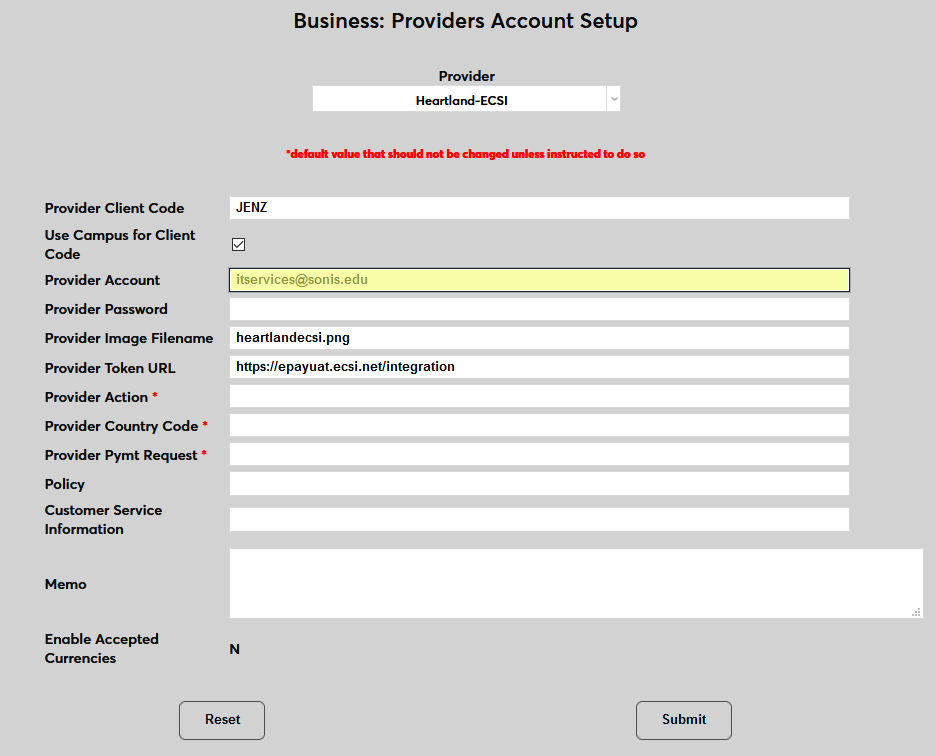
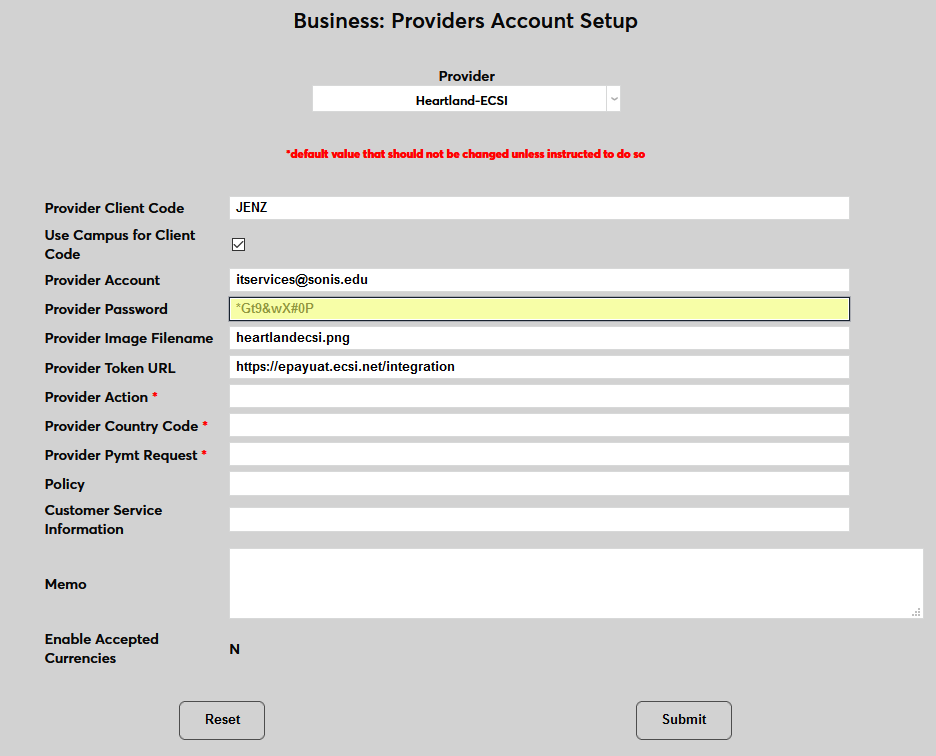
Fill in the Provider Account name and Provider Password. These values come from the Heartland ECSI website and are specific to each individual account.
The Provider Image Filename is predefined based on the default image stored in the SONIS Images folder. This value can be updated if the Heartland logo is replaced, but should be left as predefined otherwise.

The Provider Token URL is predefined as well and should be universal for all SONIS clients. Based on the current Heartland ECSI setup, the token URL is https://epayuat.ecsi.net/integration Do not change this value unless instructed to do so in the future by Heartland or SONIS support.
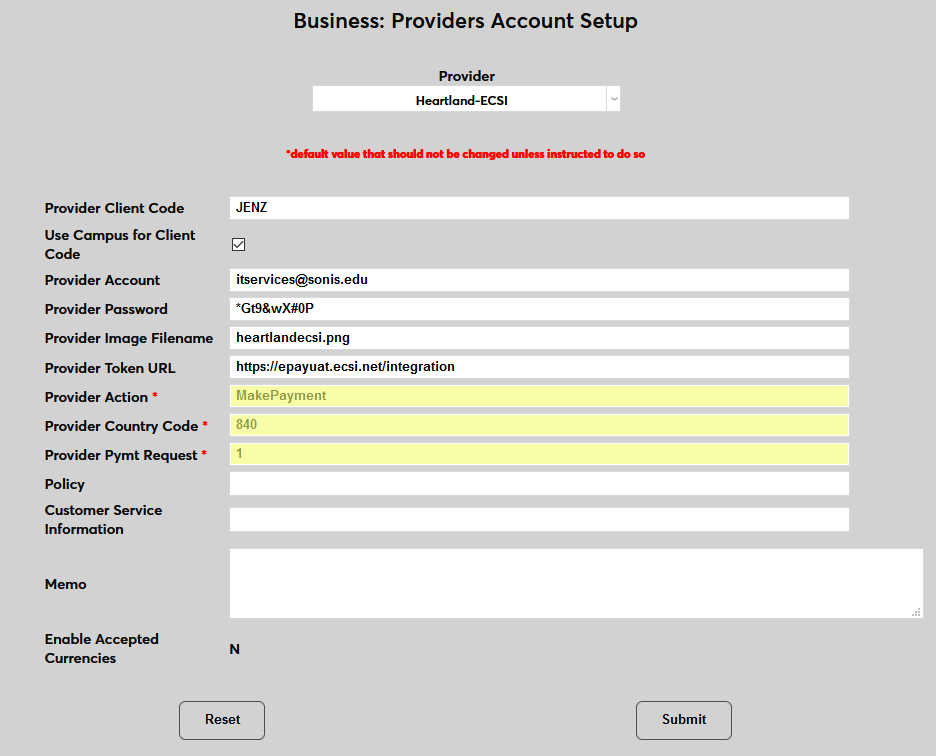
The Provider Action, Provider Country Code, and Provider Payment Request fields are all populated based on individual settings. These values should be provided by Heartland customer support.
Policy, Customer Service Information, and Memo are all fields that display on the initial page before going to the Heartland ECSI site and can be tailored to the needs of the customer.
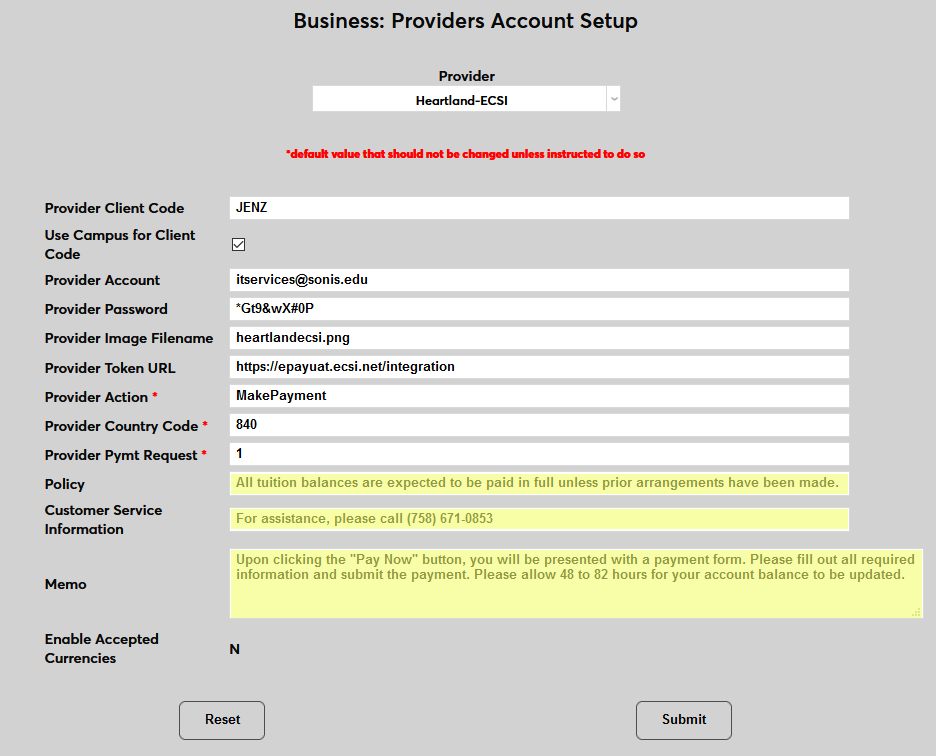
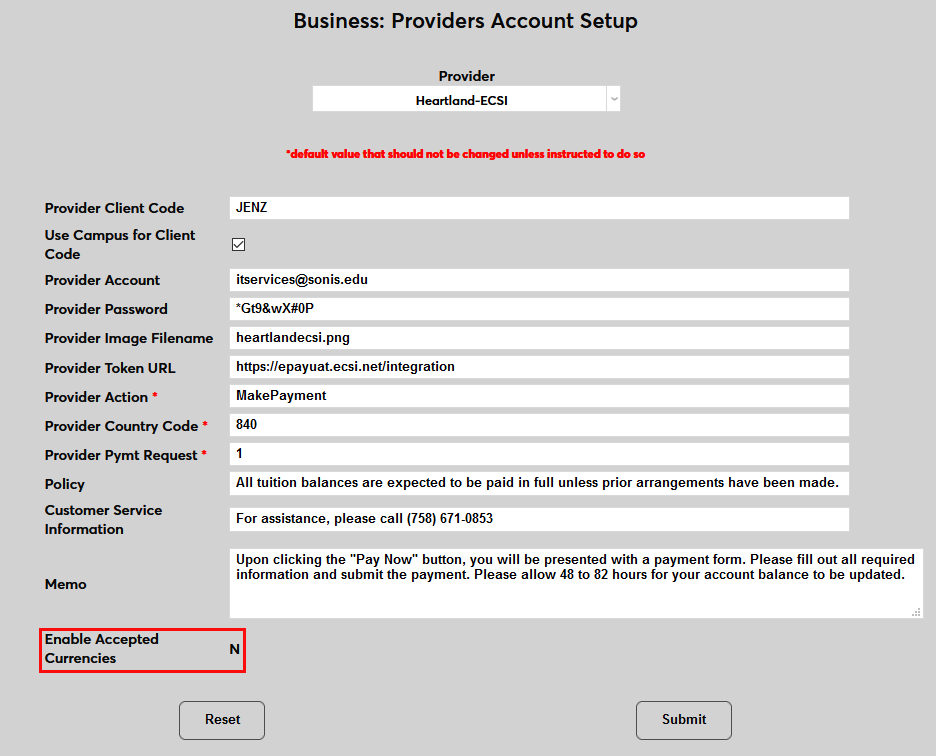
The Enable Accepted Currencies field defaults to N, designating that only American dollars are accepted. Currency conversion is available through PayPal.
Click Submit to complete the Account Setup.

Credit Card Processing Setup
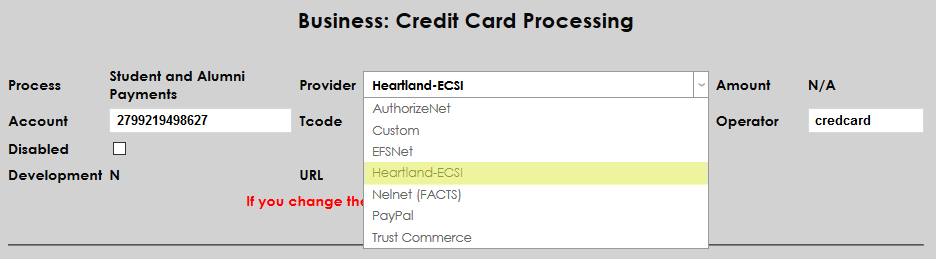
Once the Heartland account information has been set up, administrators must choose a payment type or types to be handled by Heartland. Navigate to the Credit Card Processing utility in the Systems hub.
The start page displays each type of process along with the Provider currently set up for that process, the Account, the standard Amount if there is one, the Transaction Code, and the Operator. The table also lists whether the process is Disabled or not. The Dev field is no longer used. To set up a process type, click the link for that type in the Process column.
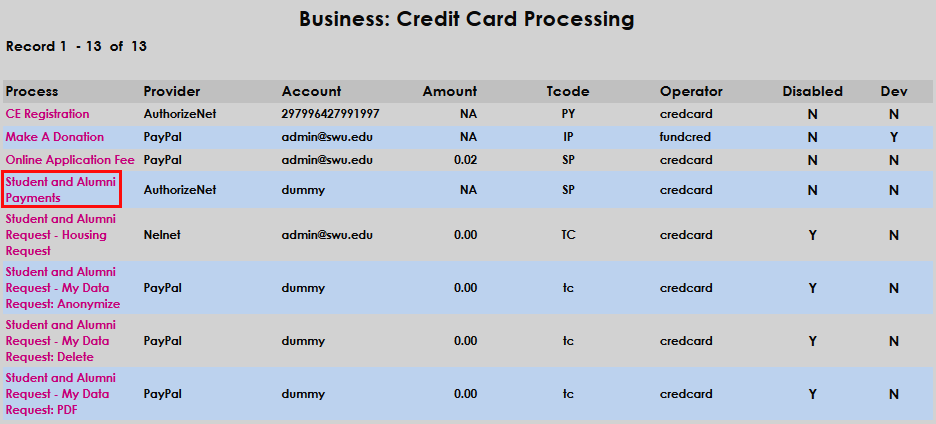
Select Heartland-ECSI from the Provider dropdown menu and enter the school's Heartland ECSI account number.
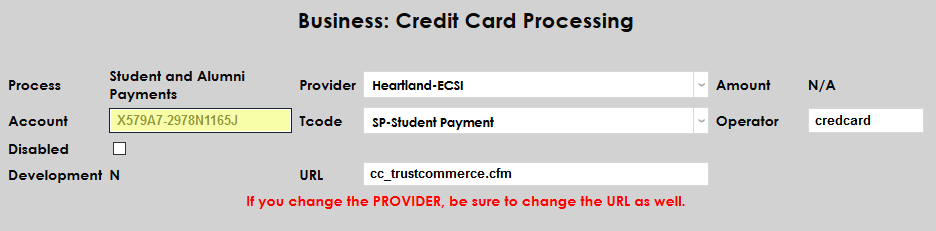
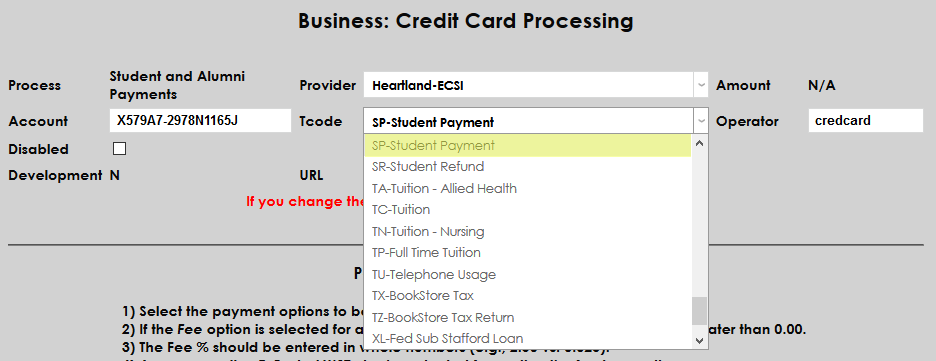
Next, select a Transaction Code from the T-code dropdown.
Finally, fill in the proper URL for the payments to be processed and click Submit. At the time of writing, the Heartland setup URL is cc_heartlandecsi.cfm.
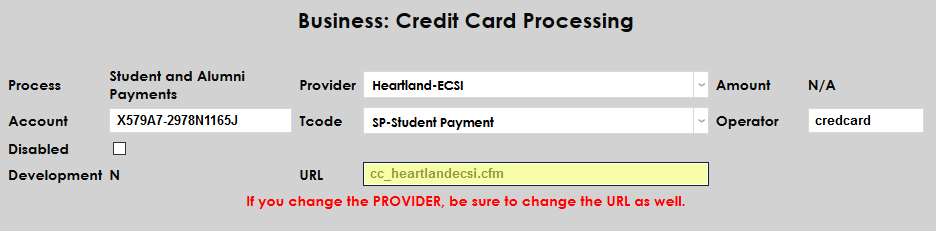
Once the top section has been completely filled out, click Submit to save the changes and load the proper processing options for Heartland ECSI.
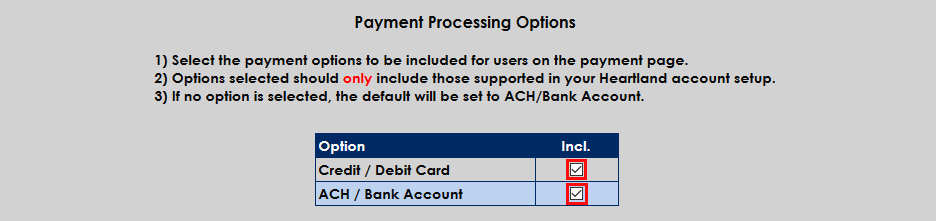
Payment Processing Options
Two kinds of payments can be processing through Heartland ECSI: credit/debit card payments and ACH/bank account payments. To control which types are available to users, scroll down to the Payment Processing Options section of the page. To include a payment option, click the Include box. Administrators should only select the payment options that are supported through their account with Heartland or errors will occur.
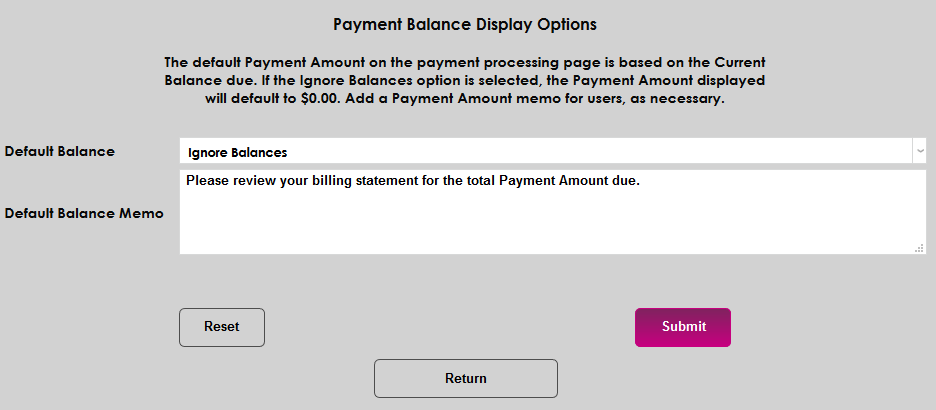
Payment Balance Display Options
While some institutions post all charges immediately, others take advantage of the SONIS Pre-Billing feature to create what is essentially a balance preview before the charges are posted. This pending balance is shared with the student, allowing them to anticipate charges and make payments towards those charges. However, the SONIS Credit Card Processing utility only displays charges that have been billed and cannot display pre-billing information. For this reason, some schools wish to show students a balance of zero when they make a payment rather than showing them a balance that may be less than their full charges for the semester and encourage partial payments.
To change the way the Credit Card Processing Utility displays student balances, scroll down to the Payment Balance Display Options section of the page. By default, the utility will display the student's Current Balance. Select Ignore Balances to display a zero balance instead.
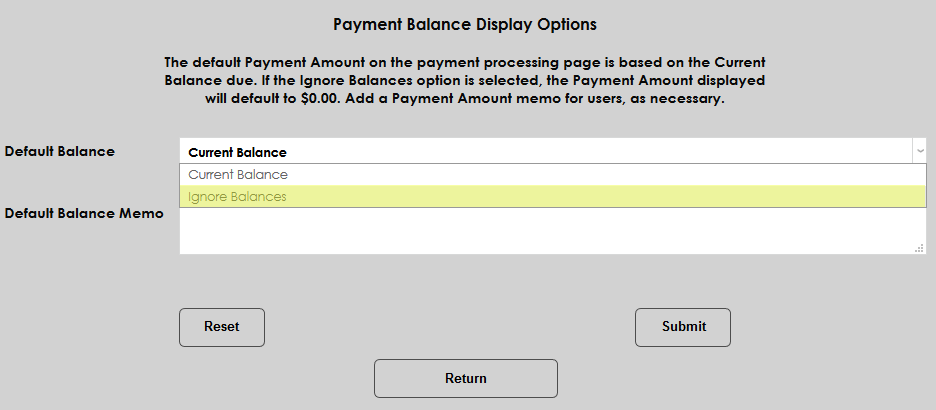
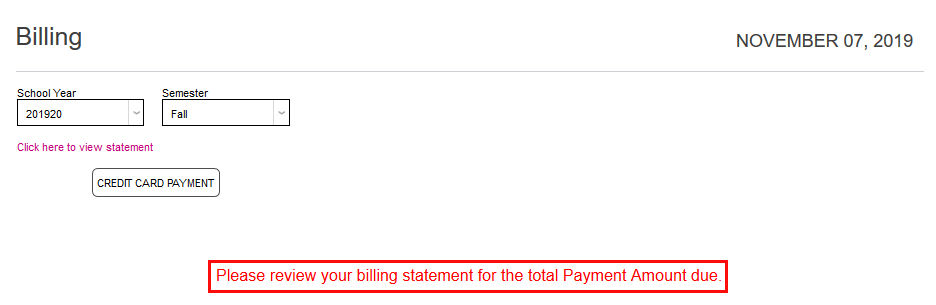
It's recommended that schools add a Memo as well to let students know why their balance isn't displaying and where to find the total they should pay.
Click Submit to save the changes. The memo will display on at the bottom of the page when students access their Billing page and the Payment Amount on the following page will display as 0.00 regardless of the student's actual balance.
Making Payments
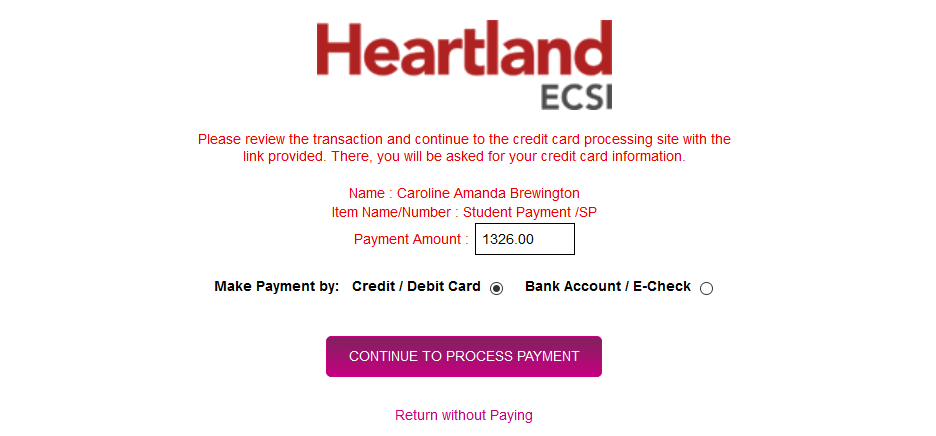
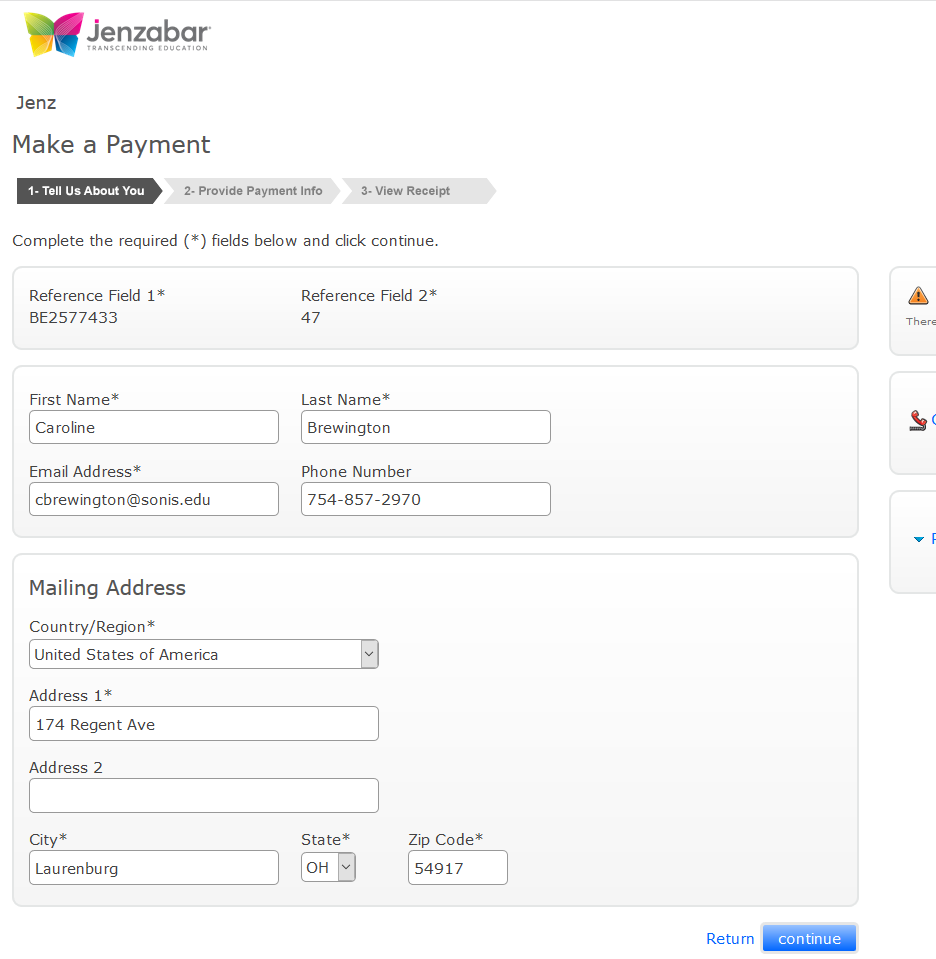
Once Heartland ECSI has been set up as a SONIS payment gateway, payments can be made through the various SONIS portals. Navigate to the Billing page under the Financials menu and click Credit Card Payment to continue.
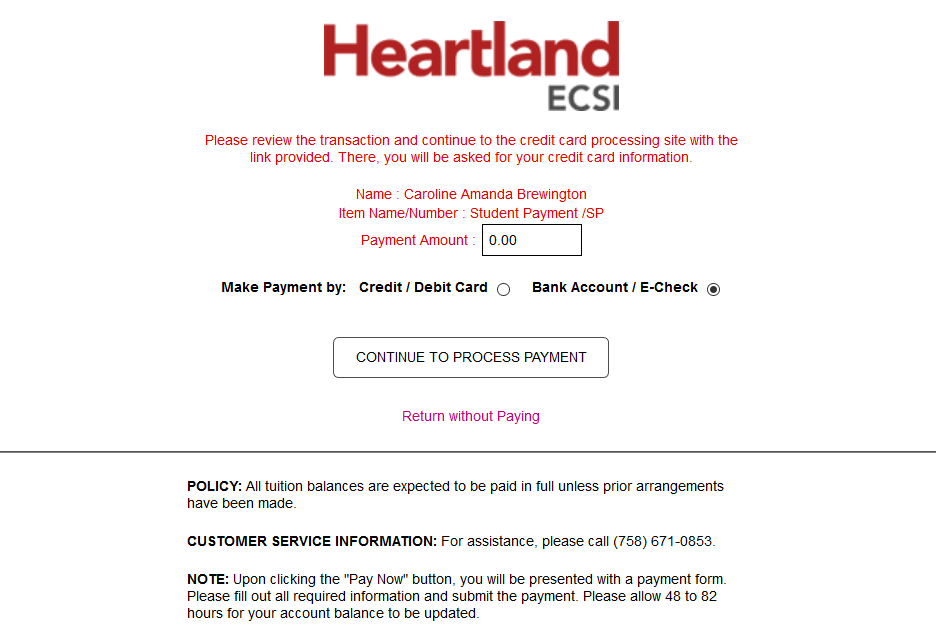
On the next page, if the Current Balance display option was selected, the student's current balance will display in the Payment Amount field. If the Ignore Balances option was chosen, the user should look up their current balance and fill it in. Click Continue to Process Payment to continue.
The student will be taken to the Heartland ECSI website to continue processing the payment. The student's name and address information is passed from SONIS to Heartland to save time.
Once the payment has been processed, the user is given a receipt for the transaction and the option to return to SONIS. Should the need arise, the Transaction ID number (stored as the Check/Receipt number in the user's SONIS account) can be used to further verify payment information within their ECSI account.

Providers Account Setup for Refund Processing
Prior to beginning setup in Business: Providers Account Setup, ensure the Master Profile utility has been used to add the ECSI Refund Exports function to the appropriate user security classes.

From the Systems hub, select the Business: Credit Card Providers Acct Setup page. In the Provider dropdown, select Heartland-ECSI. Scroll to the bottom of the page and locate Provider Client Code under the Refund Processing Setup heading.

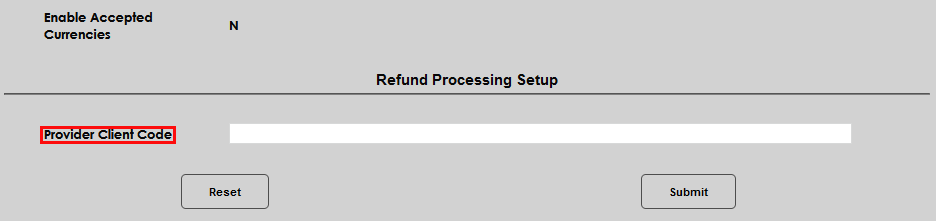
Enter the Provider Client Code as assigned by Heartland ECSI and click Submit.


Using the ECSI Refund Exports Utility
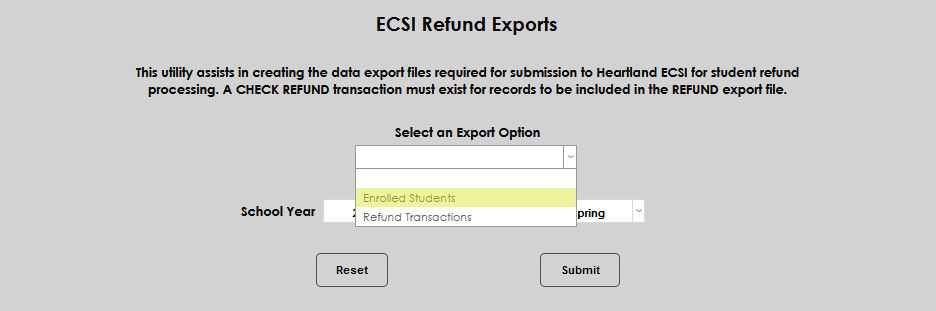
The ECSI Refund Exports utility provides users with the ability to create export files of enrolled students and student refund transactions for import or upload to Heartland-ECSI.
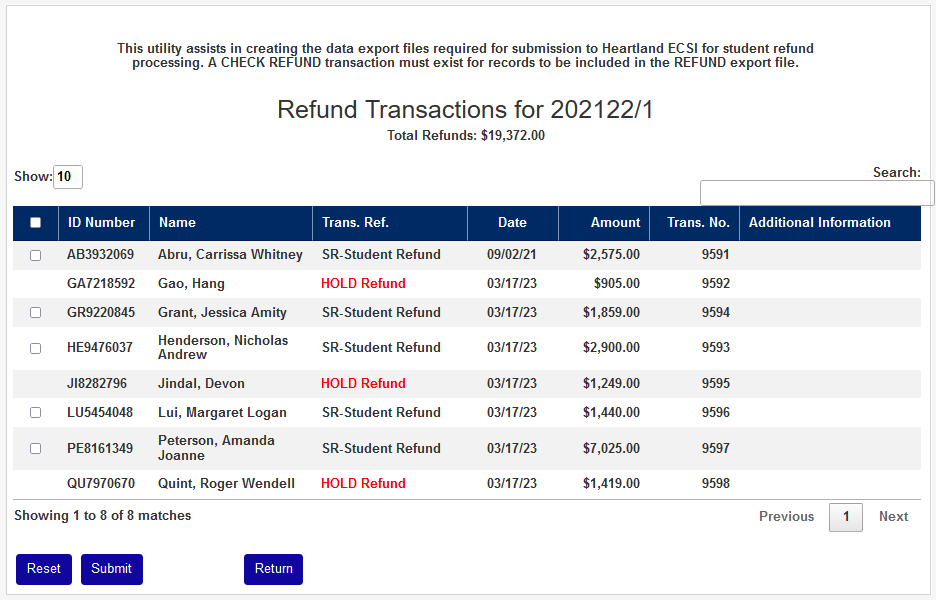
Refund Transactions Export
For a record to exist in the Refund Transactions file, a refund transaction must exist. In order for transactions to be designated as refund transactions, the transaction code being used must have the Check Refund box checked.
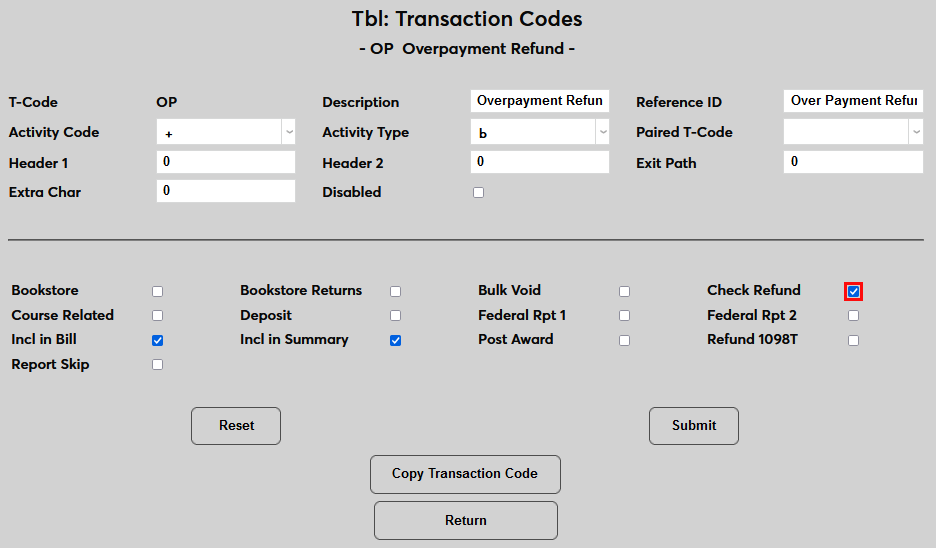
Transaction codes without this designation will not be included in the export.
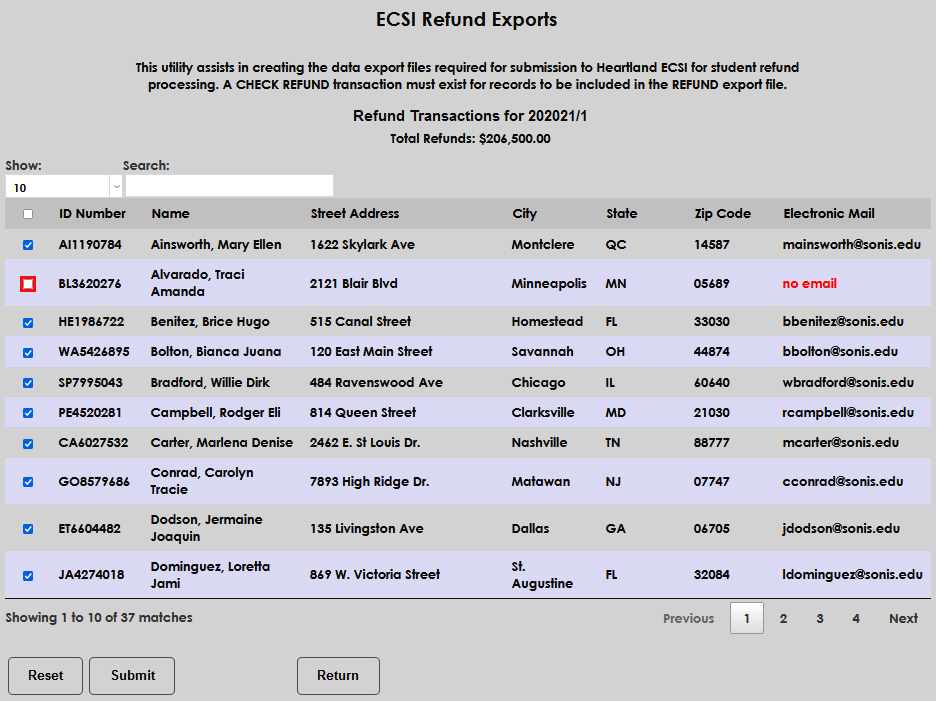
The Refund Transactions export pulls students’ refund data, per the user-selected school year and semester. Users have the option to include all student records or can select individual records for inclusion in the file. If a student record is missing required data, an alert will display to make the user aware of the specific update needed, prior to compiling the export file.
Import File Label | Value Required or Optional | SONIS Table Column | Description |
|---|---|---|---|
SID | Required | soc_sec | Student ID in SONIS |
First Name | Required | Student First Name in SONIS | |
Middle Initial | Optional | Student Middle Name in SONIS | |
Last Name | Required | Student Last Name in SONIS | |
Required | |||
Secondary Email | Optional | ||
Phone Number 1 | Required | ||
Phone Number 2 | Optional | ||
Date of Birth | Required | ||
Address Line 1 of 2 | Required | ||
Address Line 2 of 2 | Optional | ||
City | Required | ||
State/Local Code | Required | ||
Country Code | Optional | ||
Postal Code | Required | ||
Credit Balance Origination Date | Optional | Date refund posted. | |
Disbursement Amount | Optional | Amount of refund, includes decimal. | |
Enrollment Status | Optional | Null in Refund Transactions export. |
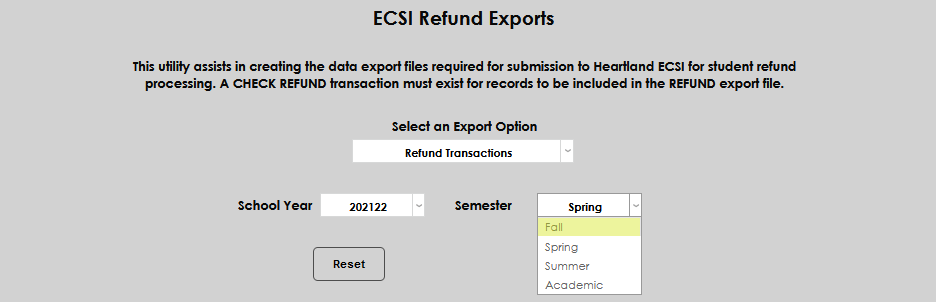
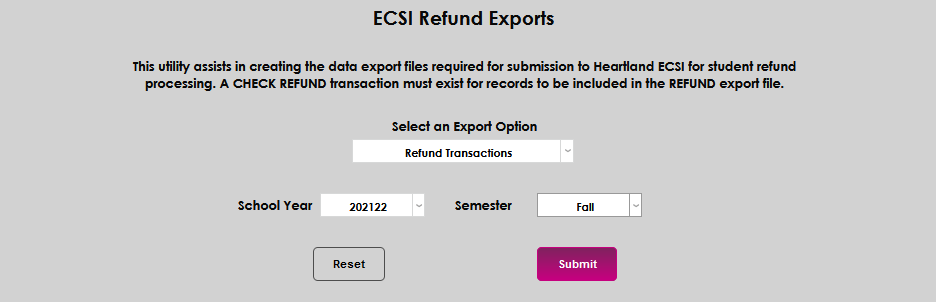
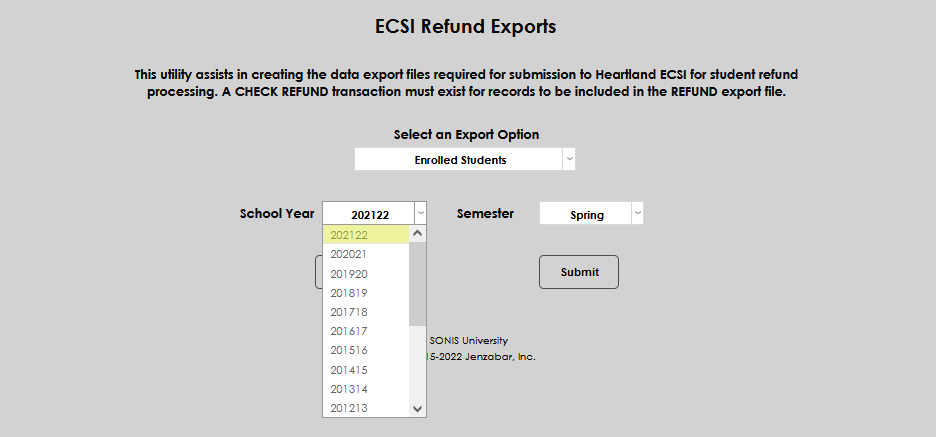
From the ECSI Refund Exports page, select the Refund Transactions export from the dropdown menu. Select the desired School Year from the dropdown.
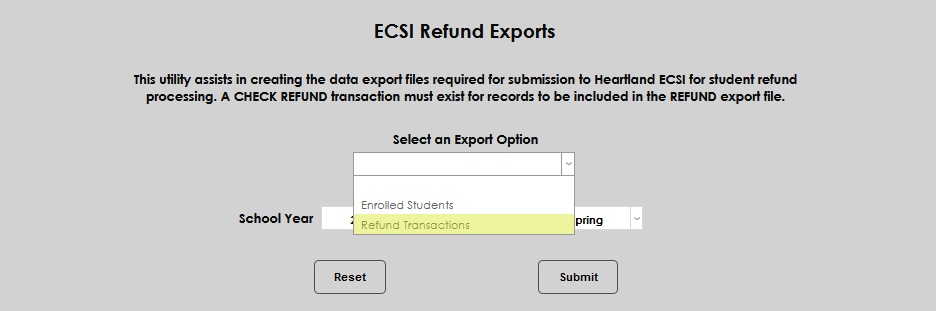
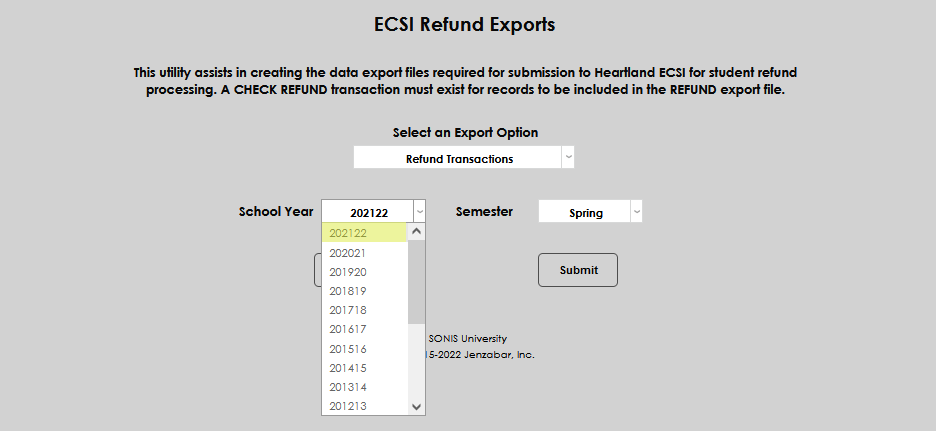
Select the desired Semester from the dropdown and click Submit to begin creating the export file.
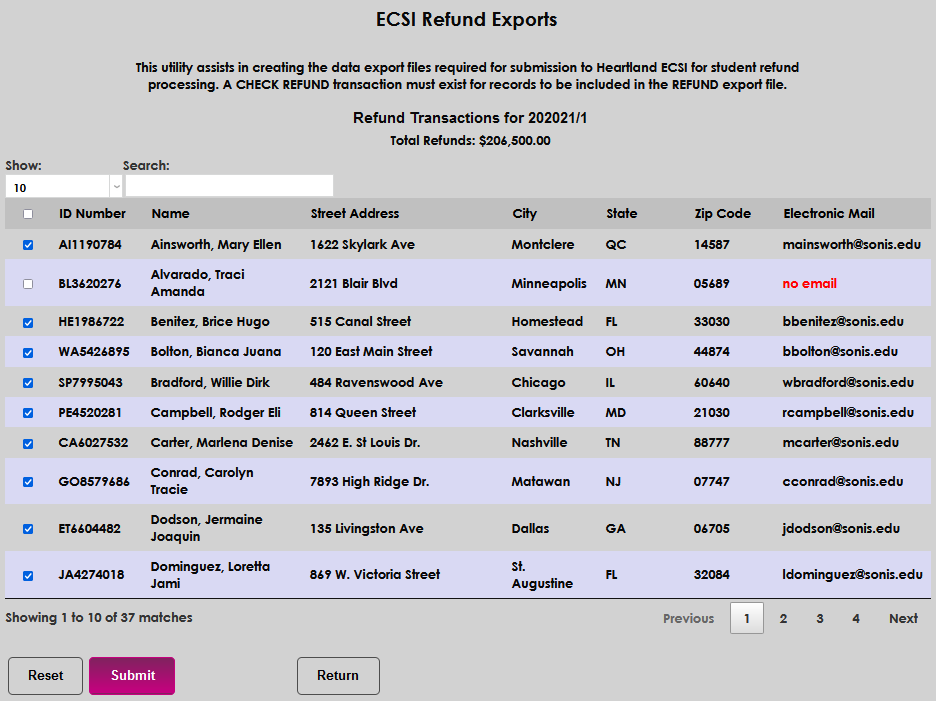
After clicking submit, a summary results page displays students who will be included in the export, as well as any data errors that should be corrected before finalizing the creation of the file. Errors display in red in the column of the data item that must be corrected. If there are errors that cannot be corrected prior to export creation, the user can simply leave those students unchecked and they will not be included.
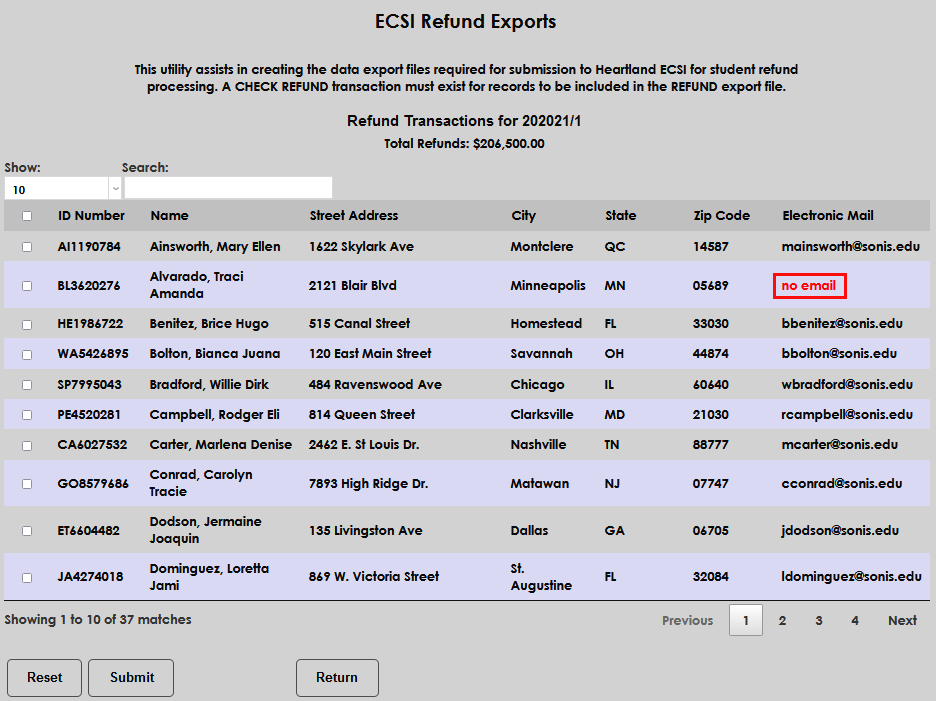
After reviewing the records, click Submit to create the file.
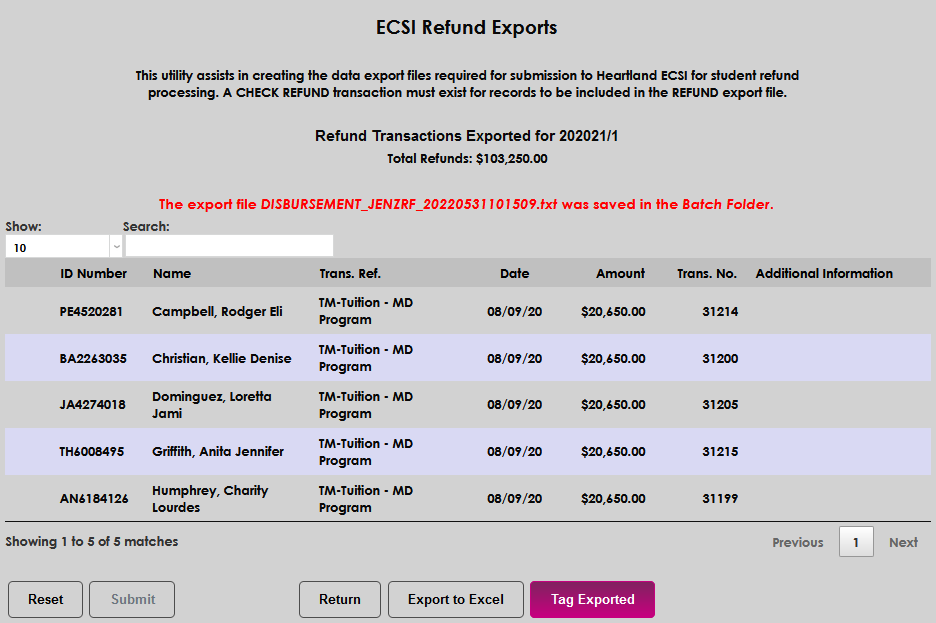
A summary page displays showing which students were included, where the export file was saved, provides the user the opportunity to export to Excel, and also provides the ability to Tag Exported students.
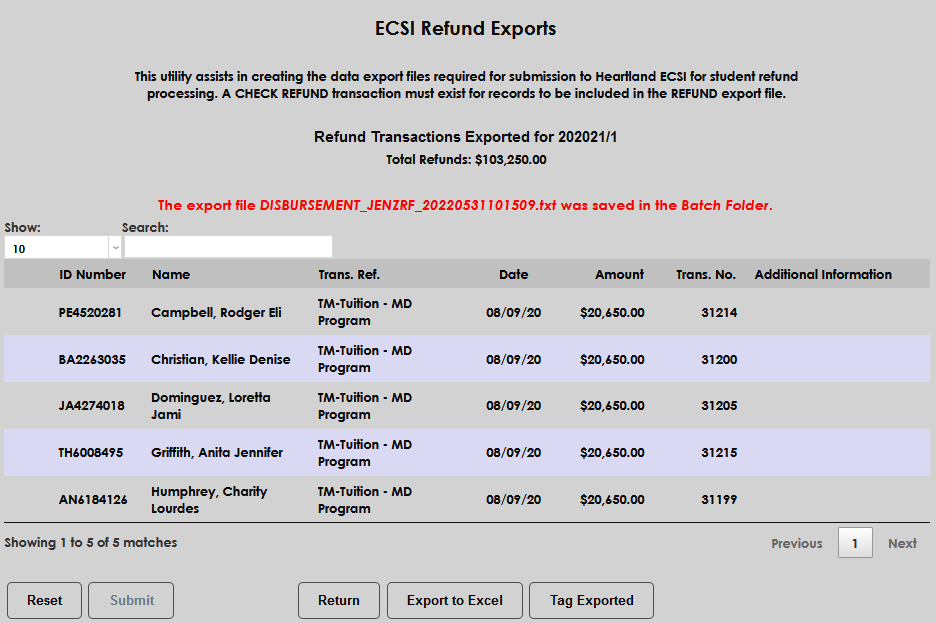
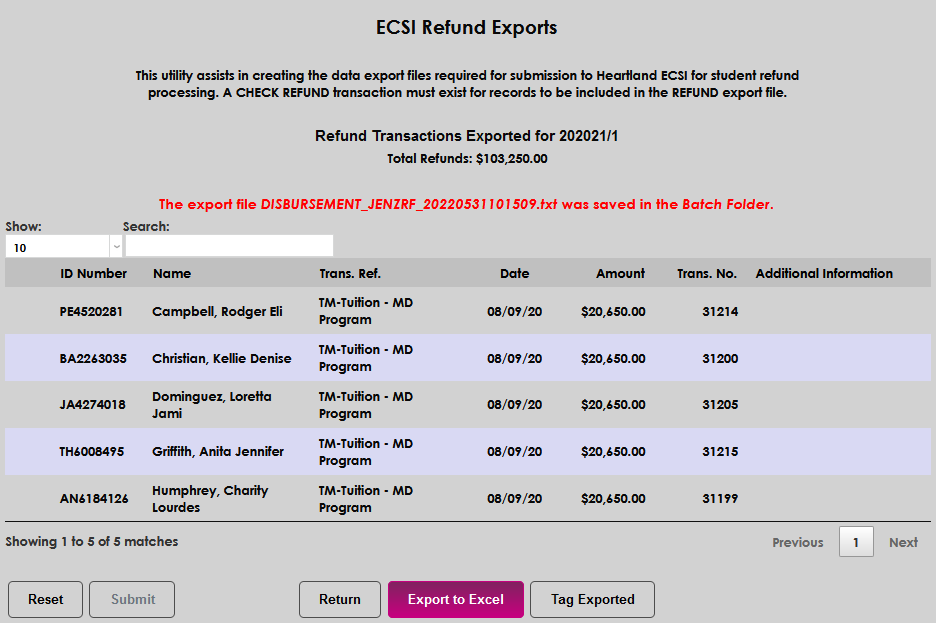
Note that the Export to Excel includes the demographic and refund details shown below. It does not contain all of the information included in the .txt file and required by Heartland-ECSI in a refund transactions export.

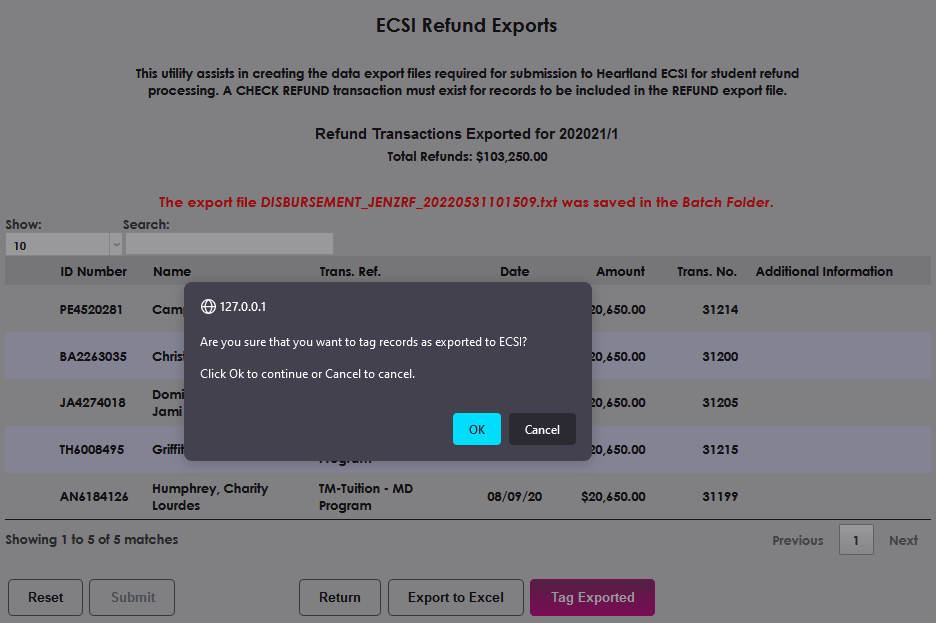
The Tag Exported option provides the opportunity to mark a disbursement record as included in the export. After clicking the Tag Exported button, the user is required to confirm whether or not the records should be marked, or tagged, as included in the export. Click OK to confirm and tag the record, or Cancel to discontinue record tagging. As a result of tagging a disbursement record, the next export of refunds will exclude any previously exported and tagged refund records. Any new, or not tagged, refund transactions will be gathered in the next refund transaction export, if any exist.
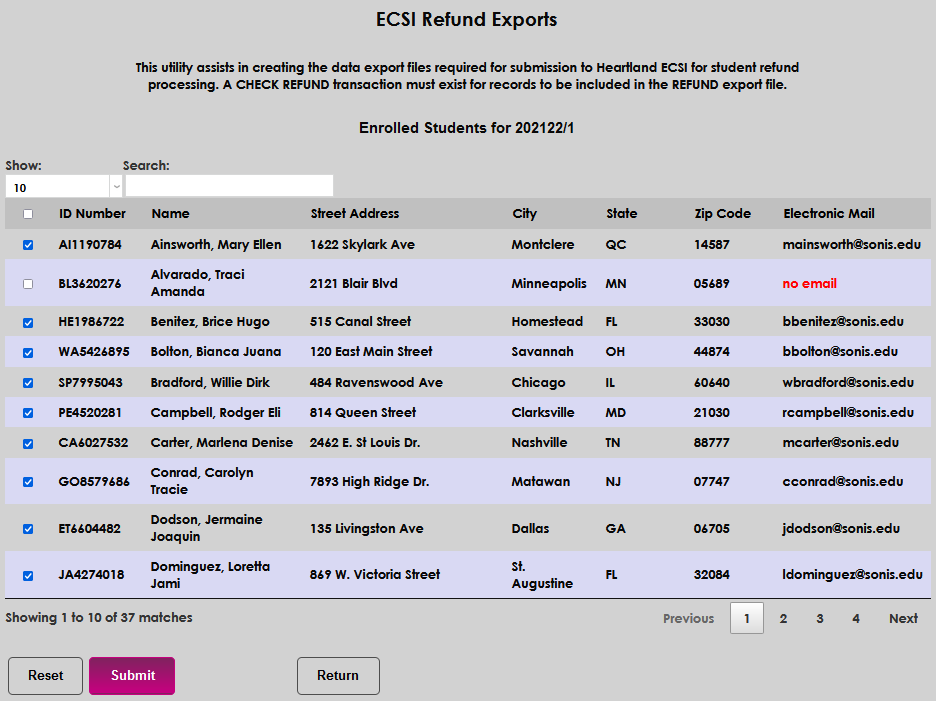
Enrolled Students Export
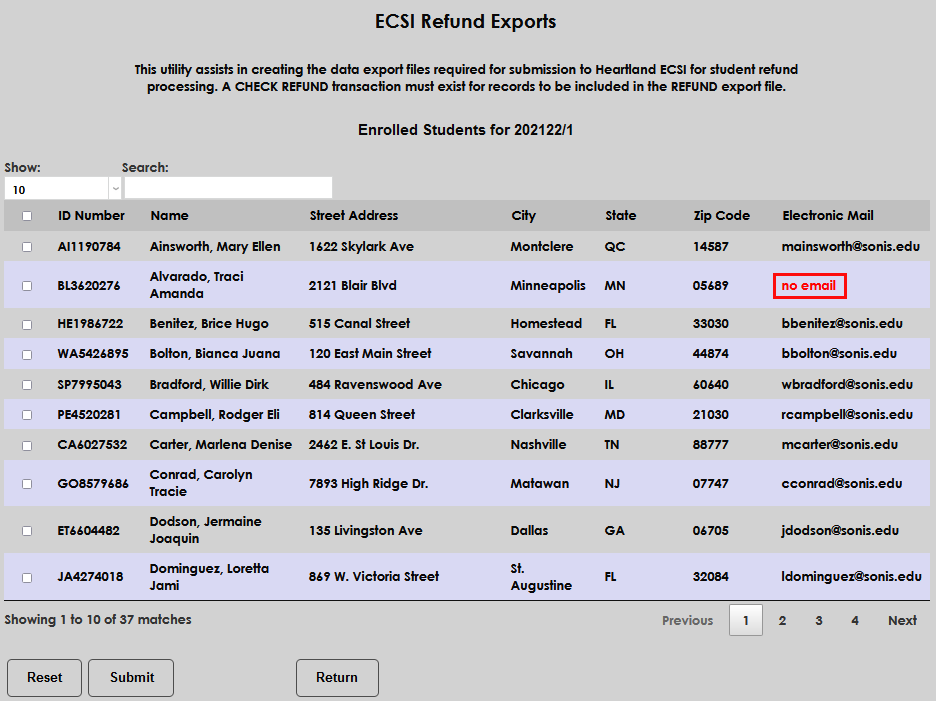
The Enrolled Students export pulls enrolled students’ data, per the user-selected school year and semester. Users have the option to include all student records or can select individual records for inclusion in the file. If a student record is missing required data, an alert will display to make the user aware of the specific update needed, prior to compiling the export file.
Import File Label | Value Required or Optional | SONIS Table Column | Description |
|---|---|---|---|
SID | Required | soc_sec | Student ID in SONIS |
First Name | Required | Student First Name in SONIS | |
Middle Initial | Optional | Student Middle Name in SONIS | |
Last Name | Required | Student Last Name in SONIS | |
Required | |||
Secondary Email | Optional | ||
Phone Number 1 | Required | ||
Phone Number 2 | Optional | ||
Date of Birth | Required | ||
Address Line 1 of 2 | Required | ||
Address Line 2 of 2 | Optional | ||
City | Required | ||
State/Local Code | Required | ||
Country Code | Optional | ||
Postal Code | Required | ||
Credit Balance Origination Date | Optional | Null in enrollment record | |
Disbursement Amount | Optional | Null in enrollment record | |
Enrollment Status | Optional | Y if presently enrolled in courses/N if not presently enrolled |
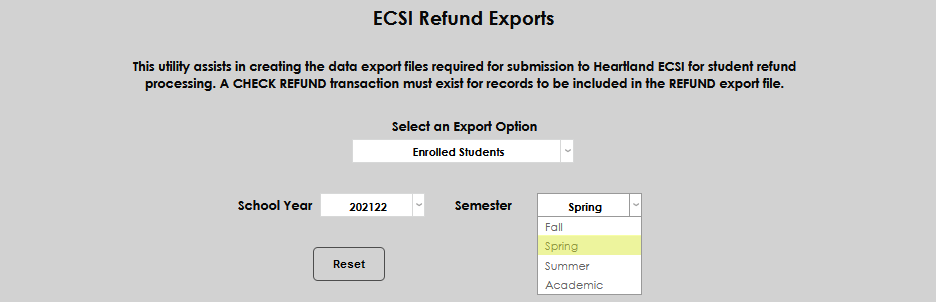
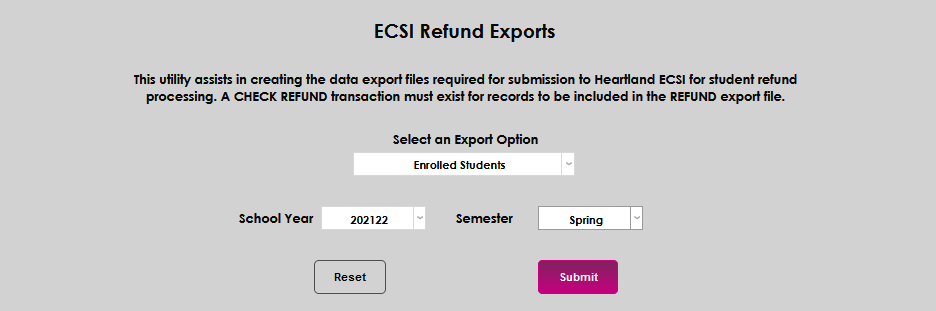
From the ECSI Refund Exports page, select the Enrolled Students report from the dropdown menu. Select the desired School Year from the dropdown.
Select the desired Semester from the dropdown and click Submit to begin creating the export file.
After clicking submit, a summary results page displays students who will be included in the export, as well as any data errors that should be corrected before finalizing the creation of the file. Errors display in red in the column of the data item that must be corrected. If there are errors that cannot be corrected prior to export creation, the user can simply leave those students unchecked and they will not be included.
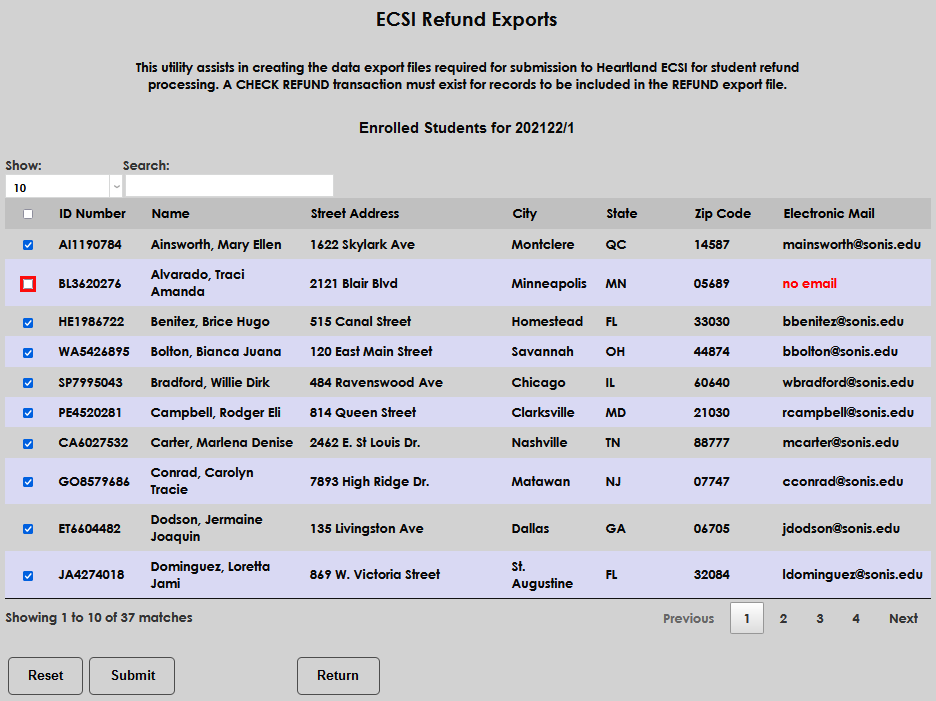
After reviewing the records, click Submit to create the file.
A summary page displays showing which students were included, where the export file was saved, and provides the user the opportunity to export to Excel.
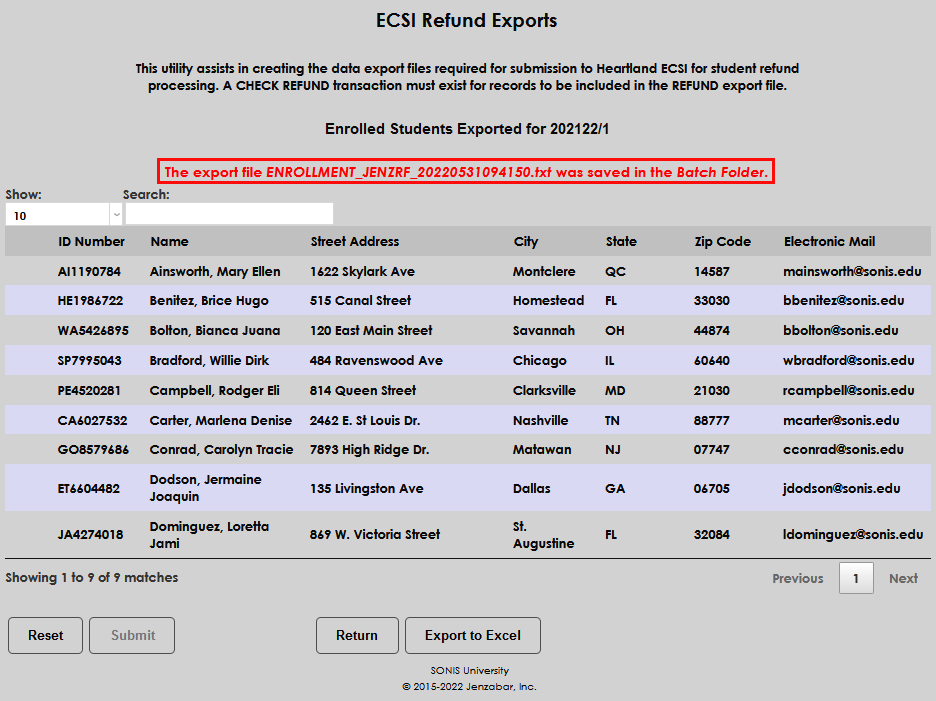
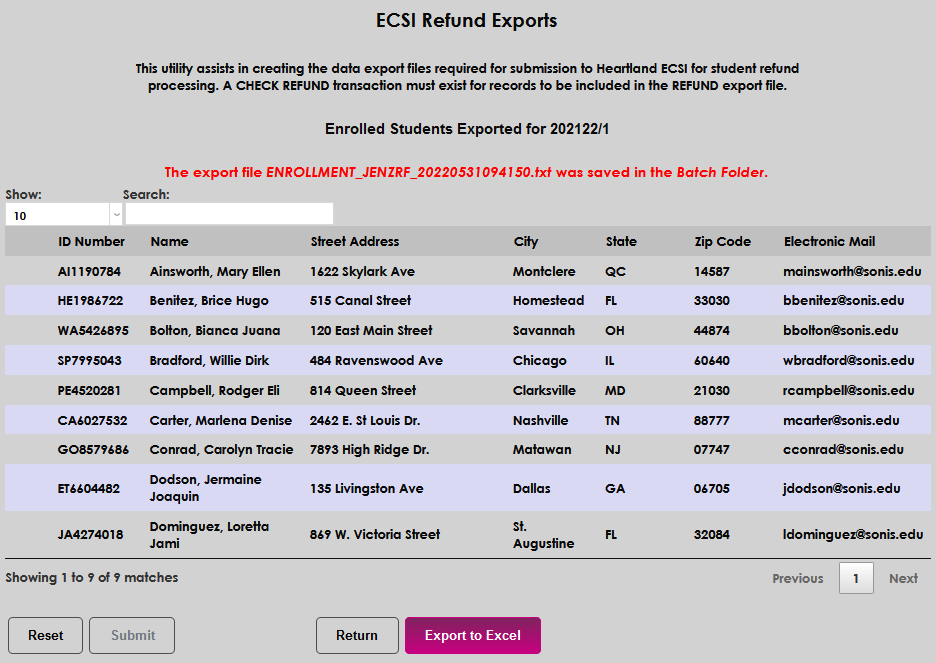
Note that the Export to Excel includes only the demographic details shown below. It does not contain all of the information included in the .txt file and required by Heartland-ECSI in an enrolled students export.

Hold Refund Requests
If the option has been activated, students can request that their financial aid refund money held by the school and applied to future transactions rather than being returned to them. If a student has a hold refund request on file, this information will appear on the export summary page and that student's refund record will not be exported to ECSI.
See Hold Refund Request for more information on this process.