Workflow Roles and Permissions

Roles determine what users can and cannot do in J1 Web. Each role has specific privileges to different features and information available to those users assigned to it. Jenzabar provides standardized 'default roles' for each module. Use these default roles as templates that can be copied and tailored to create new roles with varying permissions to control different levels of access. For example, you can set roles up according to your school's organizational or departmental hierarchy. Roles can have multiple users assigned to them and a user can belong to multiple roles.
Standard roles are provided by Jenzabar and control access to common and module-specific features. All users belong to the J1 Web User role that allows access to basic Web features.
Workflow Roles and Permissions
The following table shows the permissions available for the Workflow roles.
Permission | Base | Plus |
|---|---|---|
Can manage workflow definitions |  | |
Can view workflows | | |
Can associate workflows | | |
Can delete workflows | | |
Can remove workflows | | |
Can automate long running processes | | |
Can add or edit automation plans | | |
Can delete automation plans | | |
Can view automation plans | | |
Can manually run automation plans | | |
Can manage blocks | | |
Can request Third Party Signatures | | |
Can view object workflows | |
Workflow Base Permissions
Workflow Base
The default Workflow Base role determines which users can access and work with different workflows and automation plans.
J1 Web users do not need to be in a Workflow role to be involved with a workflow. For general purposes, users only need to be in a role with Interaction Access permissions enabled.
Definitions
Permission | Users in this role can. . . |
|---|---|
Can manage workflow definitions | Create, update, publish, associate, and delete workflows on the Manage Workflows page. |
Workflows
Permission | Users in this role can. . . |
|---|---|
Can view workflows | View workflows on person pages. General system users that aren't responsible for managing workflows do not need this permission to see workflows. General users only need to be in a role with module access enabled. |
Can associate workflows | Associate workflows with individuals from their pages in the system. |
Can delete workflows | Delete inactive, unused interactions on the Manage Workflows page. |
Can remove workflows | Remove a workflow associated with an individual. |
Automation Plan Permissions
Permission | Users in this role can. . . |
|---|---|
Can automate long running processes | Long running processes can be initiated from automation plans. Long running processes can be performing rules-based updates, making automated advisor assignments, and stored procedures. Users with this permission enabled can include a long running process in the automation plan they create. |
Can add or edit automation plans | Build and manage automation plans. |
Can delete automation plans | Permanently delete automation plans in J1 Web. These users should understand when and how automation plans are used. |
Can view automation plans | View automation plans and the interactions associated with them. |
Can manually run automation plans | Access Run Automation Plan Now option to run an automation plan outside the scheduled timeframe. |
Additional Permissions
Permission | Users in this role can. . . |
|---|---|
Can manage blocks | Access block settings on the Workflow Summary page. These settings let users add and update custom content blocks as well as remove, activate, deactivate, and reorder Jenzabar-provide and custom content blocks on the page. |
Workflow Licensed Permissions
The default Workflow Licensed role is available with the licensed Plus version of Workflow and grants access to options for requesting third party signature from DocuSign and lets users see workflows associated with objects in the system.
Permission | Users in this role can. . . |
|---|---|
Can request Third Party signatures | Lets users creating workflows request a DocuSign signature on uploaded forms. |
Can view object workflows | View workflows on object pages. For example, when a workflow is associated with a facility. |
Recommended Workflow Roles
Not all J1 Web users participating in workflows need to be assigned to a Workflow role or have permission to access different workflows. Users that only need to review, approve, and deny workflow items assigned to them will be able to do so from their To Do list, which is available to everyone from their Home page as well as the global icons at the top of every page.
Jenzabar recommends copying the Workflow Base and Licensed default roles to create the following custom Workflow roles:
Role | Responsibilities | Example | |
|---|---|---|---|
Workflow Administrator  | Administrators have a comprehensive understanding of the various processes and steps needed to complete them in their area.
*Workflow Plus only. | Registrars and Department Heads | |
Workflow Manager  | Managers know who should be assigned to different processes and monitor them to ensure progress. They are also occasionally responsible for completing various tasks.
| Advisor | |
Workflow Stakeholder  | Stakeholders monitor workflow progress and associate workflows with individuals.
| Athletics Coach, Financial Aid Officer, Student Success Officer | |
Workflow User
| Workflow users have limited access requirements. They view workflows associated with individuals and report on workflow progress, but they do not participate in them or manage who they are assigned to.
| Administrative Support, Student Support |

Common Roles and Permissions for Workflow Users
To fully leverage Workflow features, users may need to be assigned one or more of the following common roles:
All users that work in J1 Web are assigned to the J1 Web User role, which grants permissions to standard features like bookmarks, calendar, to do lists, and pins. There are different ways to assign people to this role that depend on your authentication method. For additional information, see Manage User Access to J1 Web.
To work with person and organization information, users must belong to one or more of the following roles. These roles let you see name and contact information for people/organizations:
Person Management
Organization Management
External Person Management
External Organization Management
Note
These are the default Jenzabar-provided roles. Your school should have created custom versions with unique names.
To ensure users who are able to search for or access certain people's information (e.g., high level donors or board members), assign them to a J1 Web Privacy role and define which users they won't be able to access in the system.
Associate Workflow users with the appropriate Facilities roles.
To associate workflows with facilities, Workflow Plus users must be in a Facilities User role with "Can view" permissions.
To view facilities associated with workflows, Workflow Base users need to be in a Facilities User role with "Can view" permissions enabled.
If a Workflow Administrator will be responsible for creating/managing interactions included in workflow-initiated automation plans, they must also belong to Communication Management Base and Communication Management Licensed roles. These roles allow them to:
View and access the Interaction Inventory and Interaction Inbox* to see communications sent and received (including historical Notepad messages).
Create and edit interaction templates that can be added to automation plans initiated from workflow item rules.*
*Plus only.
If a Workflow Administrator will be responsible for creating/managing data sets used with workflows, they must belong to Campus-wide Definitions role with data set permissions enabled. Data sets can be used with workflows to establish data requirements associated with a workflow, determine who a workflow is associated with, who will be assigned a specific workflow To Do.
Create Roles
Important
Information and features vary according to the roles to which you belong and the permissions associated with those roles. For more information, contact your module manager or your campus support team.
Create and copy role options both create a new role. The difference between them is that when you choose to create a role, you can only base the new role on a Jenzabar-provided one. When you create a new role by copying an existing role, you can use your school's own custom roles or a Jenzabar-provided role. Copying a role is useful when creating role variations that share similar access requirements.
Both processes follow six steps:
Select the role template on which the new role will be based.
Use create a new role to select a Jenzabar-provided role.
Use copy a role to select one of your school's custom roles. You can also select a Jenzabar-provided role, but the advantage of copying is further tailoring your custom roles.
Update the role name and description.
Select the permissions users assigned to the role should have.
Assign users to the role.
Configure module access settings.
Configure associations and user-defined form permissions, if applicable.
When new permissions are added to a role, the default role automatically enables those permissions and users immediately have access to those new features. Copied roles do not. The new permissions are available, but not enabled. This gives admin users a chance to ensure they want users in those roles to have those features.
Jenzabar recommends using a role name that most administrative users will easily understand. For example, you can base role names off of your organizational hierarchy to quickly distinguish permissions.
Jenzabar recommends tailoring the new role description by briefly describing the role. This can be particularly helpful in distinguishing multiple roles with similar permissions.
Click the Create role button. The Create Role page appears.
From the Role Template drop-down, select the role template you want the new role to be based upon. The New Role Name and New Role Description fields automatically show the name and description of the original role template.
In the New Role Name field, update the role name to an easily recognizable name. The name can be based on how roles/positions are set up at your school as well as distinguish how this role differs from the role template.

In the New Role Description field, update the description to highlight permissions or features available to users assigned to the role. The description can help distinguish how the new role differs from the role template.
Click Save and continue. The Define Access options appear.
Select the checkboxes of the permissions you want to enable for this role.

Click Create role. The Create Role page closes and the System Roles page reappears.
Create a role creates a new custom role based on a Jenzabar-provided role template. You select the permissions and settings to enable for the role.
Copy a role creates a new role based on an existing role. The new role inherits the source role's Permissions, Module Access settings, and User-Defined Field permissions, providing a starting point that can then be modified. Users and Associations are not copied.
Note
In either case, copied or created, only the permissions are inherited. No users are copied over with the new role.
The role template is provided by Jenzabar and cannot be modified. This helps ensure the base template can easily be identified by other administrative users when creating roles. You can tailor the name of the role being created using the New Role Name field.
Edit Role
Important
Information and features vary according to the roles to which you belong and the permissions associated with those roles. For more information, contact your module manager or your campus support team.

The Edit Role page lets you manage role permissions, assigned users, access controls, and role relationships. The tabs available vary depending on the role.
Each role includes:
Name
Description
Permissions
Assigned users
Module Access settings
Association settings (if applicable)
User-Defined Form/Field permissions (if applicable)
Changes can be made at any time and are reflected for all users assigned to the role.
To update roles, you must belong to a role with the appropriate permissions enabled. Jenzabar provides these permissions with the Common, User Management role, but your school may have created a customized version of this role.
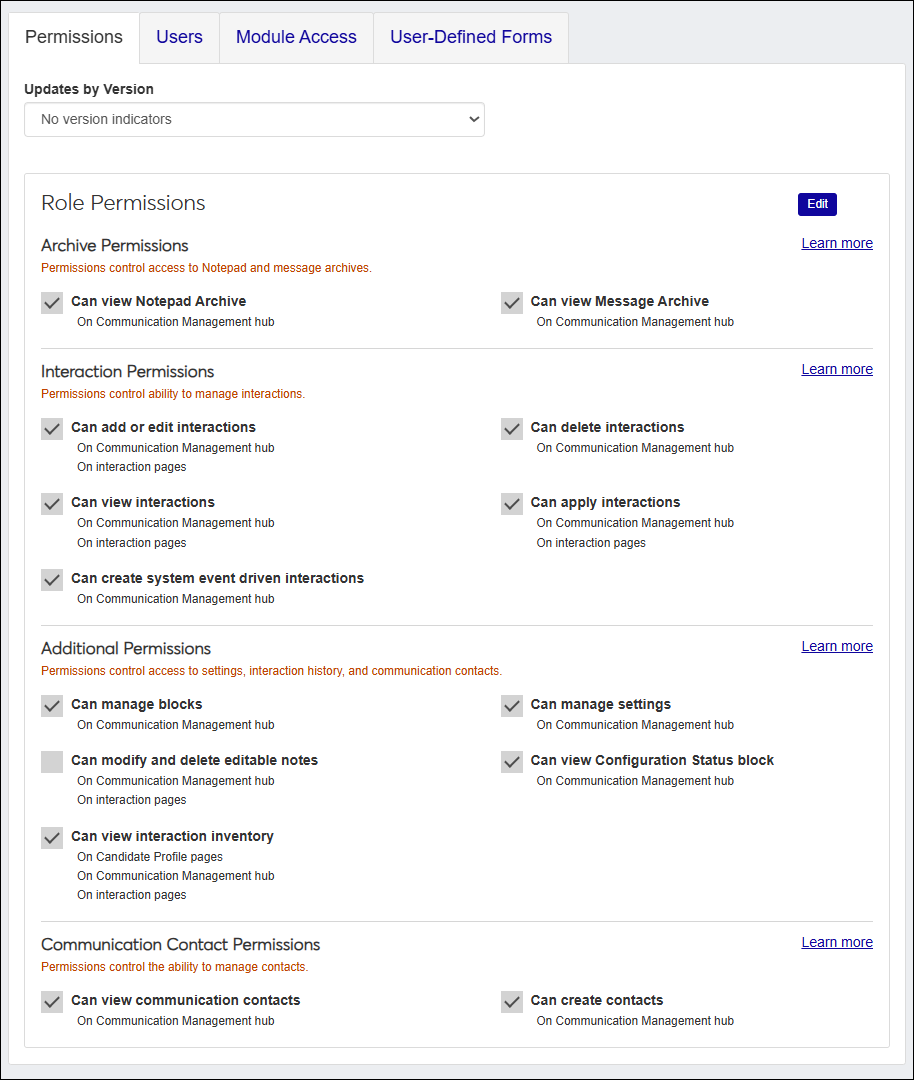
The Permissions tab controls which pages, features, and actions users can access in J1 Web. Permissions are granular, allowing users to have different levels of access to various functionalities.
Permissions are organized by module and feature area. Depending on the permission, users may be able to:
View information
Create records
Edit records
Delete records
Configure settings
Users assigned to multiple roles receive permissions from all assigned roles.
Updates by Version | Select a version to see show which roles have been added or changed and in which release. This can help identify new permissions and ensure they are enabled for the appropriate roles.
|
Permissions and Permission Checkboxes | Permissions are grouped by relevance. To enable or disable permissions, click the Edit button and select the appropriate checkboxes. Hubs and pages impacted by the permission are listed underneath. |
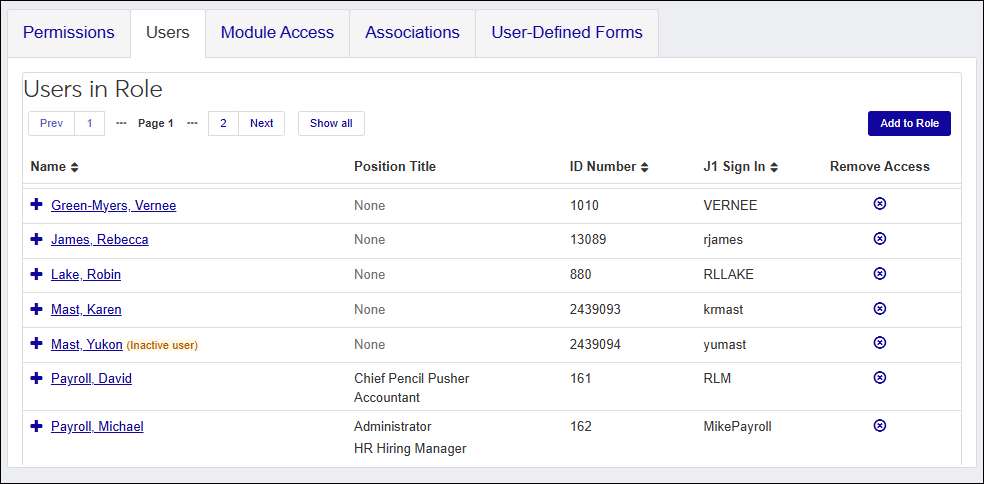
The Users tab lists individuals assigned to the role with options to add and remove users. Users can be assigned to multiple roles. To be added to a role, users must have an ID number and be an active J1 Web user.
Note
You may see a inactive user listed, which means they were deactivated after being added to the role. Only active users can be added to roles. Inactive users are identified by the Inactive user icon  .
Name |
|
Position Title | Shows any titles a user is assigned to on the Positions tab in the Desktop HR Employee Master via Personnel window. If the user is not assigned to a position title or your school is not licensed for HCM, nothing appears in this column. |
ID Number | System identification number. |
J1 Sign In | User's J1 ID managed in the Desktop, Users window. |
Remove Access | Option to remove the user from the role. |
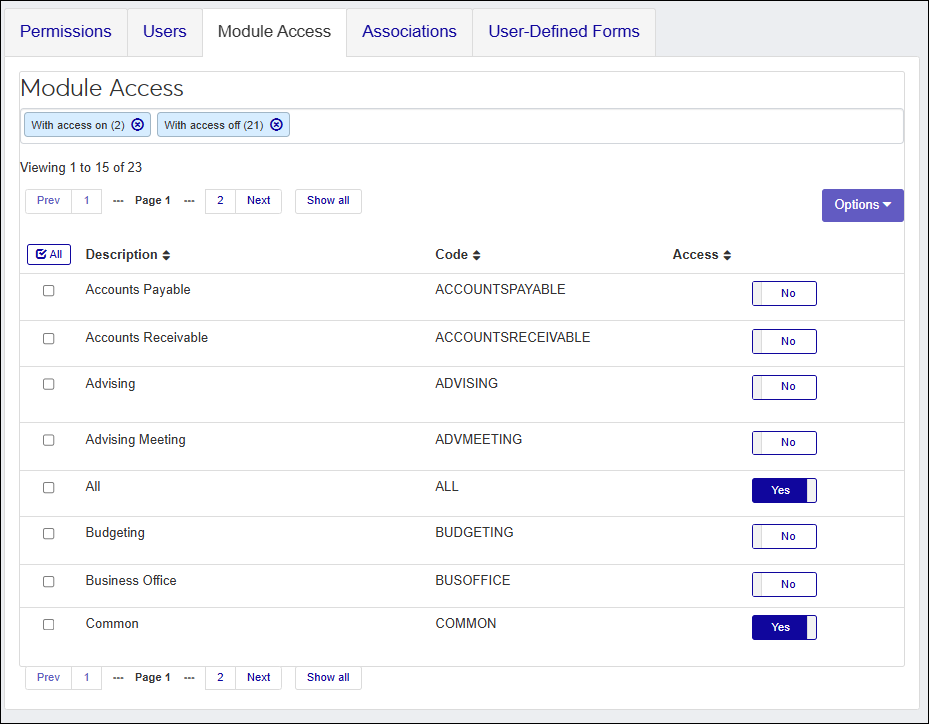
The Module Access tab controls access to different things in the system such as data sets, forms, interactions, and workflows, similar to Desktop's Module Code Stamps. Codes are associated with items throughout the system when they are created and updated. Users gain access through the roles assigned to them and the access codes enabled for each. Users assigned to multiple roles have access to the access codes enabled with each.
The following example shows interaction access codes being associated with a text interaction. Users in roles with access to the enabled codes will be able to view/work with the text message.
 |
This example shows the access code being associated with a new workflow. Users in roles with access to the enabled codes can view the workflow.
 |
Jenzabar provides access codes based on Jenzabar modules; custom codes can be created on the Access Codes page.
Description | Identifies the access code. |
Code | Access code identifier. |
Access | Enables or disables users' access to items in the system associated with the module code. If Registration access is enabled and then selected when creating interactions, users in a role with Registration access enabled can view/work with the interaction. Consider what departments would benefit from seeing different interactions, information, and workflows with students or staff. For example, advising users might benefit from being able to view/comment on student life interactions. |
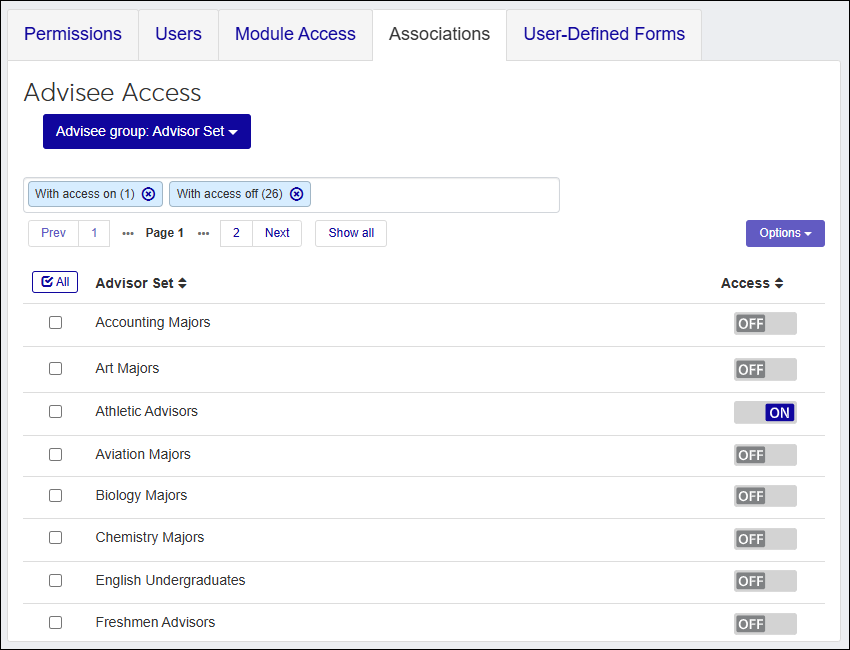
The Associations tab manages relationship-based access. It is only available for select roles, and options vary by role. As relationships change, access is updated automatically.
Examples: A coach may receive access to students based on athletic roster membership. When a student is added to or removed from a roster, access is updated accordingly. Department Heads can have access to students based on their majors. When a student adds or changes a major, the Department Head's access is updated automatically.
Group selector | Groups available for access. Groups are categorized by concentration or program, budgets, advisor sets, etc. you created in your system. Users in the role will be able to access individuals/things in the group based on the enabled sets. |
Set | Lists the criteria that drives the association. For example, lists all available advisor sets, budgets, concentrations and programs. |
Access | Enables or disables users' access to the group. If the Advisor Set access is enabled for Athletic Advisors, then users will see advising information for student athletic advisors. |
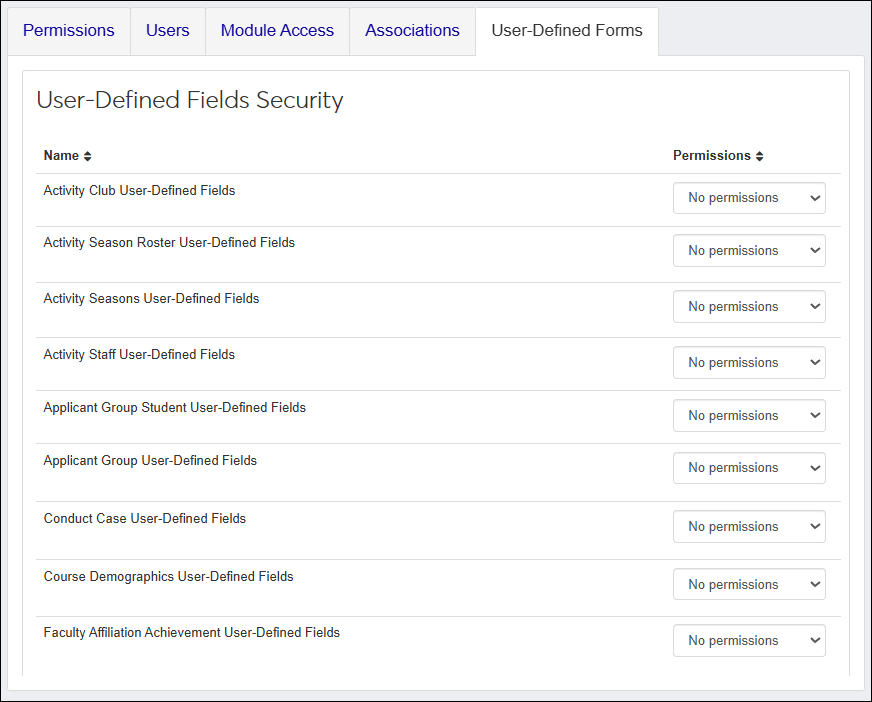
The User-Defined Fields tab controls permissions for viewing, editing, and configuring user-defined fields (UDEF) across the system. Users who belong to multiple roles will have access to the user-defined features enabled with each.
Permission levels determine what users can do with user-defined fields:
No permissions - users cannot see/access this user-defined field.
Can view UDEF data - users can see this user-defined field but cannot modify it.
Can edit UDEF data - users can view, update, and delete data in this user-defined field.
Can configure UDEF form - users can configure this user-defined field and includes view and edit permissions. They can also manage the fields from the Manage User-Defined Fields page.


Tip
To review detailed information about the role permissions, refer to the Jenzabar-Provided Roles online help topic.
Access the System Roles page.
Find the appropriate role. You can use filter and sort options to help.
From the Options menu, select Edit. The Edit Role page appears.
Select the Permissions tab.
Click Edit. The permissions checkboxes are enabled.
Select the checkboxes of the permissions you want to grant the role or deselect the permissions you want to remove from the role.
Note
When you assign permissions to the role, it is important to consider the different levels of capability you want users to be granted. You may want to create several roles with varying permissions to accommodate different types of users.
Click the Save button. Several things happen:
Permissions are associated with the role and the checkboxes are no longer enabled.
Role permissions are immediately applied. A user will immediately have permission granted or revoked according to the updated features of the role.
Access the System Roles page.
Find the appropriate role. You can use filter and sort options to help.
From the Options menu, select Edit. The Edit Role page appears.
Select the Users tab.
Click the Add to Role button. The Add to Role window appears.

Start typing the name of the user you want to add to the role and select them. You can select as many users as needed.
Note
Only active J1 Web users with an ID number can be added to the role. Users are activated using the Desktop, Users window. For more information, see Managing User Access to J1 Web.
Click the Add to Role button. The Add to Role window closes and the Edit Role page appears with the newly added user shown in the list. Additional user information is available by clicking the Expand icon.
Access the System Roles page.
Find the appropriate role. You can use filter and sort options to help.
From the Options menu, select Edit. The Edit Role page appears.
Select the Users tab.
Click the Remove icon
 in the Remove Access column. The confirmation pop-up window appears.
Click the Yes, remove button. The confirmation pop-up window closes and the Edit Role page reappears with the user no longer listed.
To view a user's Desktop ID Number and Sign In, and a list of any other roles the user is assigned to, click the Expand icon.
Note
Use the column headings to quickly sort the listings.
Tip
Jenzabar provides access codes based on Jenzabar modules; custom codes can be created on the Access Codes page.
Access the System Roles page.
Find the appropriate role. You can use filter and sort options to help.
From the Options menu, select Edit. The Edit Role page appears.
Select the Module Access tab.
From the Access column, click the OFF or ON option to enable or disable access to the appropriate module access codes. These access codes are associated with items and information throughout the system and users with the code enabled will have immediate access to it. If a user belongs to multiple roles, they’ll have access to the items available with each.
Only available with certain roles.
Access the System Roles page.
Find the appropriate role. You can use filter and sort options to help.
From the Options menu, select Edit. The Edit Role page appears.
Select the Associations tab.
From the Group drop-down, select the appropriate group. The groups appear.
Notice
For example, the Secondary Advisor - Access to Students by Academic Program role groups students by certifications, concentrations, minors, and programs. Once you select the certifications group, you'll see a list of the available certifications.

From the Access column, click the OFF or ON option to enable or disable access. Users assigned to the role will have immediate access to individuals in the group based on their association to them.
If an individual moves out of the group, the user assigned to the role no longer has access to them through this role and group. This could be when a student is no longer on a coach's roster or a student changes majors and their advisor changes.
Only applies to schools using user-defined information in the system.
Access the System Roles page.
Find the appropriate role. You can use filter and sort options to help.
From the Options menu, select Edit. The Edit Role page appears.
Select the User-Defined Forms tab. User-Defined Fields Security information appears.
From the Permissions drop-down for the various fields, select from the following permission options:
No permissions - users cannot see/access this user-defined field.
Can view UDEF data - users can see this user-defined field but cannot modify it.
Can edit UDEF data - users can view, update, and delete data in this user-defined field.
Can configure UDEF form - users can configure this user-defined field and includes view and edit permissions. They can also manage the fields from the Manage User-Defined Fields page.
Access the System Roles page.
Locate the role to review.
Click the Edit icon next to the role. The Edit Role page appears.
From the Updates by Version drop-down on the Permissions tab, select the version for which you want to see information about new and updated roles.
New and Updated indicators appear next to roles that were added or changed for the selected release version.
New means the role was added to J1 Web in the release shown.
Updated means the role was changed in the release shown. This could mean permissions were added or modified.
Note
Removed roles and permissions are not shown at this time.
Yes, click the Expand icon. The user's Desktop login, ID, and other J1 Web roles appear.
Yes, you can remove and grant access to the same user as many times as needed. Follow the How Tos listed above for step-by-step instructions on adding a user to a role and removing a user from a role.
Yes, any users assigned to a role can immediately access all the information and features associated with the role. You can create several similar roles with varying levels of access to control access for different users.
Ensure you clicked the Edit button before updating the role permissions. If you still cannot update the role permissions, you may not have access to the edit feature. For some roles, various permissions are enabled by default as part of the selected role template and cannot be changed.
They may not have been added to the Desktop application. This can be verified using the Desktop Users window.
Users can be added in J1 Web if they are informally associated with a process, but they cannot log in to J1 Web and are not considered active J1 Web users. In order to be assigned to a role in J1 Web, they must be in the Desktop application and have an active J1 Web login (designated on the Desktop Users window).
Several things could cause this happen:
The user may be in the Desktop application, but doesn't have an active J1 Web login.
The user may have been added to J1 Web and not the Desktop application.
The user may be in the Desktop application, but doesn't have an active J1 Web login.
The user may already be assigned to this role.
To resolve this issue:
Verify the user exists on the Desktop Users window.
Verify the user has an active J1 Web login on the Desktop Users window.
Verify the user isn't already assigned to the role by searching for them in the Filter these users search option.
What are active users?
Active users have an active J1 Web login and can be assigned to roles. Users are activated on the Desktop, Users window.
Can a user belong to multiple roles?
Yes. Users can be assigned to multiple roles and receive access from each assigned role.
Position titles are assigned to users on the Desktop HR Employee Master via Personnel window, Positions tab. If the user is not assigned to a position title, nothing appears in this column.
Your school may not be licensed to use the Human Resources module.
The user may not be assigned to a position on the Desktop HR Employee Master via Personnel window, Positions tab.
Some permissions are selected and can't be deselected because another permission depends on them. For example, granting course overrides depends on being able to view them. Therefore, you can't deselect the "Can view course overrides" permission if "Can grant course-full overrides" is selected.
Version indicators show you which roles have been added or changed and in which release. This can help you identify new permissions and ensure they are enabled for the appropriate roles.
Use the Updates by Version drop-down to select a specific version, all versions, or no versions.
New means the role was added to J1 Web in the release shown.
Updated means the role was changed in the release shown. This could mean permissions were added or modified.
Note
Removed roles and permissions are not shown at this time.
New permissions may become available following a software update. Administrators can review and enable those permissions as needed.
Jenzabar provides access codes based on Jenzabar modules; however, you can create custom codes on the Access Codes page. Select Core from the main navigation pane, then select Campus-wide Definitions, and then Access Codes.
Only roles that support relationship-based access include the Associations tab.
The highest level of access assigned through any role is applied to the user.