Manage Student Conduct Roles
Important
Information and features vary according to the roles to which you belong and the permissions associated with those roles. For more information, contact your module manager or your campus support team.
Users with the necessary permissions can manage student conduct roles and permissions from within the Student Conduct Administration Hub. When you manage roles in this hub, the list displays only Student Conduct roles, so there's no need to filter the list to find the roles you need.
To access the Student Conduct Roles page, navigate to the Student Conduct Administration Hub page and select Admin options > Manage student conduct roles from the Hub options drop-down.
From the Student Conduct Roles page, you can also assign users to a role and manage access to modules, conduct departments, and user-defined fields.
To manage student conduct roles and permissions from the Student Conduct Roles page, you must be in the Student Conduct Administrator role (or a role copied from that role) and have all Student Conduct Roles permissions enabled.
All permissions are enabled by default for this role.
From the Student Conduct Administration Hub page, select Admin options > Manage student conduct roles from the Hub options drop-down. The Student Conduct Roles page opens.
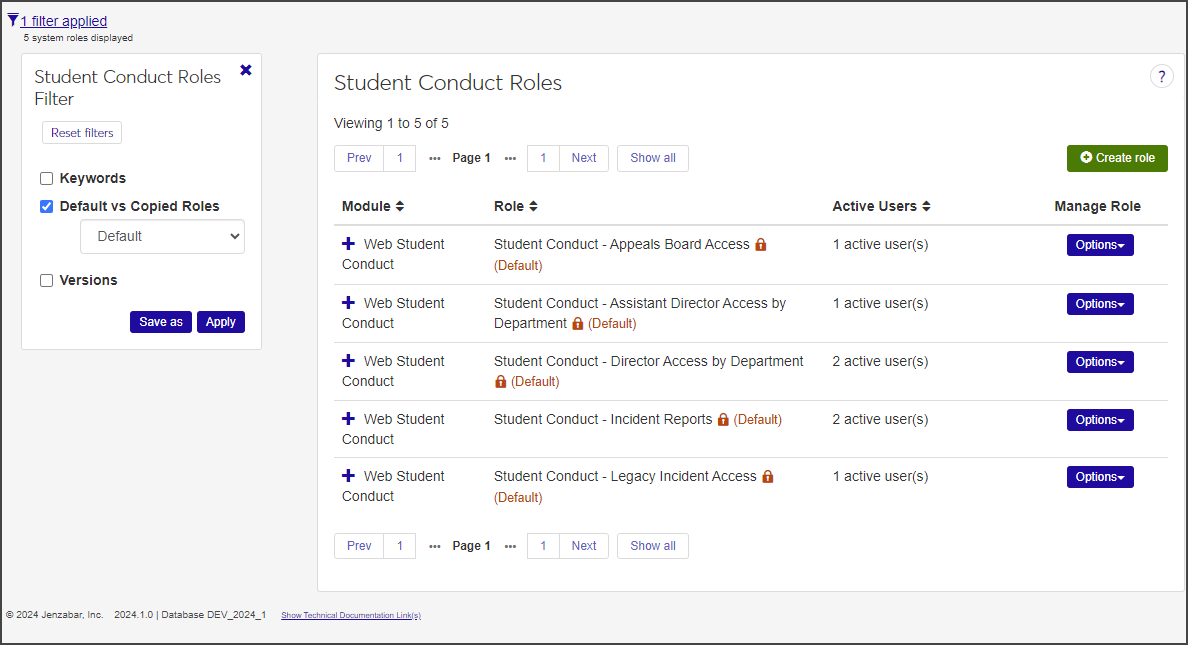
The Student Conduct Roles page lists all existing Student Conduct roles, both default and custom. For each role, the list displays the module the role is associated with; the role name; the number of active users assigned to the role; a brief description of the role; and, in the case of custom roles, the role it was copied from.
To filter the list:
Select the checkbox next to one or more filters in the Student Conduct Roles Filter.
Enter or select criteria for each filter.
Click Apply.
To save a filter that you use frequently, select the criteria, click Save as, and enter a name for the filter at the prompt. To make it the default filter, select Set as Default, then click Save.
To create a new Student Conduct role, you'll need to choose a role template to base the new role on, then customize the name, description, and permissions to suit your needs.
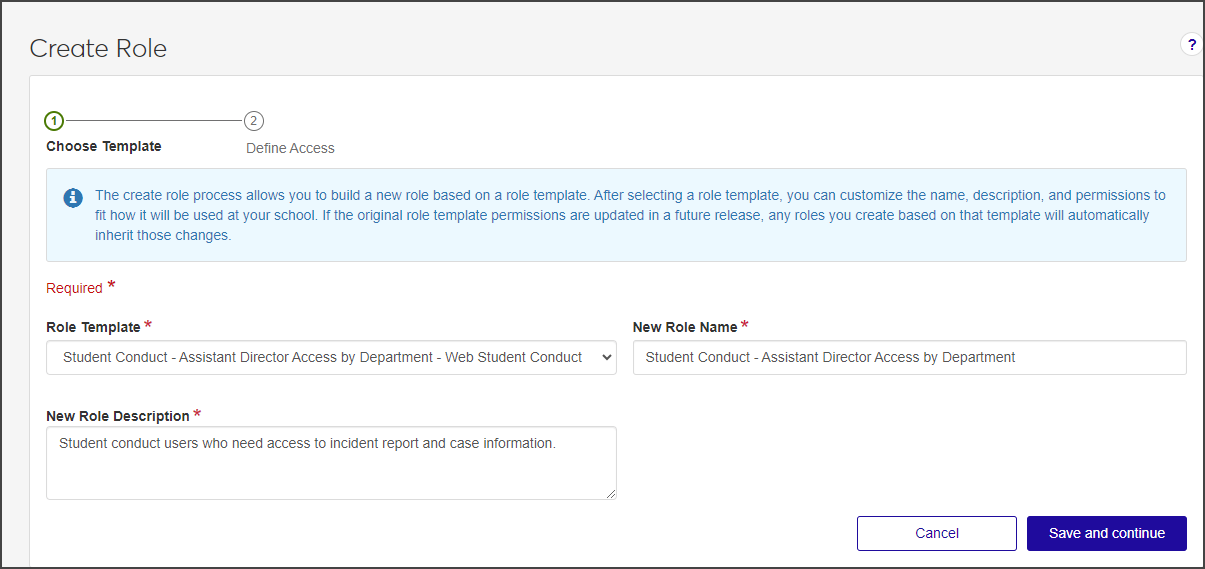
On the Student Conduct Roles page, click Create role. The Create Role wizard opens to the first step, Choose Template.
From the Role Template drop-down, select the role you want to base the new role on. The New Role Name and New Role Description fields autofill with the name and description of the original role.
In the New Role Name field, update the role name to one that is easily recognizable. The name can be based on how roles and positions are set up at your school and should distinguish how this role differs from the role template.
In the New Role Description field, update the description to distinguish it from the role template you used. You might choose to highlight permissions or features available to users assigned to the role.
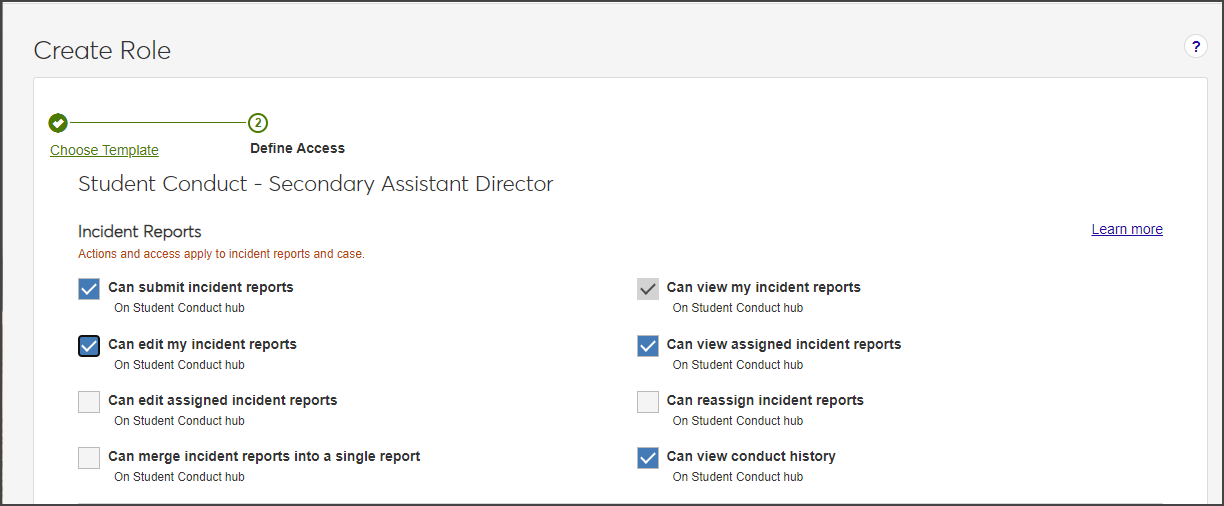
Click Save and continue to move to the Define Access step. All available permissions for this role are listed, and all can be edited.
Select the checkboxes for the permissions you want to enable for this role.
Click Create role to save the changes and return to the Student Conduct Roles page.
On the Student Conduct Roles page, find the role you want to copy.
From the Options drop-down, select Copy. The Copy Role page opens.
The Role Template field shows the name of the role being copied. The New Role Name and New Role Description fields autofill with the values of the role you're copying and must be edited so they differ from the original.
In the New Role Name field, update the role name to one that is easy to recognize. The name should distinguish how this role differs from the role being copied.
In the New Role Description field, update the description to highlight permissions or features available to users assigned to the role. The description can help distinguish how the new role differs from the role being copied.

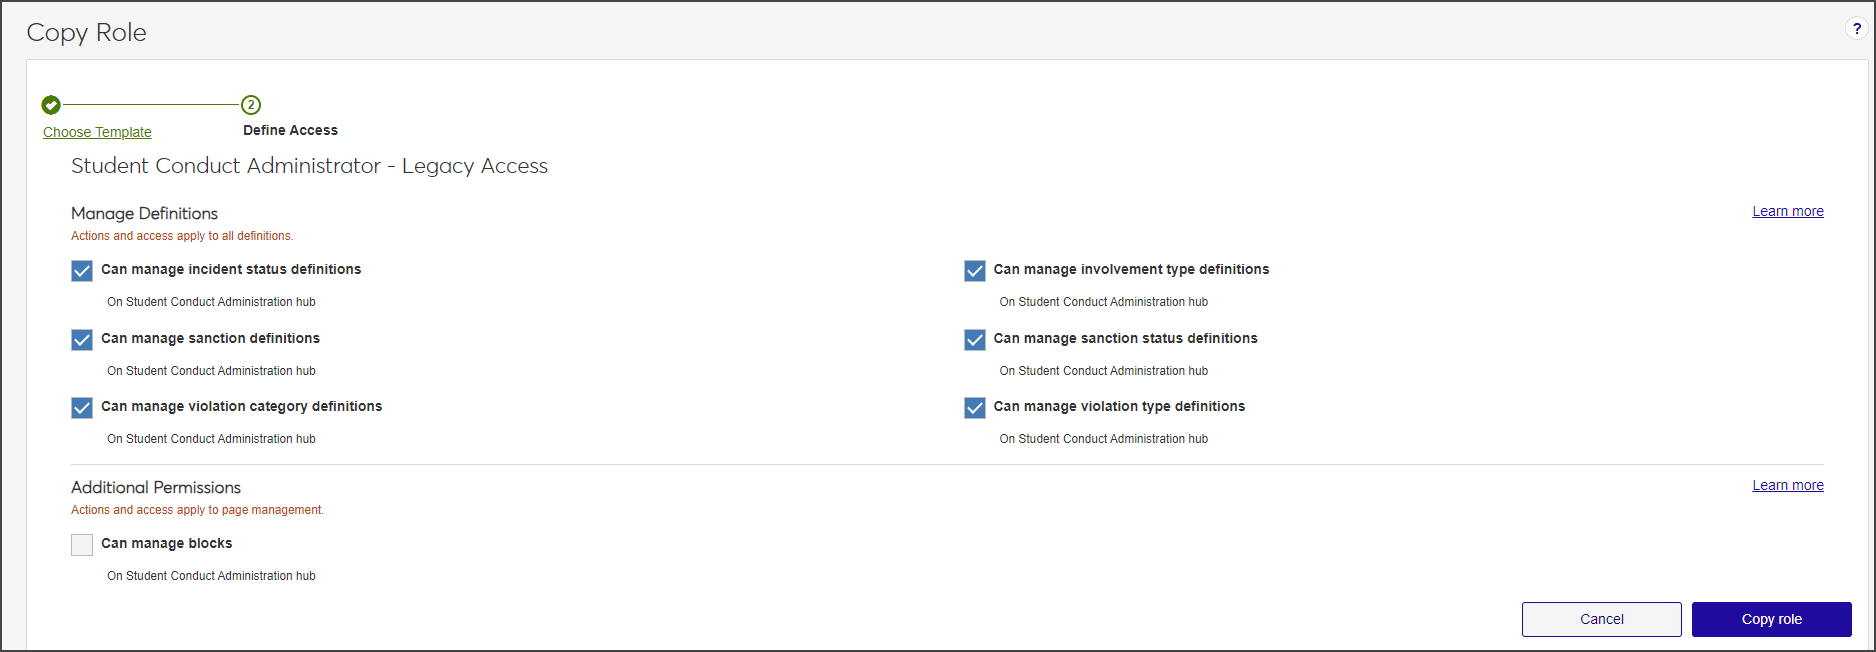
Click Save and continue. The Define Access section opens.
Select the checkboxes next to the permissions you want to enable for this role.
Click Copy role to save the new role. The Copy Role page closes.
You can edit the name and description of a custom role directly on the Student Conduct Roles page. To manage permissions, add or remove users, and manage access to modules, conduct departments, and user-defined fields, you'll need to select Edit from the Options drop-down.
To edit the name of a custom role, click the Edit icon next to the name in the Student Conduct Roles list. The name field becomes editable.
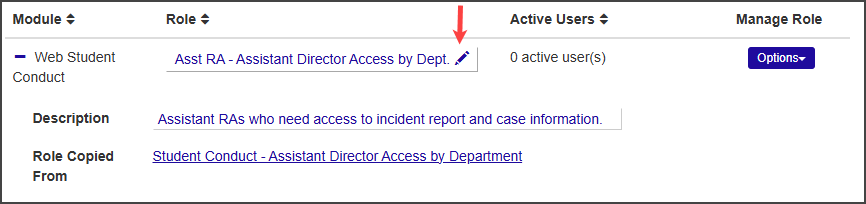
Update the name and click Save.
To update the role description, click the plus icon next to the Module name to expand the list.
Click in the description field and update the description as needed. Use the formatting tools provided to change text formatting or insert a bulleted.
Click Save when you are done.
On the Student Conduct Roles page, select Edit from the Options drop-down next to the role you need to edit. The Edit page for the role opens, defaulting to the Permissions tab.
Click the Edit button to make the checkboxes editable.
Select or deselect checkboxes as needed to enable or disable permissions.
Click Save to save your changes.
After a role has been created, users can be assigned to it.
On the Student Conduct Roles page, select Edit from the Options drop-down next to the role you want to add users to. The Edit page for the role opens.
Select the Users tab.
Click Add to Role. The Add to Role pop-up opens.
Click in the Search Users by Name field, start typing the name of the user to be added to the role, and select from the names that appear.
Note
You can only select active users. Names that cannot be selected are flagged as "Not a user."
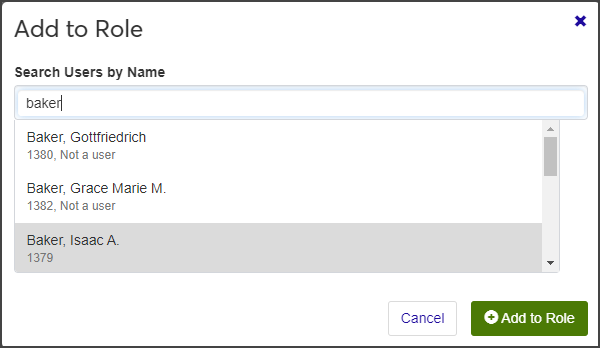
Repeat step 4 as many times as needed.
When you are done, click Add to Role to add the users and close the window. The users are added to the role and immediately have access to the information and features associated with it.
All Student Conduct roles include the option to specify which modules the role can access. In addition to module access, the Student Conduct - Assistant Director Access by Department and Student Conduct - Director Access by Department roles also include the option to manage access to specific conduct departments.
After a role has been created or copied, access to specific modules can be enabled or disabled.
From the Student Conduct Administration Hub, click the Hub options drop-down and select Admin options > Manage student conduct roles. The Student Conduct Roles page opens, listing both system-provided and custom student conduct roles.
Select Edit from the Options drop-down next to the role you want to edit. The Edit page for the role opens.
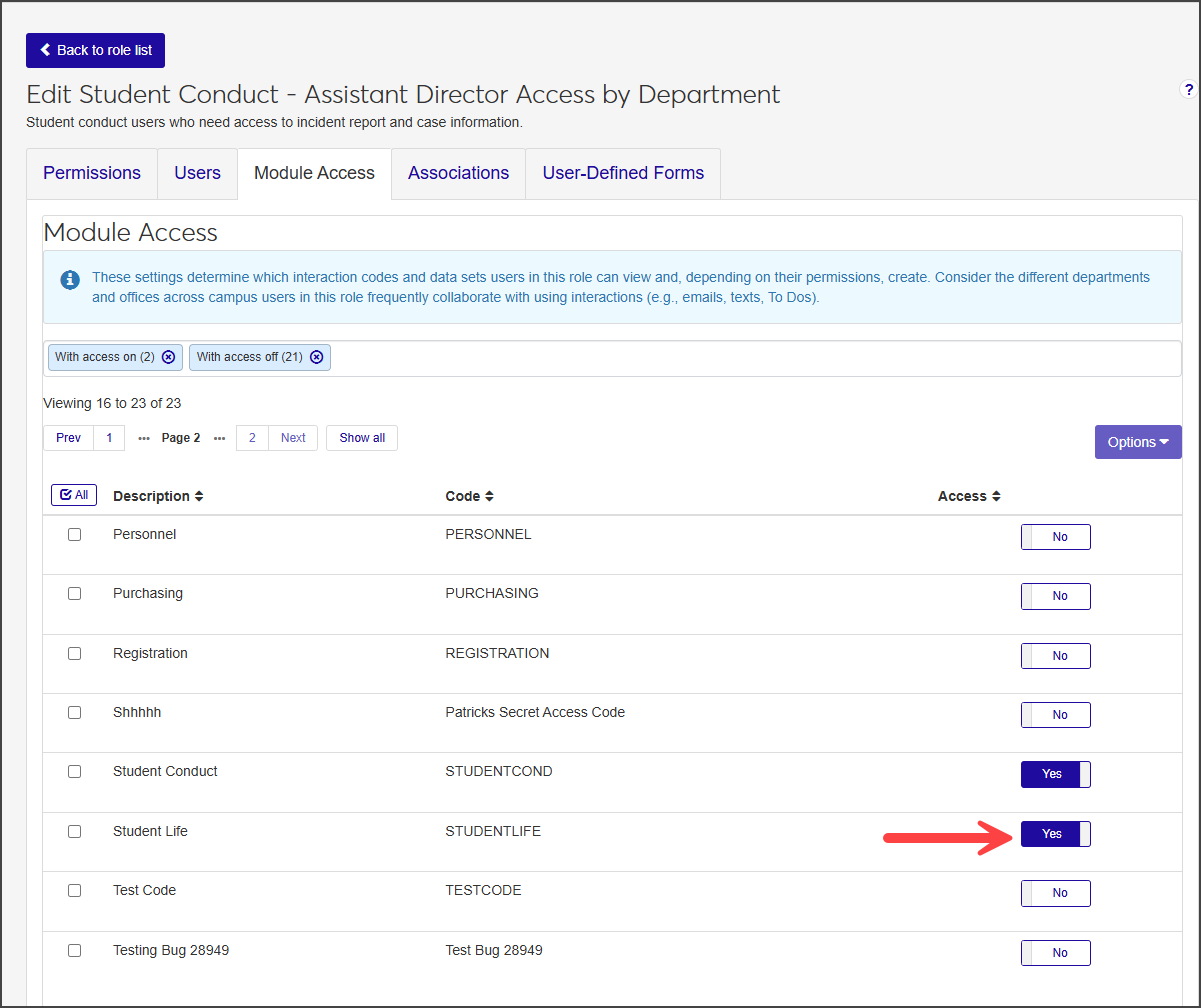
Select the Module Access tab to open a list of all modules you have access to based on your login.
In the Access column, click Yes or No to turn access to a module on or off.
Note
To manage access for multiple modules, select the checkbox next to all the modules you want to edit and select Turn access on or Turn access off from the Options drop-down. To select all modules, click the Check All button
 and then select from the Options drop-down.
For the Student Conduct - Assistant Director Access by Department and Student Conduct - Director Access by Department roles (and roles copied from them), the Edit Role page includes an Associations tab. This tab lets you control the role's access to conduct departments.
For example, a user in the Student Conduct - Assistant Director Access by Department role might be given access to the Residence Life conduct department but not to other departments; that user can reassign incident reports, but only to the Residence Life conduct department. Similarly, a user in the Student Conduct - Director Access by Department role might be given access to the Residence Life and Greek conduct departments; that user will be able to reassign incident reports and cases to those two departments but not, for example, to the Title IX department.
Note
J1 Web provides several default conduct department definitions, but you can create as many custom definitions as you need to meet your school's needs. See Conduct Department Definitions for more information.
From the Student Conduct Administration Hub page, click the Hub options drop-down and select Admin options > Manage student conduct roles. The Student Conduct Roles page opens, listing both default and custom Student Conduct roles.
Select Edit from the Options drop-down for the role you want to edit. The Edit page for the role opens.
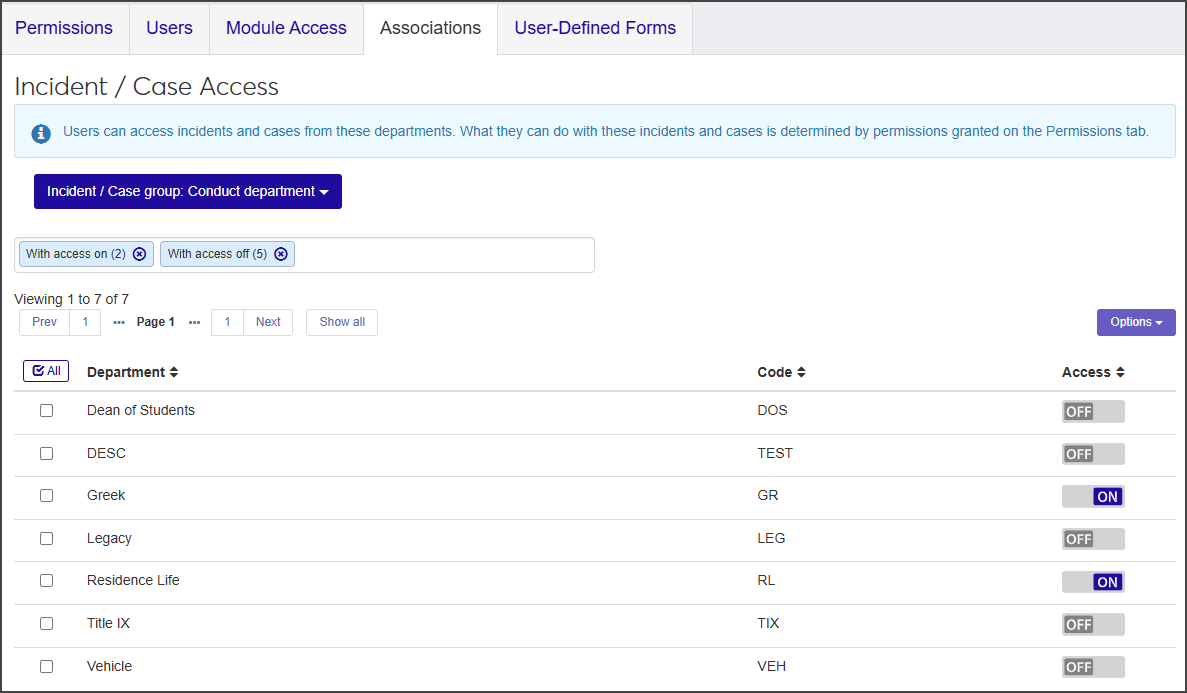
Click the Associations tab.
Select Conduct department from the Incident / Case group drop-down to open a table listing all conduct departments defined for your school.
The field under the drop-down shows you the number of departments that have access turned on or off. By default, the list displays all departments. To see only departments with access turned off, delete With access on; to see only departments with access turned on, delete With access off.

In the Access column, click Off or On to disable or enable access to the appropriate conduct departments. Users assigned to the role will have access to conduct departments based on their associations to them.
Note
To manage access for multiple conduct departments at once, select the checkbox next to each department you want to update and select Turn access on or Turn access off from the Options drop-down. To select all departments, click the Check All button
.
On the Student Conduct Roles page, select Edit from the Options drop-down for the new role. The Edit page for the role opens.
Select the User-Defined Forms tab. The User-Defined Fields Security page opens.
Find the row for the user-defined fields you want to grant or restrict access to. In the Permissions column:
Select No permissions (default) to restrict users from accessing user-defined fields. This option is selected by default.
Select Can configure UDEF data to allow users to design the user-designed field forms (this option grants view and edit permissions as well).
Select Can edit UDEF data to allow users to enter data in user-defined fields.
Select Can view UDEF data to allow users to view data only. They will not be able to edit or enter data.
Only custom roles can be deleted. Default roles cannot be deleted.
On the Student Conduct Roles page, click Options next to the role you need to edit and select Delete from the drop-down. The Delete this Role? pop-up opens, telling you how many active users are in this role.
If you are certain you want to delete the role, click Yes, delete. The role is removed from the list.
When you delete a role that a user is assigned to, the user receives a message outlining the permissions lost.
You might not have the permissions necessary to manage student conduct roles. Users must be in the Student Conduct - Director Access by Department role and have the following permissions enabled under the Student Conduct Roles category:
Can view roles
Can create roles
Can add and remove user role assignments
Can change what the role can access
Can edit non-default role names & descriptions
Can copy roles
Can change role permissions
Can delete non-default roles