Requirement Met By Type Definitions
Important
Information and features vary according to the roles to which you belong and the permissions associated with those roles. For more information, contact your module manager or your campus support team.
Sometimes a program requirement can be satisfied by other courses, life experience, or test results. The Met By code defines the type of override or course substitution and allows institutional requirements to be modified on an individual student-by-student basis. These changes are also called alterations in J1 Advising.

These are the most common types of advising alterations:
Course substitutions: To allow another course, with its credits and grade, to fulfill the requirement of the required course.
Waivers: To not require a required course. No credits or grade take the place of the required course. For example, you may waive the course because of the student's life experience or test scores.
Other: To alter the hours or count needed, the maximum hours or count, the quality points or GPA needed, the Grade Scale/Credit Type/Grade needed, the priority 1 or 2 values, or to enter a bypass. This is a catchall type. You can refine it over time or make more specific types.
Knowing how to enter these kinds of alterations helps ensure that degree audits accurately reflect a student's progress toward completing their program.
The permission to manage Requirement Met By Types definitions is in the Academic Advising Module Manager default role, under the Advising Administration section.
You can also manage these definitions in J1 Desktop on the Requirement Met By Types window. Definitions edited in J1 Web are changed in Desktop and vice versa.
From the Advising Administration hub, click the Hub options drop-down.
Select Definitions, and then Requirement Met By Types.
Tip
You can also use the page search in the upper right corner of J1 Web. Select System page and start typing the name of the definition page you want, then select it in the results.
Enter characters, words, or phrases in the Quick Filters to limit the list of definitions.
Click the plus sign beside any definition to expand the row and see more information.
Click a heading to sort the list by that column.
Tip
We recommend starting with 3 types:
Met By (code) | Description | Reference Required |
|---|---|---|
SUB | Course Substitution | Yes |
WAIVER | Waiver | No |
OTHER | Other | No |
Click the Create definitions button.
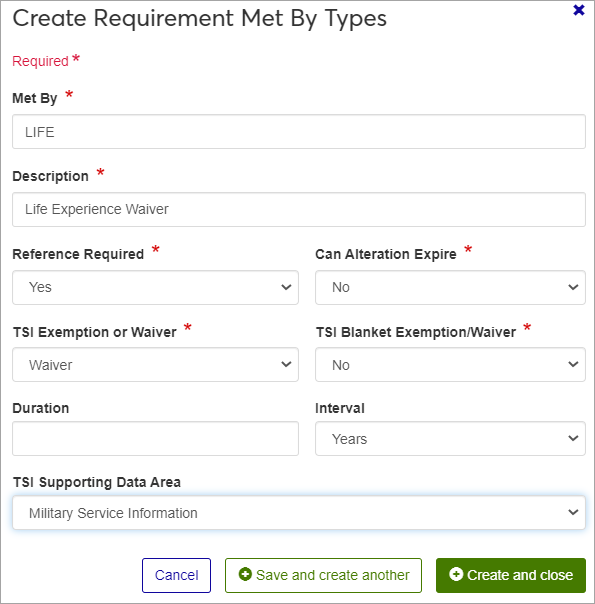
Enter a Met By, code, up to 6 letters or numbers. Once saved, you won't be able to edit this label. Required.
Enter a Description. This 30-character maximum field provides a brief description of this aim. This will help other users understand how this aim is used. This description will show up in most places where the Aim Label is used. Required.
In Reference Required, select Yes or No to specify whether or not a Substitute Requirement Code must be used to satisfy the Met By code. The Substitute Requirement Code can added be on the Student Aims page when the alteration is made. This field is required.
For substitutions, select Yes if you want to require substitution alterations to specify the substitution requirement. Then when a user creates an alteration using this type, they'll be required to enter a corresponding advising requirement (ARC). That ARC is an essential connection to the student's Course History row for which the academic information is generated. This is done most often when you are configuring a substitution where you want to apply the academic weight (credits and grade) of another course.
For waivers, select No. This is because a waiver indicates that the requirement has been met but there are no hours earned or grade points applied.
In the Can Alteration Expire drop-down, select Yes or No. If Yes, then enter a Duration and select an Interval.
Duration: Enter a positive integer 1–99.
Interval: Select an option from the drop-down (Days, Weeks, Months, or Years).
Tip
If Can Alteration Expire is No, then leave Duration and Interval blank.
Texas Success Initiative (TSI) fields:
In TSI Exemption or Waiver, select an option from the drop-down (Exemption, Waiver, Not an Exemption or Waiver).
Tip
If your school doesn't participate in the Texas Success Initiative, then select Not an Exemption or Waiver.
In TSI Blanket Exemption or Waiver, select Yes or No.
Tip
If your school doesn't participate in the Texas Success Initiative, then select No.
In TSI Supporting Data Area, select an option.
Tip
If your school doesn't participate in the Texas Success Initiative, leave it blank.
Click either Save and create another or Create and close.
On the row you want to edit, click the Edit icon
 . The Edit Requirement Met by Type Definition pop-up opens.
Make your changes. You can't edit the Met By field, but you can edit the others.
Click the Update button.
Select the checkbox on the rows you want to edit.
In the Options drop-down, click Edit Selected. The Edit Requirement Met by Type Definitions pop-up opens.
The top section of the pop-up displays information about the selected definitions. In the Select a Detail to Update drop-down, select a detail to edit. In the next field, enter or select a new value that will apply to all the selected definitions. You can edit every field except Met By.
Click the Update button.
Select the checkboxes next to the rows you want to export.
From the Options drop-down, select Download to Excel. The Download to Excel pop-up opens.
Select options for the Excel format and data columns.
Click Download. Your .xlsx or .zip file is saved in the file location that you have set in your browser settings.