Candidate Profile: Contact Info Tab
Important
Information and features vary according to the roles to which you belong and the permissions associated with those roles. For more information, contact your module manager or your campus support team.
Note
From the Jenzabar One Web navigation menu, select Enrollment, then Admissions, and then Candidates, or use the Find a Page search for the Candidates page. Use the filter to find candidates. On a candidate's row, click the Actions drop-down and selectCandidate Profile. When the page loads, click the Contact Info tab.
You can also use the Person Search icon  to find a candidate. Then, use the Person options drop-down to select Candidate, then Profile. When the page loads, click the Contact Info tab.
Use the Candidate Profile: Contact Info tab to maintain mailing address, phone, email, and other contact information.
From the Contact Info tab, you can:
View, create, and update address records
Tip
Use the View on map button to open Google Maps for an address record.
View, create, and update phone numbers
View, create, and update alternate contact information (e.g., email address)
View historical records for address, phone, and alternate contact information
View and edit user-defined fields
The Candidate Profile: Contact Info tab displays connection-related information for a prospective student. Users can view addresses, phone numbers, email addresses, social media contact links, and historical contact information here.
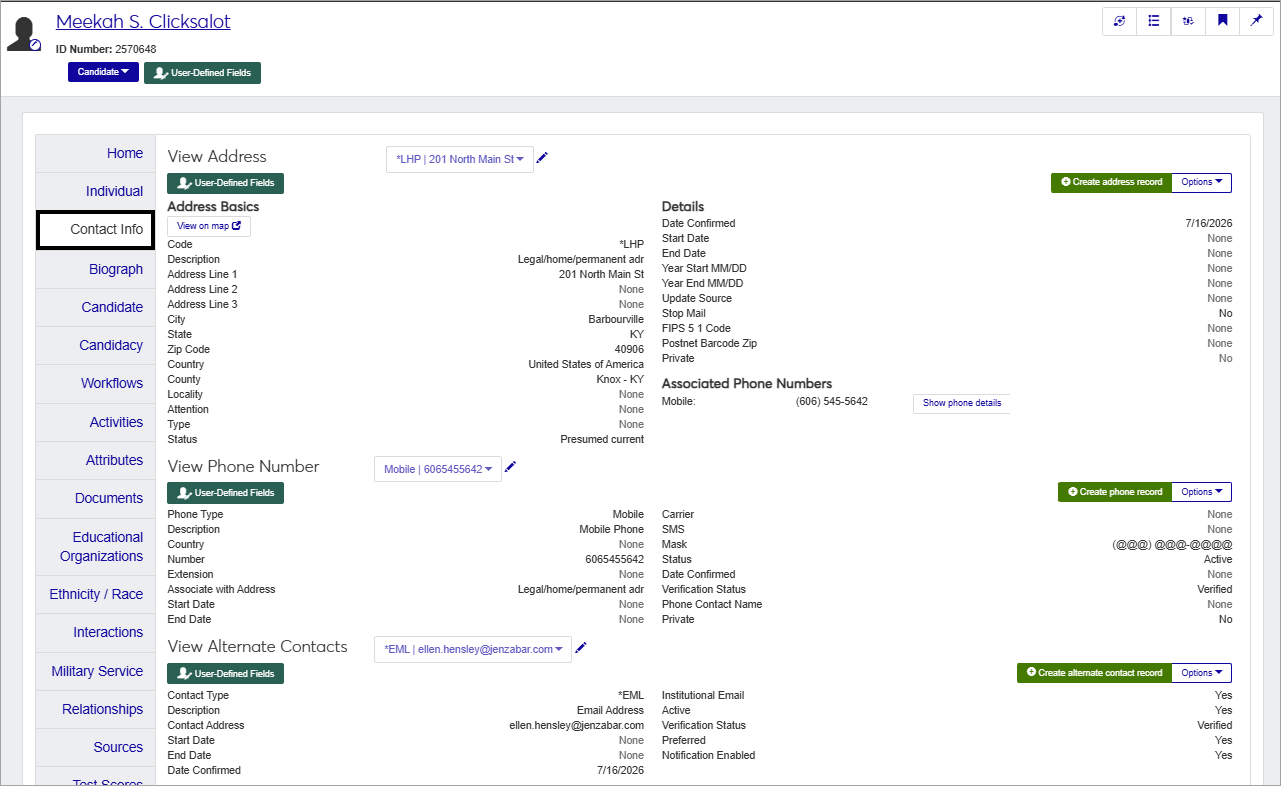
The Candidate Profile: Contact Info tab includes the following areas:
View Address: If the individual has more than one address, there is a drop-down list available for you to select the appropriate one. The software defaults to an address record based on your institution's Display Ordering configurations. These settings can be found by navigating to Core, then Campus-wide Definitions, then Contact Definitions, then Definition Category For Address Code, then Edit Order, and then Display Ordering. You can also view someone's historical address information if the individual has one or more history records associated with an address.
Address Basics: This section displays an individual's address components.
Details: This section contains administrative and tracking information for an individual's address, including dates, verification, updates, mailing controls, identifiers, and privacy settings, to support record maintenance, reporting, and compliance with data management practices.
Associated Phone Numbers: This section displays phone numbers linked to the address type being viewed.
View Phone Number: This section stores phone record details, including phone number, contact associations, carrier, messaging, verification, and privacy settings. These fields support contact management, communication, record validation, and compliance. Historical phone information can be viewed if associated with an address.
View Alternate Contacts: The software displays a person's email address or alternative ways to reach the individual such as a website or social media link. Users can view historical email information associated with an email address definition.
The View Address, View Phone Number, and View Alternate Contacts components have an Options menu.
Copy: Enables you to copy the information of one record to create a new one.
View historical records: Enables you to view historical data for the components.
Remove: Enables you to delete an existing record.
Contact information is used across the system and many processes let you select a contact information code including how to determine where and how communications are sent. Some examples of where contact info is used include:
Student billing
Year-end reporting (1099s, 1098-Ts, W2s, and 1095-Cs)
State and institutional reporting (IPEDS, NSC, etc.)
Automation plans (created in the Communication Management hub)
System notifications in Campus Portal, Jenzabar One Web, and Desktop
Sending emails and text messages from the system
You can capture additional contact information with user-defined fields. User-defined fields are managed by your System Administrator and can be useful for internal reporting. Click the User-Defined Fields button to review or add more details to an individual's record.
To view and manage contact information, you must be in a Person Management role (or copy of it) with the appropriate permissions. For additional information about permissions, see Person Management Permissions.
To access this page and work with the general features, you must belong to the Admissions role or a customized version of this role with the Can view candidates permission enabled. In order to edit candidate information, you will need to enable the Can manage candidates permission.
If you use user-defined fields (UDEFs) for tracking candidate information, users will also need permission to view and edit those fields. Administrators assign access to user-defined fields through role-level permissions. For each role that you want to give access to user-defined fields, click on the User-Defined Fields tab. You can give varying degrees of access to each user-defined field group used in the system. For more information, review User-Defined Forms.
Access the Candidate Profile from the Candidates page. Following these steps will take you to the Candidate Profile: Contact Info Tab.
Open and log in to Jenzabar One Web.
From the Jenzabar One Web navigation menu, select Enrollment, then Admissions, and then Candidates, or use the Find a Page search for the Candidates page.
Use the filter to find candidates.
On a candidate's row, click the Actions drop-down and select Candidate Profile.
Click the Contact Info tab.
Note
You can also use the Person Search icon to find a candidate. Then, use the Person options drop-down to select Candidate, then Profile. When the page loads, click the Contact Info tab.
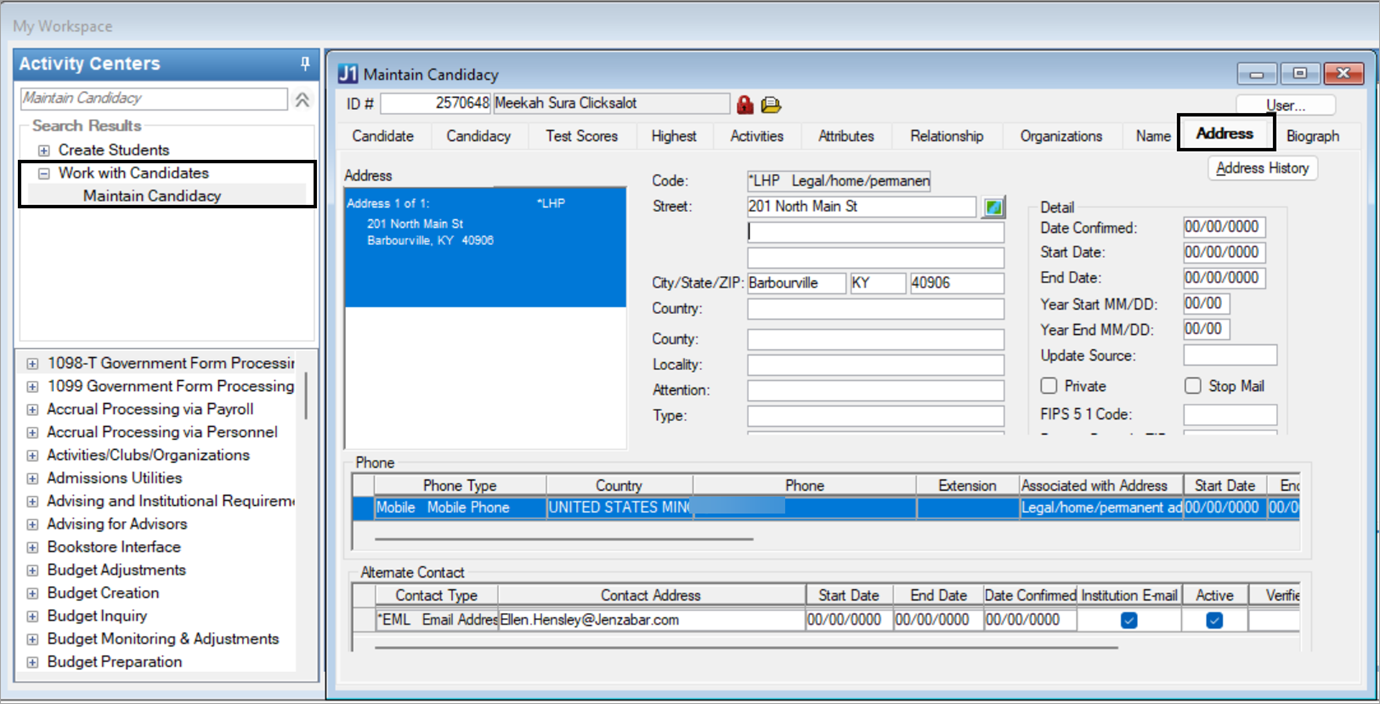
The Maintain Candidacy window in Jenzabar One Desktop serves as the central location for managing candidate information. To access the Address tab within this window, follow these steps.
Open and log in to Jenzabar One Desktop.
In the search bar for Activity Centers, type "Maintain Candidacy". The Create Students and Work with Candidates Activity Centers options appear.
Select Maintain Candidacy from Create Students or Work with Candidates.
When the window opens, enter an ID number or search for a person. Then, select the Address tab.
Note
Updating an address, phone number, or email in the Address tab of the Jenzabar One Desktop Maintain Candidacy window allows this information to be seen in Jenzabar One Web. Conversely, any changes or additions you make to contact information on the Contact Info tab of the Jenzabar One Web Candidate Profile page will also be reflected in Jenzabar One Desktop, ensuring seamless access to your updated details across both platforms.
The fields available on the Candidate Profile: Contact Info tab are listed in the Field column of the tables below. For each field, the associated database table and column names are provided, along with additional field information that may be useful for support, maintenance, and reporting activities.
To view and manage contact information, you must be in a Person Management role (or copy of it) with the appropriate permissions. For additional information about permissions, see Person Management Permissions.
To view and edit user-defined fields, you must have the "Can edit UDEF data" permission for the appropriate fields on the User-Defined Fields tab.
How To
Open and log in to Jenzabar One Web.
From the Jenzabar One Web navigation menu, select Enrollment, then Admissions, then Candidates, or use the Find a Page search for the Candidates page.
Use the filter to find one or more candidates.
From the Actions menu, click Candidate Profile.
Click the Contact Info tab.
To see details about other addresses, phone numbers, or alternate contacts for the individual, click the drop-down next to View Address/View Phone Number/View Alternate Contact and select an option.
To view historical address, phone number, or alternate contacts, click the Options button for the appropriate contact type and select View historical records. The View Historical Records pop-up opens, and you can select a record to view from the drop-down list.
Tip
You can also use the Person Search icon to find a candidate. Then, use the Person options drop-down to select Candidate, then Profile. When the page loads, click the Contact Info tab.
On the Candidate Profile: Contact Info tab, click the Create address record button. The Create Address Record pop-up opens.
Select an Address Code. Required, and cannot be edited once the record is created. Available options are maintained in the Campus-wide Definitions hub on the Contact Definitions page.
Enter or select details for the following fields. At least one address field must have a value to enable the "Create" button.
Enter an Address Line 1, Line 2, and Line 3 (up to 60 characters).
Enter the City name (up to 60 characters).
Select a State.
Enter a Zip Code (up to 5 characters).
Select a Country.
Select a County.
Select a Locality.
Enter a name in the Attention field if mailed items should be addressed to someone other than the associated name (up to 45 characters).
Select an address Type.
Select the address Status.
Enter the Date Confirmed, if known.
Enter the Start Date and End Date to indicate when the record is available in the system.
Select a Year Start Month and Year Start Day if this address will be used for the person for only part of the year.
Select the Year End Month and Year End Day to indicate when this address is no longer active for the year. The combination of Year End Month and Year End Day must be greater than or equal to the combination of Year Start Month and Year Start Day.
The Update Source field is typically autofilled when information is added via the Process Internet Submission process or another import process. If not, select an option from the drop-down.
Select the Stop Mail checkbox if this address should not receive mail.
Select an FIPS 5 1 Code, if known.
Enter a 9-digit Postnet Barcode Zip if you'll need to print the address with a barcode.
Select a Private option. Default is No.
Review the information and make any necessary changes. For additional information about these fields, see Candidate Profile: Contact Info Database Table Information.
Click Create. After updates are made, the previous information is saved as a historical address record with today's date as the archive date, and the most recent information you entered displays on the page as the current record.
Note
The "Address Type" cannot be updated.
On the Candidate Profile, Contact Info tab, select a record from the View Address drop-down.
Click the Edit icon
 to open the Edit Address Record pop-up.
Click Update. After updates are made, the previous information is saved as a historical address record with today's date as the archive date, and the most recent information you entered displays on the page as the current record.
On the Candidate Profile page, Contact Info tab, select an address to copy from the View Address drop-down.
Click the Options button and select Copy. The Copy Address Record pop-up opens.
Select an Address Code. Required.
Review and update information in the editable fields. For more details about each field, see Candidate Profile: Contact Info Database Table Information.
Click Create. The new address details display when the pop-up closes.
On the Candidate Profile page, Contact Info tab, select a record from the View Address drop-down.
If the individual has an address code and a phone number associated with that address code in the View Phone Number section, information displays in Associated Phone Numbers and the Show phone details button appears.
If the individual has an address code and does not have a phone number associated with that address code, information is not displayed in Associated Phone Numbers and the Show phone details button does not appear.
Click Show phone details. The system looks at the address code selected in View Address. Then, it will examine the Associate with Address data in the View Phone Number area to determine how to respond.
If the Associated Phone Number's address code does not match the address code selected in View Address for the phone type and phone number showing in View Phone Number, the system refreshes the View Phone Number data to reflect the phone number details that link the address and phone number.
An individual has a *LHP address code and a mobile phone number that is associated with the *LHP address code.
The mobile phone number appears in Associated Phone Numbers, and the Show phone details button appears.
In the screenshot below, you can see these details in place. The *LHP address code is selected in View Address .
A mobile phone number appears in Associated Phone Numbers, and the Show phone details button is present.
When the Show phone details button is clicked, the system looks at the View Phone Number section to determine the displayed phone number's Associate with Address value. In this example, the value is Person father addr (PFTH).
The address code selected in the View Address section is Legal/home/permanent adr (*LHP) and is not a match to the Person father addr (PFTH).

Since the address codes do not match, the system refreshes the data in the View Phone Number section.

If the Associated Phone Number address code matches the address code selected in View Address, the application displays the linked phone number details in View Phone Number. When the same information is already visible, clicking Show phone details refreshes the section without changing the displayed data. As a result, the action may appear to have no effect, even though the refresh is successfully completed.
An individual has a *LHP address code and a mobile phone number that is associated with the *LHP address code.
The mobile phone number appears in Associated Phone Numbers, and the Show phone details button appears.
In the screenshot below, you can see these details in place. The *LHP address code is selected in View Address.
A mobile phone number appears in the Associated Phone Numbers section, and the Show phone details button is present.
When the Show phone details button is clicked, the system looks at the View Phone Number section to determine the displayed phone number's Associate with Address value. In this example, the value is Legal/home/permanent adr (*LHP).
The address code selected in the View Address section is Legal/home/permanent adr (*LHP) and is a match to the Mobile number as well as a match to the *LHP address.
The system refreshes the data but does not produce a visible change because the displayed information already reflects the current address-phone relationship.
On the Candidate Profile: Contact Info tab, click the Create phone record button. The Create Phone Record pop-up opens.
Select a Phone Type. Required.
Select a Country.
Enter a Number with up to 30 digits. Required.
Enter an optional Extension with up to 5 digits.
From the Associate with Address drop-down, select the address code the phone number should be tied to.
Enter the Start Date and End Date to indicate when the record is available in the system.
Select an optional phone Carrier.
Select the Text Capable checkbox if the number can receive and send text messages.
Select a Mask option to determine how the number is displayed throughout the system (e.g., U.S. number with an extension).
Select a Status.
If known, enter the Date Confirmed.
Select the Verification Status. Required. Default value is Unknown.
Enter a Phone Contact Name (up to 45 characters) if the phone number is shared and may have a contact other than the associated name record.
Select whether the phone number is Private. Default is No.
Click Create. The tab updates to display details for the new number.
The Phone Type cannot be updated.
On the Candidate Profile: Contact Info tab, select a record from the View Phone Number drop-down.
Click the Edit icon
to open the Edit Phone Number pop-up.Make updates to the editable fields as needed. For more details about fields, see View Phone Number.
Click Update. After updates are made, the previous information is saved as a historical record, and the most recent information displays on the page as the current record.
Note
The Phone Type cannot be updated.
On the Candidate Profile: Contact Info tab, select a phone number to update from the View Phone Number drop-down.
Click the Options button and select Copy. The Copy Phone Record pop-up opens.
Select a Phone Type. Required.
Make updates to the following editable fields:
Country
Number (Required)
Extension
Associate with Address
Start Date
End Date
Carrier
Text Capable
Mask
Status
Date Confirmed
Verification Status (Required)
Phone Contact Name
Private
Click Create. The new phone details display when the pop-up closes.
On the Candidate Profile: Contact Info tab, click the Create alternate contact record button. The Create Alternate Contact Record pop-up opens.
Select a Contact Type. Required.
Enter the Contact Address (up to 60 characters). Required.
If the selected Contact Type is an email, select the Institutional Email checkbox to indicate the record should be used as the default email for certain system processes.
Caution
Only one email can be flagged as the institutional email. If another email was already flagged, selecting the checkbox for this record deselects the checkbox on the other record.
Select the Preferred checkbox if this is the preferred alternate contact method.
Caution
Only one alternate contact can be flagged as preferred. If another alternate contact record was already flagged, selecting the checkbox for this record deselects the checkbox on the other record.
The Active checkbox is selected by default. Deselect it to mark the alternate contact inactive.
Select the Notification Enabled checkbox if notifications can be sent to this alternate contact record.
Enter the Start Date and End Date to indicate when the record is available in the system.
Enter the Date Confirmed, if known.
Select the Verification Status. Required. Default is Unknown.
Click Create. The tab updates to display details for the new alternate contact.
Note
The "Contact Type" cannot be updated.
On the Candidate Profile: Contact Info tab, select a record from the View Alternate Contacts drop-down.
Click the Edit icon. The Edit Alternate Contact pop-up opens.
Make updates to the editable fields as needed. For more details about the fields, see Alternate Contact Database Table Information.
Click Update. After updates are made, the previous information is saved as a historical archived alternate contact record with today's date, and the most recent information displays on the page as the current record.
On the Candidate Profile: Contact Info tab, select a record from the View Alternate Contacts drop-down.
Click the Options button and select Copy. The Copy Alternate Contact Record opens.
Make updates to following fields.
Contact Type (Required)
Contact Address (Required)
Institutional Email (only visible if the contact type is "email")
Preferred
Active
Notification Enabled
Start Date
End Date
Date Confirmed
Verification Status (Required)
Click Create. The tab updates to display details for the new alternate contact.
On the Candidate Profile page, Contact Info tab, click the User-Defined Fields button in the View Address, View Phone Number, or View Alternate Contacts sections on the page.
On the User-Defined Fields Edit Data pop-up, edit the fields as needed.
Click Save. After updates are made, the information is saved and displays on the page.
FAQ
Access to view and edit user-defined fields is based on permissions granted by your organization. For example, let's look at the Candidate Profile, Individual tab.
Someone with administrative-level permissions will navigate to Core, User Management, then Manage System Roles.
Use the System Roles Filter to find the appropriate role. In this example, choose a customized version of the Admissions Role .
From the Options menu, select Edit.
Click on the Users tab.
If you do not see the staff member in the Users in Role list, click the Add to Role button.
When the Add to Role pop-up window appears, type in the name of the individual to search. Once the individual appears, select the person and click the Add to Role button.
Click the User-Defined Forms tab.
Find one or more of the user-defined fields in the Name column. Each of these fields has a corresponding Permissions column. Select the relevant permission from the available options for the users assigned to the customized Admissions role as discussed in this example,
No permissions means users in this role will not see user-defined fields in the system.
Can configure UDEF form means users in this role can see user-defined fields in the system, and add, update, or delete data in the user-defined fields as well as manage the fields from the Core, Campus-wide Definitions, User-Defined Fields page.
Can view UDEF data means users in this role can see the user-defined fields in the system.
Can edit UDEF data means users in this role can add, update, or delete data in the user-defined fields in the system.
If you need to grant permissions to more than one User-Defined Fields area, repeat Step 8. Once completed, if the user has a permission value other than No Permissions the user should be able to log in to Jenzabar One Web and see the User-Defined Fields button for the related fields.
Yes, students can use the Contact Information Update form in the Campus Portal to update address, phone, and email information. When they submit the form, the information is updated throughout the system.
For additional information about the form, see Set Up the Contact Information Update Form.
Below is a sample query of how to include name and phone information. This example pulls records only if the ID Number has a value in the NameMaster.UDEF_1A_1 field.
SELECT nm.Last_Name,
       nm.First_Name,
       pm.FormattedPhoneNumber,
       nm.ID_NUM,
	   ptd.PhoneType
FROM NamePhoneMaster npm
LEFT JOIN PhoneMaster pm ON npm.PhoneMasterAppID = pm.AppID
LEFT JOIN NameMaster nm ON npm.NameMasterAppID = nm.AppID
LEFT JOIN PhoneTypeDef ptd ON npm.PhoneTypeDefAppID = ptd.AppID
where nm.UDEF_1A_1 is NOT NULL
ORDER BY nm.Last_Name asc, nm.First_Name asc;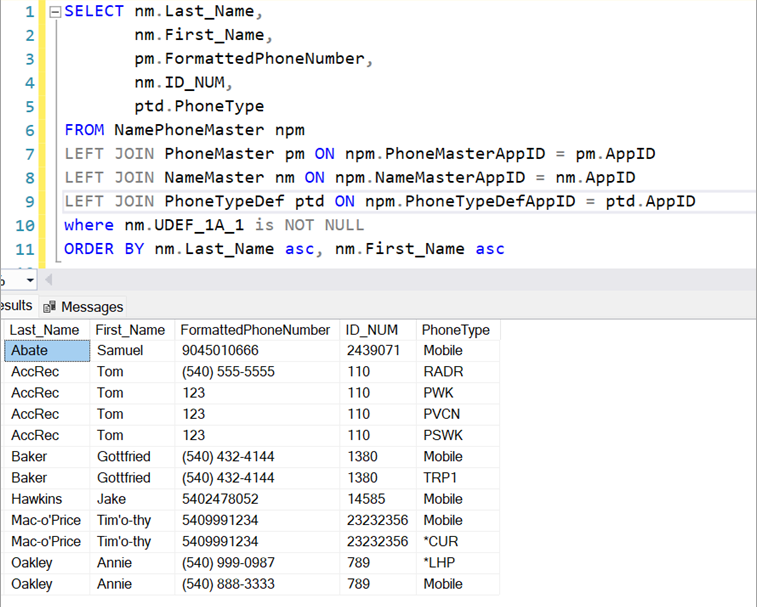
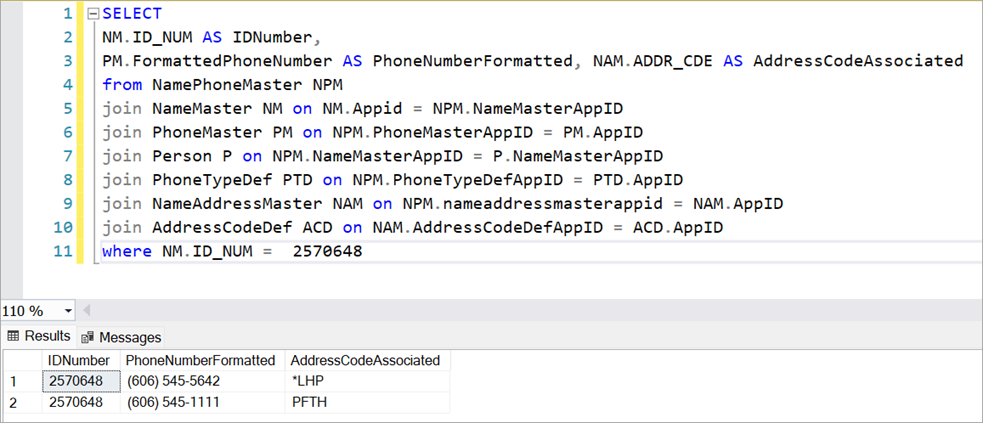
Associated phone numbers are created when an address code is added to the Associate with Address field for a phone record. For example, if a person has an address code of PFTH and the same person has a phone type of PFTH, then the software will display the phone number as the associated phone number.
Here is a SQL query that will show you an address with it's associated phone number for a specific ID Number. You can modify this query to meet your needs.
SELECT
NM.ID_NUM AS IDNumber,
PM.FormattedPhoneNumber AS PhoneNumberFormatted, NAM.ADDR_CDE AS AddressCodeAssociated
from NamePhoneMaster NPM
join NameMaster NM on NM.Appid = NPM.NameMasterAppID
join PhoneMaster PM on NPM.PhoneMasterAppID = PM.AppID
join Person P on NPM.NameMasterAppID = P.NameMasterAppID
join PhoneTypeDef PTD on NPM.PhoneTypeDefAppID = PTD.AppID
join NameAddressMaster NAM on NPM.nameaddressmasterappid = NAM.AppID
join AddressCodeDef ACD on NAM.AddressCodeDefAppID = ACD.AppID
where NM.ID_NUM =  2570648
You may not have the appropriate permissions. You must be in a role with "View" permission for addresses, phone numbers, and/or alternate contacts to see contact information. Contact your campus support team if you need assistance.
Jenzabar One Desktop and Jenzabar One Web Contact Info use more than the NamePhoneMaster table to display the data you see on the screen. Here is a sample query you can use to see both the AppIDs and descriptions from various tables.
In this example, the query is looking for ID numbers that have information in the NameMaster UDEF_1A_1 column. You may need to edit the query for your reporting purpose.
SELECT
nm.APPID,
nm.ID_NUM,
nm.LAST_NAME,
nm.FIRST_NAME,
ptd.PhoneType,
pm.CountryDefinitionAppID,
cd.Name,
pm.FormattedPhoneNumber,
pm.EXTENSION,
NAM.ADDR_CDE AS AddressCodeAssociated,
npm.START_DTE,
npm.END_DTE,
npm.SMSCapable,
npm.PhoneCarrierDefAppID,
pcd.CarrierName,
pm.PhoneMaskDefAppID,
pmd.PhoneMask,
pmd.Description,
npm.PHONE_STS,
npm.DTE_CONFIRMED,
npm.PhoneVerificationStatusDefAppID,
pvsd.Description,
npm.PhoneContactName,
npm.PHONE_PRIVATE
FROM NamePhoneMaster npm
LEFT OUTER JOIN PhoneMaster pm ON npm.PhoneMasterAppID = pm.AppID
LEFT OUTER JOIN NameMaster nm ON npm.NameMasterAppID = nm.AppID
LEFT OUTER JOIN PhoneTypeDef ptd ON npm.PhoneTypeDefAppID = ptd.AppID
LEFT OUTER JOIN CountryDefinition cd ON pm.CountryDefinitionAppID = cd.AppID
LEFT OUTER join NameAddressMaster NAM on NPM.nameaddressmasterappid = NAM.AppID
LEFT OUTER join AddressCodeDef acd on NAM.AddressCodeDefAppID = ACD.AppID
LEFT OUTER join PhoneCarrierDef pcd on npm.PhoneCarrierDefAppID = pcd.AppID
LEFT OUTER join PhoneMaskDef pmd on pm.PhoneMaskDefAppID= pmd.AppID
LEFT OUTER join PhoneVerificationStatusDef pvsd on npm.PhoneVerificationStatusDefAppID = pvsd.AppID
--where nm.UDEF_1A_1 is NOT NULL
ORDER BY nm.Last_Name asc, nm.First_Name asc;
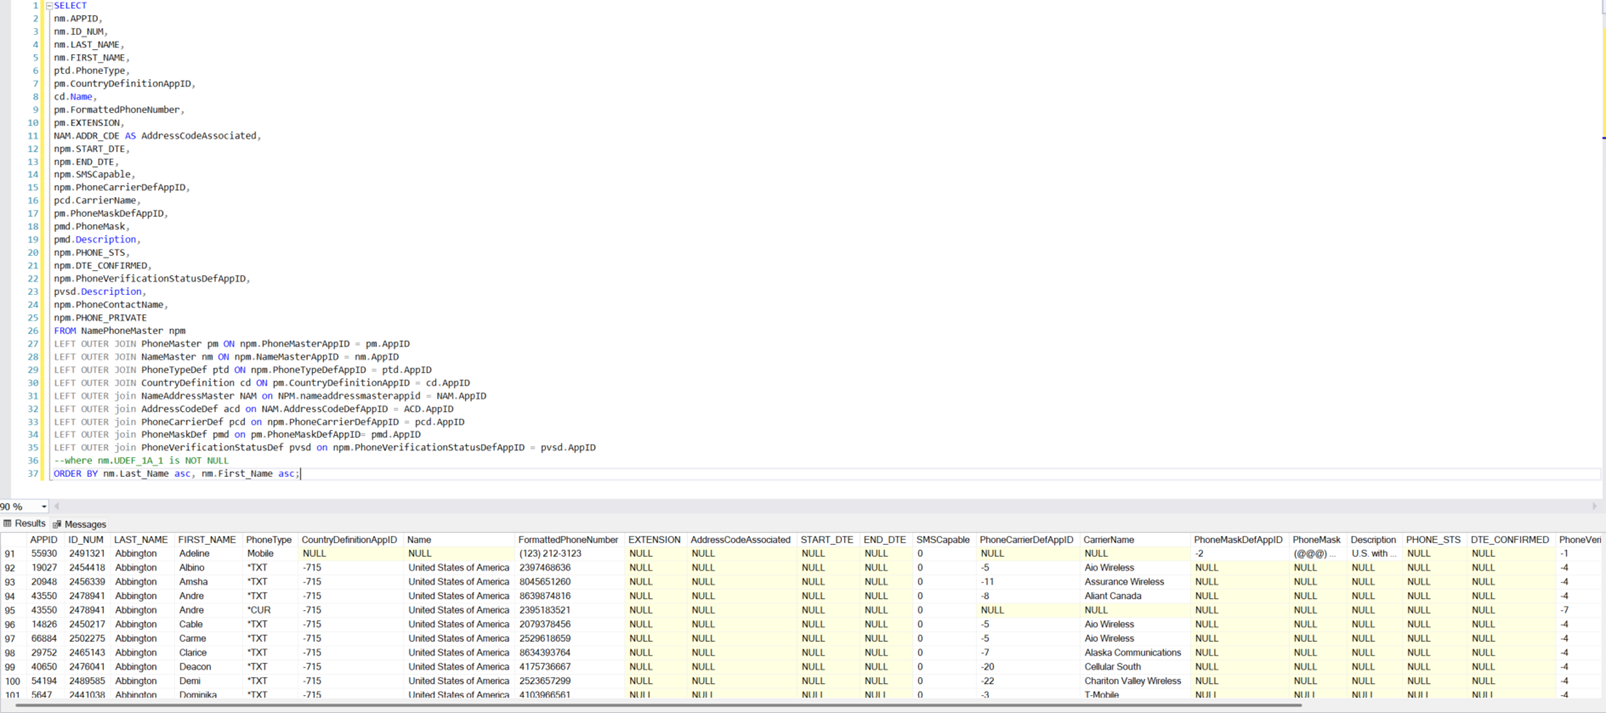
Jenzabar One Desktop and Jenzabar One Web Contact Info use more than the AlternateContactMethod table to display the data you see on the screen. Here is a sample query you can use to see both the AppIDs and descriptions from various tables.
In this example, the query is looking for ID numbers that are marked as active in the AlternateContactMethod table with a value of 1 in the IsActive column. You may need to edit the query for your reporting purpose.
   SELECT
    nm.ID_NUM,
    nm.First_Name,
    nm.Last_Name,
    acm.AlternateContact AS Contact_Address,
	acm.AlternateContactTypeDefAppID,
    actd.ContactType,
    actd.Description,
    acm.Addr_Cde,
    acm.StartDate,
    acm.EndDate,
    acm.DateConfirmed,
    acm.Institution_Email,
	acm.IsPreferred,
    acm.IsActive,
    acm.ExternalValidation,
    acm.Notification_Enabled
FROM NameMaster nm
INNER JOIN AlternateContactMethod acm
    ON nm.ID_NUM = acm.ID_NUM
INNER JOIN AlternateContactTypeDef actd
    ON acm.AlternateContactTypeDefAppID = actd.AppID
WHERE acm.IsActive = 1
ORDER BY
    nm.Last_Name asc,
    nm.First_Name asc;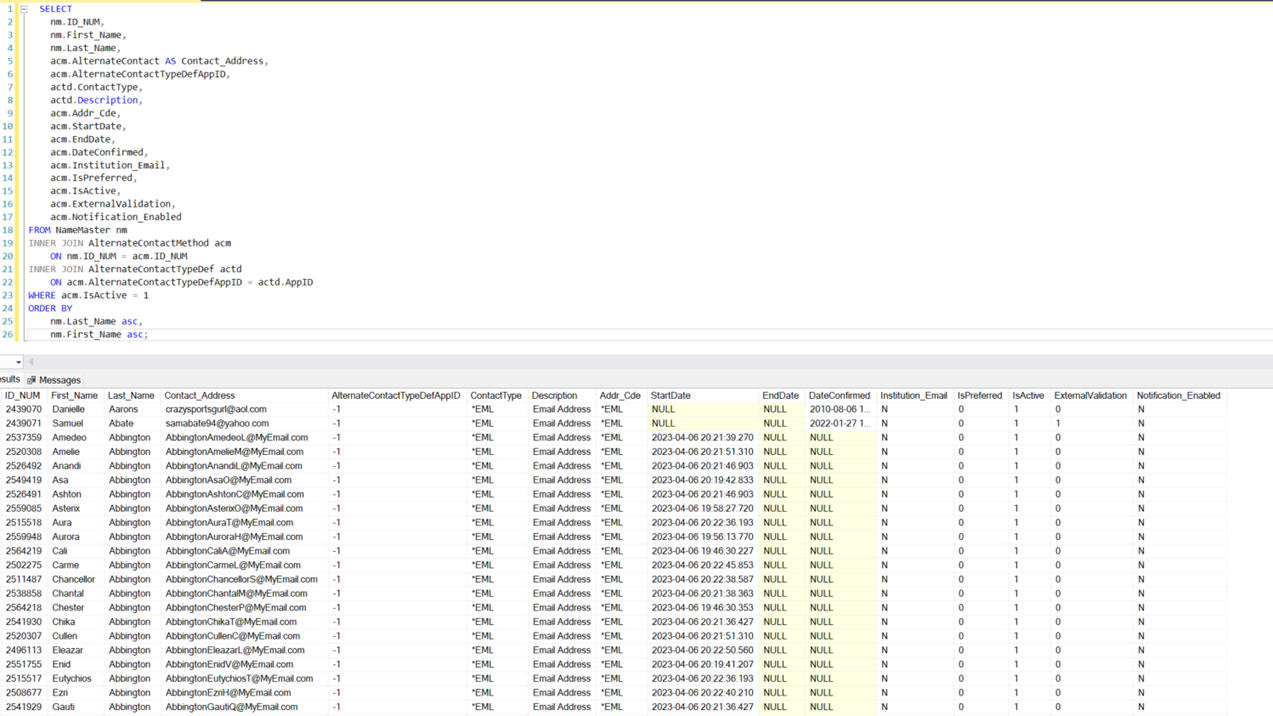
Additional Contact Info Resources
USPS Address Standards is useful for address formatting ZIP Codes, postal standards and mailing requirements.
ZIP Code Lookup is useful for address validation.
FIPS Standards provides additional information for FIPS 5-1.