Candidate Profile: Activities
Important
Information and features vary according to the roles to which you belong and the permissions associated with those roles. For more information, contact your module manager or your campus support team.
Note
From the Jenzabar One Web navigation menu, select Enrollment, then Admissions, and then Candidates, or use the Find a Page search for the Candidates page. Use the filter to find candidates. On a candidate's row, click the Actions drop-down and select Candidate Profile. When the page loads, click the Activities tab.
You can also use the Person Search icon  to find a candidate. Then, use the Person options drop-down to select Candidate, then Profile. When the page loads, click the Activities tab.
From the Candidate Profile: Activities tab, you can perform the following actions for each candidate:
View activities
Create new activities
View activity details
Delete activities
The Candidate Profile: Activities tab provides your institution with a way to track a candidate's community engagement, extracurricular activities, and professional and skill-building pursuits.
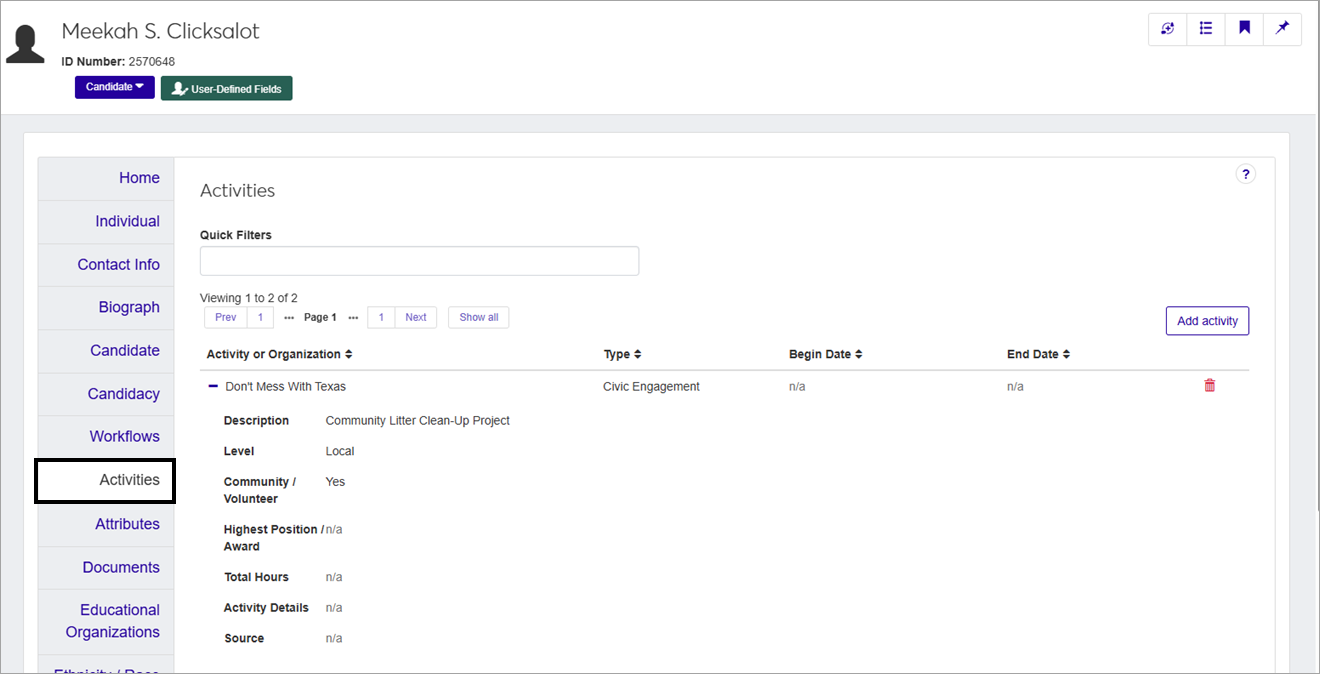
The Candidate Profile: Activities tab displays activity records in a grid format. Each activity appears as a separate record containing summary information, including activity name, type, and dates. You can expand an activity to view additional details such as participation level, volunteer information, awards, hours, and supplemental notes.
By default, a limit of 15 records appear on a page, but you can click Show all to see all records at once. As you scroll down the page, additional rows will appear. To go back to the default limit of 15, click Show 15.
You can capture additional information about candidates with user-defined fields. Your system administrator manages user-defined fields. These fields can support institution-specific tracking and reporting needs. Click the User-Defined Fields button to review or add institution-specific information to a candidate's record.
To access this page and work with the general features, you must belong to the Admissions role or a customized version of this role with the Can view candidates permission enabled. To view activity information on this tab, enable the Can view activities permission. To add activity records, enable the Can manage activities permission.
If you use user-defined fields for tracking candidate information, users will also need permission to view and edit those fields. Access to user-defined fields is assigned by role-level permissions. For each role that requires access to user-defined fields, click the User-Defined Fields tab. There you can give varying degrees of access to each user-defined field group used in the system. For more information, review User-Defined Forms.
Access the Candidate Profile from the Candidates page. Following these steps will take you to the Candidate Profile: Activities Tab.
Open and log in to Jenzabar One Web.
From the Jenzabar One Web navigation menu, select Enrollment, then Admissions, then Candidates, or use the Find a Page search for the Candidates page.
If needed, use the filter to find one or more candidates.
On a candidate's row, click the Actions drop-down and select Candidate Profile.
Click the Activities tab.
Note
You can also use the Person Search icon to find a candidate. Then, use the Person options drop-down to select Candidate, then Profile. When the page loads, click the Activities tab.
The Maintain Candidacy window in Jenzabar One Desktop serves as the central location for managing candidate information.
Caution
If your institution is transitioning to Jenzabar One Web, you should create and maintain Activities in Jenzabar One Web instead of using Jenzabar One Desktop to manage a candidate's activity information.
To access the Educational Organization information within this window, follow these steps.
Open and log in to the Jenzabar One Desktop application.
In the search bar for Activity Centers, type "Maintain Candidacy". The Create Students and Work with Candidates Activity Centers appear.
Select Maintain Candidacy from Create Students or Work With Candidates.
When the window opens, enter an ID number or search for a person. Then, select the Activities tab.
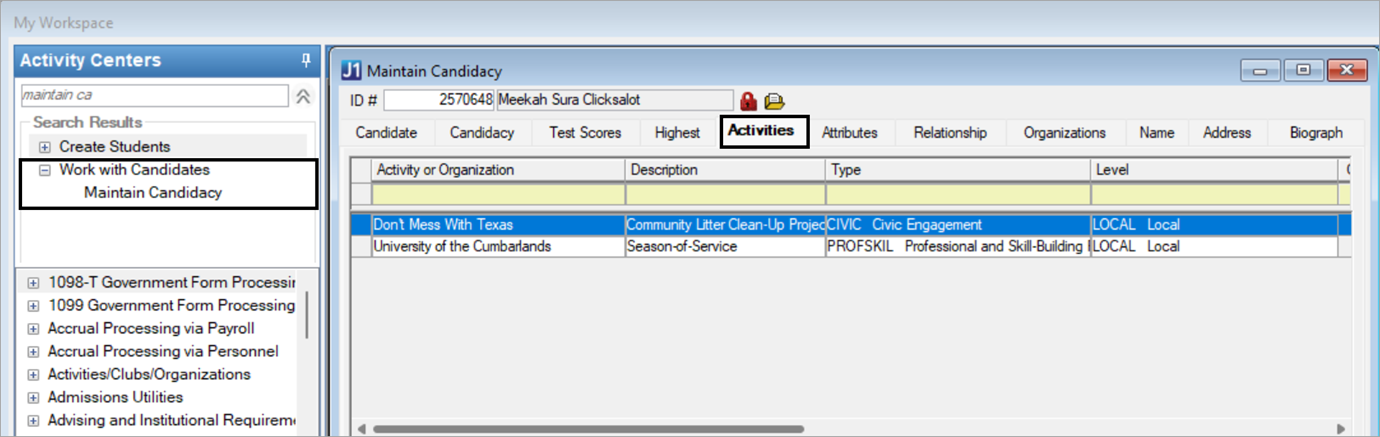
The Candidate Profile: Activities tab displays certain fields in the grid. Additional fields become visible when an activity record is expanded. The fields available on the Candidate Profile: Activities tab are listed in the Field Name column of the tables below. For each field, the associated database table and column names are provided, along with additional field information that may be useful for support, maintenance, and reporting activities.
How To
Open and log in to Jenzabar One Web.
From the Jenzabar One Web navigation menu, select Enrollment, then Admissions, then Candidates, or use the Find a Page search for the Candidates page.
Use the filter to find one or more candidates.
From the Actions menu, select Candidate Profile.
Click the Activities tab.
Tip
You can also use the Person Search icon to find a candidate. Then, use the Person options drop-down to select Candidate, then Profile. When the page loads, click the Activities tab.
On the Candidate Profile: Activities tab, click the Add activity button. The Add Activity pop-up appears.
Complete the Activities fields as needed.
When you finish entering the activity data:
Click Save and create another if you have additional activities to add for the candidate.
Click Create and close if you have entered all the activities for the candidate.
On the Candidate Profile: Activities tab, find the Activity or Organization entry that you want to delete.
Click the Delete Activity icon
 .
The Delete Activity pop-up appears. Click Yes, delete activity. Click Cancel to exit without making a change.
Caution
While on the Activities tab, the User-Defined Fields button is available from the header of the Candidate Profile. The user-defined field data is stored in the CANDIDATE and CANDIDATE_UDF tables. Saving changes updates the CANDIDATE and CANDIDATE_UDF tables accordingly.
On the Candidate Profile: Activities tab, click the User-Defined Fields button in the page header located underneath the ID Number.
On the User-Defined Fields Edit Data pop-up, edit the fields as needed.
Click Save to save your changes. Click Cancel to exit without making a change.
To sort by activity, click the Activity or Organization column heading.
To sort by activity type, click the Type column heading.
To sort by the begin date, click the Begin Date column heading.
To sort by the end date, click the End Date column heading.
You can use a quick filter to limit the list of Activities or Organizations to a particular item, such as Academic Team.
Limit the list of Activities or Organizations to one or more activities, such as typing "Academic Team", and then clicking Add 'Academic Team'.
Limit the list to one or more types, such as typing "Campus", then clicking Add 'Campus'.
Limit the list to activities with one or more specific year values, such as typing "2026", and then clicking Add '2026'.
FAQ
The ability to edit existing activities is currently under consideration. Until edit functionality becomes available, use the following workaround to update an activity.
Make detailed notes, and possibly screenshots of the affected activity record that needs editing.
Click Add activity.
Recreate the activity record ensuring that any modifications to the previous record are made on this new entry.
Click Create and close.
Find the activity record with incorrect information, and click the Delete Activity icon
.
You can let Jenzabar Product Development know of your interest in having the ability to edit an existing activity on the Candidate Profile: Activities tab by submitting an enhancement request.
You will need to be logged into MyJenzabar.net to submit the new idea. Once logged in, navigate to the Feedback tab. On the Feedback tab there is a video called "How to Give Feedback". There are also additional instructions in the FAQ section under the question titled "How do I submit an idea?"
Access to view and edit user-defined fields is based on permissions granted by your organization. For example, let's look at the Candidate Profile: Candidate tab.
Someone with administrative-level permissions will navigate to Core, User Management, then Manage System Roles.
Use the System Roles Filter to find the appropriate role. In this example, choose a customized version of the Admissions role.
From the Options menu, select Edit.
Click on the Users tab.
If you do not see the staff member in the Users in Role list, click the Add to Role button.
When the Add to Role pop-up window appears, type in the name of the individual to search. Once the individual appears, select the person and click the Add to Role button.
Click the User-Defined Forms tab.
Find one or more of the user-defined fields in the Name column. Each of these fields has a corresponding Permissions column. Select the relevant permission from the available options for the users assigned to the customized Admissions role as discussed in this example.
No permissions means users in this role will not see user-defined fields in the system.
Can configure UDEF form means users in this role can see user-defined fields in the system, and add, update, or delete data in the user-defined fields as well as manage the fields from the Core, Campus-wide Definitions, User-Defined Fields page.
Can view UDEF data means users in this role can see the user-defined fields in the system.
Can edit UDEF data means users in this role can add, update, or delete data in the user-defined fields in the system.
If you need to grant permissions to more than one User-Defined Fields area, repeat Step 8. Once completed, if the user has a permission value other than No Permissions, the user can log in to Jenzabar One Web and see the User-Defined Fields button for the related fields.
The Type column stores an APPID value in the AD_ACTIVITY table and is connected to the AD_ACTIVITY_TYPE_DEF table. The sample query below will show how you can join the tables together on the APPID and view the description of the activity type for ID Number 2570648.
SELECT
NM.ID_NUM,
NM.FIRST_NAME,
NM.LAST_NAME,
AA.CANDIDATE_APPID,
AA.ACTIVITY_OR_ORGANIZATION,
AA.DESCR,
AA.AD_ACTIVITY_TYPE_APPID,
AATD.APPID AS AD_ACTIVITY_TYPE_DEF_APPID,
AATD.ACTIVITY_TYPE_CODE,
AATD.DESCR
FROM NameMaster NM
INNER JOIN AD_ACTIVITY AA
ON NM.ID_NUM = AA.ID_NUM
INNER JOIN AD_ACTIVITY_TYPE_DEF AATD
ON AATD.APPID = AA.AD_ACTIVITY_TYPE_APPID
WHERE NM.ID_NUM = 2570648
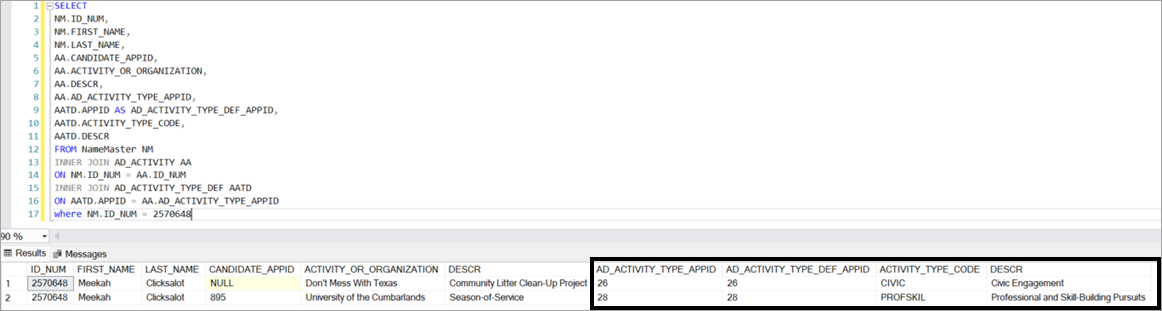
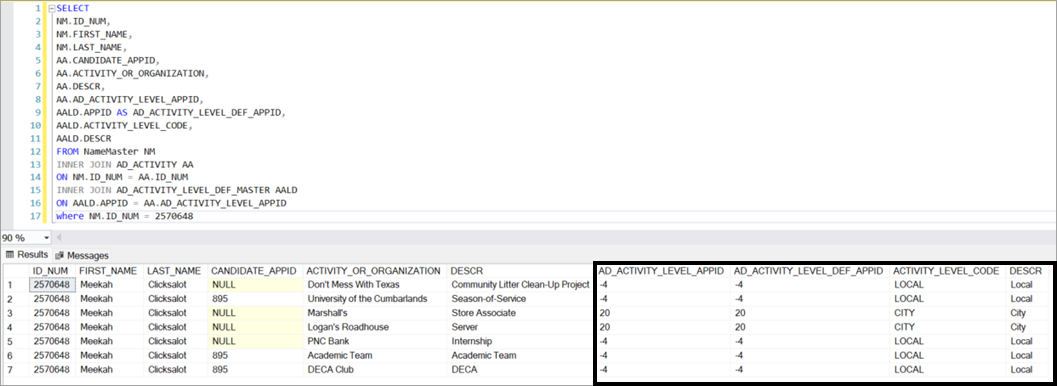
The Level column stores an APPID in the AD_ACTIVITY table and is connected to the AD_ACTIVITY_LEVEL_DEF_MASTER table. The sample query below will show how you can join the tables together on the APPID and view the description of the activity level for ID Number 2570648.
SELECT
NM.ID_NUM,
NM.FIRST_NAME,
NM.LAST_NAME,
AA.CANDIDATE_APPID,
AA.ACTIVITY_OR_ORGANIZATION,
AA.DESCR,
AA.AD_ACTIVITY_LEVEL_APPID,
AALD.APPID AS AD_ACTIVITY_LEVEL_DEF_APPID,
AALD.ACTIVITY_LEVEL_CODE,
AALD.DESCR
FROM NameMaster NM
INNER JOIN AD_ACTIVITY AA
ON NM.ID_NUM = AA.ID_NUM
INNER JOIN AD_ACTIVITY_LEVEL_DEF_MASTER AALD
ON AALD.APPID = AA.AD_ACTIVITY_LEVEL_APPID
WHERE NM.ID_NUM = 2570648
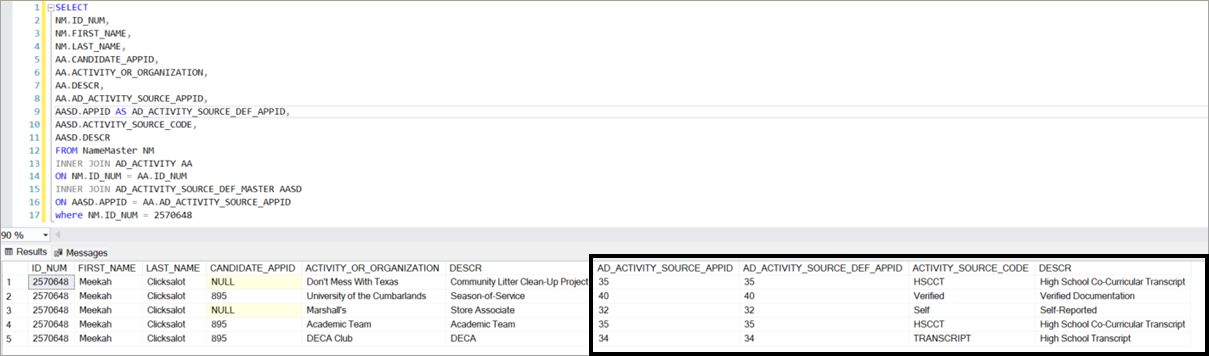
The Source column stores an APPID value in the AD_ACTIVITY table and is connected to the AD_ACTIVITY_SOURCE_DEF_MASTER table. The sample query below will show how you can join the tables together on the APPID and view the description of the source for ID Number 2570648.
SELECT
NM.ID_NUM,
NM.FIRST_NAME,
NM.LAST_NAME,
AA.CANDIDATE_APPID,
AA.ACTIVITY_OR_ORGANIZATION,
AA.DESCR,
AA.AD_ACTIVITY_SOURCE_APPID,
AASD.APPID AS AD_ACTIVITY_SOURCE_DEF_APPID,
AASD.ACTIVITY_SOURCE_CODE,
AASD.DESCR
FROM NameMaster NM
INNER JOIN AD_ACTIVITY AA
ON NM.ID_NUM = AA.ID_NUM
INNER JOIN AD_ACTIVITY_SOURCE_DEF_MASTER AASD
ON AASD.APPID = AA.AD_ACTIVITY_SOURCE_APPID
WHERE where NM.ID_NUM = 2570648
If the trashcan icon is unavailable at the end of an activity record, then you likely do not have permission. Check with your campus support team to ensure you have the Can manage activities permission.