Candidate Profile: Individual Tab
Important
Information and features vary according to the roles to which you belong and the permissions associated with those roles. For more information, contact your module manager or your campus support team.
Note
From the Jenzabar One Web navigation menu, select Enrollment, then Admissions, and then Candidates, or use the Find a Page search for the Candidates page. Use the filter to find one or more candidates. On a candidate's row, click the Actions drop-down and select Candidate Profile. When the page loads, click the Individual tab.
You can also use the Person Search icon  to find a candidate. Then, use the Person options drop-down to select Candidate, then Profile. When the page loads, click the Individual tab.
The Candidate Profile: Individual tab displays detailed name information for a prospective student. For example, campus name, legal name, alternate identifiers, and name history are viewable here.
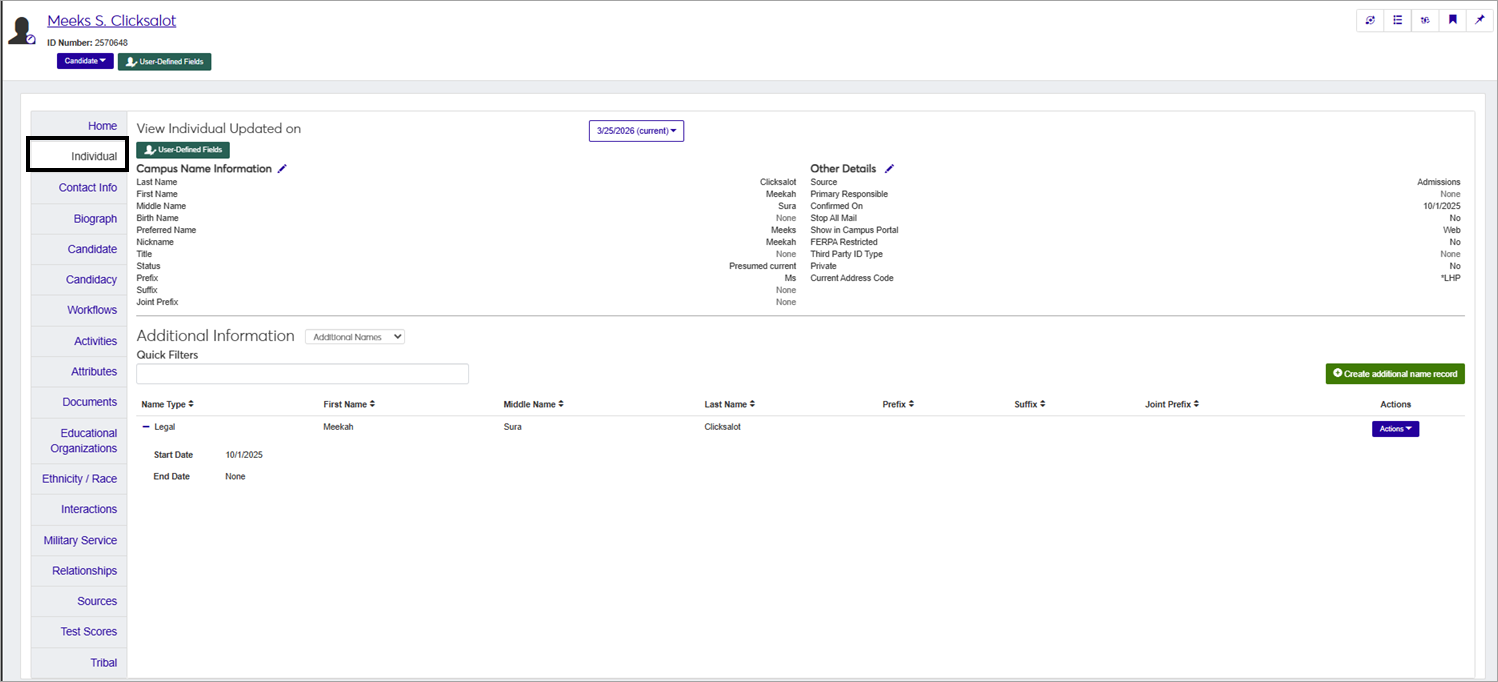
The Candidate Profile: Individual tab includes the following areas:
View Individual Updated on: There is a drop-down list so you can choose which history record to view if the individual has one or more history records associated with the name information. The software defaults to the current record. This information is stored in the NAME_HISTORY table.
Campus Name Information: Appears in all name-related fields, searches, processes, and reports throughout Jenzabar One Desktop, Jenzabar One Web, and Campus Portal except where legal name is required. This information is stored in the NameMaster table. More information about how Campus Name, Legal Name, and Alternate Identifiers are used in the software can be found in Working With System Names.
Other Details: This section includes fields for storing optional name details, such as name source, area of primary responsibility, and confirmation date, to name a few. This information is stored in the NameMaster table.
Additional Information: Jenzabar One Web provides you the opportunity to track additional name information for a person.
Additional Names: Displays information such as a person's legal name or previous married names. This information is stored in the AlternateNameMasterNames table.
Alternate Identifiers: Displays secondary or alternate ID number information associated with a student from various sources. For example, a student may have a state ID number, legacy ID number from another system, or other government issued ID number. This information is stored in the ALTERNATE_IDENTIFIER table.
You can capture additional information about individuals with user-defined fields. User-defined fields are managed by your System Administrator and can be useful for internal reporting. Click the User-Defined Fields button to review or add more details to an individual's record.
To access this page and work with the general features, you must belong to the Admissions role or a customized version of this role with the Can view candidates permission enabled. In order to edit candidate information, you will need to enable the Can manage Candidates permission.
Additionally, you must belong to the Person Management role. More permission information can be found by reviewing Person Information: Individual Details.
If you use user-defined fields (UDEFs) for tracking candidate information, users will also need permission to view and edit those fields. Access to user-defined fields is assigned by role-level permissions. For each role you want to give access to user-defined fields, click on the User-Defined Fields tab. There you can give varying degrees of access to each user-defined field group used in the system. For more information, review User-Defined Forms.
Access the Candidate Profile from the Candidates page. Following these steps will take you to the Candidate Profile: Individual Tab.
Open and log in to Jenzabar One Web.
From the Jenzabar One Web navigation menu, select Enrollment, and then Admissions, then Candidates, or use the Find a Page search for the Candidates page.
Use the filter to find candidates.
On a candidate's row, click the Actions drop-down and select Candidate Profile.
Click the Individual tab.
Note
You can also use the Person Search icon
to find a candidate. Then, use the Person options drop-down to select Candidate, then Profile. When the page loads, click the Individual tab.
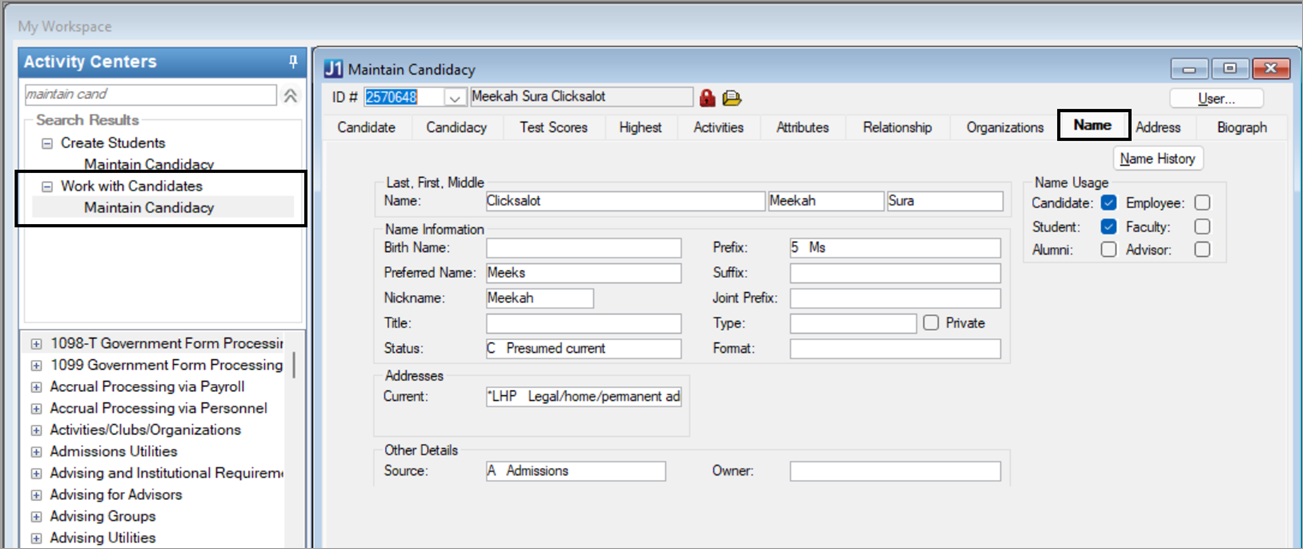
The Maintain Candidacy window in Jenzabar One Desktop serves as the central location for managing candidate information. To access the Name tab within this window, follow these steps.
Open and log in to the Jenzabar One Desktop application.
In the search bar for Activity Centers type "Maintain Candidacy".
The Create Students and Work with Candidates Activity Centers appear.
Select Maintain Candidacy from Create Students or Work With Candidates.
By default, the window opens to the Name tab.
Note
Adding a new name on the Name tab in the Jenzabar One Desktop Maintain Candidacy window makes that person's record available in the Jenzabar One Web Candidate List. To find the record, use the Name/ID filter in Candidate Filters or the Person Search icon. Similarly, records created in Jenzabar One Web with an assigned ID number are automatically available in Jenzabar One Desktop.
The fields available on the Candidate Profile: Individual tab are listed in the Field Name column of the tables below. For each field, the associated database table and column names are provided, along with additional field information that may be useful for support, maintenance, and reporting activities.
Additional Names - Information is stored in the AlternateNameMasterNames table.
Note
The Legal (Legal Names) Additional Name Type is a Jenzabar-provided value. If needed, you can create more values. More information can be found in the Jenzabar One Web Additional Name Type Definitions topic.
Field Name | Database Column Name | Notes |
|---|---|---|
Name Type | AlternateNameTypeDefinitionAppID | Choose a value from the drop-down list. Correlates to the AlternateNameTypeDefinition table to obtain the AppID associated with the row. The Description column in the AlternateNameTypeDefinition table is the name type description. |
First Name | FirstName | The individual's first name for the name type. Up to 30 characters. |
Middle Name | MiddleName | The individual's middle name for the name type. Up to 30 characters. |
Last Name | LastName | The individual's last name for the name type. Up to 60 characters. |
Prefix | NamePrefix | Choose a valid prefix (e.g., Dr., Fr., Hon., etc.) from the drop-down list. Available options are managed in Jenzabar One Web Core, then Campus-wide Definitions, then Maintain Table Values under the "prefix" column name. Up to 3 characters. |
Suffix | NameSuffix | Choose a suffix (e.g., Jr., Sr., II., etc.) from the drop-down list. Available options are managed in Jenzabar One Web Core, then Campus-wide Definitions, then Maintain Table Values under the "suffix" column name. Up to 3 characters. |
Joint Prefix | JointPrefix | Choose a valid joint prefix from the drop-down list. Indicates the prefix used when spouses are referenced together (e.g., Dr. and Mrs., Mr. and Mrs., etc.). This field can be used in reports or queries for mailings. Available options are managed in Jenzabar One Web Core, then Campus-wide Definitions, then Maintain Table Values under the "joint_prefix" column name. Up to 3 characters. |
Start Date | StartDate | The Start Date indicates the initial addition of an individual's name to the system, based on the specific name type. |
End Date | EndDate | The End Date indicates the individual's name is no longer in use. End dates automatically reflect the date a new name of the same type is added. NoteFor example, Marcus Morgan has a legal name entered in the system on April 25, 2019. A change to his legal name is made on September 10, 2026 and a new legal name row is created. The end date on the first legal name entry for Leo Baker becomes September 10, 2026. Start and End dates cannot overlap. 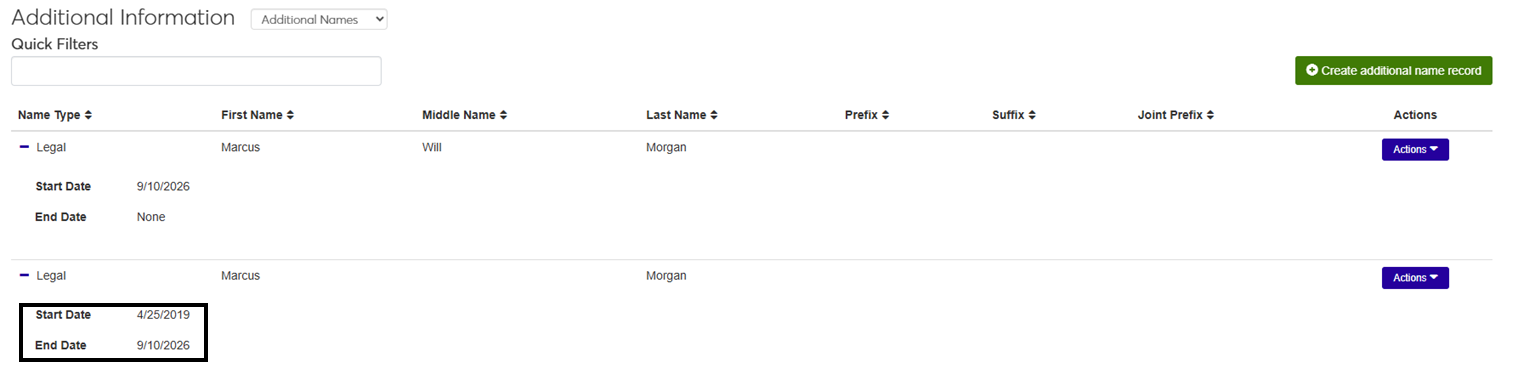 |
The Candidate Profile: Individual tab provides name and other personal information for a candidate. The page displays Campus Name, Legal Name, Alternate Identifiers for a name, and other details.
The Campus Name is considered an optional name. If a person wants to be identified by a name other than their legal name, a user can manage how that data resides in the system. For example, married or transgender names.
The Campus Name appears in all name-related fields, searches, processes, and reports throughout Desktop, Jenzabar One Web, and the Campus Portal except where legal name is required.
Data entry occurs through various channels, including the Campus Portal, My profile and settings, Campus Name options, and the Additional Names window accessible to administrative Jenzabar One Desktop users. Additionally, data can be entered via Jenzabar One Web Create Person and the Designate Candidate option. When a campus name is not provided, the system defaults to displaying the individual's legal name.
The authoritative identifier required when users are first added to the system.
Functions as a user’s campus name unless the campus name is changed.
Appears in name-related fields, searches, processes, and reports throughout Desktop, Jenzabar One Web, and Campus Portal where legal name is required for users with the appropriate permissions. For example, institutional, state, and federal reporting related information.
Data entry occurs through various channels, including the Campus Portal, My profile and settings, Campus Name options, and the Additional Names window accessible to administrative Jenzabar One Desktop users. Additionally, data can be entered via Jenzabar One Web Create Person and the Designate Candidate option. When a campus name is not provided, the system defaults to displaying the individual's legal name.
Users must have permission to view legal names. Access is managed within the Enrollment Management role or a customized version of this role with the Can manage candidates permission. If a user needs the ability to use the global search as part of seeing legal names, then a user will need to belong to the Person Management role or a customized version of this role with the Can manage additional name information permission.
Additional IDs linked to a person’s record, allowing institutions to store and recognize multiple identifiers (e.g., legacy, admissions, or external system IDs).
They support system integration and data continuity, helping match records across platforms and preserve historical IDs during migrations.
They improve search and reporting, enabling users to locate individuals using different identifiers and meet external reporting requirements.
How To
Open and log in to Jenzabar One Web.
From the Jenzabar One Web navigation menu, select Enrollment, then Admissions, then Candidates, or use the Find a Page search for the Candidates page.
Use the filter to find one or more candidates.
From the Actions menu, click Candidate Profile.
Click the Individual tab.
Tip
You can also use the Person Search icon
to find a candidate. Then, use the Person options drop-down to select Candidate, then Profile. When the page loads, click the Individual tab.
Caution
Updates to name information may impact reports or processes in Jenzabar One and connected systems.
On the Candidate Profile: Individual tab, click the Edit icon
 next to Campus Name Information.
Make the needed updates to one or more fields. For additional information about these fields, see Campus Name Information.
Click Update. After updates are made, the previous information is saved as a historical name record with today's date, and the most recent information displays on the page as the current record.
On the Candidate Profile: Individual tab, click the Edit icon next to Other Details.
Make the needed updates to one or more fields. For additional information about these fields, see Other Details.
Click Update. After updates are made, the previous information is saved as a historical name record with today's date provided the change is made to a UDEF column on the master table. The most recent information displays on the page as the current record.
On the Candidate Profile: Individual tab, click the User-Defined Fields button.
On the User-Defined Fields Edit Data pop-up, edit the fields as needed.
Click Save. After updates are made, the previous information is saved as a historical name record with today's date, and the most recent information displays on the page as the current record.
On the Candidate Profile: Individual tab, select Additional Names in the Additional Information section.
If needed, use Quick Filters and column sorting to find a name record.
Click Create additional name record. The Create Additional Name Record pop-up opens.
Click in the Name Type field and select an option from the drop-down. Required. Available options are the Additional Name Types defined in the Campus-wide Definitions hub.
Enter a First Name (up to 30 characters). Required.
Enter a Middle Name (up to 30 characters).
Enter a Last Name (up to 60 characters). Required.
Select a Prefix.
Select a Suffix.
Select a Joint Prefix.
Enter a Start Date. Required. The default is today's date.
Note
The End Date is disabled. It is updated when an Additional Name of the same type with an earlier Start Date is added to the system.
Click Create.
On the Candidate Profile: Individual tab, select Additional Names in the Additional Information section.
If needed, use Quick Filters and column sorting to find a name record.
Click the Actions button and select Copy. The Copy Additional Name Record pop-up opens.
To change the Name Type, click the Remove icon
 for the existing selection and select another option from the drop-down.
Make updates to the following fields as needed.
First Name (required)
Middle Name
Last Name (required)
Prefix
Suffix
Joint Prefix
Start Date (required)
Click Create.
On the Candidate Profile: Individual tab, select Additional Names in the Additional Information section.
If needed, use Quick Filters and column sorting to find a name record.
Click the Actions button and select Edit. The Edit Additional Name Record pop-up opens.
To change the Name Type, click the Remove icon
for the existing selection and select another option from the drop-down.Make updates to the following fields as needed.
First Name (required)
Middle Name
Last Name (required)
Prefix
Suffix
Joint Prefix
Start Date (required)
Click Update.
On the Candidate Profile: Individual tab, select Additional Names in the Additional Information section.
If needed, use Quick Filters and column sorting to find a name record.
Click the Actions button and select Delete.
In the Delete Definitions? pop-up, click Yes, delete.
On the Candidate Profile: Individual tab, select Alternate Identifiers in the Additional Information section.
If needed, use Quick Filters and column sorting to find a name record.
Click Create definitions. The Create Alternate Identifier pop-up opens.
Select an Identifier Type. Required; cannot be changed after saving.
Enter a unique Identifier (up to 255 characters). Required; cannot be edited after saving.
Enter a Begin Date. Required. The default is today's date.
If needed, enter an End Date.
Click Save and create another or Create and close.
On the Candidate Profile: Individual tab, select Alternate Identifiers in the Additional Information section.
If needed, use Quick Filters and column sorting to find a name record.
Click the Edit icon for a record. The Edit Alternate Identifier pop-up opens.
Make updates to the Begin Date or End Date. The Identifier Type and Identifier cannot be updated.
Click Update.
On the Candidate Profile; Individual tab, select Alternate Identifiers in the Additional Information section.
Select the checkboxes next to the rows you want to export.
From the Options drop-down, select Download to Excel. The Download to Excel pop-up opens.
Select options for the Excel format and data columns.
Click Download. Your .xlsx or .zip file is saved in the file location that you have set in your browser settings.
FAQ
Access to view and edit user-defined fields is based on permissions granted by your organization. For example, let's look at the Candidate Profile: Individual tab.
Someone with administrative level permissions will navigate to Core, User Management, then Manage System Roles.
Use the System Roles Filter to find the appropriate role. In this example, choose a customized version of the Admissions role.
From the Options menu, select Edit.
Click on the Users tab.
If you do not see the staff member in the Users in Role list, click the Add to Role button.
When the Add to Role pop-up window appears, type in the name of the individual to search. Once the person's name appears, select the row and click the Add to Role button.
Click the User-Defined Forms tab.
Find one or more of the user-defined fields in the Name column. Each of these fields has a corresponding Permissions column. Select the relevant permission from the available options for the users assigned to the customized Admissions role as discussed in this example.
No permissions means users in this role will not see user-defined fields in the system.
Can configure UDEF form means users in this role can see user-defined fields in the system, and add, update, or delete data in the user-defined fields as well as manage the fields from the Core, Campus-wide Definitions, User-Defined Fields page.
Can view UDEF data means users in this role can see the user-defined fields in the system.
Can edit UDEF data means users in this role can add, update, or delete data in the user-defined fields in the system.
If you need to grant permissions to more than one User-Defined Fields area, repeat Step 8. Once completed, if the user has a permission value other than No Permissions the user should be able to log in to Jenzabar One Web and see the User-Defined Fields button for the related fields.
Additional name and identifier types are defined in the Campus-wide Definitions hub. See the help for each page for additional information.
To write a report that retrieves individuals with alternate identifiers, you will need to use the NameMaster, ALTERNATE_IDENTIFIER, and IDENTIFIER_TYPE_DEF tables. If additional information is needed for your report, other tables may need to be included. Here is an example of SQL syntax to get started:
SELECT
    NM.ID_NUM,
    NM.FIRST_NAME,
    NM.MIDDLE_NAME,
    NM.LAST_NAME,
    AI.IDENTIFIER,
    AI.BEGIN_DTE,
    AI.END_DTE,
    ITD.IDENTIFIER_TYPE_DESC
FROM ALTERNATE_IDENTIFIER AI
INNER JOIN IDENTIFIER_TYPE_DEF ITD
    ON AI.IDENTIFIER_TYPE = ITD.IDENTIFIER_TYPE
INNER JOIN NameMaster NM
    ON AI.ID_NUM = NM.ID_NUM
	ORDER BY ITD.IDENTIFIER_TYPE_DESC