Residence Life Administration Hub
Important
Information and features vary according to the roles to which you belong and the permissions associated with those roles. For more information, contact your module manager or your campus support team.
The Residence Life Administration hub provides a centralized workspace for the Residence Life Administrator to manage processes such as:
Session dates and times
Staff rosters and assignment zones for each session
Residence bedrooms available for each session
Student Housing (application, roommate requests, and room assignment)
Blocks on the Hub
Residence Life Administration Hub Overview Block
Residence Life Admin Calendar Block
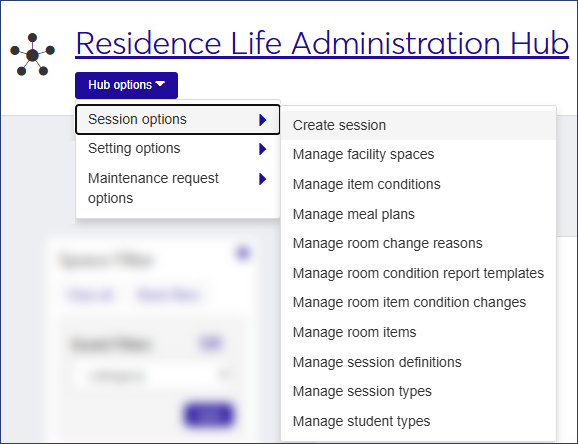
Hub Options Menu
Navigate to the Manage Session Definitions page and use the Session Filter to find the session you want to work with. You can search by check-in and check-out date range, session date range, keywords, or session type.
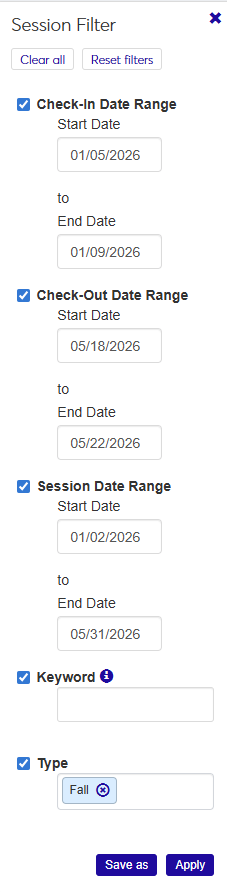
To search by a date range (check-in, check-out, or session), select the checkbox for the range you want to use, then click in the date field and use the pop-up calendar to select a date. You can select more than one date range.
If you select a start date but not an end date, the search returns all sessions that start or have a check-in/check-out start date after the date you selected.
If you select an end date but not a start date, the search returns all sessions that end or have a check-in/check-out end date before the date you selected.
If you select both a start and end date, the search returns all sessions or check-in/check-out periods that start and end within the selected dates.
To search by keyword, select the Keyword checkbox and enter a word or two that you expect to be in the title or description of the session overview. The search returns all sessions that include the keyword in the code, description, or session name.
To search by session type, select the Type checkbox, click in the field, and select an option from the list.
Click Apply. The Session Definitions list is narrowed to include only those sessions that match your filter criteria.
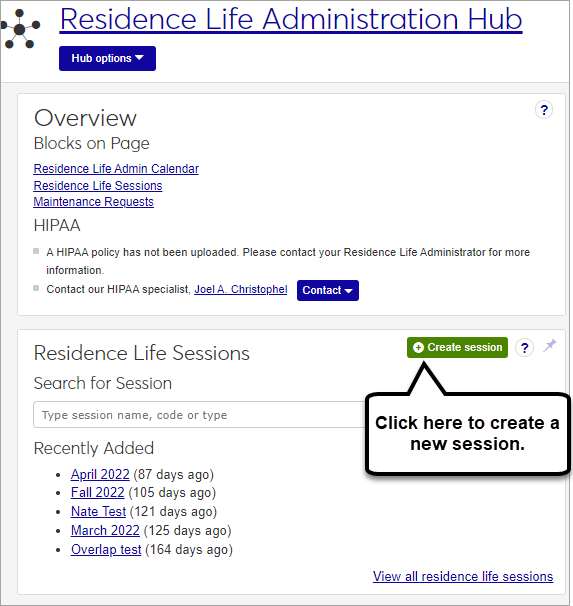
To create a new session, click the Create session button in the Residence Life Sessions block on the Residence Life Administration Hub. You can also find this button on the Manage Session Definitions page.
The Create Session Definition pop-up opens.
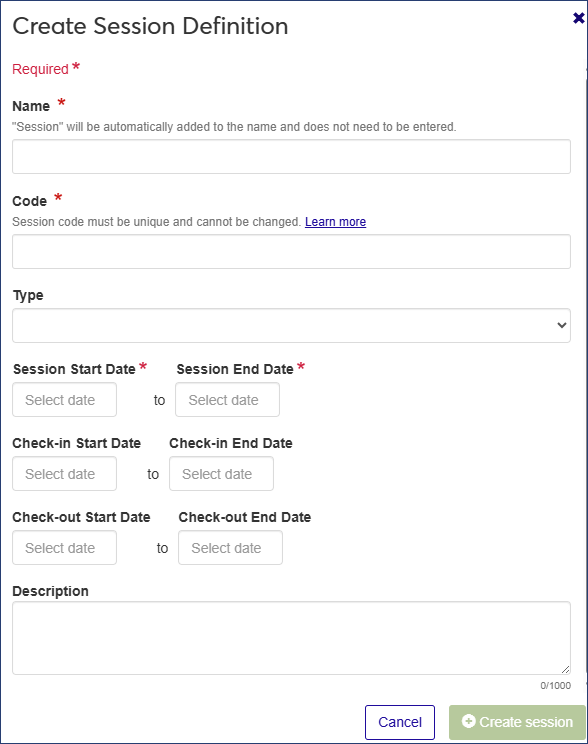
Enter a Name for your new session (required). The word "session" will be added to the end of the name automatically. If you enter "Summer 2024," for example, the name of the session will be "Summer 2024 Session."
Enter a unique session Code (required).
Tip
Your institution may have an established pattern for assigning codes, for example, Q32016 or FALL2018. Check with your administrator before setting a code, as this value is not editable and cannot be changed later.
Choose a Type from the drop-down menu (optional).
Tip
If there are no session types defined, this field will not appear. To attach a session type to a session, first define session types on the Manage session types page.
Click in the Session Start Date and Session End Date fields and use the pop-up calendars to select the start and end dates for the session. Both date fields are required.
If students need to be able to check in before the session starts, click in the Check-in Start Date and Check-in End Date fields and use the pop-up calendars to select start and end dates for the check-in period.
If students need to be able to check out after the session end date, click in the Check-out Start Date and Check-out End Date fields and use the pop-up calendars to select start and end dates for the check-out period.
Note
Setting check-in and check-out dates allows students to check in and check out outside of the session time frame. For example, if the session starts on September 1 but football players need to check in a week early to start practice, you can select a check-in start date of August 25.
Enter a Description (optional).
Click Create session.
Note
When you copy a session, you are making a snapshot of that session at the time of the copy. Changes you make to the copied session after that time will not be reflected in the new session. In other words, if you copy Session A to create Session B, changes you make to Session A after you copy it will not appear in Session B.
There are two ways to copy a session:
You can use an existing session as the basis for a brand new session.
You can copy information from one session into another already existing session.
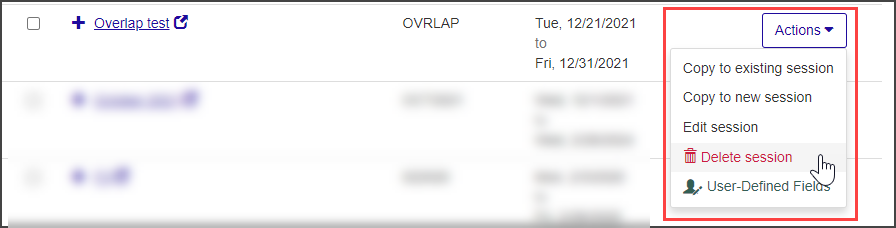
On the Manage Session Definitions page, find the session you would like to copy.
From the Actions drop-down, select Copy to new session. The Copy to New Session pop-up window opens.
Enter a Name for your new session (required). The word "session" will be added to the end of the name automatically. If you enter "Summer 2024," for example, the name of the session will be "Summer 2024 Session."
Enter a unique session Code (required).
Tip
Your institution may have an established pattern for assigning codes, for example, Q32016 or FALL2018. Check with your administrator before setting a code, as this value is not editable and cannot be changed later.
Choose a Type from the drop-down menu (optional).
Tip
If there are no session types defined, this field will not appear. To attach a session type to a session, first define session types on the Manage session types page.
Click in the Session Start Date and Session End Date fields and use the pop-up calendars to select the start and end dates for the session. Both date fields are required.
If students need to be able to check in before the session starts, click in the Check-in Start Date and Check-in End Date fields and use the pop-up calendars to select start and end dates for the check-in period.
If students need to be able to check out after the session end date, click in the Check-out Start Date and Check-out End Date fields and use the pop-up calendars to select start and end dates for the check-out period.
Note
Setting check-in and check-out dates allows students to check in and check out outside of the session time frame. For example, if the session starts on September 1 but football players need to check in a week early to start practice, you can select a check-in start date of August 25.
Enter an optional Description.
Select the checkboxes under Select Items to Copy to determine which items you want to copy to the new session.
Billing Configuration: Copies the session billing configuration from the existing session to the new one.
Session Students: Copies students from the existing session into the new one. When you select the checkbox, options appear that allow you to choose whether or not to include students' meal plans or activities.
Residence Spaces: Copies residence spaces from the existing session into the new one. When you select the checkbox, options appear that allow you to choose whether or not to include student bedroom assignments and existing housing process setup, as well as assignment and on-call zones.
Residence Life Staff: Copies assigned staff from the existing session to the new one.
Click Create session.
On the Manage Session Definitions page, find the session you would like to copy information from.
From the Actions drop-down, select Copy to existing session. The Copy to Existing Session pop-up opens.
In the Select an Existing Session to Copy to field, begin typing the name of the session you want to copy into and select the name when it appears on the list. The drop-down won't display any choices until you type at least two characters of the session name.
Select the checkboxes under Select Items to Copy to determine which items you want to copy to the new session.
Billing Configuration: Copies the session billing configuration from the existing session to the new one.
Session Students: Copies students from the existing session into the new one. When you select the checkbox, options appear that allow you to choose whether or not to include students' meal plans or activities.
Residence Spaces: Copies residence spaces from the existing session into the new one. When you select the checkbox, options appear that allow you to choose whether or not to include student bedroom assignments and existing housing process setup, as well as assignment and on-call zones.
Residence Life Staff: Copies assigned staff from the existing session to the new one.
Click Copy.
Sessions cannot be deleted if students have been added to the session.
If the session can be deleted, the Delete session option is available from the Actions drop-down menu on the Manage Session Definitions page. To access this page, click the View all residence life sessions link on the Residence Life Sessions block in the Residence Life Administration Hub.
 |
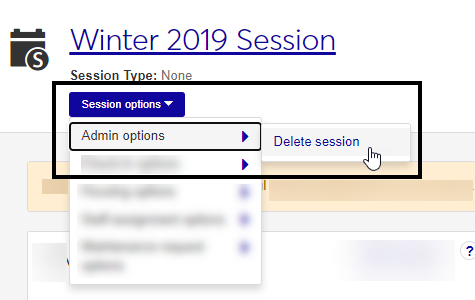
You can also delete a session from the Session summary page by clicking the Session options drop-down and selecting Admin options, then Delete Session. If the session has applicant groups associated with it, it can no longer be deleted and this menu option is not available.
 |
Before students can be assigned housing, you must first add residence spaces to the Session.
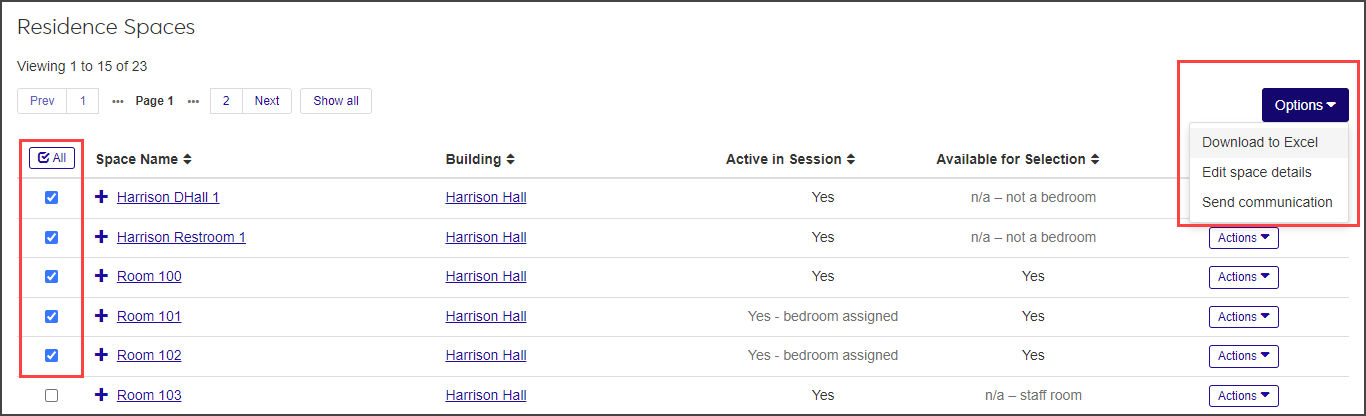
On the Session summary page, click the Session options drop-down menu and select Housing options, then Manage residence spaces. If there are active and available spaces in Facilities with a place type of Residence/Housing Facility, the Add Active Spaces to Session pop-up opens and asks if you want to make the spaces available in the session.
You will be given an option to continue or cancel the action. Click Continue. The Manage Residence Spaces page opens.
Using the Options drop-down, edit details or send communications for selected rows.
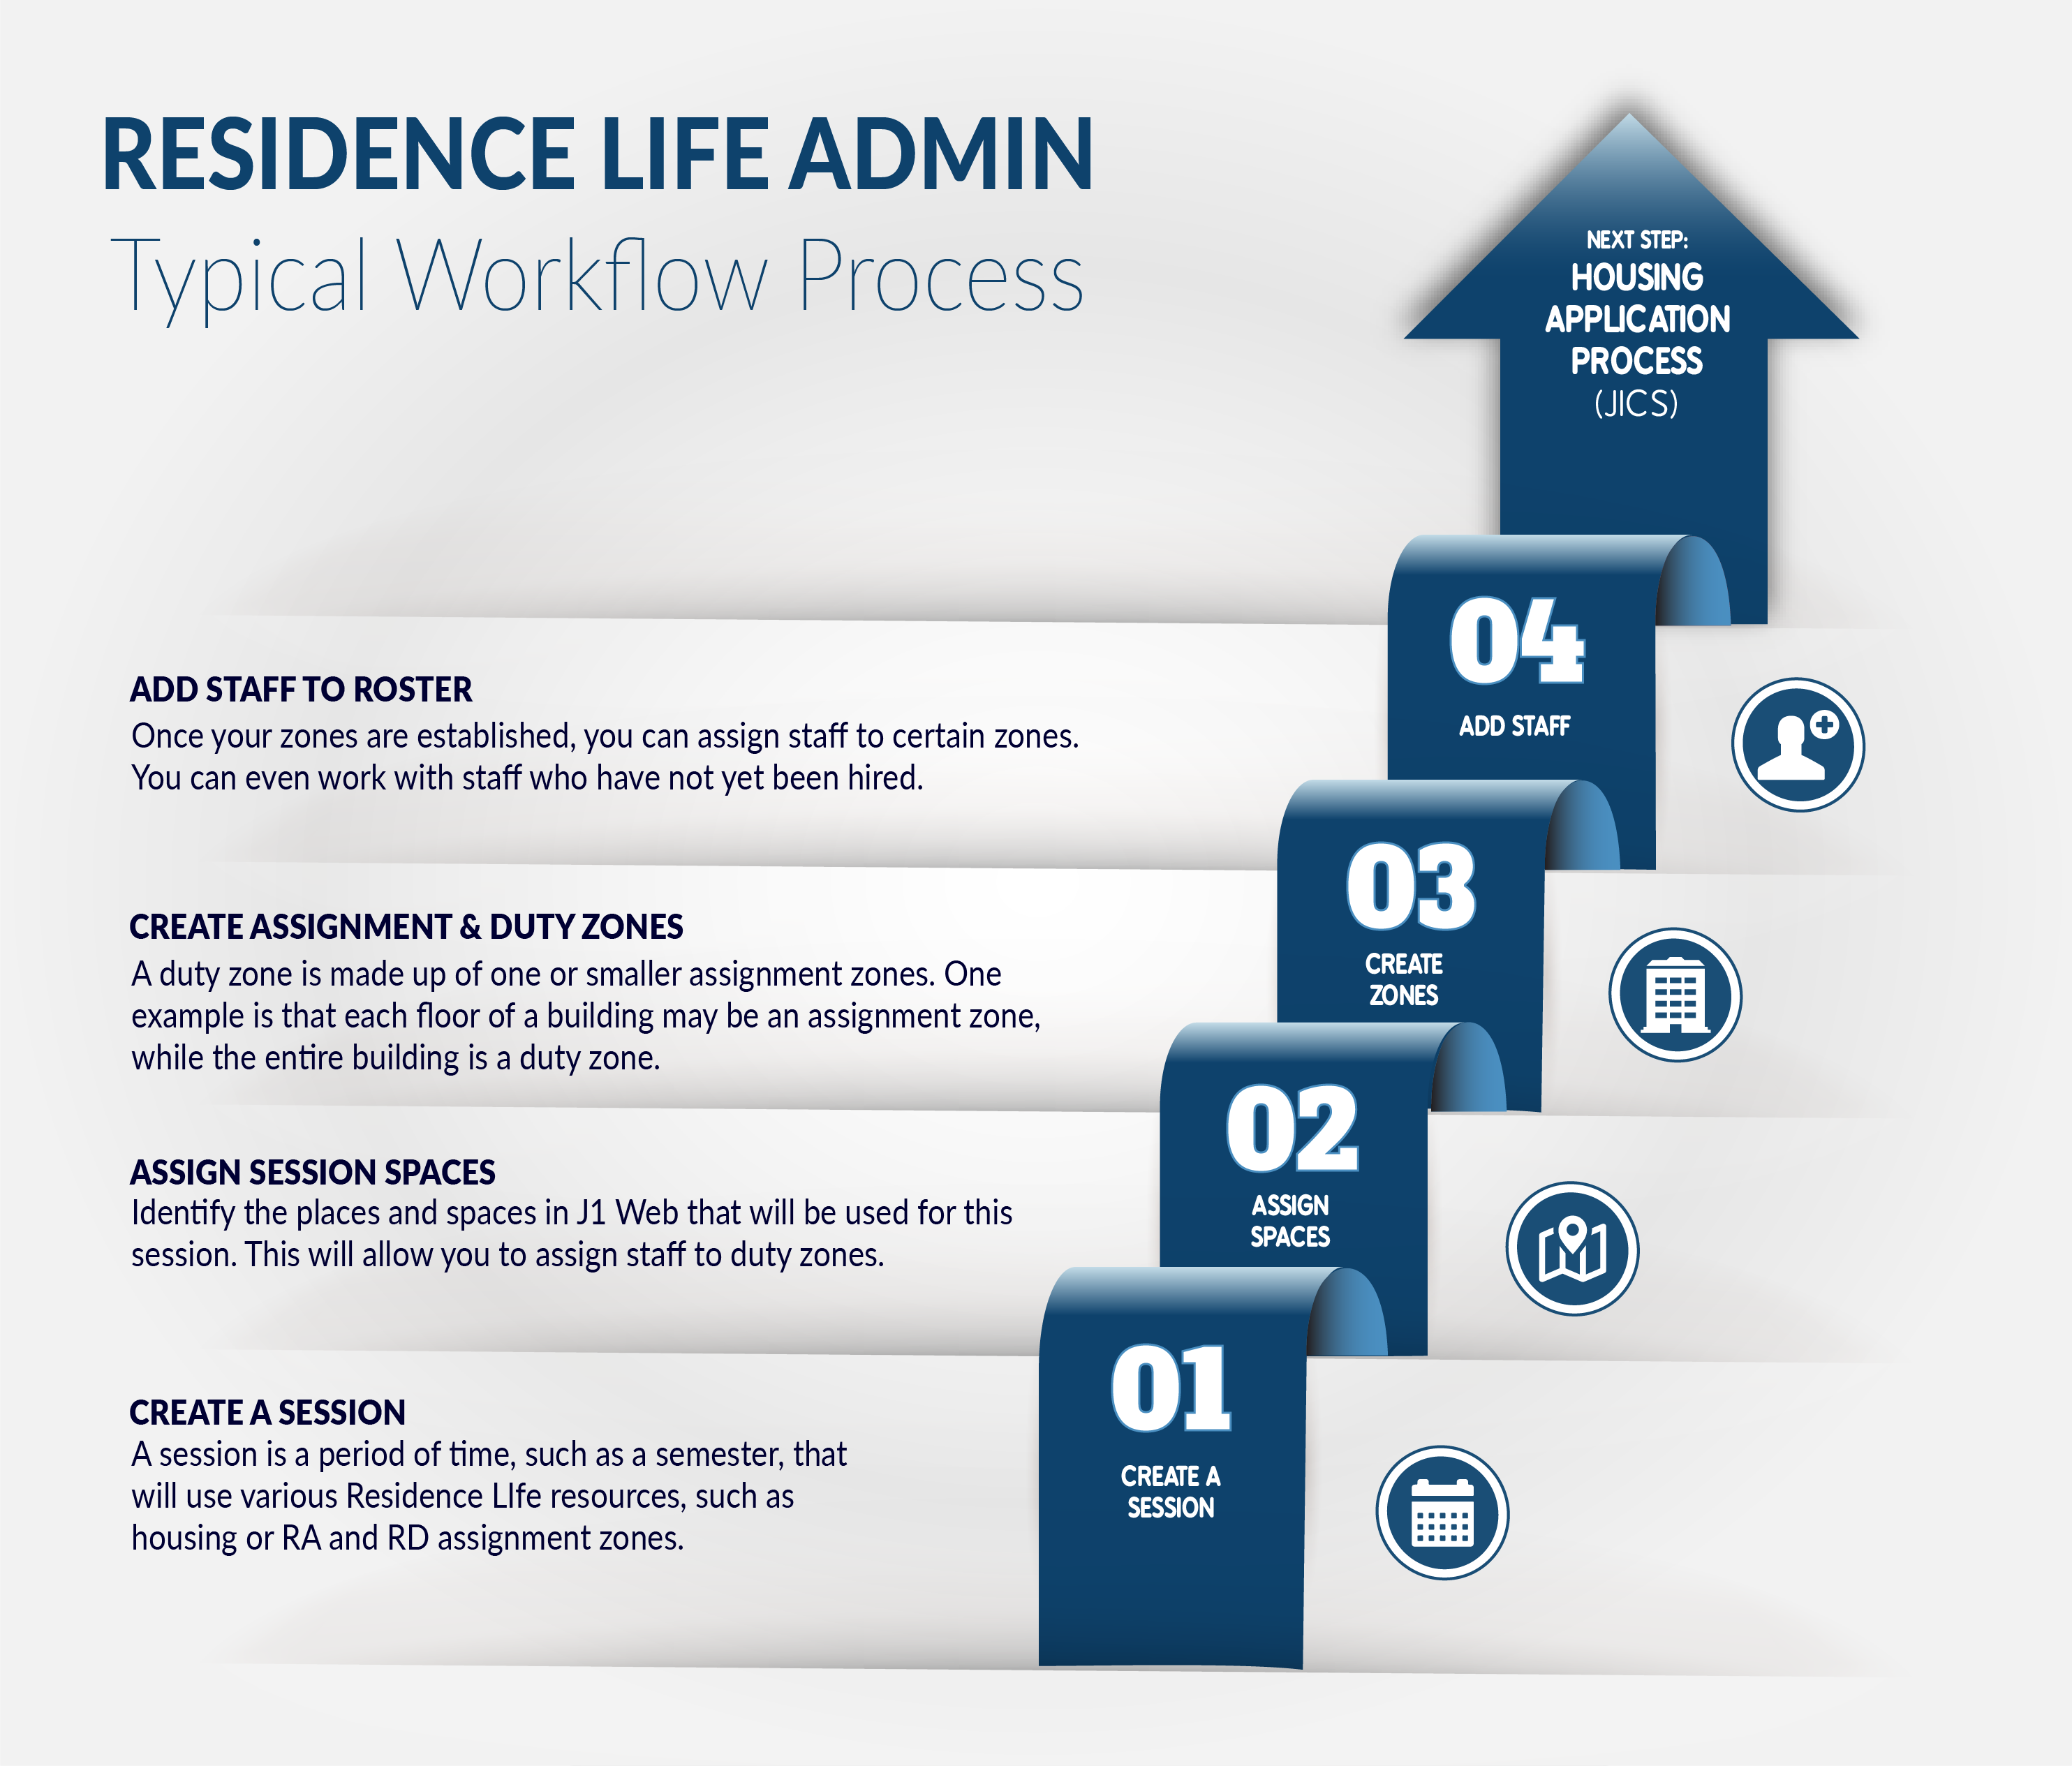
Below is a diagram of a typical Residence Life Admin workflow. Although some steps may be performed or completed in a different sequence, the first step is usually to create a session.