Candidate Profile: Biograph Tab
Important
Information and features vary according to the roles to which you belong and the permissions associated with those roles. For more information, contact your module manager or your campus support team.
Note
From the Jenzabar One Web navigation menu, select Enrollment, then Admissions, and then Candidates, or use the Find a Page search for the Candidates page. Use the filter to find candidates. On a candidate's row, click the Actions drop-down and select Candidate Profile. When the page loads, click the Biograph tab.
You can also use the Person Search icon  to find a candidate. Then, use the Person options drop-down to select Candidate, then Profile. When the page loads, click the Biograph tab.
Biograph information is used for various reports and processes throughout the system, including year-end reports, state and institutional reports, and financial aid disbursement.
The Biograph tab displays personal and demographic information. From this page, you can view and make updates to personal, employment, social security number (SSN), and other information for an individual. When biograph information is updated, a historical record is created and available for reference.
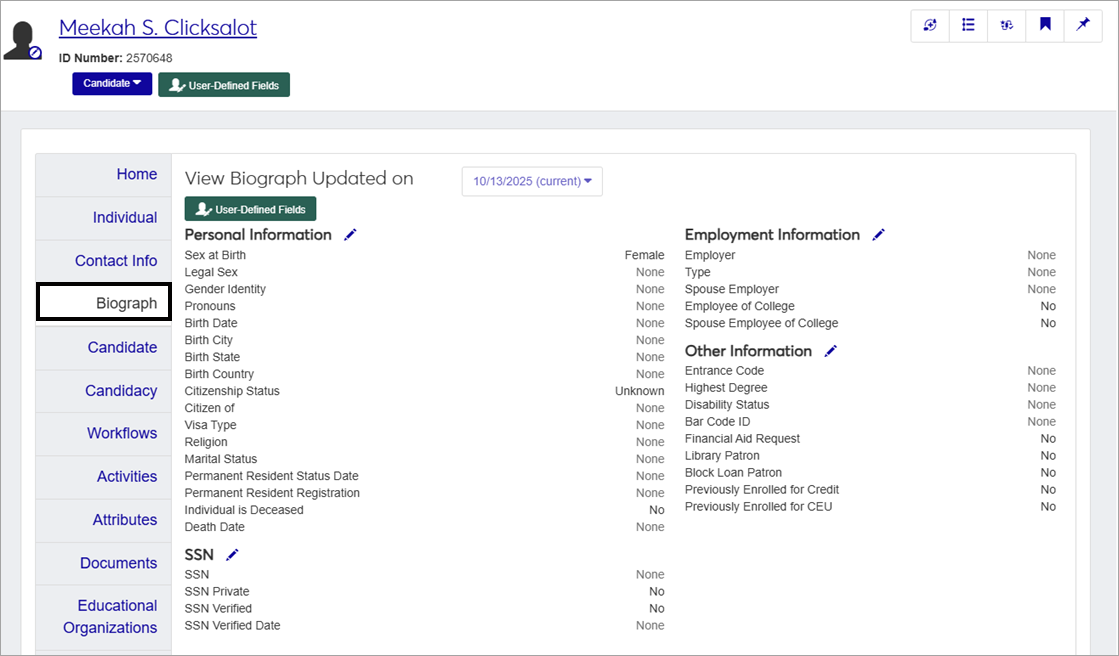
The Candidate Profile: Biograph tab includes the following areas:
View Biograph Updated on: If historical changes have been made to the individual's biographical data, a drop-down is available for you to select the appropriate date. The software defaults to the current record.
Personal Information: Supports viewing and data entry for an individual's personal biographical data such as gender, birth details, citizenship, religion, and marital status.
SSN: Supports viewing and data entry for SSN-related data.
Employment Information: Supports viewing and data entry for employment-related data tracking.
Other Information: Supports viewing and data entry for miscellaneous data such as Entrance Code, Highest Degree, Disability Status, Bar Code ID, Financial Aid Request, Library Patron, Block Loan Patron, Previously Enrolled for Credit, and Previously Enrolled for CEU.
Employment Information columns were originally designed for clients who did not purchase licensing for Jenzabar One Desktop Payroll or Personnel as a way to input employment data. Today licensed and unlicensed clients equally use these columns to capture data.
You can capture additional contact information with user-defined fields. User-defined fields are managed by your System Administrator and can be useful for internal reporting. Click the User-Defined Fields button to review or add more details to an individual's record.
To access this page and work with the general features, you must belong to the Admissions role or a customized version of this role with the Can view candidates permission enabled. You also will need the Can manage candidates permission enabled in order to edit candidate information.
To view and manage biograph information, you must be in a Person Management role (or copy of it) with the appropriate permissions. For additional information about permissions, see Person Management Permissions.
If you use user-defined fields (UDEFs) for tracking candidate information, you will also need permission to view and edit those fields. Access to user-defined fields is assigned by role-level permissions. For each role you want to give access to user-defined fields, click on the User-Defined Fields tab. There you can give varying degrees of access to each user-defined field group used in the system. For more information, review User-Defined Forms.
Access the Candidate Profile from the Candidates page. Following these steps will take you to the Candidate Profile: Biograph Tab.
Open and log in to Jenzabar One Web.
From the Jenzabar One Web navigation menu, select Enrollment, then Admissions, then Candidates, or use the Find a Page search for the Candidates page.
Use the filter to find one or more candidates.
From the Actions menu, select Candidate Profile.
Click the Biograph tab.
Note
You can also use the Person Search icon to find a candidate. Then, use the Person options drop-down to select Candidate, then Profile.
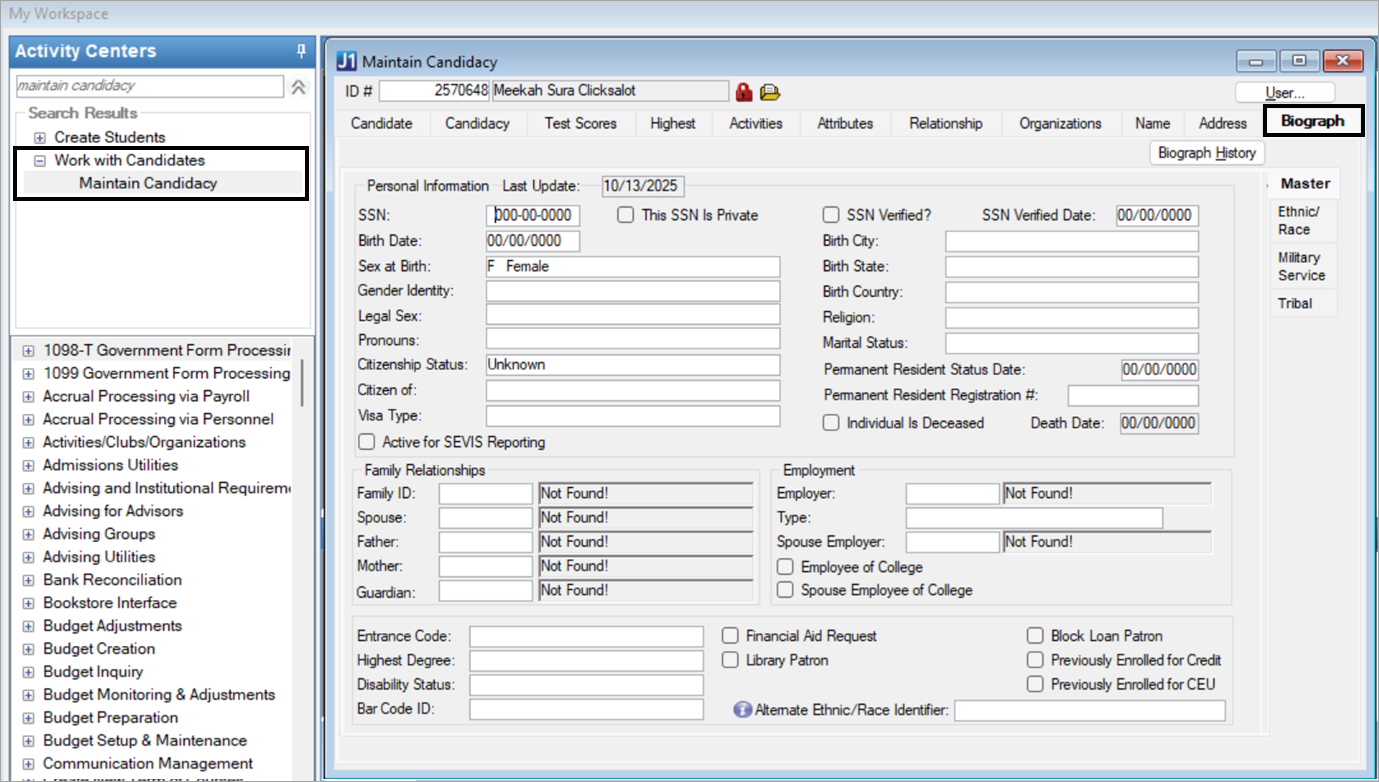
The Maintain Candidacy window in Jenzabar One Desktop serves as the central location for managing candidate information. To access the Address tab within this window, follow these steps.
Open and log in to Jenzabar One Desktop.
In the search bar for Activity Centers type "Maintain Candidacy". The Create Students and Work with Candidates Activity Centers options appear.
Select Maintain Candidacy from Create Students or Work With Candidates.
When the window opens, enter an ID number or search for a person. Then, select the Biograph tab.
Note
Updating biographical data in the Biograph tab of the Jenzabar One Desktop Maintain Candidacy window allows this information to be seen in Jenzabar One Web. Conversely, any changes or additions you make to biographical information on the Biograph tab of the Jenzabar One Web Candidate Profile page will also be reflected in Jenzabar One Desktop, ensuring seamless access to your updated details across both platforms.
The fields available on the Candidate Profile: Biograph tab are listed in the Field Name column of the tables below. For each field, the associated database table and column names are provided, along with additional field information that may be useful for support, maintenance, and reporting activities.
When the fields in a section are updated, a historical record is created to preserve the previous version of the record.
Personal Information for the current record is stored in the BIOGRAPH_MASTER table.
Field Name | Column Name | Notes | ||||||||||||||
|---|---|---|---|---|---|---|---|---|---|---|---|---|---|---|---|---|
Sex at Birth | GENDER | Indicates the person's sex (male or female) assigned to an individual at birth. This field can also be associated with a room such as a bathroom or dormitory room. Available options are managed in the Campus-wide Definitions hub, Maintain Table Values page under the "gender" column name. NoteAdditional options can be used for your school, but the Personnel IPEDS Reports only use the 'M' and 'F' values. | ||||||||||||||
Legal Sex | LegalGenderIdentificationDefinitionAppID | Identifies the person's sex as currently indicated on a birth certificate, passport, or other official document. It may differ from one's gender identity and/or sex assigned at birth. Available options are managed in the Campus-wide Definitions hub on the Gender Identity Definitions page. BIOGRAPH_MASTER.LegalGenderIdentificationDefinitionAppID values connect to the GenderIdentificationDefinition table and AppID column. The following Jenzabar-provided default data values are not editable. In Jenzabar One Web, these display with a lock icon
To make default values unavailable to users, set Active to No. | ||||||||||||||
Gender Identity | SelfGenderIdentificationDefinitionAppID | The gender the person uses for identification. Available options are managed in the Campus-wide Definitions hub on the Gender Identity Definitions page. BIOGRAPH_MASTER.SelfGenderIdentificationDefinitionAppID values connect to the GenderIdentificationDefinition table and AppID column. The following Jenzabar-provided default data values are not editable. In Jenzabar One Web, these display with a lock icon
To make default values unavailable to users, set Active to No. | ||||||||||||||
Pronouns | GenderPronounDefinitionAppID | Personal pronouns for the person (e.g., he/him, she/her, or they/them). Available options are managed in the Campus-wide Definitions hub on the Personal Pronoun Definition page. BIOGRAPH_MASTER.GenderPronounDefinionAppID values connect to the GenderPronounDefinition table and AppID column. The following Jenzabar-provided default data values are not editable. In Jenzabar One Web, these display with a lock icon
To make default values unavailable to users, set Active to No. | ||||||||||||||
Birth Date | BIRTH_DTE | The person's birthday, month, and year. | ||||||||||||||
Birth City | BIRTH_CITY | The city where the person was born. Up to 25 characters. | ||||||||||||||
Birth State | BIRTH_STATE | The state where the person was born. | ||||||||||||||
Birth Country | BIRTH_COUNTRY | The country where the person was born. | ||||||||||||||
Citizenship Status | CITIZENSHIP_STS | Required. Jenzabar provides the following values:
These values are hard coded and cannot be changed. NoteThe <country> value in the Citizen of and Non-Resident description is dependent on what value your institution chooses for the "Your Institution's Country" configuration item.
| ||||||||||||||
Citizen of | CITIZEN_OF | Indicates the country where the person has citizenship. Available options are managed on the Campus-wide Definitions hub, Maintain Table Values page under the "citizen_of" column name. | ||||||||||||||
Visa Type | VISA_TYPE | Indicates which type of visa the person has. This information is used for SEVIS (Student and Exchange Visitor Information System) reporting. Jenzabar provides the following codes associated with visa types.
Available options are maintained on the Campus-wide Definitions hub, Maintain Table Values page under the "visa_type" column name. For more information about each visa type, take a look at this Frequently Asked Question topic. CautionThese codes are required in the SEVIS Reporting; therefore, do not change the codes for F-1, M-1, J-1, F-2, M-2, and J-2. | ||||||||||||||
Religion | RELIGION | Indicates the person's religious affiliation. Available options are managed on the Campus-wide Definitions hub, Maintain Table Values page under the "religion" column name. | ||||||||||||||
Marital Status | MARITAL_STS | Indicates the person's marriage status. Available options are maintained in the Campus-wide Definitions hub, Maintain Table Values page under the "marital_sts" column name. | ||||||||||||||
Permanent Resident Status Date | PERMANENT_RESIDENT_STS_DTE | Indicates the date the person became a permanent resident of the U.S. | ||||||||||||||
Permanent Resident Registration | ALIEN_REGISTRATION_NUMBER | Up to 18 characters. The resident registration number that identifies the person's permanent registration status. | ||||||||||||||
Individual is Deceased | DECEASED | Indicates whether the person is deceased. By default, this check box is cleared (No). When you select this check box (Yes), the Death Date column becomes available. | ||||||||||||||
Death Date | DEATH_DTE | Indicates the date the person died. Visible and editable only when the "Individual is Deceased" checkbox is selected. |

Permissions Required
To view and manage biograph information, you must be in a Person Management role (or copy of it) with the appropriate permissions. For additional information about permissions, see Person Management Permissions.
To view and edit user-defined fields, you must have the "Can edit UDEF data" permission for the appropriate fields on the User-Defined Fields tab.
How To
Open and log in to Jenzabar One Web.
From the Jenzabar One Web navigation menu, select Enrollment, then Admissions, and then Candidates, or use the Find a Page search for the Candidates page.
Use the filter to find one or more candidates.
On a candidate's row, click the Actions drop-down and select Candidate Profile.
Click the Biograph tab.
By default, the system shows the current record. To see details about historical biographical data for the individual, click the drop-down next to View Biograph Updated on and select a Biograph History Record to view. If the individual does not have any historical records, you will only see the current record.
Tip
You can also use the Person Search icon
to find a candidate. Then, use the Person options drop-down to select Candidate, and then Profile. When the page loads, click the Biograph tab.
On the Candidate Profile Biograph tab, click the Create biograph record button. The Create Biograph Record pop-up opens.
Enter or select values for one or more fields. The Citizenship Status field requires a value. The default is "Unknown". For additional information about these fields, see Biograph Tab Database Table Information for the Personal Information, SSN, Employment Information, and Other Information categories.
Click Create. A row is created in the BIOGRAPH_MASTER table with the information you selected. The pop-up closes.
On the Candidate Profile, Biograph tab, click the Edit icon
 next to Personal Information. The Edit Personal information pop-up opens.
Make updates to the available fields as needed. Some fields may not be available depending on your permissions. For more information, see Biograph tab, Personal Information fields.
Click Update. The page updates and a historical record for the previous information is created.
Note
If you are in a role with a SSN data mask configured, you may not see the full SSN.
On the Candidate Profile page, Biograph tab, click the Edit icon
next to SSN. The Edit SSN pop-up opens.Review and make updates to the editable fields as needed. For more details about fields, see Biograph tab, SSN Information fields.
Click Update. The page updates and a historical record for the previous information is created.
On the Candidate Profile page, Biograph tab, click the Edit icon
next to Employment Information. The Edit Employment Information pop-up opens.Review and make updates to the available fields as needed. For more information, see Biograph tab, Employee Information fields.
Click Update. The page updates and a historical record for the previous information is created.
On the Candidate Profile page, Biograph tab, click the Edit icon
next to Other Information. .Review and make updates to the available fields as needed. For more details about fields, see Biograph tab, Other Information fields.
Click Update. The page updates and a historical record for the previous information is created.
On the Candidate Profile page, Biograph tab, click the User-Defined Fields button.
On the User-Defined Fields Edit Data pop-up, edit the fields as needed.
Click Save. After updates are made, the information is saved and displays on the page.
FAQ
The U.S. government uses SEVIS (Student and Exchange Visitor Information System) to keep track of nonimmigrant students that attend educational institutions in the U.S. The different visa types are described below. The definitions below and additional information about visas can be found at the U.S. Immigration and Customs Enforcement website..
Visa Type | Description |
|---|---|
F-1 | Visa issued to foreign students pursuing a full course of academic study in a school approved by the Student and Exchange Visitor Program (SEVP). |
M-1 | Visa issued to foreign nationals pursuing a full course of study at a SEVP-approved vocational school or other recognized nonacademic institution (other than in language training programs) in the United States. The term school encompasses all institutions approved for attendance by M-1 students. |
J-1 | Visa issued to foreign nationals who have been selected by a sponsor designated by the United States Department of State to participate in an exchange visitor program in the United States. |
F-2 | Visa issued to a foreign national who is a spouse or qualifying child (under the age of 21) of an F-1 nonimmigrant. |
M-2 | Visa issued to a foreign national who is a spouse or qualifying child (under the age of 21) of an M-1 nonimmigrant. |
J-2 | Visa issued to a foreign national who is a spouse or qualifying child (under the age of 21) of a J-1 nonimmigrant. |
Access to view and edit user-defined fields is based on permissions granted by your organization. For example, let's look at the Candidate Profile, Individual tab.
Someone with administrative-level permissions will navigate to Core, User Management, then Manage System Roles.
Use the System Roles Filter to find the appropriate role. In this example, choose a customized version of the Admissions Role.
From the Options menu, select Edit.
Click on the Users tab.
If you do not see the staff member in the Users in Role list, click the Add to Role button.
When the Add to Role pop-up window appears, type in the name of the person to activate the search. Once the user name appears, click the Add to Role button.
Click the User-Defined Forms tab.
Find one or more of the user-defined fields in the Name column. Each of these fields has a corresponding Permissions column. Select the relevant permission from the available options for the users assigned to the customized Admissions role as discussed in this example.
No permissions means users in this role will not see user-defined fields in the system.
Can configure UDEF form means users in this role can see user-defined fields in the system, and add, update, or delete data in the user-defined fields as well as manage the fields from the Core, Campus-wide Definitions, User-Defined Fields page.
Can view UDEF data means users in this role can see the user-defined fields in the system.
Can edit UDEF data means users in this role can add, update, or delete data in the user-defined fields in the system.
If you need to grant permissions to more than one User-Defined Fields area, repeat Step 8. Once completed, if the user has a permission value other than No Permissions the user should be able to log in to Jenzabar One Web and see the User-Defined Fields button for the related fields.
There are a few reasons why certain fields aren't visible.
You may not have the appropriate permissions. Remember that permissions and access between Desktop and Jenzabar One Web are handled differently, and your access in Jenzabar One Desktop does not determine your access in Jenzabar One Web.
The fields may not have been brought into Jenzabar One Web yet. These fields may be available in a future release.
As Jenzabar works to bring Desktop features into Jenzabar One Web, certain fields and functionality may be rearranged, reworked, or removed to improve the user experience. Some fields may simply be grouped differently in Jenzabar One Web than they were in Desktop.
Contact your campus support team if you need additional assistance.