Candidate Profile: Attributes
Important
Information and features vary according to the roles to which you belong and the permissions associated with those roles. For more information, contact your module manager or your campus support team.
Note
From the Jenzabar One Web navigation menu, select Enrollment, then Admissions, and then Candidates, or use the Find a Page search for the Candidates page. Use the filter to find candidates. On a candidate's row, click the Actions drop-down and select Candidate Profile. When the page loads, click the Attributes tab.
You can also use the Person Search icon  to find a candidate. Then, use the Person options drop-down to select Candidate, then Profile. When the page loads, click the Attributes tab.
From the Candidate Profile: Attributes tab, you can perform the following actions for each candidate:
View attribute information
Create new attributes for an individual
Edit existing attributes
Delete attributes
Export attribute information to Microsoft Excel
Access attribute User-Defined fields
Sort attributes by column
Filter attributes using the Quick Filter
The Candidate Profile: Attributes tab enables your institution to track characteristics, classifications, hobbies, extracurricular activities, and other institution-defined attributes associated with a candidate. Attributes can be used for reporting, filtering, communication efforts, and institutional business processes.
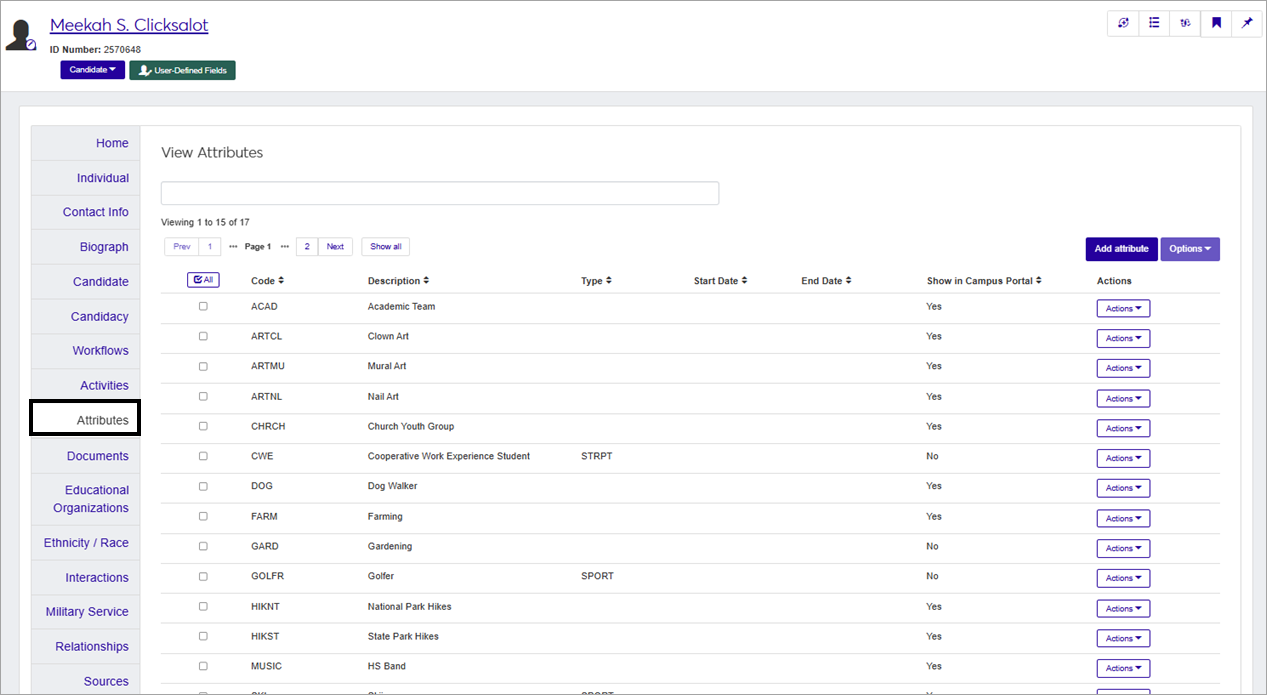
The Candidate Profile: Attributes tab displays attributes in a grid format. Each attribute appears as a separate entry showing items such as code, description, type, effective dates, and Campus Portal visibility.
By default, the page displays up to 15 entries, but you can click Show all to see all rows at once. As you scroll down the page, additional rows will appear. To go back to the default limit of 15, click Show 15.
You can capture additional information about candidates with user-defined fields. These fields can support institution-specific tracking and reporting needs. Click the User-Defined Fields button to review or add institution-specific information for a candidate. Your system administrator manages user-defined fields.
To access this page and work with the general features, you must belong to the Admissions role or a copy of this role with the Can view candidates permission enabled. To view and work with attribute information on this tab, you must also belong to the Person Management role or a copy of this role with the Can manage attributes permission enabled.
If you use user-defined fields for tracking candidate information, users will also need permission to view and edit those fields. Access to user-defined fields is assigned by role-level permissions. For each role that requires access to user-defined fields, click the User-Defined Fields tab. There you can give varying degrees of access to each user-defined field group used in the system. For more information, review User-Defined Forms.
Access the Candidate Profile from the Candidates page. Following these steps will take you to the Candidate Profile: Attributes tab.
Open and log in to Jenzabar One Web.
From the Jenzabar One Web navigation menu, select Enrollment, then Admissions, then Candidates, or use the Find a Page search for the Candidates page.
If needed, use the filter to find one or more candidates.
On a candidate's row, click the Actions drop-down and select Candidate Profile.
Click the Attributes tab.
Note
You can also use the Person Search icon to find a candidate. Then, use the Person options drop-down to select Candidate, then Profile. When the page loads, click the Attributes tab.
The Maintain Candidacy window in Jenzabar One Desktop serves as the central location for managing candidate information.
Caution
If your institution is transitioning to Jenzabar One Web, you should create and maintain Attributes in Jenzabar One Web instead of using Jenzabar One Desktop to manage attribute data.
To access the Attributes tab within this window, follow these steps.
Open and log in to the Jenzabar One Desktop application.
In the search bar for Activity Centers, type "Maintain Candidacy". The Create Students and Work with Candidates Activity Centers appear.
Select Maintain Candidacy from Create Students or Work With Candidates.
When the window opens, enter an ID number or search for a person. Then, select the Attributes tab.
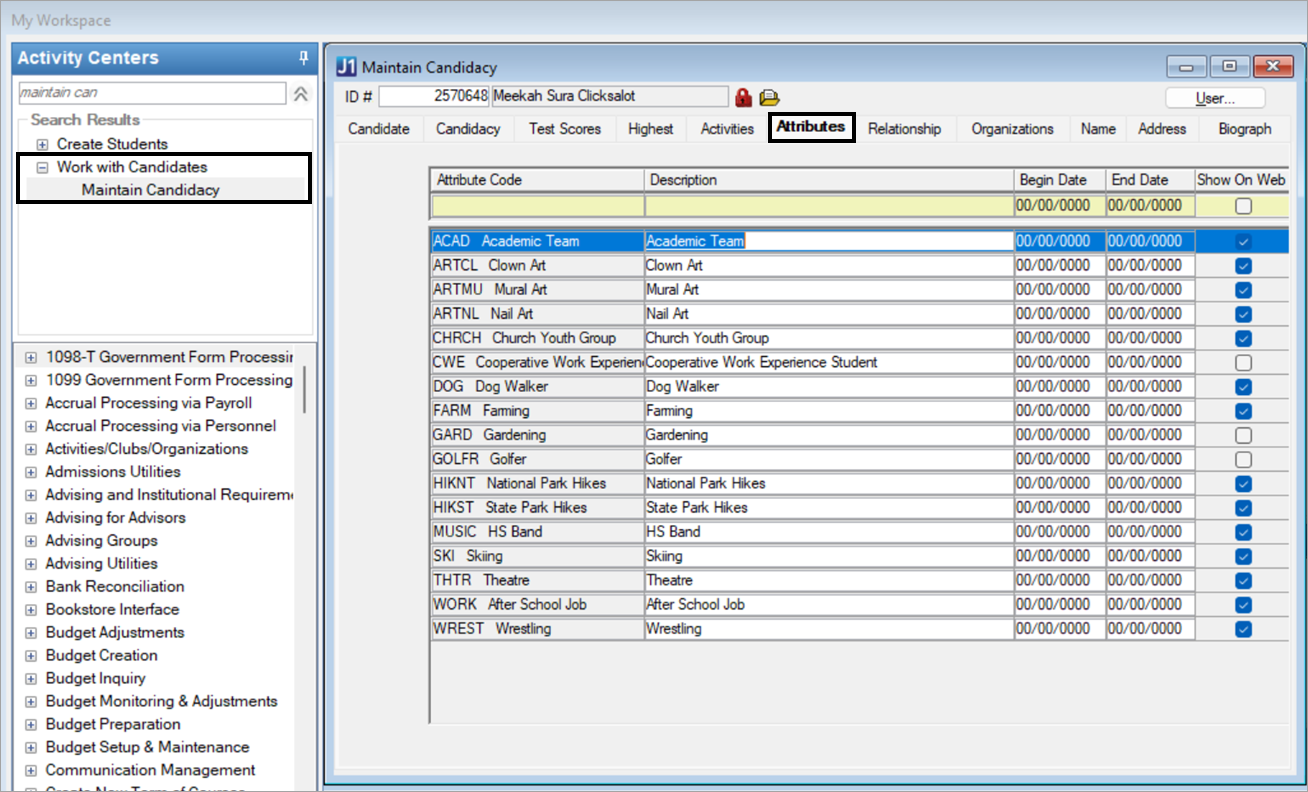
The Candidate Profile: Attributes tab displays fields in the grid. The table below lists the fields available on the Candidate Profile: Attributes tab. For each field, the following table identifies the associated database table and column names along with additional information that may be useful for support, maintenance, and reporting activities.
How To
Open and log in to Jenzabar One Web.
From the Jenzabar One Web navigation menu, select Enrollment, then Admissions, then Candidates, or use the Find a Page search for the Candidates page.
Use the filter to find one or more candidates.
From the Actions menu, select Candidate Profile.
Click the Attributes tab.
Tip
You can also use the Person Search icon to find a candidate. Then, use the Person options drop-down to select Candidate, then Profile. When the page loads, click the Attributes tab.
On the Candidate Profile: Attribute tab, click the Add attribute button. The Add Attribute pop-up appears.
Complete the Attributes fields. Attribute Code is required.
Click Save to save your changes. Click Cancel to exit without making a change.
On the Candidate Profile: Attributes tab, find the row of the attribute that you want to edit.
From the Actions menu, select Edit.
Edit the Attributes fields as needed.
Click Save to save your changes. Click Cancel to exit without making a change.
On the Candidate Profile: Attributes tab, find the row of the attribute that you want to delete, and select the checkbox for the row.
Click the Options button, and select Delete
 from the menu.
The Delete Attribute pop-up appears. Click Yes, delete to remove the attribute. Click Cancel to exit without making a change.
Select the checkboxes next to the rows you want to export.
From the Options drop-down, select Download to Excel. The Download to Excel pop-up opens.
Select options for the Excel format and data columns.
Click Download. Your .xlsx or .zip file is saved in the file location that you have set in your browser settings.
Caution
While on the Attributes tab, the User-Defined Fields button is available from the header of the Candidate Profile. The user-defined field data is stored in the CANDIDATE and CANDIDATE_UDF tables. Saving changes to the User-Defined Fields from this location updates the CANDIDATE and CANDIDATE_UDF tables accordingly.
On the Candidate Profile: Attributes tab, find the row of the attribute that you want to add user-defined data to.
From the Actions menu, select User-Defined Fields.
When the User-Defined Fields pop-up window appears, add the information to the user-defined fields.
When you are finished, click Save to save your changes to the ATTRIBUTE_TRANS_UDF table. Click Cancel to exit without making a change.
To sort by attribute code, click the Code column heading.
To sort by attribute description, click the Description column heading.
To sort by attribute type, click the Type column heading.
To sort by start date, click the Start Date column heading.
To sort by end date, click the End Date column heading.
To sort by whether the attribute is to be displayed in the Campus portal, click the Show in Campus Portal? column heading.
You can use a quick filter to limit the list of attributes to one or more items by searching for values in the columns. For example:
Limit the list to one or more attribute descriptions, such as typing "Academic Team", and then clicking Add 'Academic Team'. If the filter finds "Academic Team" in the Description column, the row appears in the list.
Limit the list to one or more attribute codes, such as typing "MUSIC", then clicking Add 'MUSIC'. If the filter finds "MUSIC" in the Code column, the row appears in the list.
Limit the list to attributes by one or more types that you have permission to see, such as typing "STRPT", and then clicking Add 'STRPT'. If the filter finds "STRPT" in the Type column, and you have permission to view that attribute type, the attributes with the STRPT Type appear in the list.
FAQ
Access to view and edit user-defined fields is based on permissions granted by your organization. For example, let's look at the Candidate Profile: Candidate tab.
Someone with administrative-level permissions will navigate to Core, User Management, then Manage System Roles.
Use the System Roles Filter to find the appropriate role. In this example, choose a customized version of the Admissions role.
From the Options menu, select Edit.
Click on the Users tab.
If you do not see the staff member in the Users in Role list, click the Add to Role button.
When the Add to Role pop-up window appears, type in the name of the individual to search. Once the individual appears, select the person and click the Add to Role button.
Click the User-Defined Forms tab.
Find one or more of the user-defined fields in the Name column. Each of these fields has a corresponding Permissions column. Select the relevant permission from the available options for the users assigned to the customized Admissions role as discussed in this example.
No permissions means users in this role will not see user-defined fields in the system.
Can configure UDEF form means users in this role can see user-defined fields in the system, and add, update, or delete data in the user-defined fields as well as manage the fields from the Core, Campus-wide Definitions, User-Defined Fields page.
Can view UDEF data means users in this role can see the user-defined fields in the system.
Can edit UDEF data means users in this role can add, update, or delete data in the user-defined fields in the system.
If you need to grant permissions to more than one User-Defined Fields area, repeat Step 8. Once completed, if the user has a permission value other than No Permissions, the user can log in to Jenzabar One Web and see the User-Defined Fields button for the related fields.
To connect the ATTRIBUTE_DEF table to the ATTRIBUTE_TRANS table, you will need to create a join between the two tables. The tables are related through the Attribute Code. Here is an example of what the join might look like.
INNER JOIN ATTRIBUTE_DEF ON ATTRIB_CDE = ATTRIBUTE_CDE
Here is a sample query that is looking for an attribute code that begins with the letters HIK. The results return two rows showing that the Attribute_Type has a NULL value for both rows.
SELECT
    nm.LAST_NAME,
    nm.FIRST_NAME,
    jfn.ID_NUM,
    jfn.Principal_ID,
    at.ATTRIB_CDE,
    ad.ATTRIBUTE_TYPE,
    at.ATTRIB_DEF,
    ad.ATTRIBUTE_DESC,
    at.ATTRIB_BEGIN_DTE,
    at.ATTRIB_END_DATE
FROM ATTRIBUTE_TRANS at
INNER JOIN ATTRIBUTE_DEF ad
    ON at.ATTRIB_CDE = ad.ATTRIBUTE_CDE
INNER JOIN J1FormattedNames jfn
    ON at.PartyAppID = jfn.PartyAppID
LEFT JOIN NameMaster nm
    ON jfn.NameMasterAppID = nm.APPID
WHERE at.ATTRIB_CDE LIKE 'HIK%'
ORDER BY
    nm.LAST_NAME,
    nm.FIRST_NAME,
    at.ATTRIB_CDE;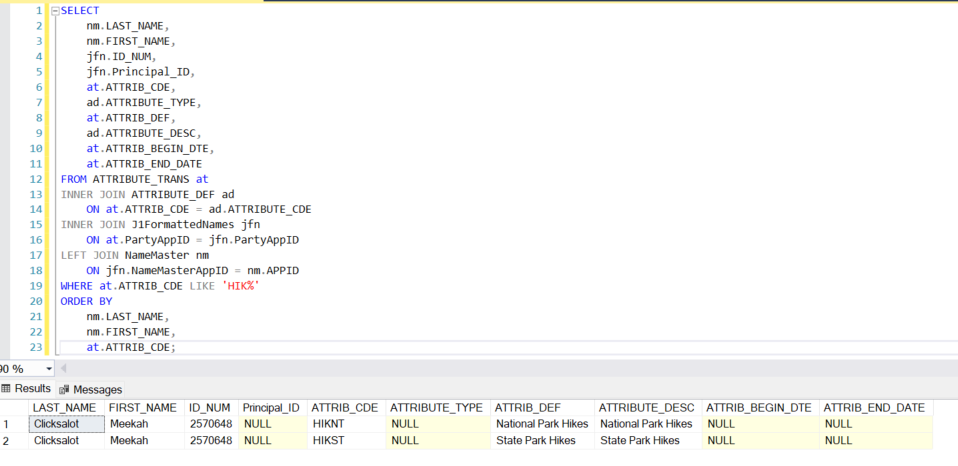
Attributes might include:
Extracurricular involvements at the high school or college level, such as Men's Basketball, Choir, or Concert Band
Intramural involvements at the high school or college level, such as Basketball, Karaoke, Academic Team, or Debate Team
Awards presented to students on Honors Day such as U.S. Presidential Scholar Award, Rhodes and Marshall fellowships, National Honor Society, or other institutional specific awards
Special Event attendance tracking, such, a lecture series held each semester or a convocation event
State regions or divisions to aid in tuition or scholarship rates, state reporting, or allocate resources efficiently
Tutoring Sessions such as subject specific sessions, one-on-one sessions, or workshops for special topics
Organization or business name changes such as two high schools that merge into one school, FICE code changes, or CSS code changes
First-generation student status
Training courses, for example a CPR training, anti-harassment training or software training