Alert Assignments Block on an Alert's Summary Page
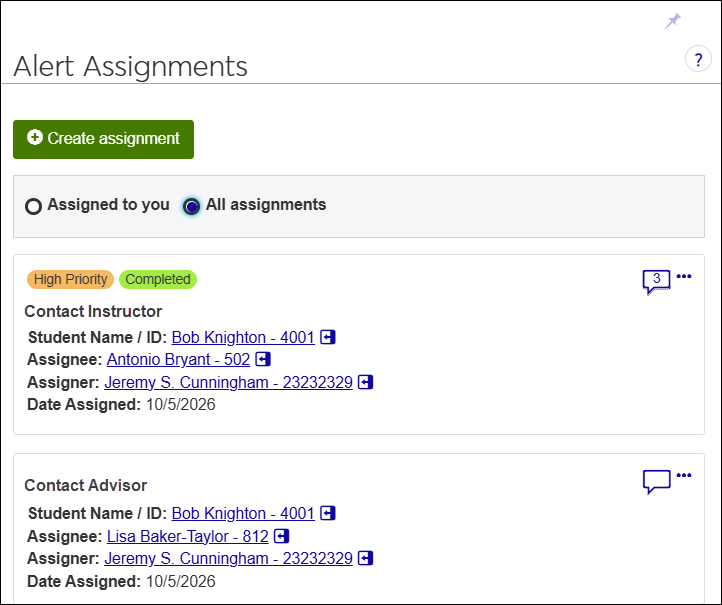
The Alert Assignments block is on the Overview tab of an alert's Summary page. Use the Alert Assignments block to view and create alert assignments.
Radio buttons let you view either all assignments or only those assigned to you.
For each assignment, the assignee's name and the assigner's name are links to their Summary pop-ups. In the pop-up, you can create a communication, and you can jump to their person pages the Person options drop-down.
The Create assignment button lets you add new assignments to the alert.
Permissions
The following permissions are on the Student Success Administrator role (and roles made from it):
Can create and manage all alert assignments
Can view all alert assignments
Can create and manage all alert assignments on confidential alerts
Can view all alert assignments on confidential alerts
How To
Tip
For instructions on features on the Overview tab, see the topic "Overview Tab of an Alert Summary Page".
On the Alert Tracking page, click the Alert Summary link on an alert. The alert's Summary page opens.
Click the Overview tab. The Alert Assignments block is there.
To select a which assignments to view, click either radio button:
Assigned to you
All assignments
To open the Summary pop-up for either the assignee or the assigner, click their name or ID. Their Summary page opens.
In the Alert Assignments block, click the Create assignment button. The Create Assignment pop-up opens.
Enter the information:
Assignee Name / ID: Begin typing a name or ID, and select it from the list. Required.
Task: Enter a name for the task you want to assign. Up to 80 characters. Required.
Task Details: Enter details for the task—what the assignee should do, deadlines, and any information that will help the assignee complete the task. Up to 500 characters. Required.
This assignment is high priority: Select the checkbox as needed. Not required.
Click either the Save and create another assignment button or the Create assignment button. The assignment is saved and appears in the Alert Assignments block.
In the Alert Assignments block, click either the Assigned to you or All assignments radio button as needed. The Comments icon for each assignment has a number in it indicating how many comments there are.
 (The icon is blank if there are no comments
  .)
.)To view comments, click the Comments icon
. The Assignment Comments panel opens with the comments showing.To edit a comment, click the Edit icon
 , make your edits, and click the Save button.
To delete a comment, click the Ellipsis icon (. . .), and select Delete. The comment is deleted.
Warning
There's no confirmation pop-up, so be sure you really want to delete the comment before you click Delete.
To add a comment, click the New comment button. A text editor box opens.
Enter up to 1000 characters.
For information on the text editor (such as keyboard shortcuts for formatting), click in the text editor and press Alt + 0 (zero). The text editor's help panel opens.
To add an attachment to the note, click the Attach button, select the file, and click the Open button in the file explorer. The file is attached.
Click the Add button. Your comment is added.
To mark all comments as read, click the Mark all read button.
In the Alert Assignments block, click either the Assigned to you or All assignments radio button as needed.
Click the Ellipsis icon (. . .) for a particular assignment, and select Edit from the drop-down. The Edit pop-up opens. The following fields are editable:
Task: Up to 80 characters. Can't be empty.
Task Details: Up to 500 characters. Can't be empty.
This assignment is high priority (checkbox): Select or deselect as needed.
Make your edits, and click the Save button. Your changes are saved, and the pop-up closes.
In the Alert Assignments block, click either the Assigned to you or All assignments radio button as needed.
Click the Ellipsis icon (. . .) for a particular assignment, and select Reassign from the drop-down. The Reassign pop-up warns you that reassigning the task may affect the current assignee's permissions to the alert.
In New Assignee Name / ID, begin typing a name or ID, and select it from the list. Required.
Click the Yes, reassign button. The assignment is reassigned, and the pop-up closes.
In the Alert Assignments block, click either the Assigned to you or All assignments radio button as needed.
Click the Ellipsis icon (. . .) for a particular assignment, and select Delete from the drop-down. The Delete pop-up warns you that deleting can't be undone.
Click the Yes, delete button. The assignment is deleted, and the pop-up closes.
In the Alert Assignments block, click either the Assigned to you or All assignments radio button as needed.
Click the Ellipsis icon (. . .) for a particular assignment, and select Close from the drop-down. The Close Assignment pop-up opens.
Under What was the outcome of the assignment?, select either the Completed or Not Completed radio button.
In Outcome Details, enter up to 500 characters to describe the outcome. These may be important notes for record keeping.
Click the Mark as closed button. The assignment is closed, and the pop-up closes. On the Alert Assignments block, the assignment is marked either as Completed or Unresolved, depending on which radio button you selected.