Student Housing Session Roster
Important
Information and features vary according to the roles to which you belong and the permissions associated with those roles. For more information, contact your module manager or your campus support team.
The Manage Session Roster page consists of two tabs: Session Roster and Roommate Groups.
The Session Roster tab lists all the students who have been added to this session. From this tab, you can update details such as applicant group, commuter/resident status, bedroom assignment, and meal plan.
The Roommate Groups tab allows administrative users to manage roommate groups for residents before they are assigned to a bedroom or suite. The tab lists all the roommate groups that have been created, ordered by the Group Lead's name. From this tab, you can view the students in the roommate group, including accepted, pending, and denied requests; create new roommate groups; edit or remove roommate groups; and send communications to members of a roommate group.
To access the Manage Session Roster page from the Session summary page, click the Session options drop-down and select Housing options, then Manage session roster.
The Session Roster tab lists all the students who have been added to this session. You can select students on the roster and update details, such as applicant group, commuter/resident status, bedroom assignment, and meal plan.
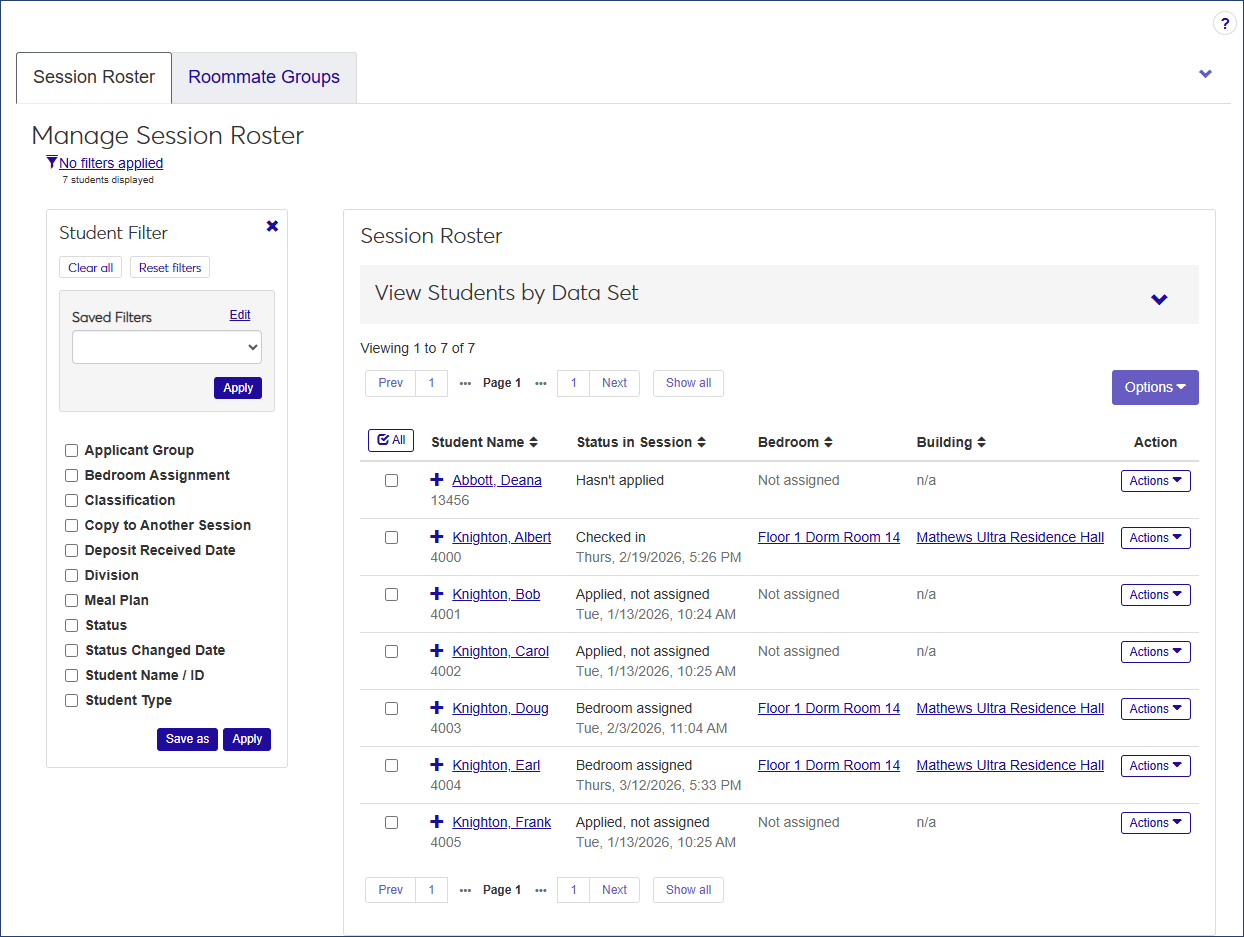
Because the Session Roster can be very long, you can use filters or data sets (or both) to narrow the list.
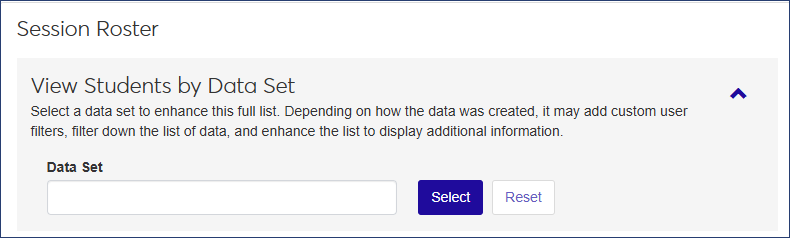
The View Students by Data Set feature lets you select a predefined data set such as "Incoming Freshmen" or "Off-Campus Students." Available options include all data sets with the classification "Session Roster." Data sets are defined on the Data Sets page found in the Campus-wide Definitions hub.
Note
For more details, see Create a Data Set for a Session Roster below. For more information about data sets in general, see Data Sets.
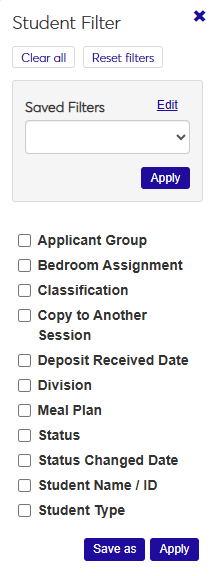
The Student Filter lets you narrow the list by a number of student-related criteria. Select the checkbox for some or all filters, then select values for them. For example, you could search for specific students by name or ID, students in a particular applicant group, or sophomores who live on campus and have a meal plan.
Tip
If you already used a data set to narrow the roster, using filters further limits the results of that data set. If you don't select a data set, the filter narrows the complete list.
Data sets are created by your school's IT team on the Data Sets page in the Campus-wide Definitions hub. The instructions below are intended for that team. Ask them to create the data sets you need.
Create a data set file using a third-party application such as Bold Reports, InfoMaker, Rest API, Source, or SQL.
Note
The first column must be the ApplicantGroupStudentAppI (an alias is not required). This is the only required column.
From the Campus-wide Definitions hub, select Data Sets from the Hub options drop-down. The Data Sets page opens with the People/Organizations Lists view selected.
Click the Create data set button. The Create Data Set pop-up opens.
In the Name of Data Set field, enter a descriptive name for the data set.
Click in the Classification field and select Session Roster.
In Select Modules Allowed to Access the Data Set, select Student Life.
In the Type field, select the type of file you have made for your data (Bold Reports, InfoMaker, Rest API, Source, or SQL).
The next actions vary depending on the type of file you selected in the Type field:
If you selected SQL, click the Choose file button, select the file you want to use, and click Open.
If you selected InfoMaker, click the PBL field and select the correct option, then select an option from the Query field.
If you selected Source, click in the Select One or More Sources field and choose an option.
When you are done, click the Create data set button. Your data set now appears in the Data Set list under View Students by Data Set on the Session Roster page.
To view the details of your data set, navigate to the the Data Sets page in the Campus-wide Definitions hub, click the Actions drop-down for the row of your data set, and select View Details. The View Details pop-up opens. To download the details, click the Download query syntax button.
The following information is displayed for each student on the roster. Click the plus icon  next to a student's name to expand the row and display all columns.
Column | Description |
|---|---|
Student Name | Click the name to open the student's summary page. |
Status in Session | The student's residence status (for example, Bedroom assigned; Checked in; Applied, not assigned; or Hasn't applied). If the status is Bedroom assigned, Checked in, or Applied, not assigned, the application or check-in date is included. |
Bedroom | The bedroom the student has been assigned to, if applicable. Click the bedroom name to open the Manage Residence Spaces page specific to that room. |
Building | If the student has been assigned to a bedroom, this column displays the building that includes the assigned bedroom. Click the building name to open the building's summary page. |
Action | The options on the Actions drop-down allow you to assign a bedroom and view resident history. If the student has already been assigned to a bedroom, you can assign an empty room slot; clear the current bedroom assignment; check in a resident; or swap the bedroom with another resident. If the student has already been checked in, you can also check the student out from this page. Refer to the How To section below to see instructions for all these actions. |
Suite | If the student has been assigned a bedroom in a suite, the name of the suite is displayed here. Click the suite name to open the suite summary page. |
Applicant Group | The applicant group the student has been assigned to. To assign the student to a different applicant group, click the pencil icon next to the group name, select a new applicant group from the drop-down, and click Save. |
Campus Box Number | The student's campus box number, if one has been assigned. To add or update the number, click the pencil icon, enter the box number in the field, and click Save. |
Classification | The student's classification, e.g., Freshmen or Senior. This value cannot be edited from this page. |
Deposit Received Date | The date the student's deposit was received, if applicable. To add or edit the date, click the pencil icon, use the pop-up calendar to choose the correct date, and click Save. |
Division | The student's division, e.g., Undergraduate or Graduate. This value cannot be edited from the Session roster. |
Meal Plan | The meal plan the student has been assigned, if applicable. To edit the meal plan, click the pencil icon, select another meal plan from the drop-down, and click Save. |
Roommates | The names of the student's roommates, if applicable. Click the name to open that student's summary page. |
Suitemates | If the student lives in a suite, the names of the suitemates are listed here. Click a name to open the student's summary page. |
Student Type | The student's type, e.g., Resident, Commuter, Online Only, etc. To update the student type, click the pencil icon, select a new student type from the drop-down, and click Save. |
When Copying to Another Session | Indicates what information will be included if you copy this student to another session: Copy student and preserve bedroom assignment, Copy student, but don't preserve bedroom assignment, or Don't copy this student. To edit, click the pencil icon, select a new option from the drop-down, and click Save. |
How To
From the Session summary page, click the Hub options drop-down and select Housing options > Manage session roster. The Manage Session Roster page opens.
To narrow the list of students, use the Student Filter or a data set.
To use the Student Filter:
Click the Filter icon to expand the filter (if it is not already expanded).
Select the checkbox next to the filter you want to use, then select an option from its drop-down. The contents of the drop-downs vary depending on the filter category.
Select as many filters as you need.
Click the Apply button.
To use a data set, click the Expand arrow icon next to the View Students by Data Set heading.
Click in the Data Set field and select an option.
Click Select to apply the data set and narrow the list of students.
On the Manage Session Roster page, locate the student you want to assign to a room.
From the Actions drop-down for the student, select Assign a bedroom. The Update Bedroom Assignment pop-up opens.
Select the Only show bedrooms that can fit roommate group checkbox if you want to see only bedrooms with a minimum size that can accommodate the roommate group. For example, if the roommate group consists of 4 residents, checking this box will display only those bedrooms with a minimum group size of 4.
Click in the Select a Bedroom with Remaining Room Slot field and begin typing the name of the room that has the available slot, then select the name when it appears on the list. This field is required. Only rooms with available slots are included in the list.
Click Update to save the student's room assignment.
On the Manage Session Roster page, locate the student you want to assign to an empty room slot.
From the Actions drop-down for that student, select Assign to empty room slot. The Update Bedroom Assignment pop-up opens. The Room Change field is automatically set to "Assign to empty room slot."
Click in the Select a Bedroom with Remaining Room Slot field, begin typing the name of the residence hall, and select the available bedroom you want to assign the student to.
Note
If the selected student is in a roommate group, assigning them to the room slot will remove the student from the roommate group.
Select a Reason for the room assignment, if needed.
Enter an optional Comment.
Click Update to save the changes.
On the Manage Session Roster page, locate the student whose room assignment you need to clear.
From the Actions drop-down for that student, select Clear current bedroom assignment. The Update Bedroom Assignment pop-up opens. The Room Change field is automatically set to "Clear current bedroom assignment."
Note
If the selected student is in a roommate group, clearing the room assignment will remove the student from the group.
Select a Reason for the change, if necessary.
Enter an optional Comment.
Click Update to save the change.
You can check residents in and out of their room from the Manage Session Roster page, as long as they have been assigned to a bedroom.
When you check a resident in from the Manage Session Roster page, you use the standard check-in wizard.
On the Manage Session Roster page, locate the student you need to check in.
From the Actions drop-down menu on the student's row, select Check in resident. The Resident Check-In wizard page opens on step one, Check-in Basics.
Note
Your school may have customized some of the following steps, making them required or turning them off completely.
Tip
After you complete a step, you can return to that page by clicking the relevant link on the left side of the page.
Enter the resident's phone number and any relevant notes and click Save and continue. The Emergency Contact Information step opens.
If the resident already has emergency contact information entered, it appears here. You can create a new emergency contact or edit an existing one from this page.
When you have finished entering or editing emergency contact information, click Save and continue. The Student Keys step opens, if your school has included it.
Note
The Student Keys step is included only if Enable Student Keys at Check-In is selected in the Resident Check-In section of the Residence Life Settings page.
If the resident has already been issued keys, that information will be displayed on this page.
If you are not assigning a key at this point, click Save and continue to move to the next step.
To assign a key as part of check-in, click the Assign a key button at the bottom of the page. The Assign Key pop-up opens.
Begin typing the Key Number and select the appropriate key when it appears in the list.
Select the status from the Key Status drop-down (e.g., Issued or Assigned).
The Building and Room fields are pre-populated with the room this resident is being checked in to and cannot be changed. The Status Date is automatically set to the current date.
Add an optional Comment.
If you need to assign the student another key, select Save and assign another key. When you are finished assigning keys to this resident, select Assign key and close.
Click Save and continue. The Room Condition Report step opens.
Note
The room condition report step is included only if Enable Room Condition Reports at Check-In is selected on the Residence Life Settings page. If it is not selected, the Sign Report step opens instead.
The Room Condition Report page shows all items associated with the room and their condition at check-in. This page allows you to review the items and their condition with the resident during a walk-through inspection prior to signing the check-in agreement.
For each room item, click the Update button to open the Update Item Check-In Condition window.
From the Check-In Condition drop-down menu, select the item's condition as it is now. Add any notes about the item, then click Update.
To attach a document, such as an image, click Choose file and locate the file you need to attach.
Add optional Check-In Notes if needed.
If you need to email the other roommates about the changes you have made, select the Email other roommates about this update checkbox.
Click Update to save the changes, close the pop-up, and return to the Resident Check-In wizard.
When you have finished recording item conditions, click Save and continue. The Sign Report step opens.
Enter the Resident Full Name and Student ID.
Note
These fields are required if the Resident signature required checkbox is selected on the Residence Life Settings page. If it is not selected, the fields are optional.
Select the checkbox at the bottom of the page to indicate that you agree on the recorded room condition.
Click Save & finish to save the check-in and room condition information.
If you would like to generate a PDF of the room condition report, click the Review PDF button.
If you need to edit any of the information at a later date, click one of the steps linked on the left side of the window to open that step and make the needed changes. You cannot edit the Sign Report page.
When you check a resident out from the Manage Session Roster page, you use the standard check-out wizard.
On the Manage Session Roster page, locate the student you need to check out.
From the Actions drop-down for the student, select Check out resident. The Resident Check-Out wizard opens to the first step, Check-out Basics.
Enter the resident's Mobile Phone number if it did not autofill.
Enter optional comments in the Notes field.
Click Save and continue to continue to the Student Keys step.
Note
The Student Keys step is included only if Enable Student Keys at Check-Out is selected in the Resident Check-Out section of the Residence Life Settings page.
To retrieve keys individually:
Click the pencil icon for the relevant row. The Edit Key pop-up opens.
Select a new status from the Key Status drop-down.
Add optional comments.
Click Update to return to the check-out wizard page.
To update multiple keys at once (for example, if the student was issued more than one set of keys):
Select the checkbox next to the keys you need to update.
Select Edit keys from the Options drop-down. The Edit Keys pop-up opens.
Under Select a Detail to Update, select "Key Status" or "Comment" from the drop-down.
If you are updating key status, select a new status from the drop-down.
If you are updating a comment, enter your comment in the text box.
Click Save and continue to move to the next step, Room Condition Report. This page lists all items associated with the room and their condition when the resident checked in. You should review the items and their condition with the resident during a walk-through inspection prior to signing the check-out agreement. There is a room condition report for each bedroom in the space.
Note
The room condition report step is included only if Enable Room Condition Reports at Check-Out is selected on the Residence Life Settings page. If it is not selected, the Sign Report step opens instead.
To change the condition of a room item, click the Update button for the item. The Update Item Check-Out Condition pop-up opens.
Select an option from the Check-Out Condition drop-down.
To add the name of the resident responsible for the item, click in the Responsible Resident field and select the correct name. This field is optional.
To add supporting documentation, such as a photo of the item, click Choose file under Add Supporting Documentation and upload the file.
Add optional Check-Out Notes as needed.
When you are done, click Update. The condition of the item is updated in the list. If you selected Damaged, Dirty, or Needs to be replaced, the value in the Check-Out Condition column is in red text and flagged with a warning icon.
After you update the room items, click Save and continue to move to the Sign Report step.
Enter the Resident Full Name and Student ID in the fields. This information is required.
Note
These fields are required if the Resident signature required checkbox is selected on the Residence Life Settings page. If it is not selected, the fields are optional.
The Date field autofills with the current date. If you need to change it, click in the field and use the pop-up calendar to select a new date.
Select the checkbox at the bottom of the page to indicate that you agree to the recorded room condition.
Click Save & finish to complete the process.
To generate a PDF of the Check-Out Report, click the Review PDF button.
On the Manage Session Roster page, locate the student whose room assignment you need to swap.
From the Actions drop-down for the student, select Swap with another resident. The Update Bedroom Assignment pop-up opens. The Room Change field defaults to "Swap with another resident."
Click in the Select a Resident / Room Slot field and begin typing the name of the student you want to swap with. Select the correct name when it appears.
Note
If the selected student is in a roommate group, swapping the room assignment will remove that student from the roommate group.
If needed, select a Reason for the change.
Enter an optional Comment.
Click Update to save the changes and close the window.
On the Manage Session Roster page, locate the student whose resident history you need to review.
From the Actions drop-down, select View resident history. The View Resident History pop-up opens, displaying the student's room assignment history.
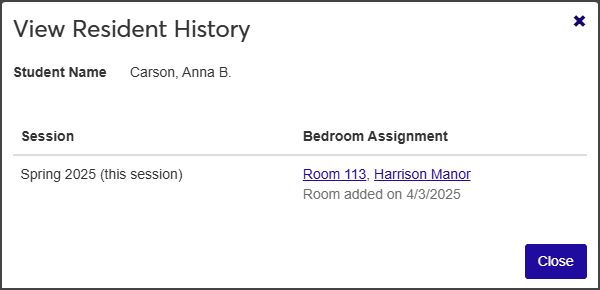
Click the available links to open the session, room, suite, or residence hall summary pages.
When you are done, click Close.
Administrators might need to update check-in information after the student has checked in to a room. They can do this from the Session Roster page as long as the student's Status in Session is "Checked in" and the user is in a Student Life Module Manager or Residence Life Administrator role (or a role copied from one of them) with the "Can view resident check-in" permission enabled.
On the Manage Session Roster page, select Update resident check-in from the Actions drop-down. The Update Resident Check-in? pop-up opens, reminding you that the student has already checked in and asking if you want to continue.
Note
To bypass the confirmation pop-up for subsequent updates, select the Don't ask again during this browser session checkbox. This way you can avoid the pop-up and go straight to the Resident Check-In wizard when you update a check-in.
Click Yes, continue. The Resident Check-In wizard opens to the first step, Check-in Basics.
Make updates as needed and click Save and continue to continue to the next step.
Note
The steps that follow may vary depending on how residence life settings are configured. For example, if room condition reports are not enabled at check-in, the Room Condition step will not be included.
When you have completed the final step in the wizard, click Save & finish.
You can easily send emails to residents from Manage Session Roster page.
On the Manage Session Roster page, select the checkbox next to each student you want to send an email to.
Select Send communication from the Options drop-down. The Create New Communication window opens.
The Communication Type, Interaction Code, Name/Description, From, To, and Contact Type fields autofill with the relevant options. You cannot edit the sender, the recipients, or the contact type.
Note
Texting capabilities are available with the Communications Plus plan.
The Interaction Code, Name / Description field defaults to "General Student Life Email." To change it, click the Remove icon
 to delete the current option, then click in the field and select a new option from the list.
Enter a Subject. This field is required.
Type your message in the Body text field. Use the editing toolbar as needed to format your text.
To include bedroom assignment information for the students who have been assigned bedrooms, select the checkbox under Attachments. The email subject and message will be the same for all recipients, but the bedroom assignment information will be specific to each student.
When you are done, click Send.
From the Manage Session Roster page, you can update meal plans for a single student or for multiple students at once.
Note
Resident/Commuter status only affects whether or not a student can be assigned to a resident bedroom. When a student is designated as a commuter, that student cannot be requested as a roommate or be assigned to a bedroom. If a student is already assigned to a bedroom and their status is changed from resident to commuter, they will automatically be removed from the bedroom assignment.
On the Manage Session Roster page, select the checkbox next to each student whose status you need to update.
From the Options drop-down, select Update details for selected students. The Update student details pop-up opens.
From the Select a Detail to Update drop-down, select Student Type.
Select the new student type from the adjacent drop-down.
Click Update to save the change.
You can also update the following details from the Manage Session Roster page:
Applicant Group
Campus Box Number
Deposit Received Date
When Copying to Another Session
To edit, click the plus icon next to the student you need to update, then click the pencil icon next to the detail you need to update, select or enter the new information, and click Save when you're done.
Select the checkboxes next to the rows you want to export.
From the Options drop-down, select Download to Excel. The Download to Excel pop-up opens.
Select options for the Excel format and data columns.
Click Download. Your .xlsx or .zip file is saved in the file location that you have set in your browser settings.
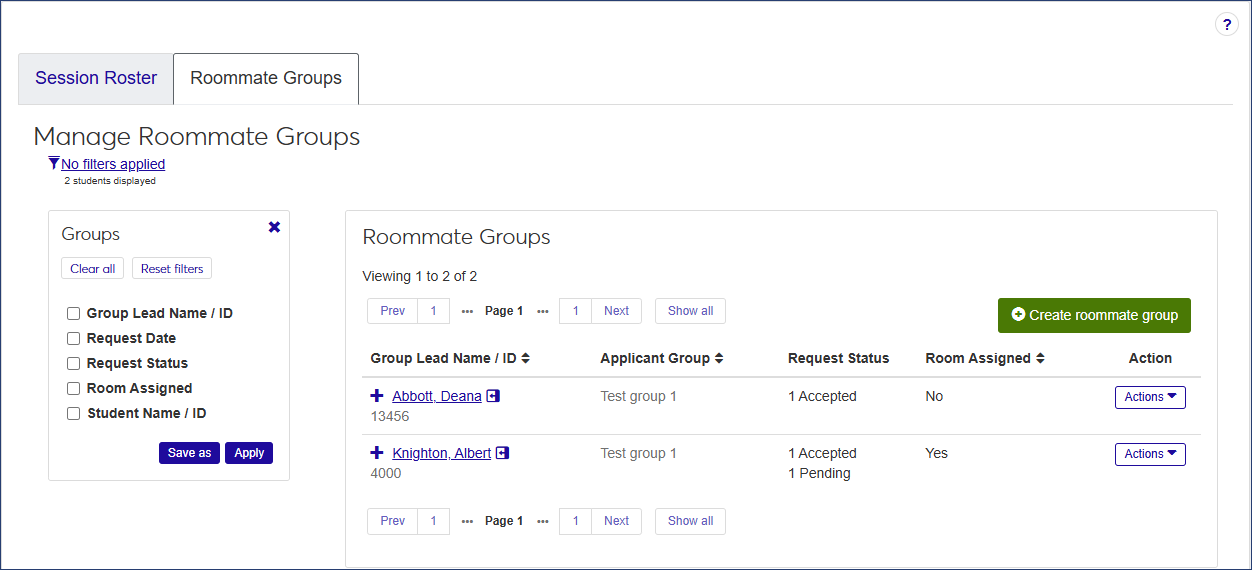
From the Roommate Groups tab, administrative users can manage roommate groups for residents before they are assigned to a bedroom or suite.
If the user is in a Residence Life Administrator or Student Life Module Manager role (or a role copied from one of them) and has permissions to manage housing and check-in/check-out processes, the Roommates Group tab is available.
The Roommate Groups tab displays a list of all roommate groups for the session, ordered alphabetically by Group Lead.
The list provides the following information for each roommate group. Click the plus sign to expand the row and see all columns.
Column | Description |
|---|---|
Group Lead Name / ID | The name and ID of the Group Lead. |
Applicant Group | The applicant group the Group Lead belongs to. |
Request Status | The number of accepted, ending, and denied roommate requests. |
Room Assigned | Displays Yes if at least one person in the roommate group is assigned to a room. |
Action | The Actions drop-down in this column enables users to:
|
Accepted Requests | Displays the name and ID of each student who has accepted the roommate request. |
Request Accepted Date | For each accepted roommate request, the date the request was accepted is displayed. |
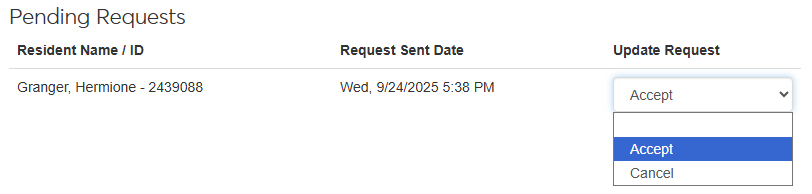
Pending Requests | Displays the name and ID of each student who has a pending roommate request. NoteIf the student has pending roommate requests from multiple groups, a warning symbol appears next to the name along with the text Multiple requests. |
Request Sent Date | For each person listed, the date the roommate request was sent is displayed. |
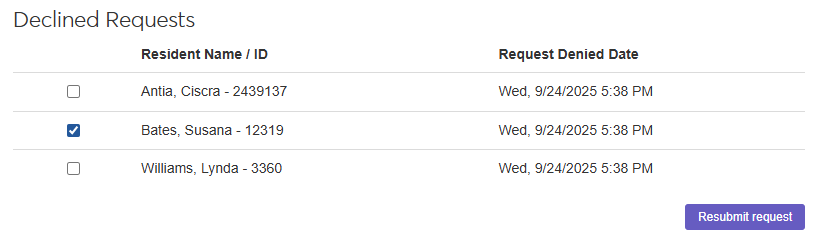
Denied Requests | The name and ID of each student who denied a roommate request. |
Request Denied Date | For each person listed, the date the roommate request was denied is displayed. |
How To
On the Manage Session Roster page, select the Roommate Groups tab.
Click the Create roommate group button. The Create Roommate Group pop-up opens.
Click in the Group Lead Name / ID field and begin typing the name of the student who will be the designated group lead.
Select the correct name when it appears in the list. You can only select one group lead. After you select a group lead, the Applicant Group that student belongs to is displayed.
Note
The list includes any student in the session roster except those who are already a Group Lead, have accepted another roommate request, or have already been assigned a room.
Click in the Resident Name / ID field and begin typing the name of a student who will be part of the roommate group, then select the name when it appears in the list.
Note
Only students in the same applicant group as the group lead are available for selection. The list does not include students who are already a group lead or those who have accepted another roommate request or have already been assigned to a room.
The number of roommates you can add to the group is limited to the largest maximum capacity for a bedroom or suite in the session minus 1. For example, if the suite with the largest maximum capacity can hold 6 students total, you can add 5 students to the roommate group (one group lead and five roommates).
Repeat step 5 to add more residents to the roommate group.
When you are done, click Save and create another if you want to create another roommate group, or Create and close to save the group and close the pop-up.
Users with edit permissions can select a different group lead from the list of students who have accepted the roommate request; decline roommate requests for one or more students; accept or decline pending requests; and add roommates to the group, as long as the maximum size of the group has not been met.
Note
If the group lead has already been assigned a bedroom, the Edit roommate group option is not available.
On the Manage Roommate Groups page, locate the group you need to edit.
Select Edit roommate group from the Actions drop-down. The Edit Roommate Group window opens.
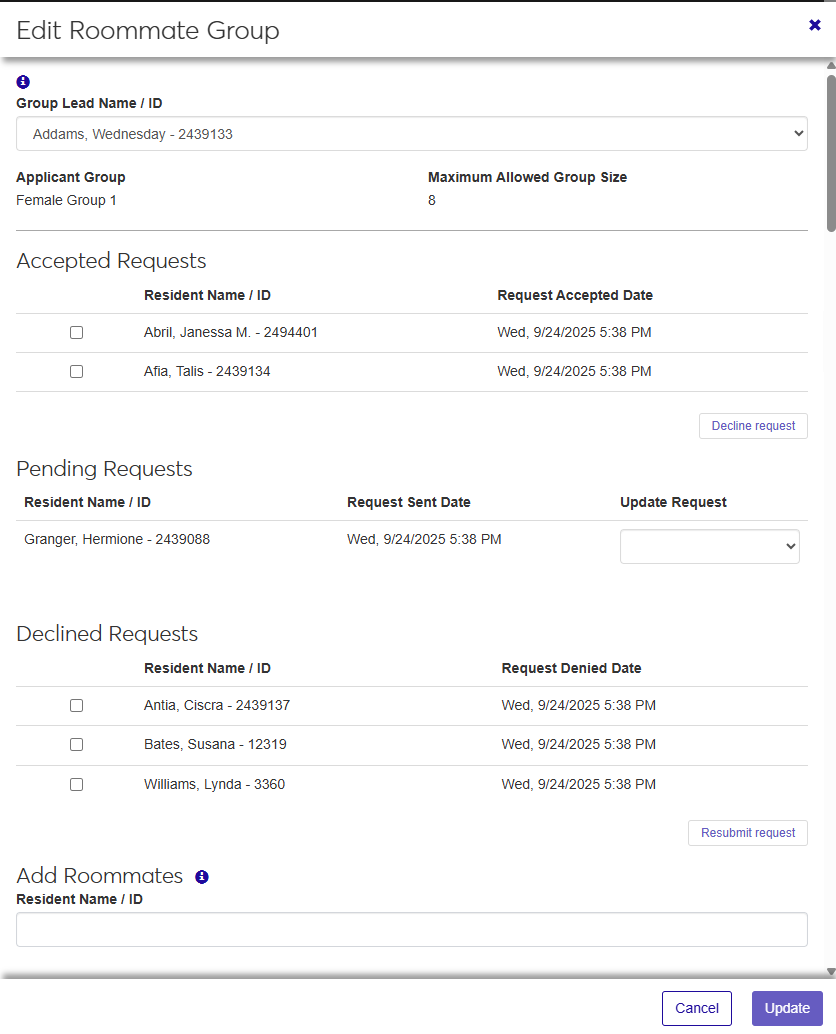
The top of the window displays the current Group Lead, the Applicant Group the group lead belongs to, and the Maximum Allowed Group Size. Applicant Group and Maximum Allowed Group Size are not editable. The window also displays a list of students who have accepted the roommate request, any pending requests, and those who have declined the request. If there are no requests in a category, that section is not displayed.
To change the Group Lead, select a name from the Group Lead Name / ID drop-down. The available names include the current group leader and any students in the group who have accepted a roommate request. If there are no accepted requests, the drop-down is unavailable.
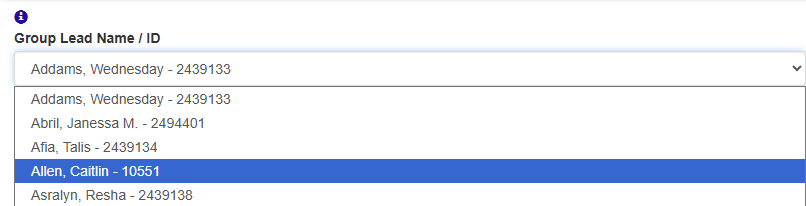
Note
If you select a new group leader, the previous group leader is moved to the Accepted Requests list. In addition, the Applicant Group changes to reflect the new leader's group. Most of the time the Applicant Group will be the same, but on occasion it might be different.
If a resident who has accepted a roommate request needs to decline it, select the checkbox next to the resident's name in the Accepted Requests section. When you do this, the Decline request button turns blue to indicate that you have made changes.
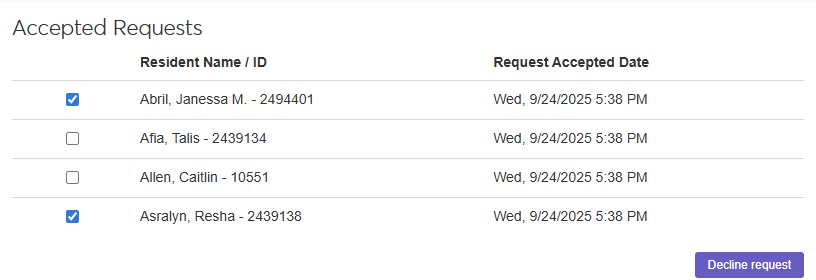
Note
The Decline request button is not an active button; it simply shows you that changes have been made. The changes do not take effect until you click the Update button.
If you need to change the status of any of the pending requests, select either Accept or Cancel from the drop-down next to the name in the Pending Requests section. The change will take effect when you click the Update button.
To resubmit a roommate request that has been declined, select the checkbox next to each student in the Declined Requests section that you want to resend the request to. The Resubmit request button changes from white to blue, but the changes will not take effect until you click the Update button.
To add a roommate to the group, click in the Resident Name / ID field in the Add Roommates section, begin typing the name or ID of the student you want to add, and select the name when it appears in the list. Only students in the same applicant group as the group leader who have not accepted another roommate request are available to select.

You can remove a roommate group unless the group leader has already been assigned to a bedroom.
On the Roommate Groups tab, find the group leader of the group you need to remove.
Select Remove group from the Actions drop-down. The Remove Roommate Group? pop-up opens, displaying a list of the members of the roommate group.
Note
Removing the group does not remove the residents from the applicant group.
If you are sure you want to remove the group, click Yes, remove.
You can send a communication to all the residents in the group with an accepted or pending request.
Note
To receive text messages, the residents must have a phone number on file.
On the Roommate Groups tab, find the group leader of the group you need to send a communication to.
Select Send communication from the Actions drop-down. The Create New Communication window opens.
The Communication Type defaults to "Email." If you have Communication Plus, you can also send a text message.
To send an email communication:
If you need to change the Interaction Code, Name / Description, delete the existing default value, click in the field, and select a new value from the list. The interaction code classifies the content of the communication. You can only select one code.
Note
Only the active codes you have access to are available to select. For more information about permissions, contact your campus support team.
The From field defaults to the logged-in user's email address. If you need to change it, delete the existing address, click in the field, begin typing the email address of the preferred sender, and select the address when it appears in the list.
Double-check the recipients' email addresses in the To section. If any of the members of the group are missing an email address, you see an alert message.
Enter the Subject of the email.
Type your message in the Body text field. Use the formatting toolbar to format the text.
To attach a file, click the Attach file button, locate the file you want to add, and select it. The file format must be DOTX, HTML, PDF, or WAV.
When you are done, click Send. Separate but identical emails will be sent to the students listed in the To section.
To send a text message:
Note
To send text messages, you must be assigned to a phone number in the system. To receive text messages, recipients must have a valid, verified SMS number in the system.
Select Text from the Communication Type drop-down.
The Interaction Code, Name / Description defaults to "General Student Life Text." If you need to change it, delete the default value, click in the field, and select a new value from the list. The interaction code classifies the content of the communication. You can only select one code.
Click in the Select 'From' Number field and select the number you want the message to be sent from.
The To section lists all the students who have accepted the roommate group request.
If you need to change the Contact Type, delete the existing value, click in the field, and select a new contact type from the list.
Type your message in the Body field.
To add an emoji to the text, click the emoji icon.
To use AI to generate the message, click the Generate Content icon
 and follow the instructions in the Generate Content pop-up.
Note
Messages can be up to 1,600 characters, but be aware that long texts will be broken up into multiple 160-character messages.
When you are done, click Send or Send and close timed session.
The number of roommates you can request is limited to the largest maximum capacity for a bedroom or suite that you can select, minus 1 (yourself). For example, if the suite with the largest maximum capacity can hold 6 students total, you can request up to 5 roommates.
The roommate group lead is the student who initially sent roommate requests to others.
When you search for and select a person as a roommate, then send the person a roommate request, that request is in pending status until the request is accepted or declined.
When a person accepts a roommate request you sent, or when you accept a request that was sent to you, the request is in accepted status.
When a person declines a roommate request you sent, or when you decline a request that was sent to you, the request is in declined status.
If you have accepted a request and then decide to cancel it, the request is in canceled status.
If you have sent a request that is still pending, you can cancel the request and the status changes to canceled.
There are a couple of reasons why you might not be able to request roommates:
If you have accepted a roommate request from another person, you are in their roommate group, and only the roommate group lead can send requests. If you have another person in mind for your roommate group, contact your group leader and have them send a roommate request to that person.
You have reached the maximum number of roommate requests allowed.
There are several possible reasons why you aren't able to select a person you have searched for:
.The person you searched for has already accepted a roommate request from another group lead
The person you searched for is a group lead who has accepted or pending requests.
You already have a pending request for the person you searched for.
You are a group lead with pending or accepted roommate requests, and the person you searched for is already assigned to a room.
Yes! This is simple but requires some extra setup.
On the Session summary page, click the Residence Spaces link on the Housing Application block to open the Manage Residence Spaces page. From here you can set the applicant group for the group you want to make this space available for.
If you are only going to change a small number of spaces, you can click on the plus sign beside the row to expand the details for that space and click the pencil icon next to Applicant Group to make it editable. Select a new Applicant Group and click Save.
If you have a larger number of spaces to change:
Select the checkbox beside each row you want to include.
Select Edit space details from the Options drop-down. The Edit Space Details pop-up opens.
Select Applicant Group Restriction from the Select a Detail to Update drop-down.
Click in the adjacent field and select the applicant group you want the spaces to be limited to. Now only applicants in the group you chose will be able to select these spaces.
Note that you can add multiple applicant groups. For example, if rooms are only available for juniors and seniors, enter those two applicant groups in the residence space details.
Keep in mind that adding the applicant group for certain spaces limits those spaces, but not others. For example, if you have a group of rooms where you want freshmen to be assigned, you will need to assign those spaces to the freshman applicant group (only freshmen can select them), AND assign any other spaces that freshmen are eligible to choose.
Set up meal plans from the Residence Life Administration hub. In the Hub options drop-down, select Manage Meal Plans. From here you can add or remove meal plans that can then be assigned to students. For more information, see Manage Meal Plans