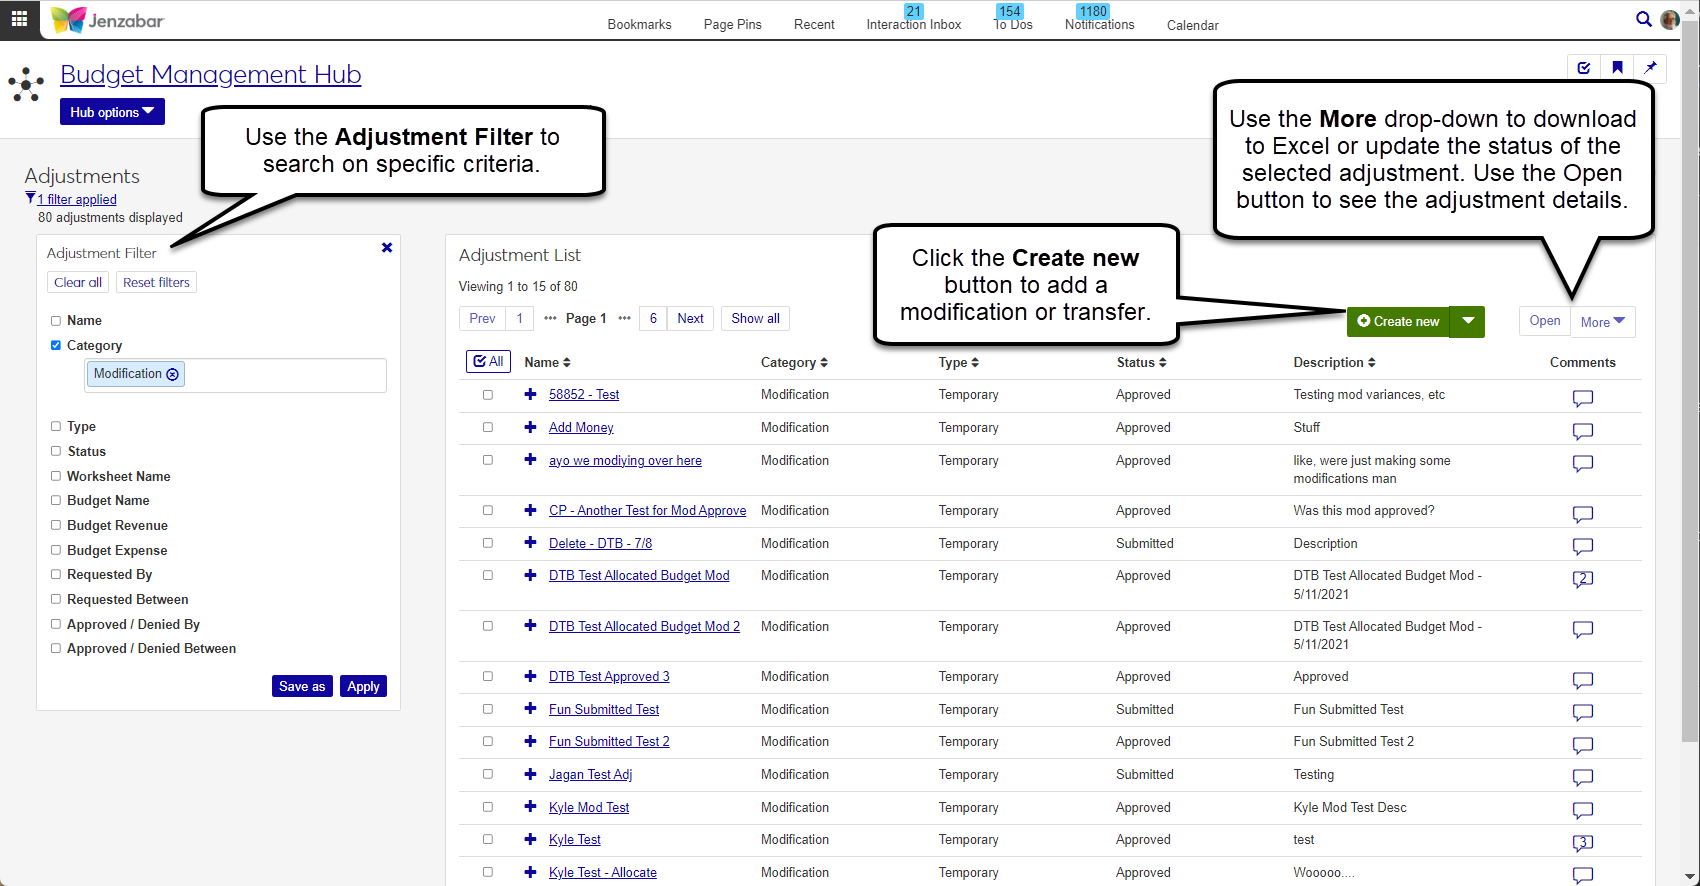
Adjustments
Important
Information and features vary according to the roles to which you belong and the permissions associated with those roles. For more information, contact your module manager or your campus support team.
The Adjustments page lists the modifications and transfers in the system. Depending on your role and permissions, you can access adjustment pages, create new modifications or transfers, submit adjustments for approval, and approve or deny submitted adjustments.
Once the budget has been approved by the board, any updates to the original budget amount must be made as an adjustment. There are two types of adjustments.
Transfers are made between one or more line items with total amounts netting to zero.
Modifications are one sided increases or decreases of funds made to one or more line items.
Adjustment amounts can be allocated across different months or quarters and can be temporary or permanent. Temporary adjustments are applied to the current budget and aren't carried over to the next year (e.g., funds reallocated to cover storm damage). Permanent adjustments are carried over into the next year's budget (e.g., funding for a new faculty position).
Adjustments cannot cross over budgets, but they can be applied to any line items or worksheets within a budget. When a line item adjustment is submitted, it must be approved before it can be applied to the current budget balance.
The default Budget Management Worksheet & Adjustment Access role grants permission to access the Adjustments page and perform specific actions with adjustments. Users can only manage adjustments for the worksheets they have access to.
Use any combination of the following filters to search for specific adjustments. You will see adjustments for budgets and worksheets that you have permission to access.
Name
Description
Category
Type
Status
Worksheet Name
Budget Name
Budget Revenue
Budget Expense
Requested By
Requested Between
Approved / Denied By
Approved / Denied Between
Tip
You can select a saved filter or you can select various checkboxes, enter search phrases, and save your selections as a new filter.
The Adjustment List section shows all modifications and transfers in their various statuses. Depending on your permissions, from this list, you can access each adjustment's detail page, add comments, submit, approve, deny, or delete adjustments.
How To
From the Budget Management Hub options, select Adjustments.
Select and apply options in the Adjustment Filter.
Use the arrows on each column to sort results.
Select a Budget Name.
Select a Worksheet Name.
Enter values for one or more line item parameters.
Line Item Code - Enter a G/L account number and select an option from the drop-down.
Line Item Description - Enter a keyword and select an option from the drop-down.
Line Item Account Type - Select either Expense or Revenue.
Line Item Fund Type - Select either Restricted or Unrestricted.
Enter an Available Budget Min and Available Budget Max to search within a specific range.
Click Get line items.
Enter details into the Modification Name and Modification Description fields.
Click the Make Part of Next Year's Budget option to Yes if the transfer is a permanent one. For one-time transfers, click the option to No.
There are two ways you can make a modification:
Enter an amount into the Modification Amount column manually.
Select one or more line items using the checkboxes, then click the Apply changes to selected button. From the pop-up window, select if you want to affect the Available, Original, or Current budget, then enter the percentage you want the funds to change.
Select a Modification Status. Depending on your permissions, you may see Active, Submitted, or Approved statuses.
Click Create Modification.
Select a Budget Name.
Go to the Transfer From tab.
Select a Worksheet Name.
Enter values for one or more line item parameters.
Line Item Code - Enter a G/L account number and select an option from the drop-down.
Line Item Description - Enter a keyword and select an option from the drop-down.
Line Item Account Type - Select either Expense or Revenue.
Line Item Fund Type - Select either Restricted or Unrestricted.
Enter an Available Budget Min and Available Budget Max to search within a specific range.
Click Get line items.
Select the line item you want to transfer money from.
Note
There must be money in the line item's Current amounts in order to make a transfer.
Enter the amount of funds you want to transfer in the Transfer from Amount.
Go to the Transfer To tab.
Search for line items and click Get line items.
Choose which line item(s) you want to receive the funds.
Note
You can choose one or more line items and distribute the amount you entered on the Transfer From across them.
Enter the amount of funds you want to transfer in the Transfer to Amount column.
Tip
The amount you entered on the Transfer From tab must equal the amount entered on the Transfer To tab.
Enter a Transfer Name.
Enter a Transfer Description.
Click the Make Part of Next Year's Budget option to Yes if the transfer is a permanent one. For one-time transfers, click the option to No.
In the Transfer Status section, choose a status for your new transfer. Depending on your permissions, you may see the option to make the budget Active, Submitted, or Approved.
Using the checkboxes in the first column, select the adjustments you want to work with.
To submit adjustments:
Click the More drop-down and select Submit.
Review the adjustments in the Ready to Submit and Unable to Submit sections.
Click Yes, submit.
To approve adjustments:
Click the More drop-down and select Approve.
Review the adjustments in the Ready to Approve and Unable to Approve sections of the confirmation pop-up.
Click Yes, approve.
To deny adjustments:
Click the More drop-down and select Deny.
Review the adjustments in the Ready to Deny and Unable to Deny sections of the confirmation pop-up.
Click Yes, deny.
To delete adjustments
Click the More drop-down and select Delete.
Review the adjustments the Ready to Delete and Unable to Delete sections of the confirmation pop-up carefully. Once deleted, this process cannot be undone.
Click Yes, delete.
Click the Comments icon
 .
. From the Comment pop-up, you can read the existing comments, mark them all as read, and add your own comments.
Click New comment and enter your text.
If you want to upload an attachment, click Attach, locate the file, then click Open.
Click Add to save your text and/or attachment.
Select the checkboxes next to the rows you want to export.
From the Options drop-down, select Download to Excel. The Download to Excel pop-up opens.
Select options for the Excel format and data columns.
Click Download. Your .xlsx or .zip file is saved in the file location that you have set in your browser settings.
FAQ
In order to save or submit a transfer, the Revenue Left to Transfer and/or the Expense Left to Transfer must equal zero.
In addition, there are several required fields that must be completed before you'll be able to move forward.
If your school is configured to allow budget management from your Campus Portal, J1 Web and Campus Portal provide different features for adjustment submission and approval.
J1 Web | Campus Portal |
|---|---|
Features
| Features
|