Residence Life Settings - Resident Check-In
Important
Information and features vary according to the roles to which you belong and the permissions associated with those roles. For more information, contact your module manager or your campus support team.
Resident Check-In settings let you turn on resident check-in and control which features are enabled. You can configure the following:
whether or not check-in staff can issue Student Keys at check-in
if Emergency Contact Information should be collected (or required) during check-in
if Room Condition Reports should be enabled
if a resident is required to sign the Room Condition Report at check-in
if the check-in agreement will be displayed in the PDF that is generated in JICS
You can also customize the text of the Check-In Agreement as needed. The agreement is displayed automatically as part of the resident's check-in process.
You can access the Residence Life Settings page from the Residence Life Administration Hub. From the Hub options menu, select Setting options, then Manage residence life settings, and scroll to the Resident Check-In section or click the Resident Check-In link at the top of the page.
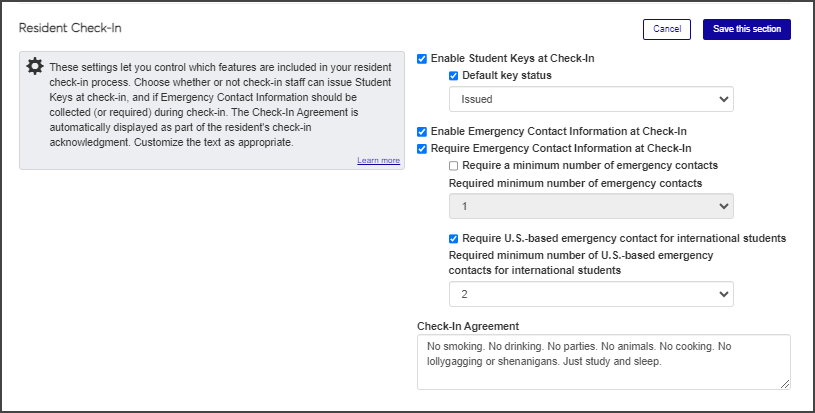 |
Enabling student keys at check-in allows residence life staff to issue keys (most often room keys) to residents during resident check-in.
On the Residence Life Settings page, under Resident Check-In, click the Edit this section button.
Select the Enable Student Keys at Check-In checkbox.
If you want all of the keys for this session check-in to start with a specific status (such as "Available"), select the Default key status checkbox and choose the status you want. For example, you might want to set the status of all keys as Available.
Click Save this section.
Enabling Emergency Contact Information at check-in allows residence life staff to collect and enter the resident's emergency contact information during resident check-in. You can also choose to require this information at check-in, which will prevent the check-in process from being completed until that information is added.
On the Residence Life Settings page, under Resident Check-In, click Edit this section.
Select the Enable Emergency Contact Information at Check-In checkbox.
Select the Require Emergency Contact Information at Check-In checkbox, if needed, then select the minimum number of emergency contacts that will be required.
If you would like to require the emergency contact information for international students to be U.S.-based contacts, select the Require U.S.-based emergency contact for international students checkbox and then select the minimum number of required contacts.
Click Save this section.
Room condition reports settings allow you to enable or disable the room condition report during the check-in process and determine whether or not the resident's signature on the report is required.
On the Residence Life Settings page, under Resident Check-In, click Edit this section.
If you want the room condition report to be available at check-in, select the Enable Room Condition Reports at Check-In checkbox. If the checkbox is not selected, the room condition report will not be included in the check-in wizard. The checkbox is selected by default.
To require the resident's signature on the room condition report at check-in, select the Resident signature required checkbox. If the checkbox is not selected, the signature field is optional rather than required. The checkbox is selected by default.
You can create a custom check-in agreement that residents must acknowledge during check-in. You can also indicate if that agreement will be shown on the JICS PDF that students can download.
On the Residence Life Settings page, under Resident Check-In, click Edit this section.
In the Check-In Agreement text field, enter the text that residents must read and acknowledge during check-in. This agreement might include rules, details about how damages will be charged for suites, and liability conditions. Note that this is separate from the check-in information that is sent to residents when the check-in process is broadcast. This field can contain a maximum of 8,000 characters.
If you want the check-in agreement to appear on the JICS PDF, select the Show Check-In Agreement on JICS PDF checkbox.
Click Save this section.