Manage Check-In Room Condition Reports
After you have set up Room Condition Report Templates on the Residence Life Administration hub and assigned the report templates to individual spaces, you can generate the check-in report within the specific session. You do this on the Manage Unsigned Check-In Room Condition Reports page.
Unsigned reports are used to record the condition of room items at check-in. These reports can be used during the walk-through inspection to note the condition of room items. When the report is completed, the resident signs the report to acknowledge it.
Note
The room condition report is not a required part of the check-in process. You can manage report settings on the Residence Life Settings page. To enable the report at check-in, select the Enable Room Condition Reports at Check-In checkbox. To require a signature on the report, select the Resident signature required checkbox.
Access the Manage Unsigned Check-In Room Condition Reports page from the Session summary page by clicking the Session options drop-down and selecting Check-in options, then Manage unsigned room condition reports.
Note
To manage room condition reports for suites, select Manage unsigned room condition reports (suites) from the Session options drop-down.
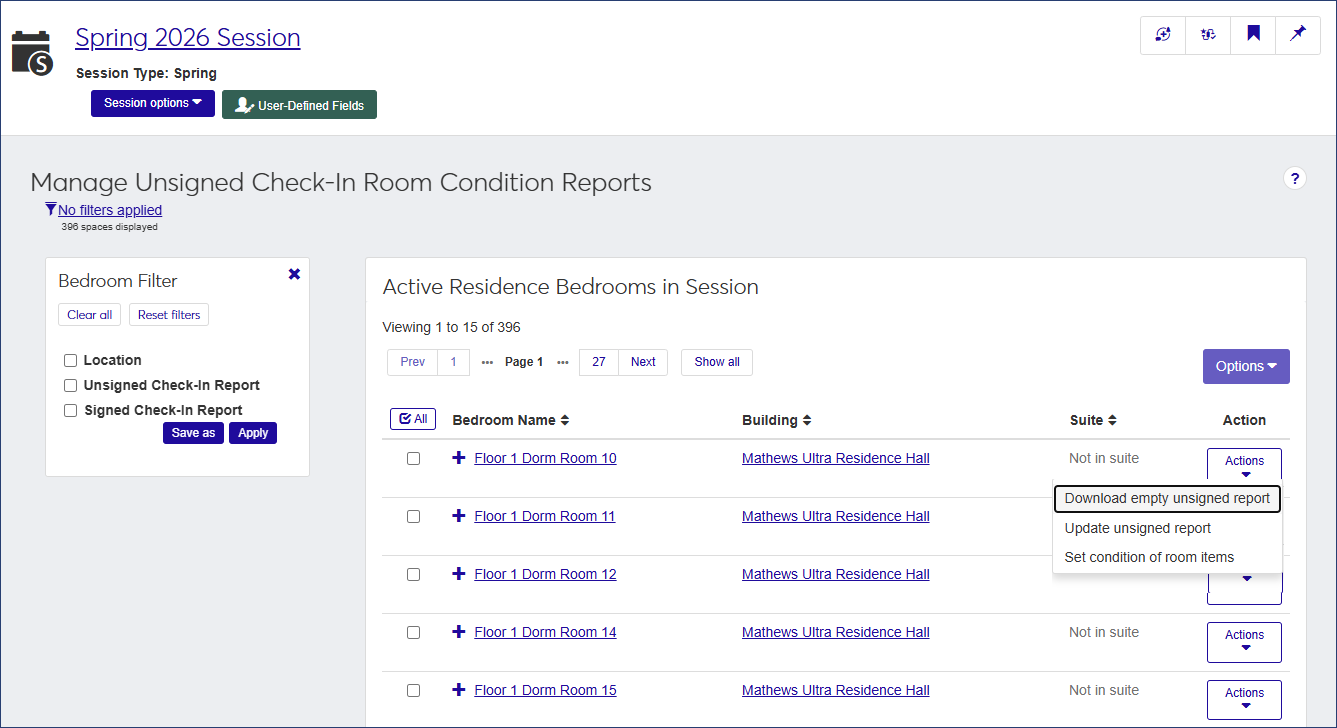
The Manage Unsigned Check-In Room Condition Reports page provides the following information about each available room in the session. Click the plus icon  next to a row to expand it and see all columns.
Field | Description |
|---|---|
Bedroom Name | The name of the bedroom. Click the link to open the Manage Residence Spaces page for the room. |
Building | The name of the building the bedroom is in. Click the link to open the building's summary page. |
Suite | If the bedroom is in a suite, click the name of the suite to open the summary page for the suite. |
Action | If the bedroom is not in a suite, this column contains an Actions drop-down with the following options:
If the bedroom is in a suite, this column contains a link to the Manage Unsigned Check-In Room Condition Reports (Suite) page, which lists all active residence suites in the session. |
Unsigned Check-In Report | If an unsigned check-in report has been generated, click the link provided to open the PDF. |
Signed Check-In Report | If a signed check-in report has been generated, click the link provided to open the PDF. |
How To
On the Session summary page, click the Session options drop-down and select Check-in options, then Manage unsigned room condition reports. The Manage Unsigned Check-In Room Condition Reports page opens, displaying a list of all active residence bedrooms in the session.
Locate the room you need to work with and select Generate unsigned report from the Actions drop-down. The Generate Unsigned Room Condition Report wizard opens to Step 1, Report Basics.
Enter Report Notes as needed and click Save and continue to move to step 2, the Room Condition Report. This page lists all the items in the room and the condition currently assigned to each one. Click the Expand icon to view notes and any supporting documentation, such as a photo of damage.
Update the condition of the room items as needed. You can update items individually or in a batch.
To update the condition of an individual item:
Click Update next to the item you need to update. The Update Item Condition pop-up opens.
From the Condition drop-down, select the new condition of the item.
If you have a photo or other supporting documentation, click Choose file and upload the document or image.
Note
This feature is only available when Document Storage is enabled in Desktop and the Active checkbox is selected for SADAMAGE.
Enter Notes as needed.
Click Update to save the changes.
Repeat steps i–v to update the conditions of other room items.
To update conditions for items in a batch:
Note
When you update items in a batch, each item you select will be assigned the same condition.
Select the checkbox next to each item you want to update. Click the All icon
 to select all items listed.
From the Options drop-down, select Update item condition. The Update Item Condition window opens, listing each item you selected and its current condition.
From the Condition drop-down, select the condition you want to assign to the items.
Click Update to save the changes and close the window.
Repeat steps i–iv as many times as needed to update the conditions of other room items.
When you are done, click Save & finish.
To generate a PDF of the report, click Generate report. You can then download or print the report.
If a check-in report has been generated but has not yet been signed, you can add notes and update the condition of room items.
On the Manage Unsigned Check-In Room Condition Reports page, select Update unsigned report from the Actions drop-down for the room you need to update. The Generate Unsigned Room Condition Report window opens to the first step, Report Basics.
Update the Report Notes as needed.
Click Save and continue to move to the next step, Room Condition Report.
Update the condition of the room items as needed. You can update items individually or in a batch.
To update the condition of an individual item:
Click Update next to the item you need to update. The Update Item Condition pop-up opens.
From the Condition drop-down, select the new condition of the item.
If you have a photo or other supporting documentation, click Choose file and upload the document or image.
Note
This feature is only available when Document Storage is enabled in Desktop and the Active checkbox is selected for SADAMAGE.
Enter Notes as needed.
Click Update to save the changes.
Repeat steps i–v to update the conditions of other room items.
To update conditions for items in a batch:
Note
When you update items in a batch, each item you select will be assigned the same condition.
Select the checkbox next to each item you want to update. Click the All icon
to select all items listed.From the Options drop-down, select Update item condition. The Update Item Condition window opens, listing each item you selected and its current condition.
From the Condition drop-down, select the condition you want to assign to the items.
Click Update to save the changes and close the window.
Repeat steps i–iv as many times as needed to update the conditions of other room items.
When you are done, click Save & finish.
To generate a PDF version of the blank report, click Generate report. You can then download or print the report.
If you have the required permissions, you can save time and effort by setting the condition of all room items directly from the Manage Unsigned Room Condition Reports page without having to generate an unsigned report first. For example, if all the items in the room are new, you can simply set the condition to "New" for all the items in the room at once.
To set room item conditions, you must be in a role with the "Can set up check-in process" or "Can manage resident check-in process" permissions enabled. Otherwise, this option is not available.
Note
When you set room items conditions from this page, all items in a room are set to the same condition. If you need to update the condition of an individual room item later on, you can do so by updating the Unsigned Room Condition Report.
To set item conditions for one room at a time:
From the Actions drop-down for the room you need to update, select Set condition of room items. The Set Condition of Room Items pop-up opens.
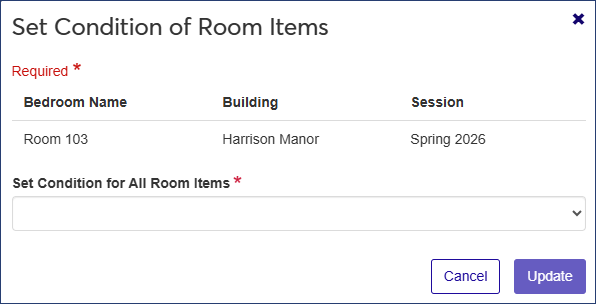
Select an option from the Set Condition for All Room Items drop-down. The condition you select will be applied to all items in the room.
Click Update to save the change and close the pop-up.
To set the conditions for items in multiple rooms:
On the Managed Unsigned Check-In Room Condition Reports page, select the checkbox next to each room you need to update. To select all rooms on the list, click the All icon
.From the Options drop-down, select Set condition of room items. The Set Condition of Room Items? pop-up opens, listing the rooms you selected and asking if you're sure you want to update all items in every active room listed.

If you need to remove a room from the list, click the Remove icon next to that room.
From the Condition drop-down, select the new condition for the room items.
Note
If conditions have already been set for the items in any of the selected rooms, the condition of those items will be changed to the value you choose in this step.
Click Yes, update to close the pop-up and update the condition of all items in the selected rooms.
To download an empty check-in report that you can print for use during the walk-through check-in process:
From the Session options drop-down on the Session summary page, select Check-in options > Manage unsigned room condition reports. The Manage Unsigned Check-In Room Condition Reports page opens showing a list of all of the active residence bedrooms in the session.
On the row of the room you need to work with, select Download empty unsigned report from the Actions drop-down. A blank PDF version of the report opens in a new tab.
Download or print the blank report.
If an unsigned report has been generated, you can open it as a PDF.
On the Manage Unsigned Check-In Room Condition Reports page, click the plus icon next to the relevant room to expand the row.
Click the link next to Unsigned Check-In Report.
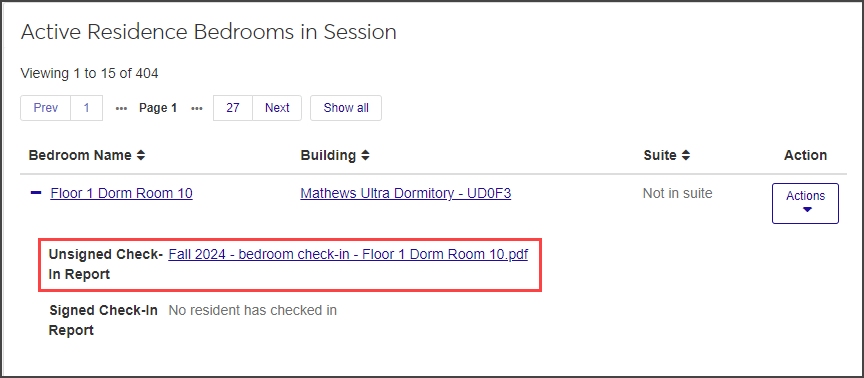
A PDF version of the report opens in a new tab.
Download or print the report as needed.