My Assignments Block
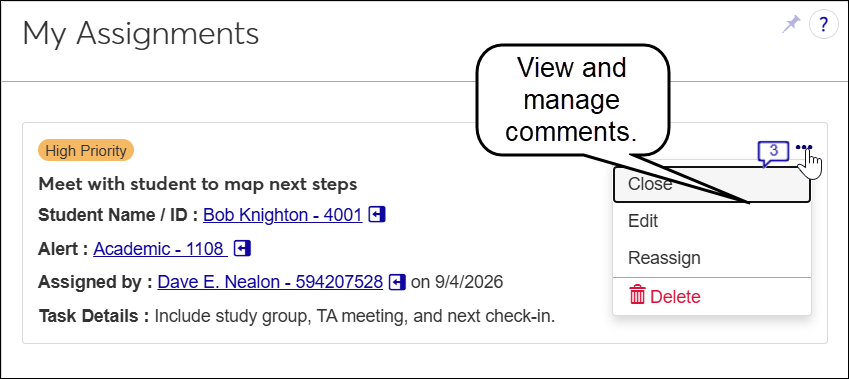
Use the My Assignments block on the Student Success hub Summary page to view alerts assigned to you. You can access information you need for each assignment, and you can close the assignments.
 |
Badges
An assignment may have a badge marking it as High Priority, giving it extra visibility for you on the list.
Permissions
The My Assignments block is available to users who have an alert assignment. When an alert is assigned to you, you're automatically placed in the Alert Assignee role. The role gives you permission to view and work on the assignment and to close it when you're done.
If you're also in the Alert Administrator role, or a role made from it, you may also have permission to create assignments, and to view and manage (edit, delete, and reassign) all assignments.
Fields
Student Name / ID: The student's name is a link to their information pop-up.
Task: This is the title of the assignment. It's not labeled "Task", but Task is the field in the Create Assignment pop-up.
Alert: The alert type and ID number are a link to the alert's Summary pop-up.
Assigned by: The name of the assigner is a link to their Summary pop-up. The date it was assigned also appears.
Task Details: A brief explanation of the task
How To
In the Navigation panel, click the Student product to expand it.
Click Student Success, and select Summary. The Student Success hub opens to the Summary page. The My Assignments block is visible.
In the My Assignments block, the Comments icon for each assignment has a number in it indicating how many comments there are.
 (The icon is blank if there are no comments
  .)
.)To view comments, click the Comments icon
. The Assignment Comments panel opens with the comments showing.To edit a comment, click the Edit icon
 , make your edits, and click the Save button.
To delete a comment, click the Ellipsis icon (. . .), and select Delete. The comment is deleted.
Warning
There's no confirmation pop-up, so be sure you really want to delete the comment before you click Delete.
To add a comment, click the New comment button. A text editor box opens.
Enter up to 1000 characters.
For information on the text editor (such as keyboard shortcuts for formatting), click in the text editor and press Alt + 0 (zero). The text editor's help panel opens.
To add an attachment to the note, click the Attach button, select the file, and click the Open button in the file explorer. The file is attached.
Click the Add button. Your comment is added.
Click the Ellipsis icon (. . .) for a particular assignment, and select Edit from the drop-down. The Edit pop-up opens. The following fields are editable:
Task: Up to 80 characters. Can't be empty.
Task Details: Up to 500 characters. Can't be empty.
This assignment is high priority (checkbox): Select or deselect as needed.
Make your edits, and click the Save button. Your changes are saved, and the pop-up closes.
Click the Ellipsis icon (. . .) for a particular assignment, and select Reassign from the drop-down. The Reassign pop-up warns you that reassigning the task may affect the current assignee's permissions to the alert.
In New Assignee Name / ID, begin typing a name or ID, and select it from the list. Required.
Click the Yes, reassign button. The assignment is reassigned, and the pop-up closes.
Click the Ellipsis icon (. . .) for a particular assignment, and select Close from the drop-down. The Close Assignment pop-up opens.
Under What was the outcome of the assignment?, select either the Completed or Not Completed radio button.
In Outcome Details, enter up to 500 characters to describe the outcome. These may be important notes for record keeping.
Click the Mark as closed button. The assignment is closed, and the pop-up closes. On the Alert Assignments block, the assignment is marked either as Completed or Unresolved, depending on which radio button you selected.
Click the Ellipsis icon (. . .) for a particular assignment, and select Delete from the drop-down. The Delete pop-up warns you that deleting can't be undone.
Click the Yes, delete button. The assignment is deleted, and the pop-up closes.
FAQ
Can an alert have more than one assignment?
Yes. An alert can have multiple assignments. On the My Assignments block, you may have several assignments to various alerts and even several different assignments to the same alert.
On the Alert Assignments block (on the Overview tab of an alert's Summary page), you may see several assignees, and each could have multiple assignments for that alert.