Manage Facility Spaces
On the Manage Facility Spaces page, residence life administrators with the necessary permissions can maintain housing information at the facility level, before a space has been added to a session. Being able to maintain this information at the facility level means that default values can transfer easily to the session level when a new session is created.
The Manage Facility Spaces page provides general information about the spaces before they are added to a session. Users can edit the space's maximum capacity and the space type from this page, as well as assign a room condition report template to the space.
Note
Although both the Manage Residence Spaces page and the Manage Facility Spaces page allow you to view and edit information about spaces, the Manage Residence Spaces page includes only spaces that have already been added to a session.
Access the Manage Facility Spaces page from the Residence Life Administration Hub by clicking the Hub options drop-down and selecting Session options, then Manage facility spaces.
To edit information on the Manage Facility Spaces page, you need to be in a Residence Life Administrator or Student Life Module Manager role (or a role copied from one of those roles) with the "Can view session-related facility information" and "Can edit session-related facility information" permissions enabled.
If only "Can view session-related facility information" is enabled, you can view facility information but cannot edit it.
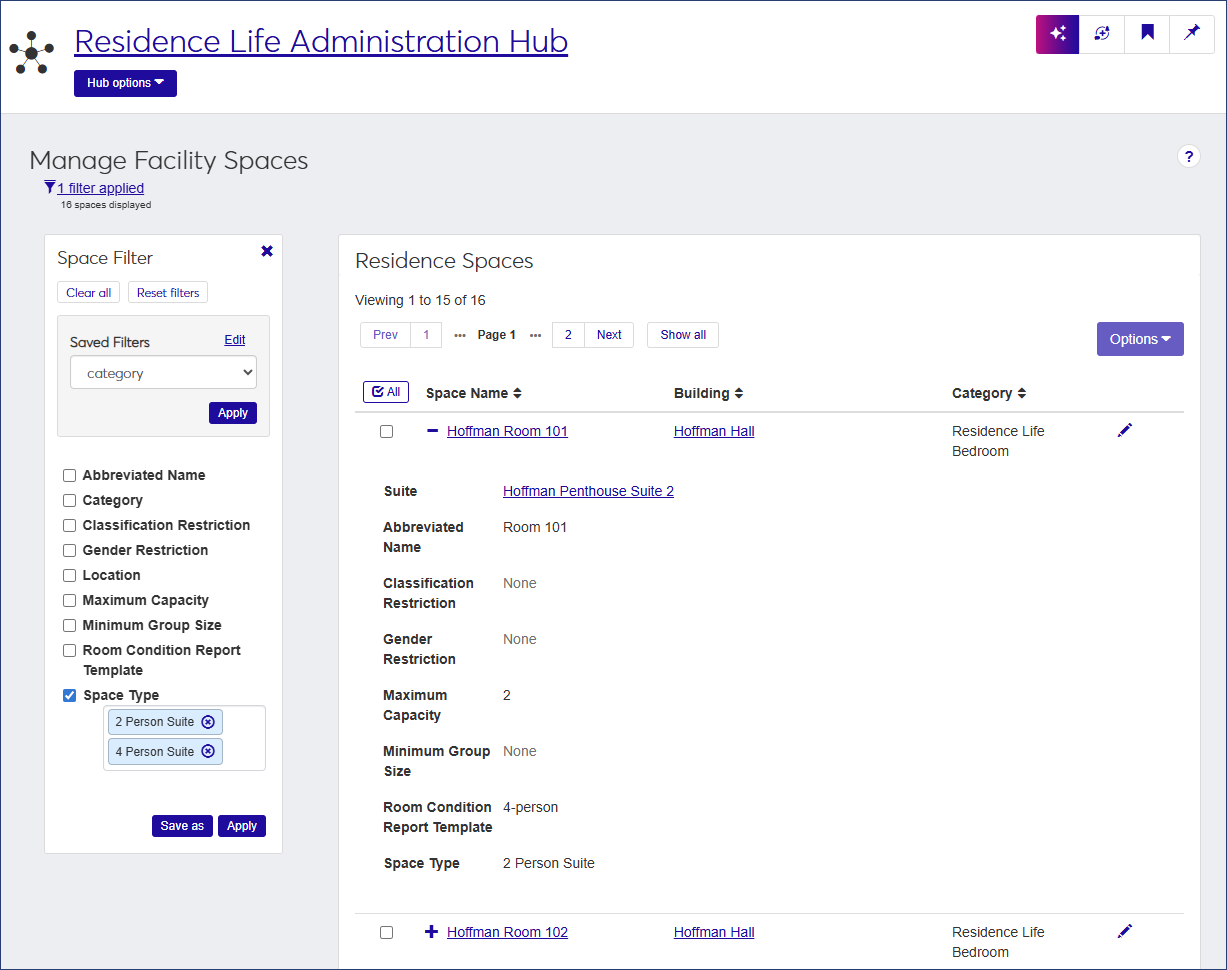
The list of residence spaces on the Manage Facility Spaces page includes the following information.
Click the plus icon  to expand the list and view all details.
Column | Description |
|---|---|
Space Name | The name of the space. Click the name to open the summary page for that space. |
Building | The name of the building the space is in. Click the name to open the summary page for that building. |
Category | The category of the space (e.g., bedroom, study lounge, residence hall kitchen, etc.). |
Suite | If applicable, the name of the suite. Click the name to open the summary page for the suite. |
Abbreviated Name | The abbreviated name for the space. |
Classification Restriction | If the space is restricted based on Classification (e.g., freshman or junior), that restriction is specified here. |
Gender Restriction | If the space is restricted by gender, that restriction is specified here. |
Maximum Capacity | The maximum number of people who can be assigned to the space. This value cannot be less than the Minimum Group Size. |
Minimum Group Size | The minimum number of people who can be assigned to the space. |
Room Condition Report Template | The room condition report template that has been assigned to the space. |
Space Type | The space type (e.g., 2-person suite, laundry room, seminar room, etc.). |
How To
The list of residence spaces is usually quite long, but you can narrow it using the Space Filter. If you do not see the filter, click the No filters applied link beneath the page heading.
You can filter the list by any of the details that are displayed for a space.
In the Space Filter, select the checkbox next to the option you want to filter the list by. A criteria field opens under the selected option. You can filter by as many details as you want.
For each detail, enter or select the criteria by which to filter the list.
Click Apply. The list is narrowed to display only those residence spaces that match the filter criteria.
To save a filter that you will use often:
Select the option and criteria you want to filter the list by.
Click Save as and enter a name for the filter.
Check Set as default if you would like this to be the default filter.
When you are done, click Save.
To use a saved filter that is not the default, select the filter from the Saved Filters drop-down.
You can edit residence spaces individually or in a batch.
From the Manage Facility Spaces page, click the pencil icon for the space you need to edit. The Edit Facility Space pop-up opens.
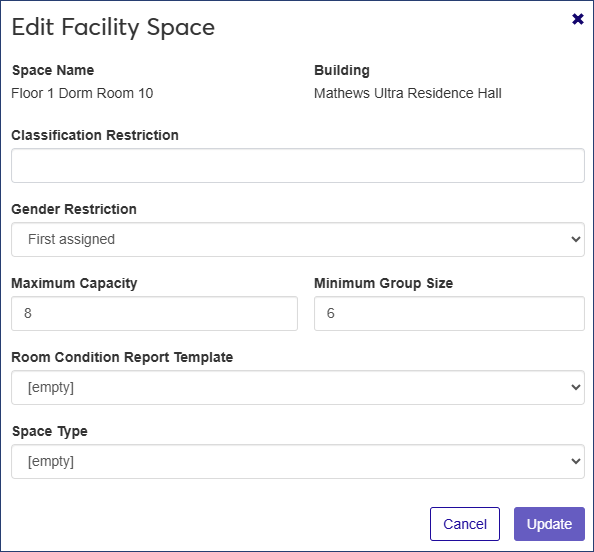
You can edit all fields but the Space Name and Building.
To add or change a Classification Restriction, click in the field and select an option (e.g., Sophomore or Doctoral) from the drop-down. The list contains all available classifications defined by your institution. This field is only available if you are editing a bedroom space.
To add or change Gender Restriction, select an option from the drop-down. The list contains all room genders defined by your institution and associated with residence life spaces. This field is only available if you are editing a bedroom space.
In the Maximum Capacity field, enter the maximum number of residents who can be assigned to the space. This value cannot be less than the Minimum Group Size.
In the Minimum Group Size field, enter the minimum number of people who can be assigned to the space. This value cannot be greater than the Maximum Capacity.
Note
If the value you enter in the Maximum Capacity field is less than the value in the Minimum Group Size field, the minimum group size will be set to match the updated maximum capacity.
To update the Room Condition Report Template attached to the space, select an option from the drop-down. The list contains all active room condition report templates defined by your institution.
To edit the Space Type, select an option from the drop-down. The list contains all facility space types defined by your institution.
When you are done, click Update to save the changes and close the window.
When you edit a detail for multiple spaces at once, the change is applied to all the spaces you select.
On the Manage Facility Spaces page, select the checkbox next to each residence space you need to update.
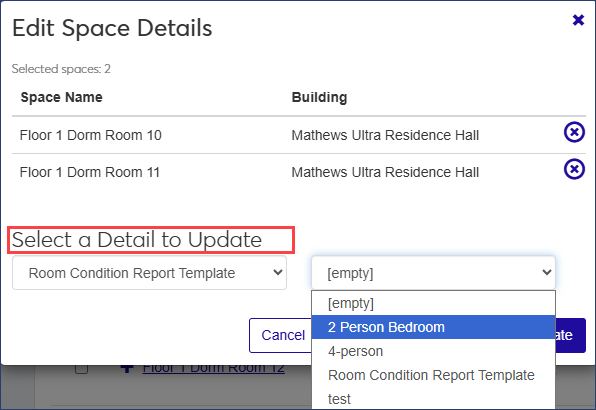
From the Options drop-down, select Edit space details. The Edit Space Details pop-up opens, displaying the spaces you selected.
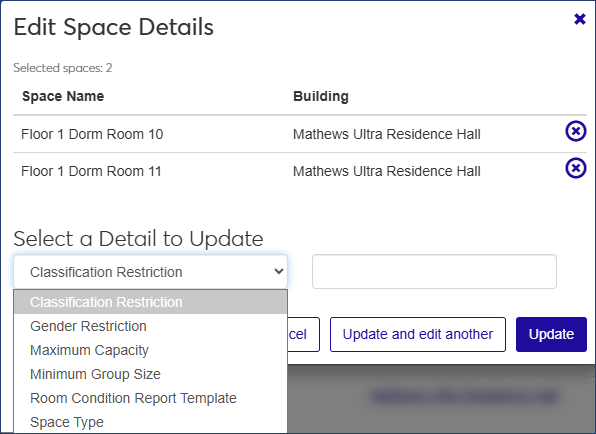
You can edit Classification Restriction, Gender Restriction, Maximum Capacity, Minimum Group Size, Room Condition Report Template, and Space Type.
If you need to remove a space from the list, click the Remove icon
 for that space.
Under Select a Detail to Update, select the detail you want to edit from the drop-down.
Select a value from the adjacent drop-down. If you are updating Maximum Capacity or Minimum Group Size, enter a value in the text field.
Note
For Room Condition Report Template and Space Type, "[empty]" is an available option.
When you are done, click Update and edit another if you want to edit another detail, or Update to save the change and close the pop-up.
You can assign a Room Condition Report Template to an individual space or apply the same template to multiple spaces.
To assign a template to an individual space:
On the Manage Facility Spaces page, click the pencil icon for the space you want to assign a template to. The Edit Facility Space pop-up opens.
Select the template you want assign to the space from the Room Condition Report Template drop-down.
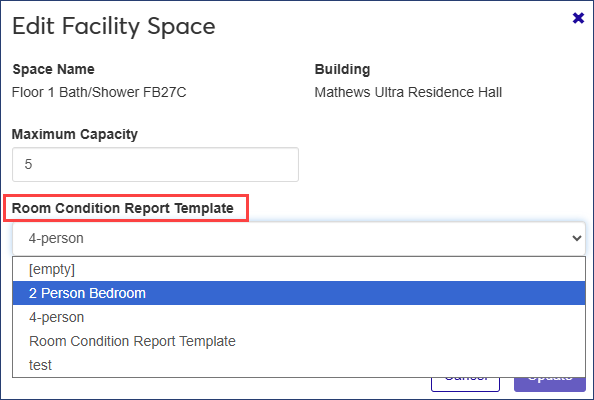
Click Update to save your change.
To assign a template to multiple spaces:
On the Manage Facility Spaces page, select the checkbox next to each space you want to assign the template to.
From the Options drop-down, select Edit space details. The Edit Space Details pop-up opens.
Select "Room Condition Report Template" from the Select a Detail to Update drop-down.
From the adjacent drop-down, select the template you want to assign to the spaces.
Click Update to save the change.