Create Batches
Using batches to work with your account transactions can be helpful when you want to organize and quickly process multiple transactions at one time (e.g., monthly student fees, payments, vendor invoices, daily cash received, etc.). Grouping types of transactions together helps streamline your accounting and makes processing more consistent and efficient.
Tip
Transaction Groups in J1 Desktop are now Batches in J1 Web.
How To
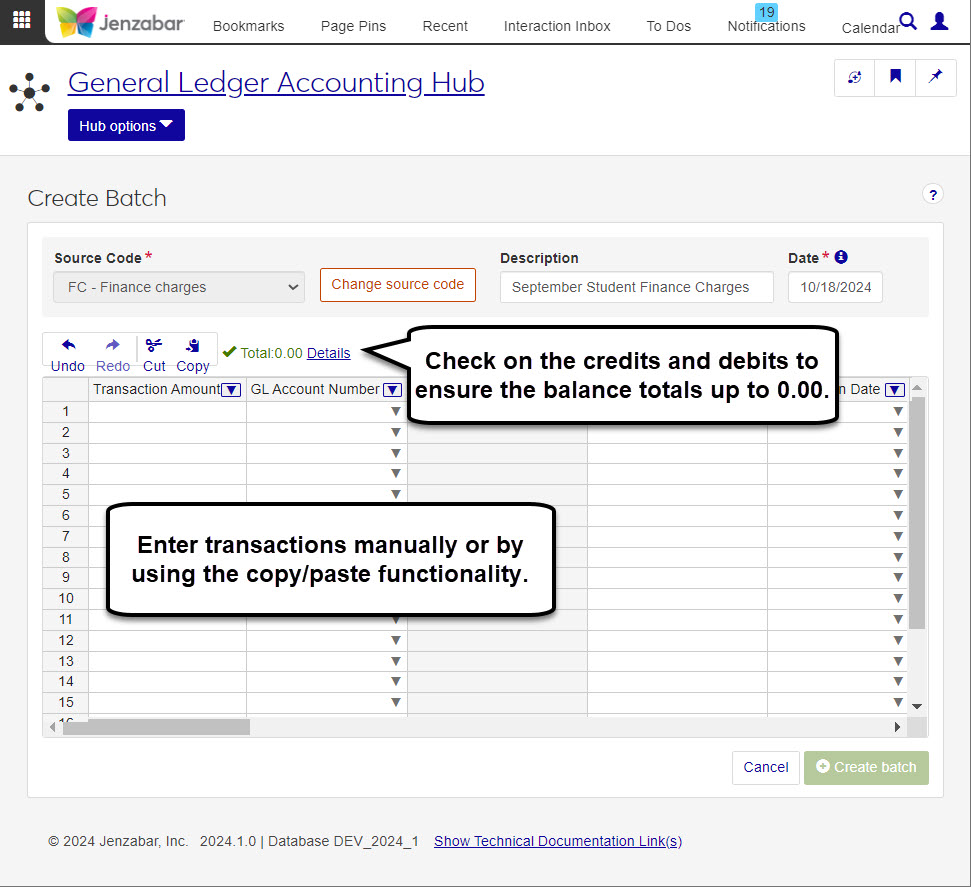
To create a new general ledger batch, select Create batch from the General Ledger Accounting Hub options drop-down or click the Create batch button on the Batches page. An empty spreadsheet displays.
At the top of the page, you'll need to enter the basic information for your new batch:
Tip
You will only see the source codes you have been given permissions/associations to.
Select a source code from the Source Code drop-down.
If you want to label the batch, enter a batch Description.
Enter the batch Date.
Now it's time to enter batch transactions into the batch spreadsheet. You can enter transactions manually into the spreadsheet, or if you have an existing spreadsheet (such as Excel) you can use Ctrl + C and Ctrl + V to paste transactions into the batch spreadsheet. Be sure to validate your data.
Note
Data is validated immediately in the spreadsheet. If the content you entered into a cell is invalid or has an error, the cell will be highlighted red with an Alert
 icon that will explain why the data entered cannot be validated.
 The batch spreadsheet offers many columns where you can add details.
Click Create batch.
Tip
After a batch is created, the batch details page opens. From there you can edit and maintain the batch information. To create another batch, go to Batch options and click Create.
After creating a batch, you can make edits until the batch is posted and the status changes to U.
From the Batches page, search and select the batch you want to edit from the Batch List by clicking the number link in the Batch Number column.
After you click on a batch number link, the Batch Details page will open. From the Batch Detail page, you can make, add, remove, or edit the transactions in the batch. Make changes to the spreadsheet as needed.
When you're done making edits, click the Save button from the spreadsheet toolbar.
Danger
When an approved user is working in a batch, it is locked. If you choose to unlock a batch, changes made by the other user, or yourself could be lost. Jenzabar recommends NOT using this feature unless you contact the other person working in the same batch.
You can unlock a batch from the Batch List or the Batch Details page. Select the batch you want to unlock.
From the Batch List, click the More drop-down and select Unlock , or, from the Batch Details page, click the Unlock button in the alert bar.
Tip
The warnings and alerts that appear when a batch is locked by another user will give you the name of the individual currently working in the batch. Please contact the person before unlocking.
In the Unlock Batches pop-up window, you will see the selected batches listed in one of two sections:
Ready to Unlock: Batches listed here will be unlocked and made available to yourself and others. Be sure to check the User column and communicate with the user currently using the batch so they won't lose work or overwrite your content.
Unable to Unlock: Batches listed in this section could not be unlocked.
Click Yes, unlock.
The summarize option is typically used with large batches where there are many transactions from the same account listed on the batch detail spreadsheet. Summarizing will take multiple transactions from one account, merge the individual transactions into a single transaction, and update the Transaction Amount to show the cumulative total.
Tip
For the summary option to work, the included accounts cannot be subsidiary accounts and the Summarize checkbox must be selected on the GL Accounts page.
From the Batch List, select the checkboxes next to the row(s) of batches you want to summarize.
Click the More drop-down and select Summarize.
In the Summarize Batches pop-up window, you will see the selected batches listed in one of two sections:
Ready to Summarize: Batches listed in this section will be summarized into a single transaction. You may notice a warning icon at the end of a batch row, which indicates that only part of the batch will be summarized.
Unable to Summarize: Batches listed in this section could not be summarized. An alert icon at the beginning of the batch row lists the reasons why the batch couldn't be summarized.
Click Yes, summarize.
Tip
If none of the selected batches can be summarized, you will see an OK button instead of the Yes, summarize.
Tip
You can also summarize a batch from the Batch Details page. When you open a batch, you will see the Batch options drop-down where you can click the Summarize option and follow the same steps as above.
FAQ
Yes, Created By and Posted By fields are populated and displayed on the Batch List page as well as within the Batch as you view the details. They are also clickable links that open that person's Summary page so you could send them a communication if needed.
When batches are posted, the following occurs:
The amount of the transaction is applied to its account balance and is reflected in the General Ledger Account Master table.
The Post Transactions report is printed listing each transaction in the group.
The transaction status becomes current (C), no longer appears on the window, and becomes part of the month in which it was posted.
Some functions in the General Ledger system create transactions for each student. For example, when you generate tuition charges for a student, the system creates one debit to the Accounts Receivable account and one credit to the Tuition Income account. While these transactions are necessary, they often provide more detail than required. For this reason, you can choose to summarize entries for selected accounts
A batch will be locked when an approved user selects one or more batches from the Batch List and clicks one of the following options:
Post
Summarize
Reverse
Delete
Any batches that appear in the Ready to... section will be locked to other users until the action is complete. If the user becomes inactive before the action is complete, the batches will be locked for 30 minutes, then become unlocked for use.
When you create or edit a batch, be sure all the required fields are correct and there is at least one transaction in the batch.
Yes. You can open a batch from the Batches page in the General Ledger Account Hub. Open the batch or batches you want to edit, and you can make your changes from the Batch Details page.
Warning
You cannot make changes to a batch after it's been posted.