Manage Residence Spaces
Important
Information and features vary according to the roles to which you belong and the permissions associated with those roles. For more information, contact your module manager or your campus support team.
Residence spaces are used for housing students. The Manage Residence Spaces page allows you to work with the spaces that will be assigned to students. You can update details about the spaces, designate them as active and available for the session, and assign roommates.
The Manage Residence Spaces page is specific to each session. Access it from the Session summary page by clicking the Residence Spaces link in the Housing Application block, or by clicking the Session options drop-down and selecting Housing options, then Manage residence spaces.
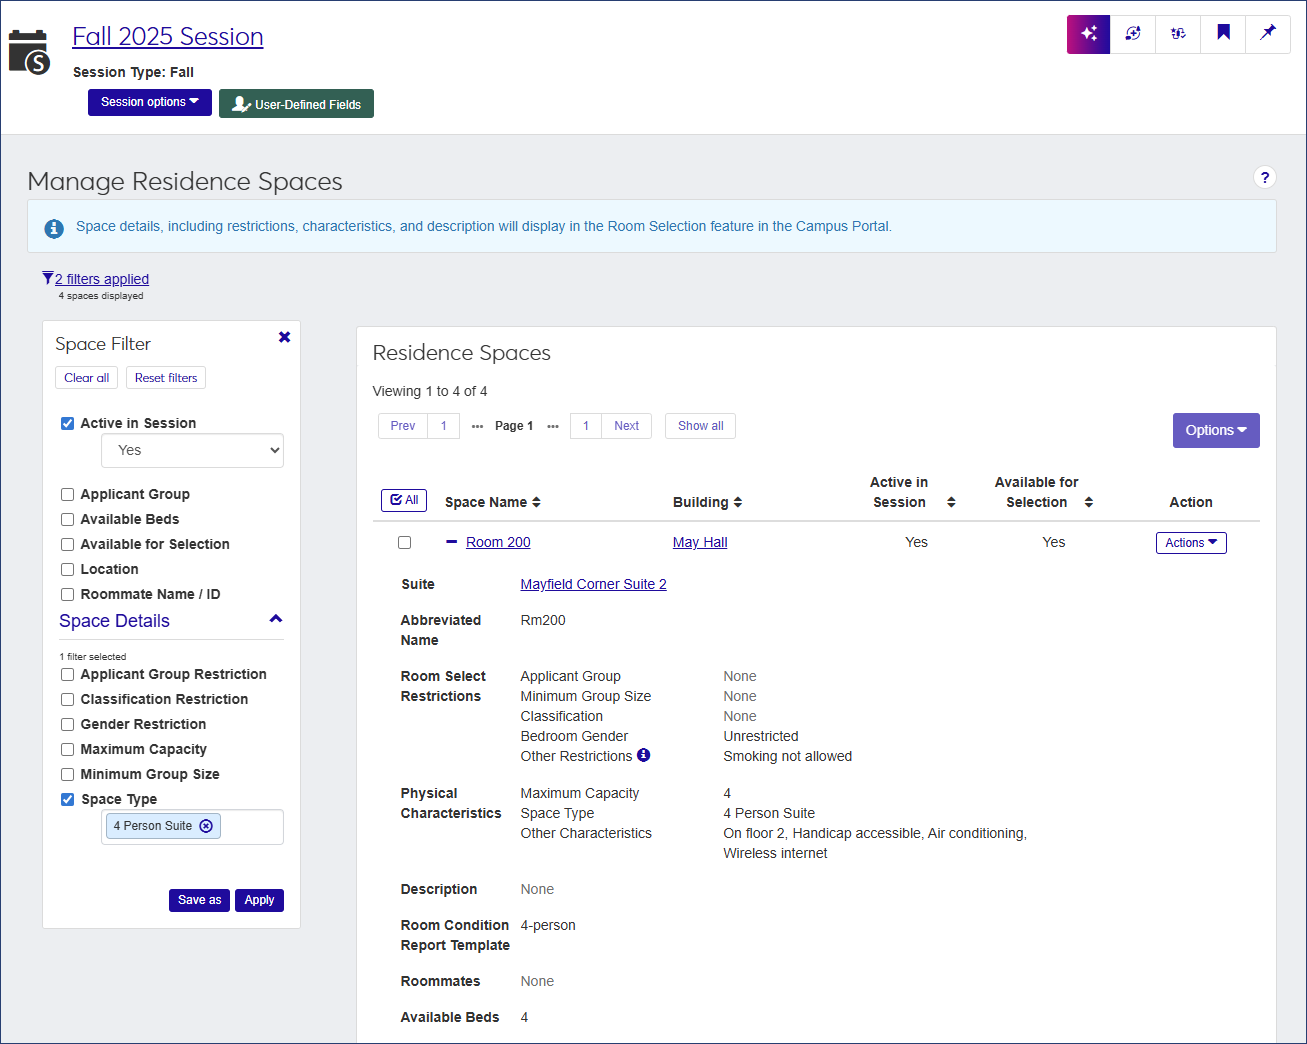
The Residence Spaces list provides the following information for each space listed. Click the plus icon  next to a space name to expand the list and see all the columns available.
Column | Description |
|---|---|
Space Name | The name of the space (e.g., Room 101 or Hoffman Lounge Floor 1). Click the space name to open the summary page for that space. |
Building | The name of the building that contains the space. Click the name to open the summary page for the building. |
Active in Session | Tells you whether or not the space is active in the session. If the space is a bedroom and is active, the column also indicates if the bedroom is assigned to a student. |
Available for Selection | Indicates if the space is available to be assigned to a student. If the space is not available, the column indicates the reason (e.g., is not a bedroom or is already full). |
Action | From the Actions drop-down, you can assign a new roommate to the space, edit the space, or view roommate history. If the space is not a bedroom (whether or not it is active), Edit is the only available option. If the room is not active in the session, the Assign new roommate option is unavailable. |
Suite | If the space is a suite, this column displays the name of the suite. Click the name to open the summary page for that suite. |
Abbreviated Name | The abbreviated name that was entered when the space was created. |
Room Select Restrictions | If the space is a bedroom, this column lists any restrictions that affect the space's availability to be selected:
If the space is not a bedroom, this column does not appear. |
Physical Characteristics | The physical characteristics of the room as defined when the space was created:
|
Description | A brief description of the space, if one was entered when the space was created. |
Room Condition Report Template | The Room Condition Report Template that has been assigned to the space. If a template has not been assigned yet, this column is blank. |
Roommates | If the space is a bedroom, this column lists the names and IDs of any roommates that have been assigned to the space. Click a name to open the summary page for that student. If no roommates have been assigned yet, the column says "None." |
Available Beds | The number of beds available in the space, if any. |
How To
The list of spaces can get quite long, but you can narrow it using the Space Filter. If you do not see the filter, click the No filter applied link beneath the page heading.
You can filter the list by any of the details that are displayed for the space.
In the Space Filter, select the checkbox next to the detail you want to filter the list by. A criteria field opens under your selection. You can select more than one detail.
Enter or select the criteria by which you want to filter the list.
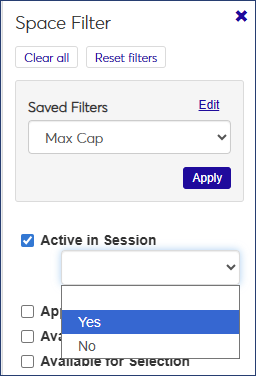
Click Apply. The list narrows to display only those residence spaces that match the filter criteria.
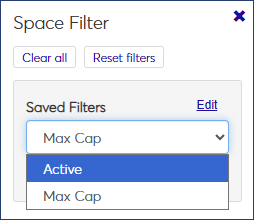
To save a filter that you will use often:
Select the filter and criteria you want to filter the list by.
Click Save as and enter a name for the filter.
Select the Save as default checkbox if you would like this to be the default filter.
When you are done, click Save.
To used a saved filter that is not the default, select the filter from the Saved Filters drop-down.
Navigate to the Session summary page.
On the Housing Application block, click the Residence Spaces link, or click the Session options drop-down and select Housing options, then Manage residence spaces. The Manage Residence Spaces page opens.
Find the room you want to assign a roommate to.
From the Actions drop-down, select Assign new roommate. The Assign New Roommate window opens.
The Current Roommates in [Room #] section tells you who (if anyone) is currently assigned to the room. The next section tells you if there are any remaining room slots, and if so, how many.
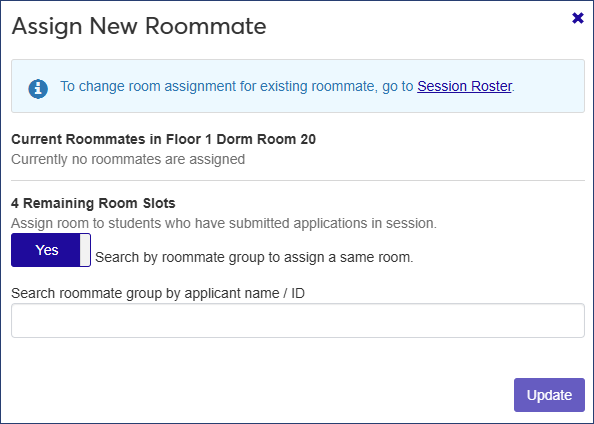
If you want to assign a new roommate from the student's requested roommate group, make sure the room slot option is set to Yes. To search all applicants, set the option to No.
In the search field, begin typing the name of the student you want to assign to the room slot and select the student's name when it appears.
Click Update to add the roommate to the room.
When the change is made, a communication is sent automatically to all existing members of the room except the person being moved. This communication can be found in the recipients' Interactions Inbox.
You can edit most residence space details, with the following exceptions:
Space Name and Building cannot be edited.
Active in Session cannot be edited if a bedroom has been assigned.
Gender Restriction cannot be edited if residents have already been assigned to the room.
The Room Condition Report Template cannot be edited if a room condition report for the room has already been generated.
You can edit spaces one at a time or multiple spaces at once.
On the Manage Residence Spaces page, locate the space you need to edit.
Select Edit from the Actions drop-down for that space. The Edit Residence Space pop-up opens.
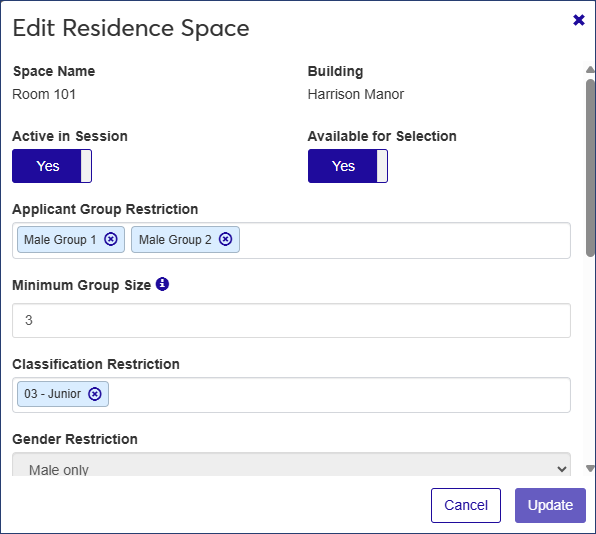
Edit the details as needed.
When you are done, click Update.
On the Manage Residence Spaces page, select the checkmark next to each space you need to edit. To select all spaces on the list, click the All
 button.
From the Options drop-down, select Edit Space Details. The Edit Space Details pop-up opens, listing the spaces you selected.
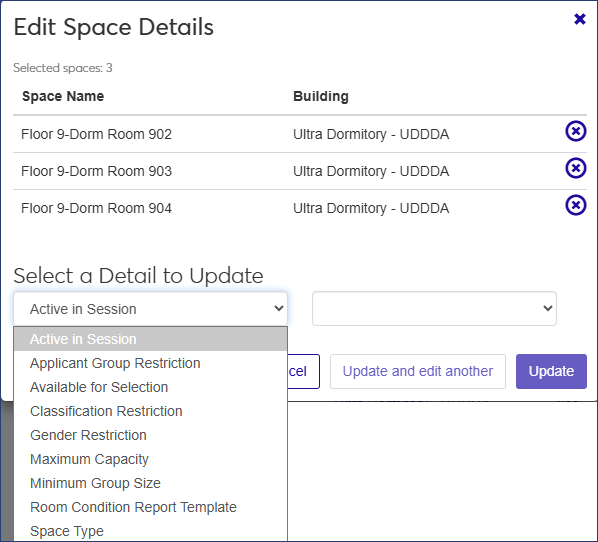
From the Select a Detail to Update drop-down, select the detail you need to update. You can update only one at a time.
When you are done, click Update and edit another to save the changes and keep the pop-up open so you can edit another detail, or click Update to save the changes and close the pop-up.
Note
If the detail you edited cannot be updated for all the spaces you selected, a message appears telling you how many spaces were edited successfully and how many could not be edited and why (for example, because a room has already been assigned).
Navigate to the Session summary page.
Click the Residence Spaces link on the Housing Application block, or click the Session options drop-down and select Housing options, then Manage residence spaces. The Manage Residence Spaces page opens.
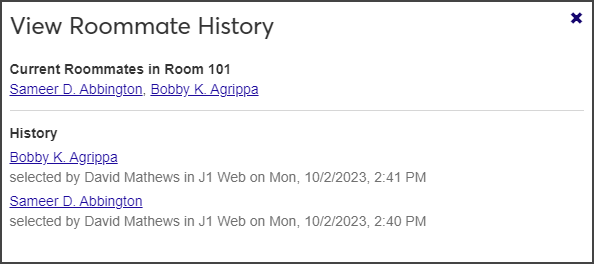
Locate the room you want to view.
From the Actions drop-down, select View roommate history. The View Roommate History pop-up opens, displaying the roommates currently assigned to the room and any past roommates.
Navigate to the Session summary page.
Click the Residence Spaces link on the Housing Application block, or click the Session options drop-down and select Housing options, then Manage Residence Spaces. The Manage Residence Spaces page opens.
Select the checkbox next to the room (or rooms) you want to work with and then select Send communication from the Options drop-down. The Create New Communication window opens.
Select the Communication Type (Email or Text).*
The Interaction Code, From, To, and Contact Type fields are pre-populated. You cannot change the recipients or the Contact Type. To change the Interaction Code or the From value, click the X icon next to the value and select a new option from the list.
Enter a Subject for the email. This field is required.
Type your message in the Body text box. Use the editing toolbar to format your text.
If you need to attach a file, click Attach file and upload the file you need.
When you are done, click Send.
*Texting settings are available with Communications Plus.
Residence spaces cannot be removed from a session after they are added, but you can make them inactive in the session or mark them as unavailable for selection.
Select the checkboxes next to the rows you want to export.
From the Options drop-down, select Download to Excel. The Download to Excel pop-up opens.
Select options for the Excel format and data columns.
Click Download. Your .xlsx or .zip file is saved in the file location that you have set in your browser settings.
Create the room items (for example, Bed 1, Bed 2, Bed 3, Bed 4).
Create room condition report templates (for example, 2-person room).
Assign room items to room condition report templates (for example: 2-person room template gets Beds 1 and 2).
Assign the room condition report templates to residence spaces. For example: Room 104-D is a 2-person room, so you assign the 2-person template to it. Now the Room 104-D room condition check in report includes the 2 beds.