Alert Outcome Definitions
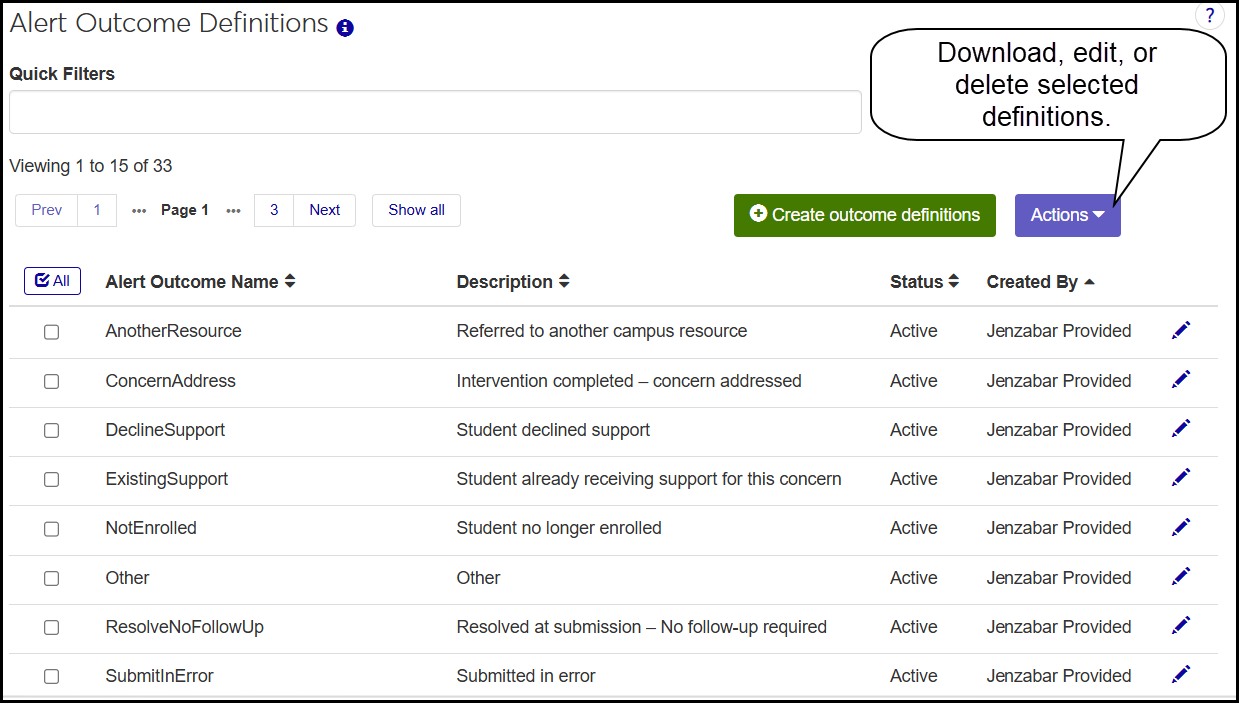
Alert outcome definitions describe the resolutions to the issues that prompt alerts. When a user closes an alert, they select the resolution that resolved the alert. Only active outcome definitions are available to select.
Where Alert Outcome Definitions Are Used
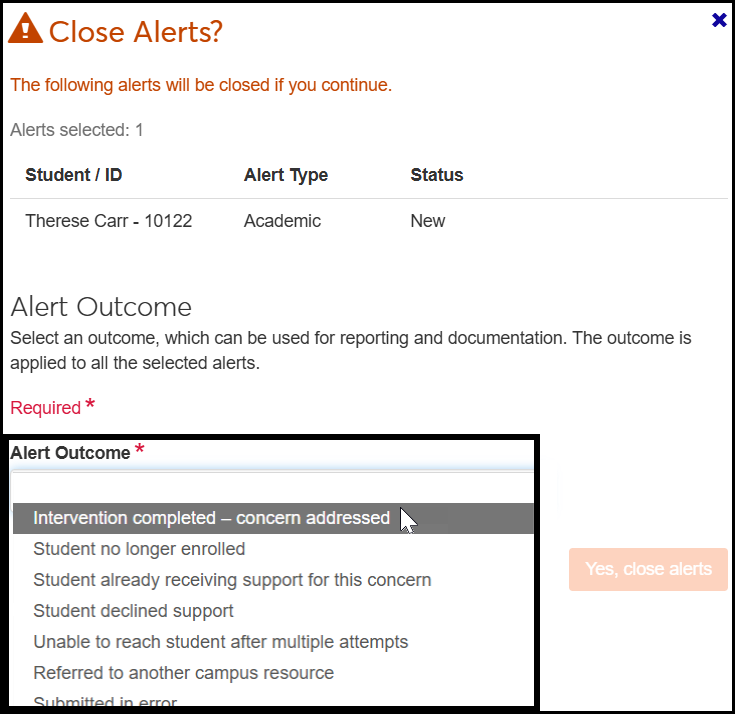
When a user closes an alert, they select one of the definitions in the Alert Outcome drop-down on the Close Alert pop-up.
After an alert is closed, the Alert Outcome appears as part of the closed alert in several places:
The Alert Tracking page: Expand a closed alert, and scroll down to the Alert Outcome field. The outcome is listed with date closed.
The alert's Summary page, Overview tab, Alert Details block
The alert's Summary page, Timeline tab
In each location, the name of the person who closed the alert is a link to their Summary page. If the alert was closed, reopened, and closed again, the outcomes are listed as Current Outcome and Previous Outcome.
Permissions Required
The "Can manage alert outcome definitions" is available in the Student Success Administrator role and roles made from it. With that permission, users can view, edit, create, download, and delete definitions.
Provided Definitions
You can create definitions and use the ones Jenazabar provides. Jenzabar provides the following definitions. You can edit the provided definitions and make them inactive, but you can't delete them.
Alert Outcome Name | Description |
|---|---|
AnotherResource | Referred to another campus resource |
ConcernAddress | Intervention completed – concern addressed |
DeclineSupport | Student declined support |
ExistingSupport | Student already receiving support for this concern |
NotEnrolled | Student no longer enrolled |
Other | Other |
ResolveNoFollowUp | Resolved at submission – No follow-up required |
SubmitInError | Submitted in error |
UnableReach | Unable to reach student after multiple attempts |
The Fields
Alert Outcome Name: The code name for the definition. Up to 30 characters. Must be unique. Required.
Description: Up to 75 characters. Need not be unique. Required.
Status: Active or Inactive. Only active outcome definitions are available to select in the Alert Outcome drop-down on the Close Alert pop-up. Required.
Created By: Populated automatically when a definition is created. It lists the creator's username and the creation date.
Actions
You can operate on one or more definitions by selecting their checkboxes and clicking the Actions drop-down. Drop-down options include Download to Excel, Edit, and Delete.
Note
You can't delete Jenzabar-provided definitions or definitions that are in use.
Database Location
Alert Outcome definitions are stored on the ILInterventionOutcomeDefinition table.
An alert's current selected outcome is stored in ILAlertMaster.InterventionOutcomeDefinitionAppId.
How To
In the main Navigation panel, click Student to expand the list of Student modules and hubs.
Expand Student Success, and select Definitions and then Alert Outcome Definitions. The definitions page opens.
To filter the list, enter a search term in the Quick Filters. It searches each field, so you can enter a date, active or inactive, or part of a name, description, or creator. For example, to narrow the list to only the Jenzabar-Provided definitions, you could type "Jenz" and press Enter.
To sort the list by a column, click the column heading. Click it again to reverse the order.
To edit a single outcome definition:
On a definition's row, click the Edit icon
 . The Edit pop-up opens. You can edit the Description and the Status.
Make your changes, and click the Update button. Your changes are saved.
To edit one or more outcome definitions:
Select the checkbox for one or more definitions.
Click the Actions drop-down, and select Edit. The Edit pop-up opens. You can edit the Status for all the selected definitions.
Select either Active or Inactive, and click the Update button. Your changes are saved.
Click the Create outcome definitions button. The Create pop-up opens.
Enter a Name and Description. Use the information from The Fields section above for guidance.
Select a Status.
Click either Save and create another or Create and close. Your new definition is saved.
Select the checkbox for one or more definitions.
Click the Actions drop-down, and select Delete. The Delete pop-up opens. A message tells you if any of the definitions can't be deleted (because they're in use or they're Jenzabar provided, or they're the last active definition). A message also warns you that deleting can't be undone.
To remove a definition from the deletion list, click the Remove icon
 on its row. The definition is removed from the list, and it won't be deleted.
If you're sure you want to delete the listed definitions, click Yes, delete. The definitions are deleted.
Workbook Creation Options: This option lets you choose how you want the data to be organized when it's exported. If you are exporting a large number of rows, you may want to separate the data into different worksheets or even workbooks. Once you select this option, the Separate (Sheets or Workbooks) By drop-down becomes available so you can choose the groupings for each worksheet or workbook.
Separate (Sheets or Workbooks) By: This field becomes available when you choose to organize your export into multiple worksheets or workbooks. In general, you'll have the option to separate the data based on the columns. You will only see options for the visible columns.
Note
For example, if you are exporting a set of definitions, you might choose to organize the data into two workbooks: one for active definitions, and one for inactive definitions. Do this by selecting the Active column in this drop-down. All of your rows designated as active will be in one workbook, and the inactive ones in a separate workbook.
Workbook Format: This section lets you set some Excel display options for your data. For more information about each of these features, consult Microsoft Excel help.
Autofit columns: Fits column width to the data so that fields are not truncated.
Turn on filtering: Turns on the AutoFilter feature, which allows you to show only rows that meet your selected criteria.
Freeze Top Row: Your worksheet displays the column title in the first row by default. Selecting this option keeps the top row at the top so that as you scroll down through your data, the column headings remain displayed.
Show totals for numeric columns: This option will include the sum of a column of numbers at the bottom of that column.
Columns to Include: These options are specific to the page you are viewing, so they will vary. You will only see options for columns that you can see on the page. All of the columns are selected by default, but you can deselect any of the columns you don't want to include.