Manage Room Item Condition Changes
On the Manage Room Item Condition Changes page, you can easily view the condition of room items at check-out compared to check-in, edit item conditions individually or in a batch, and record notes as needed.
To access the page from the Residence Life Administration Hub page, click the Hub options drop-down menu and select Session options and then Manage room item condition changes.
To view and edit room item conditions, you must be in the Residence Life Administrator or Student Life Module Manager role (or a role copied from one of those roles) and have the "Can set up check-in process" permission enabled.
How To
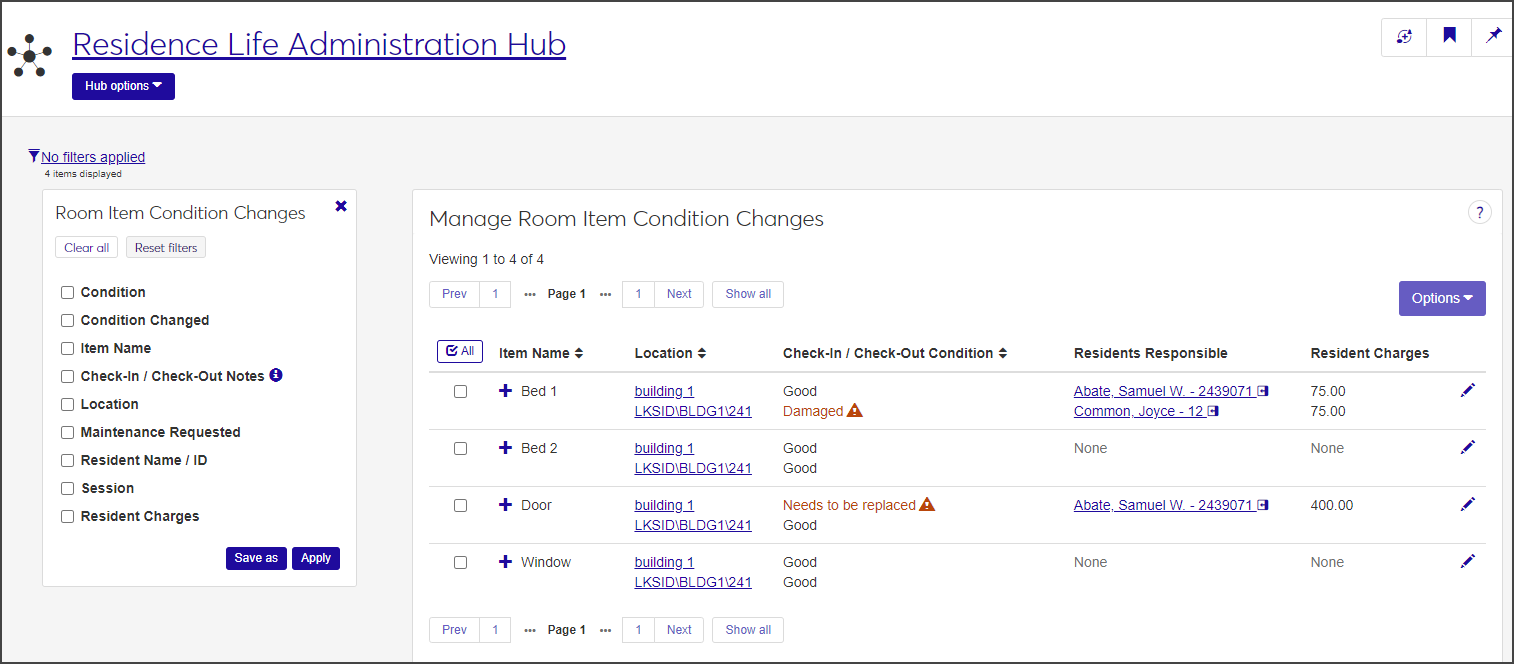
The Manage Room Item Condition Changes page lists all room items created for a session.
 |
Click the expand icon  next to an item name to expand the row.
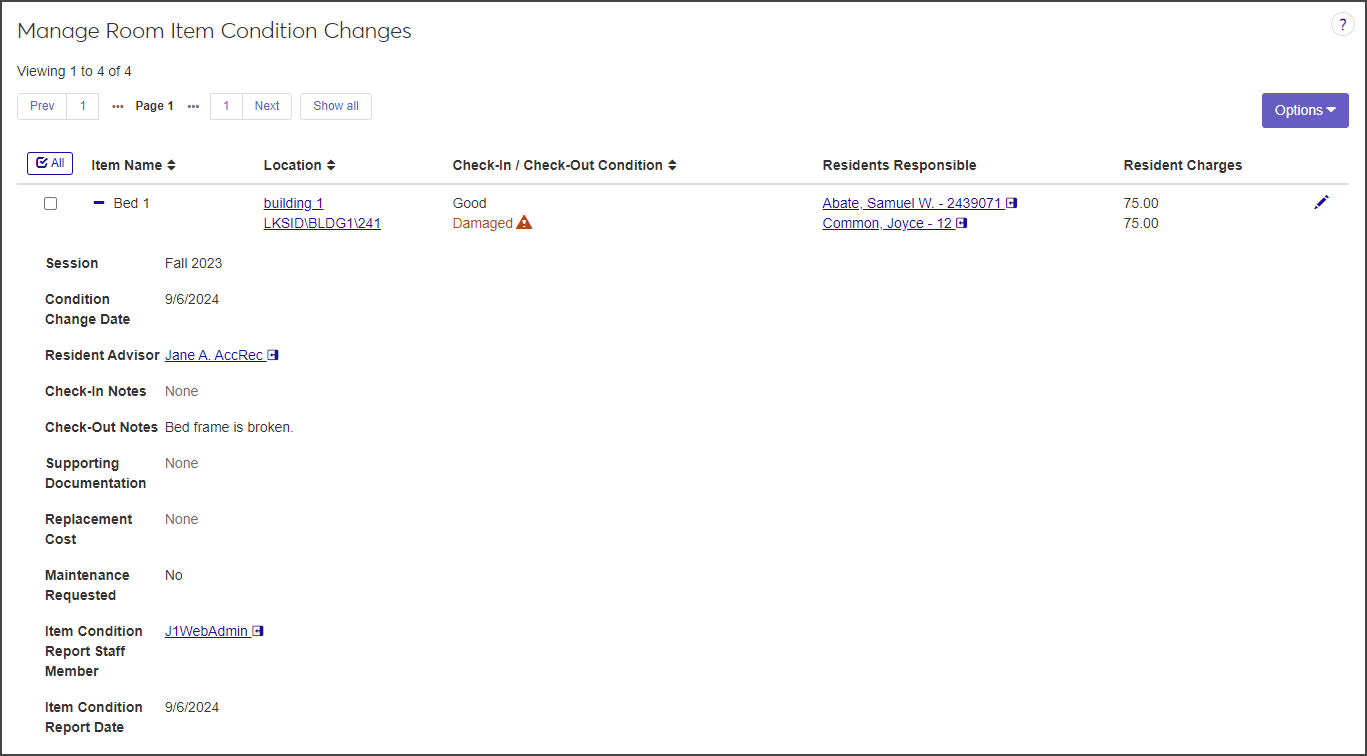 |
The Manage Room Item Condition Changes page provides the following information for each room item listed:
Column | Description |
|---|---|
Item Name | The name of the item (e.g., Bed 1, Desk 2). |
Location | The location of the item, including the building, suite, and room. Click the links to open the summary pages for the places and spaces. |
Check-In / Check-Out Condition | The condition of the item at check-in and check-out. If the condition for either is "Damaged," "Needs to be replaced," or "Dirty," the text is in orange and a warning icon appears next to it. |
Residents Responsible | The residents responsible for the item, with each name linked to the resident's Student summary page. |
Resident Charges | The charges for each resident responsible for the item, if applicable. |
Session | The name of the in which the check-in and check-out took place. |
Condition Change Date | The date the change in condition was documented (i.e., the check-out date). |
Resident Advisors | The resident advisors assigned to the room. Each RA's name is linked to that person's summary page. |
Check-In Notes | Notes about the item recorded at check-in, if applicable. |
Check-Out Notes | Notes about the item recorded at check-out, if applicable. |
Supporting Documentation | Any supporting documentation about the condition of the item, such as photos of damage. |
Replacement Cost | The cost to replace the item, if applicable. |
Maintenance Requested | Whether or not maintenance was requested for this item. |
Item Condition Report Staff Member | The staff member who checked the resident out and reported the change in condition. The name is linked to the staff member's summary page. |
Item Condition Report Date | The date when the staff member made the changes to the item's condition. |
Note
If your screen or window is not maximized, the Check-In/Check-Out Condition, Residents Responsible, and Resident Charges columns might not be displayed as column headings across the top of the list; instead, they appear when the row is expanded.
You can limit the number of items on the list by applying one or more filters.
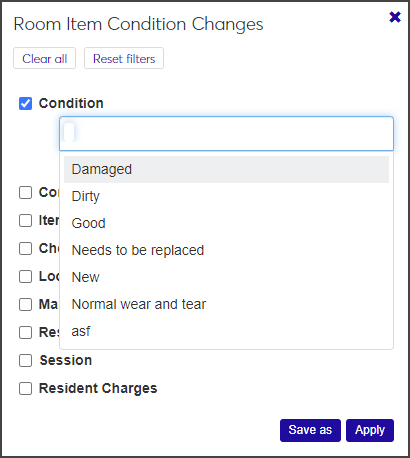
In the Room Item Condition Changes filter, select the checkbox next to the filter you want to use. Additional fields appear that are specific to the filter you selected. Depending on the filter, you will need to select criteria from a list or enter specific parameters.
For example, if you select Condition, click in the field to see a list of all active item condition definitions for the session and select the ones you want to filter the list by.
If you select Maintenance Requested, a drop-down appears with the options Yes and No.
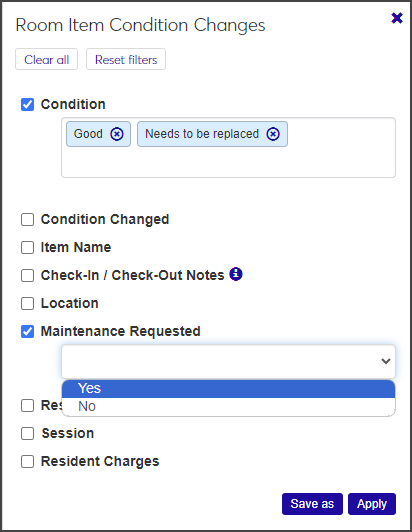
You can select more than one filter.
Select or enter the criteria in the filter field.
After you have selected the filters you want, click Apply. The list is updated to display only those items that match the selected criteria.
If the filter you applied is one you will use frequently, you can save it so it's easy to apply in the future. Click Save as, enter a filter name in the Save the Current Filters As... field, and click Save. Select the Set as Default checkbox if you want this to be your default filter.
Click Clear all to clear the filters and start over. Click Reset filters to reset them to the default values.
You can edit room item conditions either individually or in a batch.
When you edit an individual room item condition, you can change the check-in or check-out condition, add check-out notes or supporting documentation, add or update the residents responsible and item charges, and request maintenance for the item.
Required fields are indicated by a red asterisk.
Click the pencil icon next to the room item you want to edit. The Edit Item Condition Changes window opens.
To change the item's condition at check-in or check-out, select an option from the Check-In Condition or Check-Out Condition drop-down.
Enter Check-Out Notes as necessary. You can enter up to 1,000 characters.
To add supporting documentation, click the Add another Supporting Document link, then click Choose file and select the file you want to add.
In the Item Charges field, enter the amount being charged to the responsible residents. This field is required if at least one responsible resident is specified.
To add a responsible resident, click the Add Resident Responsible link in the Resident Information section. Two additional fields become available.
From the Resident Responsible drop-down, select the name of the resident responsible for the item's change in condition. The menu shows all residents assigned to the room.
Under Responsibility Percentage, enter the percentage of the item charges this resident will be responsible for. The total must add up to 100%, so if only one resident is responsible, leave the default value of 100. If you add another resident, adjust the percentage as necessary.
If you need to request maintenance for this item, select the Request Maintenance checkbox under Item Maintenance Information. When you select the checkbox, the Date/Time and Maintenance Request Description fields become editable.
Click in the date and time fields and select a date and time for the maintenance.
Enter a description of the maintenance required for the item in the Maintenance Request Description text field. The description can contain a maximum of 8,000 characters.
When you have finished making your changes, click Update to save the changes and close the window.
Using the batch edit function, you can update the check-in and check-out condition and add check-out notes for multiple room items at once.
On the Manage Room Item Condition Changes page, select the checkbox next to each room item you need to edit. To select all items on the list, click the All button at the top of the list.
From the Options drop-down menu, select Edit selected. The Edit Item Condition Changes pop-up opens.
The window displays each item you selected, the location of the item, and the check-in and check-out condition of the item.
If you decide that an item should not be part of this batch edit, click the Remove icon next to it to remove it from the list.
From the first drop-down under Select a Detail to Update, select the detail (Check-In Condition, Check-Out Condition, or Check-Out Notes) you want to edit.
If you selected Check-In Condition or Check-Out Condition, select a condition from the adjacent drop-down. If you selected Check-Out Notes, enter a note in the text box.
To edit another detail, click the Add another detail link and repeat steps 4 and 5.
When you are finished, click Update to save your changes and close the window. The changes are applied to the selected items.