Academic Advising Hub Summary Page Blocks
The blocks on the Summary page and the information in them may vary a bit from tab to tab, but these are the blocks generally available.
Advising Calendar (on Primary Advisor tab only)
There's also a link to your Advisee Roster.
Custom Blocks
In addition to the blocks provided, administrators can add custom blocks, including charts, data set lists, and custom content blocks. Users with permission can enable and disable the custom blocks and remove them.
Academic Advising Overview Block
Important
Information and features vary according to the roles to which you belong and the permissions associated with those roles. For more information, contact your module manager or your campus support team.
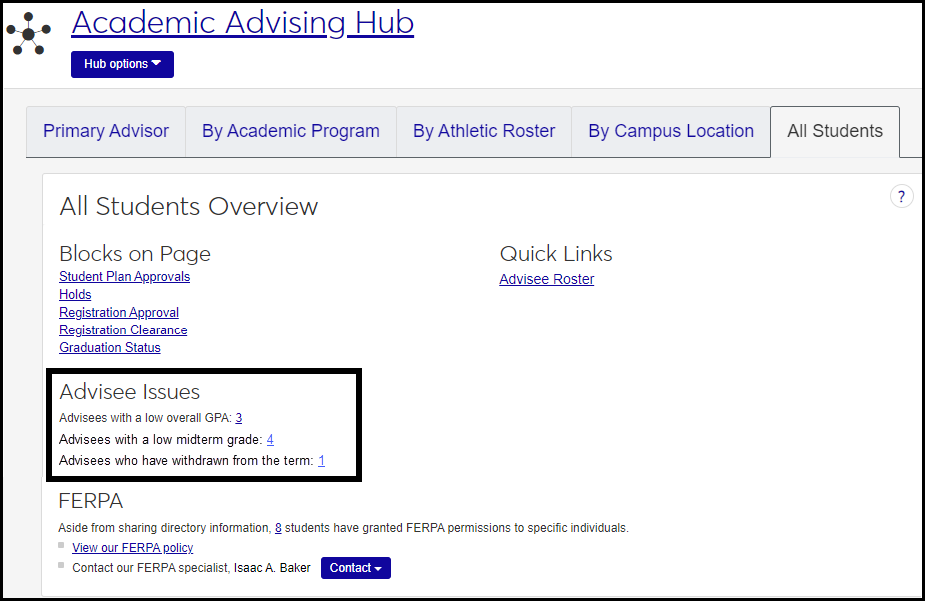
This block is on the summary pages in the Academic Advising hub. Depending upon your school's configuration, the Overview block can be used to access blocks and get a quick look at any outstanding issues impacting your students, see and access a copy of your school's FERPA policy or contact a campus FERPA specialist.
Blocks on Page
This section lists the blocks available from the Academic Advising home page. Click on a block name to access the block.
Current Advising Cycles
Lists any advising cycles you are currently assigned to.
Advisee Issues
This shows the number of advisees with various issues, such as low GPA, low midterm grades, withdrawn from the term, at risk, and so on.
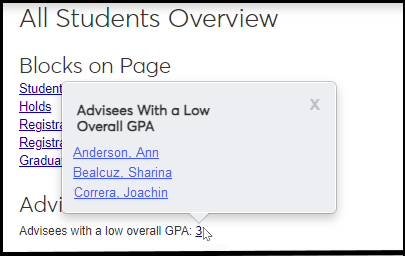
Click the number to see the list of students who have that issue. Their names are links to their summary pages. From there, you can contact the advisees to help them resolve issues and get on track.
Issues that may be shown include these:
Low Overall GPA: Below than 2.0
Low midterm grade: Below 2.0 (that is, earning fewer than 2.0 quality points)
Withdrawn from the term: Withdrawn from all courses
FERPA
This shows how many students have granted FERPA permissions to specific individuals. Click the number to see the list of the students with links to their FERPA blocks. There's also a link to your school's FERPA policy, and contact information for your FERPA contact.
On the Navigation panel, click the Academic Advising hub. The page options appear.
Select one of the options: Primary, Academic Program, Athletic Roster, Campus Location, or All Students. The Summary page for that option opens, and the Overview block appears. (The other options appear as tabs if you have those roles. Those tabs also have the Overview block.)
To access the block, click on the block name or scroll down the page.
Clicks on the number of students link. The Students with FERPA Permissions pop-up appears. You can click on a student’s names to access their Student page for more information about the student and access any available contact information.
Click View our FERPA policy. Depending upon the browser or device being used, a PDF copy of your school's FERPA policy is opened or downloaded.
Click the Contact drop-down button next to the FERPA specialist's name and select from the available contact information:
To send a message, select Send a Message. The Send a Message window appears.
To send an email, select Send an Email. Depending upon your configurations, a blank Outlook email automatically appears. Enter your email message and click Send.
To call, select the FERPA specialist's phone number. From a mobile device this will allow you to call your administrator. From a desktop, this will show you the administrator's phone contact.
Only a user with Advising Administration permissions can set or change the contact information and policy file. This is set in Advising Administration Settings.
You may not be in a role with the appropriate permissions. Contact your system administrator or module manager for more information.
The FERPA policy may not have been uploaded or a FERPA contact may not have been designated. You can change FERPA information on the Advising Settings page. From the Advising Administration Hub options, select Manage advising settings. (Advising Administration users only.)
There are several reasons you might not be seeing advising cycle information:
Your school may not be using advising cycles.
Advising cycles may not have been created yet.
The current time frame may fall between advising cycles and the new one hasn’t started yet.
Academic Advising Calendar
Important
Information and features vary according to the roles to which you belong and the permissions associated with those roles. For more information, contact your module manager or your campus support team.
This block on Academic Advising summary pages shows your advising calendar and can include the following:
Available and accepted advising appointments set up when the advisor cast appointment blocks. Student advisees select appointments using CRM Advisor Meeting.
Meetings and advising appointments scheduled using the calendar. These may include informal peer meetings and advising appointments created spontaneously or outside the casted appointment blocks range.
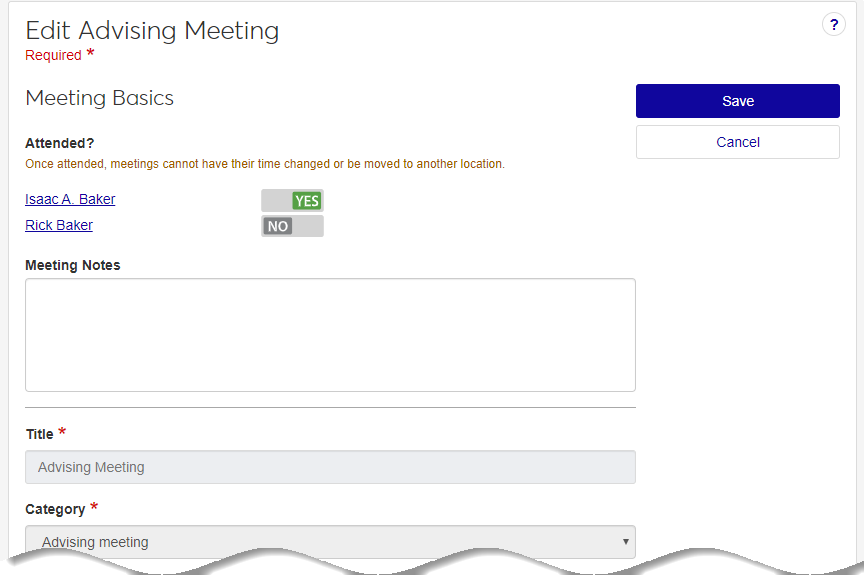
You can mark advising appointment attendance and enter meeting notes as well as use standard calendaring features such as viewing the calendar by the day, week, month, and accessing previous and upcoming dates.
For information on using Calendar features, see the Calendar Features topic in the Standard Features online help.
On the Navigation panel, click the Academic Advising hub. The page options appear.
Select one of the options: Primary, Academic Program, Athletic Roster, Campus Location, or All Students. The Summary page for that option opens, and the Calendar block appears. (The other options appear as tabs if you have those roles. Those tabs also have the Calendar block.)
Tip
You can only delete appointments you created.
Click the advising meeting on the advising calendar or another calendar.
Click Delete meeting and confirm in the pop-up. When the pop-up closes, the advising meeting is removed from all calendars and the advisee receives an email notification that the meeting has been canceled.
Advising Student Holds Block
Important
Information and features vary according to the roles to which you belong and the permissions associated with those roles. For more information, contact your module manager or your campus support team.
Use this block to identify advisees who have a registration or transcript problem with their student record. Depending upon your school‘s holds setup, holds can be placed on students for academic performance, fines, unpaid tuition, etc. Holds can impact a student’s ability to register for classes, retrieve transcripts, or receive their grades.
Permission to View and Manage Holds
Viewing and managing holds requires the "Can view holds" permission available in the Person Management role and roles copied from it. That role is on the User Management hub.
You assign None, View, Add, Add and Remove, or Admin permission for various hold types in the Associations tab of the role. See instructions below.
Note
Prior to J1 2024.1, permissions for holds were in Registration and Advising roles. (In fact, Advising roles still have the "Can view holds" permission in 2024.1, but it's restricted to view only.)
Permission to Override Holds
Overriding holds (to generate an official transcript of a student who has holds, for example) requires the "Can override student holds" permission available in the Registration Override and Access Control role and roles copied from it. The role is on the Registration Administration hub.
On the Navigation panel, click the Academic Advising hub. The page options appear.
Select one of the options: Primary, Academic Program, Athletic Roster, Campus Location, or All Students. The Summary page for that option opens, and the Advising Student Holds block appears. (The other options appear as tabs if you have those roles. Those tabs also have the Advising Student Holds block.)
Click the View details button. A Holds Information pop-up appears.
On the Holds block, the To Resolve column gives brief instructions for resolving the hold.
Note
Resolution options are set up on the Holds Definitions page.
Contact the appropriate office, department, or library to resolve the hold.
Then, when the issue is settled, click the Person options drop-down, and select Student, Student, Manage student holds. The Manage Student Holds page for that student opens.
Click the Actions drop-down, and select Edit hold. The Edit Student Hold pop-up opens.
Enter an End Date / Time and other information as needed.
Tip
As an alternative, you could enter a Removal Date / Time. However, if the hold wasn't a mistake, it's usually better to end the hold rather than remove it. That way the record of the hold is preserved.
Click the Update button.
Find a student's Summary page by using the universal search:
Click the Universal Search icon
 . The Search panel opens with the Person parameter selected.
Enter some of the student's name or ID, and select it from the list. The student's Summary page opens.
Click the Person options drop-down, and select Person, Manage holds. The student's Manage Holds page opens. Depending on permissions, you can view, add, edit, remove, and delete holds.
On the User Management hub, click the Hub options drop-down, and select Manage System Roles.
Scroll or use the System Roles Filter to find the role to set permissions on.
Tip
To find the Person Management role (or a copy with "Person" in the role name), click the Keyword checkbox. Enter "person" and click the Apply button.
Recommended: If a copy of the Person Management role doesn't already exist, make one to customize for your purposes. You could make one for Advising and one for Registrars, for example.
On the row for the Person Management role, click the Options drop-down, and select Copy. The Copy Role page opens.
Enter a New Role Name (such as Person Management - Advising) and New Role Description.
Click Save and continue. The role's permissions appear. Select and deselect permissions as needed.
Click the Copy role button. You're returned to the System Roles page. You can use the filters to find your new role.
Edit the role's permissions.:
On your role's row, click the Options drop-down, and select Edit. The Edit Role pop-up opens to the Permissions tab.
Click the Edit button.
Select and deselect permissions as needed, and click the Save button.
Add users to the role:
Click the Users tab.
Click the Add to Role button. The Add to Role pop-up opens.
Begin entering a user's name or ID, and select them from the list. Repeat for as many users as you need to add.
Click Add to Role. The users are added, and the pop-up closes.
Add modules to the role to enable interactions (communications) associated with those modules:
Click the Module Access tab.
Select the checkboxes for the modules you want.
Click the Options drop-down, and select Turn access on. Your changes are saved automatically.
Add specific permission types to specific hold types:
Click the Associations tab.
Click the Related Information group drop-down, and select Hold Type. The hold types appear below.
Select the checkbox for one or more hold types.
Click the Options drop-down, and select an access level:
None
View
Add
Add and Remove
Admin
Your changes are saved automatically.
Click on the advising student's name. The Student page appears with information about the student, including any available contact information.
Advisee Registration Approval
Important
Information and features vary according to the roles to which you belong and the permissions associated with those roles. For more information, contact your module manager or your campus support team.
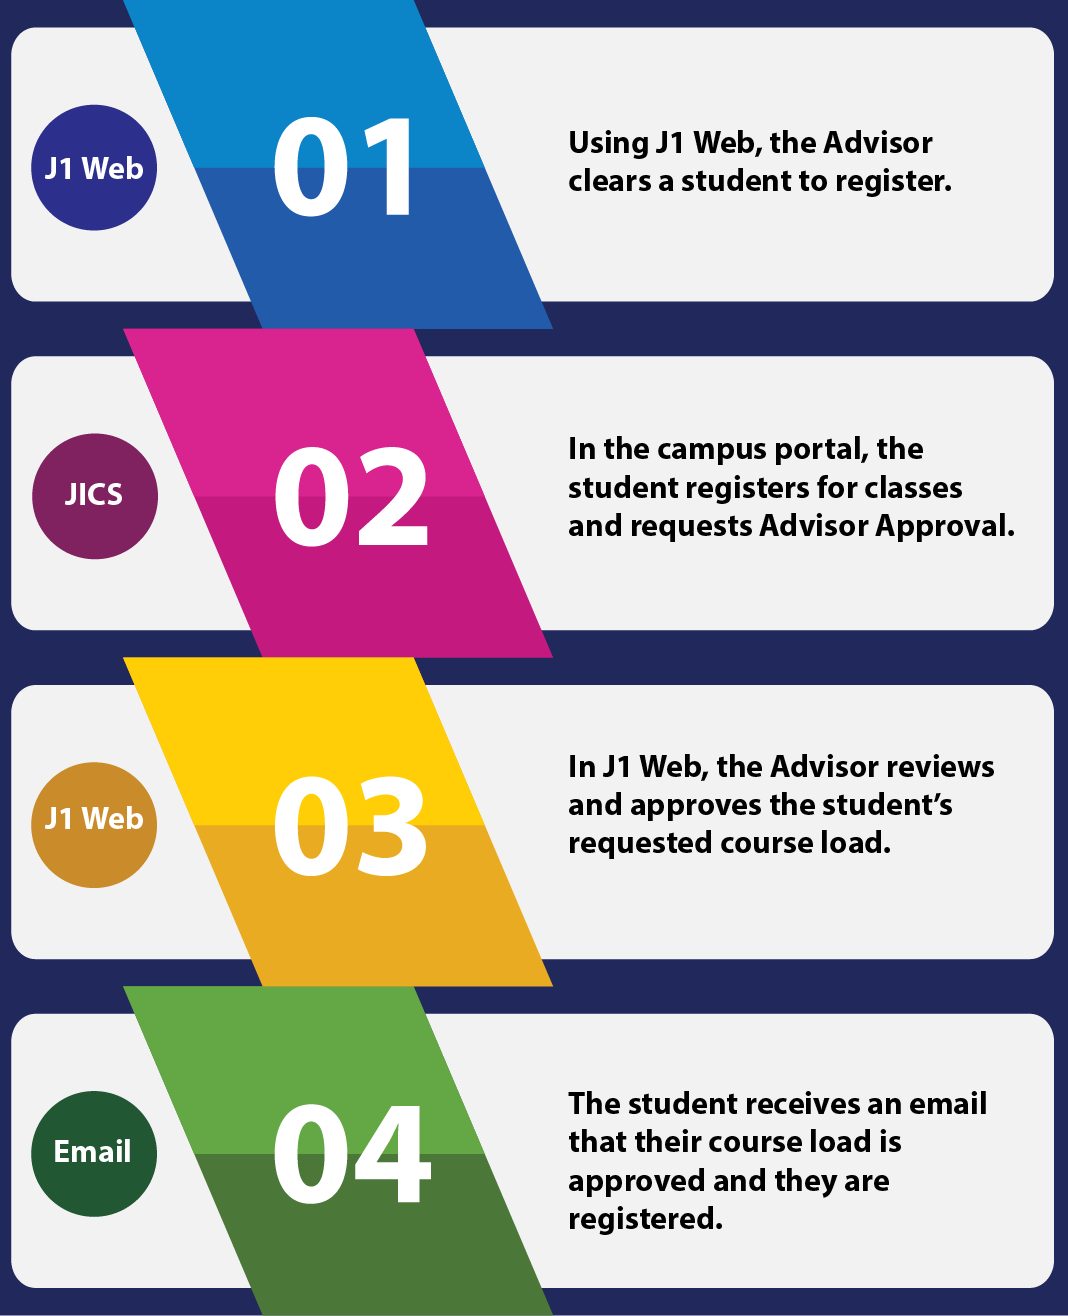
Use this block to review your advisees who have registered and are awaiting your approval before they are officially enrolled in their courses. Once you approve an advisee’s course load, their registration is complete. Advisees can use the email link from the Course Schedule feature in the Campus Portal to let their Advisor know they are ready to have their registration approved.
On the Navigation panel, click the Academic Advising hub. The page options appear.
Select one of the options: Primary, Academic Program, Athletic Roster, Campus Location, or All Students. The Summary page for that option opens, and the Advisee Registration Approval block appears. (The other options appear as tabs if you have those roles. Those tabs also have the Advisee Registration Approval block.)
Click the Expand icon  . The courses the advisee has registered to take in this advising cycle appear. To contact the student about their course load, click on their name to access their personal page where contact information is available.
Note
You can approve or deny all of the courses this student has requested approval for from this block, but if you need to approve or deny each course individually, you can do that from the student's summary page.
On your Academic Advising hub home page, in the Registration Approval block, click the Approve course(s) or Deny course(s) button. A pop-up appears to confirm your action.
Click Yes, approve course load, or Yes, deny course load as appropriate.
The course load is approved and the advisee is officially enrolled in the approved courses, or the course is dropped.
Note
Depending on how your school has set up course drops, the student history row might be deleted if that is how they are configured.
If your school has automated communications set up then the student will receive a message informing them of your actions.
Click the View all waiting approval link. The Course Approvals page appears.
Your advisees for this year/term/subterm may not require registration approval.
Your advisees may not have registered for any courses. One or more of the student's courses for the term must be in a Reserved status on the Student Section List page.
Your advisees may not have requested your approval yet. When students register for classes online, a link is available to request advisor approval. When they click this link, they appear here for your review and approval.
You may not be in an active advising cycle.
The advising cycle may have just started and none of your advisees have registered yet or they may not have completed their registration.
You may be in the midst of the advising cycle and all registrations have been approved.
Your advisee may have a registration hold. Check the Holds block and contact the registration office.
Advisee Registration Clearance
Important
Information and features vary according to the roles to which you belong and the permissions associated with those roles. For more information, contact your module manager or your campus support team.
Use this block to review your advisees who require your clearance in order to register for classes. You can see when you and the advisee last met for an advising appointment and link to available appointment information, view any planning information including courses that may need reviewing with the student because they are off plan, and link to the Student's page for contact information.
On the Navigation panel, click the Academic Advising hub. The page options appear.
Select one of the options: Primary, Academic Program, Athletic Roster, Campus Location, or All Students. The Summary page for that option opens, and the Advisee Registration Clearance block appears. (The other options appear as tabs if you have those roles. Those tabs also have the Advisee Registration Clearance block.)
Once you have reviewed available planning information and are ready to allow the advisee to register, select the year/term for which you are clearing the advisee to register.
Click Clear to register. The registration clearance confirmation window appears.
Click Yes, clear. The confirmation window closes and the student can now register for their classes.
You may have entered notes from the advising appointment that could impact registration. To view advising appointment details, click the appointment date. Advising Meeting information appears.
Click the View all waiting for clearance link. The Registration Clearance page appears.
Your advisees for this year/term/subterm may not require registration clearance.
Your advisees may not have registered for any courses (one or more of the student's courses must be in a Reserved status (Student Section List page).
You may not be in an active advising cycle.
The advising cycle may have just started and the registration period may not have started yet.
You may be in the midst of the advising cycle and all registrations have been cleared.
Your advisee may have registered for a course that isn't a part of their major/program, minor, certification, and/or concentration.
Your advisee may have dropped or failed a required course.
Your Advising Administrator or Registrar may have made updates to the plan requirements that impact your advisee's plan and courses.
Graduation Status Block
Important
Information and features vary according to the roles to which you belong and the permissions associated with those roles. For more information, contact your module manager or your campus support team.
This block appears on the Academic Advising summary pages. Use this block to see where advisees are in the graduation process and identify potential issues that may impact graduation. You can see who has applied to graduate and how many hours they have earned. The graduation process varies according to how your school has set it up on the Graduation Stage Definitions page.
The block shows up to 5 advisees nearing graduation. If there are more advisees nearing graduation, the View all advisees nearing graduation link appears. It takes you to the Graduation Status List page.
In the Academic Advising hub, click the Hub options drop-down, and select Summary under one of the categories (Primary, By Academic Program, All Students, etc.). The Summary page opens.
Scroll down to the Graduation Status block, or click the link to it in the Overview block.
If 5 advisees are listed in the Graduation Status block, but there are more advisees nearing graduation, click the View all advisees nearing graduation link. The Graduation Status List page opens.
Tip
Use Ctrl + click to open linked pages in a new tab.
To filter the list, enter a name or a stage in the filter field.
Graduation Status is derived from the Manage Student Program Information page. It may not appear if:
The advisee isn’t close to graduating or hasn’t started the graduation process.
The graduation stage hasn’t been selected for the advisee’s active degree.
Graduation stages may not have been ordered using the Graduation Stage Definitions page.
The advisee is a freshmen or sophomore student who hasn’t had this information defined yet.


