System Roles
Important
Information and features vary according to the roles to which you belong and the permissions associated with those roles. For more information, contact your module manager or your campus support team.
System roles determine which features and data users can access in J1 Web. The System Roles page lets you review roles available at your school, create and copy role, and delete custom roles, and update role names and descriptions.
Jenzabar provides default roles for each module. These roles are available for use and can serve as templates for creating custom roles. Although users can be assigned directly to Jenzabar-provided roles, Jenzabar recommends creating and assigning custom roles instead.
When new permissions are added to a Jenzabar-provided role during a software update, they are automatically enabled for Jenzabar-provided roles. As a result, users assigned to these roles may immediately gain access to new features before your school has reviewed and approved them. Custom roles allow administrators to review and enable new permissions before granting access.
Custom roles can be created in two ways:
Create a role to build a new custom role from a Jenzabar-provided role template.
Copy a role to create a new role based on an existing role, either a Jenzabar-provided role or a custom role created by your school. Copying a role is useful when creating role variations that share similar access requirements.
Creating custom roles allows your school to control which permissions are enabled and when users receive access to new functionality.
The Default icon  distinguishes Jenzabar-provided roles from roles your school has created. The lock indicates these roles can be updated and used to manage users, but they cannot be deleted.
Notice
Jane Smith is your school's primary event approver; however, you want to create a role for a secondary event approver in case Jane is unavailable to approve events. You can customize the permissions if you want the secondary event approver to have more limited access. Tailoring the name lets you clarify it is a secondary role.
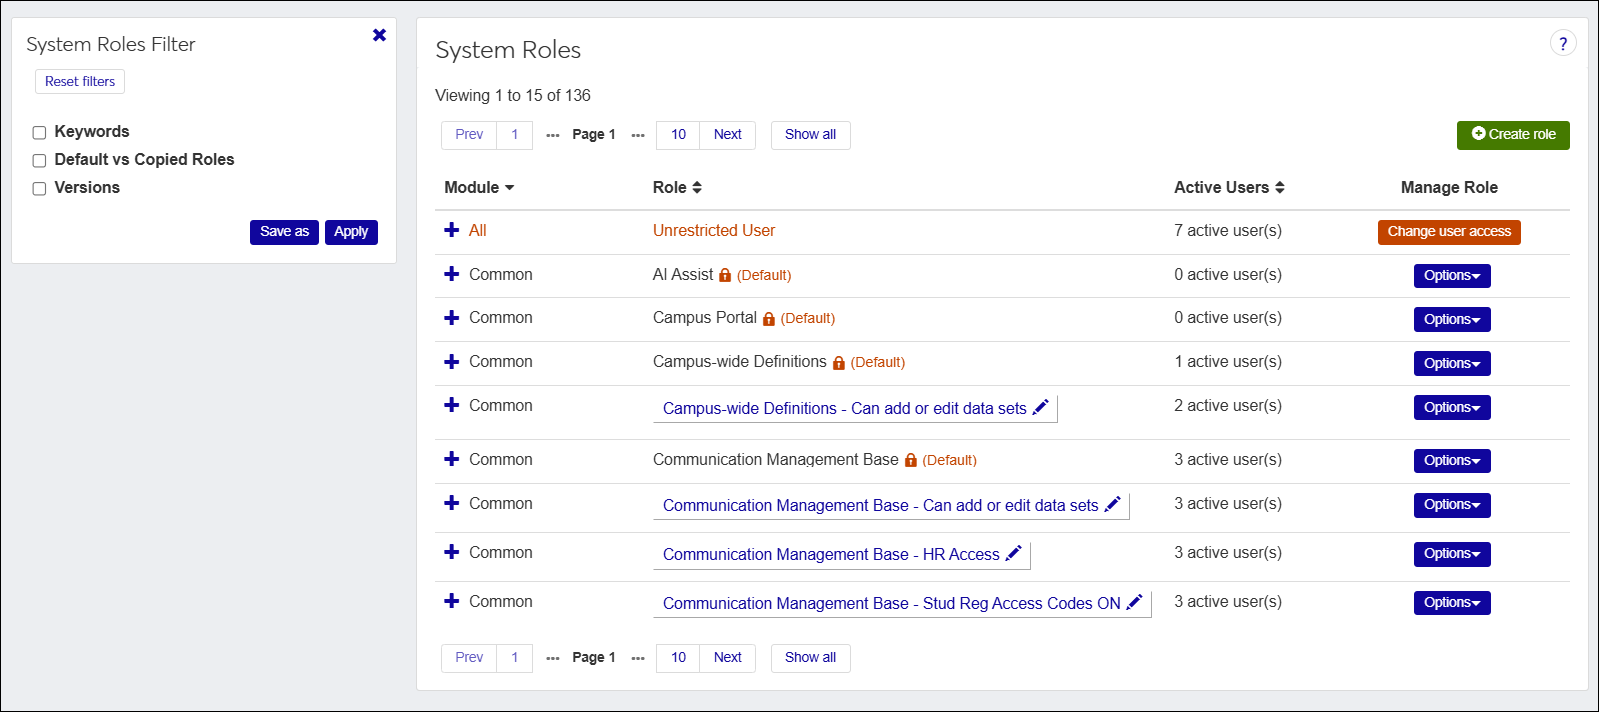
To view, create, copy, update, or delete roles, you must belong to a role with the appropriate permissions enabled. Jenzabar provides thess permissions with the Common, User Management role, but your school may have created a customized version of this role.
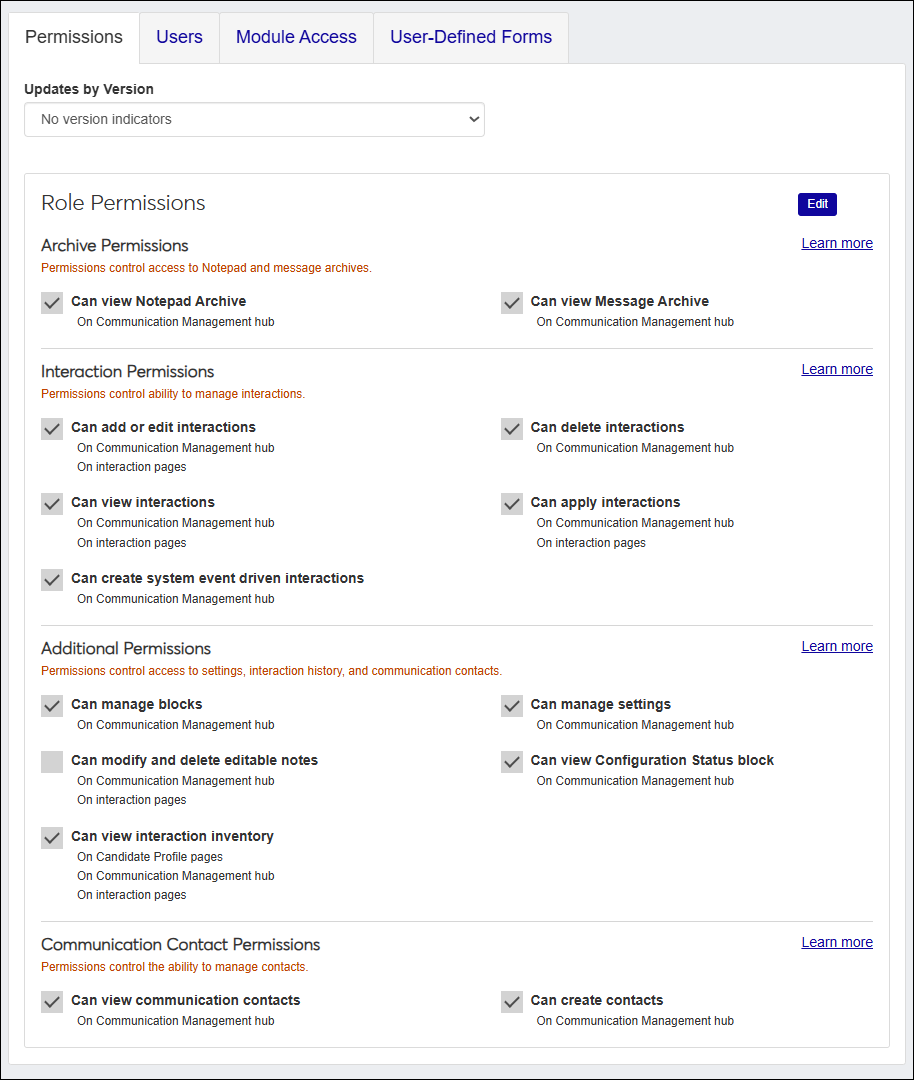
Role component options are managed from tabs on the Edit Role page.
Permissions | Control which pages, features, and actions users can access in J1 Web. Permissions are granular, allowing users to have different levels of access to various functionalities. |
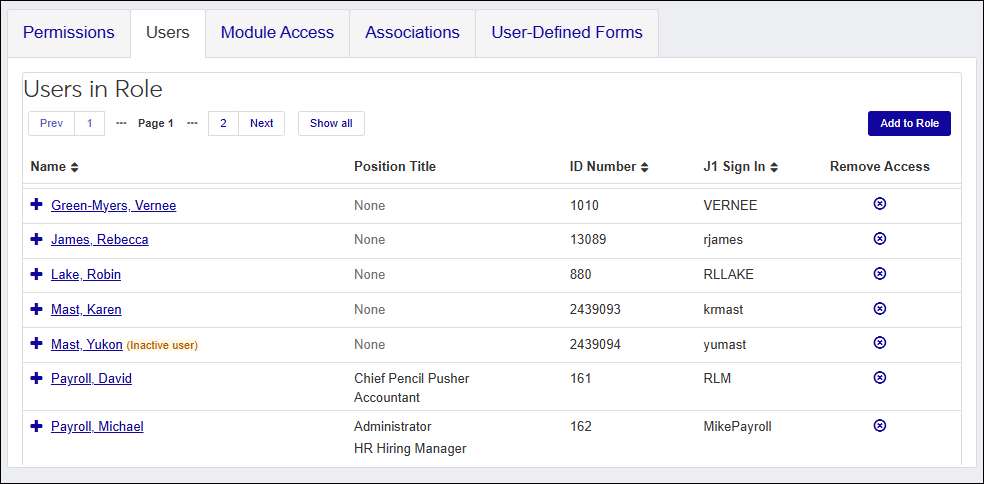
Users | Individuals assigned to the role with options to add and remove users. Users can be assigned to multiple roles. To be added to a role, users must have an ID number and be an active J1 Web user. |
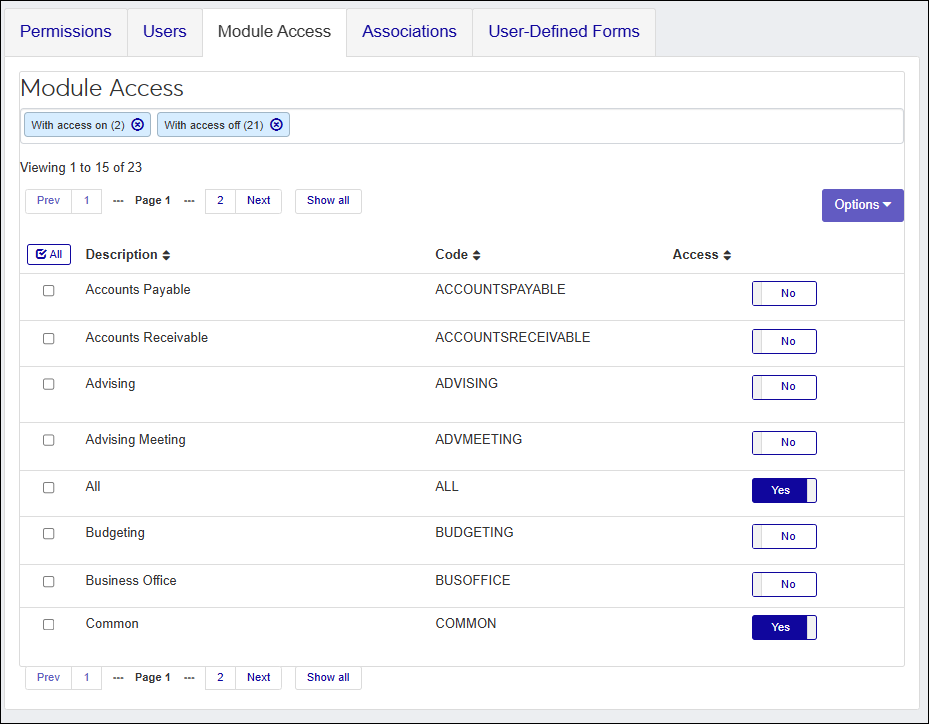
Module Access | Controls access to various things in the system such as data sets, forms, interactions, and workflows. Access codes are associated with items throughout the system when they are created and updated. Users gain access through the roles assigned to them. Users assigned to multiple roles have access to the access codes enabled with each. Jenzabar provides access codes based on Jenzabar modules; custom codes can be created on the Access Codes page. |
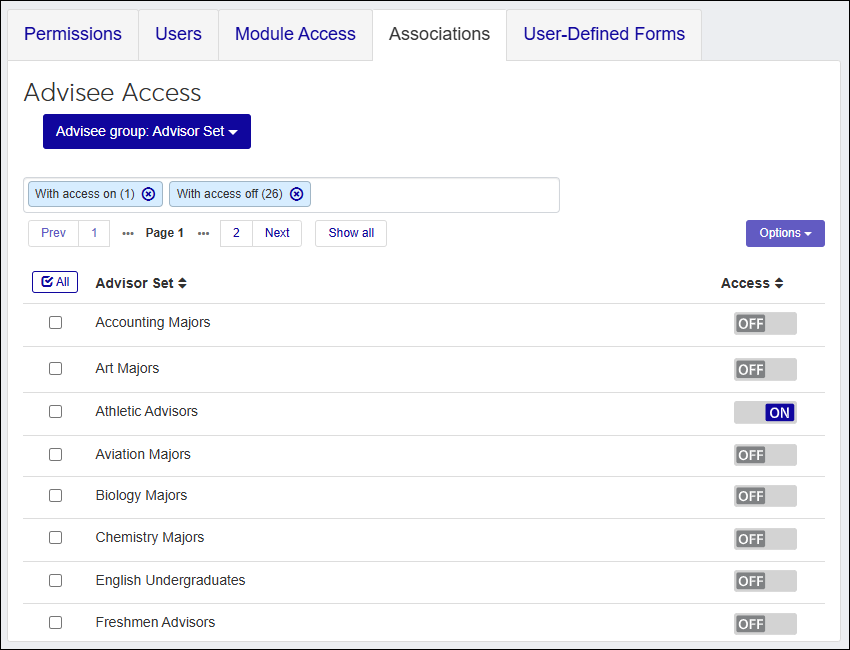
Associations | Control access to people and information based on relationships and are only available for select roles. For example, users assigned to an advising or department head role may gain access to students, courses, or other information through program, department, or roster relationships. As those relationships change, access is automatically updated. |
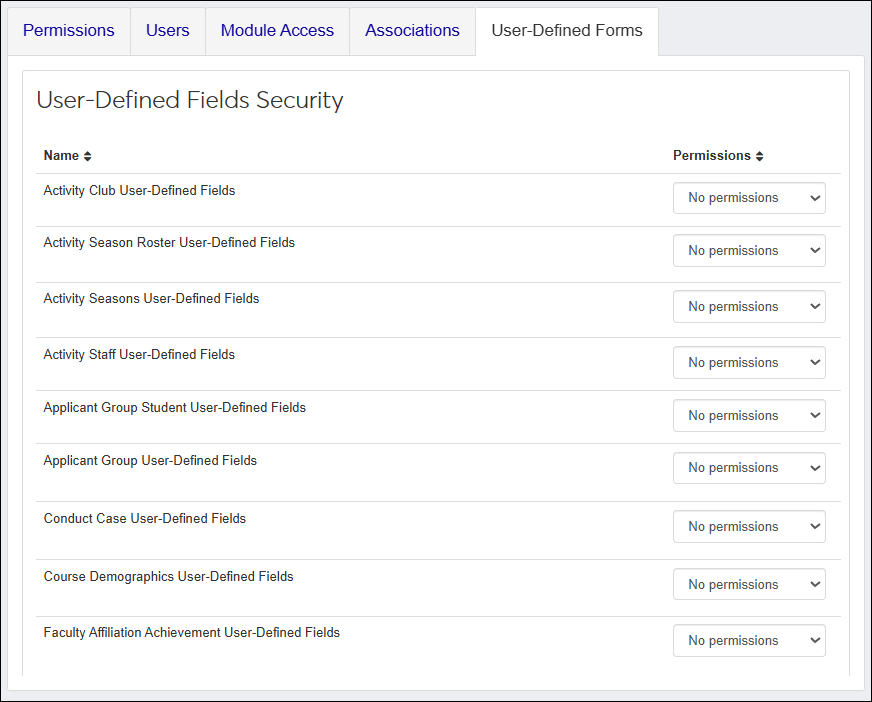
User-Defined Forms | Control whether users can view, edit, or configure user-defined fields (UDEF) across the system. Users assigned to multiple roles have access to the user-defined features enabled with each. |
You can filter roles in several ways:
Searching by specific word
Viewing just default or copied roles
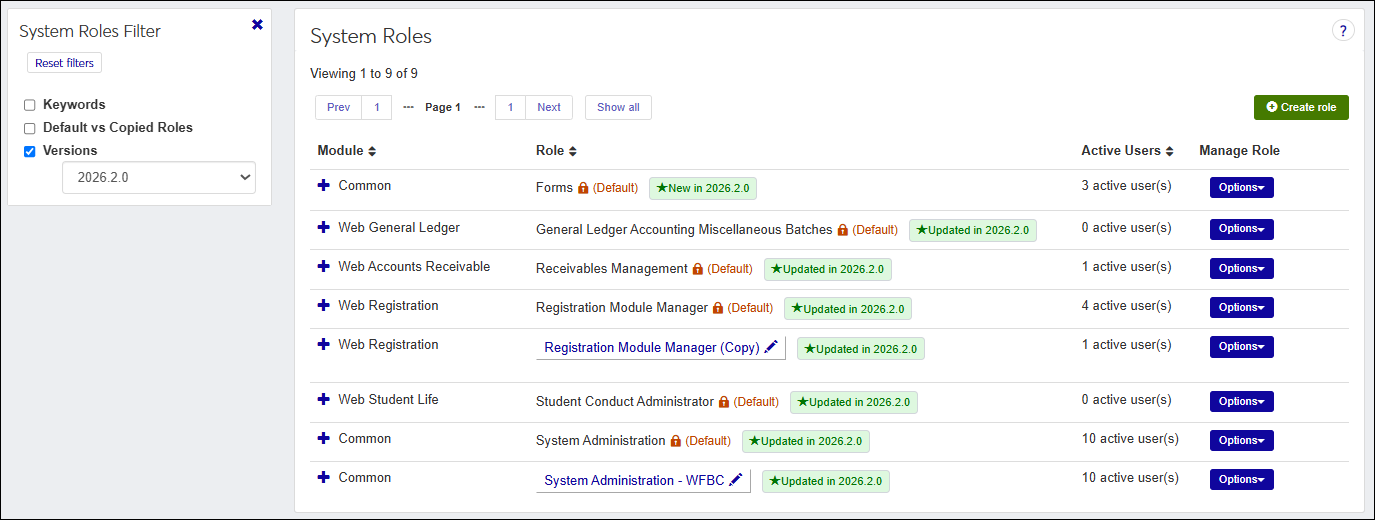
Viewing only those roles that have been added or updated in a selected version, which helps identify new permissions and ensure they are enabled for the appropriate roles
Clicking a column heading to sort in ascending or descending order
A combination of one or more of the filters above
Note
Filter by copied roles and the latest version to see if you need to enable new permissions for roles your school created or filter by default roles and the latest version to see if you need to assign users to any new roles.
Both processes create a new role. The difference between them is that when you choose to create a role, you can only base the new role on a Jenzabar-provided one. When you create a new role by copying an existing role, you can use your school's own custom roles or a Jenzabar-provided role. Both processes follow six steps:
Select the role template on which the new role will be based.
Use create a new role to select a Jenzabar-provided role.
Use copy a role to select one of your school's custom roles. You can also select a Jenzabar-provided role, but the advantage of copying is further tailoring your custom roles.
Update the role name and description.
Select the permissions users assigned to the role should have.
Assign users to the role.
Configure module access settings.
Configure associations and user-defined form permissions, if applicable.
How To
Use this option to build a new custom role from a Jenzabar-provided role template.
Click the Create role button. The Create Role page appears.
From the Role Template drop-down, select the role template you want the new role to be based upon. The New Role Name and New Role Description fields automatically show the name and description of the original role template.
In the New Role Name field, update the role name to an easily recognizable name. The name can be based on how roles/positions are set up at your school as well as distinguish how this role differs from the role template.

In the New Role Description field, update the description to highlight permissions or features available to users assigned to the role. The description can help distinguish how the new role differs from the role template.
Click Save and continue. The Define Access options appear.
Select the checkboxes of the permissions you want to enable for this role.

Click Create role. The Create Role page closes and the System Roles page reappears.
Use this option to create a new role based on an existing role, either a Jenzabar-provided role or a custom role created by your school.
From the System Roles page, find the role you want to copy.
From the Options drop-down list, select Copy role. The Copy Role page appears.
The Role Template field automatically shows the name of the template the role being copied is based upon. This field cannot be updated.
In the New Role Name field, update the role name to an easily recognizable name. The name can be based on how roles/positions are set up at your school as well as distinguish how this role differs from the role being copied.
In the New Role Description field, update the description to highlight permissions or features available to users assigned to the role. The description can help distinguish how the new role differs from the role being copied.
Click Continue. The Define Access options appear.
Select the checkboxes of the permissions you want to enable for this role.
Tip
The permissions enabled for the original role are already selected. They can be disabled and others enabled as needed.
Click Save. The Create Role page closes and the System Roles page reappears.
Tip
To review detailed information about the role permissions, refer to the Jenzabar-Provided Roles online help topic.
Access the System Roles page.
Find the appropriate role. You can use filter and sort options to help.
From the Options menu, select Edit. The Edit Role page appears.
Select the Permissions tab.
Click Edit. The permissions checkboxes are enabled.
Select the checkboxes of the permissions you want to grant the role or deselect the permissions you want to remove from the role.
Note
When you assign permissions to the role, it is important to consider the different levels of capability you want users to be granted. You may want to create several roles with varying permissions to accommodate different types of users.
Click the Save button. Several things happen:
Permissions are associated with the role and the checkboxes are no longer enabled.
Role permissions are immediately applied. A user will immediately have permission granted or revoked according to the updated features of the role.
Access the System Roles page.
Find the appropriate role. You can use filter and sort options to help.
From the Options menu, select Edit. The Edit Role page appears.
Select the Users tab.
Click the Add to Role button. The Add to Role window appears.
Start typing the name of the user you want to add to the role and select them. You can select as many users as needed.
Note
Only active J1 Web users with an ID number can be added to the role. Users are activated using the Desktop, Users window. For more information, see Managing User Access to J1 Web.
Click the Add to Role button. The Add to Role window closes and the Edit Role page appears with the newly added user shown in the list. Additional user information is available by clicking the Expand icon.
Access the System Roles page.
Find the appropriate role. You can use filter and sort options to help.
From the Options menu, select Edit. The Edit Role page appears.
Select the Users tab.
Click the Remove icon
 in the Remove Access column. The confirmation pop-up window appears.
Click the Yes, remove button. The confirmation pop-up window closes and the Edit Role page reappears with the user no longer listed.
Tip
Jenzabar provides access codes based on Jenzabar modules; custom codes can be created on the Access Codes page.
Access the System Roles page.
Find the appropriate role. You can use filter and sort options to help.
From the Options menu, select Edit. The Edit Role page appears.
Select the Module Access tab.
From the Access column, click the OFF or ON option to enable or disable access to the appropriate module access codes. These access codes are associated with items and information throughout the system and users with the code enabled will have immediate access to it. If a user belongs to multiple roles, they’ll have access to the items available with each.
Only available with certain roles.
Access the System Roles page.
Find the appropriate role. You can use filter and sort options to help.
From the Options menu, select Edit. The Edit Role page appears.
Select the Associations tab.
From the Group drop-down, select the appropriate group. The groups appear.
Notice
For example, the Secondary Advisor - Access to Students by Academic Program role groups students by certifications, concentrations, minors, and programs. Once you select the certifications group, you'll see a list of the available certifications.

From the Access column, click the OFF or ON option to enable or disable access. Users assigned to the role will have immediate access to individuals in the group based on their association to them.
If an individual moves out of the group, the user assigned to the role no longer has access to them through this role and group. This could be when a student is no longer on a coach's roster or a student changes majors and their advisor changes.
Only applies to schools using user-defined information in the system.
Access the System Roles page.
Find the appropriate role. You can use filter and sort options to help.
From the Options menu, select Edit. The Edit Role page appears.
Select the User-Defined Forms tab. User-Defined Fields Security information appears.
From the Permissions drop-down for the various fields, select from the following permission options:
No permissions - users cannot see/access this user-defined field.
Can view UDEF data - users can see this user-defined field but cannot modify it.
Can edit UDEF data - users can view, update, and delete data in this user-defined field.
Can configure UDEF form - users can configure this user-defined field and includes view and edit permissions. They can also manage the fields from the Manage User-Defined Fields page.
Note
Customizations to Jenzabar-provided roles will be lost when a product update is installed. To maintain your customizations, create new roles based on the Jenzabar-provided ones and give them unique names.
Access the System Roles page.
Locate the role to be updated.
Tip
Use the column headings to quickly sort the listings.
Click the Edit icon next to the role name or description to be updated.
Make the appropriate updates.
Click Save. The updates are applied.
Note
If the role has any users that are not associated with any other roles, it cannot be deleted. To delete a role with users assigned to it, assign the users to other roles first.
For example, Hermione Granger is only assigned to the Academic Advising Module Manager role. Before you can delete the Academic Advising Module Manager role, Hermoine must be assigned to the Advisors role or another role within J1 Web.
Access the System Roles page
Locate the role to be deleted.
Tip
Use the column headings to quickly sort the listings.
From the Manage Role Options drop-down, select Delete role. The delete confirmation pop-up window appears.
Click Yes, delete. Several things happen:
The delete confirmation pop-up window closes and the role is immediately removed from the role listing.
Impacted users are notified the role has been removed in a J1 Web message and a notification banner on their Home page. These link to detailed information about the change.
Note
Users removed from a role still appear on any J1 Web messages and tasks they were a included with before being removed.
To view the J1 Web modules associated with the role, click the Expand icon.
Access the System Roles page.
Click the Filter icon. The filter options appear.
Select the checkboxes for the filters you want to use. The filter options appear.
Select and enter the filter options you want to apply to the roles list.
Click Apply. The roles are filtered.
Create a role creates a new custom role based on a Jenzabar-provided role template. You select the permissions and settings to enable for the role.
Copy a role creates a new role based on an existing role. The new role inherits the source role's Permissions, Module Access settings, and User-Defined Field permissions, providing a starting point that can then be modified. Users and Associations are not copied.
Yes, provided:
The role is not a a Jenzabar-provided role.
All users assigned to the role belong to at least one other role.
Before deleting a role, ensure affected users are assigned to alternative roles so they retain appropriate access.
Yes, customizations are lost with subsequent software updates.
Active users:
Have an active J1 Web login configured in the Desktop Users window
Can be added to J1 Web roles
They were deactivated after they were assigned to the role. Inactive users cannot be added to a role.