Waitlist Options Settings
These options on the Enrollment Settings page let you determine what happens at registration when a section is already full. No matter which option you select, the user is always notified that the section is full.
Allow overenrollment without permission: Newly registered students are marked as Current (not as Waitlisted) even though the section is already full.
Allow overenrollment only with permission: Users need permission to overenroll. With permission, newly registered students are then marked as Current (not as Waitlisted) even though the section is already full. If this is selected, users need the "Can overenroll as Current or move Waitlisted to Current" permission on the Registration Override and Access Control role (and roles made from it).
Use the waitlist process: When the section is full, registering a student puts them on the waitlist. Users need permission to put students on the waitlist and also to change their status from Waitlisted to Current. If you turn on Waitlist Usher, students receive a notification when a seat opens, and they can move themselves from Waitlisted to Current status. If this is selected, users need the "Can overenroll as Current or move Waitlisted to Current" permission on the Registration Override and Access Control role (and roles made from it).
Tip
Each course section also has an Allow Waitlisting on/off button on the Manage Course Details page, Enrollment tab.
Waitlist Usher: This feature sends students an automatic message when they're allowed to move a course from Waitlisted to Current. Use these settings to turn it on or off and to set its parameters.
Important
If this is selected, the Waitlist Usher User (entered in the User Name field) needs the "Can overenroll as Current or move Waitlisted to Current" permission on the Registration Override and Access Control role (and roles made from it).
The information is stored on the Registration Configuration table.
Label | Database Location |
|---|---|
[radio button group] | CONFIGURATION_TABL.config_value where MOD_CDE = 'RE' and FUNCT_CDE = 'CRSCAPACITY' and CHAR_CDE = 'OVERENROLL' |
Allow overenrollment without permission | Value to save to the db: CURRENT_WITH_WARNING |
Allow overenrollment only with permission | Value to save to the db: CURRENT_WITH_PERMISSION |
Use the waitlist process | Value to save to the db: CURRENT_AND_WARNING_WITH_PERMISSION |
Use Waitlist Usher | Tables: Setting, SettingValue, SettingValueFree Column: Value Data InternalName: UseWaitlistUsher |
User Name | Tables: Setting, SettingValue, SettingValueFree Column: ValueData InternalName: EXWaitlistUsherUserName |
Hours Before Drop | Tables: Setting, SettingValue, SettingValueFree Column: ValueData InternalName: HoursBeforeDrop |
Use Course Census Date | Tables: Setting, SettingValue, SettingValueFree Column: ValueData InternalName: UseCourseCensusDate |
Process only sections whose registration period is open | Tables: Setting, SettingValue, SettingValueFree Column: ValueData InternalName: OnlyProcessRegOpenSections |
Authorization Reason | Maintain Table Values (also called Table Detail) page, Column Name: authorization_reason |
In Desktop, these settings are found on the Registration Configuration window, Configuration Table tab, Exceeding Course Capacity section.
The permission needed to edit this page is "Can manage enrollment settings". It's available in the Registration Settings section of the Registration Module Manager role or roles copied from it.
To overenroll a course section, put students on the waitlist, or move students from the Waitlisted to Current, users need the "Can overenroll as Current or move Waitlisted to Current" permission on the Registration Override and Access Control role (and roles made from it).
From the Registration Administration hub options, select Settings.
Click Enrollment settings. The Enrollment Settings page opens.
Scroll down, or click the anchor link to the Waitlist Options section.
To edit, click the Edit this section button.
Select one of the radio buttons:
Allow overenrollment without permissions
Allow overenrollment only with permission
Use the waitlist process
Click the Save this section button. Your edits are saved.
If your school already has Desktop Waitlist Usher, uninstall it:
Make sure everyone is ready for the switch to J1 Web Waitlist Usher.
Contact Jenzabar Managed Services to cancel the Desktop Waitlist Usher service, and work with Managed Services to uninstall the Desktop Waitlist Usher feature.
Uninstall the Desktop Waitlist Usher feature.
Create the Waitlist Usher User:
In Desktop, open the Name Entity window.
Right-click, and select Add Row.
In the Name (Last), field, enter a name such as Waitlist Usher.
No other information is needed on this window. Click Save on the main toolbar.
Note or copy the ID # to enter in the next window.
In Desktop, open the Users window.
Right-click, and select Add Row.
In the ID Number cell, enter the ID # from the Name you created on the Name Entity window. The Waitlist Usher name information appears.
Enter a User ID. Suggestion: Waitlist Usher
Enter a Description. Suggestion: Waitlist Usher
Select the checkbox for Active Web Login.
You don't need to change any other fields. Click Save on the main toolbar.
Give the Waitlist Usher user permission to drop student sections.
Tip
Why does the Waitlist Usher need to drop students? If Waitlist Usher invites a waitlisted student to move their registration to current, but the student doesn't before the deadline, the Waitlist Usher drops the student from the course.
In J1 Web, access the Registration Roles page.
On the row for Registrars (or a copy of it), click the Options drop-down, and select Edit. The Edit role page opens.
Tip
We recommend creating a copy of the Registrars role for Waitlist Usher only. Suggested name: Waitlist Usher - Can Drop. It needs only one permission selected: Can drop student section records that do not have History status.
In the Search field, begin typing the name or ID number, and select Waitlist Usher (or the name you used) from the list. Click Add to Role.
On the Users tab, click Add to Role. The Add to Role pop-up opens.
On the Permissions tab, make sure the Can drop student sections that do not have History status checkbox is selected. (If it isn't, click Edit, select the checkbox, and click Save.)
Turn on J1 Web Waitlist Usher and set its parameters:
In J1 Web, on the Enrollment Settings page, scroll down, or click the anchor link to the Waitlist Options section.
Click the Edit this section button.
Select the Use the waitlist process radio button.
Click the On/Off button to turn Waitlist Usher on or off.
Enter a User Name. We recommend creating a J1 Web user with a username that's easily identified as the Waitlist Usher (such as "WaitlistUsher").
Enter a number in Hours Before Drop.
Click the button for At section census date, stop authorizing students to move to current to set it to On or Off.
Click the button for Authorize students to move to current only when the registration period for the section is open to set it to On or Off.
Tip
For more information and guidance about the settings for At section census date, stop authorizing students to move to current and Authorize students to move to current only when the registration period for the section is open, see the Waitlist Usher FAQ section.
In the Authorization Reason drop-down, select WL - Waitlist Usher.
Click the button for Automatically drop waitlisted sections after census date to set it to On or Off.
If you set it to On, then in Number of Days After Census Date, enter a whole number. To have the courses dropped on the census date, enter 0.
Click the Save this section button. Your edits are saved.
Designate a contact for Waitlist Usher:
Tip
This is the person who will receive the automated messages such as “Student moved course from Waitlisted to Current” and "The student course was dropped". We recommend designating the registrar as the contact.
In J1 Web, on the General Settings page in Registration, scroll down or click the anchor link to the Contacts section.
Click Add another.
In the drop-down, select Waitlist Usher.
Click the add contact field. Begin typing a name or ID number, and select from the list.
Click the Save button.
Make sure Course Authorization is turned on for the the Campus Portal:
Warning
If Course Authorization is not turned on, students won't see an option to move their waitlisted courses to registered, even when a seat opens.
In J1 Web, on the Campus Portal (JICS) Settings in Registration page, scroll down or click the anchor link to the Controls for Faculty and Student Features category.
Make sure the checkbox for Use course authorization is selected.
If it isn't, click the button. Now you're in edit mode.
Select the checkbox for Use course authorization.
Click the Save this section button. Your selection is saved, and you're returned to view mode.
Turn Waitlist Usher on for individual course sections:
In J1 Web, on the Manage Section Details page for any course section, click the Enrollment tab.
Click the Edit details button.
Click the Allow Waitlisting button to set it to Yes.
Click the Allow Waitlist Usher button to set it to Yes.
Click Done editing.
For detailed instructions on Interactions, see the Interactions help topic in the Communication Management hub. Below are abbreviated instructions specific to Waitlist Usher interactions.
Important
Permissions needed to create interactions for Waitlist Usher:
Communication Management Base role (or a copy):
Can add or edit interactions
Can create system event interactions
Registrars role (or a copy):
Can register students
On the Communication Management hub, click Hub options, and select Interactions. The Interactions page opens.
Make a copy of each of the default Waitlist Usher interactions, and make the defaults inactive.
In the filter, select the Keyword checkbox, type one of the Codes from the table below, and click Apply. The interaction appears.
In the Status column, click the Active button to change it to Inactive.
In the Actions drop-down, select Copy. The Copy Interaction wizard page opens to the Basics settings..
Type: Email is the default for student recipients, and Notification is the default for staff. If your school has the Communication Management Plus license, you can also select Text.
Name / Description and Code: Use the information in the table below as a guide for your Name / Description and Code. Give the copy the same Code as the default it's copied from, but use our suggested Default Name / Description (or something like it).
The prepopulated values for the rest of the Basics page are probably correct, but some are editable. Review them, and click Save and continue.
Warning
Don't select Do not allow duplicate interactions for a record. Leave it unselected.
Tip
The Show in Communication Feed checkbox is available for schools that have the Communication Management Plus license.
The Data Merge options are preselected. Make sure they're okay, and click Save and continue.
The Email Basics options are preselected. Make sure they're okay, and click Save and continue.
The Template Content options:
Click the Status button to change it to Active.
Check the Content, and edit as necessary.
Click Save and finish. The copied interaction now appears in the list.
Tip
If you haven't changed the filter settings, just click Apply again. The default and the copy appear.
Repeat these steps for each of the Waitlist Usher interactions.
Tip
If you included "Waitlisted" in each Name / Description field, then you can find all the Waitlist Usher interactions by filtering for "Waitlisted" in either Keyword or Name / Description.
For detailed instructions on Automation Plans, see the Automation Plans help topic in the Communication Management hub. Below are abbreviated instructions specific to Waitlist Usher automation plans.
Important
To edit, copy, and create automation plans, you need permissions in the Communication Management Base role.
On the Communication Management hub, click Hub options, and select Automation Plans. The Automation Plans page opens.
Make a copy of each of the default Waitlist Usher automation plans.
In the filter, select the Keyword checkbox, type one of the Codes listed below, and click Apply. The automation plan appears.
In the Status column, click the Active button to change it to Inactive.
In the Actions drop-down, select Copy. The Copy pop-up opens to the Basics page.
Name / Description and Code: Use the information in the table below as a guide for your Name / Description and Code. Give the copy the same Code as the default it's copied from, but use our suggested Default Name / Description (or something like it).
Initiated By: Keep the default: System Event. The system event is, for example, a seat opened in the course, or the census date passed.
Module, Process, and Event are prepopulated from the default automation plan. See the FAQ for which process and event go with each automation plan.
Click Save and continue. The Automation Tasks page opens.
On the Automation Tasks page, click the Inactive button to make it Active.
Change the associated interaction from the default to the corresponding copy:
In Interaction Name / Description, begin typing the name of the copied interaction that corresponds with this automation plan. Select the interaction from the list.
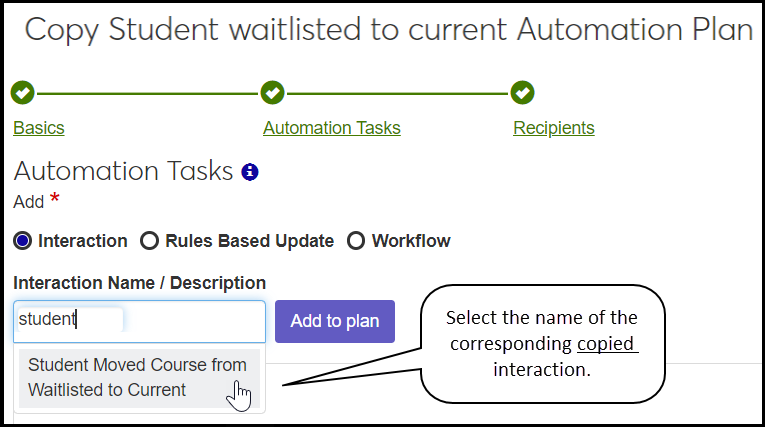
Click Add to plan. The interaction appears in the Tasks list below.
On the row for the default interaction, click the Remove icon
 . The default interaction is removed from the list.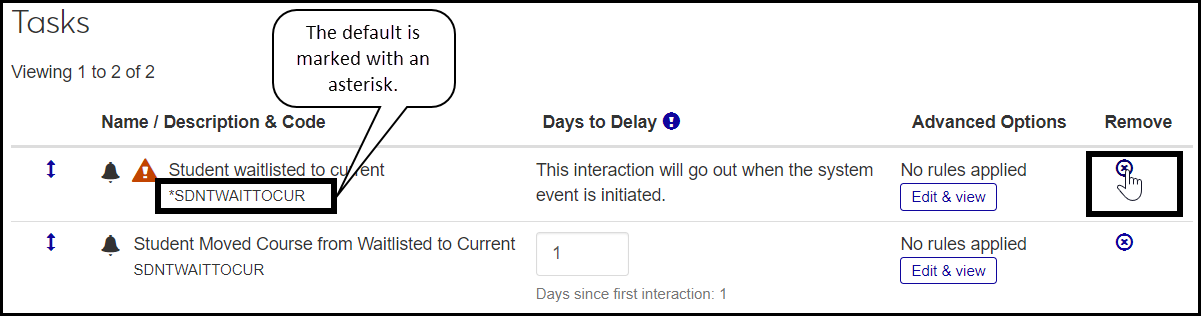
Click Save and continue. The Recipients page opens.
The Recipients options are preselected. Make sure the radio button for Anyone asociated with system event is selected. For communications to students, make sure Students is selected. For communications to staff, make sure Advisor, Instructor, and Registrar are selected.
Click Save and finish. The copied automation plan now appears in the list.
Tip
If you haven't changed the filter settings, just click Apply again. The default and the copy appear.
Repeat these steps for each of the Waitlist Usher automation plans.
Tip
If you included "Waitlist" in each Name / Description field, then you can find all the Waitlist Usher automation plans by filtering for "Waitlist" in either Keyword or Name / Description.
No, they don't conflict, but those settings (At section census date, stop authorizing students to move to current and Authorize students to move to current only when the registration period for the section is open) may overlap. That is, if Authorize students . . . is On, then At section census date . . . may not matter because the Waitlist Usher has already stopped at the end of the registration period, and the census date is usually later.
Where Registration Period and Census Date Are Set
The Registration Period is when students can register themselves. Staff can add or drop students until the Census Date, which is usually later than the close of registration.
The system first looks for dates on the course section itself. If the dates aren't there, it looks at the year/term/subterm (if applicable), and then at the year/term.
Manage Section Details Page | Year / Term / Subterm Definitions Page | |
|---|---|---|
J1 Web | Portal Control tab > Campus Portal Registration Dates: Add Begin Date, Add End Date, Drop Begin Date, Drop End Date | Subterm view: First Campus Portal Add / Drop, Last Campus Portal Add / Drop Year / Term view: First Campus Portal Add / Drop, Last Campus Portal Add / Drop |
Database | section_master.add_beg_dte, section_master.add_end_dte, section_master.drop_beg_dte, section_master.drop_end_dte | yr_trm_sbtrm_table.first_drop_add_dte, yr_trm_sbtrm_table.last_drop_add_dte year_term_table.first_drop_add_dte, year_term_table.last_drop_add_dte |
Manage Section Details Page | Year / Term / Subterm Definitions Page > Subterm View | |
|---|---|---|
J1 Web | Schedule tab > Dates: Census Date and Time | Subterm view: Census Date and Time Yeat / Term view: Census Date and Time |
Database | section_master.census_dte | yr_trm_sbtrm_table.sbtrm_census_dte year_term_table.census_dte |
What You Want | At section census date, stop authorizing students to move to current | Authorize students to move to current only when the registration period for the section is open | Are Students Invited to Move from Waitlisted to Current if a Seat Becomes Available? |
|---|---|---|---|
Waitlist Usher to keep running throughout the term or subterm | Off | Off | Yes, even after registration has closed and after the census date |
Waitlist Usher to stop running at the end of the Census Date | On | Off | Yes, until the end of the census date |
Waitlist Usher to stop running at the end of the Registration Period | Off* | On | Yes, but only until the end of the Registration Period |
* If Registration Period ends before the Census Date, and the Authorize students to move to current only when the registration period for the section is open setting is On, then it doesn't matter whether At section census date, stop authorizing students to move to current is On or Off.
When a seat becomes available for a waitlisted student, the Waitlist Usher sends them an email inviting them to go to the Student Registration feature on the Campus Portal to move their status from Waitlisted to Current.
How does a student move their course to Current?
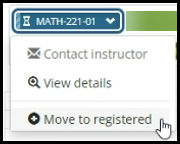
On their My Schedule planning calendar in the Campus Portal, the student clicks the course. In the drop-down, they select Move to registered.
Warning
Make sure the "Use course authorization" checkbox is selected on the Campus Portal (JICS) Settings page (in J1 Web) > Controls for Faculty and Student Features category.
If this checkbox is not selected, then students won't see an option to move their waitlisted courses to registered, even when a seat opens.